1
VidiNOW Conference System
User Manual
Version 3.2.x
March 2009
This page is intentionally left blank
VidiNOW User Manual
Trademark Information
Audividi and Audividi Logo design are registered trademarks of Audividi Inc. VidiNOW™, VidiNOW Meeting
Center™, PC Meeting™ are trademarks of Audividi Inc in the United States and various other countries.
Internet Explorer®, NetMeeting®, Windows®, Windows/2000®, Windows/XP® are either trademarks or registered
trademarks of Microsoft Corporation in the United States and/or other countries.
All other trademarks are the property of their respective owners. Every effort has been made to ensure the
information in this manual is accurate. Audividi Inc is not responsible for typographical or clerical errors.
Information in this document is subject to change without notice.
I
VidiNOW User Manual
About This Manual
New user is advised to start from Chapter 1 for a quick tour of VidiNOW system. The section
titles in this manual are self-explanatory. For a query on how to perform a specific task, user can
look up directly from Table of Contents.
II
VidiNOW User Manual
Conventions Used in This Manual
[ B u t t o n N a m e ] is used to indicate a button on the display or a key on the keyboard, which will be clicked or
pressed by the user.
Example: “Single click [ O K ] ” is to click the “OK” button on the window.
< M e n u I t e m > is used to indicate menu item selection.
Example: “< F i l e > ” is to select the “File” menu item in the menu bar.
< L e v e l 1 M e n u > < L e v e l 2 M e n u > is used to indicate multiple level menu selection.
Example: “< Vi e w > < A l w a y s O n To p > ” is to select the “View” menu, then “Always On Top” item under the
“View” menu.
{ W i n d o w n a m e } is used to indicate a web page, a window, a tab to select a window, or a dialog box on the
monitor display.
Example: { M e e t i n g C e n t e r } is the “Meeting Center” web page.
Notes symbol, for supplemental information
III
VidiNOW User Manual
Table of Contents
Chapter 1
1.1
1.2
1.3
1.4
VidiNOW System Components - Server and Client ......................................................................................1
Client Interface: Web-Based Meeting Management & Window-Based PC Meeting.....................................1
Scheduled Meeting and Ad hoc Meeting .......................................................................................................2
Starting a Meeting..........................................................................................................................................2
Chapter 2
2.1
2.2
2.3
2.4
Scheduled Meeting.............................................................................................................................20
Creating a Scheduled Meeting.....................................................................................................................20
Editing a Scheduled Meeting.......................................................................................................................25
Joining a Meeting ........................................................................................................................................25
Exiting a Meeting ........................................................................................................................................26
Chapter 6
6.1
6.2
6.3
6.4
6.5
6.6
6.7
6.8
6.9
Ad hoc Meeting ..................................................................................................................................16
Starting an Ad hoc Meeting .........................................................................................................................16
Joining an Ad hoc Meeting ..........................................................................................................................18
Exiting an Ad hoc Meeting ..........................................................................................................................19
Chapter 5
5.1
5.2
5.3
5.4
Login to VidiNOW Meeting Center .................................................................................................12
Login............................................................................................................................................................12
The Meeting List in Meeting Center............................................................................................................14
Chapter 4
4.1
4.2
4.3
VidiNOW PC Meeting Installation.....................................................................................................6
Security Settings for IE Browser ...................................................................................................................6
Downloading VidiNOW PC Meeting Software .............................................................................................8
Installing VidiNOW PC Meeting...................................................................................................................9
Removing (Uninstalling) VidiNOW PC Meeting ........................................................................................11
Chapter 3
3.1
3.2
A Quick Tour ........................................................................................................................................1
Meeting Management ........................................................................................................................27
Meeting Management Web Pages................................................................................................................27
Viewing Meeting Information .....................................................................................................................29
Controlling Entry into a Meeting.................................................................................................................30
Terminating a Meeting.................................................................................................................................30
Reassigning a Meeting Manager..................................................................................................................30
Managing Participant List............................................................................................................................31
Changing Meeting Format ...........................................................................................................................32
Changing Connection Settings.....................................................................................................................33
Managing Document Files...........................................................................................................................35
Chapter 7
VidiNOW PC Meeting Operation.....................................................................................................37
7.1
Window Layout ...........................................................................................................................................37
7.1.1
Vi d e o D i s p l a y .................................................................................................................................41
7.1.2
Participants Window............................................................................................................................44
7.1.3
Audio/Video Mute Control ...................................................................................................................44
7.1.4
A u d i o Vo l u m e A d j u s t m e n t .........................................................................................................45
7.2
Host and Moderator .....................................................................................................................................46
7.2.1
B e c o m e H o s t i n a F re e F o r m M e e t i n g .................................................................................46
7.2.2
M o d e r a t e d M e e t i n g ......................................................................................................................47
7.3
Share Program .............................................................................................................................................50
7.3.1
Share Desktop ......................................................................................................................................53
7.3.2
Share Selected Applications.................................................................................................................53
7.3.3
Control the Shared Program................................................................................................................55
IV
VidiNOW User Manual
7.4
Share Web ....................................................................................................................................................57
7.5
Share Media.................................................................................................................................................58
7.6
Presentation .................................................................................................................................................62
7.7
Annotation ...................................................................................................................................................64
7.7.1
File Functions......................................................................................................................................65
7.7.2
View Functions.....................................................................................................................................66
7.7.3
Editing Tools ........................................................................................................................................66
7.7.4
Markup Tools .......................................................................................................................................67
7.7.5
Importing Pages...................................................................................................................................70
7.7.6
Annotation Options ..............................................................................................................................72
7.8
Document Center .........................................................................................................................................73
7.8.1
Toolbar.................................................................................................................................................74
7.8.2
File Download .....................................................................................................................................74
7.9
Text Chat......................................................................................................................................................76
7.10 Recording Meeting ......................................................................................................................................77
7.11 Video Options ..............................................................................................................................................79
7.12 Audio Options..............................................................................................................................................80
7.13 Network Options..........................................................................................................................................81
Chapter 8
8.1
8.2
Personal Address Book and User Profile .........................................................................................83
Personal Address Book ................................................................................................................................83
Editing User Profile .....................................................................................................................................83
Appendix A
Roles in the VidiNOW System ......................................................................................................85
Appendix B
Custom Installation and Upgrade PC Meeting ...........................................................................86
B.1
B.2
Custom Installation......................................................................................................................................86
Upgrade PC Meeting ...................................................................................................................................89
V
VidiNOW User Manual
List of Figures
Figure 1. VidiNOW Client Interface.............................................................................................................................2
Figure 2. {Login} page.................................................................................................................................................3
Figure 3. VidiNOW PC Meeting icon at system tray....................................................................................................3
Figure 4. Join a scheduled meeting at {Meeting Center} .............................................................................................3
Figure 5. Start an ad hoc meeting at {Meeting Center}................................................................................................4
Figure 6. The Windows display of VidiNOW PC Meeting..........................................................................................4
Figure 7. Manage an ongoing meeting in real time at {Meeting Center}.....................................................................5
Figure 8. IE {Internet Options} dialog box ..................................................................................................................6
Figure 9. Enable “Run ActiveX Controls and Plug-ins”...............................................................................................7
Figure 10. Enable “Active Scripting” ...........................................................................................................................8
Figure 11. VidiNOW Meeting Center {Login} page ....................................................................................................8
Figure 12. PC Meeting {Download} page....................................................................................................................9
Figure 13. Selecting the language option of installation...............................................................................................9
Figure 14. Selecting a setup type ................................................................................................................................10
Figure 15. The progress of installation shown in {InstallShield Wizard} dialog box.................................................10
Figure 16. Installing virtual printer.............................................................................................................................11
Figure 17. Installing mirror driver ..............................................................................................................................11
Figure 18. The End of PC Meeting Installation ..........................................................................................................11
Figure 19. {Login} page.............................................................................................................................................12
Figure 20. {Meeting Center} page: “Function Panel” on left column........................................................................13
Figure 21. Starting an ad hoc meeting at {Meeting Center} page ..............................................................................16
Figure 22. {VidiNOW Invitation} to an ad hoc meeting ............................................................................................18
Figure 23. Schedule a Meeting - filling in meeting information.................................................................................20
Figure 24. Schedule a Meeting – {Select Participants} page .....................................................................................21
Figure 25. Schedule a Meeting – {Select Meeting Format} page...............................................................................22
Figure 26. Schedule a Meeting – set video position ...................................................................................................23
Figure 27. Sending E-mail Notification......................................................................................................................24
Figure 28. Notification e-mail of a Scheduled Meeting..............................................................................................25
Figure 29. Editing/Deleting a scheduled meeting; Joining a meeting.........................................................................25
Figure 30. Meeting Management entry.......................................................................................................................27
Figure 31. {Meeting Information} page .....................................................................................................................29
Figure 32. Reassigning a Meeting Manager ...............................................................................................................31
Figure 33. Participant List ..........................................................................................................................................31
Figure 34. Adding Participants ...................................................................................................................................32
Figure 35. Meeting Format .........................................................................................................................................33
Figure 36. Connection Settings...................................................................................................................................34
Figure 37. {File Management} page ..........................................................................................................................36
Figure 38. {VidiNOW PC Meeting} window at start up ............................................................................................37
Figure 39. Pop up menu box in “Center” display mode .............................................................................................41
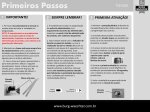
Figure 40. {PC Meeting} with “Corner” video display and {Welcome} window......................................................42
Figure 41. Pop up menu box in “Corner” display mode.............................................................................................42
Figure 42. {PC Meeting} with “Floating” video display and {Welcome} window....................................................43
Figure 43. Pop up menu box in “Floating” video display...........................................................................................43
Figure 44. PeggyLee’s {Participants} window...........................................................................................................46
Figure 45. The pop up menu at PeggyLee’s {Participants} window ..........................................................................47
Figure 46. The refusal message received by the requester..........................................................................................47
Figure 47. The pop up menu at PeggyLee’s {Participants} window, with a pending host request from JoeSmith ....48
Figure 48. The pop up menu at PeggyLee’s {Participants} window, with a pending “Req to Speak” from JoeSmith.
.............................................................................................................................................................................49
Figure 49. The window tabs of multiple “Share Program” sessions...........................................................................50
Figure 50. The owner’s {Share Program} window.....................................................................................................50
VI
VidiNOW User Manual
Figure 51. <Options> menu at the owner’s {Share Program} window ......................................................................51
Figure 52. Non-owner’s {Share Program} window, with a PDF file as the active shared content.............................52
Figure 53. Select applications to be shared in the <Share selected applications> ......................................................54
Figure 54. Request control message, waiting for PeggyLee’s reply ...........................................................................55
Figure 55. Reject “Request control” message, sent to KCarter ..................................................................................56
Figure 56. PeggyLee receives notification of cancelling request control ...................................................................56
Figure 57. The drop-down list of non-owner participants for “Forward control” ......................................................56
Figure 58. The message box for owner to consent or reject “Forward control” .........................................................57
Figure 59. The message box for recipient to accept or reject “Forward control” .......................................................57
Figure 60. {Share Web} window ................................................................................................................................58
Figure 61. The host’s {Share Media} window, with the {Open media URL} dialog box ..........................................59
Figure 62. The host’s {Share Media} window, with a pull-down menu from the {Open media URL} dialog box and
Media Player controls. .........................................................................................................................................60
Figure 63. The {Presentation} window ......................................................................................................................62
Figure 64. The Host’s {Annotation} window, with Page 3 opened ............................................................................64
Figure 65. The Host’s pop up menu in the {Annotation} window .............................................................................70
Figure 66. {Audividi VP Output} dialog box .............................................................................................................71
Figure 67. {Image Import} dialog box .......................................................................................................................72
Figure 68. Annotation options ....................................................................................................................................73
Figure 69. The {Document Center} window, with a download in progress ...............................................................74
Figure 70. File tip on a file posted by other user (KCarter), before download ...........................................................75
Figure 71. File tip on a file posted by other user (KCarter), after download process starts........................................75
Figure 72. Document Center Options .........................................................................................................................75
Figure 73. The file owner is notified by the “!” mark of download in progress .........................................................76
Figure 74. {Chat} window..........................................................................................................................................76
Figure 75. Chat Options..............................................................................................................................................77
Figure 76. {Record option} dialog box ......................................................................................................................78
Figure 77. Set the starting (X,Y) coordinate of the recorded region...........................................................................78
Figure 78. Set the width/height of the recorded region...............................................................................................79
Figure 79. Recording in progress, shown in the {Participant} window......................................................................79
Figure 80. Video Options............................................................................................................................................80
Figure 81. Audio Options ...........................................................................................................................................80
Figure 82. Network Options .......................................................................................................................................82
Figure 83. Personal Address Book..............................................................................................................................83
Figure 84. Editing User Profile...................................................................................................................................84
Figure 85. Selecting the language option of installation.............................................................................................86
Figure 86. Selecting a mode of installation ................................................................................................................86
Figure 87. Choose Destination Location ....................................................................................................................87
Figure 88. Select Features...........................................................................................................................................87
Figure 89. Ready to Install the Program .....................................................................................................................88
Figure 90. Setup Status ...............................................................................................................................................88
Figure 91. Installing virtual printer.............................................................................................................................88
Figure 92. Installing mirror driver ..............................................................................................................................89
Figure 93. Installation completion ..............................................................................................................................89
Figure 94. Select Features – Windows/XP .................................................................................................................90
Figure 95. Setup Status ...............................................................................................................................................90
Figure 96. Upgrade/Repair Completion......................................................................................................................91
VII
VidiNOW User Manual
List of Tables
Table 1. Buttons of the Function Panel.......................................................................................................................14
Table 2. <Meeting List> explanation..........................................................................................................................15
Table 3. Operations that the user can do to listed meetings ........................................................................................15
Table 4. Meeting Rights and Video Size.....................................................................................................................17
Table 5. Meeting Management tabs............................................................................................................................28
Table 6. <View> Menu of {VidiNOW PC Meeting} window ....................................................................................39
Table 7. <Tools> Menu of {VidiNOW PC Meeting} window....................................................................................40
Table 8. The Status Bar of {VidiNOW PC Meeting} window....................................................................................41
Table 9. {Participants} window ..................................................................................................................................44
Table 10. Audio/Video Mute Control..........................................................................................................................45
Table 11. Tool icons at non-owner’s {Share Program} window.................................................................................53
Table 12. Host’s media player controls in {Share Media} window............................................................................61
Table 13. Main Components of the {Presentation} window ......................................................................................63
Table 14. {Presentation} Toolbar................................................................................................................................63
Table 15. Main Components of an {Annotation} window .........................................................................................65
Table 16. {Annotation} - File Functions ....................................................................................................................66
Table 17. {Annotation} – View Functions..................................................................................................................66
Table 18. {Annotation} – Editing Tools .....................................................................................................................67
Table 19. {Annotation} - Markup Tools .....................................................................................................................69
Table 20. Toolbar icons in the {Document Center} window ......................................................................................74
VIII
VidiNOW User Manual
Chapter 1
First time user:
Please read this
Chapter.
A Quick Tour
The VidiNOW system, from Audividi Inc., is a rich media IP-based conference
system. It supports powerful interactive collaboration with integrated
data/audio/video functions in an easy-to-use interface.
This chapter brings you through a quick tour of the VidiNOW system, covering basic
concept and some operation procedures. You can start a simple meeting by the end of
this chapter.
The VidiNOW system consists of a server called VidiNOW Meeting Center, and a
Windows-based client called VidiNOW PC Meeting. Users access the server
through web pages and the client program.
The VidiNOW system supports two types of meetings: Scheduled Meeting and Ad
hoc Meeting. A Scheduled Meeting provides the user with the most flexibility and
sophisticated management, while the Ad hoc Meeting is an instant start to meet other
online users.
1.1 VidiNOW System Components - Server and Client
Server: VidiNOW
Meeting Center
The server runs the Meeting Center. The server could be physically installed in a
company's server room, or in a remote data center.
Terms “VidiNOW server”, “VidiNOW Meeting Center”, and “Meeting Center” are
interchangeable and this manual uses all of them without discrimination.
Client: VidiNOW PC
Meeting
Users can access the Meeting Center from a Windows PC in the office, at home, or
anywhere with Internet access, to create, join, and manage a meeting.
Terms “VidiNOW client”, “VidiNOW PC Meeting”, and “PC Meeting” are
interchangeable and this manual uses all of them without discrimination.
1.2 Client Interface: Web-Based Meeting Management & Window-Based
PC Meeting
The interface for client-side operations is composed of a web-based meeting
management and a Windows-based PC Meeting, as shown in Figure 1.
1
VidiNOW User Manual
Figure 1. VidiNOW Client Interface
Web-based
Meeting Management
Users access the VidiNOW Meeting Center from the web browser. This web-based
interface allows a user to login, join a meeting, create & manage meetings, and
manage user account information.
Windows-based
PC Meeting
Users should download PC Meeting software from the VidiNOW server and finish the
installation in PC. When a user logs in on the VidiNOW server and joins a meeting,
the PC Meeting application will start automatically. The multimedia operations
(audio, video, and data) are implemented in this Windows application to achieve
optimal performance and great flexibility.
1.3 Scheduled Meeting and Ad hoc Meeting
Scheduled Meeting
A Scheduled Meeting can be created by a user with specific attributes as: date/time,
participants, video display format, and sophisticated rights for each participant.
Ad hoc Meeting
A user can start an Ad hoc meeting with other online users in simple steps.
1.4 Starting a Meeting
Login
A user sees the { L o g i n } page, Figure 2, when accessing the URL of the VidiNOW
server. Enter the User ID and password to log into the VidiNOW Meeting Center.
2
VidiNOW User Manual
Figure 2. {Login} page
After a successful login, the { M e e t i n g C e n t e r } page as illustrated in Figure 4
will show up, and the VidiNOW icon will be in the system tray as illustrated in Figure
3. The VidiNOW icon indicates the PC Meeting client software has started. It is
ready to start a meeting or receive incoming calls from others.
Figure 3. VidiNOW PC Meeting icon at system tray
Join a Scheduled
Meeting
All the scheduled meetings are listed under <Meeting List> at {Meeting Center}
page. An invited user can join a scheduled meeting by clicking the [Join] button
under <Operations> tag, as shown in Figure 4.
Figure 4. Join a scheduled meeting at {Meeting Center}
Start an Ad hoc
Meeting
All the online users are listed under <Public Address List> at {Meeting Center}
page. An online user can invite others in this list to start an ad hoc meeting, by
clicking on the box of selected users under <User ID>. The meeting initiator can
click on <Ad hoc Meeting Settings> bar to open the meeting parameter settings. To
start this ad hoc meeting, click on [Start] button as illustrated in Figure 5.
3
VidiNOW User Manual
Figure 5. Start an ad hoc meeting at {Meeting Center}
In a VidiNOW
Meeting
Meeting participants can use audio, video, and data operations to conduct the
meeting, as shown in Figure 6.
Figure 6. The Windows display of VidiNOW PC Meeting
4
VidiNOW User Manual
Meeting Management
During the meeting, the meeting manager (or the initiator of an ad hoc meeting) can
adjust the meeting settings in real time by clicking on [Manage] button, as shown in
Figure 7.
Figure 7. Manage an ongoing meeting in real time at {Meeting Center}
The details of operations can be found in the subsequent chapters of this manual.
5
VidiNOW User Manual
Chapter 2
VidiNOW PC Meeting Installation
The VidiNOW PC Meeting (aka VidiNOW client) is available for download from the
VidiNOW Meeting Center (aka VidiNOW server). To ensure the successful
download, installation, and proper operation, the security settings on Internet Explorer
browser should be set up according to the instructions in this chapter. The last section
of this chapter describes how to uninstall the VidiNOW PC Meeting.
2.1 Security Settings for IE Browser
The following description of security settings on Internet Explorer browser is based
on Windows XP operating system. For other versions of Windows, the procedure is
similar.
IE
< To o l s >
<InternetOptions>
<Security>
[Custom Level…]
Go to the { S e c u r i t y S e t t i n g s } dialog box in the Internet Explorer
Select the menu sequence < To o l s > < I n t e r n e t O p t i o n s > in Internet Explorer
to display the { I n t e r n e t O p t i o n s } dialog box. Select the < S e c u r i t y > tab as
illustrated in Figure 8. Click the [ C u s t o m L e v e l … ] to display the { S e c u r i t y
S e t t i n g s } dialog box.
Figure 8. IE {Internet Options} dialog box
6
VidiNOW User Manual
{Security Settings}
Enable “Run ActiveX
Controls and plug-ins”
Enable "Run ActiveX Controls and plug-ins" under the "ActiveX controls and
plug-ins" section, as illustrated in
Figure 9.
Figure 9. Enable “Run ActiveX Controls and Plug-ins”
{Security Settings}
Enable "Active
scripting"
Enable "Active scripting" under the "Scripting" section as illustrated in Figure 10.
Then click [OK] to save the changes.
7
VidiNOW User Manual
Figure 10. Enable “Active Scripting”
2.2 Downloading VidiNOW PC Meeting Software
Meeting Center
{Login}
Enter the URL or IP address of the Meeting Center in the browser. Depending on the
installation of the server, the message of security certificate warning may come up
because the HTTPS protocol is used for login. Proceed to the Meeting Center {Login}
page as shown in Figure 11. Click “Install Software” on the {Login} page to enter the
{Download} page, as shown in Figure 12.
Figure 11. VidiNOW Meeting Center {Login} page
Download
Click “ I n s t a l l ” or “Client Software VidiNOW3-Setup-…exe” link to start the
download. You can save VidiNOW PC Meeting software at a specified location to run
it later, or select the "Run" directly from the server.
8
VidiNOW User Manual
Figure 12. PC Meeting {Download} page
2.3 Installing VidiNOW PC Meeting
Select English for
language option
The {InstallShield Wizard} dialog box (Figure 13) will be displayed when the
installation process starts --- either run the downloaded file or run directly from the
server. Select “English” in the dialog box as your language option and click [ N e x t ]
to continue.
Figure 13. Selecting the language option of installation
Select Express or
Custom Installation
PC Meeting will be installed to your “%System Disk\Program Files\Audividi” by
default. “Express installation” is recommended, unless you want to install it in a
different location.
Select the “Express installation” and click [ N e x t ] to begin the installation.
9
VidiNOW User Manual
Figure 14. Selecting a setup type
- VidiNOW, as the current release, only supports Microsoft Internet Explorer.
- DirectX version 9.0c or later is required. Please go to the Microsoft website for the
latest version of DirectX.
- Users can choose the location which they want to save PC Meeting software.
- To customize installation location and network settings, refer to Appendix B.
Installation in
Progress
The progress of installation will be displayed on the {InstallShield Wizard} dialog
box (Figure 15). You can cancel the installation by clicking the [ C a n c e l ] button.
Figure 15. The progress of installation shown in
{InstallShield Wizard} dialog box
10
VidiNOW User Manual
Install Virtual Printer
A virtual printer for the Annotation operation will be installed for screen capture.
Figure 16. Installing virtual printer
Install Mirror Driver
A mirror driver will be installed for Program Share.
Figure 17. Installing mirror driver
PC Meeting
installation is
completed.
The following dialog box (Figure 18) will be displayed at the end of a successful
installation. Select to restart the computer now or later, and click [ F i n i s h ] to
complete the installation. Before you can use VidiNOW PC Meeting, you must
restart your computer.
Figure 18. The End of PC Meeting Installation
2.4 Removing (Uninstalling) VidiNOW PC Meeting
Always use Windows
“Add or Remove
Programs” tool to
remove the PC
Meeting
At the bottom of PC screen, click [ St a r t ] , < C o n t ro l P a n e l > , then double-click
< A d d o r R e m o v e P ro g r a m s > . Select “VidiNOW PC Meeting” in the list of
the programs and then click [ R e m o v e ] .
When the dialog box “Do you want to completely remove the selected application and
all of its features” appears, click [ Ye s ] to remove the software.
11
VidiNOW User Manual
Chapter 3
Login to VidiNOW Meeting Center
VidiNOW users can create, join, and manage meetings after a successful login to the
VidiNOW Meeting Center. This chapter describes the login process and explains the
features on the Meeting Center page.
Starting meetings and managing meetings in VidiNOW are part of a user’s rights which
are defined by the VidiNOW administrator. Users without the proper rights may not
perform some of the operations discussed in this manual.
VidiNOW Meeting Center has an administrator account with the User ID “vidinowadmin”. The administrator can create and manage other regular user accounts. Please
refer to System Manager’s Manual for detail information about this administrator
account.
3.1 Login
{Login} page
{Login} page is illustrated in Figure 19. Enter the User ID and password (password
is case-sensitive), select the language option and click [ L o g i n ] .
The language option selected here applies to the subsequent web pages. It will not
affect the language option of the PC Meeting software, which is selected during client
software installation as shown in Figure 13.
User can check the “Remember User ID and Password” option for the PC to
remember the login data. The server software version number, “3.x.xx”, is displayed
on the upper right corner of {Login} page.
Figure 19. {Login} page
12
VidiNOW User Manual
{Meeting Center} page
A successful login will bring the user to the { M e e t i n g C e n t e r } page in Figure
20. If the PC Meeting program cannot link to the VidiNOW server successfully, the
system tray at the lower right-hand corner will display the VidiNOW icon as:
PC Meeting starts up
automatically
VidiNOW PC Meeting will start automatically after the connection to the VidiNOW
Meeting Center is established. It will then minimize to stay in the Windows system
tray. The computer is now ready to send or receive meeting invitation over the
network.
PC Meeting software
upgrade
VidiNOW Meeting Center may prompt the users to upgrade the PC Meeting software
in case the version of the PC Meeting is not compatible with the version of the
Meeting Center.
Figure 20. {Meeting Center} page: “Function Panel” on left column
Function Panel
The Function Panel on the left side of the { M e e t i n g C e n t e r } page is explained in
Table 1.
Function Button
[Logout]
Description
Logout of the Meeting Center
[ M e e t i n g C e n t e r ] As shown in Figure 20
- Displays the list of meetings available for this login user,
including current and future meetings
- Displays all online users
- To start an ad hoc meeting, if the login user has the right
to initiate a meeting
[Schedule a
Meeting]
Set a Scheduled Meeting if the login user has the proper
rights
[ E d i t P ro f i l e ]
Edit this login user’s information
[Address Book]
Maintain a personal address book
[Desktop Icon]
Customize a VidiNOW desktop shortcut so the user can
perform an operation quickly, such as login or join a
meeting
13
VidiNOW User Manual
[Install
Software]
Download the VidiNOW PC Meeting and/or the required
system software DirectX
Table 1. Buttons of the Function Panel
Administrator will see additional buttons [ A d m i n i s t r a t i o n ] a n d [ L D A P
S e t t i n g s ] on the Function Panel. Administrator can manage all users, groups,
meetings in the Meeting Center, and make LDAP Settings. Refer to System Manager’s
Manual for more information.
3.2 The Meeting List in Meeting Center
Meeting Center lists
only meetings specific
to the login user
A successful login will lead the user to the { M e e t i n g C e n t e r } page, which can
also be opened by clicking the [ M e e t i n g C e n t e r ] button on the Function Panel.
The { M e e t i n g C e n t e r } page displays Meeting List in the upper half of the page,
as illustrated in Figure 20. Only the meetings related to this login user are shown.
Meetings are listed bottom up, in the sequence of created time
Meeting List
explanation
All the items under <Meeting List> are explained in Table 2.
<Meeting List> Item
Description
ID
Meeting ID is assigned by the Meeting Center.
Meeting Name
Meeting Name is the name of the meeting. The default
name given by Meeting Center is “UserID_xxx”. The
meeting creator can change this name.
Operations
The displayed operation buttons match the role of the login
user (such as meeting manager, invited participants, …,etc).
The definitions of all the operation buttons are listed in
Table 3.
St a r t Ti m e
The starting time of the meeting, with the clock reference to
the server time.
Duration
Length of time slot for this scheduled meeting. For
example, 2 hours is displayed as (02:00:00). “Always On”
is a special value used for a Scheduled Meeting that never
ends.
St a t u s
Possible values are “Scheduled”, “Available & Empty”,
and “In Progress”
Scheduled: for a scheduled meeting to start in the future
In Progress: for an on-going meeting with participants
currently in the meeting
Available & Empty: for an on-going meeting without any
participant in the meeting. The “Always On” meeting with
this status means empty virtual meeting room that no one is
currently using.
14
VidiNOW User Manual
The person to contact about the meeting. The default is the
meeting creator.
Table 2. <Meeting List> explanation
Contact
Operations the user
can do to listed
meetings
The operation buttons are listed in Table 3.
Operations
Description
[Join]
The meeting has started. The login user can join this
meeting. See Section 5.3.
[Info]
Display information about the currently available meeting.
This is also the entry for a participant to download
document files under [File] tab.
[Manage]
Manage the meeting. This is available to the meeting
manager only. Please refer to Chapter 6 for meeting
management.
[Edit]
The meeting hasn’t started yet. The meeting creator can
edit the meeting information. See Section 5.2.
[Delete]
The meeting hasn’t started yet. The meeting creator can
delete this meeting. See Section 5.2.
Table 3. Operations that the user can do to listed meetings
For a repeated login (from a different computer) with the same User ID, the original
login user will receive a message, saying “UserXXX has registered to the Directory
from another computer, this connection is terminated.” Then, the connection will be
terminated by the Meeting Center. The newly loggein user will kick the old one off the
Meeting Center with the identical User ID.
15
VidiNOW User Manual
Chapter 4
Rich media meeting
as easy as Instant
Message
Ad hoc Meeting
The login user can select people from a list of online users and start an ad hoc
meeting instantly. All the selected online users will receive a pop up dialog
prompting for acceptance or rejection of the invitation. Upon accepting the invitation,
the PC Meeting will fire up at the invitee’s computer to join this meeting. Audio and
video will start automatically.
Ad hoc meeting is as easy to use as any personal Instant Message software. Yet, it is
specially designed for conducting group meetings with audio, video, and sophisticated
collaboration operations.
This chapter explains how to start and join an ad hoc meeting. It also recommends
proper network setting for a successful server/client connection.
4.1 Starting an Ad hoc Meeting
At the {Meeting Center} page, the login user can start an ad hoc meeting instantly
with three simple steps, as illustrated in Figure 21:
1. Select participants from the list of online users.
2. Set up meeting rights.
3. Click [Start] button.
Figure 21. Starting an ad hoc meeting at {Meeting Center} page
16
VidiNOW User Manual
Select Participants
Click on the boxes of User ID to invite meeting participants, using online user list
from either <Public Address List> or <Personal Address Book>.
<Public Address List>: The list of all online users in this VidiNOW server.
<Personal Address Book>: The list of online users, who are in this login user’s
personal address book.
Set up Meeting Rights
Click on <Ad hoc Meeting Settings> bar will turn on/off the display of Meeting
Rights.
The login user as the meeting creator can set rights of audio, video, and meeting
recording for this meeting. The default settings in this field are derived from the rights
of this login user, which is set by the VidiNOW administrator. The meeting creator can
turn off some meeting rights, but not enable new rights beyond the default settings. The
meeting creator can also set the video size for the meeting.
Check a box to enable the corresponding right.
Table 4 lists the meeting rights and video size used in the VidiNOW system.
Audio input (microphone) right: this meeting participant can
speak to the meeting when this is enabled.
Audio output (speaker) right: this meeting participant can hear
the audio from the meeting when this is enabled.
Video input (camera) right: this meeting participant can send
video image to the meeting for others to see when this is
enabled.
Video output (display) right: this meeting participant can see the
video from the meeting when this is enabled.
Meeting recording right: this meeting participant can record the
meeting progress when this is enabled.
File transfer right: this meeting participant has the privilege to
use Document Center for file transfer.
Set up the display size of video image: “Normal” for 160x120,
“Large” for 320x240, “Larger” for 640x480, “Larger(wide)”
Video Size
for 640x360, “HD 720P” for 1280x720. The default setting is
“Large”.
Table 4. Meeting Rights and Video Size
Start a meeting and
Invite more people to
• [ St a r t ] and [ I n v i t e ]
Click the [ St a r t ] button to initiate a meeting. The meeting manager will see
17
VidiNOW User Manual
the meeting
this button change to [ I n v i t e ] after the meeting starts. The meeting manager
can add more people to the meeting by checking the User ID boxes and clicking
the [ I n v i t e ] button.
The meeting creator is the meeting manager by default. Please refer to Chapter 6
for reassigning someone else to be the meeting manager.
Ringing and Cancel
the Invitation
On the meeting creator’s {Meeting Center} page, the ringing icon
preceding the
invitee’s User ID will show up before the invitation is answered. The meeting creator
can cancel the invitation by a left click on the icon.
The ringing icon will disappear once the invited user accepts or rejects the invitation,
or after 15 minutes of time-out period.
Ad hoc Meeting is
listed under <Meeting
List>
After the ad hoc meeting has started, all the users in the meeting can see information
about the meeting in their respective {Meeting Center} page under <Meeting List>.
The Ad hoc meeting is named as “User ID_XXX”by default. “User ID” is the
meeting creator’s User ID. “XXX”is a sequentially assigned number.
The creator is the first participant into the meeting. The meeting duration is“Always
On”. However, the Meeting Center will terminate the meeting automatically if all the
meeting participants exit.
4.2 Joining an Ad hoc Meeting
Once a login user receives an invitation to an ad hoc meeting, the computer will
prompt the user with {VidiNOW Invitation} dialog box at the lower right corner of
the screen. The {VidiNOW Invitation} dialog box is shown in Figure 22.
Figure 22. {VidiNOW Invitation} to an ad hoc meeting
The user should click [ A c c e p t ] to accept the invitation and enter the ad hoc
meeting, or [ C a n c e l ] to decline the invitation.
The {VidiNOW Invitation} will show up even if the user is already in an ongoing
meeting. If the user clicks [ A c c e p t ] button, the VidiNOW server will disengage this
user from the current meeting and connect him/her to the new meeting.
18
VidiNOW User Manual
4.3 Exiting an Ad hoc Meeting
A participant can exit an ad hoc meeting by simply closing the {PC Meeting}
window, or click the menu sequence <File> <Exit> at {PC Meeting} window.
19
VidiNOW User Manual
Chapter 5
Scheduled Meeting
Scheduled Meetings are usually created before the actual meeting time. The
participants are notified by e-mail or some other means. Participants also take the
initiative to join the meeting from the { M e e t i n g C e n t e r } page. Sophisticated
video format and rights for each individual participant can be set up at the time the
meeting is created, or changed when the meeting is ongoing.
5.1 Creating a Scheduled Meeting
There is a [ S c h e d u l e a M e e t i n g ] button on the F u n c t i o n P a n e l c o l u m n
o f t h e {Meeting Center} page. Click the [ S c h e d u l e a M e e t i n g ] to enter the
{ S c h e d u l e d M e e t i n g } page, as illustrated in Figure 23.
Figure 23. Schedule a Meeting - filling in meeting information
Step 1 –
Setting Up the
Meeting Information
The meeting creator needs to fill in the following information,
• Meeting Name
Meeting Center automatically assigns a meeting name “User ID_XXX” by
default. “User ID” is that of the meeting creator and “XXX”is a sequentially
assigned number. For example, “Tom_002” is the second meeting created by the
user with User ID “Tom” in the Meeting Center.
Meeting creator can change the default meeting name to a more descriptive
name, so other participants can easily identify the meeting.
• Contact
The meeting creator is assigned as the default contact by the Meeting Center.
This field can be changed to any other person. This field is intended to be used to
show the name or phone number of someone to contact in case the human
20
VidiNOW User Manual
intervention is needed. For example, company network has to be shut down for
urgent maintenance.
• Start Time
Enter the time to start the meeting. Select [ N o w, C u r r e n t s e r v e r t i m e
i s … ] if the user wants to start a meeting immediately. Or select the [ F u t u r e ]
radio button and set a future time.
Please be aware the time is interpreted as the time of the Meeting Center.
• Duration
Set the length of time for the meeting. If [ A l w a y s o n ] is selected, the meeting
will not end until it is terminated by the meeting manager.
Click [ N e x t ] after all information is entered. It brings up {Select Participants} page
as shown in Figure 24.
Step 2 –
Selecting Participants
& Meeting Manager
Figure 24. Schedule a Meeting – {Select Participants} page
The user can select meeting participants from <Public Address List> or <Personal
Address Book>.
• Public Address List
This list includes all the user accounts in the Meeting Center.
• Personal Address Book
This list includes all the user accounts in the personal address book. Refer to
Chapter 8 about how to create your own personal address book.
Check the boxes of the corresponding users to invite them to the Scheduled Meeting.
• Meeting Manager
The meeting creator is assigned as the meeting manager by default. To reassign
the Meeting Manager, click on the radio button under the Manager column. Refer
21
VidiNOW User Manual
to Chapter 6 about the meeting manager role.
Click [ N e x t ] after selecting participants and the meeting manager to enter {Select
Meeting Format} page as in Figure 25. Or click [ P r e v i o u s ] to modify meeting
information.
Step 3 –
Setting Up Meeting
Format and Rights
In the {Select Meeting Format} page, the meeting creator can set the following
options: (1) Set the video size for screen display (2) Set screen format (3) Select a
meeting chair (4) Assign meeting rights and video position on the screen for each
participant.
Figure 25. Schedule a Meeting – {Select Meeting Format} page
• Wait for Chair to start meeting
Once this box is checked, the meeting requires the meeting chair present to start.
“Waiting for the Chair to join the meeting …” message will be displayed to all
participants trying to join the meeting before the meeting chair.
There is no such restriction if the box is not checked.
• Video Size
Set up the display size of video image: “Normal” for 160x120, “Large” for
320x240, “Larger” for 640x480, “Larger(wide)” for 640x360, “HD 720P” for
1280x720. The default setting is “Large”.
• Screen Format
This field allows the meeting creator to select a video display format. When the
“ A u t o ” is selected, the Meeting Center will automatically adjust the format to
the number of participants to be displayed on the screen. Any selection other
than “ A u t o ” will force the Meeting Center to use that specific format for the
video, regardless of the number of participants.
22
VidiNOW User Manual
• User ID & User Name
These two fields list all the participants to join the Scheduled Meeting.
• Chair
The meeting creator can select a “Meeting Chair”, if the < Wa i t f o r C h a i r
t o s t a r t m e e t i n g > option is checked. Meeting Chair must be one of the
meeting participants.
• Meeting Rights
Refer to Table 4 for the definitions of these meeting rights.
• Video Position
For a selected screen format other than “Auto”, the meeting creator can choose
where to place a specific participant from the pull-down menu. In the example of
Figure 26, a 6-person screen format is chosen for an 8-person meeting. The
meeting creator can only pick 6 participants to fill the screen format.
Figure 26. Schedule a Meeting – set video position
Click [ P r e v i o u s ] to modify or review previous steps.
Click [ C a n c e l ] to cancel the meeting creation and return to { M e e t i n g
Center}.
Click [ C r e a t e ] to create the Scheduled Meeting.
An {Error} page will display the reason of failure in case the meeting fails to be
created.
Optional –
Sending Meeting
Notification
A { S e n d N o t i f i c a t i o n } page will appear after a meeting is successfully created,
as illustrated in Figure 27.
The Scheduled Meeting has been created up to this stage. Success or failure of the E-
23
VidiNOW User Manual
mail notification will not change the status of this Scheduled Meeting. This meeting
can be seen in the {Meeting Center} by all participants and the meeting manager.
VidiNOW will enter the e-mail addresses automatically if they are available in the
users’ profiles. The meeting creator can also enter them manually.
Click [ S e n d E m a i l ] to send notification and return to { M e e t i n g C e n t e r } .
Click [ D o n o t S e n d ] and return to { M e e t i n g C e n t e r } directly.
Figure 27. Sending E-mail Notification
The notification e-mail includes meeting name, User ID, starting time, and Meeting
Center IP address or URL, as shown in Figure 28.
24
VidiNOW User Manual
Figure 28. Notification e-mail of a Scheduled Meeting
5.2 Editing a Scheduled Meeting
Before a scheduled meeting starts, the meeting creator can make changes to this
scheduled meeting. Click the [Edit] button on the meeting list, as shown in Figure
29, to start the “Schedule a Meeting” process as in Figure 23.
The meeting creator can also delete a scheduled meeting before it starts, simply by
clicking the [Delete] button in the meeting list.
Figure 29. Editing/Deleting a scheduled meeting; Joining a meeting
5.3 Joining a Meeting
When the start time of a scheduled meeting passes, the meeting becomes
25
VidiNOW User Manual
“Available”. All participants will see a blue [Join] button on the meeting list of their
respective {Meeting Center} page.
Click the [ J o i n ] button on the meeting list, as shown in Figure 29, to join this
meeting. The {PC Meeting} window will fire up automatically to connect to the
VidiNOW server.
5.4 Exiting a Meeting
A participant may exit a meeting in one of the following ways:
• Exit/Close {PC Meeting} window
Use menu sequence < F i l e > < E x i t > to hang up the meeting, or simply close
the { P C M e e t i n g } window.
• Duration has ended
The meeting will stop when the duration set by meeting creator is up.
• Disconnect or terminate
The meeting manager can disconnect or delete selected meeting participants
during the meeting, or terminate the meeting completely by using the
[ Te r m i n a t e ] (refer to Chapter 6 for details).
26
VidiNOW User Manual
Chapter 6
Meeting Management
A meeting manager can perform the following management tasks to the meetings that
he/she is assigned to manage. Administrator (“Admin”) can see and manage all
meetings on the server.
•
•
•
•
•
•
•
•
Viewing meeting information
Controlling entry into a meeting
Terminating a meeting
Reassigning a meeting manager
Managing participant list
Changing meeting format
Changing connection settings
Managing document files
Only the user with a right to create meetings can be assigned as a meeting manager.
This right and several other rights are assigned when the user account is created by
the VidiNOW administrator.
A meeting manager can manage a meeting using the web page interface, without
being in the meeting. This capability allows a dedicated meeting manager in charge
of the meeting logistics based on real-time network performance measurement, while
staying out of the meeting for confidentiality reason.
The meeting to be managed will be called “current meeting” in the following sections.
6.1 Meeting Management Web Pages
When a meeting status is “Available & Empty” or “In Progress”, the meeting
manager will have a [Manage] button under the <Operations> column of the
<Meeting List>, as shown in Figure 30.
Figure 30. Meeting Management entry
When the meeting manager clicks [ M a n a g e ] button on a meeting list, VidiNOW will
go to the { M e e t i n g I n f o r m a t i o n } page, illustrated in Figure 31, as the entry into
the Meeting Management operation.
The major management functions are categorized into several web pages as: {Meeting
Information}, {Assign Manager}, {Participant List}, {Meeting Format}, {Connect
Settings}, and {File Management}. The “Tab Bar” across the upper part of each
management page, as shown in Figure 31, provides the access to other management
27
VidiNOW User Manual
pages. Table 5 is a brief description of the tabs listed on the Tab Bar.
Function components
[Meeting
Information]
Description
See meeting information for the current meeting. This is
also the entry page to meeting management.
The buttons for “terminating the meeting” and
“allow/disallow joining” are available on this page only.
The page display will refresh if the user is already in the
{ M e e t i n g I n f o r m a t i o n } page.
[Assign
Manager]
Assign another user to be the meeting manager of the
current meeting.
[Participant
List]
List all participants of the current meeting and their
respective status.
Disconnect/Delete current participants. Add new
participants.
[Meeting
Format]
Set meeting format and participant’s rights for the current
meeting. Meeting rights include audio, video, recording,
and file transfer.
[Connect
Settings]
Change operational settings of the current meeting. This is
for expert users only.
[File
Management]
Upload document files to be used in current meeting.
Table 5. Meeting Management tabs
The “Meeting Name” of the current meeting is displayed above the “Tab Bar” on
each management page. Each page has its own associated buttons, located on top and
bottom rows, as shown in Figure 31.
28
VidiNOW User Manual
Figure 31. {Meeting Information} page
6.2 Viewing Meeting Information
Most of the contents on { M e e t i n g I n f o r m a t i o n } page are the same as on
Meeting List, exemplified in Figure 30. The extra information is explained
underneath:
• Join
Either “A l l o w ” or “D i s a l l o w ” indicates if the meeting is still open for joining.
• Manager
This field displays the manager’s User ID.
• Wait for Chair
Either “Ye s ” or “N o ” indicates if this option is chosen.
• Number of Participants
This field displays the total number of scheduled participants.
• Current Attendees
This field displays the number of participants currently in the meeting.
The three buttons on the top and bottom rows of { M e e t i n g I n f o r m a t i o n } page
are explained in the following:
•
[Disallow Join]/[Allow Join]
29
VidiNOW User Manual
Control the entry to the current meeting as the name indicated. This button
toggles between the two values. See Section 6.3 for the detail.
• [ Te r m i n a t e ]
Terminate the current meeting. See Section 6.4 for the detail.
• [Join]
This button shows up if the meeting manager is also a participant of the current
meeting. It allows him/her to join the meeting by clicking the button.
6.3 Controlling Entry into a Meeting
Closing/Opening
Door to Meeting
The meeting manager controls the door to the meeting by using the [ D i s a l l o w
J o i n ] ( or [ A l l o w J o i n ] ) button in the { M e e t i n g I n f o r m a t i o n } page
(Figure 31). This button toggles its operation depending on the “J o i n ” state of the
current meeting.
• [Allow Join]
Allow participants to join the meeting. This button is available when the “Join”
state of the current meeting is “Disallow”.
• [Disallow Join]
Stop more participants to enter the meeting. This button is available when the
“Join” state of the current meeting is “Allow”.
6.4 Terminating a Meeting
The Meeting Manager can permanently close a meeting by using this [ Te r m i n a t e ]
button in the { M e e t i n g I n f o r m a t i o n } page (Figure 31). A dialog box will pop
up for confirmation. All participants are forced to exit and the meeting is closed as
soon as the operation is confirmed.
The Meeting Center will go back to the { M e e t i n g I n f o r m a t i o n } page if this
operation is cancelled.
6.5 Reassigning a Meeting Manager
The Meeting Manager can pass the role to someone else. This operation is done
through the { A s s i g n M a n a g e r } page.
The new meeting manager can be selected from the “Meeting Participants”, “Public
Address List” or “Personal Address Book”.
30
VidiNOW User Manual
Click the [ S a v e ] button after the selection is made.
Figure 32. Reassigning a Meeting Manager
6.6 Managing Participant List
The { P a r t i c i p a n t L i s t } page is illustrated in Figure 33.
Figure 33. Participant List
• In Meeting
Indicates if the participant is already in the meeting.
• Join Time
Indicates when the participant joined the meeting. This field is blank if the
participant has not yet joined the meeting.
• User Name
Indicates participant’s name.
• Phone
Indicates participant’s phone number.
The four buttons on the top and bottom rows of the { P a r t i c i p a n t L i s t } page are
31
VidiNOW User Manual
explained below:
•
[Refresh]
Refresh this { P a r t i c i p a n t L i s t } web page. The user list is updated to
reflect the new status.
“Disconnect a
participant from a
meeting” temporarily
• [Disconnect]
Disconnect the selected participants from the meeting. This operation
disconnects the participants but does not remove them from the Participant List.
They can join the meeting again if the meeting allows.
“Delete a participant
from a meeting”
permanently
• [Delete]
Disconnect the selected users if they are in the meeting and remove them from
the Participant List.
Participants can be removed regardless of whether they are in the meeting or not.
A meeting manager can be deleted from the Participant List and continue to be the
meeting manager since the meeting manager is not necessarily a participant.
• [Add]
Add more participants. After clicking on [Add] button, a new page under the
same tab of {Participant List} displays either “Public Address List” or
“Personal Address Book” for the Meeting Manager to select new participants,
as illustrated in Figure 34.
Select the people to add from the “Public Address List” or “Personal Address
Book”. Then click the [ O K ] button.
Figure 34. Adding Participants
6.7 Changing Meeting Format
32
VidiNOW User Manual
The Meeting Manager can change the video format and meeting rights of each
participant in the { M e e t i n g F o r m a t } page, as illustrated in Figure 35.
Figure 35. Meeting Format
Please refer to the “Step3 – Setting Up Meeting Format and Rights” in Section 5.1.
Click the [ S a v e ] button to complete the operation.
6.8 Changing Connection Settings
This section is only
for expert users.
It is recommended to
stay with the Meeting
Center default
settings.
Performance of the public Internet fluctuates up and down. When the Internet
performance degrades and the default settings can no longer provide adequate
communication quality, the Meeting Manager can adjust parameters in this page in
real-time to compensate for the changes.
The { C o n n e c t S e t t i n g s } page is illustrated in Figure 36. This page is intended
for expert users only. Detail explanation of the technical terms in this page is out of
the scope of this manual.
33
VidiNOW User Manual
Figure 36. Connection Settings
There is a trade off between the amount of data to be sent across the network and the
quality of the audio and video delivered. The most appropriate codec is dependent on
the user priority, for instance, trade off between the video image quality and the
motion fluidity when the network bandwidth is limited and changing.
The Meeting Manager can define up to 3 levels of audio and 3 levels of video codec
for a meeting. The inbound and outbound audio and video can be processed using the
most appropriate codec.
The initial setting by the Meeting Center uses only one level of codec. Please be
aware the more codec levels are used the more server CPU performance is consumed.
The adjustment on {Connect Settings} page should only be done when the audio and
video quality severely deteriorates by the network.
Audio codec setting consists of Audio Format and R e d u n d a n c y .
• Audio Format
This parameter selects a compression format for the audio data. The default
w_band is highly recommended.
• Redundancy
This parameter sets a level of audio data redundancy to overcome the data drop
out caused by the Internet.
Video codec consists of Video Format, Video Size, Frame Rate, I-frame Interval,
and Q value.
• Vi d e o F o r m a t
This parameter selects the compression format used by the video data. Staying
34
VidiNOW User Manual
with the default compression scheme is highly recommended.
• Vi d e o S i z e
This parameter selects the video image size.
• Frame Rate
This parameter sets the number of frames per second. With higher frame rate
setting, VidiNOW will consume more network bandwidth. Be aware that the
public Internet may not be able to sustain a high frame rate.
If the audio shows signs of breakup, the Meeting Manager should decrease this
“Frame Rate” number to lower the bandwidth consumed by the video.
Therefore, there is less competition for the limited bandwidth between the audio
and video.
A frequently used adjustment is to lower the video quality to maintain the audio quality.
An individual participant can also “Mute” the video to keep the audio when the network
is really bad.
Part of the video data will be lost in the Internet, so the video frame rate one sees in
display may not be the number indicated here. Sending video in high frame rate will
create high network traffic that could cause worse congestion for busy network. So the
meeting manager should lower the frame rate when the network is not in good
conditions.
• I-frame interval
This parameter indicates the time interval between two I-frames in unit of
second. Changing this number is not recommended.
• Q Va l u e
This parameter indicates the image quality of each individual compressed frame.
Lower value will result in better quality for the individual frame, but will
increase the amount of video data to the network dramatically. Then, it will lead
to a bad video quality in a bandwidth limited network because more data will be
dropped by the network.
There is a trade off between the amount of data and the quality of each individual video
frame. The network effect is very often more visible than the compression quality. A
lower frame rate and higher Q value to reduce the amount of data over the network may
end up with a more acceptable video performance.
•
To S e r v e r
Selects the audio and video settings from the client (PC Meeting) to the server
(VidiNOW Meeting Center). The default is “Level 2” for both audio and video
settings, defined under “Audio Format” and “Video Format” in Figure 36.
6.9 Managing Document Files
Meeting Manager controls “Upload” and “Delete” of document files used in the
current meeting from the {File Management} page, as shown in Figure 37.
35
VidiNOW User Manual
Figure 37. {File Management} page
Clicking on [Upload] button will open the [Browse] & [Done] buttons. Click on
[Browse] to select a file and then click on [Done] for the file to be uploaded.
To remove files, just select the files and click [Delete] button.
36
VidiNOW User Manual
Chapter 7
VidiNOW PC Meeting Operation
This chapter explains the user interface of VidiNOW PC Meeting. Section 7.1
presents the general view of PC Meeting’s window layout. Section 7.2 to 7.10
explains the major functions as: Host & Moderator, Program Sharing, Web Sharing,
Media Sharing, Presentation, Annotation, Document Center, Text Chat, and Meeting
Recording. The last three sections, 7.11 to 7.13, are about setting options: Video
Options, Audio Options, and Network Options.
7.1 Window Layout
W h e n t h e u s e r j o i n s a Vi d i N O W m e e t i n g , t h e { Vi d i N O W P C
M e e t i n g } window will start up, as illustrated in Figure 38. The layout of this
window is made of one main window ( {Data Operation} ), several smaller windows
on the left pane ( {Participants}, {Chat}, {Doc Center} ), and four bars across the
top and bottom as (Title Bar, Menu Bar, Toolbar, and Status Bar).
The window layout will change by the user’s actions, such as: (1) Open/close
functional windows via <View> menu. (2) Close functional windows by clicking on
the “x” sign. (3) Manipulate video display mode via right click or double click. (4)
Change the {Data Operation} window to full screen and vice versa, by clicking on
and
. (5) Change to a preset layout using the layout icon
Bar.
Figure 38. {VidiNOW PC Meeting} window at start up
37
at the Status
VidiNOW User Manual
Title Bar
The Title Bar displays User ID, Meeting Name, and Server URL in the format as
“User_ID in Meeting_Name at Server_URL”.
Menu Bar
There are four items in the Menu Bar: <File>, <View>, <Tools>, and <Help>.
<File>
The <File> <Exit> is used to close the PC Meeting program, thus exit the current
meeting.
<Help>
The <Help><About> displays version number of this PC Meeting program.
Menu Bar
<View>
There are six items under <View> as: <Video>, <Participants>, <My Video>,
<Chat>, <Doc Center>, <Floating left pane>, <Toolbar>, and <Status Bar>.
View menu items
< Vi e w >
< Vi d e o >
Description
Turn on/off the video display of all participants. There are
four display options: “Center”, “Corner”, “Floating”, and
“Full Screen”. At default, the video is displayed in the
center of the main window. The icon
Bar is a shortcut of <View><Video>.
at the Status
Read Section 7.1.1 about how to manipulate the video
display modes.
< Vi e w >
<Participants>
Turn on/off the display of {Participants} window on the
left pane. It will share the same location with {My Video},
when both are enabled. Click on the downward triangle at
upper bar to switch between {My Video} and
{Participants}. This window is opened at start-up.
Read Section 7.1.2 for the detailed description on all the
symbols used in the {Participants} window.
< Vi e w >
< M y Vi d e o >
Turn on/off the local video image on the left pane. It will
share the same location with {Participants}, when both are
enabled. Click on the downward triangle in the upper bar to
switch between {My Video} and {Participants}.
< Vi e w >
<Chat>
Turn on/off the {Chat} window on the left pane. It will
share the same location with {Document Center}, when
both are enabled. Click on the tab of the upper bar to
switch between {Chat} and {Doc Center}. Both {Chat}
and {Doc Center} are opened at start-up.
Read Section 7.9 for the detailed description of {Chat}.
< Vi e w >
<Doc Center>
Turn on/off the {Doc Center} window on the left pane. It
will share the same location with {Chat}, when both are
enabled. Click on the tab of the upper bar to switch
between {Chat} and {Doc Center}. Both {Chat} and {Doc
Center} are opened at start-up.
See Section 7.8 for the detailed description of {Doc
Center}.
<Floating left
Change the left pane into an independent window, separated
38
VidiNOW User Manual
pane>
from {PC Meeting} window. When this floating window is
closed, the left pane will go back to the same location of
{PC Meeting} window.
< To o l b a r >
Turn on/off the display of the Toolbar.
Turn on/off the display of the Status Bar.
< St a t u s B a r >
Table 6. <View> Menu of {VidiNOW PC Meeting} window
Menu Bar
<Tools>
(or Toolbar)
There are ten items under <Tools> as: <Req to Speak>, <Become Host>,
<Moderator>, <Share Program>, <Share Web>, <Share Media>,
<Presentation>, <Annotation>, <Recording>, and <Options>. These <Tools>
items also appear on Toolbar, except <Recording>.
Tools menu items
< To o l s >
<Req to Speak>
Description
Participants can request to speak in a moderated meeting.
See Section 7.2.
< To o l s >
<Become Host>
The participant will become host of data operations (Share
Program, Share Web, Share Media, and Annotation), when
this request is granted by the current host or moderator.
See Section 7.2.
< To o l s >
<Moderator>
Only the meeting manager can conduct the meeting as
moderator.
See Section 7.2.
< To o l s > < S h a r e
Program>
Share Program is one of the data operations.
See Section 7.3.
< To o l s >
< S h a r e We b >
Share Web is one of the data operations.
See Section 7.4.
< To o l s >
<Share Media>
Share Media is one of the data operations.
See Section 7.5.
< To o l s >
<Presentation>
Presentation is one of the data operations
See Section 7.6
< To o l s >
<Annotation>
Annotation is one of the data operations.
See Section 7.7.
< To o l s >
<Recording>
Record the meeting in progress.
See Section 7.10.
39
VidiNOW User Manual
< To o l s >
<Options>
The <Options> opens a dialog box for the settings in the
following categories: General, Annotation, Doc Center,
Chat, Video, Audio, and Network.
Table 7. <Tools> Menu of {VidiNOW PC Meeting} window
Status Bar
The Status Bar provides a quick glimpse of important meeting status, shortcut for
preset window layouts, and shortcuts for audio/video controls.
Status Bar items
Description
This is a shortcut to open the {Chat} window.
or
In a free form meeting with ongoing data session, the
current host will receive a flashing red icon when there is a
participant request of “Become Host”. In the meantime, the
host will see a raising hand appearing at requester’s UserID
in {Participants} window.
In a moderated meeting, moderator will receive a flashing
red icon when there is a participant request of “Become
Host” or “Request to Speak”.
On “Become Host”, the moderator will see a raising hand
appearing at requester’s UserID in {Participants} window.
On “Request to Speak”, the moderator will see a raising
hand with a microphone appearing at requester’s UserID in
{Participants} window.
This message line conveys the important status related to
request/grant of host and audience mike, which is a
reminder of the status already illustrated in {Participants}
window.
The message line may also show the status of an ongoing
task, such as “Recording is successful”.
This is a moderated meeting.
This is a shortcut to several preset window layouts.
This is a shortcut of <View> <Video>.
Mute control on display
See Section 7.1.3 for mute control.
Mute control on camera
See Section 7.1.3 for mute control.
Mute control on speaker
See Section 7.1.3 for mute control.
Speaker volume adjustment
See Section 7.1.4 for volume adjustment.
40
VidiNOW User Manual
Mute control on microphone
See Section 7.1.3 for mute control.
Microphone volume adjustment
See Section 7.1.4 for volume adjustment.
Attendance status
Example: “2/3” means 2 participants in the meeting, but 3
people are invited or scheduled.
Progression time of the meeting
Example: “00:33:26” means 0 hour, 33 minutes, and 26
seconds
CPU usage indicator
Table 8. The Status Bar of {VidiNOW PC Meeting} window
7.1.1
Vi deo Display
There are four display options: “Center”, “Corner”, “Floating”, and “Full Screen”.
The default display when {PC Meeting} starts up is “Center” display mode.
“Center” display
mode
When the video display is set to “Center”, the video image of all participants with
video right is placed in the center of the {Data Operation} window, as shown in
Figure 38. With a right click on the {Data Operation} window, a menu box will pop
up as shown in Figure 39.
In a two-participant meeting, the video display shows the opposite participant’s video.
When the <Picture in Picture> is selected (as default), My Video is inserted in the
lower right-hand corner, as shown in Figure 38.
<Floating>, when selected, will change the display mode to “Floating”. <Show User
Name>, when selected, will display user name in the upper left corner of the
participant’s video image. <Stretch & Keep Ratio> will stretch the video image to
fill the window. The mute functions (<Mute Audio In>, <Mute Audio Out>, <Mute
Video In>, and <Mute Video Out>) are self-explanatory.
Figure 39. Pop up menu box in “Center” display mode
41
VidiNOW User Manual
A double-click on the video image will bring the video display up to “Full Screen”
mode.
If the user closes the {Data Operation} window, the video display will be moved to
the “Corner” position. The {Welcome} window will pop up in the {Data Operation}
window, as shown in Figure 40, with the meeting information in three lines as:
meeting name, meeting starting time of the local computer, and meeting manager
name.
“Corner” display
mode
The “Corner” video display is placed on the upper left corner, as shown in Figure 40.
Figure 40. {PC Meeting} with “Corner” video display and {Welcome} window
A right click on this video window will pop up a menu as in Figure 41. The
<Floating> and <Center> selections allow the switch of video display mode. If this
video window is closed and reopened with <View> <Video> from the Menu Bar, the
video display will still be in the “Corner” mode.
Figure 41. Pop up menu box in “Corner” display mode
A double-click on the video image will bring the video display up to “Full Screen”
mode.
“Floating” display
The “Floating” display is originally placed on the upper left corner like the “Corner”
42
VidiNOW User Manual
mode
display, but with a frame added around the window. The user can drag this video
window to any place on the screen, by grabbing the window. This video window can
be scaled by dragging the edge of the frame. A “Floating” video window is
demonstrated in Figure 42. When this video window is closed, the video image will
be placed back to “Corner” display mode.
Figure 42. {PC Meeting} with “Floating” video display and {Welcome} window
A right click on this video window will pop up a menu box as in Figure 43. The
<Center> selection will switch the video display to “Center” mode. If <Show
Caption> is unchecked, the window frame will disappear. The <Always on Top>
sets this video window always above other windows on the screen.
Figure 43. Pop up menu box in “Floating” video display
A double-click on the video image will bring the video display up to “Full Screen”
mode.
“Full Screen” display
mode
A double-click on the “Full Screen” video image will change it back to previous
display mode.
43
VidiNOW User Manual
7.1.2
Participants Window
There are seven columns used to describe the meeting rights of each participant.
Items on List
Description
An up/down raising hand indicates the user’s request to
“Become Host”.
An up/down raising hand with a mike indicates the user’s
“Request to Speak”.
See Section 7.2 for detailed description.
This user is meeting manager.
User ID
The user’s User ID.
The user is recording the meeting.
Podium Mike
This user is allowed to speak into the meeting anytime at
will. The podium mike is typically assigned to lecturers,
invited speakers, and panelists by the moderator. By
default, moderator and host will own a podium mike.
Audience Mike
This user is allowed to speak into the meeting because of a
grant from the moderator. There is only one audience mike
in the meeting. Normal participants (audience) should
“Req to Speak” to get the moderator’s attention for granting
the audience mike.
Center of the microphone is the audio input volume bar. A
row of green dots will flash across the volume bar when
this user is speaking. This is also the place to locate the
user whose microphone is picking up noise while no one is
speaking.
See Section 7.2 for the explanation on grant/retract mike in
a meeting.
This user is the current host of data operations (Share
Program, Share Web, Share Media, Presentation, and
Annotation).
This user is presently in the video display.
Table 9. {Participants} window
7.1.3
Audio/Video Mute Control
Click the respective icon at the Status Bar (or using the Mute operations at the pop up
menu as shown in Section 7.1.1) will mute display, camera, speaker, and microphone.
44
VidiNOW User Manual
These devices are part of user’s rights, set up by the meeting creator upon the meeting
creation, or by the meeting manager. The red cross sign, “X”, will appear on the icon
when the corresponding right is disabled.
It is meaningless to “mute” a “Not Available” device, but is allowed. The
corresponding media data stops to generate when a device is “Not Available” or
“Muted”. The icons of mute control are illustrated in Table 10.
Device
Not
Available
Muted
Not Available &
Muted
Speaker
Microphone
Camera
Display
Table 10. Audio/Video Mute Control
7.1.4
A u d i o Vo l u m e A d j u s t m e n t
Microphone Volume
There is a green signal strength bar moving back and forth in the scale to indicate the
instantaneous level of the microphone signal received by the computer.
In the default setting, the user cannot control the microphone volume, because the
Automatic Gain Control (AGC) of the microphone device is enabled. VidiNOW will
automatically adjust the microphone volume to a proper level when the AGC is on for
most computers. User can turn off the AGC in the A u d i o { O p t i o n s } dialog box
(<Tools><Options><Audio> menu) when the AGC cannot produce a suitable signal
level.
The slider on icon is the control for an amplification gain to the microphone signal.
This slider can be dragged by mouse.
The signal bar and control operate independently in their respective ranges of
operation. Position of the control does not indicate the highest position of the signal
bar level.
Refer to Section 7.12 for adjusting microphone audio.
Speaker Volume
There is a signal strength bar moving back and forth in the scale to indicate the
speaker volume sent out by VidiNOW. The slider on icon is a control for an
amplification gain to the speaker output signal. This slider can be dragged by mouse.
The signal bar and control operate independently in their ranges of operation.
Position of the control does not indicate the highest position of the signal level bar.
If you do not hear audio from headset/speaker but the speaker signal is active, check the
headset/speaker connection.
45
VidiNOW User Manual
7.2 Host and Moderator
Host symbol at
{Participants} box:
VidiNOW provides five data operations: “Share Program”, “Share Web”, “Share
Media”, “Presentation”, and “Annotation”. At any time, there is only one host in a
meeting who dictates the data operation session viewed by all other participants. The
host is identified by a pencil symbol in {Participants} window. The message line at
the Status Bar also states who the host is.
The VidiNOW meeting can be with or without the moderator, which is the role taken
by the meeting manager. The default setting when a VidiNOW meeting starts is a
Free Form Meeting. The meeting manager can change the Free Form Meeting to a
Moderated Meeting, where the moderator controls grant/retract of host and mike
rights.
Section 7.2.1 describes how to acquire and release host role in a Free Form Meeting.
Section 7.2.2 describes the protocol used in a Moderated Meeting.
7.2.1
B e c o m e H o s t i n a F re e F o r m M e e t i ng
In a Free Form Meeting, every participant is facilitated with a podium mike on the
{Participants} window. Therefore, those with mike rights can speak into the meeting
at will. If the participant isn’t assigned a mike right from the meeting creator (or
meeting manager), his/her podium mike will not work.
Request to
“Become Host”
The current host will
see
and
Everyone in the meeting has equal opportunity to become the first host, by clicking
on <Become Host> in the Toolbar. VidiNOW server assigns host to the first
requester. Later on, the host role can change hands via the request/grant protocol.
Whoever wishes to host the data session should raise hand by clicking on <Become
Host> in the Toolbar. The current host will receive a flash red icon in the Status Bar,
with a reminding message about who is requesting. Also, The current host will see a
raising hand appearing at the requester’s User ID list in the {Participants} window.
Figure 44 illustrates PeggyLee as the current host and KCarter as the requester.
Figure 44. PeggyLee’s {Participants} window
The current host’s
action: “Assign host”
or “Refuse host
request”.
The current host should right click on the requester’s User ID line to get a pop up
menu for the choice of “Assign host” or “Refuse host request”. See Figure 45 for
the illustration.
46
VidiNOW User Manual
Figure 45. The pop up menu at PeggyLee’s {Participants} window
If the current host answers with “Assign host”, the pencil symbol will move to the
new host. A renewed message at the Status Bar will state who the host is.
If the current host answers with “Refuse host request”, a message box at the lower
right corner of the requester’s screen will pop up, saying “Request of Become HOST
was declined”, as shown in Figure 46.
Figure 46. The refusal message received by the requester.
7.2.2
M o d e r a t e d M e e t i ng
The meeting with
podium and audience
setting
Some meetings (such as seminar, forum, workshop, or classroom) should be
structured with a moderator role to maintain order and keep the flow. Typically, there
will be presentations, lectures, panel discussions, and Q&A with general audience.
The meeting setting should be divided into podium and audience seating. The
podium seating includes moderator, invited speakers, lecturers, and panelists. The
audience seating can be students or general attendees, who mainly absorb information
but may raise their hand in order to ask questions once in a while.
Each podium member is facilitated with a podium mike for them to speak anytime at
will. The audience member shares one audience mike, which is granted by the
moderator for each use in Q&A session. The podium member is also likely to use
data tools to make presentation, which means hosting the data operation session in a
VidiNOW meeting.
Start a Moderated
Meeting
Among all meeting participants, only the meeting manager has the <Moderator>
menu in the Toolbar. Clicking on the <Moderator> menu, the meeting manager
changes the meeting from Free Form Meeting to Moderated Meeting, which is noted
message in every participant’s Status Bar. The meeting
with the
manager is the moderator in a moderated meeting. Repeated clicking on
<Moderator> menu, the meeting manager can toggle the meeting mode between
Moderated Meeting and Free Form Meeting.
In a VidiNOW meeting, the moderator is equipped with special privileges to ensure
the meeting flows smoothly and in order. The moderator’s privileges cover (1)
47
VidiNOW User Manual
assign, grant, or refuse host request (2) assign, grant, or retract the microphone.
Managing request to
host data session
Unlike Free Form Meetings, the host change is solely administered by the moderator,
while the current host (non-moderator) has no right to grant or refuse other people’s
host request.
Whoever wishes to host the data session should raise hand by clicking on <Become
Host> in the Toolbar. Moderator will receive a flash red icon in the Status Bar, with a
reminding message about who is requesting. Also, the moderator will see a raising
hand appearing at the requester’s User ID list in the {Participants} window.
The moderator should right click on the requester’s User ID line to get a pop up menu
for the choice of “Assign host” or “Refuse host request”. See Figure 47 for the
illustration, with PeggyLee as the moderator.
Figure 47. The pop up menu at PeggyLee’s {Participants} window, with a
pending host request from JoeSmith
If the moderator answers with “Assign host”, the pencil symbol will move to the new
host. A renewed message in the Status Bar will state who the host is. If the
moderator answers with “Refuse host request”, a message box at the lower right
corner of the requester’s screen will pop up, saying “Request of Become HOST was
declined” as shown in Figure 46. The moderator can also use “Clear all requests” to
reject all “Become Host” requests. All the requesters will receive the same message
saying “Request of Become HOST was declined” as shown in Figure 46.
Even without a “Become Host” request, the moderator can assign host to any
participant, with a right click on the User ID line to bring out the same pop up menu
as in Figure 47. But, only the “Assign host” option is available, while the “Refuse
host request” option is grayed out.
The moderator can retract the current host assignment. Simply clicking on <Become
Host> in the Toolbar, the moderator will bring the host control back to
himself/herself.
Grant and Retract
microphone
As stated in Table 9, there are two types of microphones: podium mike and audience
mike. The podium mike is typically assigned to lecturers, invited speakers, and
panelists by the moderator. By default, the moderator and the host will each own a
podium mike. There is only one audience mike in the meeting. Normal participants
(audience) should “Req to Speak” to get the moderator’s attention for granting the
48
VidiNOW User Manual
audience mike.
With or without the request, the moderator can assign either mike to other
participants, except the host who will automatically own a podium mike to perform
the host capacity. Typically, the moderator will furnish the podium mikes to
designated people at the beginning of the meeting, and grant the audience mike to
whomever requests to speak while the meeting is in progress.
Those without a mike but wish to speak should raise their hand by clicking on <Req
to Speak> in the Toolbar. The moderator will receive a flashing red icon in the Status
Bar, with a reminding message about who is requesting. The moderator will also see
a raising hand with a mike appearing at the requester’s User ID list in the
{Participants} window.
The moderator should right click on the requester’s User ID line to get a pop up menu
for the choices of “Grant”, “Always enable”, or “Clear all requests”. See Figure 48
for the illustration, with PeggyLee as the moderator.
Figure 48. The pop up menu at PeggyLee’s {Participants} window, with a
pending “Req to Speak” from JoeSmith.
If the moderator answers with “Grant”, the audience mike symbol will appear at the
requester’s User ID line. A renewed message in the Status Bar will state who has the
“Speak” right (audience mike). When there are multiple hands raised up for “Req to
Speak”, the moderator can only grant the audience mike to one and let the others
wait. The moderator can end a participant’s “Speak” right by clicking on “Reset
without grant” on the pop up menu. The audience mike symbol will disappear from
this participant’s User ID line.
If the moderator answers with “Always enable”, the podium mike symbol will appear
at the requester’s User ID line. The moderator can retract the podium mike from a
participant by clicking the “Reset always enable” option in the pop up menu.
The moderator can use “Clear all requests” to reset all “Req to Speak” and
“Become Host” requests. The “Request to Speak” requester will receive a declined
message in the Status Bar, not a message box like Figure 46.
Without “Req to Speak” from participants, the moderator can assign a mike to any
participant, with a right click on the User ID line to bring out the same pop up menu
as in Figure 48.
49
VidiNOW User Manual
7.3 Share Program
{Share Program} is one of the data operations supported in a VidiNOW meeting.
There may be more than one {Share Program} sessions opened in one meeting.
These sessions are differentiated with the index number included in the window tab,
{Share Program – n}, at the title bar of the {Data Operation} window, as shown in
Figure 49.
Host vs Owner
at the
“Share Program”
session
Each {Share Program} session is opened by a participant while serving as host.
Whoever starts the {Share Program} is the owner of that session. The current host
has the control of all data sessions and activates a data operation window for all to
work on. At an active {Share Program} session, the owner can share application
programs or the desktop of his/her computer system with other participants. The
owner can also pass the control of the shared applications to other participants upon
request.
Figure 49. The window tabs of multiple “Share Program” sessions
Start a “Share
Program” session
To start a {Share Program} session, the host should select <Tools><Share
Program> menu, or click on <Share Program> button in the Toolbar. The {Share
Program} window opens and resides in the {Data Operation} window, with a tab of
the namesake. Figure 50 is the owner’s view of {Share Program} window.
Figure 50. The owner’s {Share Program} window
Owner’s
{Share Program}
window
There is a menu column on the right-hand side of owner’s {Share Program} window,
which includes the <Share Applications> menu on the top and the <Options> menu
at the bottom.
50
VidiNOW User Manual
<Share Applications>
Menu
The owner can choose either <Share desktop> or <Share selected applications> in
his/her own computer, by clicking on the respective item in the <Share
Applications> menu. The owner can stop the sharing activity anytime, by clicking
on <Stop sharing>. Section 7.3.1 explains “Share desktop” function. Section 7.3.2
explains “Share selected applications” in detail.
All the selections made on the <Share Applications> menu need to be activated by
clicking the [Apply] button at the bottom of this menu column.
<Options>
Menu
There are five items on the <Options> menu: <View shared contents>, <Color
quality>, <Allow control>, <Auto reply to request control>, and <Auto reply to
forward control>.
Check <View shared contents> enables the display of shared contents at owner’s
{Share Program} window. This feature allows the owner to have the same visuals as
other participants on the {Share Program} window. For the shared application to be
viewed entirely in the {Share Program} window, this application window in the
owner’s computer should not be occulted by other window applications, which
includes {PC Meeting} window. Therefore, only with multiple monitors, can the
owner benefit from the <View shared contents> feature.
The <Color quality> menu has three items on the drop-down list, as shown in Figure
51: “High (32 bit)”, “Medium (16 bit)”, and “Low (256 colors)”. The 32-bit high
setting preserves true color but consumes large network bandwidth, so the response
can be slow. The 8-bit (256 colors) low setting can be used for the application where
color is nonessential for fast response. The default color quality setting is 16-bit
medium. The non-owner participant can further adjust down the color quality for the
transmission from server to his/her own computer, to lower the bandwidth
consumption --- see the description at Table 11.
Figure 51. <Options> menu at the owner’s {Share Program} window
The owner can check <Allow control> to let other participant fully access the shared
application. The control right can be passed around, among all meeting participants.
The owner needs to reply on every control right transfer. The two auto reply check
items, <Auto reply to request control> and <Auto reply to forward control>, free
51
VidiNOW User Manual
the owner from such routine actions. Section 7.3.3 explains how to control shared
program and control right transfer.
All the selections made on the <Options> menu need to be activated by clicking the
[Apply] button at the bottom of this menu column.
Non-owner’s
{Share Program}
window
The non-owner participant’s {Share Program} window doesn’t have the right-hand
column with <Share Applications> and <Options> as in owner’s {Share Program}
window.
When the owner starts <Share desktop> or <Share selected applications>, nonowner participants will receive shared content in the {Share Program} window,
together with four tool icons in the toolbar of the {Share Program} window, as
shown in Figure 52. A list of shared applications from the host is shown at the bottom
of the {Share Program} window, with the active application highlighted.
Figure 52. Non-owner’s {Share Program} window, with a PDF file as the active
shared content
The function of tool icons is explained in Table 11.
Items on List
,
,
,
Description
This icon is used to request/release the control of a {Share
Program} session. See 7.3.3 for detail description.
: This function is not available. The owner doesn’t
allow control.
: Request control
: Cancel request control
: Release control
52
VidiNOW User Manual
,
This icon is used to forward the control to other non-owner
participants. See 7.3.3 for detail description.
: This function is not available. It could be either the
owner doesn’t allow control, or no other non-owner
participant to pass the control as in a two-person meeting.
: Forward the control to …
A drop-down list from this icon shows the selection of color
quality to be used in the transmission with the server. The
selection is a downgrade from the owner’s setting on color
quality. This selection allows the participant to reduce
bandwidth consumption.
The default is set to owner’s color quality setting (high,
medium, or low).
A drop-down list from this zoom icon shows the selection
of: Auto fit, 25%, 50%, 100%, 200%, and 400%. It’s used
to zoom the shared content inside the {Share Program}
window.
The default is set to Auto fit.
Table 11. Tool icons at non-owner’s {Share Program} window
In a “Share Program” session, participants can bring {Share Program} window into full
screen for the best display effect, by clicking on
7.3.1
in the right corner of the title bar.
Share Desktop
The typical purpose of “Share desktop” is for other participant to access the owner’s
computer system, possibly for remote technical help.
Check
<Share desktop>
To enable this function, the owner should click on <Share desktop> item on the
<Share applications> menu. To allow control from others in the meeting, click on
respective items of the <Options> menu --- see Subsection 7.3.3 for detail on allow
control.
To stop “Share desktop”, the owner should first get the control back (if the control
right is out) with a click on any place of the screen, and then click on <Stop sharing>
item of the <Share Applications> menu.
Click [Apply]
7.3.2
The selection on {Share Program} menu should always be activated by clicking on
the [Apply] button.
Share Selected Applications
53
VidiNOW User Manual
Check <Share selected
applications>
Select the application
programs to share
To start sharing selected applications, the owner should click on <Share selected
applications> item of the <Share applications> menu, as shown in Figure 53. All
running programs are listed in the “Application list”. If the program to be shared is
not already on the list, the owner should launch it to be added into “Application list”.
button to move it to “Shared
Select the programs to be shared, and click the
applications” in the right column. The
button will move everything from
“Application list” to “Shared applications”. The
and
buttons work in the
opposite direction.
To allow control from others in the meeting, click on respective items of the
<Options> menu --- see Subsection 7.3.3 for detail on allow control.
To stop “Share selected applications”, the owner should first get the control back (if
the control right is out) simply with a left click, and then click on the <Stop sharing>
item of the <Share Applications> menu.
Click [Apply]
The selection on the {Share Program} menu should always be activated by clicking
on the [Apply] button.
Figure 53. Select applications to be shared in the <Share selected applications>
54
VidiNOW User Manual
Bring the shared
program to active
display
For the shared program to be viewed by others, it must be in the owner’s foreground
window, i.e. the window has to be visible.
If there are multiple programs shared in the {Share Program} session and the owner
allows control, the non-owner participant with the control right can switch shared
programs with a click on the program list as shown in Figure 52. It will bring the
selected program (highlighted) to the foreground in the {Share Program} window.
Once Windows Explorer, My Computer, Control Panel, or any folder is shared, all subfolders and programs underneath will be shared too. Therefore, the whole computer
system is exposed.
7.3.3
Control the Shared Program
Owner allows control
The owner of a {Shared Program} session can allow other participants to control the
shared program, by checking the <Allow control> item of the <Options> menu --See Figure 53.
Non-owner
participant:
There are two control-right related icons (request/release control and forward control)
in the toolbar of the non-owner participant’s {Share Program} window --- see Table
11 for the description of icons. If the owner of {Share Program} session doesn’t
allow control, these two icons will be in gray color to indicate unavailability. When
the owner allows control, the “Request control” icon will be alive in non-owner
participant’s {Share Program} window.
Control function
unavailable
Request control
As an example, set the meeting with three participants as Peggy Lee, Kelly Carter,
and David Brown.
Peggy Lee (PeggyLee): meeting manager/host/owner of the {Share Program}
session
Kelly Carter (KCarter): participant
David Brown (DBrown): participant
The non-owner participant, KCarter, wishes to control the program, so she clicks on
the “Request control” icon. The owner, PeggyLee, will receive a message box, as
shown in Figure 54.
Figure 54. Request control message, waiting for PeggyLee’s reply
Release control
When PeggyLee grants the request by clicking on [Yes], KCarter’s “Request
control” icon will change to “Release control”. KCarter has the control right and
can start to access the shared program. The owner, PeggyLee, will see the right-hand
menu column of the {Share Program} window disappear.
55
VidiNOW User Manual
KCarter can release the control back to PeggyLee by clicking on the “Release
control” icon, which will change to “Request control”. PeggyLee will see the menu
column appears again in the {Share Program} window.
If PeggyLee replies with [No] to the request control, then KCarter will be notified
with a message box as shown in Figure 55. However, KCarter’s “Request control”
icon is still available for placing request anytime.
Figure 55. Reject “Request control” message, sent to KCarter
Cancel request control
When KCarter clicks on “Request control”, the icon will change to “Cancel request
control” until PeggyLee replies the request. If KCarter clicks on “Cancel request
control” before PeggyLee replies, PeggyLee will be notified with a cancel request
message as shown in Figure 56. KCarter will get her “Request control” icon back.
Figure 56. PeggyLee receives notification of cancelling request control
Non-owner
participant:
When there are three or more participants in a meeting, the control right can be passed
around among non-owner participants, with the consent from the owner on each
change request.
Forward control
function unavailable
The “Forward control to…” icon will come alive in non-owner participant’s {Share
Program} window, when there are at least three people in the meeting and the owner
allows control.
Forward control to …
Assume KCarter has the control right of {Share Program} and would like to pass the
control to DBrown. KCarter will click on “Forward control to ..” icon to get the
drop-down list of the non-host participants, as shown in Figure 57.
Figure 57. The drop-down list of non-owner participants for “Forward control”
56
VidiNOW User Manual
When KCarter chooses DBrown to forward control, a message box as in Figure 58
will appear in the owner, PeggyLee’s screen for her to consent or reject. When the
owner clicks on [Yes], DBrown will receive a message box as in Figure 59. If
DBrown clicks [Yes] to accept, then the control transfer is completed.
If [No] is clicked by the owner or the recipient, the “Forward control” action is
aborted.
Figure 58. The message box for owner to consent or reject “Forward control”
Figure 59. The message box for recipient to accept or reject “Forward control”
Owner can regain
control anytime
The owner of the shared program can regain the control right at anytime by clicking
any place on the screen.
Owner can set up
Auto reply to grant
requests automatically
The owner can set up the auto reply to “Request control” and/or “Forward control”
to grant requests automatically, just checking the item (<Auto reply to request
control> and/or <Auto reply to forward control>) of the <Options> menu as in
Figure 53.
7.4 Share Web
Browse the same URL
page
{Share Web} is one of the data operations supported in a VidiNOW meeting. The
{Share Web} window is opened by a participant while serving as host. There is only
one {Share Web} window allowed in one meeting. Host’s role in {Share Web}
session is to navigate the web, so all participants will browse the same URL page.
When host changes hands, the new host will pick up the navigation task from
wherever the previous host left.
57
VidiNOW User Manual
Start a {Share Web}
session
To start a {Share Web} session, the host should select <Tools><Share Web> menu,
or click on the <Share Web> button in the Toolbar. The {Share Web} window opens
and resides in the {Data Operation} window, with a tab of the namesake. Figure 60
shows the {Share Web} window, with URL address as “http://www.google.com /”.
Besides the URL address entry, the host also has the four navigation icons as in IE
browser:
back,
forward,
stop, and
refresh.
Figure 60. {Share Web} window
Non-host may stray
away
Content change may
not correspond to
URL change,
vice versa.
The URL address in every participant’s {Share Web} window will follow the host’s
URL address change. Although non-host participants cannot enter URL, they can
click on the links inside the page to stray away from the host control. A new URL
change or a refresh from the host will bring the wanderers back to the same page.
There are some situations that the host’s URL navigation cannot bring synchronized
display on every computer. The web page containing auto-login information from
cookie will display personalized contents on specific computer. Some plug-in in web
page design is not reflected in URL, therefore the host cannot convey the content
change through URL change.
7.5 Share Media
Play the same media
as the host
“Share Media” is one of the data operations supported in a VidiNOW meeting. The
{Share Media} window is opened by a participant while serving as host. There is
only one {Share Media} window in one meeting. The host’s role in a {Share Media}
session is to select the media file and control the play. All participants will play the
same media with the playing control from the host.
When host changes hands, the new host will take over the player control. The last
media file played in this {Share Media} session still exists for the new host to control
playing. The new host can select other media file to share in the meeting.
Start a {Share Media}
To start a {Share Media} session, the host should select <Tools><Share Media>
58
VidiNOW User Manual
session
menu, or click on the <Share Media> button in the Toolbar. The {Share Media}
window opens and resides in the {Data Operation} window, with a tab of the
namesake. Figure 61 shows the {Share Media} window with the {Open media
URL} dialog box, which is opened by clicking on “Open media file or URL” icon,
.
Once the host opens a {Share Media} session, all participants have the same three
icons in the {Share Media} toolbar. But, only the host has the access to “Open
media file or URL” icon
control” icon
progress bar”
, while others have a grayed icon
will come alive
. The “Mute
, when the media player starts. The “Playing
will move along when the media is playing.
Figure 61. The host’s {Share Media} window, with the {Open media URL}
dialog box
The host’s action:
Open media file or
URL
One of the host’s tasks in a {Share Media} session is to select the media file to play.
The host can choose from several options: (1) repeat the media file last played in this
meeting, by current or previous host. (2) browse his/her own computer to locate the
media file. (3) enter a legal and valid URL of the media file (4) select from the pulldown menu on {Open media URL} dialog box --- see Figure 62.
To repeat the last played media file, simply click on the play button
Media Player at the bottom of the {Share Media} window.
of the
The host can click on the [Browse] button in the {Open media URL} dialog box to
open the media file in his/her own computer system. This selected file will be
uploaded into the VidiNOW server with a designated URL. A progressing bar will
appear in the window during the uploading. When it’s done, the host can click on the
play button, the Media Player of each participant’s computer will start to play from
this URL at server.
59
VidiNOW User Manual
If the media file resides in Web with a valid URL, the host can enter this URL directly
in the dialog box. When the host clicks on the play button, the Media Player of each
participant’s computer will access the media directly from the Internet and start to
play.
All the media files uploaded to the VidiNOW server by the host are listed sequentially
in the URL pull-down menu, with the most recently used on top. The URL for files
used in previous meetings may still be listed, but these media files had been deleted
when the previous meetings were closed. The URL can be recognized from the
Meeting ID number, as shown in Figure 62. Only the URLs of the current meeting
are valid and can be used to play repeatedly. Since the list of the pull-down menu is
previously uploaded files or self-entered URLs, each participant has his/her own
individual list which was accumulated while serving as host.
Figure 62. The host’s {Share Media} window, with a pull-down menu from the
{Open media URL} dialog box and Media Player controls.
The host controls
media playing
Only the host has the media player control right. The non-host participant’s {Share
Media} window doesn’t have the media player at the bottom as shown in Figure 62.
The function of the host’s media player is explained in Table 12. In summary, the
host can control the following functions that apply to all participants: start playing,
pause, stop, fast forward, rewind, and mute. But, non-host can also turn on/off the
mute control locally. The host’s volume control only applies to his/her own computer.
Items on List
,
Description
: The “Play” button appears when the media is not
playing.
: The “Pause” button appears when the media is
playing.
60
VidiNOW User Manual
,
,
The “Stop” button
: The button is grayed when the media is not
playing.
: The button is alive when the media is playing or
paused.
: The button is highlighted when it’s pointed by
the cursor.
The “Fast Forward” button is on the far right of the
progress bar.
The “Rewind” button is on the far left of the progress bar.
The function of these symbols is not implemented, although
the tool tip shows “next” and “previous”.
,
The “Mute” control for speaker.
This mute control is linked to the other mute control,
/ , in the {Share Media} toolbar. Click on either one
will mute/un-mute both symbols.
The host’s mute action applies to all participants, i.e. the
to
(or vice versa) will show on non-host
change of
participant’s {Share Media} window. But, non-host can
also maneuver his/her own mute control independently.
The host’s local “Volume control”.
This volume control only applies to the host’s computer.
Table 12. Host’s media player controls in {Share Media} window
Mute control:
in the {Share
Media} toolbar
The media playing in the {Share Media} session adds a separate media audio on top
of the mike audio from all other participants in the meeting. Media audio and mike
audio have separate mute controls.
in the {Share Media} toolbar mutes media audio.
versus
in the {PC Meeting} Status Bar (Table 8) mutes mike audio.
in the {PC
Meeting} Status Bar
Volume control:
The host has a separate volume control for media audio. And it applies only to the
host’s computer.
Media volume
(host only)
All participants (host and non-host) can adjust their speaker volume in the Status Bar
--- see Subsection 7.1.4. The adjustment will affect both media audio and participant
audio.
versus
Speaker volume
(all participants)
61
VidiNOW User Manual
7.6 Presentation
A PowerPoint Slide
Show
{Presentation} is one of the data operations supported in a VidiNOW meeting. In the
{Presentation} session, the host can run a PowerPoint slide show to all participants in
a fast synchronized fashion. Although the host can run the PowerPoint application in
a {Share Program} session, the slide shows at other participants’ computers cannot
be as smooth as what’s shown at the host’s computer.
The {Presentation} window is opened by a participant while serving as host. The
host should choose the PowerPoint file (ppt or pps) to be uploaded into the VidiNOW
server. This file is then downloaded to each participant’s computer in the folder
“…\My Documents\VidiNOW3\SharePpt”.
When the host conducts the slide show, the change of slides will be followed instantly
by all participants’ computers. A participant can click away from the current slide,
but the next slide change from the host will bring all participants to the same page.
There is only one {Presentation} session in a VidiNOW meeting. If the role of host
changes hands, the new host cannot open a new {Presentation} session before
closing the existed one. However, the new host can resume the task of conducting
slide show in the existed session.
Start the
{Presentation} session
To start the {Presentation} session, the host should select <Tools><Presentation>
menu, or click on the <Presentation> button in the Toolbar. The {Presentation}
window opens and resides in the {Data Operation} window, with a tab of the
namesake. Figure 63 shows the {Presentation} window at host’s {VidiNOW PC
Meeting} window.
Figure 63. The {Presentation} window
The {Presentation}
window
Major components of the {Presentation} window are shown in Table 13.
Main components
Description
62
VidiNOW User Manual
Title Bar
The tab of the {Presentation} window is shown in the Title
Bar.
Toolbar
There are seven icons in the Toolbar for the host to open a
file and control slide show play. Non-host participants
don’t have the access to these icons.
The descriptions of all Toolbar icons are listed in Table 14.
Slide Display
The display area of the current slide
“Outline/Slides” Panel The left panel that lists all the slides or outlines.
PowerPoint icons in
the bottom
These PowerPoint functions (“Normal View”, “Slide Sorter
View”, and “Slide Show from current slide”) are under
individual participant’s control. For a coherent view of the
host’s presentation, all other participants should refrain
from accessing these icons during the {Presentation}
session.
“Click to add notes”
Adding notes to the slide is meaningless in the
{Presentation} session, since the file cannot be saved. All
participants should ignore this function.
PowerPoint pop-up
menu
Although the pop-up menu is under individual participant’s
control, all participants should refrain from accessing popup menu during the {Presentation} session.
Table 13. Main Components of the {Presentation} window
The {Presentation}
Toolbar
Table 14 describes the seven icons in the host’s {Presentation} Toolbar.
File items
Description
Open a PowerPoint file: The host can open a ppt or pps
file in his/her own computer. After a file is selected, a
progress bar indicates the file is being uploaded to the
VidiNOW server.
Start Play: The host starts the slide show with a click on
this icon. Once the slide show is started, the five icons that
control the slide show play will become alive.
First Slide: Go to the first slide.
Previous Slide: Go to the previous slide.
Next Slide: Go to the next slide.
Last Slide: Go to the last slide.
End Play: End the slide show.
Table 14. {Presentation} Toolbar
Play a media-packed
pps file
A pps file is a slide show presentation, which is likely packaged with audio and/or
animation. A media-packed pps file should be played in its entirety without
pause/resume.
63
VidiNOW User Manual
The audio playing in the slide show adds a separate media audio on top of the mike
audio from all other participants in the meeting. The mute and volume control of the
mike audio, (
and
), cannot apply to the media audio.
7.7 Annotation
Markup tools for
interactive Discussion
{Annotation} is one of the data operations supported in a VidiNOW meeting. In an
{Annotation} session, the host dictates which page to open for discussion. All
participants have equal right using markup tools to express opinions.
The {Annotation} window is opened by a participant while serving as host, who can
open multiple {Annotation} windows in one meeting. Therefore, there may be more
than one {Annotation} sessions opened by one or more participants. These sessions
are differentiated with the index number included in the window tab, {Annotation –
n}, in the title bar of the {Data Operation} window. Normally, one {Annotation}
session can accomplish the meeting goal of interactive discussion. The multiple
{Annotation} sessions may help the meeting manager and/or participants to organize
a discussion topic with a specific {Annotation} window.
The current host has the control of all data sessions and activates an {Annotation}
window for all to work on.
Start an {Annotation}
session
To start an {Annotation} session, the host should select <Tools><Annotation>
menu, or click on <Annotation> button in the toolbar. The {Annotation} window
opens and resides in the {Data Operation} window, with a tab of the namesake.
Figure 64 shows an active {Annotation} window at the host’s {VidiNOW PC
Meeting} window.
Figure 64. The Host’s {Annotation} window, with Page 3 opened
Major components of
the {Annotation}
Major components of the { A n n o t a t i o n } window are shown in Table 15.
64
VidiNOW User Manual
window
Main components
Description
Title Bar
The tab of the active {Annotation} window is shown in the
Title Bar.
Toolbar
The icons in the Toolbar are divided into three major
functions: File, View, and Edit. The host has access to all
functions. Non-hosts can use editing tools and save the
markup page.
Refer to Section 7.7.1 for File Functions, Section 7.7.2 for
View Functions, and Section 7.7.3 for Editing Tools.
Markup Tools
These tools can be used to create markup objects on the
current page to express opinions, make suggestions, and
therefore record the discussion.
The selection of markup tools is also available in the pop up
menu as shown in Figure 65.
Table 19 describes each tool in detail.
More markup icons can be made for particular professional
fields. See Section 7.7.6 for the related option setting.
Working Area
Work space for the current page in discussion
Thumb View
The thumbnail panel that lists all the pages in discussion
Navigator View
This panel shows the working area portion in the whole
page. The host can drag the highlighted working area to a
new location, which is a synchronized action to all
participants.
Table 15. Main Components of an {Annotation} window
7.7.1
File Functions
Table 16 describes the seven file functions.
File items
Description
Save: All participants can save the annotation work to local
computer, in various file types.
(*.ant): The ANT file used specifically for {Annotation} is
the default type to save the entire session, including all the
pages. All markup objects are kept in this format.
(*.pdf): All the pages in one session can be saved into a
PDF file. All markup objects are converted into bitmap
objects and merged with the background image.
(*.png, *.jpg, *.jpeg, *.bmp, *.gif, *.tiff): Only the current
65
VidiNOW User Manual
page can be saved into image file.
Add New Page: The host can add a new page after the last
page of the current {Annotation} session.
Delete Page: The host can delete the current page in
working area.
This function is also duplicated in the pop up menu, as
shown in Figure 65.
Import Page: The host can import pages from an existing
file. Refer to Section 7.7.5 for file type and conversion.
Capture Desktop: The host can capture the whole desktop
as an image to add into the working area.
Capture Window: The host can capture the selected
window as an image to add into the working area.
Capture Region: The host can capture the selected region
of the display as an image to add into the working area.
Table 16. {Annotation} - File Functions
7.7.2
View Functions
Table 17 describes the view functions.
View items
Description
Zoom In/Zoom Out: Enlarge/Shrink the image of the
current page in working area.
Preset zoom scale: Enlarge or shrink the image in a preset
zoom scale.
Table 17. {Annotation} – View Functions
7.7.3
Editing Tools
Table 18 describes the functions of editing tools.
Editing Tools
Description
Copy: Copy the selected objects for later paste.
This function is also duplicated in the pop up menu, as
66
VidiNOW User Manual
shown in Figure 65.
Paste: Paste the copied objects to the upper left corner of
the working area.
This function is also duplicated in the pop up menu, as
shown in Figure 65.
Undo: Undo the last operation.
Redo: Redo the last operation.
Move to Another Page: Clicking the button can change
the current page to First Page, Previous Page, Next Page, or
Last Page.
These functions are also duplicated in the pop up menu, as
shown in Figure 65.
Double-clicking a thumbnail in the thumbnail panel can
swap in that particular page.
Table 18. {Annotation} – Editing Tools
7.7.4
Markup Tools
Table 19 describes each markup tool in detail.
Markup Tool
Description
Select: Click on an object to select for subsequent
operation, such as copy, paste, move, and delete. To
select multiple objects, hold the [Shift] key and click
on those objects.
To copy/paste selected objects, refer to the copy/paste
tools in Table 18. To move selected objects, drag the
whole group to the new location. To delete the selected
objects, refer to the pop up menu in Figure 65.
When an object is selected by a participant, other
people cannot access this object until it’s de-selected.
Delete: Click on an object to delete it.
To delete all objects, right click on the current page for
the pop up menu and select < D e l e t e A l l
O b j e c t s >.
To partially delete text in a text field, use the Text tool,
. Click on the text to position the cursor, and press
the [ D e l e t e ] or [ B a c k S p a c e ] key to perform the
deletion.
67
VidiNOW User Manual
To remove a pointer, see the pointer icon explanation.
Arrow: Click this tool to add an arrow into the current
page. Drag the cursor across the intended location to
place the arrow. The user can select the width, style,
and color with adjustable tints.
Line: Click this tool to add a line into the current page.
Drag the cursor across the intended location to place
the line. The user can select the width, style, and color
with adjustable tints.
Rectangle: Click this tool to add a rectangle into the
current page. Drag the cursor across the intended
location to place the rectangle. The user can select
width and color for the outline.
Ellipse: Click this tool to add an ellipse into the
current page. Drag the cursor across the intended
location to place the ellipse. The user can select width
and color for the outline.
Filled Rectangle: Click this tool to add a filledrectangle into the current page. Drag the cursor across
the intended location to place the rectangle. The user
can select width/color for the outline, and a separate
color for the interior. The adjustable scale for color
tints applies to both outline and interior together.
Filled Ellipse: Click this tool to add a filled-ellipse
into the current page. Drag the cursor across the
intended location to place the ellipse. The user can
select width/color for the outline, and a separate color
for the interior. The adjustable scale for color tints
applies to both outline and interior together.
Text: Click this tool to add a text box into the current
page. Click on the current page to position the starting
point of the text box, then use the keyboard to insert or
delete text. The user can select color/size/font for the
characters, and also background color behind the text.
Pencil: Click this tool to do free-hand drawing. The
user can set width and color with adjustable tints.
Highlight: Click this tool to highlight an area on the
current page. The default color is yellow. Users can
set color with adjustable tints.
Preset Symbols: Click this tool to select a preset
symbol and place on the current page. Drag the cursor
across the intended location to place the selected
symbol.
,
Cross/Check Symbol: Click this tool to add the
selected symbol to the current page. Drag the cursor
across the intended location to place the selected
symbol.
68
VidiNOW User Manual
Pointer: The pointer is different from other markup
tools because it doesn’t create an object on the current
page. It is only used to direct participants’ attention.
There are four pointers for use in one {Annotation}
session. To avoid confusion, there should be an
agreement among all participants on who owns what
pointer.
Click on one pointer symbol, the selected pointer will
appear in the center of the working area. A participant
can move the pointer by dragging it with the cursor of
any markup tool (including scissors). To remove a
pointer from the working area, click on that pointer
symbol on pull-down menu again.
Pointers placed on the current page are not included in
the saved file when the page is swapped out or saved.
They stay at the same locations on working area when a
new page is swapped in.
Table 19. {Annotation} - Markup Tools
Pop up menu has
extra editing tools:
Besides the editing tools in the toolbar, the pop up menu from a right click on the
working area provides extra editing tools. Figure 65 shows the pop up menu for a
host, which includes page swapping function at the top and the <Delete Page>
function at the bottom. The non-host has the same pop up menu, except those page
functions.
The <Copy>, <Paste>, and <Markup Tools> are the same function as the equivalent
icons in the toolbar. Clicking on these items has the same effect as clicking on the
equivalent icons.
<Copy Page Region>
<Copy Page Region>: Drag the cursor through diagonal corners to define the region
and copy. Then, use the <Paste> tool to paste it to the upper left corner of working
area.
<Delete Object>
<Delete Object>: Delete the selected objects.
<Delete All Objects>
<Delete All Objects>: Delete all the objects in the current page.
<Bring to Top>
<Bring to Top>: Bring the selected object to the foreground.
<Bring to Bottom>
<Bring to Bottom>: Bring the selected object to the background.
69
VidiNOW User Manual
Figure 65. The Host’s pop up menu in the {Annotation} window
7.7.5
Importing Pages
The host can import pages from many file types: (1) an ANT file saved from previous
{Annotation} session (2) an image file (3) a PDF file or a Microsoft Office document
which will go through an auto conversion by Audividi virtual printer.
Audividi virtual
printer converts a file
to ANT file or image
file.
For other file types from application programs, users can convert the file to either
ANT file or image file by Audividi virtual printer. In the application program, choose
<Print> on the <File> menu, and select <Audividi Print to File> printer on the
printer window, and click [ P r i n t ] to prompt {Audividi VP Output} dialog box, as
shown in Figure 66. Choose related option and click [ St a r t ] to print.
70
VidiNOW User Manual
Figure 66. {Audividi VP Output} dialog box
Import Page
To start importing pages, the host should click the import page icon in the tool bar,
and then select a file from the {Open} dialog box. The imported pages will be added
after the last page of the current session.
ANT file
An ANT file is the saved file from previous {Annotation} session, which contains all
pages in the session. If chosen, the PC Meeting will start uploading this file to server.
All participants can continue the work seamlessly from the previous {Annotation}
session.
Image file
The host can import an image file as a new page. The {Image Import} dialog box,
as in
Figure 67, allows the margin setting on left and top.
PDF file or
MS Office file
If a PDF file or a MS Office file is selected to import, a print process will start to
convert the file into an ANT file, which is then uploaded to server. The file may
generate multiple pages as a normal printing process does.
71
VidiNOW User Manual
Figure 67. {Image Import} dialog box
7.7.6
Annotation Options
There are default settings for memory buffer size of page, object, text, and font. The
default settings are selected to cover a wide range of annotation applications on most
computer systems. In rare cases, users may want to change the settings. VidiNOW
allows user-defined symbols for objects, which are stored in a known folder. The
{Options} dialog box in Figure 68 lists buffer size settings and path to the folder of
symbols.
Open {Options}
To open the Annotation Options, click on the [Options] button in the toolbar or
choose <Tools><Options> from the menu bar, then select <Annotation> from the
left column of the {Options} dialog box. To activate the new changes, click [Apply]
or [OK]. The [OK] button will also close the dialog box.
Memory buffer
settings for page,
object, text, and font
<Maximal number of pages (50-256)>: This option defines the maximal number of
pages per annotation session. The selection ranges from 50 to 256, with 128 as the
default.
<Maximal number of objects (128-1000)>: This option defines the maximal
number of objects per annotation session. The selection ranges from 128 to 1000,
with 256 as the default.
<Width of a new page (640-4000)>: This option defines the width of a new page in
pixels. The selection ranges from 640 to 4000 with 1024 as the default.
<Height of a new page (480-3000)>: This option defines the height of a new page in
72
VidiNOW User Manual
pixels. The selection ranges from 480 to 3000 with 768 as the default.
<Maximal width of bitmap object (640-1920)>: This option defines the maximal
width of an image object in pixels. The selection ranges from 640 to 1920, with 1024
as the default.
<Maximal height of bitmap object (480-1440)>: This option defines the maximal
height of an image object in pixels. The selection ranges from 480 to 1440, with 768
as the default.
<Folder of symbols>: This option allows the user to specify the path to load
symbols for use as objects. The default path is
“%System Disk\Program Files\Audividi Inc\VidiNOW3\seal”.
User-defined symbols
for markup objects
Figure 68. Annotation options
7.8 Document Center
A secured place to
hold electronic files
for meeting discussion
In many meetings, participants refer to the same set of information as the baseline to
start the discussion. The Document Center provides a secured place to hold such
information in electronic files, for convenient access by the participants.
The {Document Center} window is located in the left pane sharing the same space
with the {Chat} window, when both windows are opened. Clicking on the {Doc
Cen…} window tab will activate the {Document Center} window, as shown in
73
VidiNOW User Manual
Figure 69. There are four functional icons in the toolbar. All the files posted by
participants for sharing are listed in the window area. The status bar in the bottom
displays the message and a cancel button when download is in progress.
Figure 69. The {Document Center} window, with a download in progress
7.8.1
Toolbar
Table 20 explains the four functional icons in the toolbar.
Tool bar items
Description
Share File: Click on this icon, the user can post a file in
the Document Center to share with others.
The selected file will appear in the {Doc Cen…} window as
shown in Figure 69.
Download: Click the selected file, and then click this icon
to start downloading.
Refer to Section 7.8.2 for detailed functional description.
Remove: The owner of the file can remove it from the
Document Center. Click the selected file, and then click on
this icon.
View: View the file items in “Icons” or “List”. Click on
this icon will toggle between these two display modes.
Table 20. Toolbar icons in the {Document Center} window
7.8.2
File Download
74
VidiNOW User Manual
Select the file for
download
A participant who wishes to access a file posted by other participant, should select the
file and click on the download icon.
Before download starts, the file tip shows no file path on the participant’s local
computer, as shown in Figure 70.
Figure 70. File tip on a file posted by other user (KCarter), before download
Download in progress
Once download begins, the file path points to the received folder at the participant’s
computer, as shown in Figure 71. The participant can check the progress from the
moving message in the status bar, or click on the right corner icon for the status at the
instant, as shown in Figure 69. The cancel button [x] in the status bar can cancel the
download instantly.
Figure 71. File tip on a file posted by other user (KCarter), after download
process starts
Option to set receive
directory
Open {Options}
The file path shown in Figure 71 is a typical default setting. The user can change the
received folder using <Options> setting, as shown in Figure 72
To open the Document Center Options, click on the [Options] button in the toolbar or
choose <Tools><Options> from the menu bar, then select <Doc Center> from the
left column of the {Options} dialog box. To activate the new changes, click [Apply]
or [OK]. The [OK] button will also close the dialog box.
Figure 72. Document Center Options
Beware of
download in progress
When the download is in progress, the file owner will see a yellow triangle mark of
“!” added to the file icon. If the file owner removes the file at this time, the download
will be aborted.
75
VidiNOW User Manual
Figure 73. The file owner is notified by the “!” mark of download in progress
7.9 Text Chat
Supplement audio
communication
Text chat can supplement audio communication in a meeting. The {Chat} window is
located in the left pane sharing the same space with the {Document Center } window,
when both windows are opened. Clicking on the {Chat} window tab will activate the
{Chat} window, as shown in Figure 74.
Send text
Select the User ID from the < S e n d t o > pull-down list to send the message to, or
select “All” to send to all participants.
Enter text in the lower part of the {chat} window to draft the outgoing message.
Press [ E n t e r ] key or click the [Enter] icon to send the message.
: [Enter] icon
Figure 74. {Chat} window
Set Font for
text display
Clicking on the “Set Font” icon, the {Font} dialog box will pop up. The newly set
font will affect next entered message, but not the drafted text in the lower part of
{Chat}.
Show Chat History
Clicking on “Show chat history” icon will bring out the past chat history in VidiNOW
meetings from the “Chat Message Save Directory”, which is set in {Options} as
shown in Figure 75.
76
VidiNOW User Manual
The chat history is stored in XML file in the Chat folder as: “UserID.xml”, which
includes date, time, from, to, and message contents.
Option to set message
save directory
Open {Options}
The chat messages are saved in the default directory as:
“My Documents\VidiNOW3\Chat”. The user can set the save directory in the Chat
Options.
To open the Chat Options, click on the [Options] button in the toolbar or choose
<Tools><Options> from the menu bar, then select <Chat> from the left column of
the {Options} dialog box. To activate the new changes, click [Apply] or [OK]. The
[OK] button will also close the dialog box.
Figure 75. Chat Options
7.10 Recording Meeting
VidiNOW provides the recording feature, which should be turned on by the System
Administrator, or SysManager. The meeting manager can also set the individual
recording rights for each participant.
The user with recording rights can record the meeting into an AVI file, with three
options: (1) video only (2) full screen, possibly including other applications (3)
defined region within the {VidiNOW PC Meeting} window.
Open {Record option}
To start recording, click on <Tools> <Recording> from the menu bar to open the
{Record option} dialog box, as shown in Figure 76.
The user can use the [Browse] button to set the AVI file name. The default AVI file
name is set as following:
\My Documents\VidiNOW3\Record Folder\MeetingName.avi
77
VidiNOW User Manual
Figure 76. {Record option} dialog box
If the recording type is set to “Video”, only the video window will be recorded. If the
recording type is “Full screen”, everything in the user’s computer screen will be
recorded.
Record a defined
region
If the recording type is “Region”, the user needs to define the starting coordinate in
the upper left corner and the width/height of the region. When the radio button of
“Region” is clicked, the “Region” selection menu will come alive.
Set the starting (X,Y)
for upper left corner.
Clicking on the [Region] button will bring out the red cross lines intersected in the
center of the [Region] button. Move the cursor to the desired location of upper left
corner as the starting (X,Y) coordinate. The intersection of crossed red lines will be
dragged along, as shown in Figure 77. After clicking on the desired coordinate, the
“Start X” and “Start Y” numbers will be set automatically, and the red lines will
disappear.
Figure 77. Set the starting (X,Y) coordinate of the recorded region
Set width/height of the
region.
Once the starting (X,Y) is set, the red lines is replaced by a blue rectangle while the
cursor is moving downward towards lower-right corner. When the user clicks again,
the region is set by the blue rectangle, as shown in Figure 78.
78
VidiNOW User Manual
Figure 78. Set the width/height of the recorded region
Start recording
When the user clicks on the [OK] button in the {Record option} dialog box, a
{Record} control box pops up, as shown in the left column. Press the red dot to start
recording. Press pause in the middle to temporarily hold the recording. Press stop in
the right to end the recording.
When the recording is in progress, a camcorder icon will appear in the participant’s
list, as shown in Figure 79.
Figure 79. Recording in progress, shown in the {Participant} window
7.11 Video Options
Open {Options}
To open the Video Options, click on the [Options] button in the toolbar or choose
<Tools><Options> from the menu bar, then select <Video> from the left column of
the {Options} dialog box. To activate the new changes, click [Apply] or [OK]. The
[OK] button will also close the dialog box. The dialog box is illustrated in Figure 80.
79
VidiNOW User Manual
Figure 80. Video Options
Camera device
selection
The “Device” pull-down menu is to select the video capture device (camera) to be
used by the PC Meeting. VidiNOW PC Meeting supports built-in camera, USB
camera, and plug-in video capture card. Standard video cameras can be used through
the video capture card.
Camera Tool
Clicking the [Camera Tool] button will bring up the {Camera Properties} dialog
box, which is furnished by the camera manufacturer.
Refer to camera manufacturer’s manual for the technical detail on camera adjustment.
7.12 Audio Options
Open {Options}
To open the Audio Options, click on the [Options] button in the toolbar or choose
<Tools><Options> from the menu bar, then select <Audio> from the left column of
the {Options} dialog box. To activate the new changes, click [Apply] or [OK]. The
[OK] button will also close the dialog box. The dialog box is illustrated in Figure 81.
Figure 81. Audio Options
80
VidiNOW User Manual
Audio device selection
Playback: Speaker
Record: Microphone
The pull-down menu displays the sound card used in the client computer. If the
computer has more than one sound card, the user should select the one to be used by
the PC Meeting.
• Enable Acoustic Echo Cancellation (AEC)
Check this option for VidiNOW to enable acoustic echo cancellation. The default is
enabled.
• Enable Automatic Gain Control (AGC)
Check this option for VidiNOW to adjust microphone volume automatically. The
default is enabled.
There are situations users may want to disable AGC and manually select the optimal
settings for microphone and sound card.
When AGC is enabled, the microphone volume control will be gray out and the user
cannot adjust it manually. Two options, “Enable Automatic Noise Reduction” and
“Enable Automatic Silence Removal”, are also disabled once AGC is enabled.
• Enable Automatic Noise Reduction
This option is available only when AGC is disabled. It is to perform the noise
reduction to the microphone input signal. This feature may need to be disabled to
work with some special microphones. Users should enable or disable this feature
based on the result of actual use.
• Enable Automatic Silence Removal
This option is available only when the AGC is disabled. It is to remove the silence
data out of the audio data stream. This feature may have to be disabled to work with
some special microphones. Users should enable or disable this feature based on the
result of actual use.
• Conference Room Mode
This feature is to reduce the sensitivity of the microphone.
• Audio Effects
Check this option to enable alert sounds when receiving an ad-hoc meeting invitation.
7.13 Network Options
Open {Options}
To open the Network Options, click on the [Options] button in the toolbar or choose
<Tools><Options> from the menu bar, then select <Network> from the left column
of the {Options} dialog box. The dialog box is illustrated in Figure 82.
The network setting requires IT professional knowledge. Please seek help from the
system administrator.
81
VidiNOW User Manual
Figure 82. Network Options
82
VidiNOW User Manual
Chapter 8
Personal Address Book and User Profile
A login user can manage personal address book and edit his/her own user profile in
the {Meeting Center} web page.
8.1 Personal Address Book
In the {Meeting Center} page, click the [ A d d r e s s B o o k ] button in the function
panel, the { A d d r e s s B o o k } page will show up as illustrated in Figure 83.
Figure 83. Personal Address Book
The login user is in the personal address book by default. This is indicated by a
hyphen preceding his/her own user ID as illustrated in Figure 83. The user can add or
delete other users in the personal address book.
• [Add]
Clicking the [ A d d ] button, the Public Address List will be displayed for the
user to select into the Personal Address Book.
• [Delete]
Check the boxes in the User ID column of Personal Address Book, and click the
[ D e l e t e ] button to remove them. A user can only delete user names from
his/her own address book, not the Public Address List.
8.2 Editing User Profile
A user can edit his/her profile in the {Meeting Center}. Enter this operation by
clicking the [ E d i t P ro f i l e ] button in the function panel.
83
VidiNOW User Manual
Figure 84. Editing User Profile
Click the [ S a v e ] button to make changes effective after the information is entered.
84
VidiNOW User Manual
Appendix A
Roles in the VidiNOW System
• Meeting Creator
Meeting creator is the user who creates a meeting.
• Meeting Manager
Meeting manager manages all aspects of a meeting, including participants selection, meeting format,
allow/disallow join, connection setting … etc. Meeting creator is the default meeting manager of a meeting.
The role of meeting manager can be assigned to others at any time before the meeting ends. Meeting Manger
does not have to be a participant in the meeting.
• Participant
A participant is a user who participates in a meeting. The meeting manager defines how a participant involves
in a meeting through meeting management.
• Chair
Chair is a meeting participant and appointed by the meeting creator at the meeting creation time. Participants
are prevented from joining the meeting before the Chair joins if the “Wait for Chair to start meeting” option
is enabled.
• Moderator
In a moderated meeting, meeting manager is a participant and takes the moderator role. Moderator enforces the
protocol of granting “Become Host” and “Req to Speak” requests.
• Host
Host is a participant who hosts the data sessions. The host role can be passed around upon request.
• Owner of a {Share Program} Session
The owner of a {Share Program} session is the participant who starts this session while serving as host.
Owner intends to share the application programs in his/her own computer.
The above roles are all meeting specific roles temporarily existed in a certain meeting.
• User
Users are the registered members in the Meeting Center, including the administrator (User ID “Admin”).
• Administrator (User ID “Admin”)
Administrator (Admin) is the first user of the VidiNOW Meeting Center. It is a built-in user that cannot be
deleted. All other users are created by the Admin. Admin manages all meetings and all users in VidiNOW
Meeting Center.
• SysManager
SysManager is the super-user of the VidiNOW Meeting Center server. SysManager performs VidiNOW system
configuration, system upgrade, backup, and restore. Unlike “Admin”, SysManager is not a role related to
meetings.
85
VidiNOW User Manual
Appendix B
Custom Installation and Upgrade PC Meeting
B.1 Custom Installation
Figure 85. Selecting the language option of installation
1.
Select the language option
After starting the InstallShield Wizard, select English in the dialog box as
your language option.
Click [ N e x t ] to continue.
Figure 86. Selecting a mode of installation
2.
Select [ C u s t o m i n s t a l l a t i o n ]
Select [ C u s t o m i n s t a l l a t i o n ] to customize the installation path and
network profiles. The [ N e x t ] button brings you to the { C h o o s e
D e s t i n a t i o n L o c a t i o n } dialog.
86
VidiNOW User Manual
Custom installation
allows you to install to
a different location
Figure 87. Choose Destination Location
Press the [ C h a n g e … ] button to select another destination folder, and click
[ N e x t ] to continue with the installation program. You can click [ B a c k ] to
review or change any installation settings, or you can click [ C a n c e l ] to quit the
installation.
3.
Click [ N e x t ]
For Windows/XP users, the { S e l e c t F e a t u r e } screen will pop up as
illustrated in Figure 88.
Additional step on
Windows/XP for
Windows firewall
Figure 88. Select Features
Check the [ A l l o w Vi d i N O W t o p a s s t h ro u g h Wi n d o w s
F i r e w a l l ] , then click [ N e x t ] to proceed.
4.
Click [ I n s t a l l ] to begin the installation
87
VidiNOW User Manual
Figure 89. Ready to Install the Program
5.
Installation program copies files
The { S e t u p St a t u s } window indicates the installation progress,
displaying the files being copied to the destination folder. You can click
[ C a n c e l ] to terminate the installation.
Figure 90. Setup Status
6.
Install virtual printer and mirror driver
VidiNOW automatically installs a Virtual Printer for Annotation and a
mirror driver for Share Program.
Figure 91. Installing virtual printer
88
VidiNOW User Manual
Figure 92. Installing mirror driver
7.
Click [ F i n i s h ] to complete the installation
Figure 93. Installation completion
B.2 Upgrade PC Meeting
When the version of PC Meeting is old and not compatible with the Meeting Center
software, an upgrade is needed. When the PC Meeting is damaged, reinstalling the
software can override and repair the damage. Users can keep the previous settings in
upgrade and repair installation.
Procedure for Update/Repair is similar to that of a full installation. You are given the
options of Express installation or Custom installation. The setup window that appears
during the process is dependent on the client PC’s operating system.
1.
Start the installation program
Select [ E x p re s s i n s t a l l a t i o n ] to apply the default network profiles
Select [ C u s t o m i n s t a l l a t i o n ] to reconfigure your network
2.
Select Features
Skip to step 3 if the [ E x p r e s s i n s t a l l a t i o n ] is selected. The
installation program starts copying files to the same destination folder used
by the old version and using the system default network profiles.
The following Setup window will appear if the [ C u s t o m i n s t a l l a t i o n ] has
been selected.
For Windows/XP users who have changed the default network profiles, the
following dialog box will appear on the screen:
89
VidiNOW User Manual
Figure 94. Select Features – Windows/XP
The option [ A l l o w Vi d i N O W t o p a s s t h ro u g h Wi n d o w s
F i r e w a l l ] should be checked to allow PC Meeting to pass through the
Windows firewall.
For Windows/XP users who have not changed the default network profiles, the
installation proceeds to Step 3.
3.
Click [ N e x t ] to start copying files to the destination folder
Figure 95. Setup Status
4.
Install virtual printer and mirror driver
90
VidiNOW User Manual
Figure 96. Upgrade/Repair Completion
5.
Click [ F i n i s h ] to complete the installation
91