1
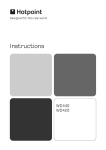
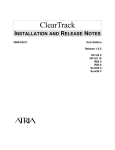
Remote Proposal Submission 2
User’s Manual for Cycle 11
• An Overview of RPS2
• Installing RPS2
• Using RPS2
• The Description Generator Reports
• The Proposal Editor (PED)
• Alternate Ways to Run RPS2
Space Telescope Science Institute
3700 San Martin Drive Baltimore MD 21218
printed 12/10/01 11:23 AM
RPS2 User’s Manual (11.0 )
Table of Contents
Table of Contents
Chapter 1:
An Overview of
RPS2 ... 5
1.1 What Can RPS2 Do for You? ... 5
1.2 Who Can Use RPS2? ... 5
1.3 The Components of RPS2 ... 5
1.4 RPS2 Processing ... 6
1.5 RPS2 Limitations ... 6
1.5.1 Orbit Structure ... 6
1.5.2 Scheduling ... 6
1.6 How to Get Help ... 6
Chapter 2:
Installing
RPS2 ... 8
2.1 Installation Requirements ... 8
2.2 Available Configurations of the RPS2 Software ... 8
2.2.2 Alternatives ... 9
2.3 Retrieving the Software from STScI ... 9
2.4 Unpacking the Software ... 10
2.5 Installing the Software ... 10
2.6 Testing Your Installation ... 10
2.7 How RPS2 Works and Client-Server Systems ... 10
2.7.1 Server Configurations ... 11
2.7.2 Mix and Match Servers ... 11
Chapter 3:
Using RPS2
... 12
3.1 The RPS2 Graphical User Interface ... 12
3.1.1 Starting RPS2 ... 12
3.1.2 The User Interface "Buttons" ... 13
3.2 How to Select a "File ..." ... 13
3.2.1 Selecting or Creating Proposal Templates ... 13
3.2.2 How to Make Backup Versions ... 14
3.2.3 Keeping Track of Changes with the History File ... 14
3.3 How to "Edit" a Proposal ... 14
3.3.1 Using Editors Other than PED ... 14
3.3.1.1 Caveats and Advice ... 15
3.4 How to "Process" a Proposal ... 15
3.4.1 Using Only Some of the Subsystems during Processing ...
16
3.4.2 RPS2 Description Generator Reports ... 16
3.4.3 Files Created during Processing ... 17
3.4.4 Processing in Batch Mode ... 17
3.4.5 How to Stop Processing a Proposal ... 17
3.5 How to "Display Output" ... 17
3.6 How to "Submit" a Proposal ... 18
3.7 How to "Configure..." ... 18
3.7.1 Changing Server Routing ... 19
3.7.2 Configuring the Servers and Bringing Them Up and Down
... 19
3.7.3 Changing the Default Editor ... 19
3.7.4 Changing Display Default Settings ... 20
3.7.5 Configuring Proposal Processing ... 20
- 2-
RPS2 User’s Manual (11.0 )
Table of Contents
3.8 Other RPS2 Related "Documents" ... 20
3.9 System Error Messages ... 20
3.9.1 The Error Log File ... 21
3.10 Tips on Making RPS2 Run Faster ... 21
Chapter 4:
The Description
Generator
Reports ...
22
4.1 The Proposal Summary Report ... 22
4.1.1 Proposal Summary Sections ... 22
4.1.1.1 Summary ... 23
4.1.1.2 Diagnostics ... 23
4.1.1.3 Schedule Summary ... 23
4.2 The Visit Analysis Report ... 23
4.2.1 Visit Section ... 23
4.2.2 Diagnostics Section ... 23
4.2.3 Fixed Targets Section ... 24
4.2.4 Patterns Section ... 24
4.2.5 Exposures Section ... 24
4.2.6 Estimated Structure Section ... 24
4.2.7 Scheduling Section ... 26
4.2.8 Visit Analysis Tools ... 27
4.2.8.1 FOV Tool ... 27
4.3 "Write PS Files" ... 28
Chapter 5:
The Proposal Editor
(PED) ... 29
5.1 What is PED and Why Use It? ... 29
5.1.1 Requirements ... 29
5.1.2 Processing Speed ... 29
5.2 How to Start PED ... 29
5.3 How to Edit a Proposal in PED ... 30
5.3.1 How to Use the PED Screens ... 30
5.3.1.1 Entering Data ... 31
5.3.1.2 Using the Sliders ... 31
5.3.1.3 Modifying Lists ... 31
5.3.1.4 Immediate Syntax Checking ... 32
5.3.1.5 Available and Unavailable Items in Pop-Up Menus ... 32
5.3.2 The "File" Selection Button ... 32
5.3.3 The "General" Information Page ... 33
5.3.4 The "Targets" Page ... 34
5.3.5 The "Visits" Page ... 35
5.3.5.1 Visit Information Page ... 35
5.3.5.2 Exposure Information Page ... 35
5.3.6 The "Patterns" Page ... 36
5.4 How to Get Help in PED ... 36
Chapter 6:
Alternate
Ways to
Run RPS2
... 38
6.1 A Summary of Alternatives ... 38
6.2 How to Run RPS2 Remotely from an XWindows Display ...
38
6.3 How to Run the Command Line Version of RPS2 ... 39
6.4 How to Use RPS2 from Home ... 40
- 3-
RPS2 User’s Manual (11.0 )
Table of Contents
Chapter 7:
Glossary ...
41
- 4-
RPS2 User’s Manual (Version 11.0)
Chapter 1: An Overview of RPS2
In this Chapter ...
• What Can RPS2 Do for You?
• Who Can Use RPS2?
• The Components of RPS2
• RPS2 Processing
• RPS2 Limitations
• How to Get Help
1.1 What Can RPS2 Do for You?
The RPS2 system can help you write and submit a Phase 2 observing program,
which is not only syntactically correct, but also feasible and schedulable, making
optimal use of its allocated orbits.
1.2 Who Can Use RPS2?
Anyone with internet access can use RPS2 in some form. Currently, RPS2 is
configured to run only in unix environments (see section 2.2). However, it can be
run remotely and displayed back to a graphical device that supports XWindows
(e.g., VAX Workstations, Macs). For anyone who does not have access to a
graphical workstation, see section 6.3.
1.3 The Components of RPS2
The RPS2 system consists of six pieces of software held together by a seventh.
1. The User Interface (UI) is the front door to RPS2. Through it you can edit
your proposal, process it, check for errors, display it, see how it schedules
on the telescope, and submit it to STScI.
2. The Proposal Editor (PED) is a graphical editor designed to help you write
error-free proposals.
3. The Preprocessor (PP) checks for errors in your proposal and creates files
used by other subsystems. This is called the Syntax subsystem.
4. Transformation (Trans) takes the information generated by the PP and constructs a detailed plan for executing your proposal on HST. Trans is called
the Feasibility subsystem.
5. The Constraint Analysis Spike Module (CASM) checks to see if and when
your observations can be scheduled on HST. CASM is called the Schedulability subsystem.
6. The Description Generator (DG) collates the descriptions and diagnostics
- 5-
RPS2 User’s Manual (Version 11.0)
from the PP, Trans and CASM subsystems, and displays them as either onscreen or PostScript graphical reports.
7. The Control System (CS) handles communication among the other pieces
of RPS2 and determines the order of processing.
1.4 RPS2 Processing
When RPS2 processes a proposal, up to three subsystems can be used: Syntax,
Feasibility and Schedulability. These subsystems employ much of the same
software as STScI uses to prepare a proposal for flight.
•Syntax (PP) performs error checking and supplies information to the
Feasibility (Trans) and Schedulability (CASM) subsystems.
•Feasibility takes input from the PP and calculates how much time each
exposure will take (including spacecraft and instrument overhead times)
and how the target visibility periods will be filled.
•Schedulability takes input from Syntax (such as target information and
user-specified special requirements) and Feasibility and then calculates
when each constraint can be met during the upcoming cycle.
1.5 RPS2 Limitations
1.5.1 Orbit Structure
RPS2 can help you use your orbit allocation efficiently through the graphical
timeline located in the structure section of the Visit Analysis Report (see section
4.2.6). Although this timeline is a good model of what will happen during your
observations, it is not an exact replication of observing events.
1.5.2 Scheduling
While RPS2 has, at its heart, the same software that is used at STScI to evaluate and
prepare a proposal, not all of the STScI processing capabilities are used. Therefore,
there are some situations in which RPS2 will display a visit as schedulable (see
section 4.2.7) at a particular time when it is actually not schedulable, and other
situations where the converse is true.
For example, the RPS2 does not have the capability to test for guide star
availability. Therefore, a visit which appears to be schedulable in RPS2 may in fact
not be schedulable due to lack of appropriate guide stars for the target. This can be
determined only after your Phase 2 proposal has been submitted and processed at
STScI.
1.6 How to Get Help
If you encounter any problems while installing or running RPS2, please contact
your Program Coordinator (PC). The PCs maintain a list of advisories describing
known problems and recommended workarounds. This list is available on the
STScI Web page for Phase 2 Proposal Development, http://www.stsci.edu/public/
- 6-
RPS2 User’s Manual (Version 11.0)
rps2home.html. You also can get this to list by clicking on “Documents” on the
RPS2 User Interface (see section 3.1).
- 7-
RPS2 User’s Manual (Version 11.0)
Chapter 2: Installing RPS2
In This Chapter ...
• Installation Requirements
• Available Configurations of the RPS2 Software
• Retrieving the Software from STScI
• Unpacking the Software
• Installing the Software
• Testing Your Installation
• How RPS2 Works and Client-Server Systems
2.1 Installation Requirements
Installing the RPS2 software should be relatively easy, but it does require a basic
understanding of Unix. If you are familiar with Unix, you should be able to install
it without any special privileges and with minimal help from the system managers.
Check with your system manager to determine the best place to install the software.
This consideration is particularly important at institutions where more than one
person needs access to RPS2.
Note: Users at STScI do not have to install this software. It’s available on the unix
science cluster at /usr/local/bin/.
2.2 Available Configurations of the RPS2 Software
Several configurations of precompiled binaries are available for different unix
platforms.
Table 2.1 Available Configurations
Computer
OS
Full Configuration
Small Configuration
Sun
SunOS 4.x
not available
sun4-RPS2bin.tar.Z
Sun
Solaris 2.x
(SunOS 5.x)
solaris-RPS2bin.tar.Z
available on request
DEC Alpha
Digital Unix
not available
alpha-RPS2bin.tar.Z
SGI
IRIX
not available
sgi5-RPS2bin.tar.Z
HP
HP/UX
not available
available on request
- 8-
RPS2 User’s Manual (Version 11.0)
The Full Configuration (solaris-RPS2bin.tar.Z for Solaris 2.x):
• This is the recommended configuration. It includes all of the RPS2
subsystems, allowing you to run all of RPS2 on your machine.
• After unpacking the file, the code will use ~ 89 MB of disk space; after
the original binary (.Z) file is deleted, it will use ~ 57 MB.
The Small Configuration ( sun4-RPS2bin.tar.Z for SunOS 4.x, alphaRPS2bin.tar.Z for DEC Alpha, otherwise available on request):
• This configuration includes the User Interface (UI), PreProcessor (PP),
and Description Generator (DG) subsystems, all of which will run locally.
It does not include the Feasibility and Schedulability subsystems, which
will be run remotely on a STScI machine.
• The Control System (CS) will handle communication between the local
and remote subsystems via the Internet. Consequently, there will be times
when heavy network traffic will cause slow processing time.
• After unpacking the binary file, the code will use ~ 15 MB (DEC Alpha)
or ~8.2 MB (Sun) of disk space. The original binary file can then be
deleted, freeing up 4.5 MB (for the DEC version) or 3.3 MB (for the Sun).
You should be able to run the small configuration on any unix system to which tcl/
tk/tcl-dp/itcl has been ported.
2.2.2 Alternatives
Currently, this software is available only as precompiled binaries on the platforms
listed in Table 2.1 on page 8. If you do not have one of these platforms, you can run
RPS2 by one of the alternative methods described in section 6.1.
2.3 Retrieving the Software from STScI
You can retrieve the code using the World Wide Web or anonymous FTP. Since
all of the software elements needed to install and use RPS2 are archived together in
this file, you need to retrieve only one file.
Via the WWW:
1) Open URL: http://www.stsci.edu/ftp/software/rps2/
2) Click on the desired file (such as solaris-RPS2bin.tar.Z)
3) Type the full path (of the directory in which you want to install RPS2) and
the chosen RPS2 file name in the dialog box
Via anonymous FTP:
1) Type cd <directory in which you want to install RPS2>
2) Type ftp ftp.stsci.edu
3) Type in the name “anonymous” as your user name
4) Give your e-mail address as your password
5) Type cd software/rps2
6) Type bin
- 9-
RPS2 User’s Manual (Version 11.0)
7) Type get solaris-RPS2bin.tar.Z (or other desired file)
8) Type quit
2.4 Unpacking the Software
Once you have downloaded the file into your installation directory, examine the file
name. If the file still has the .Z extension, use the following command for the
solaris configuration (note: unix commands are case sensitive):
zcat solaris-RPS2bin.tar.Z | tar -xf If the file no longer has the .Z extension, your FTP or WWW client uncompressed
the file for you. In this case type the command:
tar -xf solaris-RPS2bin.tar
When it’s finished, the installation directory will contain some files (such as,
INSTALL and README) and subdirectories (such as, docs/ and testprops/).
Read the INSTALL and README files. The docs/ directory will have a copy of a
blank Phase 2 proposal template.
2.5 Installing the Software
While in the installation directory, execute the following command:
make install
This command modifies the source code to conform to its current location and sets
the necessary file permissions. The “make install” command only needs to be
run once, unless the files are moved to another location.
2.6 Testing Your Installation
A sample RPS2 proposal is provided in a subdirectory of the installation directory
called testprops/. The file name is: 2.prop (a WFPC2 example). Copy this
proposal into a new directory and follow the instructions starting with section 3.1.
This sample proposal has minor errors designed to illustrate how RPS2 diagnostics
work. The README file in the testprops/ directory outlines what is in the
sample proposal. Additional sample proposals are available on the WWW from the
Phase 2 proposal development page, http://presto.stsci.edu/public/
rps2home.html,and from the Instruments Page,http://www.stsci.edu/instruments/.
2.7 How RPS2 Works and Client-Server Systems
RPS2 is a client-server system: the user "talks" to a “client” program, which in turn
communicates with one or more “server” programs. A server program can be on a
- 10 -
RPS2 User’s Manual (Version 11.0)
local machine or on a machine accessible via the Internet. There are four separate
servers in RPS2 -- PP, Trans, CASM and DG (see section 1.3). All four servers
should be running at STScI and can be accessed through the Internet.
2.7.1 Server Configurations
In the full configuration (see section 2.2) all four servers can be run locally on your
computer. In the smaller configuration, only the PP and DG can run on your
machine.
If the servers are not run locally, RPS2 will automatically access the servers at
STScI. In addition to slower run times and potential network connection problems,
there is a potential security risk. If the local servers are not started, the xhost
command will need to be issued to allow a server at STScI to display windows to
your screen. This allows access to your machine from outside. You should check
with your system manager to see if this is acceptable for your institution.
2.7.2 Mix and Match Servers
When RPS2 is started, it attempts to bring up all the servers in your installed
configuration. If the servers are already up, nothing happens. The servers will stay
up until they are explicitly brought down or the system on which they are running
is rebooted. This should not be a problem; servers consume minimal resources
when they are not being used. Configuration switches are available for controlling
whether the servers come up automatically (see section 3.7).
Servers started on one workstation can be accessed by people running RPS2 on a
different workstation through the Internet. If you are running RPS2 on a different
machine from the one where the RPS2 servers are running, you must execute the
command:
xhost
+<servername>
where <servername> is the name of the machine where the servers are running. This
command allows it to display XWindows on your machine.
You can mix and match servers to optimize RPS2 for your situation. For example,
after installing the full configuration, you might discover that running all the servers
on your machine slows it down considerably. Consequently, you might turn off the
Feasibility and Schedulability servers and change the default so they do not come
up when you start RPS2 (see section 3.7.1).
If you require any assistance deciding which options are best for your system,
please contact your PC.
- 11 -
RPS2 User’s Manual (Version 11.0)
Chapter 3: Using RPS2
In this Chapter ...
• The RPS2 Graphical User Interface
• How to Select a "File ..."
• How to "Edit" a Proposal
• How to "Process" a Proposal
• How to "Display Output"
• How to "Submit" a Proposal
• How to "Configure..."
• Other RPS2 Related "Documents"
• System Error Messages
• Tips on Making RPS2 Run Faster
3.1 The RPS2 Graphical User Interface
3.1.1 Starting RPS2
You should set up a directory (used for both input and output files) for a single
proposal. Since RPS2 generates a large number of intermediate files, the amount of
room you will need in this directory will depend on the size of your proposal. Only
very large proposals require more that one megabyte for these intermediate files.
Start RPS2 by typing the following at the Unix prompt:
<path of installation>/RPS2 &
For example, if RPS2 was installed in directory /user/local/bin/rps2, type:
/usr/local/bin/rps2/RPS2 &
- 12 -
RPS2 User’s Manual (Version 11.0)
3.1.2 The User Interface "Buttons"
At first the servers will start (described in section 3.7.2). Then a window (shown
above) will appear on your screen. It has buttons along the top row that invoke the
tools and options for RPS2: "File"(page 13), "Edit"(page 14), "Process"(page 15),
"Display Output"(page 17), "Write PS Files"(page 28), "Submit"(page 18),
"Configure..."(page 18), "Documents"(page 20) and "Quit." Place the mouse
pointer on top of a button to see a description of its function.
3.2 How to Select a "File ..."
3.2.1 Selecting or Creating Proposal Templates
The "File ..." button on the UI allows you to either select an existing proposal file
or create a new file that you wish to edit, process or submit.
General Observers (GOs) should start with the template supplied by their Program
Coordinator. This template has most of the text sections already filled in from your
Phase I proposal; the rest of it contains a single visit and single exposure skeleton
with all the keywords and special requirements already provided.
Save this template in your proposal directory to a file named <#>.prop where <#>
is the proposal ID number (be sure to delete the mail header).
• Click on “File...” at the top of the RPS2 User Interface.
• Select the “Select Existing File” option in the Select File dialog window..
• Select your <#>.prop file.
• Click on "Select."
If you do not have this partially completed template, you can obtain a blank one.
• Click on “File...” at the top of the RPS2 User Interface.
• Select the “Create New File” option in the pop-down menu.
• Click on "Create Blank Template" in the Confirmation window.
• Type in <#>.prop in the New File window.
• Click on "Select."
The Instrument Handbooks provide guidelines for instrument use, and the Phase 2
Proposal Instructions provides the proper proposal syntax. Before writing the
entire proposal, you may wish to try out a small subset of the proposal (i.e., one visit
- 13 -
RPS2 User’s Manual (Version 11.0)
with a few exposures) to become accustomed to proposal writing and RPS2.
3.2.2 How to Make Backup Versions
If you would like to save a copy of the current version of a proposal before making
changes, you can do this from the "Backup..." option available from the “File...”
• Click on “Backup...” A pop-down menu will appear.
• Click on one of the options: “Backup Current Version,” “Restore
Backup Version,” and “Remove Backup.”
• Type in the name of the backup in the Archive Name window.
• Click on "OK."
• Click on "Dismiss" in the Backup Results window.
All the cached files and other output files that have been created so far will be
archived with the proposal. This can save processing time when you restore the
backup. You also will have all the cached files and output files in your current
working directory so incremental changes will take less time.
Avoid creating new directories or proposal numbers when trying new things;
this will cause unnecessary reprocessing and slow your work.
3.2.3 Keeping Track of Changes with the History File
RPS2 creates a history file for each proposal that you work on. This file is
maintained across different RPS2 sessions and contains time and date stamps. To
view the history file:
• Select the “History...” option from the “File...” menu. Two options will
appear in a pop-down menu.
• Select “View History” to bring up a window with the most recent activity
listed at the top.
• Or Select “Add To History” to add a line of free text to the history file.
3.3 How to "Edit" a Proposal
Changes can be made to the proposal while still in RPS2. Click on “Edit” at the top
of the RPS2 UI window, and if you have chosen the Proposal Editor (PED) as your
editor (see section 5.1), the proposal will be loaded into PED and initial syntax
checking will be done automatically. Otherwise the editor will be the one selected
in your EDITOR environment variable (e.g., emacs). If your EDITOR environment
variable has not been set, the internal RPS2 text editor will be used. When you are
finished making changes, save the file in your proposal directory and reprocess the
proposal. You do not have to quit the editor to reprocess a file.
3.3.1 Using Editors Other than PED
We recommend that most of your proposal editing be done with the RPS2 Proposal
Editor (PED) because it has much greater control over the entries you make than a
- 14 -
RPS2 User’s Manual (Version 11.0)
regular text editor. However, because of certain limitations in PED, there may be
circumstances when it might be useful to switch to another editor temporarily. For
example, in PED you cannot add, delete, or replace a common entry (e.g., a special
requirement) to all exposures or visits. This can be done easily in a text editor.
3.3.1.1 Caveats and Advice
As with all editors, caution must be exercised if you have more than one editor open
on a file at one time. If changes are made in one editor, they do not automatically
appear in the other.
• Save Your Proposal in PED
We strongly recommend that you save your proposal in PED and exit PED
completely before switching to another editor (You don’t have to exit RPS2).
Then, after using your favorite text editor and making changes, read the proposal
back into PED by choosing “Edit” from the RPS2 User Interface, assuming RPS2
is configured to use PED as your default editor (see section 3.7.3), or by typing
rps2-ped at the unix prompt (include the full path name if necessary).
• Errors, Warnings and Diagnostic Messages
If you have made any typing errors in another editor, PED may not be able to
understand what you have entered, resulting in one of the following symptoms (this
list is not meant to be exhaustive):
• Duplicate or bad numbers assigned a target, exposure or visit: PED
will renumber them, and if you gave a duplicate or bad name to a target,
PED will rename it. PED will provide a diagnostic message, and you can
rename or renumber entries in the appropriate editing screens.
• Misspelled or misplaced template keywords (PI_Name,
Visit_Number, Sp_Element, etc.): PED will issue a warning and not open.
You will have to go back to your regular text editor and fix the
keyword(s).
• Keyword values PED cannot understand (i.e., it can’t be parsed): PED
will issue a warning. You can open the appropriate PED screen to enter a
correct value. However, if you do not enter a new value, PED will retain
the "bad" value when you save the proposal.
• Missing Comments: These are the lines starting with an “!”. If you
insert comments using another text editor, chances are good that when you
save the proposal in PED, your comments will be lost (no warnings will be
issued). We recommend that you always use PED to insert comments.
3.4 How to "Process" a Proposal
Once a draft of the proposal has been written, RPS2 can be used to check for syntax
problems, evaluate potential implementation problems, and determine if and where
it can be scheduled.
• Click on “File...” on the RPS2 User Interface (UI).
• Click on the “Select Existing File” option in the Select File dialog
window.
- 15 -
RPS2 User’s Manual (Version 11.0)
• Click on your <#>.prop file in your proposal directory; click on "Select."
• Click on “Process” on the UI. In a few seconds, a progress meter will
appear, appended to the bottom of the existing UI.
A proposal with one target and one visit will generally take about 10 minutes to
process fully the first time. If you find RPS2 runs too slowly, see sections 3.4.1 and
section 3.10 for some tips on getting it to run faster.
3.4.1 Using Only Some of the Subsystems during Processing
You can select which subsystems will run during processing by using the switches
that appear on the front panel of the RPS2 User Interface. They look like:
Process = Syntax (always) [] Feasibility [] Schedulability [] Display Output
When you first bring up RPS2, only the Syntax and Feasibility subsystems will be
selected (the button in front of them will be green). Click on the green button to turn
off the selection of a subsystem. Click on the box to turn it back on.
•Syntax: This is always required and cannot be turned off. During the
early stages of proposal development, you should turn off Feasibility and
Schedulability and run only the syntax subsystem to save time.
•Feasibility and Schedulability: These subsystems can be turned off or
back on. For more information on these subsystems, see section 1.3.
Feasibility cannot be turned off if Schedulability is on. This prevents a
user from trying to run Schedulability before Feasibility has been run on a
visit. Feasibility will be run on only those visits that have changed, even if
the button is on (green).
• Display Output: This option can be turned off or back on. If left on
(green) the output from the other subsystems will be assembled and
displayed into the on-screen reports -- called RPS2 Description Generator
reports -- after the other subsystems are finished.
3.4.2 RPS2 Description Generator Reports
After processing by the other subsystems has completed and the Display Output
option has been left on (see the previous section), a new screen will appear called
- 16 -
RPS2 User’s Manual (Version 11.0)
the RPS2 Description Generator, which can display the processing results in a
series of separate reports (see section 4.1). This interface has options displayed at
the top, allowing you to select a particular report or change a display format. A short
explanation of an option will appear just below the top row if the cursor is placed
over its button.
3.4.3 Files Created during Processing
Processing a proposal will put many small files in your proposal directory. You
should not delete these files as they store intermediate results and the final output.
Many of the files are recalculated each time you process, but if you need to view
the current output again later, you can do so without reprocessing the proposal. Note
that there is a target file created by the Schedulability subsystem which is created
on the first run and reused in subsequent runs (the file is simply updated as you
change targets in the proposal). If you delete all the files, or move the proposal to a
new directory, that target file will need to be recreated.
3.4.4 Processing in Batch Mode
If you need to process many proposals in batch, this can be done using the command
line version of RPS2 (section 6.3) and a shell script. Contact your PC if you need
help. Here is an example shell script:
rps2-com -- process $1.prop
lpr $1*.ps
3.4.5 How to Stop Processing a Proposal
Some proposals will be so large that they will take a long time to process through
all the subsystems. If a proposal has started processing and you wish to stop it (e.g.,
you forgot to change something), click on "Halt" (next to the progress meter). This
aborts all subsequent processing on that proposal. If you are processing and/or
displaying multiple proposals and would like to stop everything, use the “Halt All”
button at the top of the User Interface. If the progress meter fails to go away
completely after performing these steps, there probably has been a communications
error, "Quit" RPS2 and start over again.
3.5 How to "Display Output"
Two types of reports summarize the information generated during RPS2
processing: The Proposal Summary Report and the Visit Analysis Report. See “The
Description Generator Reports” on page 22. After you have processed a proposal,
you can display these reports by clicking on “Display Output” at the top of the RPS2
User Interface. Unless you change the default (by using the "Configure..." button see section 3.7), these reports will be created and displayed automatically after
processing has completed.
- 17 -
RPS2 User’s Manual (Version 11.0)
3.6 How to "Submit" a Proposal
Once you have written your Phase 2 proposal, processed it, examined the output
products -- confirming that it is error-free and within its orbit allocation -- and are
confident that the proposal is correct, you can submit your proposal to STScI using
the “Submit” button on the RPS2 User Interface.
If you haven’t done so already, select your proposal file using the "File ..." button
on the RPS2 UI; then click on the "Select Existing File" in the pop-down menu.
• Select the proposal file (<#>.prop where <#> is your proposal ID
number) that you wish to submit from the "Select File"dialog box
• Click on "Select."
• Click on "Submit" on the RPS2 UI. The diagnostic files in the proposal
directory from the most recent processing of the proposal will be checked
before the proposal is actually submitted to STScI. If there are outstanding
diagnostics, a red warning message will appear in the "Submitting
Proposals" window to remind you that there are still problems with the
proposal.
• Click on "Yes" if you wish to include comments to your PC; enter your
comments in a separate window and then click on "Done."
• Click on "Submit Proposal."
If there is a bug or a limitation in RPS2 that makes it impossible for you to submit
the proposal without diagnostics, you must discuss this with your PC before
submiting the proposal. If a problem cannot be resolved, you can submit the
proposal, but it will be flagged and you must work it out with your PC.
If you submit a proposal with errors that have not been reviewed with your
PC, it will not be accepted for processing and scheduling until these errors have
been discussed with the PC.
The submission software sends an automatic electronic acknowledgment to you via
e-mail that your proposal has been received. Both your Program Coordinator and
your Contact Scientist will be notified of your submission, and you should receive
a message from your PC regarding the acceptance of your proposal in a few days.
3.7 How to "Configure..."
The “Configure” button on the User Interface allows you to change default settings,
such as server routing, the default editor, display settings and proposal processing
options. When you click on this, a menu of options appears (described in the
following subsections); when you change an option in the menu, it goes into effect
immediately. When you quit out of RPS2, these new default settings are saved in
your home directory to a file named .rps2-init. The next time you bring up
RPS2 the new defaults will still be in effect.
- 18 -
RPS2 User’s Manual (Version 11.0)
3.7.1 Changing Server Routing
If you cannot run some (or all) of the servers on your own computer (see section
2.7) and servers exist on a computer more convenient to use than the one at STScI,
you can specify a preference for this computer.
• Select the “Configure Routing” option from the “Configure” menu.
• Click on the word “Machine,” type in the Internet Protocol (IP) address
or IP name (e.g., 130.167.107.14 or anarky.stsci.edu) of the computer
desired.
• Click on “Apply.”
3.7.2 Configuring the Servers and Bringing Them Up and Down
When RPS2 comes up (and you haven’t modified any of the initial default settings),
it will attempt to start all the servers in your installed configuration, and if they are
already up from a previous session, RPS2 will not start new ones. You can change
this his behavior.
• Select the “Configure Servers... ” option from the “Configure” menu.
The four servers of RPS2 are listed (Syntax, Description Generator,
Feasibility, Schedulability)
• Click on one of them to either turn on (green box) or turn off automatic
starting when RPS2 is started.
• Click on "Apply."
You can also stop and restart the servers in real time from this menu, which is useful
if you want to experiment with combinations of servers to be run locally and those
to be run at STScI through the Internet. It takes approximately 5 minutes for the
operating system to clear the server connection, so if you bring the servers down
and try to bring them back up immediately, they will not come up because they still
appear to be running.
3.7.3 Changing the Default Editor
When you first bring up RPS2 and click the “Edit” button, you are asked to select
a default editor (a text editor or PED). The default editor can be changed.
• Select “Configure Editor” option from the “Configure” menu.
• Select "PED" or "EDITOR in environment variable." (see below)
• Click on "Apply."
The following unix command will set the EDITOR environment variable on most
unix systems:
setenv EDITOR <full path of your preferred editor>
You may wish to add this to your shell setup file (for example in the C shell, place
this command in your .cshrc file). If you are unsure of the editors available on
your system or where they are located, talk to your system manager.
- 19 -
RPS2 User’s Manual (Version 11.0)
3.7.4 Changing Display Default Settings
You can change the default font size for reports created by the Description
Generator (section 4.1).
• Select the “Configure Description_Generator” option from the
“Configure” menu.
• Enter an integer (0 to 2) next to “zoom” (0 for 10 point, 1 for 14 point -the initial default -- and 2 for 18 point.
• Click on “Apply.”
3.7.5 Configuring Proposal Processing
By default RPS2 will only process the visits in a proposal that have changed since
the last time it was processed, and it will run only the subsystems that have not been
run yet on a particular version of the proposal. There are no known problems with
this time saving feature, but there is a way to turn this off.
• Select the “Configure Processing” option from the “Configure” menu.
• Click on “Entire Proposal.”
• Click on “Apply” to commit the change.
3.8
Other RPS2 Related "Documents"
The “Documents” button on the User Interface will bring up a World Wide Web
client (such as Netscape) and displays the RPS2 Help Page. This page has links to
the RPS2 User’s Manual, advisories of known RPS2 problems, other Phase 2
documentation and a list of Program Coordinators.
The default World Wide Web client can be set by typing
setenv RPS2_WWW <full path of your preferred WWW client>
at the Unix prompt before running RPS2. You may wish to add this to your shell
setup file (for example in the C shell, place this command in your .cshrc file).
3.9 System Error Messages
When RPS2 detects a system error, it displays a window to your screen. The text in
the box should be self-explanatory. For example if you click on the “Submit”
option, but have not first “Select”ed a proposal, you will get a small window which
says “No Proposal Selected.” Click on “Dismiss” at the bottom of the small window
when you are finished reading the error message.
Less straightforward error conditions may yield system messages that are difficult
to understand. If you encounter an cryptic error message, contact your Program
Coordinator, and be sure to include the text of the error message in your message to
the PC.
- 20 -
RPS2 User’s Manual (Version 11.0)
3.9.1 The Error Log File
Each session of RPS2 keeps a log of all system errors. The rps2-error file can
be found in the directory RPS2 was started in, and can be copied directly into an email message. Along with the error message, please include the version of the
proposal that had the problem and the history of your session (this is stored in the
file, <#>.log.
3.10 Tips on Making RPS2 Run Faster
Large programs can take more than a half hour to process, which can be frustrating
if you need to iterate many times to resolve problems. Here are some tips to make
RPS2 run faster:
•Start with a small portion of the proposal: If you have several similar
targets, visits or exposures, write and process one or two first to eliminate
or reduce duplicate errors.
•Run only the subsystems you need: In the initial writing stages only run
the Syntax checking subsystem. When you are iterating to fill your orbits,
you can turn off the Schedulability subsystem (see section 3.4.1).
•Do not move the proposal to another directory: The first run of the
Schedulability subsystem creates and saves a file containing information
for each target which is reused on subsequent runs. This file takes a long
time to generate. If you would like to try an experiment with the proposal,
use the backup feature to save your current work (see section 3.2.2). Then
you can change the proposal in your working directory and not have to
regenerate the target file.
•Use batch processing: You can make a small shell script which runs the
command line version of RPS2; then print out the PostScript reports (see
section 4.3). If you want to compare different strategies, save several
versions of the proposal with different file names and process them in
series overnight (see section 3.4.4).
•Examine Syntax diagnostics files directly: Displaying the output for
proposals with many targets (like large survey proposals) can take a very
long time. If all you want to do is check for the presence of Syntax errors,
examine the raw *.p*-diag files instead.
- 21 -
RPS2 User’s Manual (Version 11.0)
Chapter 4: The Description Generator
Reports
In this Chapter ...
• The Proposal Summary Report
• The Visit Analysis Report
• "Write PS Files"
Two Descriptor Generator (DG) reports summarize the information generated
during RPS2 processing: The Proposal Summary Report and the Visit Analysis
Report. You can display these reports by clicking on “Display Output” at the top of
the RPS2 User Interface.
4.1 The Proposal Summary Report
Select this report by clicking on “Proposal Summary” at the top of the DG window.
Top of the Proposal Summary Report
•To obtain an explanation of a section, click on the “HELP” vertical bar to
the right of that section in the report. Click on “Dismiss” at the bottom of
the small window when you are finished reading the help message.
•To change the font in a report, click on “Zoom+” at the top of the
window to increase the font size. The report can also be made smaller by
clicking on “Zoom-.” Zoom is a configurable option. (see section 3.7.4).
4.1.1 Proposal Summary Sections
- 22 -
RPS2 User’s Manual (Version 11.0)
4.1.1.1 Summary
A summary of proposal level information as well as high level information about
all the visits in a proposal along with any targets, science instruments used, number
of HST orbits used, and outstanding diagnostics.
4.1.1.2 Diagnostics
A list of proposal-level diagnostics, which affect the entire proposal but not
necessarily an individual visit.
4.1.1.3 Schedule Summary
At the bottom of the report is a graphical summary of each visit’s schedulability
(identical to the one at the bottom of each visit report described in section 4.2).
4.2 The Visit Analysis Report
Select a report for a particular visit by clicking on “Visit Analysis” at the top of the
DG window, and then select a visit in the pull-down menu. (or use the “Visit+” and
“Visit-” buttons to select visits in order.)
Top Portion of the Visit Analysis Report
Each visit analysis report is divided nto the following sections:
4.2.1 Visit Section
This lists the number of orbits used, science instruments, visit-level special
requirements, visit-level comments, and if there are any diagnostics.
4.2.2 Diagnostics Section
- 23 -
RPS2 User’s Manual (Version 11.0)
This summarizes any error or warning messages in the visit. They are broken down
into System, Syntax, Feasibility, and Schedulability. These messages are generally
short; longer, more detailed explanations are available by clicking on the message
of interest. A small window will appear on the screen with both the short and long
explanations
Click on “Dismiss” at the bottom of the small window when you are finished
reading the message.
Since the output from Feasibility and Schedulability depends on correct proposal
syntax, you should resolve any Syntax problems before addressing the Feasibility
and Schedulability diagnostics.
4.2.3 Fixed Targets Section
This lists the name and any other important information (coordinates, flux, and so
on) for each target used in the visit.
4.2.4 Patterns Section
This summarizes the characteristics of the Patterns you have defined (Pattern #,
Type, Purpose, Number of Points, Point Spacing, and so on), and the exposure(s) in
the visit using a particular Pattern #.
4.2.5 Exposures Section
This lists the exposures in the visit, reflecting what was specified for each exposure
in the proposal (target number, SI configuration, Spectral Element and so on). It
also shows the mapping of exposures to orbits and if any exposures have been
lengthened or shortened by RPS2.
To save space on the display, the target for each exposure is referred to only by its
number in the target list. If you have more than one target in the target list for that
visit, you should check to make sure you are observing the right target in each
exposure.
4.2.6 Estimated Structure Section
This is generated by the Feasibility (Trans) subsystem and is a graphical
representation of the exposure section with comments that are meant to assist the
observer in designing a visit so that it will fit into the number of allocated orbits.
There are exposure-level special requirements that allow you to specify which
exposures can be lengthened or shortened and by how much.
If you are iterating on how to best fill your orbits, you probably should turn
off Schedulability to reduce processing time.
- 24 -
RPS2 User’s Manual (Version 11.0)
Estimated Structure
A key to the color and hatching scheme is available by clicking on the “HELP”
vertical bar to the right of that section. Each orbit is represented by a 96-minute
orbital timeline, and the major events of the orbit are noted separately (e.g., guide
star acquisition, target acquisition, exposures, unused target visibility, and
occultation). Note that each exposure is shown with all associated overhead
included. The actual on-target exposure time is displayed in brackets next to the
total time.
Although this timeline is a good approximation of what will happen during your
observations, it is not an exact representation of observing events because of certain
conceptual simplifications in RPS2:
• Alignment Overheads
Alignments are generally groups of exposures that use the same aperture and
pointing, but the detailed operational rules are much more complex. As a
simplification, RPS2 does not display the alignment structure, so it cannot show
you where the alignment overheads actually occur. In RPS2 all alignment
overheads are distributed evenly among the exposures within an alignment.
• Target Viewing Time and Its Effect on the Structure
Since HST is in low earth orbit, the target viewing time varies over the course of
the year. Unless you specify timing special requirements you will not be guaranteed
the precise structure given in the Visit Analysis Report. Generally, this is not a
problem if exact timing of your observation is not critical.
** Targets in the CVZ **
For instance, after viewing the RPS2 timeline, you may think that your exposures
will be taken every 96 minutes for ~50 minutes. But your visit might actually be
- 25 -
RPS2 User’s Manual (Version 11.0)
scheduled when the target is in or near the Continuous Viewing Zone (CVZ), in
which case the exposures would be taken back-to-back over a shorter period of
time.
** Orbits Affected by the South Atlantic Anomaly (SAA) **
Another example is a group of exposures that appear in the same orbit in RPS2 may
not end up back-to-back because the exposures may be scheduled in orbits affected
by the South Atlantic Anomaly (SAA).
4.2.7 Scheduling Section
This section, generated by the Schedulability (CASM) subsystem, consists of a
graphical timeline of when the visit can be scheduled.
Scheduling Timeline
• Calculated Scheduling Constraints
All calculated constraints are displayed in separate bar graphs above the visit’s
scheduling timeline. These are physical constraints affecting target visibility (e.g.,
Sun, Moon) and absolute or relative constraints reflecting special requirements on
timing and/or orientation.
Only those physical constraints that affect scheduling are plotted. For example, if
the target is within 50 degrees of the Sun at some point during the year, the Sun
constraint graph will appear and will have a dashed line during the time that the
target is too close to the Sun for observation with HST. If the target is never within
50 degrees of the Sun, no Sun constraint graph will appear.
- 26 -
RPS2 User’s Manual (Version 11.0)
• Special Requirements Constraints
These are constraints imposed on visits by an observer using special requirements
(see the Phase 2 Proposal Instructions), such as the ORIENT special requirement.
• Total Scheduling Windows
The resulting Total Scheduling Windows -- the resulting intersection of all the
individual constraints -- are plotted below the target visibility windows. You can
click on the name next to each constraint time line to see a report which contains all
the schedulable intervals.
• Roll Range Information
The item, "Roll Range Information for visit #," below the scheduling timeline
shows the allowed range of telescope roll angles each day in the timeline. If a day
is not listed, there are no allowable roll angles for that day.
4.2.8 Visit Analysis Tools
4.2.8.1 FOV Tool
The Field Of View (FOV) tool draws a picture of aperture locations, showing what
your pattern will look like. The picture will be drawn in one of the following
reference frames:
•CELESTIAL (signified by an N/E in the upper right corner)
•POS TARG (signified by a X/Y in the upper right corner)
The scaled axes are in arc seconds, relative to the pointing of the first exposure in
the pattern (as defined in the target list, including any POS TARG special
requirements on that exposure).
• Display Rules:
1) If the orientation is constrained by the visit-level ORIENT special
requirement, the CELESTIAL (N/E) frame will be used.
2) If the aperture’s orientation relative to the reference frame is known, the
outline of the aperture will be drawn (a square or rectangle).
3) If the aperture’s orientation is not known, the FOV tool will display a circle
circumscribing the aperture used in the exposure.
• Display Hints:
1) You can turn off the display of the aperture outlines by clicking on the
"Configure Display Options" button and then selecting, "Represent Aperture."
Dots marking the aperture center locations will then be displayed. This can be
useful when making small moves, such as dithering.
2) For large pattern motions, such as mosaics or background measurements, you
may want to leave this display option set to "Real Shape", to get a picture of the
- 27 -
RPS2 User’s Manual (Version 11.0)
areas included in the exposure.
3) Other options in the "Configure Display Options" menu allow you to get rid
of the numbers that indicate the sequence of execution of the pattern, show
parallel with primary apertures, and show all the patterns in a given visit at once.
3) The "Exposure" buttons work like the "Visit" buttons on the Description
Generator. When more than one exposure in a visit uses a pattern, you can move
from one to the next (including forward from the last to the first) using these
buttons.
4) The "Zoom" buttons work like the corresponding buttons on the Description
Generator. If you are dithering as well as chopping, for example, the default
FOV scale will include all your exposures. You may want to "Zoom+" to get a
better view of your dithering pattern.
4.3 "Write PS Files"
Copies of the Proposal Summary and all Visit Analysis reports can be created and
printed as PostScript files (extension .ps) by clicking on “Write PS Files” at the
top of the RPS2 User Interface window. If any of the reports contain diagnostics, a
separate file, having the long explanation of each diagnostic, will be generated for
each report. A file named help.ps is also generated; it contains all the help panels
concatenated together. You can then print these files to a local PostScript printer.
- 28 -
RPS2 User’s Manual (Version 11.0)
Chapter 5: The Proposal Editor (PED)
In this Chapter ...
• What is PED and Why Use It?
• How to Start PED
• How to Edit a Proposal in PED
• How to Get Help in PED
5.1 What is PED and Why Use It?
The Proposal EDitor (“PED”) is a graphical editor meant to be used for writing and
modifying Phase 2 proposals (<#>.prop files). Users, both new and old, will find
preparing their proposal much easier using this editor instead of a text editor. PED
allows you to enter data quickly and easily with specially designed forms and
tables, and you get immediate syntax checking and feedback on illegal entries.
5.1.1 Requirements
To use PED, you must have a terminal or workstation that supports XWindows.
5.1.2 Processing Speed
PED uses the same syntax checking software as the Preprocessor (PP) subsystem;
it checks for the legality of all entries you make, such as spectral elements, apertures
and special requirements. Because there are so many rules and combinations,
sometimes PED can take a few seconds to react to an entry you make.
5.2 How to Start PED
After you have selected a proposal file (see section 3.2), open PED by clicking on
the “Edit” button at the top of the RPS2 User Interface.
- 29 -
RPS2 User’s Manual (Version 11.0)
The PED User Interface has a similar appearance as the RPS2 User Interface. Upon
opening a proposal, PED will perform syntax checking and provide a dialog box of
any syntax diagnostics. This may take a few minutes to complete.
If you do not have RPS2 open, you can still run PED by typing
<path of installation>rps2-ped & at the unix prompt.
PED will create a backup file (#.prop-ped_backup) before you make any
changes to the proposal. When proposals are saved in this editor, a new version of
the <#>.prop file will be written to your directory.
5.3 How to Edit a Proposal in PED
If this is the first time you are editing a proposal through this version of RPS2, you
will be prompted to select an editor -- PED or your default editor (e.g., emacs or vi).
You can always switch editors later by choosing the “Configure Editor” option
under the RPS2 “Configure” button (see section 3.7).
The following buttons appear across the top of the PED user interface:
Except for “File”, each of the top row buttons corresponds to a unique section of
the Phase 2 proposal file. Clicking on one of these buttons will bring up a particular
screen editor where the user can enter or modify data. The following sections have
additional information on how to use these screen editors:
• How to Use the PED Screens
• The "File" Selection Button
• The "General" Information Page
• The "Targets" Page
• The "Visits" Page
• The "Patterns" Page
There are two buttons near the bottom of the PED user interface:
• Click on "Quit" to exit out of PED
• Click on "Check Proposal" to perform syntax checking on the entire
proposal.
5.3.1 How to Use the PED Screens
All the PED screens are structured similarly, so the following information should
be relevant to most of the screens.
- 30 -
RPS2 User’s Manual (Version 11.0)
5.3.1.1 Entering Data
Data can be typed directly into the highlighted entry boxes (blue on most systems).
To enter data, position the mouse in the box and click once, and blinking cursor will
appear.
It is not possible to move between entry boxes using the Return or Tab keys; you
must reposition the mouse and click once. If an entry box is darkened (grey on most
systems), it means that it is not legal to enter data there due to other options or
configurations you have chosen.
Any box that turns slightly darker when you position the mouse pointer over it can
be clicked on to make a selection or bring up another list or data entry box.
5.3.1.2 Using the Sliders
Some entry screens contain sliders. To enter data, you can either type directly into
the entry box or move the slider. To move the slider, place the mouse over the slider
button and click and drag it in the desired direction.
5.3.1.3 Modifying Lists
Many screens contain lists of certain items, such as the Visit List shown below:
• To add a new item, click the “New <item>” button below the list.
• To renumber the items, click the “Renumber <item>” button below the
list.
• To edit an existing item, position the mouse over the appropriate <item>.
The line will become highlighted. Click the left mouse button, and a pulldown menu will appear. Choose “Edit <item>”. Alternatively, you can
just double click on the item to edit it.
• To copy an item, position the mouse over the appropriate item. The line
will become highlighted. Click the left mouse button and choose “Copy
<item>" from the pull-down menu.
• To delete an item, place the mouse over the <item> and click the left
mouse button. Choose “Delete <item>” from the pull-down menu.
- 31 -
RPS2 User’s Manual (Version 11.0)
5.3.1.4 Immediate Syntax Checking
Most of the entry screens contain two boxes: “Done” and “Check <item>”, where
<item> may be flux, optional parameter, target, exposure, visit, proposal and so on.
• Click on “Done” if you are finished entering data and want to close the
screen without performing an immediate syntax check.
• Click on “Check <item>” to perform a syntax check on the data in that
screen. In this way, you can check entries in individual screens as you go
(e.g, flux data, exposure, targets, visits).
If problems are found, a new window will pop up with a brief diagnostic messages.
More detailed explanations are available by clicking on the message of interest.
5.3.1.5 Available and Unavailable Items in Pop-Up Menus
Much of the exposure-level data (e.g., instrument configuration, operating mode) is
selected by clicking on items in pop-up menus. These menus list both available and
unavailable selections (described in the relevant section the Phase 2 Proposal
Instructions). The available options are on the left side of the menu; the unavailable
options are on the right side of the menu and will be in gray. If you try to select an
unavailable option, text will appear at the bottom explaining why it’s available.
5.3.2 The "File" Selection Button
Clicking on this button opens a pop-down menu with the following options:
•New - create a new, blank RPS2 template. You will be prompted to enter
the new file name (include the directory path if necessary). The file must
be of the form <#>.prop, where <#> is your HST proposal ID. (Or, it can
be any number if you’re creating a template for your own use).
•Open - open an existing <#>.prop file
•Save - save (write) the selected <#>.prop file. You must save the proposal
before running RPS2. RPS2 will process the version which is saved on
disk, not the version loaded in PED.
•Save Quickly - Same as the save option.
•Quit - exit PED. You do not need to exit PED to run RPS2.
- 32 -
RPS2 User’s Manual (Version 11.0)
5.3.3 The "General" Information Page
This button brings up this PED General Proposal Information page.
Proposal Information
In this screen, you can enter and edit the following portions of the template:
• Proposal Title
• Principal Investigator Name and Institution
• Parallel Pointing Tolerance (for Parallel Proposals)
• Co-Investigator Names and Institutions
• Abstract
• Description of Observation(s)
• Real Time Justification Calibration Justification
• Additional Comments
- 33 -
RPS2 User’s Manual (Version 11.0)
This information will be filled in already from Phase I proposal information, and
you should review the text sections and update them if necessary.
5.3.4 The "Targets" Page
This button brings up the Targets List Page
Targets List
In this screen, you can
• enter a new target,
• modify, renumber, delete an existing target,
• and check the syntax for all targets using the "Check Targets" button.
To edit, copy or delete a target entry, click on the desired item (see section 5.3.1).
When you click on “New Target”, a menu will appear: Fixed Target, Moving Target
or Generic Target (Target of Opportunity or Parallel Target). Upon making your
selection, the Target Editor page will appear and you should fill in all the needed
information (number, name, position, and so on). When you add a new target, a
default target name will be entered automatically, so be sure to change the default
name to the proper target name.
- 34 -
RPS2 User’s Manual (Version 11.0)
5.3.5 The "Visits" Page
This button brings up the PED Visit List.
Visit List
This screen contains the existing visit(s), the target(s) used in each visit, and any
visit-level special requirements. From this list, you can create a new visit, modify,
renumber or delete existing visits, and check the syntax for all visits. See item 4 in
section 5.3.1 for information on how to edit the Visit List.
When you add or modify a visit, the PED Visit Editor is brought up on your screen
(see next section).
5.3.5.1 Visit Information Page
The visit page lists visit-level special requirements and all the exposures in the visit.
You can add, delete or edit the special requirements or exposures by clicking on the
entry you wish to change. Refer to item 4 in section 5.3.1 for information on how
to edit these lists. From this page, you can also copy or delete one or more exposures
in the current visit. This page also has areas to enter visit-level "Comments" and "On
Hold" comments.
When you add or modify an exposure (by clicking on it and selecting "edit", "copy"
or "delete" from the pop-down menu), the PED Exposure Editor Page will come up
on your screen.
5.3.5.2 Exposure Information Page
On this page, you can enter all exposure-level data such as Science Instrument,
configuration, aperture, and so on. This page also lists the exposure-level optional
parameters and special requirements. See item 4 in section 5.3.1 for information on
how to edit these lists. Each exposure has its own Exposure Editor page.
On this page you can also add, modify, or delete an exposure’s optional parameters
and comments.
- 35 -
RPS2 User’s Manual (Version 11.0)
5.3.6 The "Patterns" Page
This button brings up the Patterns Page.
Patterns allow an observer to make small-scale repositioning of the aperture (e.g.,
for dithering) or make larger-scale movements to produce a mosaic of a region of
the sky or obtain background measurements. For more information on Patterns,
please consult Chapter 8 of the Phase 2 Proposal Instructions.
From this screen, you can add, delete or copy a Pattern renumber them, or check the
syntax. See item 4 in section 5.3.1 for information on how to edit the Pattern List.
Pattern Editor Page
5.4 How to Get Help in PED
Context sensitive, on-line help from the Phase 2 Proposal Instructions is available
- 36 -
RPS2 User’s Manual (Version 11.0)
on the editing pages. If you have a question concerning a particular item on a page
(e.g., "Special Requirements" in the Visit Page or "Pattern Type" in the Pattern
Page):
• Click on the "Help" button located near the lower right corner of the
page.
• Then move the pointer over to the item of interest. If help information is
available, a ? mark will appear.
• Click again with the ? mark and a help window should appear with
information on the item.
If you need additional assistance, contact your Program Coordinator (see the
Program Information page) at any time.
- 37 -
RPS2 User’s Manual (Version 11.0)
Chapter 6: Alternate Ways to Run
RPS2
In this Chapter ...
• A Summary of Alternatives
• How to Run RPS2 Remotely from an XWindows Display
• How to Run the Command Line Version of RPS2
• How to Use RPS2 from Home
6.1 A Summary of Alternatives
The following table offers alternatives for users who do not have one of the
supported platforms described in section 2.2.
Table 6.1: RPS2 Alternatives
Do you have an account on a supported platform?
Yes
Do you
have an
XWindows
display?
No
Yes
No
Install and run RPS2 on a supported workstation and redirect
display to your own graphics
terminal.
Obtain a guest account from
STScI and run RPS2 there,
redirecting the display to your
own graphics terminal.
Install RPS2 on the supported
workstation and run the command line version of RPS2.
Obtain a guest account from
STScI and run the command
line version of RPS2.
6.2 How to Run RPS2 Remotely from an XWindows Display
Any XWindows display device with TCP/IP (the Internet Protocol) can be used to
display the interactive version of RPS2. The display device does not need to be a
Sun; any XWindows client will work. (Some examples are: non-Sun Unix
workstations, XTerminals, personal computers running XWindow emulation
software, and VAX workstations.) In all cases follow these four steps:
1) Log on remotely using rlogin or telnet to the workstation on which RPS2
has been installed.
2) In the local session, enable the workstation with RPS2 to write to your
screen. This step is different for each system (VAXes, PCs, etc.). For exam- 38 -
RPS2 User’s Manual (Version 11.0)
ple, on an XTerminal, you would type: xhost +<computer running RPS2>.
Your system manager may be able to help.
3) In the remote session, set the Unix environment variable DISPLAY to point
to your graphics display (e.g., on Unix this might be setenv DISPLAY <your
computer name>:0.0).
4) In the remote session, run the command: <path of installation>/RPS2 &
You can skip Step 3 by setting the display environment variable at the time you
invoke RSP2 with the command:
<path of installation>/RPS2 -display <host:0.0> &
6.3 How to Run the Command Line Version of RPS2
If you have Internet access but do not have access to a suitable graphics terminal
which can display XWindows, your PC can assist you in obtaining a special account
on a computer at STScI. Then you can run the command-line version of RPS2 (but
not PED) using the following steps.
• Transfer the Proposal File
Once you have completed the first draft of your proposal, use telnet or rlogin
to login remotely to your STScI account. Then use a transfer protocol -- such
as FTP or Kermit -- to copy your proposal from your home computer to your
STScI account. Remember to create a separate subdirectory for your proposal
and use the file name: <#>.prop, where <#> is the proposal ID number
supplied by your PC.
• Process the Proposal with RPS2
Type the following command while in the directory which contains your draft
proposal:
rps2-com -- process <#>.prop
(There is a blank, two dashes, and a blank between “rps2-com” and “process.”)
This command combines two of the interactive RPS2 commands: “Process”
and “Write PS Files.” You will see status information scroll by on your
terminal screen. When processing is finished, a complete set of PostScript files
will be available in the proposal directory. These files will contain the Proposal
Summary Report, Visit Summary Reports for each visit, diagnostic reports for
each visit, and the concatenated help file. These are the same files that would
have been created had you been running the interactive version of RPS2 and
used the “Write PS Files” option.
• Retrieve the Output Products and Make any Needed Changes
In order to look at these PostScript reports, transfer all the .ps files back to your
home machine and print them on a PostScript printer. Examine them, make any
- 39 -
RPS2 User’s Manual (Version 11.0)
necessary changes to your proposal, and then transfer the modified proposal to
STScI and reprocess it.
• Submit Proposal to STScI
Once you have worked out all the details of your proposal and are satisfied with
the processing results, the proposal can be submitted to STScI. Place the
completed version of the proposal in a directory on your STScI account (you
may want to include a comments file with your submission), and then issue the
following command:
rps2-com -- submit <#>.prop <comments file name>
(There is a blank, two dashes, and a blank between “rps2-com” and “submit.”)
As with the “Submit” option in the interactive RPS2, the submission software
returns an automatic electronic acknowledgement to you via e-mail.
6.4 How to Use RPS2 from Home
If you have RPS2 installed on a system at work but want to work from a nongraphical terminal at home (or in your office), you can use the command line
version of RPS2 as outlined in section 6.3. If you do not have a PostScript printer
at home, you can at least review the Syntax diagnostics on-line by reading the raw
*.p*-diag files.
If you have not run the graphical RPS2 interface first (and therefore have not started
the servers), you may want to start the servers on your work system to avoid the
internet connection to servers at STScI.
• Starting the Servers from the Command Line
To start the servers type
<path of installation>/start-RPS2-servers
This will start all server processes and create log files in your current directory
(each with the extension.log). As long as the servers are running, the RPS2
client will be able to use the local servers instead of the ones running at STScI.
• Shutting Down the Servers
To stop the servers type
<path of installation>/stop-RPS2-servers
Normally there is no reason to shut down the servers, since they consume
minimal resources when they are not being used. Remember that if the local
servers are stopped, RPS2 will run, but it will be accessing the heavily loaded
STScI servers generally resulting in slower response.
- 40 -
RPS2 User’s Manual (Version 11.0)
Chapter 7: Glossary
CASM (Constraint Analysis Spike Module) or Schedulability - This is the core
of STScI’s Spike constraint software configured separately to serve both RPS2 and
Spike. Input files come from the PP and Trans. Output files contain information on
the schedulability of each visit and are passed to the DG.
CS (Control System) - This is the subsystem that facilitates the communication
among the other pieces of the RPS2 software system. It includes the Controller, the
Dispatcher, the Router, and the Server wrappers for each service. The user interacts
with the Control System via the User Interface.
DG (Description Generator) - This is the subsystem that combines the output
(descriptive and diagnostic) of the other RPS2 subsystems (PP, Trans, and CASM)
into a set of reports that are easy to read and informative. There are two types of
reports: the proposal summary and visit analysis reports.
Diagnostics - This is a generic name for the error or warning messages that the
RPS2 subsystems can produce.
Dispatcher - This is part of the Controller which communicates between the client
and a server.
Orbit - This is the 96 minute HST orbit around the Earth. Do not confuse this with
the "visibility period" which usually is the ~50 minute usable portion of an orbit
where the target is not occulted by the Earth.
PC (Program Coordinator) - The primary STScI contact for the PI. The PC will
help the PI throughout the observing program preparation process. He or she will
also process the program for scheduling on HST after it has been submitted to
STScI.
PED (Proposal Editor) - This is the graphical editor for writing and editing HST
Phase 2 proposals.
PP (Preprocessor) - This subsystem checks the syntax (and reports diagnostics to
the DG) and then converts the RPS2 file into the files needed for Trans and CASM.
Proposal Summary Report - This is one of the DG product reports that
summarizes the proposal visit by visit. It includes the target name, instrument and
mode, number of orbits used, and diagnostic status. It also includes proposal-level
syntax diagnostics, general proposal-level information, and a scheduling summary.
Router - This is the part of the Control System that chooses which Server to use for
a particular process. (If there are two computers running the CASM Server then it
will choose which one to use.)
- 41 -
RPS2 User’s Manual (Version 11.0)
RPS2 file - This is the file that contains a Phase 2 proposal, hopefully in the proper
"visit based" syntax. The naming convention is <#>.prop where <#> is the
proposal ID number.
RPS2 system - This is the proposal preparation software package that helps an HST
observer to write and submit a Phase 2 proposal, which is not only syntactically
correct, but also feasible, schedulable, and makes optimal use of its allocated orbits.
Server - This is another part of the Control System that serves as a “wrapper” to
allow the other subsystems (e.g., Trans, and CASM) to be run remotely without
modification. There will be servers for each subsystem running at STScI. The
server software for a subsystem must be running on a machine in order for that
machine to be used for processing by that subsystem.
Service - This is the generic name for any of the subsystems (e.g., Trans or CASM)
which is run remotely by the Control System.
Spike - This is the STScI software that determines the schedulability of an
observation and helps STScI develop a long range plan of observations on-board
HST.
Trans or Feasibility - This is the STScI software (and a subsystem in RPS2) that
determines the feasibility of a proposal. The files it generates are used to populate
the STScI operational database, which in turn are used when preparing and
scheduling visits for execution on HST.
UI (User Interface) - This subsystem allows the user to talk to the Control System.
In addition to processing a proposal, the UI can be used to start the DG, start PED,
and submit a proposal to STScI.
Visit - This is a group of exposures that should be observed together. If a visit has
more than one target, they should be located close together. The observer using the
RPS2 determines what exposures go into each visit of their proposal.
Visit Analysis Report - From the output of other RPS2 subsystems, the DG
assembles an analysis report for each visit. It contains a summary of the visit -exposure by exposure -- its Feasibility, Schedulability, and any diagnostics.
- 42 -