1
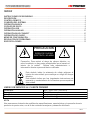
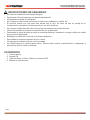
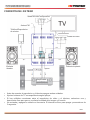
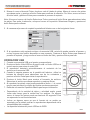
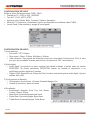
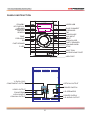
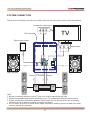
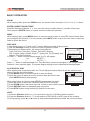
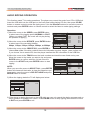
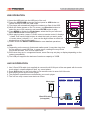
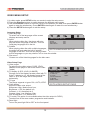
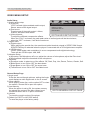
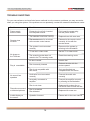
MANUAL DE INSTRUCCIONES
MINI-COMPONENTE C/REP. DE VIDEO
SX-5257BT
ESTIMADO CLIENTE
Con el fin de que obtenga el mayor desempeño de su producto, por favor lea este manual de
instrucciones cuidadosamente antes de comenzar a utilizarlo, y guárdelo para su futura referencia.
Si necesita soporte adicional, no dude en escribir a: [email protected]
ÍNDICE
INSTRUCCIONES DE SEGURIDAD ......................................................................................................... 2 DESCRIPCIÓN .......................................................................................................................................... 3 CONTROL REMOTO ................................................................................................................................. 4 CONEXIÓN DEL SISTEMA ....................................................................................................................... 5 OPERACIÓN BÁSICA ............................................................................................................................... 6 COPIADO DE DISCO ................................................................................................................................ 8 OPERACIÓN USB ..................................................................................................................................... 9 OPERACIÓN AUXILIAR.......................................................................................................................... 10 OPERACIÓN BLUE-CONNECT .............................................................................................................. 10 OPERACIÓN DEL RADIO ....................................................................................................................... 11 MENÚ DE CONFIGURACIÓN ................................................................................................................. 11 RESOLUCIÓN DE PROBLEMAS ........................................................................................................... 13 ESPECIFICACIONES .............................................................................................................................. 13 PRECAUCIÓN
RIESGO DE CHOQUE
ELÉCTRICO , NO ABRA
Precaución: Para reducir el riesgo de choque eléctrico, no
retire la cubierta, no hay partes manipulables por el usuario al
interior de la unidad.
Refiera todo mantenimiento o
intervención técnica a personal técnico calificado.
Este símbolo indica la existencia de voltaje peligroso al
interior de esta unidad, que constituye un riesgo de choque
eléctrico.
Este símbolo indica que hay importantes instrucciones de
operación y mantenimiento en la literatura que acompaña a
esta unidad.
LÍNEAS DE SERVICIO AL CLIENTE PREMIER
Venezuela:
Panamá:
Sitio Web:
E-mail:
0800 – ELECTRIC (353-2874)
300-5185
www.premiermundo.com
[email protected]
NOTA
Nos reservamos el derecho de modificar las especificaciones, características y/u operación de este
producto sin previo aviso, con el fin de continuar las mejoras y desarrollo del mismo.
P-1
INSTRUCCIONES DE SEGURIDAD
•
•
•
•
•
•
•
•
•
•
•
•
No utilice la unidad cerca de fuentes de agua.
Para limpiar utilice únicamente una prenda humedecida.
No bloquee las rejillas de ventilación.
No coloque la unidad cerca de fuentes de calor como radiadores, estufas, etc.
El enchufe cuenta con una pata más ancha que la otra. En caso de que no encaje en el
tomacorriente, reemplace al tomacorriente por uno más moderno.
No coloque el cable de poder de tal forma que las personas se pueden enredar.
Utilice únicamente los accesorios especificados por el fabricante.
Desconecte el cable de poder en caso de tormenta eléctrica o cuando no se vaya a utilizar la unidad
por un período prolongado.
Mantenga la unidad en un entorno con buena ventilación.
Esta unidad no requiere conexión al polo a tierra.
No exponga la unidad a la lluvia ni a la humedad.
No intente reparar la unidad usted mismo. Remita toda revisión, mantenimiento y reparación a
personal de servicio técnico calificado.
ACCESORIOS
1.
2.
3.
4.
P-2
Control remoto
Antena FM
Cable de Audio y Video, Cable con conector RCA
Manual de instrucciones
DESCRIPCIÓN
Standby
Pantalla VFD
R/L/Idioma
Indicador
Pantalla
Búsqueda
Tono
Anterior
Ecualización
Retroceder
LED
Video/USB
Blue-Connect
Sensor IR
FM
Play/Pause
Entrada auxiliar
Siguiente
Abrir/Cerrar
Adelantar
Volumen
Detener
Bandeja de disco
Puerto de Micrófono
Puerto USB
Salida Componente
Y, Pb/Cb, Pr/Cr
Salida óptica
Interruptor de Encendido
Salida de Video
Antena FM
Entrada L/R Aux
Parlantes L/R
Salida Coaxial
Conector de Energía
Salida de Audio L/R
P-3
CONTROL REMOTO
Standby
Video
Blue-Connect
USB
Repetición A-B
Repetición
Título
Menú
Configuración
Play/Pause/Enter
Dirección
Detener
Siguiente/Canal +
Anterior/CanalÁngulo/Guardar
Búsqueda
Ecualización
Graves
Zoom
OK On/Off
•
•
•
Expulsar
FM
Entrada Auxiliar
Botones Numéricos
Hora/Frecuencia
Copiar CD
Mostrar
R/L/Idioma
Subtítulos
Silenciador
Retroceder
Volumen +/Adelantar
Mono/Estéreo
Agudos +/Ok / Volumen +/-
Coloque las baterías para comenzar a utilizar el control remoto. Cuando use el control remoto
apúntelo al sensor de la unidad.
La distancia entre la unidad y el control remoto no debe ser mayor a 7 metros.
Evite utilizar la unidad y el control remoto cerca de otros dispositivos electrónicos para evitar
interferencias.
P-4
CONEXIÓN DEL SISTEMA
Salida de video componente
Antena FM
Teléfono/Reproductor
de música
Salida de video
Parlante
derecho
Parlante izquierdo
Óptico
Amplificador
•
•
•
•
Antes de conectar el reproductor y el televisor apague ambas unidades.
Ajuste el sistema de TV correspondiente según aplique.
Si hay múltiples conexiones entre el reproductor de vídeo y el televisor, seleccione una y
desconecte otras para que no se afecte la calidad de la imagen y el sonido.
No encienda y apague la unidad con frecuencia. El intervalo mínimo para apagar y encender es de
3 segundos.
P-5
OPERACIÓN BÁSICA
PREPARACIÓN
1. Antes de encender la unidad verifique que todas las conexiones son correctas y confiables. Conecte
los cables de poder. Encienda la unidad.
2. Presione el botón Standby para encender la unidad o ponerla en modo de espera.
3. Presione el botón Expulsar en el control remoto o Abrir/Cerrar en el panel frontal para sacar la
bandeja y colocar un disco. La unidad reproduce el disco automáticamente.
STANDBY
Presione este botón en el control remoto (o en el panel frontal) para cambiar la unidad al modo de
espera.
SELECCIÓN DE MODO
• Presione los botones Video, BT, FM, Aux o USB en el control remoto para seleccionar el modo.
• Presione el botón Video/USB en el panel frontal para seleccionar Video o USB.
• Presione el botón Blue-Connect, FM o Auxiliar en el panel frontal para seleccionar el modo.
PLAY/PAUSA
Presione este botón para iniciar y pausar la reproducción.
ANTERIOR Y SIGUIENTE
Utilice estos botones para cambiar de pistas hacia adelante y hacia atrás.
RETROCEDER Y ADELANTAR
Utilice estos botones para retroceder y adelantar las pistas a alta velocidad. Cada vez que presione los
botones la velocidad cambia de la siguiente forma: 2X, 4X, 8X, 16X, 32X.
AJUSTE DE VOLUMEN
Presione el botón de volumen o gire la perilla para ajustar el nivel.
SILENCIADOR
Presione este botón para cancelar el sonido. Presiónelo de nuevo para reactivarlo.
BOTONES NUMÉRICOS
Utilice estos botones para seleccionar pistas, frecuencias o estaciones, etc.
DETENER
Utilice este botón para detener la reproducción. Presione Play para reanudar.
VISTA DE ÁNGULO
Presione el botón Ángulo en el control remoto de forma repetida para ver el video en diferentes ángulos.
(El disco debe tener disponible la función de ángulo).
ECUALIZACIÓN
Presione el botón de ecualización para seleccionar diferentes tipos de ecualización: Jazz, Rock,
P-6
Clásica, Pop, Live, Dance y apagado.
AJUSTE DE TONO
Para ajustar el efecto de graves y agudos, presione el botón Tono en el panel frontal para seleccionar
graves o agudos; luego gire el botón de volumen para ajustar. O presione los botones Graves +/-,
Agudos +/- en el control remoto para ajustar directamente los niveles.
REPETIR
Presione el botón Repetir en el control remoto para seleccionar los modos de repetición (la función de
repetición se activa dependiendo del tipo de disco): Capítulo, Título, Todos, Apagado; Pista, Todos;
Sencillo, Repetir Uno, Repetir Carpeta, Apagado.
REPETICIÓN A-B
Presione este botón para activar la función de repetición de sección. Seleccione el punto A (punto de
inicio) y presione el botón. Avanza hasta el punto B (punto final) y presione de nuevo el botón. La
unidad reproducirá esta sección una y otra vez. Para cancelar presione de nuevo el botón.
OK ON/OFF
Utilice este botón en el control remoto para encender y apagar el micrófono.
OK VOLUMEN
Presione este botón para ajustar el volumen del micrófono.
CANAL IZQUIERDO/DERECHO Y SELECCIÓN DE IDIOMA
Utilice este botón para cambiar entre las funciones de audio: L-Mono, R-Mono, Mix-Mono y Estéreo.
Cuando reproduzca un disco con varios idiomas, utilice este botón para seleccionar el idioma.
TÍTULO
Al reproducir un vídeo, presione este botón en el control remoto para entrar al menú de Título o menú
principal. Utilice los botones de dirección para mover el cursor y seleccionar los ítems que desea
reproducir, o utiliza directamente los botones numéricos para seleccionar.
SELECCIÓN DE SUBTÍTULOS
Si el disco contiene subtítulos, presione este botón en el control remoto para elegir uno.
MOSTRAR (Display)
Utilice este botón en el control remoto para mostrar información sobre la reproducción del disco: tiempo
transcurrido, tiempo restante, tiempo total restante, etc. (la información mostrada depende del tipo de
disco).
ZOOM
Al reproducir un vídeo presione este botón para aumentar el tamaño de la imagen. La imagen cambia
de la siguiente forma: ½, 1/3, ¼, 2, 3, 4 veces.
ENTRAR Y BOTONES DE DIRECCIÓN
Utilice los botones de dirección para mover el cursor y seleccionar ítems o contenido del menú.
Presione el botón Entrar para aceptar la selección.
P-7
MENÚ
Al reproducir un vídeo, presione el botón Menú en el control remoto para activar esta función. (En
algunos discos se utiliza el botón Silenciador para ir al menú o abrir una lista de archivos).
DATOS SOBRE EL DISCO
1. En el modo de reproducción, presione el botón -/-- para mostrar información sobre el disco.
2. Utilice los botones de dirección para moverse a través de los ítems.
3. Usted puede seleccionar características como: pista, tiempo del disco, tiempo de la pista, entre
otras.
REPRODUCCIÓN DE DISCO ESPECIAL
Al reproducir formatos especiales de disco, el televisor mostrará todos los ítems del disco y comenzará
a reproducir desde la primera pista.
1. Presione el botón Menú en el control remoto para ingresar a la carpeta.
2. Mueva el cursor para seleccionar el contenido de la lista de archivos y presione el botón Entrar.
Al reproducir un disco de imágenes, presione el botón Detener para ingresar a la carpeta.
1. Mueva el cursor al archivo que desea abrir y presione el botón Entrar.
2. Utilice el botón Zoom para aumentar el tamaño de la imagen, y los botones Derecha/Izquierda.
3. Presione el botón Repetir para activar la función de repetición.
4. Presione el botón Detener durante la búsqueda para ingresar al menú principal.
COPIADO DE DISCO
Esta función requiere de un televisor para poder llevarla a cabo. El reproductor puede convertir la
música de un CD a una memoria USB. Conecte la memoria USB en el puerto correspondiente en el
panel frontal y el CD en la bandeja. Presione el botón CD RIP en el control remoto para ingresar al
menú de copiado. Utilice los botones de dirección para mover el cursor por el contenido y presione
Entrar en el control remoto para seleccionar los elementos que desea copiar.
OPERACIÓN
1. Mueva el cursor a Velocidad, y presione Entrar para
seleccionar una de las velocidades: Normal o Rápido (al
seleccionar la velocidad rápida la música no se reproduce
durante el proceso de copiado).
2. Mueva el cursor Tasa de Bits, presione Entrar para
seleccionar una de las tasas de bits: 96, 112, 128, 192, 256
o 320 kps.
3. Mueva el cursor a Crear ID3, y presione Entrar para
seleccionar Sí o No. Si el disco contiene información sobre
la música como cantante, años, escritor, etc, esta
información quedará en la pista y se podrá ver en el archivo
en la USB.
P-8
4. Mueva el cursor al área de Pistas, donde se verá el listado de pistas. Mueva el cursos a las pistas
que desea copiar, y presione el botón Entrar para confirmar la selección. Por último, mueva el cursor
al botón Iniciar y presione Entrar para comenzar el proceso de copiado.
Nota: Al mover el cursor a la función Seleccionar Todos, presione el botón Entrar para seleccionar todas
las pistas. Para quitar la selección, coloque el cursor en la posición Seleccionar Ninguno y presione el
botón Entrar para confirmar.
5. Al comenzar el proceso de copiado la pantalla del televisor se ve de la siguiente forma:
6. Si el reproductor está copiando música a la memoria USB, usted sólo puede cancelar el proceso y
no hay ninguna otra función disponible en ese momento. Presione el botón Entrar para detener el
proceso de copiado, y luego mueva el cursor al botón de Salir y presione Entrar para salir.
OPERACIÓN USB
1. Conecte una memoria USB en el puerto correspondiente.
2. Presione el botón Video/USB en el panel frontal o el botón USB en el
control remoto para entrar al modo USB.
3. El reproductor detectará automáticamente el contenido de los
archivos en la memoria USB.
4. Cuando la carpeta aparece en la pantalla del televisor, utilice los
botones de dirección para seleccionar uno de los contenidos y
presione el botón Entrar para iniciar la reproducción.
5. Presione el botón Menú para mostrar el buscador de archivos.
Seleccione el archivo que desea reproducir y presione Entrar.
6. Al reproducir las pistas, usted puede presionar el botón -/-- el control
remoto para introducir los dígitos de la pista que desea reproducir.
7. Refiérase a la sección Operación Básica para mayor información.
•
•
•
Dependiendo de la cantidad de datos y velocidad media, puede
tomar más tiempo para la unidad leer los archivos. En algunos
casos, el tiempo de lectura puede ser hasta de 60 segundos. Esto
no represente un mal funcionamiento.
Incluso en algunos casos en que el formato de un archivo es
soportado por la unidad, podrían no reproducirse dependiendo de la
compatibilidad del contenido.
La capacidad máxima del puerto USB es de 32GB.
P-9
OPERACIÓN AUXILIAR
1. Utilice un cable RCA de 3.5mm (no incluido)
para conectar el puerto de Entrada Auxiliar con
Dispositivo
la salida de audio del dispositivo auxiliar.
externo
2. Presione el botón Auxiliar en el panel frontal o
en el control remoto para activar este modo.
3. Inicio la reproducción desde el dispositivo
externo.
4. Las funciones de reproducción se controlan en
el dispositivo externo.
5. Sólo se puede utilizar un dispositivo externo a la
vez.
Cable RCA
de 3.5mm
OPERACIÓN BLUE-CONNECT
1. Presione el botón Blue-Connect en el panel frontal o BT en el control remoto para ingresar a este
modo.
2. Encienda la función Blue-Connect en su dispositivo (por ejemplo, teléfono inteligente).
3. Coloque el dispositivo en el modo de búsqueda de Blue-Connect en un rango de 10 metros. El
teléfono buscará la unidad.
4. Observe la lista de dispositivos encontrados y seleccione el nombre de esta unidad SX-5257BT.
Algunos dispositivos le pedirán que confirme la selección eligiendo OK/SÍ/ENLAZAR.
5. En algunos dispositivos tal vez necesite introducir una contraseña. Ingrese “0000”.
6. El dispositivo emitirá un ‘bip’ cuando la conexión se establezca.
7. Al terminar apague la función Blue-Connect en su dispositivo o desconecte el enlace. Si desea
conectar otro dispositivo siga los pasos 2, 3 y 4 anteriores.
Nota
• Al reproducir música por medio de un teléfono, y entra una llamada, la música se detendrá
automáticamente. Al terminar la llamada, dependiendo de la configuración del teléfono, la
reproducción puede reanudarse uno.
• Algunos dispositivos se enlacen de inmediato; algunos requieren más tiempo.
• La unidad sólo se puede conectar a un dispositivo a la vez.
P-10
OPERACIÓN DEL RADIO
El rango de frecuencia FM es de 87.5 a 108 MHz. Para lograr la mejor recepción, ajuste primero la
antena.
Presione el botón FM en el control remoto o en el panel frontal.
Presione el botón MO/ST en el control remoto para encender o apagar la función Estéreo. Si la señal no
es muy fuerte, se recomienda que activa la función para mejorar la recepción.
SINTONIZAR
• Utilice los botones Canal- y Canal+ para moverse a través de las estaciones.
• Utilice los botones Adelantar y Retroceder para avanzar 0.1MHz cada vez.
• Presione y mantenga las botones Adelantar y Retroceder para saltar estaciones y sintonizar las de
mejor frecuencia.
• Presione el botón -/-- para introducir los números correspondientes a la estación radial.
BÚSQUEDA AUTOMÁTICA
Presione el botón Search para buscar estaciones radiales desde la frecuencia más baja hasta la más
alta, de forma automática. Presione este botón para detener la búsqueda.
GUARDAR ESTACIONES
Utilice el botón Guardar para guardar las estaciones. Presione directamente este botón en el control
remoto para guardar la estación radial en curso.
MENÚ DE CONFIGURACIÓN
•
•
•
•
En el modo de vídeo, presione el botón Configuración en el control remoto para entrar a este menú.
Utilice los botones de dirección para cambiar entre las diferentes páginas.
Utilice los botones de dirección para mover el cursor a la posición que desee, y luego presione el
botón Entrar para acceder al subdirectorio.
Presione el botón de Configuración para salir de esta función.
CONFIGURACIÓN DE IDIOMA
• Idioma OSD: seleccione el idioma en pantalla y del menú.
• Audio: al reproducir un disco con vídeo, utilice este botón para cambiar el idioma de reproducción.
• Subtítulos: utilice este botón para cambiar los subtítulos:
• Menú de disco: seleccione uno de los idiomas para el menú del disco
P-11
CONFIGURACIÓN DE VIDEO
Salida de video: Seleccione entre CVBS, YPbPr.
• Pantalla de TV: 4:3PS, 4:3LB, 16:9WIDE
• Tipo de TV: PAL, AUTO, NTSC
• Ajuste de color: Nitidez, Brillo, Contraste, Gamma, Saturación
• Modo de TV: Progresivo y Entrelazado (opción no disponible con salida de video CVBS).
• Luz de Panel: Para encender y apagar la luz del panel.
CONFIGURACIÓN DE AUDIO
1) Audio análogo:
• Surround: LT/RT, Estéreo
• Dual mono: L-Mono, R-Mono, Mix-Mono y Estéreo
• Video dinámico: Para ajustar los diferentes modos de compresión (Al seleccionar FULL el valor
pico-pico de las señales de audio será mínimo; al seleccionar OFF, será máximo).
2) Audio digital
• Audio digital: al reproducir un disco especial, las salidas coaxiales y ópticas están en formato
SPDIF/RAE. Se puede seleccionar SPDIF/PCM cuando se conecta el reproductor a un
amplificador estéreo digital de 2 canales.
• Salida LPCM: Modulación de Código de Pulso Lineal es una tecnología de audio digital. Hay dos
salidas: 48K y 96K.
3) Configuración de Karaoke
• Configuración de micrófono: Volumen, Encender/Apagar, Eco.
• Umbral de micrófono: ajuste el umbral
4) Ecualizador
• Ecualización: Apagado, Rock, Pop, Live, Dance,
Techno, Clásico, Suave.
• Bass Boost: Encender/Apagar bass boost
• Súper Bass: Encender/Apagar Súper Bass
• Treble Boost: Encender/Apagar Treble Boost
P-12
CONTROL DE PADRES
(Disponible Sin Disco)
La unidad cuenta con varios niveles de clasificación de
censura para el control de padres. Mueva el cursor para
seleccionar uno de ellos. Presione Enter para confirmar.
Contraseña: La contraseña por defecto es 0000. Usted
puede reemplazarla por una diferente.
RESOLUCIÓN DE PROBLEMAS
Esta lista es para ayudarle a resolver problemas simples que pueden presentarse en el uso del
producto. Por favor léala y verifique estos puntos antes de solicitar ayuda de personal de servicio
técnico autorizado.
PROBLEMA
La unidad no recibe energía
El control remoto no funciona
No hay imagen en el televisor
La unidad no reproduce el disco
No hay sonido en los parlantes
Sonido discontinuo o imágenes distorsionadas
Aparece un mensaje de error en la pantalla
CAUSA Y SOLUCIÓN
Verifique la conexión del cable de poder
Verifique el estado las baterías y reemplace de
ser necesario.
Apunte el control remoto al sensor de la unidad.
Verifique las conexiones del sistema.
El televisor debe estar en modo de vídeo.
El modo de escaneo no encaja con el modo de
escaneo del televisor.
No se ha insertado ningún disco.
El disco sea colocada incorrectamente.
El disco no es compatible con la unidad.
Verifique la conexión de los cables.
El disco no está limpio o está rayado. Intenté con
una diferente.
Se ha introducido un comando incorrecto.
ESPECIFICACIONES
Potencia de salida
Voltaje de entrada
Salidas
Entradas
Otras prestaciones
Distancia remota
Frecuencia
Rango de Blue-Connect
•
2 x 30W
AC 100V-240V, 50/60Hz
Vídeo componente, Audio/Video componente, Óptica, Coaxial
Auxiliar, USB
Micrófono
7 metros
87.5 – 108 MHz
10 metros
Las personas y/o Marcas registradas en este manual de instrucciones no están afiliadas a Premier Electric Japan Corp. y aparecen en
este Manual con propósitos ilustrativos únicamente.
P-13
INSTRUCTION MANUAL
Mini-Component W/Video player
SX-5257BT
DEAR CUST OM ER
In order to achieve the best performance of your product, please read this instruction manual carefully
before using, and keep it for future reference.
If you need extra support, please write to [email protected]
CONTENT
2
Warning
4
Panels Instruction
5
Remote Control
6
System Connection
7
Basic Operation
10
Audio Ripping Operation
11
USB/ Aux In Operation
12
Blue-connect/ FM Operation
13
Video Menu Setup
15
Specification
16
Trouble Shooting
ACCESSORIES
1* Remote control
1* FM Antenna
1* Six-head-Audio/Video cable w/RCA plug
1* User manual
1
CAUTION
RISK OF ELECTRIC
SHOCK, DO NOT
OPEN
Caution: To reduce the risk of electric shock do not open
this device, there are not serviceable parts for customers.
Please refer any maintenance or repair to qualified
personnel.
This sign means the existence of dangerous voltage at
the inside of the unit, which states a risk of electric shock.
This sign means that there are important instructions of
operation and handling in the manual that comes with this
device.
PREMIER CUSTOMER SERVICE
Venezuela:
0800-ELECTRIC (353-2874)
300-5185
www.premiermundo.com
[email protected]
Panama:
Website:
E-mail:
NOTE
This unit may be submitted to changes in specifications, characteristics and/or operation without prior
notice to the user, in order to continue improving and developing its technology.
IMPORTANT SAFETY INSTRUCTION
1. Read the Instructions - All the safety and operating instructions should be read carefully before you
use the product.
2. Keep the Instructions -The safety and operating instructions should be retained for future reference.
3. Heed all Warnings -All warnings on the appliance and in the operating instructions should be
adhered to.
4. Follow all instructions - All operating and use instructions should be followed.
5. Do not use this apparatus near water- The appliance should not be used near water or moisture
-for example, in a wet basement or near a swimming pool, and the like.
6. Clean only with a damp wet cloth.
2
IMPORTANT SAFETY INSTRUCTION
7. Do not block any of the ventilation openings. Install the unit in accordance with the instructions.
8. Do not install near any heat sources such as radiators, heat Registers, stoves, or other apparatus,
including amplifiers, that produce heat.
9. When the provided plug does not fit into your outlet, consult an electrician for replacement of the
obsolete outlet.
10. Protect the power cord from being walked on or pinched particularly at plugs, convenience
receptacles, and the point where they exit from the apparatus.
11. Only use attachments/accessories specified by the manufacturer.
12. Use only with a cart, stand, tripod, bracket, or table specified by the manufacturer, or sold with the apparatus. When a cart is used, use caution when
moving the cart/apparatus combination to avoid injury from tip-over.
13. Unplug the apparatus during lightning storms or when unused for long periods of time.
14. Refer all serving to qualified service personnel. Servicing is required when the apparatus has been
damaged in any way, such as power-supply cord or plug is damaged, liquid has been spilled or
objects have fallen into the apparatus, the apparatus has been exposed to rain or moisture.
15. Please keep the unit in a good ventilation environment.
16. These servicing instructions are for use by qualified service personnel only. To reduce the risk of
electric shock, do not perform any servicing other than that contained in the operation instructions
unless you are qualified to do so.
17. The mains plug is used as disconnect device, the disconnect device shall remain readily operable.
18.
This equipment is a Class II or double insulated electrical appliance. It has been designed in
such a way that it does not require a safety connection to electrical earth.
19.
-This lightning flash with arrowhead symbol within an equilateral triangle is
intended to alert the user to the presence of non-insulated dangerous
voltage within the product’s enclosure that may be of sufficient magnitude.
to constitute a risk of electric shock.
- To reduce the risk of electric shock, do not remove cover (or back) as there’re no user-serviceable
parts inside. Refer servicing to qualified personnel.
- The exclamation point within an equilateral triangle is intended to alert the user to the presence of
important operating and maintenance in the literature accompanying the appliance.
20. The batteries (if included) shall not be exposed or excessive heat such as sunshine, fire or the like.
21. The apparatus shall not be exposed to dripping or slashing and that no objects filled with liquids,
such as vases, shall be placed on the apparatus.
22. To reduce the risk of fire or electric shock, do not expose this apparatus to rain or moisture.
23. To prevent possible harm to the environment or human health from uncontrolled waste disposal,
recycle it responsibly to promote the sustainable reuse of material resources. To return your used
device, please use the return and collection systems or contact the retailer where the product was
purchased. They can take this product for environmental safe recycling.
3
PANELS INSTRUCTION
VIDEO/USB
STANDBY
VFD DISPLAY
L/R/LANG
INDICATOR
DISPLAY
SEARCH
BLUE-CONNECT
TONE
PREVIOUS
EQ
FAST REWIND
P. LED
VIDEO/USB
BLUE-CONNECT
IR SENSOR
FM
PLAY/PAUSE
AUX INPUT
NEXT
OPEN/CLOSE
FAST FORWARD
VOLUME KNOB
STOP
DISC TRAY
MICROPHONE PORT
USB PORT
Y, Pb/Cb, Pr/Cr
COMPONENT OUTPUT
OPTICAL OUTPUT
POWER SWITCH
VIDEO OUTPUT
L/R SPEAKERS
FM ANTENNA
L/R AUX INPUT
POWER SUPPLY
L/R AUDIO OUTPUT
COAXIAL OUTPUT
4
REMOTE CONTROL
1. Turn on the player and have batteries installed in the remote control, put the emitter against the
sensor of player for remote control.
2. The distance of remote control should not exceed 7 meters, or else, it will be invalid.
3. If the sensor or remote controller emitter is stuck with foreign matters, it may result in the malin signal reception or not at all.
4. The remote control function may be affected under the strong interference signals, such as power
supply and other strong high-frequency signals.
STANDBY
VIDEO
BLUE-CONNECT
USB
A-B REPEAT
REPEAT
TITLE
MENU
VIDEO
BT
FM
AUX
USB
1
2
3
4
5
6
7
8
0
REP.AB
TITLE
SUB.
CD RIP.
SETUP
PLAY/PAUSE/ENTER
+
MUTE
FAST FORWARD
CH+
VOL
PREVIOUS/CHANNELANGLE/SAVE
DISPLAY
LANG/R/L
SUBTITLE
ENTER
STOP
NEXT/CHANNEL+
CD RIPPING
DISPLAY
L/R/LANG
SETUP
DIRECTION
NUMBER
TIME/FREQUENCY
9
REPEAT
MENU
EJECT
FM
AUX IN
VOLUME+/-
CH-
-
FAST REWIND
ANGLE
SEARCH
EQ
BASS+/ZOOM
SEARCH
SAVE
MO/ST
EQ
BASS+
TREBLE+
ZOOM
BASS-
TREBLE-
OK ON/OFF
OK ON/OFF
OK VOL-
OK VOL+
MONO/STEREO
TREBLE+/-
5
OK VOLUME+/-
SYSTEM CONNECTION
Please check the below connection and make safe and firm connection before using the machine.
Component video output
Y Pb/Cb Pr/Cr
→
FM Antenna
Phone/music player
Video Input Audio R Audio L
Video output
→
→
→
→
Left Speaker
Right Speaker
Coaxial L/R Audio
Optical
→
→
→
Amplifier
Note:
1. Before connecting the player to the TV-set, turn off and unplug both the units.
2. Adjust the corresponding system according to your TV system while watching various discs.
3. If there are multiple connections between video player and TV, please select one and unplug
others so as not to affect the quality of images and sound.
4. Do not switch on and off or press power switch frequently, switching on and off each time must
have an interval of 3 seconds.
6
BASIC OPERATION
PREPARATION
1). Before turning on, check whether all the connection are correct and reliable. Insert the power plug
into the corresponding power socket. Press the power switch to power on the unit.
2). Press STANDBY
button to wake up the unit (or put into standby mode).
3). Press EJECT button on the remote control or OPEN/CLOSE button on the front panel to carry
the disc tray out, put the disc into the tray, press either button again, the unit starts reading and
playing automatically.
STANDBY
Press the STANDBY button on the remote control (or front panel) can switch on the unit or to the
standby mode.
MODES SELECTION
1) Press the VIDEO, BT, FM, AUX, or USB button on remote control to select the mode.
2) Press the VIDEO/USB button on the front panel to select VIDEO or USB mode.
3) Press the BLUE-CONNECT, FM, or AUX button on the front panel to select the mode.
PLAY/PAUSE
In play status, press PLAY/PAUSE button to pause the playing, press again to resume playback.
PREVIOUS & NEXT
In play status, press 9
button or :
button to skip to the previous or the next track.
FAST FORWARD & FAST BACKWARD
In play status, press 7
or 8
button, there will be different speeds of fast forward or fast rewind at
the speed X2, X4, X8, X16, X32.
VOLUME ADJUSTMENT
Press VOL-/+ button or rotate the volume knob to turn up or down the volume to a comfortable level.
MUTE
Press the MUTE button to mute the sound, press MUTE again or press VOL+/- button to resume the
normal status.
NUMBER BUTTONS
Use NUMBER buttons to select tracks, frequency or stations etc.
(E.g. if you want to play track 12, press the number button "1", then press "2".)
STOP
Press STOP
button to stop playing, press PLAY/PAUSE
button to start from beginning.
ANGLE VIEW
Press ANGLE button on remote control repeatedly to view the video on different angles. (The disc
must support this angle function.)
7
BASIC OPERATION
SOUND-FIELD SELECTION
Press the EQ button to select different sound fields: Jazz, Rock, Classic, Pop, Live, Dance and Off.
TONE ADJUSTMENT
To adjust the effect of bass and treble, press TONE button on the front panel to select bass or treble,
then rotate the VOLUME KNOB to adjust.
Or, press the BASS+/-, TREBLE+/- buttons on remote control to directly adjust the levels.
REPEAT
Press REPEAT button on remote control to select one of the repeat modes (based on different discs):
Chapter, Title, All, or Repeat Off; Track or All; Single, Repeat one, Repeat folder or Repeat Off.
A-B REPEAT
Press REP.AB button once at the beginning of the section (i.e A), and press it again at the end of the
section (i.e B), the player will automatically return to A and starts to repeat playing the section from A
to B. Press REP.AB button again to exit.
OK ON/OFF
Press the OK ON/OFF button on the remote control to set the microphone on or off.
Please do not point the microphone at the speakers when you set the microphone “on”.
OK VOLUME
Press the OK VOL+/- buttons to adjust the volume of the microphone.
LEFT/RIGHT CHANNEL/LANGUAGE SELECTION
Press L/R/LANG button to select one of the multiple output: L-Mono, R-Mono, Mix-mono, Stereo.
While playing disc with multiple languages, press L/R/LANG button to select a language for playback.
TITLE
While playing video, pressing TITLE button on remote control will enter the Title menu or Main menu.
Use the Direction buttons to move the cursor to select the items you want to play, or directly use the
number button to select.
SUBTITLE SELECTION
If the video disc contains multiple subtitles of different languages, press the SUB. button on remote to
choose one of the subtitles provided by the disc.
DISPLAY
In play status, press DISPLAY button on remote control to display the data of the disc:
Single elapsed, TR(track remain), Total elapsed, DR(directory remain), Display off; or Title elapsed,
Title remain, Chapter elapsed, Chapter remain, Display off. (depending on different discs.)
8
BASIC OPERATION
ZOOM
When playing video, press the ZOOM button, the screen will be zoomed in 1/2,1/3, 1/4, 2, 3, 4 times.
ENTER & DIRECTION BUTTONS
Press the Direction buttons3
4
5
6
to move the cursor to select items or contents of the menu.
Then press the ENTER button on remote control to enable the selection.
MENU
When playing video, press MENU button on remote control to open or close PBC status (Some discs
do not support this function). For some media, press MUTE button to go to the root menu or open the
folder to check the file list.
DISC DATA
In play status, press “-/--” button, the TV screen displays the data of playing disc:
1) Use the Direction buttons to move the cursor to check the items.
2) Depending on different discs, the items will be different:
Current Playing Picture
Track, Disc time, Track time, Repeat, Time DISP (display);
Title, Chapter, Audio, Subtitle, Angle, TT (total) time, CH (Chapter) time,
Repeat, Time DISP (display).
3) Press “-/--” button on when playing audio, the TV will display:
--:-SELECT:-----/xx
T:--/xx
GO TO:-:--:---:-Press “-/--” button to switch between the “Time Selection (current song/chapter)” and “Song/Chapter
Selection”; then input the digits. The system begins playing from the specified time/song/chapter.
COMPACT
BITRATE 72
MENU
TRACK
XX/XX
DISC TIME X:XX:XX
TRACK TIME X:XX:XX
REPEAT
OFF
TOTAL ELAPSED X:XX:XX
PLAY SPECIAL DISC
When playing disc of special formats, the TV will display the whole items of the disc and then start
playing from the first track/chapter:
00:00 04:33
001/010
1) Press MENU button on remote control to enter the folder.
\
2) Move the cursor to select one of the contents from the file list, then
01
02
press ENTER button to start playing.
03
128Kbps
04
5
6
When playing disc of pictures, press STOP button to enter the folder.
1) Move the cursor to one of the contents, press ENTER to display.
or 8
2) Press ZOOM button, then press 7
button to zoom into the picture.
3) Press REPEAT button to repeatedly play the picture.
4) Press STOP button during browsing to enter the main menu.
NOTE:
6
1) Press the Direction buttons 5
to move the cursor UP or DOWN to select contents.
to fast enter the PREVIOUS or NEXT page of the contents.
2) Press the Direction buttons
3) During playing, press :
or 9
button to skip tracks/chapters/pictures under the current directory.
9
AUDIO RIPPING OPERATION
This function needs TV to make operations. The player can convert the music from CD to USB stick.
Insert the USB stick into the USB port on the front panel while playing CD disc, then press CD RIP.
button on remote control to enter the ripping menu. Use the Direction buttons to move the cursor to
contents and press ENTER button on remote control to select the items to make ripping settings.
Operation:
1) Move the cursor to the SPEED, press ENTER button
to select one of the ripping speed: NORMAL or FAST.
(When you select FAST, the music will not play during
the process of ripping.)
OPTIONS
SPEED
TRACK
NORMAL
BITRATE
128kbps
CREATE ID3
DEVICE
2) Move the cursor to the BITRATE, press ENTER button
to select one of the recording bitrates:
96kps, 112kps, 128kps, 192kps, 256kps, or 320kps.
Yes
USB 1
SUMMARY
SELECTED TRACK
SELECTED TIME
START
0
00:00
EXIT
track01
track02
track03
track04
track05
track06
track07
SELECT ALL
04:43
05:07
04:23
04:57
05:27
04:55
05:36
SELECT NONE
3) Move the cursor to the CREATE ID3, press ENTER to
choose Yes or No. If the disc contains the music information such as singers, years, writers, etc.
If you choose Yes to create ID3, then the player transfers the ID3 information to the USB files.
4) Move the cursor to the TRACK area, the track numbers and track time are listed one by one.
Move the cursor to the tracks you want to rip, and press
OPTIONS
TRACK
ENTER button to confirm selection. At last move the
SPEED
NORMAL
track01
04:43
cursor to the START and press ENTER button to start
track02
05:07
BIT RATE
128kbps
ripping.
track03
04:23
CREATE ID3
NOTE:
When you move the cursor to SELECT ALL, press ENTER
button will choose all the tracks; to clear the selections you
have made, move the cursor to SELECT NONE and press
ENTER button to confirm.
DEVICE
Yes
USB 1
SUMMARY
SELECTED TRACK
SELECTED TIME
START
02
09:40
EXIT
track04
track05
track06
track07
SELECT ALL
04:57
05:27
04:55
05:36
SELECT NONE
5) When the ripping starts the TV will displays as below:
RIPPING
TRACK PROGRESS
SELECTED TRACK
track01
track04
TOTAL PROGRESS
8%
04:57
CANCEL
SUMMARY
NOW RIPPING
TRACK
01/02
6) If the player is ripping the music to the USB stick, you can only cancel the ripping progress and no
other operation is available for control. Press ENTER button to stop ripping, then move the cursor
to EXIT and press ENTER to exit.
10
USB OPERATION
1) Insert the USB stick into the USB port of the unit.
2) Press the VIDEO/USB button on the front panel or USB button on
remote control to enter the USB mode.
3) The player will automatically detect the contents or files of the USB.
4) When the folder appear on the TV screen, use Direction buttons to
select the one of the contents, and press ENTER button to play.
5) Press MENU to display the file browser, select the file you want and
press ENTER button to start playing.
6) While playing tracks, press -/-- button once on remote control, it displays
“---/xxx”, then use the digit buttons to select the track you want; press
-/-- button twice, it display “--:--”, then use the digit buttons to select the
playback time of the current track.
7) Please check the BASIC OPERATION for more detailed operations.
VIDEO/USB
BLUE-CONNECT
NOTE:
1) Depending on the amount of data and media speed, it may take long time
USB stick
for the system to read USB files. In some cases, reading time may be as
long as 60 seconds. This is not a malfunction.
2) Even when they are in a supported format, some files may not play or display depending on the
content compatibility.
3) The USB port supports the devices of maximum capacity of 32GB.
AUX IN OPERATION
1. Use 3.5mm-RCA cable (not supplied) to connect the AUX IN port of the rear panel with the outer
music player’ output/headphone jack, e.g. smart phone.
2. Press AUX button on the front panel or on remote control to enter AUX IN mode.
3. Start playing music by the music player.
4. The playback operations are controlled by your music player.
5. The unit can only connect one device at a time.
Music player
♪
♪
3.5mm RCA cable
(not supplied)
11
BLUE-CONNECT OPERATION
Pairing Operation
1) Press BLUE-CONNECT button on the front panel or BT button on remote to enter BT mode.
2) Turn on the Blue-connect function on your device (e.g. smart phone).
3) Place your device in Blue-connect search range (10 meters). The phone will search for this unit.
4) Enter the list of found devices on the phone, and select the name SX-5257BT. Some devices may
ask you to confirm the selection by choosing OK/YES/PAIR.
5) For some devices, you may need to input “0000” (four Zero) as the passkey to make connection.
6) The player will beep once a connection is established.
7) Turn off the Blue-connect function on your device or unpair from the paired device to disconnect
the devices and follow the steps 2-4 above to connect to another device.
NOTE:
* When playing music through a phone, and a call is coming, music will stop automatically. When the
call ends, it depends on the setting of your phone whether the playback will resume playback or not.
* Some devices may connect immediately in pairing, some may take long time to connect.
* The unit can only be connected and playing content from one device at a time.
RADIO OPERATION
FM Frequency range: 87.5-108.0MHz. To get the best reception, adjust the FM antenna first.
1) Press the FM button on remote or on the front panel to enter FM mode.
2) Press MO/ST button on remote control to turn stereo on or off. If the signal is not strong enough,
you can not select turn stereo on.
3) Select stations
a) Directly input frequency:
Press the -/-- button on the remote control, input the digits to select the frequency directly.
E.g. 1, to select 89.90MHz, press “-/--” button, then press the number buttons 8, 8, 9, 0.
E.g. 2, to select 105.90MHz, press “-/--” button, then press the number buttons 1, 5, 9, 0.
b) Press the CH- or CH+ buttons to select the previous or next stations.
c) Press 7
buttons to tune the frequency up or down on the step of 0.1 MHZ.
or 8
d) Press and hold 7
buttons to auto skip to the previous or next available stations of strongest
or 8
frequency. It stops tuning when it found a strong signal station.
4) Auto-Search
Press the SEARCH button to search stations from the low to high frequency automatically.
Press this button again to stop searching.
5) Save Stations
Use the SAVE button to save the station.
a) Directly press SAVE button on remote control to save the current station into the current preset.
b) E.g. If you want to save 99.30MHz in 28th, press 2, 8 button to select the preset station, then press
-/-- button and input 9, 9, 3, 0, at last press SAVE button to save.
12
VIDEO MENU SETUP
1) In video mode, press SETUP button on remote to enter the setup menu.
2) Press the Direction buttons to switch between the different setup pages.
3) Use the Direction buttons to move the cursor to the position you want, then press ENTER button
again to enter the subdirectory. Press ENTER buttons again to enter the next subdirectory.
4) Press the SETUP button again to exit the setup.
Language Setup
1) OSD language
To select one of the languages of the screen
displays and setup menus.
LANGUAGE SETUP
2) Audio
OSD LANGUAGE
SPA
AUDIO
SPA
When playing video disc, the player will autoSUBTITLE
SPA
play the built-in language of the disc. This unit
DISC MENU
SPA
could play languages as in the list.
3) Subtitle
When playing video disc with multiple languages,
GOTO LANGUAGE SETUP
the player will auto-play the built-in subtitle
language of the disc. This unit can play the listed
built-in languages or you may choose “off” to close the subtitle.
4) Disc menu
Choose one of the listed languages for the disc menu.
Video Setup Page
1) Video output
To select the the video output: CVBS, YPbPr.
(Make sure the player is set to the correct video
mode.)
VIDEO SETUP
2) TV display (4:3PS, 4:3LB, 16:9WIDE)
VIDEO OUTPUT
CVBS
Choose one of the display formats suited with TV.
TV DISPLAY
16:9
If the TV display is 4:3, the display format of the
TV TYPE
NTSC
COLOR SETTING
video is 16:9, the image will be compressed
TV MODE
horizontally.
PANEL LIGHT
3) TV type
The player supports tv types: PAL, AUTO, NTSC.
GOTO VIDEO SETUP PAGE
4) Color setting
Adjust the video color output:
Sharpness: High, Medium and Low;
Brightness: +/-20, the default is 0;
Contrast: +/-16, the default is 0;
Gamma: None, Low, Medium, High;
Hue & Saturation: +/-9, default is 0;
5) TV mode (This option is not available when the video output is CVBS.)
To select one of the scan modes: progressive and interlace.
6) Panel light
To turn the panel light ON or OFF on the front panel.
13
VIDEO MENU SETUP
Audio Setup
1) Analog audio setup
a) Surround:
AUDIO SETUP
LT/RT: left and right soundtrack audio output;
ANALOG AUDIO SETUP
DIGITAL AUDIO
Stereo: stereo audio signal output.
KARAOKE SETUP
b) Dual mono:
EQUALIZER
To select one of the audio output: L-Mono,
R-Mono, Mix-Mono and Stereo.
c) Video dynamic:
GOTO AUDIO SETUP PAGE
To adjust the different compression effects.
When the “FULL” is chosen, the peak-peak value of audio signals will be the minimum;
when the “OFF” is chosen, it will be the maximum.
2) Digital audio
a) Digital output:
When playing the special disc, the coaxial and optical terminal outputs in SPDIF/ RAW format.
SPDIF/PCM may be selected when the player is connected with a 2CH digital stereo amplifier.
b) LPCM output:
LPCM (linear pulse code modulation) is a non-compressed audio digital technology.
There are two LPCM output: 48K, 96K.
3) Karaoke Setup
a) Mic setup: Set Microphone off or on; adjust the volume of microphone; adjust the Echo level.
b) Mic threshold: adjust the threshold of the microphone.
4) Equalizer
a) Equalizer mode: to select one of the effects: Off, Rock, Pop, Live, Dance, Techno, Classic, Soft.
b) Bass Boost: to turn ON or OFF the bass boost.
c) Super Bass: to turn ON or OFF the super bass.
d) Treble Boost: to turn ON or OFF the treble boost.
General Setup Page
1) Angle mark
If the disc has multi-angle pictures, setting the Angle
mark displays a multi-angle mark on the tv screen.
2) Close caption
When playing video disc, set the option OFF to close
the caption, choose ON to open the caption.
3) Last memory
When the option is set to ON, the system memory
the played disc content. The disc content is not
memorized when the OFF option is selected.
4) Version
To check the model version of the player.
5) Default (in EJECT or NO DISC status)
To reset the player to the factory setup.
14
GENERAL SETUP
ANGLE MARK
CLOSE CAPTION
LAST MEMORY
VERSION
DEFAULT
ON
OFF
OFF
GOTO GENERAL SETUP PAGE
VIDEO MENU SETUP
Parental Control Setup Page
(Only available in EJECT or NO DISC status.)
1) Parental control
This player has several different age ratings for
selection. Move the cursor to select one of them,
then press ENTER button to confirm selection.
2) Password
The original password of the player is the “0000"
(four Zero). You can change it to a new one.
PARENTAL CTRL SETUP
PARENTAL
PASSWORD
GOTO PREFERENCE PAGE
SPECIFICATION
Output power
2*30W
Power input
AC100V-240V, 50/60Hz
Output joint
Component video output; Audio/Video output; Optical output; Coaxial output.
Input joint
Aux in, USB
Outer facilities
Microphone
Remote distance
Frequency
Blue-connect range
7 meters
87.50MHz~108.0MHz
10 meters
15
TROUBLE SHOOTING
For your convenience, we have listed some methods to solve common problems you may encounter
when you using the system. If the problem occurs repeatedly, contact the nearest maintenance center.
Problem
Possible cause
Solution
Power supply
does not work
Power plug is not fully inserted
into the power socket
Fully insert the power plug
into the power socket
The batteries have been used up
Replace them with new ones
The remote control is not aimed
at the remote control sensor
Please aim the remote control
correctly; in line with the
remote sensor
The system is not connected
correctly
Reconnect the system by
referring to the illustration
TV not set in video mode
Set the TV in video mode
The scanning mode does not
match to the TV scanning mode
Reset the scanning mode
No disc inserted
Insert a disc
Disc incorrectly inserted
Reinsert the disc with the
picture upward
Disc is not compatible with
this device
Only use disc that are
compatible with this device
Audio wire is not connected
correctly
Connect the audio wire
correctly
Incorrectly connected to
amplifier
Connect the amplifier correctly
by referring to the illustration
Disc is not clean
Replace with a clean disc or
use a soft cloth to clean the disc
Remote does
not work
No image on
the TVscreen
Play is unavailable
No sound from
speakers
Discontinuous sound
or distorted pictures
Invalid display on
the screen
Disc is scratched
Disc distorted
Replace with a new one
Operation incorrect
Please refer to the user manual
16