1
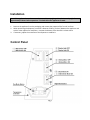
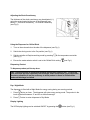
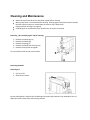
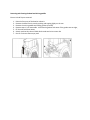
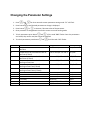
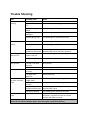
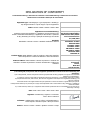
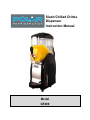
Slush/Chilled Drinks
Dispenser
Instruction Manual
Model
GF489
Safety Tips
Position on a flat, stable surface.
A service agent/qualified technician should carry out installation and any repairs if
required. Do not remove any components on this product.
Consult Local and National Standards to comply with the following:
o Health and Safety at Work Legislation
o BS EN Codes of Practice
o Fire Precautions
o IEE Wiring Regulations
o Building Regulations
DO NOT immerse the appliance in water, or use jet/pressure washers to clean the
appliance
Do not use the appliance for anything other than its intended use.
Always switch off and disconnect the power supply to the appliance when not in use.
Not suitable for outdoor use.
Keep all packaging away from children. Dispose of the packaging in accordance to the
regulations of local authorities.
If the power cord is damaged, it must be replaced by a POLAR agent or a recommended
qualified technician in order to avoid a hazard.
This appliance is not intended for use by persons (including children) with reduced
physical, sensory or mental capabilities, or lack of experience and knowledge, unless
they have been given supervision or instruction concerning the use of the appliance by a
person responsible for their safety.
Children should be supervised to ensure that they do not play with the appliance
Introduction
Please take a few moments to carefully read through this manual. Correct maintenance and
operation of this machine will provide the best possible performance from your POLAR product.
Pack Contents
The following is included:
POLAR Slush / Chilled Drinks Dispenser
Instruction Manual
POLAR prides itself on quality and service, ensuring that at the time of packaging the contents
are supplied fully functional and free of damage.
Should you find any damage as a result of transit, please contact your POLAR dealer
immediately
Installation
Note: If the appliance has not been stored or moved in an upright position, let it stand upright for
approximately 12hours before operation. If in doubt allow the appliance to stand.
1.
2.
3.
Remove the appliance from the packaging and remove the protective film from all surfaces.
When positioning the dispenser, maintain a distance of 20cm (7 inches) between the appliance and
walls or other objects for ventilation. Increase the distance if the obstacle is a heat source.
If necessary, adjust the screw feet of the dispenser to stabilise it.
Control Panel
Operation
NOTE: When in Slush mode this machine is designed for use with products with at least
12% sugar. It is the sugar content which stops the product from freezing solid in the
bowl. While products with lower sugar content may run well in the machine they are
more likely to cause freeze up of the machine and consequential damage to the unit.
Such damage is not covered by warranty.
NOTE: Never mix the product in the bowl.
NOTE: Maintain the product at or above the minimum level marked on the bowl to
prevent damage.
Filling
1.
2.
3.
Switch off the main switch (see Fig 1)
Remove the lid and pour the liquid into the tank
Replace the lid
NOTE: Do not fill the tank with hot liquid
NOTE: Do not let the level exceed the Max level line on the tank
Using the Dispenser for Slush
1.
Turn on the main switch on the side of the dispenser (see Fig 1)
2.
Switch the stirring motor to the On position (see Fig 1)
3.
Switch controller to Daytime working mode by pressing
(see Fig 1)
4.
Ensure the mode selector switch is set to Slush setting
on the temperature controller
(see Fig 1)
NOTE: Slush can only be produced in Daytime working mode.
Adjusting the Slush Consistency
The thickness of the slush consistency may be adjusted (+/-)
using the screw located at the rear of the dispenser (see
below). + for thicker consistency, - for thinner consistency
(see Fig 2)
Using the Dispenser for Chilled Drink
1.
Turn on the main switch on the side of the dispenser (see Fig 1)
2.
Switch the stirring motor to the On position (see Fig 1)
3.
Switch controller to Daytime working mode by pressing
(see Fig 1)
4.
Ensure the mode selector switch is set to the Chilled Drink setting
on the temperature controller
(see Fig 1)
Dispensing Product
To dispense product pull the tap lever.
Note: During inactivity in Slush mode product may become frozen in tap. To clear tap
open and close tap lever repeatedly until blockage clears and product can be dispensed.
In extreme situations it may be necessary to allow product to warm in Chilled drinks
mode until blockage is cleared
Day / Night Mode
The dispenser is fitted with a Night Mode for energy saving during non-serving periods.
1.
Press
button on timer. The dispenser will enter energy saving mode. The product in the
bowl will be held between 1C and 4C as chilled beverage.
2.
Press
button to return dispenser to Day Mode.
Display Lighting
The LED display lighting can be switched ON/OFF by pressing the
button (see Fig 1)
Cleaning and Maintenance
Always switch off and disconnect the power supply before cleaning
Warm soapy water is recommended for cleaning. Cleaning agents may leave harmful residues.
DO NOT wash the base unit, instead wipe the exterior with a damp cloth.
Empty and clean the drip tray reguarly.
A POLAR agent or qualified technician should carry out repairs if required.
Removing / dis-assemblying the Tap for Cleaning
1.
2.
3.
4.
5.
Remove the handle pin (A)
Remove the handle (B)
Remove the spring (C)
Remove the handle seat from the tap
Remove the tap piston and guide
To re-assemble and fit the tap reverse above
Removing the Bowl
Removing Lid
1. Lift rear of lid
2. Slide lid and remove
DO not submerge lid in liquid as this will damage the Display Light housed in the underside of the lid.
Wipe clean with a damp cloth and sanitizing solution
Removing and Cleaning the Bowl and Stirring paddle
Ensure Lid and Tap are removed
1.
2.
3.
4.
5.
6.
7.
Raise the front part of the bowl to release it
Remove the bowl from its seat by pushing and tapping lightly on the rear
Remove the stirring paddle and sealing gaskets (A and B)
Reverse steps 1-3 to reassemble. Lubricate the gaskets with water if the gaskets are too tight,
Fill the tank with clean water
Switch machine ON, select Chilled drinks mode and stirrer motor ON.
Run for 5 minutes then empty tank.
Changing the Parameter Settings
1. Press
and
2. Press button
for three seconds to enter parameter setting mode. “E1” will flash.
to until desired parameter to change is displayed.
3. Press button
or
to increase / decrease value of the parameter.
4. Once parameter is changed wait 6 seconds to return to normal working mode
5. To lock parameters press button
and
till the code “888” flashes. Once the parameters
are locked, they can be read, but cannot be modified.
6. To unlock parameters press button
and
Parameters Function
E1
Temperature to be controlled for slush of
Bowl One
E2
Temperature to be controlled for slush of
Bowl two (if fitted)
E3
Temperature to be controlled for slush of
Bowl three (if fitted)
F1
Temperature to be controlled for cold
beverage of Bowl One
F2
Temperature to be controlled for cold
beverage of Bowl Two (if fitted)
F3
Temperature to be controlled for cold
beverage of Bowl Three (If fitted)
C1
Probe correction for Bowl One
C2
Probe correction for Bowl Two
C3
Probe correction for Bowl Three
C4
Time Delay
C5
Temperature Contrast
CF
Temperature Unit
until the code “ON” flashes.
Range
-10 to +10℃/14℉ to +50℉
Factory Settings
-6⁰C/22F⁰
-10 to +10℃/14℉ to +50℉
-6⁰C/22F⁰
-10 to +10℃/14℉ to +50℉
-6⁰C/22F⁰
-10 to +10℃/14℉ to +50℉
1⁰C /33.8F⁰
-10 to +10℃/14℉ to +50℉
1⁰C /33.8F⁰
-10 to +10℃/14℉ to +50℉
1⁰C /33.8F⁰
-10 to 10℃/-18℉ to 18℉
-10 to 10℃/-18℉ to 18℉
-10 to 10℃/-18℉ to 18℉
0-10 mins
-10 to 10℃/-18℉ to 18℉
℃/ ℉
0⁰C /0F⁰
0⁰C /0F⁰
0⁰C /0F⁰
2mins
3⁰C
As desired
Trouble Shooting
Fault
The appliance is not
working
The appliance is not
cooling
The Stirring paddle
does not turn
The tap leaks
The bowl leaks
The machine works
but does not make
slush
Tap will not dispense
slush
Probable Cause
Power Supply
Action
Check power supply
Main switch is not set
to l
Set main switch to l (see fig 1)
Fuse in the plug has
blown
Plug and Lead are
damaged
Internal Wiring Fault
Replace the plug fuse
Coolant Leak
Call POLAR agent or qualified technician
Fan Motor Failed
Call POLAR agent or qualified technician
Airflow to the
condenser obstructed
The motor stirring
switch is set to 0
Increase the gap between appliance and
obstacles/heat source and clean condenser
Set motor stirring switch to 1 (see Fig 1)
Bowl blocked with Ice
Switch off the machine and allow the ice to melt
The tap is not fitted
correctly
The tap is defective
Re-fit the tap
The bowl is not fitted
correctly
The bowl seal is
defective
The machine is in
‘Night mode’
Mode switch is not set
to slush
Airflow to the
condenser obstructed
Condenser Blocked
Re-fit the bowl
Tap blocked by Ice
Call POLAR agent or qualified technician
Call POLAR agent or qualified technician
Call POLAR agent or qualified technician
Replace bowl seal
Press ‘Day mode’ button (see fig 1)
Set mode switch to slush (see fig 1)
Increase the gap between appliance and
obstacles/heat source
Call POLAR agent or qualified technician
Open and close tap lever several times in quick
succession. If tap still not clear turn off the
machine and allow ice to melt
If the machine malfunctions due to causes other than those listed or the proposed corrective
actions do not solve the problem please call a Polar agent or qualified technician
Technical Specifications
Model
Voltage
Power
Current
GF489
230v 50Hz
558W
3.2A
Capacity
(Litres)
10
Refrigerant
R404a 200g
Dimensions
H x W x D mm
810 x 270 x 510
Weight
(KG)
31
Electrical Wiring
This appliance is supplied with a 3 pin, moulded, BS1363 plug and lead, with a 13 amp fuse as standard.
The plug is to be connected to a suitable mains socket.
This appliance is wired as follows:
• Live wire (coloured brown) to terminal marked L
• Neutral wire (coloured blue) to terminal marked N
• Earth wire (coloured green/yellow) to terminal marked E
This appliance must be earthed, using a dedicated earthing circuit.
If in doubt consult a qualified electrician.
Electrical isolation points must be kept clear of any obstructions. In the event of any emergency disconnection being
required they must be readily accessible.
Compliance
The WEEE logo on this product or its documentation indicates that the product must not
be disposed of as household waste. To help prevent possible harm to human health
and/or the environment, the product must be disposed of in an approved and
environmentally safe recycling process. For further information on how to dispose of this
product correctly, contact the product supplier, or the local authority responsible for waste
disposal in your area.
POLAR parts have undergone strict product testing in order to comply with regulatory
standards and specifications set by international, independent, and federal authorities.
POLAR products have been approved to carry the following symbol:
All rights reserved. No part of these instructions may be produced or transmitted in any form or by any
means, electronic, mechanical, photocopying, recording or otherwise, without the prior written permission of
POLAR.
Every effort is made to ensure all details are correct at the time of going to press, however, POLAR reserve
the right to change specifications without notice
DECLARATION OF CONFORMITY
• Conformiteitsverklaring • Déclaration de conformité • Konformitätserklärung • Dichiarazione di conformità •
• Declaración de conformidad • Declaração de conformidade
Equipment Type • Uitrustingstype • Type d'équipement • Gerätetyp •
Tipo di apparecchiatura • Tipo de equipo • Tipo de equipamento
Slush Machine
Model • Modèle • Modell • Modello • Modelo • Malli
GF489
Application of Council Directives(s)
Toepassing van Europese Richtlijn(en) • Application de la/des directive(s) du
Conseil • Anwendbare EU-Richtlinie(n) • Applicazione delle Direttive • Aplicación
de la(s) directiva(s) del consejo • Aplicação de directiva(s) do Conselho
LVD Directive 2006/95/EC
EMC Directive 2004/108/EC
RoHS Directive 2011/65/EU
Food Contact Directive
EC/1935/2004
Standards
Standaarden • Normes • Normen • Standard • Estándares • Normas
EN 60335-1:2002
EN 60335-2-75:2004
EN 62233:2008
EN 55014-1:2006
EN 55014-2:1997
EN 61000-3-2:2006
EN 61000-3-3:2008
IEC 62321:2008
LFGB 30 & 31
Polar
Producer Name • Naam fabrikant • Nom du producteur • Name des Herstellers
• Nome del produttore • Nombre del fabricante • Nome do fabricante
Producer Address • Adres fabrikant • Adresse du producteur • Anschrift des
Herstellers • Indirizzo del produttore • Dirección del fabricante • Endereço do
fabricante
Fourth Way,
Avonmouth,
Bristol,
BS11 8TB
United Kingdom
I, the undersigned, hereby declare that the equipment specified above conforms to the above Directive(s) and
Standard(s).
Ik, de ondergetekende, verklaar hierbij dat de hierboven gespecificeerde uitrusting goedgekeurd is volgens de bovenstaande
Richtlijn(en) en Standaard(en).
Je soussigné, confirme la conformité de l'équipement cité dans la présente à la / aux Directive(s) et Norme(s) ci-dessus
Ich, der/die Unterzeichnende, erkläre hiermit, dass das oben angegebene Gerät der/den oben angeführten Richtlinie(n) und
Norm(en) entspricht.
Il sottoscritto dichiara che l'apparecchiatura di sopra specificata è conforme alle Direttive e agli Standard sopra riportati.
El abajo firmante declara por la presente que el equipo arriba especificado está en conformidad con la(s) directiva(s) y estándar(es)
arriba mencionadas.
Eu, o abaixo-assinado, declaro que o equipamento anteriormente especificado está em conformidade com a(s) anterior(es)
Directiva(s) e Norma(s)
Date • Data • Date • Datum • Data • Fecha • Data
17/12/12
Signature • Handtekening • Signature • Unterschrift
Firma • Firma • Assinatura
Full Name • Volledige naam • Nom et prénom • Vollständiger Name •
Nome completo • Nombre completo • Nome por extenso
Richard Cromwell
Position • Functie • Fonction • Position • Qualifica • Posición • Função
Commercial Director
GF489_UK_v1