1
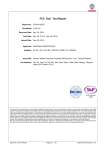
User Manual
Infusion Pump Analyzer
IPA 2000
1.1
Copyright
Copyright © 2010 Netech. All rights reserved. No part of this publication may be
reproduced, transmitted, transcribed, stored in a retrieval system, or translated into any
language, in any form or by any means, electronic, mechanical, photocopying, recording,
or otherwise, without prior written permission from Netech.
All copyright, confidential information, patents, design rights and all other intellectual
property rights of whatsoever nature contained herein are and shall remain the sole and
exclusive property of Netech Corporation.
The information furnished herein is believed to be accurate and reliable. However, Netech
assumes no responsibility for its use, or for any infringement of patents or other rights of
third parties resulting from its use.
The Netech name and Netech logo are registered trademarks of Netech Corporation.
1.2
Quality Assurance
Netech Corporation is ISO 9001-2000 Registered. This instrument was thoroughly tested
and inspected according to Netech’s ISO 9001-2000 quality standards (ISO/IEC 17025)
and test procedures, and was found to meet those specifications when it was shipped from
the factory.
1.3
Warranty
Netech warranties the IPA 2000 Infusion Pump Analyzer against defects in materials and
workmanship for one year from the date of original purchase. The standard warranty is
extended for second year if the instrument is returned to Netech for its recommended
yearly recalibration.
During the warranty period we will repair or, replace at no charge a product that proves to
be defective, provided the product is returned to Netech Corporation with prepaid shipping.
This warranty does not apply if the product has been damaged by accident, misuse, if its
serial number is defaced or removed, or if the product is serviced or modified by someone
other than Netech Corporation.
Netech reserves the right to discontinue the IPA 2000 at any time, or change its
specifications, price, or design without notice and without incurring any obligation. Netech
will make a concerted effort to supply service parts for 5 years after discontinuation.
The warranty is void if you elect to have the unit serviced and / or calibrated by someone
other than Netech.
The purchaser assumes all liability for any damages or bodily injury that may result
from the use or misuse of the unit by the purchaser, his employees, agents or
customers.
In no event shall Netech Corporation be liable for consequential damages.
IPA 2000 User Manual
Copyright 2010
Page 2 of 26
1.4
Warranty Disclaimer
Should you elect to have your instrument serviced and/or calibrated by someone other than
Netech, please be advised that the original warranty covering your product becomes void
when the tamper-resistant Quality Seal is removed or broken without proper factory
authorization. We strongly recommend, therefore, that you send your instrument to Netech
for factory service and calibration, especially during the original warranty period.
1.5
Patent / Trademarks
IPA 2000 utilizes a patent pending measurement technology. Netech and IPA 2000 are
trademarks of Netech Corporation. Any other trademark names used in this manual are
only for editorial purposes and the benefit of the respective trademark owner, with no
intention of improperly using that trademark.
1.6
Claims
Our standard method of shipment is via common carrier, FOB origin. Upon delivery, if
physical damage is found, retain all packing materials in their original condition and contact
the carrier immediately to file a claim.
If the instrument is delivered in good physical condition but does not operate within
specifications, or if there is any other problem not caused by shipping damage, please
contact Netech or its representative.
1.7
Obtaining Assistance
If you have trouble in setting up or operating the IPA 2000, contact Netech Tech support at
[email protected].
1.8
Returning the Instrument to Netech
Products returned to Netech require a RMA (Return Authorization Number) for speedy
processing of the service required. To obtain a RMA number follow the link
http://www.netech.org/rma.asp
and
fill
in
the
required
information,
Email
[email protected] or call 800-547-6557 (US & Canada), International 631-531-0100.
1.9
Warnings
IPA 2000 has been designed for testing infusion devices. It must not be used while it
is connected to a patient. Tubing sets used to connect IPA 2000 to the infusion
device under test must never be used to administer fluids to patients.
Follow manufacturers recommendations to avoid contamination due to back flow
conditions.
Do not use any other fluids other than distilled water, bottled dinking water or
domestic filtered tap water.
Care should be taken to prevent any dirt or other contaminants entering the fluid
inlet.
Use of saline solution or other high viscosity fluids will void the warranty.
IPA 2000 User Manual
Copyright 2010
Page 3 of 26
2 Table of Contents
1.1
COPYRIGHT ............................................................................................................................... 2
1.2
QUALITY ASSURANCE ................................................................................................................. 2
1.3
WARRANTY ................................................................................................................................ 2
1.4
WARRANTY DISCLAIMER ............................................................................................................. 3
1.5
PATENT / TRADEMARKS .............................................................................................................. 3
1.6
CLAIMS ...................................................................................................................................... 3
1.7
OBTAINING ASSISTANCE ............................................................................................................. 3
1.8
RETURNING THE INSTRUMENT TO NETECH................................................................................... 3
1.9
WARNINGS ................................................................................................................................ 3
2 TABLE OF CONTENTS ........................................................................................... 4
3 ABOUT THIS USER MANUAL........................................................................... 6
3.1
FEATURES ................................................................................................................................. 6
3.2
PACKAGE CONTENTS ................................................................................................................. 7
3.3
SPECIFICATIONS ........................................................................................................................ 7
4 GENERAL OVERVIEW ............................................................................................ 9
4.1
THEORY OF OPERATION ............................................................................................................. 9
4.2
MEASUREMENTS ........................................................................................................................ 9
4.3
CONTROLS AND DISPLAYS ........................................................................................................ 10
5 SETUP AND OPERATING INSTRUCTIONS ..................................... 11
5.1
INITIAL SETUP .......................................................................................................................... 11
5.2
POWER UP ............................................................................................................................... 11
5.3
CONNECTING TO THE INFUSION PUMP UNDER TEST ................................................................... 12
5.4
MEASURING FLOW ................................................................................................................... 12
5.5
MEASURING VOLUME ............................................................................................................... 13
5.6
MEASURING FLOW WITH BACK PRESSURE................................................................................. 14
5.7
MEASURING OCCLUSION PRESSURE ......................................................................................... 14
IPA 2000 User Manual
Copyright 2010
Page 4 of 26
6 SETUP MENU................................................................................................................. 16
6.1
SETUP ..................................................................................................................................... 16
7 MAINTENANCE, SERVICE / CALIBRATION ..................................... 25
7.1
ROUTINE MAINTENANCE ........................................................................................................... 25
7.2
SERVICE .................................................................................................................................. 25
IPA 2000 User Manual
Copyright 2010
Page 5 of 26
3
About this User Manual
This Manual is provided to explain the operation of the IPA 2000 – Infusion Pump Analyzer.
IPA 2000 is designed to quickly test the performance of any given infusion device and to
determine the performance qualities of the device.
The operator must be familiar with the unit before starting the test procedures.
This document is divided into the following chapters:
•
Chapter 1, Introduction
•
Chapter 2, Table of contents
•
Chapter 3, About this Manual
•
Chapter 4, General overview
•
Chapter 5, Setup and Operating Instructions
•
Chapter 6, Setup Menu
•
Chapter 7, Maintenance, Service / Calibration
3.1 Features
•
Fast and accurate test utilizing Netech’s patented technology
•
Flow measurement
•
Volume measurement
•
Occlusion pressure measurement
•
Back flow measurement
•
Test data storage over 10000 test results.
•
RS 232 PC interface to down load test results.
•
Compact and light weight.
IPA 2000 User Manual
Copyright 2010
Page 6 of 26
3.2
Package Contents
IPA 2000 is shipped with the following:
•
Main Unit - IPA 2000
•
AC Adapter
•
Luer lock
•
Tubing
•
User Manual
•
Calibration Certificate
•
Warranty Registration Card
3.3
Specifications
The IPA 2000 specifications are listed as follows.
3.3.1 Flow Rate Measurement:
Flow measurement is calculated utilizing Netech’s patent pending flow measurement
technology. The rate of rise of fluid in a calibrated tube is precisely measured by a
series of optical sensors.
Range: 0.5 - 1000 mL/hr
Accuracy: Flow rate up to 250 mL/hr, 1% of reading +/- 1 LSD,
Flow rate over 250 mL/hr, 2% of reading +/- 1 LSD
3.3.2 Volume Measurement:
The volume is measured by a minimum sample of 100 micro liters.
Range: 0.1 – 999 mL/hr
Accuracy: 1%, +/- 1 LSD for flow rate up to 250mL/hr for Volume up 20 mL.
2%, +/- 1 LSD for flow rate over 250mL/hr for Volume under 20
mL.
IPA 2000 User Manual
Copyright 2010
Page 7 of 26
3.3.3 Occlusion Pressure Measurement:
Occlusion pressure is measured by closing the fluid line prior to the measurement
column.
Range: 0 –30 PSI or equivalent units mmHg, kPa, cmH2O, bar, PSI
Accuracy: 0.5 % of full scale +/- 1 LSD.
3.3.4 Electrical Specifications:
A power adapter whose specifications are as follows powers IPA 2000.
AC Adapter input voltage: 110-220 VAC
Output Voltage: 9 Volt DC, 0.500 Amps
3.3.5 Mechanical:
Dimensions: 11” x 9” x 5” (L x W X H)
3.3.6 Enviornmental:
Operational: 15 – 30o C, Relative Humidity 50%
IPA 2000 User Manual
Copyright 2010
Page 8 of 26
4
General Overview
IPA 2000 – Infusion Pump Analyzer is designed for measuring the Flow Rate,
Volume Delivered and Occlusion Pressure of Infusion Pump Devices.
It is used to verify the performance of infusion pump devices. The test results are
displayed on the instrument’s LCD as well as saved into the internal flash memory for
subsequent printing or downloading to a PC.
4.1 Theory of Operation
Fluid from the infusion pump enters the inlet and is directed to a pressure sensor and
a set of valves that directs the fluid to a measurement chamber consisting of a
column of calibrated tubing along with an array of optocouplers (sensors) mounted
vertically along the tubing. As the fluid passes through the chamber, precise time is
obtained as fluid passes each sensor and the flow rate is calculated.
There are two modes of operation, single or continuous. In the single mode as the
fluid reaches the top of the column, the measurement is completed, and the mean
value is displayed. In the continuous mode, the fluid in the measurement chamber is
evacuated and ready for the next sample and the measurement is repeated until the
user stops the measurement.
The volume is computed from the time obtained from the individual sensors as the
fluid passes through the measurement column. The measurement results are
automatically stored in the internal memory from which the results can either be
printed or downloaded to a PC (an Excel spreadsheet or other data capture
software).
4.2
Measurements
The unit can be used in testing the following parameters of any Infusion Pump
Devices
•
Flow rate measurement in single and continuous mode.
•
Volume measurement in single and continuous mode.
•
Occlusion pressure measurement
•
Back Flow measurement.
IPA 2000 User Manual
Copyright 2010
Page 9 of 26
4.3
Controls and Displays
11
9.1
10.2
1
2
3
4
10.1
9.2
7
6
5
8
Figure 1
Front Panel
1. Liquid Crystal Display 128 x 64 graphics with multiple view ports.
2. Key pad
3. Function keys, F1, F2, F3, F4 (for menu selection)
4. Arrow keys, <, > (for scrolling the menu selection)
5. Enter Key
6. Esc key
7. Alpha numeric keypad for data entry.
8. Power ON / OFF key
9. Side Panel – Right
9.1.
Fluid Inlet – Luer lock (Female)
9.2.
Fluid Outlet – Luer lock (Male)
10. Side Panel – Left
10.1.
Power Input
10.2.
RS 232 port – DSUB 9 Male
11. Carrying Handle
IPA 2000 User Manual
Copyright 2010
Page 10 of 26
5
Setup and Operating Instructions
IPA 2000 has several menu selections. The menu selections are user friendly. Each
menu selection has a set of function keys “soft-keys” along the bottom corresponding
to the function keys F1 through F4 on the keypad. Any menu that contains more
than four functions will display two small arrows at the left (<) and right (>) edges,
which correspond to the left and right arrow keys on the keypad. This allows you to
scroll through more than one set of function keys.
During menu selection, “ESC” key brings you back to the previous menu and “MAIN”
key brings you back to the main menu. The following screen shots can be used to get
familiar with the menus and display parameters.
5.1
Initial Setup
Always make sure that IPA 2000 is not connected to a patient. IPA 2000 is operated
through the power adapter supplied along with the unit. Connect the adapter jack to
the power inlet, which is at the bottom of the left hand side panel of IPA 2000 (Refer
Fig 1).
5.2
Power up
The power ON/OFF switch is located on the bottom right hand corner of the
instrument. When the instrument is turned on, the Netech Logo, Model, Software
version, Serial Number (S/N:), and the Calibration Date is displayed for about 5
seconds, after which the main menu comes up.
Power UP Screen
IPA 2000 User Manual
Copyright 2010
Page 11 of 26
Main Menu Screen
5.3
Connecting to the Infusion Pump under Test
Refer to the Infusion pump manufacturer’s service manual for specific device
inspection requirements.
Observe all safety precautions. Use only distilled water to test the instrument.
Follow the pump manufacturer’s instruction to connect the pump to IPA 2000.
Connect the infusion pump to the inlet of IPA 2000, which is located on the upper
side of the right hand side panel (Ref Fig 1.). Connect the tubing provided with IPA
2000 to the outlet valve, which is located on the bottom side of the right hand side
panel (Ref Fig 1.).
Ensure that the pump is secured to the IPA input connecter. Turn on the unit and
start the pump. Ensure that no fluid drips through the input connector.
5.4
Measuring Flow
The rate key allows you to enter the Flow measurement mode. Selecting Rate by
pressing F1 will display the Rate screen. The flow progress bar is divided into nine
segments and displays the progress of the fluid as it travels through the column of
optocouplers.
IPA 2000 User Manual
Copyright 2010
Page 12 of 26
•
Flow is the instantaneous flow rate obtained
•
Average is the average flow rate of the entire instantaneous rate obtained.
•
Volume is the accumulated volume.
The Available soft keys are as follows:
1. Sngl’: Starts measurement in single mode. Press F1 key to select this mode.
2. Cont’: Starts measurement in continuous mode. Press F2 key to select this
mode.
3. Vol’m: Goes to the volume measurement mode. Press F3 key to select this
mode.
4. Stop: Stops a measurement in progress. Press F4 key to select it.
5. R’set: Press left/ right arrow key to display this function key and then press F1
to select it. This function resets all measurement to zero. If a measurement is
in progress it is first stopped.
6. Save: Press left/ right arrow key to display this function key and then press F2
key to select it. At the end of a single measurement, Save will record the
current results to the next internal records.
7. Exit: Press left/ right arrow key to display this function key and then press F4
key to select it. Stops any measurement in progress and exits to the Main
Menu.
5.5
Measuring Volume
Selecting Volume from Main or Rate screens will display the volume screen. This
screen displays accumulated volume, average Flow rate, and elapsed time from the
start of the current measurement. This screen contains all the same soft-keys as the
rate screen except for Pres.
1. Pres: Press F3 to select this function. This function displays the pressure
screen.
IPA 2000 User Manual
Copyright 2010
Page 13 of 26
5.6
Measuring Flow with Back Pressure
Selecting Pres from the Volume Measurement screen will display the pressure
results screen. This screen displays maximum pressure, current pressure and
average flow rate. The available soft keys are as follows:
1. Sngl’: Starts measurement in single mode. Press F1 key to select this mode.
2. Cont’: Starts measurement in continuous mode. Press F2 key to select this
mode.
3. Rate: Returns to the Rate result Screen. Press F3 key to select this mode.
4. Stop: Stops a measurement in progress. Press F4 key to select it.
5.7
Measuring Occlusion Pressure
Selecting Occl’n from the Main menu by pressing F3 key, displays the occlusion results
screen. This screen displays maximum pressure, current pressure, and elapsed time
from the start of the measurement. The available soft keys are as follows:
IPA 2000 User Manual
Copyright 2010
Page 14 of 26
1. Start: Sets the valves for occlusion mode, resets the maximum reading, and
begins a measurement. Press F1 key to select it.
2. Stop: Stops a measurement and resets the valves to standby (or pass through)
mode. Note-If a high pressure is present at the inlet, stopping an occlusion
measurement will direct that pressure to the drain outlet. Any water in the drain
tube may squirt suddenly. Press F2 key to select it.
3. Unit: This function allows you to toggle between the available pressure units for
display. Available units are psi, bar, mmHg, cmH2O, and kPa. Press F3 key to
select it.
4. Exit: Stops any measurement in progress and exits to the Main Menu. Press F4
key to select it.
5. R’set: Press left/ right arrow key to display this function key and then press F1 to
select it. Stops any measurement in progress, resets the elapsed time, and sets
the maximum pressure reading to the current pressure.
6. Zero: Press left/right arrow key to display this function key and then press F2 key
to select it. Allows the pressure sensor to be zeroed before a measurement. This
key will not function when a measurement is in progress.
7. Save: Press left/ right arrow key to display this function key and then press F3
key to select it. At the end of a single measurement, save will record the current
results to the next internal record along with any flow rate measurements not yet
saved.
IPA 2000 User Manual
Copyright 2010
Page 15 of 26
6
Setup Menu
The Setup Menu has various sub menus like Initial Condition, Prime, Flush, Purge, Settings,
Records, Calibration and Info. This Sub Menu’s can be selected by pressing the select option
using the F1 key. You can toggle between the sub menus using the Prev and Next Keys or the
arrow keys. Press Exit to exit to the main menu.
6.1
Setup
The various options provided in the Setup Menu are as follows:
•
Initial Condition: Enters a submenu, which displays the applied flow rate
and initial volume.
1. Flow Applied: Allows the user to enter the flow rate of the Infusion pump
that is to be tested.
2. Initial Volume: Enables the user to enter the volume that is already
dispensed by the Infusion pump before the actual flow measurement.
This value is used only for the first measurement cycle after which it is
cleared. Prime operation also automatically clears this value.
IPA 2000 User Manual
Copyright 2010
Page 16 of 26
•
Prime: Displays the Prime Analyzer screen. This screen allows you to prime
the fluid up to the first detector when setting the unit up for the first time.
Priming should also be done every time a manual flush is performed.
Step 1: If there is fluid in the column the IPA will flush the measuring column.
Step 2: IPA is ready for priming.
Step 3: Start the connected Infusion Pump, which is to be tested.
Step 4: The fluid enters the measurement column and is detected by the
system.
Step 5: System will stop and is ready for the measurement.
Step 6: Stop the connected Infusion pump. Using Exit option return to the
main Menu to start the measurement.
IPA 2000 User Manual
Copyright 2010
Page 17 of 26
•
Flush: Provides a screen for manually flushing the measurement tubes. If
“Bubbles Detected” message appear in the rate screen or if you suspect
flushing is not complete, a manual flush can be performed by pressing and
holding the Start soft key for as long as needed. Pressing Exit will return to
the setup screen. A Prime operation should then be performed prior to
starting any new flow measurements.
•
Purge: Purging flushes any residual fluid or air bubbles left behind in the
measurement columns.
IPA 2000 User Manual
Copyright 2010
Page 18 of 26
Step 1: Connect a 20-PSI air source to the input port.
Step 2: Press the start key to begin purging.
Step 3: System enters the purging mode.
Step 4: System beeps indicating the end of purging cycle.
Step 5: Disconnect the air supply, Press Exit to return to main menu.
•
Settings: Enters a submenu with additional selections for machine settings.
The following options are available in the settings submenu
IPA 2000 User Manual
Copyright 2010
Page 19 of 26
1. Backlight: Enters a submenu with additional selections. Used to set the
backlight timings. Available options are Always On, Always Off, 30 sec, 1
min, 2 min, 5 min, 10 min, and 20 min.
2. Shutdown: Enters a submenu with additional selections. Used to
automatically shut down the unit after a specified time interval. The
available time intervals are 5 min, 15 min, 30 min, 45 min, and 60 min.
selecting the disabled option in the shutdown menu can disable this
automatic shutdown.
IPA 2000 User Manual
Copyright 2010
Page 20 of 26
3. Baud Rate: Enters the sub menu for different baud rate options.
IPA 2000 User Manual
Copyright 2010
Page 21 of 26
4. Beeper: Enters the sub menu to enable/ disable the beeper.
5. Time: Enters the sub menu for the user to setup the system clock
IPA 2000 User Manual
Copyright 2010
Page 22 of 26
6. Date: Enters the sub menu for the user to set up the system date.
•
Records: Enters a sub Menu for the user to Print, Export and clear the saved
records.
IPA 2000 User Manual
Copyright 2010
Page 23 of 26
Print: Enables the user to print the saved records in a text format via the
serial port. Connecting a serial printer to the IPA can also print the records.
Export: Enables the user to export the saved records in a CSV (Comma
Separated Value) format via the serial port.
Clear: Enables the user to delete all saved records.
•
Calibration: This sub menu is not available for the end user.
•
Info: Enters a sub menu, which provides information about the unit.
IPA 2000 User Manual
Copyright 2010
Page 24 of 26
7
Maintenance, Service / Calibration
The following chapter explains the maintenance/ service procedures that should be followed to
ensure that the unit functions within manufacturer’s specifications.
7.1
Routine Maintenance
Maintenance of IPA 2000 is straightforward, requiring little more than keeping it clean. It is
important to keep dust and dirt from getting inside the unit or into the inlet water column. Periodic
purging of the unit using compressed air of 20 PSI is recommended.
Do not use any liquids other than distilled water to operate the unit. The use of a light detergent
and non-abrasive cleaning pad is acceptable on the exterior of the unit.
7.2
Service
The mechanical assembly of IPA 2000 contains no parts that can be serviced by the user. The
unit should be returned to Netech Corporation for repair or calibration. The alignment and
adjustment parameters are critical to the performance of the IPA 2000 and can be performed
only at the factory.
For service, pack the IPA 2000 according to the Repacking and shipping instructions in this
chapter. Failure to do so may void the warranty.
Call Netech Customer service at 1-800-547-6557(U.S.) or 1-631-531-0100 (International) for
shipping instructions.
IPA 2000 User Manual
Copyright 2010
Page 25 of 26
IPA 2000 User Manual
Copyright 2010
Page 26 of 26