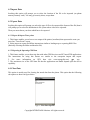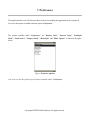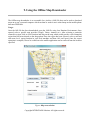
1
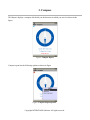
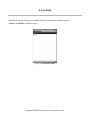
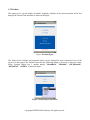
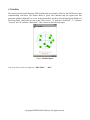
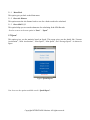
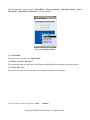
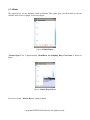
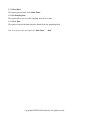
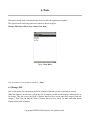
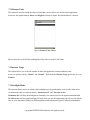
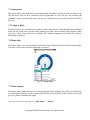
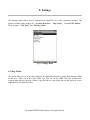
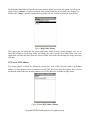
GPSWatch User Manual
Product Version 3.0
http://www.gpswatcher.com
Copyright iNTERCHAIN Solutions. All rights reserved.
Table of Contents
1. Getting Started................................................................................................................................ 4
1.1 Installation.................................................................................................................................. 4
1.1.1 Before You Begin............................................................................................................... 4
1.1.2 Installing on Phone using your PC......................................................................................4
1.1.3 Installing over Bluetooth ....................................................................................................5
1.1.4 For Smart Phone users........................................................................................................ 5
1.1.4.1 Palm users................................................................................................................... 5
1.1.4.2 Windows Mobile users................................................................................................5
1.1.4.2.1 Enabling JSR 75 File System Support in J9 JVM (For Windows Mobile users).... 6
1.1.4.3 Installing GPSWatch Plus in IBM J9..........................................................................6
1.1.4.4 Pairing your GPS Receiver ........................................................................................ 6
1.1.5 Phone specific installation procedures................................................................................6
1.1.5.1 Sony Ericsson Phones................................................................................................. 6
1.1.5.3 Motorola Phones......................................................................................................... 9
1.1.5.4 Siemens Inbuilt GPS Phones ......................................................................................9
1.2 Using GPSWatch Plus.............................................................................................................. 10
1.3 Moving Forward....................................................................................................................... 11
1.4 In-Built GPS Receiver Connection Establishment Procedure..................................................12
1.5 Bluetooth GPS Receiver Connection Establishment Procedure...............................................13
2. Navigate..........................................................................................................................................13
2.1 Special Features Available in Navigate Report........................................................................ 14
2.2 Options Available in Navigate Report......................................................................................14
3. Compass......................................................................................................................................... 17
4. Location..........................................................................................................................................19
4.1 Position..................................................................................................................................... 20
4.2 Satellites....................................................................................................................................22
5. Stats.................................................................................................................................................23
5.2 Speed ....................................................................................................................................... 26
5.3 Altitude..................................................................................................................................... 27
6. Data.................................................................................................................................................30
6.1 Manage POI.............................................................................................................................. 30
6.2 Import Data...............................................................................................................................31
6.3 Export Data...............................................................................................................................31
6.3.1 Export & Import Trace points...........................................................................................31
6.3.2 Exporting & Importing GPX Data ...................................................................................31
6.4 Clear Data................................................................................................................................. 31
7. Preferences..................................................................................................................................... 33
7.2 Internet Usage...........................................................................................................................34
7.3 Backlight Mode........................................................................................................................ 34
7.4 Autoconnect .............................................................................................................................35
7.5 Compass Mode ........................................................................................................................ 35
7.6 Menu Style................................................................................................................................35
7.7 Photo Capture........................................................................................................................... 35
Copyright iNTERCHAIN Solutions. All rights reserved.
8. Settings........................................................................................................................................... 36
8.1 Map Folder .............................................................................................................................. 36
8.2 Forced GPS Address ................................................................................................................37
8.4 POI Image Folder..................................................................................................................... 38
9. Using the Offline Map Downloader............................................................................................. 39
Copyright iNTERCHAIN Solutions. All rights reserved.
1. Getting Started
Here you get a comprehensive step by step by step procedure to operate GPSWatch Plus Application
with ease
1.1 Installation
1.1.1 Before You Begin
Point your phone's WAP browser to www.gpswatcher.com/ota and follow
on-screen instructions to download the full application.
Alternatively, if you have any difficulties installing GPSWatch via your phone, you could hit
www.gpswatcher.com/ota on your computer.
Please note, for security reasons, download is limited to only once from the website. If you have any
trouble, please revert contact us at [email protected] so that we can enable the download link once
again.
1.1.2 Installing on Phone using your PC
If you have any difficulties installing GPSWatch Plus via your mobile phone, you can install
GPSWatch Plus over your computer by following these step-by-step instructions.
First point your browser to http://www.gpswatcher.com/ota
Authenticate yourself.
1) Right click the unsigned download link and click "Save As" option to get GPSWatchPlus
JAD file to your Computer
2) Open the JAD file with text editor and you will find a property MIDlet-Jar-URL,
for example:
MIDlet-Jar-URL: http://www.gpswatcher.com/ota/trial/unsigned/GPSWatchTrial.jar
or
Copyright iNTERCHAIN Solutions. All rights reserved.
MIDlet-Jar-URL: http://www.gpswatcher.com/ota/GPSWatchPlus.jar?uid=bb0c65c4-7bb84fa1-8ccc-6b15bf6a59c00ddc85f8-9f28-4fc7-9b10-d1b262013d0cad24a48e-d18c-400b-98f87671fa4489f8
3) Get the URL alone for eg: http://www.gpswatcher.com/ota/trial/unsigned/GPSWatchTrial.jar
and paste it in your browser. This will download the JAR file to your computer.
Now that you have the JAD and JAR file, follow one of the following processes to install the
application on the phone.
1.1.3 Installing over Bluetooth
Send the downloaded JAR file via bluetooth to your mobile phone and the application will get installed
on to your phone.
1.1.4 For Smart Phone users
1.1.4.1 Palm users
Download and install a fully maintained IBM J9 directly from Palm for free of cost, including the JSR75 file I/O framework.
1.1.4.2 Windows Mobile users
1. Get IBM J9 for your phone.
a) Goto the IBM Websphere page
b) Enter [email protected] as IBM ID and guestuser as Password
c) Download the Executable file of one of the following versions based on your platform
"CLDC 1.1/MIDP 2.0 for Windows Mobile 5.0 Smartphone Edition/ARM" or
"CLDC 1.1/MIDP 2.0 for Windows Mobile 5.0/ARM"
2. Extract it, and move all extracted files to your pocket pc or memory card, under a \J9\ folder.
Files and directories extracted: <bin> , <doc> , <examples> , <lib> , copyright.txt,
buildinfo.xml
3. Go to your device to where you moved the files, run EMULATOR.exe which is will be under
J9/bin directory.
Copyright iNTERCHAIN Solutions. All rights reserved.
1.1.4.2.1 Enabling JSR 75 File System Support in J9 JVM (For Windows Mobile users)
1. Download this jar from IBM Site. Unzip it. It contains a folder called fixed.
2. Copy: fixed\ive-2.2\runtimes\wm2003\arm\midp2\bin\fileconn.dll into this folder on you
mobile device: J9\bin\
3. Copy: fixed\ive-2.2\runtimes\wm2003\arm\midp2\lib\jclMidp20\ext\fc.jar into this folder on
you mobile device: J9\lib\jclMidp20\ext\
1.1.4.3 Installing GPSWatch Plus in IBM J9
1. Copy the modified jad along with jar to Memory card:/ . Don't place the files under any folder
in the memory card.
2. Start the IBM J9 Java emulator, Press install and then you have to enter the following:
file:///storage card/GPSWatchPlus.jad
3. Phew you are done.
1.1.4.4 Pairing your GPS Receiver
1. Go to Bluetooth and add GPS device to the paired device list.
2. For the Bluetooth device add an outgoing COM Port using ports tab, For e.g COM6.
3. Now, open GPSWatch and navigate to Settings -> Forced GPS and type
comm:com6;baudrate=9600;
4. Phew, you are done, now go back to the main menu and click connect.
Make sure your BT GPS is turned on.
1.1.5 Phone specific installation procedures
1.1.5.1 Sony Ericsson Phones
In general, applications can be installed either by copying the jar and jad files to phone memory or
memory stick and invoking the application from the file manager in the phone.
Copyright iNTERCHAIN Solutions. All rights reserved.
1.1.5.2 Nokia Phones
Installation on Nokia phones by pointing the browser to the aforementioned address.
Figure: www.gpswatcher.com/ota Login Page
Figure: Once Successfully Logged in
Copyright iNTERCHAIN Solutions. All rights reserved.
To install GPSWatch Plus using Nokia PC Suite do the following:
1. Connect your mobile phone (via bluetooth, irda, serial, whatever)
2. Double click GPSWatchP.jar
3. Wait for the installation to complete
If the jar file has not been associated with Nokia PC Suite, you need to:
1.
2.
3.
4.
5.
Connect your mobile as you regularly do (bluetooth, irda, serial, whatever)
open the PC Suite
Click on "Install Application"
Select GPSWatchP.jar
Wait for the installation to complete
The program will end up in "Programs/Collection" as "GPSWatchPlus".
Once it is installed, you may want to setup the permissions:
1. Go to "Programs/Collection" and put cursor on "GPSWatchPlus".
2. Select Options->Application access->Phone Access->Read user data->Always allowed
3. do the same for Write user data
N95
Use PC Suite, or:
1. Edit the previously downloaded JAD file and replace MIDlet-Jar-URL property as MIDlet-JarURL: filename.jar For eg: MIDlet-Jar-URL: GPSWatchPlus.jar
2. Copy GPSWatchP.jar and GPSWatchP.jad to the phone
3. In the phone, use "File Manager" to browse to GPSWatchP.jad
4. Select it to start Installer and install the midlet
5. Once installed, go to Tools->AppManager->open GPSWatchPlus, and set Always allowed for
Read user data (and for Edit user data )
6. That's it!
1.1.5.3 Motorola Phones
The simplest would be transferring the application over Bluetooth. If your phone has the application
installation feature locked, then follow the instructions below to install GPSWatch.
In order to install Java apps from the file system (such as in development) you need to enable JAL
(Java Application Loader) for the phone.
Using moto4lin you can edit the seem table and enable the flag.
(http://www.planetmotox.net/motox101/v3_seem_table.htm) Then it is just a simple case of copying
the jad/jar files across to flash and selecting GPW. Triggering the JAL, enables windows users to use
the program to manage the midlets for them. moto4lin doesn't do that but seeing as I
have direct access to the file system instead it doesn't bother the user.
Courtesy: D LoCascio
Copyright iNTERCHAIN Solutions. All rights reserved.
1.1.5.4 Siemens Inbuilt GPS Phones
In order to install Java applications on one of the BREW devices of BenQ-Siemens you need a
Windows based software named Java Midlet Installer, or short JMI.
This software can be downloaded free of charge at the software section on www.BenQmobile.com. To
be redirected to the section of your phone add a slash and the device's name, e.g.:
www.BenQmobile.com/SXG75
After extracting the software you can start it and connect your mobile phone to the data cable. After
some seconds the application should state in the right part of its screen that the phone is connected. If
the phone isn't recognized check connection with the Mobile Phone Manager which ships with your
phone and can be downloaded on www.BenQmobile.com/SXG75 in the support section. (For other
mobile phones just type your mobile phone’s name). If you haven't installed the MPM your system
may just lack the necessary drivers.
Choose which type of application you want to install (application or game). Browse in the left part of
the screen to the folder in which the JAD and JAR files of the application are and select one. Click on
the „Install“ button on the right side. The application will be transfered to the phone. After the transfer
is completed the phone needs a restart.
Now you can find the application in the games or application list in the menu depending on what you
had selected as you installed it.
In case you are not able to locate the JMI installer on the support website, please write to us.
Courtesy: Stefan
Copyright iNTERCHAIN Solutions. All rights reserved.
1.2 Using GPSWatch Plus
As soon as the application loads you will get the default entry screen as the “Position Report”.
This shows the Latitude, Longitude, Altitude and the Current time. But the next time when you open
the application the entry screen would be the screen that you have closed on your previous run of the
application.
Figure: Position Report
Copyright iNTERCHAIN Solutions. All rights reserved.
1.3 Moving Forward
Now this section will explain the details of How to enter the Main menu, their contents and their
functionalities
At the Right-Bottom of the report you can see the Menu Button. Invoking this button will give you the
Menu List as shown in figure
Figure: Position Report Menu
Choosing the option “Menu/Back” will take you to the Main Menu. The main menu has the following
list of options as shown in figure (Other options of Navigate Report will be discussed later)
Figure: Main Menu
Copyright iNTERCHAIN Solutions. All rights reserved.
At first to work with the application you must connect your phone with the GPS Receiver, which can
be done by choosing the option “Connect” from the Main Menu
1.4 In-Built GPS Receiver Connection Establishment Procedure
1. In the case of GPS Enabled phones (for eg. Nokia N95), select “Settings -> Forced GPS
Address” and type the following:
comm:com6;baudrate=9600;
or
comm:rfcm;baudrate=9600;
This is used to configure the Bluetooth port.
2. Now, Location provider has been connected on your GPS-enabled phone.
If your phone doesn’t have an In-Built GPS facility and if you have the Bluetooth GPS Receiver then
follow this procedure
1.5 Bluetooth GPS Receiver Connection Establishment Procedure
2. Enable Bluetooth on your phone before opening the application.
3. Open the application and click "Connect", the application will now search for all the BT devices
in your vicinity and display them (Ensure that BT GPS Receiver is powered on).
4. Now select the GPS Receiver in the list and select OK
5. Some phones prompt for a security alert while establishing Bluetooth connection, click yes for
the prompt if any. And there you go, you are now connected and now you will be back in the
main menu.
We are done, now the connection has been established with the location provider (GPS device).
The GPS Receiver signal strength will be displayed on left top corner of the display
Now let us see the functionalities of other options available in the Main Menu. Starting off with
Navigate option
Copyright iNTERCHAIN Solutions. All rights reserved.
2. Navigate
Navigate Your Way – GPSWatch Plus Map
In order to go to the maps just go the option “Navigate” in Menu. If you’re using a signed version of
the application and if for the first time you are accessing the Internet then the application will prompt
for your permission to access the Internet in order to download the maps, otherwise in the case of the
unsigned version permission needs to be granted each time.
Once you are inside the map you can spot your self on the Map. Your location will be marked as a Red
Arrow
This Map Screen is called the “Navigate Report” as shown in the figure
Figure: Navigate Report
2.1 Special Features Available in Navigate Report
1. On the right top corner you will have your Touch Sensitive Zoom control (Touch Operations
available only in Touch screen enabled phones) .This control helps you to zoom in and zoom
out with the swipe of the stylus over it.
2. On top of the Zoom Control we have the Map Scale displayed in Kilometers
3. At the bottom of the screen we have the Current speed display. The unit of speed display
depends on the Unit choice that you choose from the “Settings -> Distance Units” choice in
the Main Menu.
Copyright iNTERCHAIN Solutions. All rights reserved.
2.2 Options Available in Navigate Report
Here we can see the features available on the “Navigate Report”– Map Screen
When you click the “Menu” button on the right-bottom it will give you a set of options available for
you in the Navigate Report. As shown in figure.
Figure: Navigate Report Menu (Scroll down to view remaining options)
Figure: Navigate Report Menu (Remaining Options)
Copyright iNTERCHAIN Solutions. All rights reserved.
Now lets see in detail, what are all the choices that are available in Navigate report Options
2.3 Menu/Back
This option will take you back to the Main Menu
2.4 Current Location
This option helps you to move your display view to your Current Location. For example if you have
moved on the map to a different position to see the in and around places and if you want to come back
to the existing place where you are you can use this option
2.5 Capture POI
This option helps you to capture a Point of Interest.
For example if you come across a place and if you want to mark that place for future reference, you can
choose this option. This will open a category list and a subcategory list under which you can store the
particular Point of Interest.
If you have enabled the camera option in the “Preferences -> Photo capture” in the Main Menu then
you can take a picture of the Point of interest and store it along with its name.
Once the Way Point is Stored you will get an image on the Map where you captured the way point and
when you click on the image (Touch Screen Enabled Phones) or when you move the Screen centre on
to the image you will get a blurb which shows the Name under which you stored the Point of Interest
and if you have taken a photo of the Point of Interest it would also come in the blurb as a thumbnail
image.
2.6 Maps Hide/Show
This option helps you to hide the maps when not needed by you, and to display Maps when they are
made hidden by you .When the maps are displayed this option would be “Maps Hide” and when this
option is chosen the Menu Content changes to “Maps Show”
2.7 Waypoint Hide /Show
This option helps you to display the way points and hide your way points whenever necessary
This is also a context sensitive button, whose name changes according to the context i.e, if waypoints
are displayed it will show the menu content as “Way Point Hide” and vice versa
2.8 Choose Active Trace
This option helps us to choose the required Trace record to be viewed. If you have traced many routes
and if you want to view a particular one, you can choose this option.
This will show the list of Trace Record Names that you have stored and you have the option to choose
which trace record to view. If you do a trace by selecting an existing trace record then the new trace
record will get appended to your existing trace record
2.9 Trace Start/Stop
This option helps you to trace the route that you travel. When you are traveling to a new place and want
save the route you have traveled you can choose this option. As default this option will be “Trace
Start” and if you choose this option you will see a line being drawn along the way you take now the
option would change to “Trace Stop”. When you are done with the trace you can choose the option
Copyright iNTERCHAIN Solutions. All rights reserved.
“Trace Stop” which will prompt you to choose the category and subcategory under which you would
like to store the Trace record. Then it will prompt you to enter the Name of the trace under which you
would like to refer it later.
2.10 Set Trace Precision
This option allows you to set the precision of the Trace that you take. Precision value is in meters
(Metric Units).
2.11 Wikimapia Show/Hide
This option gets you the “Wikimapia” maps on the screen. Those who like using wikimaps for their
region they can choose this option.
2.12 Map Provider
This option gives the users the choice between the following map providers
1. Google Maps
2. Google Earth
3. Virtual Earth
4. Amazon Maps
5. Yahoo Maps
Users can choose whichever option depending on the detail that the maps provide for their region
2.13 Zoom in
2.14 Zoom out
These controls help you to zoom in and zoom out of the map according to your requirements. It will
zoom with Screen Center as the Point of Zooming. The Current Zoom level can be found out from the
position of the zoom control slider on the Navigate Report.
So these are the options available inside the “Navigate Report”. Now the following documentation will
give you the details on the next content of Main Menu that is the “Compass Report”
Copyright iNTERCHAIN Solutions. All rights reserved.
3. Compass
This Report displays a compass which tells you the direction in which you travel as shown in the
figure.
Figure: Compass Report
Compass report has the following options as shown in figure
Figure: Compass Report Options
Copyright iNTERCHAIN Solutions. All rights reserved.
3.1. Menu/Back
This Option takes you to the Main Menu.
3.2. Select POI
This option allows you to select a Point of Interest and when you select that you will get the distance
from your current location and the Point of Interest and the time in min to reach the particular Point of
Interest
3.3. Reset Average Speed
This option allows you to reset the average speed at which you have traveled.
Next we are going to see the next “Main Menu” Option – Location
Copyright iNTERCHAIN Solutions. All rights reserved.
4. Location
Choosing this option will get you to another sub-menu containing two options namely
Position and Satellite as shown in figure
Figure: Location Sub Menu
Copyright iNTERCHAIN Solutions. All rights reserved.
4.1 Position
This option gives you the details of latitude, longitude, Altitude of the current position and it also
displays the Current Time and Date as shown in the figure
Figure: Position Report
The format of the Latitude and Longitude values can be changed for more customized view of the
report. For this purpose the Position report has the following options it its menu as shown in figure
below. Position Report has 5 options namely “Menu/Back”, “DD.dddd”, “DD’MM.mmm”,
“DD’MM’SS”, “OSGB36” as shown in figure
Figure: Position Report Sub Menu
Copyright iNTERCHAIN Solutions. All rights reserved.
4.1.1 Menu/Back
This option gets you back to the Main-menu
4.1.2 DD.ddddd
This option gives the Lat/Lon Values in a format similar to this
Lat: 45.45109
Lon: 9.98125
4.1.3 DD’MM.mmm
This option gives the Lat/Lon Values in a format similar to this
Lat: 45’36.596
Lon: 9’19.594
4.1.4 DD’MM’SS
This option gives the Lat/Lon Values in a format similar to this
Lat: 45’36”35
Lon: 9’19”32
4.1.4 OSGB38
This option gives the Lat/Lon Values in a format similar to this
ZX815 32654
Copyright iNTERCHAIN Solutions. All rights reserved.
4.2 Satellites
This option gets the details about the GPS Satellites that are currently visible for the GPS Receiver and
communicating with them. The Darker shade of green color indicates that the signal from that
particular satellite is high and vice versa. At the bottom there are three values displaying the Dilution of
Precision (DOP) Values that are sent to the GPS receivers. “P” indicates “Positional”, “V” indicates
“Vertical” and “H” indicates “Horizontal”. This is shown in the following figure
Figure: Satellite Report
Now let us move to the next option in “Main Menu” – “Stats”
Copyright iNTERCHAIN Solutions. All rights reserved.
5. Stats
This option gives you interesting statistics that a user would expect in a GPS Application
Invoking this option will display a sub-menu containing 3 options namely “Distance”, “Speed” and
“Altitude” as shown in figure.
Figure: Stats Sub-menu
Now let us move to the next option in “Stats” – “Distance”
Copyright iNTERCHAIN Solutions. All rights reserved.
5.1 Distance
This option gives statistics based on distance. Here you have the report containing the “Distance
Covered” by you right from the Applications connection to the GPS Receiver till the place where you
are currently present. It also gives the “Air Distance” covered by you. Apart from the distance data
you also have 3 Stage Odometers for calculating distance traveled. The following figure shows the
Distance Report
Figure: Distance Report
Now let us see the options available on the “Distance Report”.
Distance Report has 5 options namely “Menu/Back”, “Reset Air-Distance”, “Reset ODO-1”, “Reset
ODO-2”, “Reset ODO-3” as shown in figure
Figure: Distance Report Menu
Copyright iNTERCHAIN Solutions. All rights reserved.
5.1.1
Menu/Back
This option gets you back to the Main-menu
5.1.2
Reset Air Distance
This option resets the Air distance back to zero for a fresh record to be calculated.
5.1.3
Reset ODO 1,2,3
This option helps you to reset the odometers for calculating fresh ODO Records
Now let us move to the next option in “Stats” – “Speed”
5.2 Speed
This option gives you the statistics based on Speed. This report gives you the details like “Current
Acceleration”, “Max Acceleration”, “Max Speed”, “Min Speed”, and “Average Speed”. As shown in
figure
Figure: Speed Report
Now let us see the options available on the “Speed Report”.
Copyright iNTERCHAIN Solutions. All rights reserved.
Speed Report has 5 options namely “Menu/Back”, “Reset Avg Speed”, “Reset Max Speed”, “Reset
Min Speed”, “Reset Max Acceleration” as shown in figure
Figure: Speed Report Menu
5.2.1 Menu/Back
This option gets you back to the Main Menu
5.2.2 Reset Avg, Max, Min Speed
This option resets the Average Speed, Max Speed and Min Speed for fresh data collection on speed
5.2.3 Reset Max Accel
This option resets the Max Acceleration for fresh data collection of Acceleration
Now let us move to the next option in “Stats” – “Altitude”
Copyright iNTERCHAIN Solutions. All rights reserved.
5.3 Altitude
This option gives you the statistics based on Altitude. This report gives you the details on Current
Altitude in the form of a graph. As shown in figure
Figure: Altitude Report
“Altitude Report” has 3 options namely Menu/Back, Set Sampling Rate, Clear Data as shown in
figure.
Figure: Altitude Report Menu
Now let us see the “Altitude Report” options in detail
Copyright iNTERCHAIN Solutions. All rights reserved.
5.3.1 Menu/Back
This option gets you back to the Main Menu
5.3.2 Set Sampling Rate
This option allows you to set the sampling interval in seconds.
5.3.3 Clear Data
This option clears all the data related to altitude from the graph displayed
Now let us move to the next option in “Main Menu” – “Data”
Copyright iNTERCHAIN Solutions. All rights reserved.
6. Data
This option mainly deals with data that has been saved by the Application on phone
This option has the following sub menu contents as shown in figure
Manage POI, Import Data, Export Data, Clear Data
Figure: Data Menu
Now let us move to the options available in “Data”
6.1 Manage POI
Here in this option you can manage the Point of Interest Data that you have collected previously
When this option is invoked you will get the list of categories which in-turn displays subcategories on
invocation. This gets you to the Point of Interest that you have stored under this category and subcategory. There you can find the Point of interest that you have stored, its name and other details
related to that Point of Interest
Copyright iNTERCHAIN Solutions. All rights reserved.
6.2 Import Data
Invoking this option will prompt you to select the location of the file to be imported (on phone
memory/memory card). You may get security alerts, accept them.
6.3 Export Data
Invoking this option will prompt you select the type of file to be exported (the format of the file) then it
will prompt you to select the destination in file system where it has to be exported.
Then you must choose your data which has to be exported.
6.3.1 Export & Import Trace points
1. This feature enables you to have a text output of the points (in radians) that represent the route you
traced on "Trace Route" report.
2. Select import or export and follow instructions similar to loading map or exporting KML files
(Basically selecting the folder and then the file).
6.3.2 Exporting & Importing GPX Data
1. This feature enables you to share trip data with other GPS Receivers and PC based GPS applications.
The instructions for using this feature are similar to the tracepoint import and export.
2. For more information on GPX data visit www.topografix.com/ gpx .asp
3. The maximum size of the GPX data file that the application can handle depend upon the device
capability.
6.4 Clear Data
This option is mainly used for clearing the stored data from the phone. This option has the following
sub options as shown in figure below.
Figure: Clear Data Options
Copyright iNTERCHAIN Solutions. All rights reserved.
6.4.1 Map Cache
This option helps to clear the Map cache for a fresh collection of map data
6.4.2 POI’s
This option helps to clear the POI Data (that you have collected using the application) completely from
the phone
6.4.3 Selected Trace Record
This option gives you the list of Traces that you have made using the application and you can choose a
particular trace record and delete that particular record from the phone.
6.4.4 All TraceRecords
This option helps to clear all the trace records that you have collected using the application
Now let us move to the next option in “Main Menu” – “Preferences”
Copyright iNTERCHAIN Solutions. All rights reserved.
7. Preferences
This application has a set of Preferences that can be set for making the application more customized
Let us see the options available under the option “Preferences”
The options available under “Preferences” are “Distance Units”, “Internet Usage”, “Backlight
Mode”, “AutoConnect”, “Compass Mode”, “Menu Style” and “Photo Capture” as shown in the figure
below
Figure: Preference Options
Now let us see the descriptions of each option available under “Preferences”
Copyright iNTERCHAIN Solutions. All rights reserved.
7.1 Distance Units
This option is used for setting the choice of unit that you may like to see for the entire application.
It has two sub options namely Metric and English as shown in figure. By Default Metric is chosen
Figure: Distance Units Choice
Metric units refer to all SI Units and English Units refers to (non SI) UK Units.
7.2 Internet Usage
This option allows you to decide whether to make the application, internet enabled or not
It has two options namely “Enable” and “Disable”. By default the Internet Usage preference is set as
Enabled
7.3 Backlight Mode
This options allows you to set whether the backlight has to be permanently on or on only when active
As mentioned it has two options namely “Permanent ON” and “On when Active”
Permanent ON will keep the backlight on constantly even when you leave the application unattended
On when active will keep the Backlight ON only when you use the application and will stay for default
time as set in the phone (Differs for different phones) and subsequently gets off when left unattended.
Copyright iNTERCHAIN Solutions. All rights reserved.
7.4 Autoconnect
This option allows your application to get automatically connected to the previous device (Blue Tooth
GPS Receiver) that you have connected with the application on your last run. Just invoking the
“Connect” option from the main menu will get you connected to the previously connected BT GPS
Receiver.
7.5 Compass Mode
This option allows you to dampen the compass to reduce the precision. This dampening should enabled
when you move with a slow speed (usually walking) to get the correct reading of the Compass. When
you move with a faster speed you can disable the Compass Dampening. By default the Compass
Dampening is disabled
7.6 Menu Style
This option allows you to switch menu style between System Menu and Custom Menu but this change
will come to effect only when the application is restarted
Figure: Custom Menu
7.7 Photo Capture
This option when enabled allows you to take photographs while capturing Way Points (Available only
in selected phone models). For those phones which do not have this option to take pictures you can still
get a way point by disabling this option
Now let us move to the next option in “Main Menu” – “Settings”
Copyright iNTERCHAIN Solutions. All rights reserved.
8. Settings
The Settings option allows user to manipulate the application in a more customized manner. The
options available under settings are “Location Broadcast”, “Map Folder”, “Forced GPS Address”,
Proxy Settings”, “GPS Mode” and “POI Img Folder”
Figure: Settings Menu
8.1 Map Folder
This option helps you to set the Map Folder for the application instead of getting them through GPRS
on the move which will reduce your GPRS cost. You can Use the OMD Tool and download the
required maps and save them in a folder. Copy the folder to your phone and use this option to set the
application to read from the folder.
Copyright iNTERCHAIN Solutions. All rights reserved.
By default the Map folder will not be set to any location. When you invoke this option you will get an
option called “continue” in order to continue with existing folder that is previously set (<Empty> by
default) and “change” option to change the map folder to a new location as shown in figure below
Figure: Map Folder Setting
This option gets you inside the file system which may result in some security prompts. Give yes to
them and proceed to set the Map folder and finally give OK to set the New Map Folder. Now your
application will take the Maps from the selected folder and avoids downloading the maps from map
providers.
8.2 Forced GPS Address
For certain phones or PDAs the Bluetooth connectivity with a GPS Receiver needs a predefined
address. So such phones can be connected to the BT GPS Receivers using this option. Here you can
mention the address that you need to connect to a BT GPS Receiver as shown in figure below
Figure: Forced GPS Address Setting
Copyright iNTERCHAIN Solutions. All rights reserved.
8.3 GPS Mode
This option allows you to select between Inbuilt GPS Provider (Receiver) and Bluetooth GPS Provider
(Receiver) .Some phones have the facility of Inbuilt GPS Receivers in them, for those phones you can
choose the option between Inbuilt GPS and Bluetooth GPS . This is shown in the figure below
Figure: GPS Mode
8.4 POI Image Folder
This option helps you to set the Image folder for the images that you capture during Waypoint
Capturing (with Photo Capture Enabled in Preferences)If this is not set the default location would be
set as e:/GPSWatch/
Copyright iNTERCHAIN Solutions. All rights reserved.
9. Using the Offline Map Downloader
The Offline map downloader is an executable Java Archive (JAR) file that can be used to download
maps on to one’s personal computer which can then be used to store cached maps on the mobile phone
that runs GPSWatch.
Usage:
Once the JAR file has been downloaded, open the JAR file using Java Runtime Environment. Once
opened, select a specific map provider (Google, Yahoo, Amazon etc.). After selecting a particular
zoomed in region, click on Lock location and drag on the map which would provide a red rectangular
region that has been selected on the drag option. Once the region has been selected, select a start and
end zoom level, export location in your local machine and then click on Export. Once the export
operation is complete, files to be cached on to the mobile application can be retrieved from the location
specified.
Figure: Map area selection
Copyright iNTERCHAIN Solutions. All rights reserved.
Once an area has been locked for selection, the zoom and panning options are disabled. This allows a
user to select a desired region with ease.
An area selected by clicking on lock location can be erased by clicking on unlock location. Maps can
be panned by clicking on the map panning area and dragging. Zoom in and zoom out buttons are
available on the right hand side of the map.
Note:
Please select small size area for downloading maps at a high zoom levels (<8 levels) because the map
size will explode if you choose a large area causing problems with application (because of memory
constraints).
So probably you can download in two stages selecting little larger area for zoom levels 8-15, smaller
area for higher zoom levels (<8) and very small area for very high zoom levels (<4).
Also, the value of start zoom level should be lesser than or equal to the value of end zoom level.
Copyright iNTERCHAIN Solutions. All rights reserved.
For technical queries or questions regarding GPS Watch we request you
to make utilization of the Forum (Community) feature in our portal.
For other queries, contact us at [email protected]
Copyright iNTERCHAIN Solutions. All rights reserved.