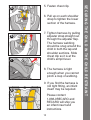
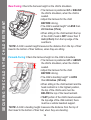
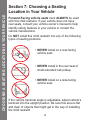
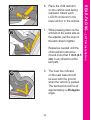
1
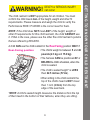
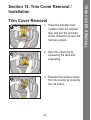
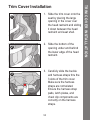
Child Safety Seats
Performance RIDE / ProRIDE Instruction Manual
Convertible Child Restraint System for
children 5 to 65 lbs (2.3 to 29.5 kg).
Approved in accordance with Federal Motor
Vehicle Safety Standard 213.
Tested in accordance to ISO/TC 22/SC 12/WG
1 N538 side impact protection requirements.
Only suitable for use in vehicles with 2-point
(lap), 3-point (lap & shoulder) seat belts and
latch anchorages.
El manual de instructiones Performance RIDE
/ ProRIDE esta disponible en español en www.
recaro-cs.com. Por favor visite el internet
para bajar una versión en español.
Please read instructions prior to
installation. Store this manual in
the seat base.
B
Contents
Section 1: Safety Warnings.......................................... p. 4-5
Section 2: General Information.........................................p. 6
Section 3: Register Your New Child Restraint..................p. 7
Section 4: Getting to Know Your Child Restraint........ p. 8-13
Section 5: Securing the Child in the Child Restraint......p. 14-16
Section 6: Adjusting the Harness System
to Fit Your Child.............................................p. 17
Section 7: Choosing a Seating Location
in Your Vehicle......................................... p. 18-19
Section 8: Learning About Your Vehicle
Safety Systems....................................... p. 20-22
Section 9: Installing the Child Restraint
Rear-Facing in Your Vehicle.................... p. 23-35
Section 10:Installing the Child Restraint
Forward-Facing in Your Vehicle.............. p. 36-46
Section 11:Certification...................................................p. 47
Section 12:Use in Aircraft................................................p. 47
Section 13:Care and Maintenance..................................p. 48
Section 14:Trim Cover Removal and
Installation............................................... p. 49-56
Section 15:Trouble Shooting.....................................p. 57–58
Section 16:Replacement Parts........................................p. 59
Section 17:Warranty.................................................. p. 60-61
Section 18:Additional Contact Information......................p. 62
Section 19:Glossary..................................................p. 63–65
1
Dear Parents,
Welcome to the RECARO family of high quality child safety
products and thank you for purchasing your new RECARO
Child Restraint System.
RECARO has over 100 years experience in the design and
manufacture of premium automotive products. To assure all
products RECARO manufactures are worthy of the name,
we’ve subjected them to a comprehensive development
program complying with American FMVSS 213 safety
standards. RECARO is also ISO 9001 certified which helps
assure the most comprehensive product development system
available.
Although each RECARO child restraint system is equipped
with state-of-the-art safety features such as Side Impact
Protection (SIP), it is not a guarantee that this child restraint
will prevent injury or death. However, if you stress careful
driving and proper use of your child restraint, it can lower the
risk of injury or death.
Therefore, please make sure to carefully review all
information in this instruction manual to properly restrain
your child. Also, before using your new child restraint for the
first time, please review all components carefully to make
sure nothing has been damaged during shipping. Failure to
follow these instructions and the labels on the seat can result
in serious injury or even death.
The RECARO child seat you have purchased is a high
quality product.
2
Its different settings and its stable and ergonomic
design ensure that the RECARO child seat is a safe and
comfortable place for your child to sit when traveling in your
car. However, before you use it, you need to adjust it to your
child’s size and then install it carefully so that the seat will
perform as required. These instructions will help you do this,
so please read them carefully.
Remember, parents are a child’s best examples. Be sure
to ALWAYS buckle your seat belt and your children will
be much more likely to do the same. Thank you again for
choosing RECARO and enjoy your child restraint! If you
have any questions or need assistance of any kind please
contact us at:
RECARO Child Safety, LLC
1600 Harmon Road
Auburn Hills, MI 48326
Tel: 1-888-9RECARO
Internet: www.recaro-cs.com
E-mail: [email protected]
El manual de instructiones Performance RIDE / ProRIDE
esta disponible en español en www.recaro-cs.com. Por favor
visite el internet para bajar una versión en español.
Yours sincerely,
The RECARO Child Safety Team
3
Section 1: Safety Warnings
Safety Warnings
or SERIOUS INJURY
WARNING! DEATH
can occur
• Do NOT place a child restraint in the front seat of a vehicle with a
passenger air bag. The back seat is the safest place for children
under 12 years of age.
• According to accident statistics, children are safer when properly
restrained in the rear seating positions than in the front seating positions.
• Use only with children who weigh between 5 and 65 pounds (2.3
and 29.5 Kg) and whose height is 49 inches (125 cm) or less.
Rear-facing 5 - 40 pounds (2.3 and 15.9 kg) and Forward-facing
20 - 65 pounds (9.1 and 29.5 kg) and at least 1 year of age. Do
NOT use for a child who weighs more than 65 pounds (29.5 kg)
• Discontinue use of your child restraint that is older than six (6)
years or has been in a severe crash to prevent injury due to
deterioration or hidden damage. See “manufactured in date”
located on a sticker on the Performance RIDE / ProRIDE.
• Secure this child restraint with the vehicle’s child restraint LATCH
anchorage system if available or with a vehicle belt.
• Do not use the lower anchors of the child restraint anchorage
system (LATCH system) to attach this child restraint when
restraining a child weighing more than 45 pounds (20.4 kg).”
• Secure the top anchorage strap provided with this child restraint.
• Snugly adjust the belts provided around your child.
• A snug strap should NOT allow any slack. It lies in a relatively
straight line without sagging. It does NOT press on the child’s flesh
or push the child’s body into an unnatural position.
• Do NOT use this child restraint system until you have read and
understood the instructions in this manual and in your vehicle
owner’s manual. Do NOT let others install or use this child restraint
system unless they understand how to use it.
4
• Do NOT make any technical modification to the child restraint
system and use it only as outlined in these instructions. Otherwise,
the safety function of the seat will be reduced or completely voided.
• Before each use, inspect the child restraint. Make sure nothing on the
child restraint is damaged, loose or broken. If anything on the child
restraint appears damaged, loose or broken, do NOT use the restraint.
• Failure to follow warnings provided on the child restraint labels and
stickers could cause serious injury or death.
• The child restraint should be securely belted to the vehicle, even
when it is not occupied, since in a crash an unsecured child restraint
system may injure other occupants.
• Placing your child in a hot child restraint may result in burns.
• Do NOT add accessories, toys, padding or other items to the child
restraint unless provided by RECARO.
• This child restraint must NOT be used in the home, boats or other
non-certified applications.
• If the child restraint has been in a crash or vehicle accident, it must
be replaced; do NOT use the child restraint again. A crash can
cause unseen damage and using the child restraint again can cause
serious injury or death.
•NEVER leave a child unattended even when sleeping.
• NEVER allow a child to play with the child restraint; it is NOT a toy.
• There is no guarantee that the child restraint will prevent injury or
death in a particular crash. However, if you stress careful driving
and proper use of the child restraint, it can lower the risk of injury or
death in most crashes.
• Do NOT lubricate buckles, fasteners or any part of the child restraint.
• NEVER use a used child seat unless you know its complete history.
5
SAFETY WARNINGS
or SERIOUS INJURY
WARNING! DEATH
can occur
Section 2: General Information
Infant Insert
Following Section 5: Securing the Child in the Child Restraint, pg. 14, you may
find that the harness does not fit snug against your child. If this is the case,
the RECARO infant insert may be required. Please call 1-888-9RECARO and
RECARO will ship you an infant insert and instructions.
Locking Clip
Following Section 9: Installing the child restraint Rear-Facing in Your Vehicle, pg. 35, Non-Locking ELR Lap-Shoulder Belt installation, you may find that you
cannot install without a universal locking clip. Please call 1-888-9RECARO and
RECARO will ship you a locking clip and instructions.
Extreme Weather
General information
When it is HOT, RECARO recommends the following tips to reduce possible injury or
discomfort to your child:
• Park your vehicle in the shade to help keep the restraint cooler.
• Cover the child restraint with a sheet or blanket when not in use.
• ALWAYS check surface temperatures of the child restraint before placing a child in it.
When it is COLD, RECARO recommends the following tips to reduce possible injury or
discomfort to your child:
• Remove the child’s bulky clothing before restraining the child. This will help belts and
other safety features function properly.
• After restraining the child in the seat, cover the child and the restraint system with a
blanket or their jacket to maintain warmth and comfort of the child.
NEVER, EVER leave your child unattended in your vehicle, no matter how long
or even if the windows are left open. NHTSA studies show that heat stroke is
the leading cause of non-crash vehicle deaths for children.
6
Child restraints could be recalled for safety reasons. You
must register this restraint to be reached in a recall.
Send your name, address, email address if available,
and the restraint’s model number, serial number and
manufacturing date to:
.
RECARO Child Safety, LLC
1600 Harmon Road
Auburn Hills, MI 48326
or call: 1-888-9RECARO
)
8
or register online at:
http://www.registry.recaro-cs.com
For recall information, call the U.S. Government’s Vehicle
Safety Hotline at 1-888-327-4236 (TTY: 1-800-424-9153)
or go to http://www.NHTSA.gov.
ALL information provided to RECARO on the registration
card or on the online registry will NOT be sold,
distributed, or used for any purposes other than to contact
you in the event of a recall.
7
REGISTER YOUR NEW Child Restraint
Section 3: Register Your New Child Restraint
GETTING TO KNOW YOUR Child Restraint
Section 4:
Getting to Know Your
Child Restraint
This child restraint is known as a convertible child
restraint because it converts from a Rear-Facing into a
Forward-Facing restraint system as your child grows.
It is important to know the difference between these two
use modes, be able to choose which mode is appropriate
for your child, and be able to choose which sections of
this instruction manual apply to the mode that you desire.
To facilitate choosing the right set of the instructions for
the mode that you desire, look for color codes on the
sides of the pages in this instruction manual.
Rear-Facing instructions are indicated in PINK, and
Forward-Facing instructions are indicated in BLUE. Note
that general information and information applying to both
user modes is not color-coded.
NEVER use the child restraint system for a child
who is not the recommended height, weight or age
recommended in this instruction manual.
The American Academy of Pediatrics and NHTSA
recommend keeping children rearward facing up to age 2.
RECARO advocates using a convertible child restraint up to
maximum rearward facing weight and height.
8
The child restraint is NOT appropriate for all children. You must
confirm the child meets ALL of the height, weight and other fit
requirements. Please measure and weigh the child to verify the
Performance RIDE / ProRIDE is the correct seat for them.
NOTE: If the child does NOT meet ANY of the height, weight or
other fit requirements for this child restraint, the child CANNOT use
it. If that is the case, please see the other fine child restraint systems
that are offered by RECARO.
A child CAN use the child restraint in the Rear-Facing position ONLY if:
Rear-Facing position
•The child’s weight is between 5 and 40
pounds (2.3 kg and 15.9 kg).
•The harness CAN be positioned AT or
BELOW the child’s shoulders, when the
child is seated.
•The child’s seated height* is LESS
than 22.5 inches (57cm).
•When sitting in the child restraint the
top of the child’s head is NOT closer
than 1 inch (2.5cm) from the top
edge of the seat back.
*NOTE: A child’s seated height measures the distance from the top
of their head to the bottom of their tailbone, when they are sitting.
9
GETTING TO KNOW YOUR Child Restraint
or SERIOUS INJURY
WARNING! DEATH
can occur
or SERIOUS INJURY
WARNING! DEATH
can occur
A child CAN use this child restraint in the Forward-Facing position ONLY if:
GETTING TO KNOW YOUR Child Restraint
Forward-Facing position • The child is at least 12 months of age.
•The child’s weight is between 20 and 65
pounds (9.1kg and 29.5 kg).
•The harness CAN be positioned AT
or ABOVE the child’s shoulders,
when the child is seated in the
Performance RIDE / ProRIDE .
•The child’s standing height* is LESS
than 49 inches (125 cm).
•When the child is sitting and the head restraint is in the highest
position, the top of the child’s ears must be BELOW the top of the
head restraint.
•If ANY portion of the child’s head exceeds the top edge of the child
restraint, there must be a vehicle headrest support.
NOTE: A child’s standing height measures the distance from the
top of their head to the bottom of their feet, when they are standing.
Safety Stripe System
TM
(Select Models)
Your child restraint is equipped with the easy-to-use RECARO Safety
Stripe SystemTM. You will notice that your harness has a white stripe
on the outside edges. This added safety feature will allow you to
ensure that your harness is not twisted. The white stripe should
always remain at the outside edge of the harness above the lower
buckle. If it is not, please loosen your harness system and remove
any twist prior to use.
10
Side Impact Protection
It is important to become familiar with the features of your
child restraint system. These diagrams help you identify
key features.
Head
Integrated 5-Point
Restraint
Trim Cover &
Harness
Comfort Padding
Chest Clip
Latch
Plates (2)
Harness
Pockets (2)
Buckle
Armrests (2)
Seat Base
Level Line
Seat Bottom
11
Recline
Adjuster
Adjuster
Lever
Cover
Harness
Adjuster Strap
GETTING TO KNOW YOUR Child Restraint
Child Restraint Features:
Child Restraint Features:
GETTING TO KNOW YOUR Child Restraint
It is important to become familiar with the features of your
child restraint system. These diagrams help you identify
key features.
Harness System
Adjustment Knobs (2)
Top Tether
Storage Pouch
Forward-Facing
Vehicle Belt Path
and Belt Lock-off
Harness
Straps (2)
Harness Connector
LATCH
Adjusters (2)
Rear-Facing
Vehicle Belt Path
LATCH
Connectors * (2)
LATCH
Strap
Tether Strap
Tether Hook
*Stored in slots on the rear of the base.
12
Standard
Harness
System with
Shoulder
Pads (2)
Performance RIDE
HERO
Harness
System
Cup Holder
NOTE: Only
provided with
Performance
RIDE
13
GETTING TO KNOW YOUR Child Restraint
ProRIDE
securing the child in the Child Restraint
Section 5: Securing the
Child in the Child Restraint
1
1. Loosen the harness
system. Press the
adjuster lever located
under the adjuster flap
and pull the shoulder
straps forward.
2
2. Open the chest clip by
squeezing tabs and
separating.
3
4
3. Open buckle by pressing
red button. Place harness
straps to the side or place
chest clip into harness
pocket to hold.
4. Seat the child in the child
restraint with his/her
bottom fully into the seat.
Position the harness
straps around the child
and fasten both latch
plates into the buckle.
14
5. Fasten chest clip.
6. Pull up on each shoulder
strap to tighten the lower
section of the harness.
6
7
7. Tighten harness by pulling
adjuster strap straight out
through the adjuster flap.
The harness webbing
should be snug around the
child in both the lap and
shoulder sections. Slide
chest clip so it is at the
child’s armpit level.
8. The harness is tight
enough when you cannot
pinch a loop of webbing.
8
9. If you find the harness is
not tight fitting, an infant
insert may be required.
Please contact
1-888-9RECARO and
RECARO will ship you
an infant insert and
instructions.
15
SECURING THE CHILD IN THE Child Restraint
5
securing the child in the Child Restraint
Rear-Facing: Check the harness height on the child’s shoulders.
•The harness is positioned AT or BELOW
the child’s shoulders, when the child is
seated.
•Adjust the harness for the child
BEFORE driving.
•The child’s seated height* is LESS than
22.5 inches (57cm).
•When sitting in the child restraint the top
of the child’s head is NOT closer than 1
inch (2.5cm) from the top edge of the
seat back.
*NOTE: A child’s seated height measures the distance from the top of their
head to the bottom of their tailbone, when they are sitting.
Forward-Facing: Check the harness height on the child’s shoulders.
•The harness is positioned AT or ABOVE
the child’s shoulders, when the child is
seated.
•Adjust the harness for the child
BEFORE driving.
•The child’s standing height* is LESS
than 49 inches (125 cm).
•When sitting in the child restraint and the
head restraint is in the highest position,
the top of the child’s ears must be
BELOW the top of the head restraint.
•If ANY portion of the child’s head exceeds
the top edge of the child restraint, there
must be a vehicle headrest support.
*NOTE: A child’s standing height measures the distance from the top of
their head to the bottom of their feet, when they are standing.
16
Place your child in the child restraint prior to installing in the vehicle and
determine if the shoulder strap height needs to be adjusted.
• When using the Rear-Facing, the shoulder straps must be located
AT or BELOW the child’s shoulders.
• When using the Forward-Facing, the shoulder straps must be
located AT or ABOVE the child’s shoulders.
1. Loosen the harness system.
Press the adjuster lever located
under the adjuster flap in the trim
cover and pull the shoulder straps forward.
1
2a. Rotate the harness system
adjustment knobs to raise the
shoulder straps or to lower the
shoulder straps.
2a
2b. Refer to the labels, near the
harness system adjustment
knobs.
2b
Headrest Adjustment
To Lower:
Rotate Knob
Clockwise
To Raise:
Rotate Knob
Counter-Clockwise
NOTE: The head restraint will move
up and down. DO NOT over rotate
the knobs.
3. Pull shoulder straps to ensure the
system is secure.
17
ADJUSTING THE HARNESS SYSTEM TO FIT YOUR CHILD
Section 6: Adjusting the Harness
System to Fit Your Child
CHOOSING A SEATING LOCATION IN YOUR VEHICLE
Section 7: Choosing a Seating
Location in Your Vehicle
Forward-Facing vehicle seats must ALWAYS be used
with this child restraint. If your vehicle does not have
rear seats, consult your vehicle owner’s manual to help
identify safety features in your vehicle or contact the
vehicle manufacturer.
Do NOT install this child restraint into any of the following
types of seating positions:
• NEVER install on a rear-facing
vehicle seat.
• NEVER install in the rear seat of
small extended cab pickup.
• NEVER install on a side-facing
vehicle seat.
If the vehicle backrest angle is adjustable, adjust vehicle’s
backrest into the upright position. Be sure this area is flat
and clear of objects that might get in the way of installing
the child restraint.
18
• Do NOT place rear-facing
child seat on front seat with
air bag.
The high pressure
deployment of the airbag
can cause serious injury or
death to a child.
If your vehicle is equipped with front passenger
airbags, consult your vehicle owner’s manual for
installation instructions for child restraints.
If your vehicle does not have rear seats, consult your
vehicle’s owner’s manual to help identify safety features
in your vehicle or contact the vehicle manufacturer.
RECARO and the U.S. Department of Transportation warn
that children age 12 and under MUST ride in the rear seat
away from front airbags.
Restraint systems should be securely belted to the
vehicle, even when they are not occupied, since in a
crash an unsecured child restraint system may injure
other occupants or store it somewhere outside the
passenger cabin so that it cannot injure anyone while
the vehicle is in motion. RECARO recommends storing
the child restraint in a cool and dry location.
19
CHOOSING A SEATING LOCATION IN YOUR VEHICLE
or SERIOUS INJURY
WARNING! DEATH
can occur
LEARNING ABOUT YOUR VEHICLE SAFETY SYSTEMS
Section 8: Learning About Your
Vehicle Safety Systems
It is important to become familiar with the features of
your vehicle so that your child rides as safely as possible.
Read the vehicle owner’s manual to learn about the
safety features and adjustments available for safe travel.
Below is a diagram that helps you to identify key features.
Not all vehicles will have all features described here.
Airbags
Top Tether Anchorage
Lower Latch Anchorage
Seat Belts
Some vehicles may have inflatable seat belts. As this is new
technology, please refer to www.recaro-cs.com for updates.
20
Because the design and operation of vehicle belts
vary, make sure to observe the following guidelines:
• Do NOT use motorized passive
restraint shoulder belt systems.
• Do NOT use passive restraints
lap or shoulder belt mounted on
a door.
• Do NOT use vehicle lap and
shoulder belt systems that have
independent retractors for the
lap and shoulder portion of the
vehicle seat belt system.
NOTE: If you have a seat belt system described above,
check your vehicle owner’s manual for advice on where
and how to install a child restraint. Your vehicle dealer
may have a replacement lap belt that when installed will
hold the child restraint tightly.
21
LEARNING ABOUT YOUR VEHICLE SAFETY SYSTEMS
or SERIOUS INJURY
WARNING! DEATH
can occur
LEARNING ABOUT YOUR VEHICLE SAFETY SYSTEMS
Vehicle Seat Belt Systems
Important!
Check to be sure which type of seat belt system you have in
the chart below. Some vehicles have more than one type of
belt system depending on the seating position. The center rear
position may have a lap only belt while the side seating locations
may have a lap/shoulder system. If you are not sure which
system you have, check your vehicle owner’s manual or contact
your vehicle dealer or manufacturer.
Types of Seat Belt Systems
Rear Facing - See page 27
Locking Lap Belt
Front Facing - See page 41
Locking Lap
Shoulder Belt
Rear Facing - See page 31
Front Facing - See page 43
Non Locking ELR
Lap Shoulder Belt
Rear Facing - See page 35
Front Facing - See page 45
22
or SERIOUS INJURY
WARNING! DEATH
can occur
• ALWAYS use in reclined position when installed Rear-Facing.
If your vehicle has lower anchors, the LATCH connector system can
be used. Check your vehicle owner’s manual to determine if lower
anchors are available and applicable vehicle seating positions. If
lower anchors are not available the vehicle seat belt must be used.
NOTE: Your child restraint seat is shipped with latches installed
for the Forward-Facing mode.
1
2
1. Adjust the child restraint
into the recline position by
pulling the recline adjust
handle and rotating the
seat back. Rotate to locked
position.
2. Locate the latch LATCH
connectors at the rear of the
base; press the red buttons
and remove the connectors
from the storage slots.
23
- LATCH Installation
LATCH Installation – Rear-Facing
REAR-FACING
Section 9: Installing the Child
Restraint Rear-Facing in Your Vehicle
3
REAR-FACING
- LATCH Installation
4
5a
5b
3. Lengthen the latch strap by
pressing the latch adjuster
release button and pull
webbing to full length.
4. Route LATCH connector
through so both connectors
sit on the side where the
latch is attached to the shell.
5a.Lift trim cover at the front and
route the latch strap through
the rear- facing belt path
(circled in red).
5b.Make sure the arrows molded
on the LATCH connectors are
facing up and replace the trim
cover.
24
8
7. While pressing down on the
armrest on the same side as
the adjuster, pull the loop on
the latch strap to tighten. Repeat as needed until the
child restraint cannot be
moved more than 1 inch (2.5
cm) in any direction at the
belt path.
8. The level line indicator
on the seat base should
be level with the ground
when the vehicle is parked.
The backrest should be at
approximately a 45-degree
angle.
25
- LATCH Installation
7
6. Place the child restraint
on the vehicle seat facing
rearward. Attach each
LATCH connector to the
lower anchor in the vehicle.
REAR-FACING
6
9
9. If the child restraint is too
upright, loosen both LATCH
connectors and place a
tightly rolled towel or foam
pool noodle under the base
below where the child’s feet
will be located.
NOTE: Do NOT place anything
under the base, except as
shown in Fig. 9.
REAR-FACING
- LATCH Installation
10. Follow steps 1-8 to secure the child restraint after adjusting
the angle.
11. After adjusting the recline angle, check that the child
restraint is tight and properly secured. The child restraint
should not move more than 1 inch (2.5 cm) in any direction
at the belt path.
12. To remove the LATCH connectors from the vehicle, first
loosen both adjusters by pressing the adjuster button and
lengthening the straps (see Fig. 3). Press the red buttons
on the LATCH connectors and remove from vehicle lower
anchors (see Fig. 6).
13. Replace the LATCH connectors into the storage slots at
rear of base.
26
If your vehicle has a locking lap belt, use
Locking Lap Belt Installation instructions.
or SERIOUS INJURY
WARNING! DEATH
can occur
• Always use in reclined position when installed rear-facing.
1
2
1. Adjust into the recline position
by pulling the recline adjust
handle and rotating the
seat back. Rotate to locked
position.
2. Lift the trim cover at the front
and locate the rear-facing belt
path (circled in red).
27
-Locking Lap Belt Installation
Many vehicles have lap only belt systems in the center rear
seating positions. Most of these systems use a locking lap belt
which can easily secure a child restraint. Check your vehicle
owner’s manual to determine which type of seat belt system is
in each seating location. There may be a label located on the
seat belt with instructions for use with a child restraint.
REAR-FACING
Locking Lap Belt Installation – Rear-Facing
3
5
4. Route the seat belt through
the rear-facing belt path. Make certain the vehicle belt
is routed under the crotch
belt.
5. Make sure the seat belt is not
twisted, then buckle seat belt.
Replace the trim over the
front edge of the seat bottom.
REAR-FACING
- Locking Lap Belt Installation
4
3. Place the child restraint
on the vehicle seat facing
rearward. Slide latch plate to
the end of seat belt webbing.
28
7. The level line indicator on the
seat base should be level with
the ground when the vehicle
is parked. The backrest
should be at approximately a
45-degree angle.
29
- Locking Lap Belt Installation
7
6. While pressing on the armrest
on the same side as the
vehicle buckle, pull the end of
the seat belt strap to tighten. Repeat as needed until the
child restraint cannot be
moved more than one inch
(2.5 cm) in any direction at the
belt path.
REAR-FACING
6
8
8. If the child restraint is too
upright, loosen the seat belt
and place a tightly rolled
towel or foam pool noodle
under the base below where
the child’s feet will be located.
9. Follow Steps 1–7 to secure the child restraint after adjusting the angle.
10. After adjusting the recline angle, check that the child
restraint is tight and properly secured. The child restraint
should not move more than 1 inch (2.5 cm) in any direction
at the belt path.
REAR-FACING
- Locking Lap Belt Installation
NOTE: Do NOT place anything
under the base, except as
shown in Fig 8.
30
If your vehicle has a switchable retractor
or locking latch plates, use Locking LapShoulder Belt Installation instructions.
or SERIOUS INJURY
WARNING! DEATH
can occur
• Always use in reclined position when installed rear-facing.
1
1. Adjust into the recline position
by pulling the recline adjust
handle and rotating the
seat back. Rotate to locked
position.
31
- Locking Lap -Shoulder Belt Installation
Many vehicles have lap-shoulder belt systems which remain
loose for adult use and can be locked for use with a child
restraint. Check your vehicle owner’s manual to determine
which type of seat belt system is in each seating location.
There may be a label located on the door side of the seat belt
with instructions for use with a child restraint.
REAR-FACING
Locking Lap-Shoulder
Belt Installation – Rear-Facing
3
4
2. Lift the trim cover at the front
and locate the rear-facing belt
path (circled in red).
3. Pull the seat belt out fully holding
lap and shoulder sections
together and route through the
rear-facing belt path. Make
certain the vehicle belt is
routed under the crotch belt.
4. Make sure the seat belt is not twisted, then buckle
seat belt. Replace the trim
over the front edge of the
seat bottom.
REAR-FACING
- Locking Lap-Shoulder Belt Installation
2
32
6. The level line indicator on the
seat base should be level with
the ground when the vehicle
is parked. The backrest
should be at approximately a
45-degree angle.
33
- Locking Lap-Shoulder Belt Installation
6
5. While pressing on one
armrest, remove slack from
shoulder belt. To help securely
tighten, press down on the
other armrest and remove any
remaining slack from seat belt. Repeat as needed until the
child restraint cannot be
moved more than one inch
(2.5 cm) in any direction at the
belt path.
REAR-FACING
5
7. If the child restraint is too
upright, loosen the seat belt
and place a tightly rolled
towel or foam pool noodle
under the base below where
the child’s feet will be located.
NOTE: Do NOT place anything
under the base, except as
shown in Fig 7.
8. Follow Steps 1–8 to secure the child restraint after adjusting
the angle.
9. After adjusting the recline angle, check that the child restraint
is tight and properly secured. The child restraint should not
move more than 1 inch (2.5 cm) in any direction at the belt
path.
10. Ensure that vehicle belt is locked.
REAR-FACING
- Locking Lap-Shoulder Belt Installation
7
34
If your vehicle has a non-locking
lap-shoulder belt system, use NonLocking ELR Lap-Shoulder Belt
Installation instructions.
If you have this seat belt configuration you will require a
locking clip. Please contact 1-888-9RECARO and
RECARO will ship you a locking clip and instructions.
or SERIOUS INJURY
WARNING! DEATH
can occur
• Always use in reclined position when installed rear-facing.
NOTE: Locking clip required.
35
- Non-Locking ELR Lap-Shoulder Belt Installation
Some older vehicles (typically pre-1996 model year) have
lap-shoulder belt systems which remain loose and cannot be
locked for use with a child restraint unless a separate locking
clip is used. These systems use emergency locking retractors
which lock only during a sudden stop or crash. Check your
vehicle owner’s manual to determine which type of seat belt
system is in each seating location. There may be a label
located on the door side of the seat belt with instructions for
use with a child restraint.
REAR-FACING
Non-Locking ELR Lap-Shoulder Belt
Installation – Rear-Facing
Section 10: Installing the Child Restraint
Forward-Facing in Your Vehicle
FORWARD-FACING
- LATCH Installation
or SERIOUS INJURY
WARNING! DEATH
can occur
If your vehicle has lower anchors, the LATCH system can be
used. Your vehicle may also have a top tether anchorage located
behind the vehicle seat. Refer to your vehicle owner’s manual to
determine if lower anchors and top tether anchors are available
and for which seating positions. If lower anchors are not available
the vehicle seat belt must be used. The top tether can be used
with the vehicle seat belt or LATCH.
Additionally, LATCH and top tether anchors are designed to a
maximum limit which can vary by vehicle. Due to this variation,
RECARO requires use of the vehicle seat belt for any child
weighing more than 45 lbs (20.4 kg).
Your vehicle will also have a top tether anchorage located
behind the vehicle seat. Refer to your vehicle owner’s manual if it is difficult to find. This can also vary by vehicle. Do NOT use
a cargo tie down for the top tether attachment.
NOTE: The child restraint seat is shipped with the LATCH strap
installed in the forward-facing mode. If you are switching from
rear-facing, you will need to reroute the LATCH strap.
•Use ONLY the fully up-right position when installed
forward-facing.
36
2
4a
2. Locate the latch LATCH
connectors at the rear of the
base, press the red buttons
and remove the connectors
from the storage slots.
3. Lengthen the latch strap
by pressing each adjuster
release button and pull to full
length.
4a. Route the LATCH connector
through the forward-facing
vehicle seat belt path.
37
- LATCH Installation
3
1. Adjust into the upright
position by pulling the recline
adjust handle and rotating the
seat back upright. Check to
be sure it locks into position.
FORWARD-FACING
1
4b
FORWARD-FACING
- LATCH Installation
5
6
4b. Make sure the arrows on the
LATCH connectors face up
and the strap is not twisted.
5. Before attaching the LATCH
connectors, locate the top
tether anchor behind the
seating position. Refer to your
vehicle owner’s manual if it is
difficult to find. If your vehicle
has top tether anchors,
remove the restraint top
tether from its storage pouch
and place it over the vehicle
seat back.
6. Place the child restraint
on the vehicle seat facing
forward. Attach each LATCH
connector to the anchors in
the vehicle.
38
7. While pressing down on the
armrest on the same side as
the adjuster, pull the loop on
the latch strap to tighten.
Repeat as needed until the
child restraint cannot be
moved more than one inch
(2.5 cm) in any direction at the
belt path.
9
8. Connect the top tether hook to
the anchor.
NOTE: Do NOT use a
cargo tie down for tether
attachment. Check your
vehicle owner’s manual if you
are not sure.
9. Snugly tighten the top tether
by pulling the free end of the
tether strap while pressing
the top of the child restraint
back into the vehicle seat. 39
- LATCH Installation
8
FORWARD-FACING
7
10. Check the tightness of the latch strap and retighten if
needed. This strap may become loose when the top tether
strap is tightened.
Recheck that both the latch strap and the top tether strap
are tight and properly secured.
12. To remove the top tether, press the release button and pull
the strap. It may be necessary to press the top of the child
restraint into the vehicle seat back to loosen the tether
adjuster. Unhook the top tether anchor from the vehicle
attachment.
13. Fold the top tether strap and place it in the storage pouch
when not in use. Place the LATCH connectors in their
storage locations when not in use.
FORWARD-FACING
- LATCH Installation
11. To remove the LATCH connectors from the vehicle, first
loosen the adjuster by pressing the adjuster button and
lengthening the strap. Press the red buttons on the LATCH
connectors and remove from vehicle lower anchors.
40
Many vehicles have lap only belt systems in the center rear
seating positions. Most of these systems use a locking lap belt
which can easily secure a child restraint. Check your vehicle
owner’s manual to determine which type of seat belt system is
in each seating location. There may be a label located on the
door side of the seat belt with instructions for use with a child
restraint.
or SERIOUS INJURY
WARNING! DEATH
can occur
•Use ONLY the fully up-right position when installed
forward-facing.
1. Adjust the child restraint into
1
the upright angle position
by pulling the recline adjust
handle and rotating the seat
back upright. Check to be
sure it locks into position.
2
2. Place the child restraint
on the vehicle seat facing
forward. Slide latch plate to
end of seat belt webbing.
41
- Locking Lap Belt Installation
If your vehicle has a locking lap belt, use
Locking Lap Belt Installation instructions.
FORWARD-FACING
Locking Lap Belt Installation – Forward-Facing
FORWARD-FACING
- Locking Lap Belt Installation
3
4
5
3. Making sure the seat belt is
not twisted, route the seat
belt through the forwardfacing belt path, then buckle
seat belt.
4. While pressing down on the
armrest on the same side as
the vehicle buckle, pull the
end of the strap to tighten.
Repeat as needed until the
child restraint cannot be
moved more than one inch
(2.5 cm) in any direction at
the belt path.
5. If your vehicle has a top
tether anchors, attach and
tighten the top tether as
shown on page 39.
42
Many vehicles have lap-shoulder belt systems which remain
loose for adult use and can be locked for use with a child
restraint. Check your vehicle owner’s manual to determine
which type of seat belt system is in each seating location.
There may be a label located on the door side of the seat belt
with instructions for use with a child restraint.
or SERIOUS INJURY
WARNING! DEATH
can occur
• Use ONLY the fully up-right position when installed
forward-facing.
1
2
1. Adjust the child restraint into
the upright angle position by
pulling the recline adjust handle
and rotating the seat back
upright. Check to be sure it
locks into position.
2. Place the child restraint on the
vehicle seat facing forward.
Fully extend the seat belt
while holding lap and shoulder
sections together.
43
- Locking Lap-Shoulder Belt Installation
If your vehicle has a switchable retractor
or locking latch plates, use Locking LapShoulder Belt Installation instructions.
FORWARD-FACING
Locking Lap-Shoulder Belt Installation –
Forward-Facing
FORWARD-FACING
- Locking Lap-Shoulder Belt Installation
3
3. Making sure the seat belt is
not twisted, route the seat belt
through the forward-facing
belt path, then buckle seat belt.
4. Open the belt lock off and route
the shoulder section of the seat
belt up into the slot.
4
5. While pressing on one armrest of
the child restraint, remove slack
from shoulder belt. To help
securely tighten, press down on
the other armrest and remove
any remaining slack from the
seat belt.
Repeat as needed until the
child restraint cannot be moved
more than one inch (2.5 cm) in
any direction in the belt path.
5
6. Close the belt lock off over the
shoulder belt by pressing the
arm down onto the webbing
and close the handle.
6
7. If your vehicle has a top tether
anchor, attach and tighten the top tether as shown on
page 39.
44
If your vehicle has a non-locking lap-shoulder belt
system, use Non-Locking ELR Lap-Shoulder Belt
Installation instructions.
or SERIOUS INJURY
WARNING! DEATH
can occur
•Use ONLY the fully up-right position when installed
forward-facing.
1. Adjust the child restraint into the
1
upright angle position by pulling the
recline adjust handle and rotating
the seat back upright. Check to be
sure it locks into position.
2
2. Place the child restraint on the
vehicle seat facing forward. Fully
extend the seat belt while holding
the lap and shoulder sections
together.
45
- Non-Locking ELR Lap-Shoulder Belt Installation
Some older vehicles (typically pre-1996 model year) have lapshoulder belt systems which remain loose and cannot be locked
for use with a child restraint unless a separate locking system is
used. These systems use emergency locking retractors (ELR)
which lock only during a sudden stop or crash. Check your vehicle
owner’s manual to determine which type of seat belt system is in
each seating location. There may be a label located on the door
side of the seat belt with instructions for use with a child restraint.
FORWARD-FACING
Non-Locking ELR Lap-Shoulder Belt
Installation – Forward-Facing
- Non-Locking ELR Lap-Shoulder Belt Installation
FORWARD-FACING
3
3. Making sure the seat belt is
not twisted, route the seat belt
through the forward-facing
belt path, then buckle seat belt.
4. Open the belt lock off and route
the shoulder section of the seat
belt up into the slot.
4
5. While pressing on one armrest of
the child restraint, remove slack
from seat belt. To help securely
tighten the child restraint, press
down on the other armrest and
remove any remaining slack
from the seat belt.
Repeat as needed until the
child restraint cannot be moved
more than one inch (2.5 cm) in
any direction on the belt path.
5
6. Close the belt lock off over the shoulder belt by pressing
the arm down onto the webbing
and close the handle.
6
7. If your vehicle has a top tether
anchor, attach and tighten the top tether as shown on
page 39.
NOTE: You must use the
belt lock off with this belt
configuration.
46
This child restraint conforms to all applicable Federal Motor Vehicle
Safety Standards.
Section 12: Use in Aircraft
The Performance RIDE / ProRIDE is certified for
use in aircraft both rear-facing and forward-facing.
The aircraft seat belt (which is not a LATCH system)
must be used since lower anchors are not available
on airplanes. Most airlines will allow child restraint use
if it is labeled as certified for use on aircraft. Check with the airline
to confirm seating is available for use with a child restraint before
booking flights. At the armrest height of the aircraft seat, the child
restraint is 14.5 in (36.8 cm) wide. Use this information when talking
with the airline to ensure the child restraint will fit in the designated
seating location.
Rear-Facing Installation:
Secure rear-facing as shown on pages 27-30, “Locking Lap Belt
Installation – Rear-Facing.”
Forward-Facing Installation:
Secure forward-facing as shown on pages 41-42, “Locking Lap Belt
Installation – Forward-Facing.”
Place in the window seat to avoid blocking the aisle.
47
CERTIFICATION / USE IN AIRCRAFT
Section 11: Certification
CARE AND MAINTENANCE
Section 13: Care and Maintenance
This child restraint has been engineered for long life and trouble-free
usage. The fabric has been designed to resist stains and soiling. With
proper care and maintenance, this premium fabric will retain its beauty
for years to come.
To clean the trim cover “on the go”, follow these easy steps:
• Remove excess soiling immediately.
• Blot area with dry cloth.
• To remove remaining stain, spray a light mist of soap solution and
rub gently in a circular motion with a clean cloth or soft toothbrush so
not to damage the fabric.
• Pat dry with cloth.
• When dry, use a soft brush to regain fabric’s smooth feel.
To clean the trim cover at home, follow these steps:
• Remove the trim cover as explained in Section 14: “Trim Cover Removal and Reinstallation.”
• HAND WASH using cold water and mild soap.
• Line dry to avoid shrinkage of the trim cover.
• Do NOT bleach, machine wash, or machine dry.
To clean the child restraint’s plastic structure, follow these tips:
• Clean by hand with a sponge or soft cloth using warm water and mild soap.
• Dry the structure off thoroughly with a soft towel.
NOTE:
• Heavily soiled areas can be spot-treated using non-solvent
commercial cleaners. Use only water soluble cleaning agents.
• NEVER use solutions that contain a petroleum or alcohol base.
Where light creases occur, they may be removed by light
steaming (an ordinary tea kettle will do). Brush the area with a
soft brush.
• Though RECARO tests many cleaning solutions, we cannot test
them all—we suggest you ALWAYS test in a discrete area first to
ensure that the cleaner does not damage the fabric.
48
Trim Cover Removal
1
2
3
1. Press the adjuster lever,
located under the adjuster
flap, and pull the shoulder
straps forward to loosen the
harness system.
2. Open the chest clip by
squeezing the tabs and
separating.
3. Release the harness straps
from the buckle by pressing
the red button.
49
TRIM COVER REMOVAL
Section 14: Trim Cover Removal /
Installation
4
TRIM COVER REMOVAL
5a
5b
4. Holding the harness
connector bracket in one
hand, remove the shoulder
straps by sliding the loops
(one at a time) to one side
so that the edge can be
guided out of the slot in the
bracket.
5a.ProRIDE with Standard
Harness System – Pull
the straps out of the child
restraint from the front
pulling above the harness
pads.
5b.Performance RIDE with
HERO Harness System
– Pull the straps out of the
child restraint from the front
pulling below the HERO.
50
• Do NOT remove the latch plates, chest clip or harness strap
pad components from the shoulder straps!
6
7
6. Adjust the head restraint to
it’s highest position making
sure to stop when resistance
is felt. DO NOT TRY TO
FORCE ADJUSTMENT
PAST THIS POINT!
7. Reach behind the top
center of the head restraint
and grasp the trim cover.
Unfasten the hidden Velcro™
strip in the center and “peel”
the cover up and forward
over the plastic frame and
off the seat.
NOTE: The head restraint foam may come off with the trim cover.
If this happens, simply remove the foam from the cover and set
aside. Do NOT wash or submerge the head restraint foam in water.
51
TRIM COVER REMOVAL
or SERIOUS INJURY
WARNING! DEATH
can occur
8
9
TRIM COVER REMOVAL
10
8. Loosen the main seat cover
by locating and unfastening
all clips attached to the outer
edge of the trim cover from
the seat shell.
9. Carefully slide the buckle
and harness straps down
through their respective
slots in the trim cover.
10. Gently pull down on the main
cover to expose the large
opening behind the head
restraint. Pull the opening
down around the bottom of
the head restraint.
11.Slide the cover up and over the
head restraint and off the seat.
11
12.The Trim Cover MUST
be hand washed. Do
NOT machine wash the
Trim Cover. Follow the
instructions in Section 13
“Care and Maintenance”
52
1
2
3
1. Slide the trim cover onto the
seat by placing the large
opening in the cover over
the head restraint and sliding
it down between the head
restraint and seat shell.
2. Slide the bottom of the
opening under and behind
the lower edge of the head
restraint.
3. Carefully slide the buckle
and harness straps thru the
3 slots of the trim cover.
Make sure the harness
straps are not twisted.
Ensure the harness strap
pads, latch plates, and
chest clip components are
correctly on the harness
straps.
53
TRIM COVER INSTALLATION
Trim Cover Installation
4
4. Pull the edges of the trim
cover out around the seat
shell and fasten all the trim
cover clips to the seat shell.
TRIM COVER INSTALLATION
5. Place the head restraint foam,
marked “L” for left and “R” for
right, into the head restraint
cover (left and right side is from
seat occupant’s perspective).
6a
6a.ProRIDE with Standard
Harness System – Slide head
restraint foam and cover onto
the plastic frame of the seat.
6b
6b.Performance RIDE with
HERO Harness System - Slide head restraint foam and
cover onto the plastic frame
of the seat. Insert the HERO
harness system into the head
restraint trim cover slots.
7. Pull the trim cover over the
top and behind the head
restraint and then fasten the
Velcro™ strips together to
secure cover. Pull the bottom
corners of the cover over the
corners of the head restraint.
54
8. Clip the harness straps into
the buckle making sure they
are not twisted.
9a
9a.ProRIDE with Standard
Harness System - Route
the harness straps through
the head restraint and seat
shell. Make sure the harness
straps are not twisted.
9b
9b.Performance RIDE with
HERO Harness System Route the harness straps
through the HERO, head
restraint, and seat shell. Make sure the harness
straps are not twisted.
55
TRIM COVER INSTALLATION
8
10
10.Connect the straps to the
harness connector located
in the back of the seat by
sliding the loop edges into
the slots of the harness
connector bracket.
NOTE: Make sure the seat LATCH strap is not routed between
the harness and the seat!
TRIM COVER INSTALLATION
11
11.Re-adjust the head restraint
height to properly fit the
occupant prior to use. See
Section 6 “Adjusting the
Harness System to Fit Your
Child”
56
In certain vehicle applications, you may encounter
challenges to safely install and position a child in the restraint
system. If you do not find an adequate solution, call us at
1-888-9RECARO for assistance.
Problem: The headrest will not raise.
Solution:WARNING! DO NOT FORCE the head restraint
knob! Severe damage to the child restraint
could result! The harness must be loosened before
the Head Restraint can be moved upwards. Press
the harness adjuster lever and pull the shoulder
straps out to loosen then raise the head restraint
with the knob.
Problem: The vehicle seat belt is not tight fitting to the child
restraint.
Solution: Press downward on the child restraint armrest and
firmly pull the slack out of the seat belt. Repeat
pressing on other armrest while pulling seat belt
tight. This will allow the child restraint to compress
the vehicle’s seat and allow the seat belt to be
further tightened. If seat belt is not locking call
1-888-9RECARO for help. Refer to installation
instructions, pages 23-46.
57
TROUBLE SHOOTING
Section 15: Trouble Shooting
Problem: The child restraint is not stable when driving.
Solution: Check to see if there are items under the base and
that the seat belts are tightly secured. Remove
anything found. Some vehicle seats are deeply
contoured making it difficult to safely install a child
restraint. If the child restraint is not stable due
to the vehicle seat cushions, move it to another
seating location.
If the situation still exists, please call 1-888-9RECARO
(1-888-973-2276).
Problem: The child restraint harness does not stay tight.
Solution: Check to determine if anything is lodged in the
adjuster. Remove any objects, food or toys that
may have become lodged in the area.
TROUBLE SHOOTING
Problem: The child restraint is too upright when used rear-facing.
Solution: A tightly rolled sheet or towel or a foam “pool
noodle” can be used to raise the foot end to a
proper angle. DO NOT over recline when using
additional items. Do not place anything under the
base except as shown on page 26. Doing so will
reduce the safety of the child restraint.
Problem: Buckle sticks or will not latch.
Solution: Check inside the buckle slots for foreign objects.
The buckle may be rinsed with cool water to remove
spilled food and juice. DO NOT use lubricants.
58
RECARO offers a variety of replacement parts for your child
restraint system. Please call us at 1-888-9RECARO and
speak to one of our customer service representatives for more
information on what is available for purchase.
59
Replacement Parts
Section 16: Replacement Parts
Section 17: Warranty
RECARO Child Safety, LLC warranties this product against
defects in materials or workmanship to the original purchaser
for a period of 12 months. You must have the original purchase
receipt for a warranty claim to be accepted.
The upholstery fabric is subject to a certain degree of wear
even from normal use. This kind of normal wear is not covered
under warranty.
Exclusions: A Product will not be considered “defective”
and this Warranty will not apply, where the claimed defect is
attributable to:
a) Improper installation, or misuse;
b) Modification or alteration of the Product;
c) Failure to comply with RECARO’s instructions for service
and maintenance;
WARRANTY
d) Accident, unauthorized repairs or unauthorized use;
e) Any attachment or replacement part that was
manufactured, supplied or added by others and was not
part of the Product;
60
g) Ordinary wear and tear (including fading and discoloration);
h) Improper loads (including passenger weight in excess of
design limits);
i) Removal of the Product from the original application or
reinstallation of the Product in the original or another
application; or
j) Any other neglect, abuse or misuse.
61
WARRANTY
f) Exposure to corrosive materials, the elements (including,
but not limited to, cold or freezing temperatures, excessive
heat, fire, humidity, and sunlight), or other acts of God;
Section 18: Additional
Contact Information
If you need help with installation or usage, please use the
following contact information:
CONTACT INFORMATION
RECARO Child Safety, LLC
1600 Harmon Road
Auburn Hills, MI 48326
Phone: 1-888-9RECARO (1-888-973-2276)
E-mail: [email protected]
Website: www.recaro-cs.com
For personal assistance in your local area, please contact a
Child Passenger Safety (CPS) technician. You can find a CPS
technician in your area at www.nhtsa.gov. Click on “Child
Passenger Safety” and select “Certified Child Passenger Safety
Technician Locator.”
Many community groups, fire and police stations schedule car
seat checks that you can visit with your child. More information
about car seat check-ups is available at www.nhtsa.gov
under “Child Safety Seat Inspections Station Locator” or at
www.seatcheck.org. You can also call 1-866-SEAT-CHECK to
find the next and closest seat check event.
62
2-Point Seat Belt: A seat belt system with two contact points,
(two hip points), also referred to as a lap belt.
3-Point Seat Belt: A seat belt with both a lap and a shoulder
portion, having three contact points (one shoulder, two hips).
Airbag: A passive (idle) restraint system that automatically
deploys during a crash to act as a cushion for the occupant.
It creates a broad surface on which to spread the forces of
the crash, to reduce head and chest injury. It is considered
“supplementary” to the lap/shoulder belts because it enhances
the protection the belt system offers in frontal crashes. Also
known as SRS - Supplemental Restraint System; SIR –
Supplemental Inflatable Restraint; IC – Inflatable Curtain; SIAB
– Side Impact AirBag.
Belt Routings: The manufacturer’s required place where
the safety belt passes around or through the child restraint.
Indicated in red on this child restraint.
Car Seat: Common term for a specially designed device that
secures a child in a motor vehicle, meets federal safety standards
and increases child safety in a crash. Also called safety seat.
Child Restraint System: Common term for a specially
designed de-vice that secures a child in a motor vehicle, meets
federal safety standards, and increases child safety in a crash.
Also called a “Car Seat.”
63
GLOSSARY
Section 19: Glossary
Federal Motor Vehicle Safety Standard (FMVSS) 213:
Federal Motor Vehicle Safety Standard that pertains to all
restraint systems intended for use as crash protection in
vehicles for children. Required for child restraints sold in the
USA.
Head Restraint: Structure at the top of the backrest which is
designed to keep the child’s head in the proper position and
provide protection for the child’s head during a crash.
HERO Harness System: Ensures the highest level of
protection and comfort by positioning the shoulder pads to
appropriately fit the child’s neck, head, and shoulders.
ISO 9001: Is focused on meeting customer expectations and
delivering customer satisfaction. Through the continuous
improvement process and review of our quality systems, we
identify and implement product improvements through the
entire product life cycle.
GLOSSARY
ISO/TC 22/SC 12/WG 1 N538: Side impact test requirements
for child restraints. Not required for child restraints sold in the USA.
LATCH: Lower Anchors and Tethers for CHildren. Acronym for standardized vehicle anchorage system. Method to affix
child restraint systems to vehicles independent of the vehicle
seat belts.
64
Side Impact Protection (SIP): Extra safety feature of
RECARO child restraints having energy absorbing foam and
structure design strategically placed in areas on the child
restraint where it is especially important to protect the child in
a crash.
Sitting Height: Measurement of a child in a seated position
from seat bottom to top of head.
Top Tether Anchorage: Attachment point in the vehicle for
child safety seat tether strap. Refer to vehicle owner’s manual
regarding anchor location. A tether strap is an additional belt
that anchors the child restraint system top to the vehicle frame;
keeping the restraint from tipping forward on impact.
65
GLOSSARY
Safety Stripe System: A white stripe on the outside edges of
the 5-point harness. The white stripe should always remain at
the outside edge of the harness above the lower buckle.
RECARO Child Safety, LLC
1600 Harmon Road, Auburn Hills, MI 48326
Tel: 1-888-9RECARO
Internet: www.recaro-cs.com, E-mail: [email protected]
In the interest of product development, RECARO reserves all rights to make changes to the
construction and design of its products without prior notification.
RECARO does not assume the liability in case of misprint. Pictures may include extras.
7220276 REV000