1
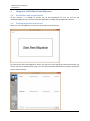
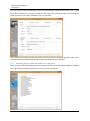
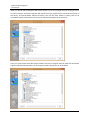
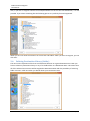
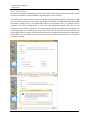
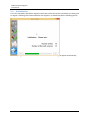
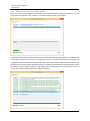
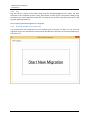
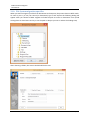
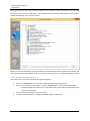
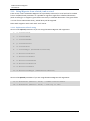
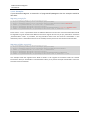
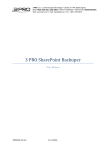
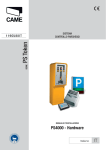
3 PRO d.o.o. za informacijske tehnologije • Lanište 24 • HR-10020 Zagreb IBAN: HR20 2390 0011 1008 4484 8 • SWIFT: HPBZHR2X • PDV/VAT ID: HR60378406301 Web: www.3pro.eu• E-mail: [email protected] • Tel.: +385 1 3333 850 3 PRO SharePoint Migrator User Manual 3PRODOC-25-6v37 03.09.2014. 3 PRO SharePoint Migrator User Manual © 2014 3 PRO d.o.o. All rights reserved. 3 PRO d.o.o. Lanište 24 HR-10020 Zagreb Croatia No part of this document may be reproduced or transmitted in any form or by any means, electronic or mechanical, for any purpose, without the express written permission of 3 PRO d.o.o. Under the law, reproducing includes translating into another language or format. Every effort has been made to ensure that the information in this manual is accurate. 3 PRO d.o.o. is not responsible for printing or clerical errors. Information in this document is subject to change without notice. 3PRODOC-25-6 v37 2 / 21 3 PRO SharePoint Migrator User Manual About This Guide This 3 PRO SharePoint Migrator Application Guide for the 3 PRO SharePoint Migrator is for administrators and users of 3 PRO SharePoint Migrator. 3PRODOC-25-6 v37 3 / 21 3 PRO SharePoint Migrator User Manual Table of Contents About This Guide ..................................................................................................................................... 3 1. Overview.......................................................................................................................................... 5 2. Using the 3 PRO SharePoint Migrator ............................................................................................. 6 2.1. Installation and requirements ..................................................................................................... 6 2.2. Starting migration job wizard ...................................................................................................... 6 2.3. Defining Source files and folders to migrate ............................................................................... 7 2.4. Defining Destination Library (folder) ........................................................................................... 9 2.5. Job Options ................................................................................................................................ 10 2.6. Initialization ............................................................................................................................... 11 2.7. Sharepoint Match Users Dialog ................................................................................................. 12 2.7.1. Export and Import options .................................................................................................... 14 2.8. Finishing migration job wizard .................................................................................................. 15 2.9. Migration Progress and Log files ............................................................................................... 16 2.9.1. Log ......................................................................................................................................... 17 2.9.2. Starting multiple jobs at the time.......................................................................................... 17 2.10. File System migration specifics.............................................................................................. 18 2.10.1. File System migration rules ................................................................................................... 19 2.11. Using Migrator from a batch/cmd as a tool .......................................................................... 20 2.11.1. Explanation of batch using .................................................................................................... 20 2.11.2. Examples................................................................................................................................ 21 3PRODOC-25-6 v37 4 / 21 3 PRO SharePoint Migrator User Manual 1. Overview This software enables you to quickly and easily migrate your documents from SharePoint on Premise to SharePoint Online (and vice-versa), SharePoint to File System, or File System to SharePoint. Software is made as a tool for administrators but is designed to be simple enough so semi-experienced SharePoint users can use it without problems. 3PRODOC-25-6 v37 5 / 21 3 PRO SharePoint Migrator User Manual 2. Using the 3 PRO SharePoint Migrator 2.1. Installation and requirements At the moment, it is enough to extract the zip file somewhere on your PC and run the “SharePointMigrator.exe” from the extracted application package and the Application will run. 2.2. Starting migration job wizard When you run the application you will see the window from the picture: By pressing the “Start New Migration” button you will start a new migration job wizard on which you choose your source and destination types. You can choose between SharePoint on Premise, SharePoint Online and File System. 3PRODOC-25-6 v37 6 / 21 3 PRO SharePoint Migrator User Manual After you select source and destination types the required input fields will show up for you to input the values. SharePoint on Premise and Online both require the same input fields, but the migrator needs to know correct type of SharePoint it has to deal with. After you finish inputting the fields you can click next and you won’t be able to go back to this screen. Once the wizard connects to defined source and destination you can’t change it. 2.3. Defining Source files and folders to migrate When you click next the following screen will appear. At the moment SharePoint migrator loaded all lists and document libraries which exists on the source you have given. 3PRODOC-25-6 v37 7 / 21 3 PRO SharePoint Migrator User Manual When you decide which SharePoint Document Library is your source target then you simply click on it to load its content. SharePoint migrator will load the content, populate tree-view with the content of the library, and automatically extend the library root. All the other folders in library have to be extended manually. (SharePoint lists cannot be selected and loaded at the moment) Then you simply select which files and/or folders you want to migrate. Keep in mind that SharePoint migrator will automatically take care of the parent folders which have to be included. 3PRODOC-25-6 v37 8 / 21 3 PRO SharePoint Migrator User Manual Also, if you wish to migrate content from multiple libraries on the site into one destination, it is also possible. If you select something like the following picture it is perfectly fine and supported. When you are over with the selection of source files and folders which you want to migrate, you can click next. 2.4. Defining Destination Library (folder) The next screen represents all the lists and document libraries on a given destination site. Now you have to select any Document Library or any of its child Folders as a Destination Root. This means that all of the selected source items will be migrated at Destination Root with the possibility of retaining folder structure. Click next when you decide about your Destination Root. 3PRODOC-25-6 v37 9 / 21 3 PRO SharePoint Migrator User Manual 2.5. Job Options The next screen shows some Migration Review information, the source site and the Destination Root as well as the number of Items included in migration (Items = files + folders). It also shows some options which are pretty clear and the Users Matching which we will explain right now. Automatch option means that when migrating the CreatedBy and ModifiedBy fields along with files/folders, migrator will try to automatically find the corresponding users. For example if file is created by user which Display Name is “John Doe” and SharePoint migrator finds the user on destination which contains “John Doe” in its Display Name, migrator will match them automatically in its matching table. If no matching user is found for some users they will be left unmatched for the manual match later on. Please note that Automatch feature will work only if destination is SharePoint Online. When you are ready to proceed you should click next button and confirm the “Proceed to initialization” dialog. 3PRODOC-25-6 v37 10 / 21 3 PRO SharePoint Migrator User Manual 2.6. Initialization This is the step where SharePoint migrator enumerates all the file versions and folders you have given to migrate, collecting all the data needed for the migration. It should look like the following picture. When the progress bar reaches the end, SharePoint Match Users dialog will appear automatically. 3PRODOC-25-6 v37 11 / 21 3 PRO SharePoint Migrator User Manual 2.7. Sharepoint Match Users Dialog This dialog is specific in a few ways. On the left part of the dialog there is a grid which represents matching table. On the right side there is a list of destination users which may be or may not be populated, depending on destination. In the grid, Source Display Names and Login Names are read-only fields and cannot be changed. Destination Display and Login Names are editable and can be edited directly in the field, or user can use one of two auxiliary ways. All the fields in a grid have to be populated before you can confirm and proceed. 3PRODOC-25-6 v37 12 / 21 3 PRO SharePoint Migrator User Manual If you are using any auxiliary way, you have to select the whole row. This is done by clicking the rectangle in front of the row marked with red on the picture. You can use multiple row selection, SHIFT and CTRL keys work without a problem. You can also use “Select All Unmatched Rows” button which will select all rows which has an empty field. When you select a row, if you have destination users list populated like on the picture, you can use double click to populate all of the selected Destination Display and Login names with the selected destination person. 3PRODOC-25-6 v37 13 / 21 3 PRO SharePoint Migrator User Manual If you don’t have the destination users list populated there is another way you can use. It is primarily here so you can quickly input same user to multiple rows. Just like in previous step, you should select the rows you want to affect and then use the “Input to selected Rows” button which is marked with red on the following picture. It will open the dialog where you will input the values once, and all of the selected rows will be affected with those values once you click OK. 2.7.1. Export and Import options On the Match Users form there are also Export and Import options. If you are doing multiple migrations from the same source server to same destination, you can export current matching table and use it later in the other migration jobs so you don’t have to do the same job now and again. Export format for matching table is xml. If you import the xml, there may be some grey rows if there are unused users found in xml. Also there may be some new users which are not found in xml so you will have to populate them. After you populate new users, you can again export the table so you can enlarge your matching table. Just remember to use one matching table for one combination of source and destination. 3PRODOC-25-6 v37 14 / 21 3 PRO SharePoint Migrator User Manual 2.8. Finishing migration job wizard After you click confirm button on Match Users dialog, your migration is ready to start. At this step, if you forgot to include some file or decided to change destination for some reason, you can go to previous steps, but keep in mind that migrator will do the initialization process again. When you are ready to finish migration job wizard and start your migration you should click Finish. 3PRODOC-25-6 v37 15 / 21 3 PRO SharePoint Migrator User Manual 2.9. Migration Progress and Log files When you click finish wizard will close and the main window will have the job attached to it. You can notice that new tab with name “Job No. 1” has been created on the main window. Progress bar counts only the files and file versions (without folders) because folders are created quickly so they don’t influence too much on the migration runtime. You will notice that bar, percentage and “migrated” counter increases sometimes but there are no new records visible on the list. This means that some file version has been migrated and this is stripped from showing on the main progress. Only the current versions, folders and errors will display here. Other details can be found later in the .csv log file. This is how it will look when the migration finishes. 3PRODOC-25-6 v37 16 / 21 3 PRO SharePoint Migrator User Manual 2.9.1. Log Log files will be created in the folder along with the “SharePointMigrator.exe” which you have extracted in the installation process. Every job will have its own log file. The easiest reading of log would be if you use the MS Excel to open the .csv because you can then easily filter the events in the log (Info, Warning and Error). Do not open log file while migration is in progress. 2.9.2. Starting multiple jobs at the time It is perfectly fine and supported to run the multiple jobs at the time, so when you run your first migration job you can switch back to Home tab on the Main form and start the new wizard while your first job is runs. 3PRODOC-25-6 v37 17 / 21 3 PRO SharePoint Migrator User Manual 2.10. File System migration specifics When you want to migrate your files from SharePoint to File System, the process does not differ much. As soon as you try to set your source (or destination) type to File System the following Dialog will appear. After you choose to folder migrator will take the path as source or destination root. (Avoid setting these to drive letters and try to set the path as deep as you can to reduce the loading time) After choosing a folder, the screen should look like this one. 3PRODOC-25-6 v37 18 / 21 3 PRO SharePoint Migrator User Manual Clicking on Next will show the following, where you can choose the files and folders exactly like you did as the source type was SharePoint. The only difference is that the whole content in the folder is loaded immediately, not on selected event. When you choose Destination type as File System, you’ll be able to see the content of the folder, but you won’t be able to select folder inside it as a root. It will just serve as a current state folder preview. 2.10.1. File System migration rules There are some “rules” which defines this type of migration: There is no Modified By in File System, Created By field will be used instead There are no versions in File System, “-version_VERSIONLabel” suffix will be used instead o SharePoint Migrator knows to turn this suffix to file version when migrating from File System to SharePoint Current File versions does not have any suffix It is sometimes impossible to migrate CreatedBy fields to File System 3PRODOC-25-6 v37 19 / 21 3 PRO SharePoint Migrator User Manual 2.11. Using Migrator from a batch/cmd as a tool From version 1.2.0.0. SharePoint Migrator has a possibility to be used as a tool and can be invoked from a cmd/batch with parameters. It is possible to migrate a single file to a defined destination (with versioning) or to migrate a given folder recursively to a defined destination. If the given folder is a root of source Document Library, whole library will be migrated. Note: Batch migration won’t work with ‘Trial’ license. 2.11.1. Explanation of batch using Here are the required parameters if you are using SharePoint Migrator with arguments: 1. -s sourceSiteUrl 2. -i sourceItemUrl 3. -u sourceUserName 4. -p sourcePassword 5. -d sourceDomain 6. -t sourceSPType (SPOnPremise/SPOnline) 7. -S DestinationSiteUrl 8. -I DestinationItemUrl 9. -U DestinationUserName 10. -P DestinationPassword 11. -D DestinationDomain 12. -T DestinationSPType (SPOnPremise/SPOnline) Here are the optional parameters if you are using SharePoint Migrator with arguments: 13. -h True/False (default: false) - hidden console window 14. -l True/False (default: false) - save log to file 3PRODOC-25-6 v37 20 / 21 3 PRO SharePoint Migrator User Manual 2.11.2. Examples If your SharePoint Migrator is extracted in C:\ProgramFiles\SPMigrator then the examples would be like these: Migrating a single file: C:\>C:\ProgramFiles\SPMigrator\SharePointMigrator.exe -s "https://sp1webapp1.dabbug.taczor.com/example/spmigratordemo" -i "https://sp1webapp1.dabbug.taczor.com/example/spmigratordemo/Shared Documents/Word.docx" -u "admin" -p "yourPassword123" -d "taczor.com" -t "SPOnPremise" -S "https://3proexample.sharepoint.com/sites/contoso" -I "https://3proexample.sharepoint.com/sites/contoso/Shared%20Documents/SomeFolder/Document.docx" -U "admin" -P "yourPassword123" -D "3proexample.onmicrosoft.com" -T "SPOnline" -l true Please notice –i and –I parameters which has different filenames at the end. It means that Word.docx would be migrated to a given location with different name than original. Of course if you put „Word.docx“ instead of „Document.docx“ under –I parameter, the copy would be exact same. Also note the “SomeFolder” in the destination path. It is the folder which has to be created previously and has to exist at the time of execution. Migrating a folder recursively C:\>C:\ProgramFiles\SPMigrator\SharePointMigrator.exe -s "https://sp1webapp1.dabbug.taczor.com/example/spmigratordemo" -i "https://sp1webapp1.dabbug.taczor.com/example/spmigratordemo/Shared Documents" -u "admin" -p "yourPassword123" -d "taczor.com" -t "SPOnPremise" -S "https://3proexample.sharepoint.com/sites/contoso" -I "https://3proexample.sharepoint.com/sites/contoso/Shared%20Documents/SomeFolder" -U "admin" -P "yourPassword123" -D "3proexample.onmicrosoft.com" -T "SPOnline" -l true This example shows the migration from folder to folder. It will migrate all the folders under the “Shared Documents” library to “SomeFolder” in the destination library. As in previous example “SomeFolder” also has to exist at the time of execution. 3PRODOC-25-6 v37 21 / 21