1
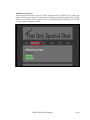
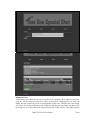
That One Special Shot
Final report
TOSS TEAM
Gregory LaFlash
Patrick O’Loughlin
Kira Jones
Zachary Snell
Joshua Howell
Hao Sun
Department of Computer Science and Engineering
Texas A&M University
4/30/2014
TAMU CSCE 483 Final Report
1/64
Table of Contents
1
Executive summary ............................................................................................................................... 3
2
Project background ............................................................................................................................... 3
3
2.1
Needs statement ............................................................................................................................ 4
2.2
Goal and objectives ....................................................................................................................... 4
2.3
Design constraints and feasibility ................................................................................................. 4
2.4
Literature and technical survey ..................................................................................................... 5
2.5
Evaluation of alternative solutions ................................................................................................ 6
Final design ........................................................................................................................................... 7
3.1
System description ........................................................................................................................ 7
3.2
Complete module-wise specifications .......................................................................................... 9
3.3
Approach for design validation ................................................................................................... 15
4
Implementation notes .......................................................................................................................... 16
5
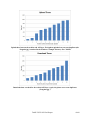
Experimental results............................................................................................................................ 38
6
User’s Manuals ................................................................................................................................... 43
7
Course debriefing ................................................................................................................................ 62
8
Budgets ............................................................................................................................................... 64
TAMU CSCE 483 Final Report
2/64
1
Executive summary
It has never been easier to take photos at public events. Yet ironically it remains difficult to gather all the
photos taken at them. To this end, our group has created “That One Special Shot” (TOSS), an application
which will facilitate the collection and distribution of photos. Using TOSS, users will be able to take a
photo at a specific event and upload it in real time to an online, crowd-sourced photo database. After the
event, TOSS will allow them to download the photos from the database for free.
In chronological order, TOSS will function in the following manner:
1. An event's host will create an account on our website. For each event, hosts will need to specify a
six-character Event Code, which in turn can be linked to a QR code. Both the QR code and the
Event Code will be linked to a private Event ID (a unique, assigned, 32-digit number identifying
the event in our system).
2. The host will then share the Event Code or QR code with the event’s attendees. Anyone with
access to the Event Code or QR code will be able to upload photos to our system for a period of
time specified by the event’s host.
3. While at the event, attendees will take photos. TOSS will automatically upload the photos to the
server specified by the Event ID.
4. Only users with the Event ID and password can access photos on the database.
Downloading photos presents its own problems: in many scenarios a user will not want to access all of
the photos taken at an event (imagine a football game where tens of thousands of photos might be taken).
TOSS provides two solutions to this problem. First, the user will be able to access the photos in a list
format on the website. He can therefore download only those specific photos he appreciates. Second,
TOSS allows for photo tags and comments which the photos can be filtered by. This way, a user can
search for only those photos which include certain tags or comments in it.
TOSS implements a number of security features to maintain our users’ privacy. First, only those creating
events will need to create accounts. As long as an event's attendees have access to the Event ID and
password, they can download photos taken at the event. This way, they can maintain their privacy, even
within our system.
Second, our website will also add photo tagging and commentary so photos can be searched through
conveniently. However, these tags and comments are kept internally, and not shared with anyone. When
the user downloads the photos, all tags and comments are stripped.
2
Project background
At any large gathering – whether it be a wedding, convention, or sporting event – attendees will want to
both take photos and see photos taken by others. With the proliferation of smartphones, taking photos has
never been easier. Retrieving others’ photos, however, remains cumbersome. It is cumbersome because
no one wants to engage in the time consuming task of contacting photographers individually (this
assumes, of course, we have their contact information) and getting their photos in that manner. A way to
easily create and access a crowd-sourced photo database would be beneficial. The TOSS application,
whose design is the basis for this document, has created such a database. It gives users a variety of storage
and access options as well as numerous security features.
TAMU CSCE 483 Final Report
3/64
2.1
Needs statement
Current software which attempts to create these databases are inadequate, for none come close to
providing TOSS’s range of functionality. TOSS is distinct from current applications in the following three
ways.
First, photos can be stored in one of two locations, Dropbox or an FTP server. Current applications only
support one type of storage, severely limiting the consumer’s choices and thus making it less likely that
the application will suit their needs.
Second, TOSS implements numerous measures to ensure and maintain its users’ privacy and security.
Our research into other applications has shown that this is not a passing concern for other software.
However, as internet users become more concerned with their privacy online, any form of social media
(including crowd-sourced photo databases) must take this concern seriously.
Third, and perhaps most important, TOSS is free. Any application currently on the market which comes
close to offering our range of functionality is either inherently for profit or must charge the users a fee to
recoup the money needed to store all of its users’ photos.
2.2
Goal and objectives
With TOSS, we have created the crowd-sourced photo database described above. Using our app, anyone
with the proper permissions will be able to upload a photo they have taken in real time to either a
Dropbox or FTP account, the databases our application supports.
In addition TOSS also provides various methods of privacy and security for free.
In order to keep the program free, our method of storage is free as well. To do this, TOSS leverages the
Dropbox API (which allows users to upload photos to designated Dropbox account) as well as the Apache
Commons library (which allows users to upload photos to a designated FTP account).
2.3
Design constraints and feasibility
Many of the constraints on TOSS derive from the fact that it is our aim to keep TOSS free. For an
application to be free, our storage must be free, and to keep the storage free we had to leverage different
APIs. It is here where we encountered the most constraints. Constraints stemming from these APIs fit into
two categories: poor documentation or lack of a dedicated API.
First, because the APIs for these social media siteS change so quickly, proper documentation often goes
undone. Many tutorials are therefore out of date and useless. A programmer could spend several hours
working through a tutorial only to find that the tutorial’s recommendations are no longer valid.
Second, though all social media websites have some form of an API, not all have a dedicated APIs in the
language we were using, Java. As an example, Facebook only provides APIs for iOS, Android, PHP and
Javascript. There are third party API’s written in Java, but these are not as well kept as the APIs Facebook
provides in house.
Other constraints we encountered were constraints inherent to nature of web applications and Android
applications. A web application allows for maximum storage capacity (necessary for when users
download their photos) but could be cumbersome to use on a phone. One can imagine the tediousness of
taking a photo, saving it, opening one’s browser, uploading the photo, closing the browser, before starting
the entire process again.
An Android app could circumvent this problem -- simply take a photo and directly upload it Dropbox or
an FTP server using their respective APIs. However, because of the Android’s limited storage capacity,
downloading the photos after they have been uploaded becomes infeasible.
TAMU CSCE 483 Final Report
4/64
2.4
Literature and technical survey
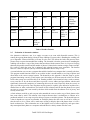
There are several existing products that solve the same issue of event photo collection that TOSS aims to
address. These existing products have a wide range of capabilities. The more capabilities the product has,
the costlier it is. One aspect not addressed in any of the existing products we reviewed is storage variety.
All the applications stored photos using their own storage, either internally or externally using cloud
services. This type of storing inflates the cost of the product to the user, and also raises privacy and
security concerns. TOSS allows the user a variety of storage options. TOSS does not keep any photos,
instead it only directs them to the storage specified by the user. This not only provides flexibility and
privacy to the user but it also reduces the operating cost of TOSS.
Wedding Snap
o Wedding Snap is a photo service geared specifically towards weddings. The website
allows event hosts to create albums, and event guests to upload photos and videos
through their Android and iPhone applications, or email them. Photos can then be
downloaded on the computer through their website. They also provide some bonus
services like live slide shows, and twitter hashtag uploads.
Sharypic
o Sharypic is another application that allows for collaborative photo galleries. It allows
users to upload photos from any device including cameras, mobile devices, or computers.
Photos can also be uploaded using twitter and instagram hashtags. Photos can then be
downloaded on the computer through their website. They also provide some bonus
services like live slideshows, importing photos from existing photo services.
Bonfyre
o Bonfyre is a service for group collaboration. This service provides group messaging, and
content sharing across several platforms including Android and iOS. It’s capabilities are
geared more towards chatting and messaging rather than photo and content sharing.
Fotojelly
o Fotojelly is a photo sharing service that is only available on Windows phones. This
application is mostly used for social network integration. The application pulls photos
from Facebook events and groups.
Napa
o Napa is a photo sharing service available only on iOS. It focuses on security. Photos can
only be shared with ‘contacts’ that have been imported into the application.
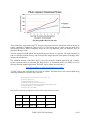
Wedding Snap
Sharypic
Bonfyre
Fotojelly
Napa
TOSS
Storage
Variety
None
None
None
None
None
DropBox
FTP Private
Server
Upload
Yes
Yes
Yes
Yes
Yes
Yes
Upload
Varieties
Android
iOS
Computer
Twitter/Instagram
Camera
Email
Android
iOS
Computer
Twitter/Inst
agram/Face
book/Flickr
/Picasa
Camera
Android
iOS
Windows
Phone
Facebook
iOS
Android
Computer
Email
TAMU CSCE 483 Final Report
5/64
Email
Upload
Features
Photo filters
None
None
Editing
None
Photo filters
Editing
Comments
Tagging
Download
Yes
Yes
No
No
No
Yes
Privacy
Features
Code
Code
Password
Code
Password
Code
Password
Share
Only via
Phone or
Email
Code
Password
Cost
$99 - $399
$199 $499 per
month
$0
$0
$0.99
$0
Table of Product Features
2.5
Evaluation of alternative solutions
One alternative solution to ours is to supply everyone at an event with disposable cameras. This is
actually how group photo sharing is done at many weddings. Everyone who is attending the wedding will
get a disposable camera which they will turn in at the end. This allows the bride and groom to have
pictures from everyone that attended the wedding. The downside is that the guests that are attending the
wedding will not have a copy of the pictures that are taken with the cameras, there is a big cost is buying
that many disposable cameras and the number of photos is limited to the amount a single camera can take.
For events in which the guest list is unknown, this solution becomes near impossible. The benefits
however is that it is simple to just buy cameras and distribute them so setup is easy.
A second solution was to create a program that could be installed on a computer that is owned by the host.
This program would function similar to our website in that it would handle to receiving of photos and
direct them to the correct storage location. The downside to this approach is that the setup to get the
program functioning correctly would require port forwarding on the hosts network which we did not
believe that average user would be able to do. Another problem is that instead of using a code to connect
to an event like we do, the host would have to provide a server address and port number which would
significantly increase the complexity of connecting devices to the event. Especially when the event is an
open even with no guest list since directions must be posted in a public space instead of explained in a
detailed letter or other such medium. The benefit of this solution would be that the photos never spend
any time on a server that is not owned by the host which would allow the ultimate level of privacy and
security for the users.
A final solution would be to ask everyone who attended the event to send a copy of their photos to the
host, most often by email. This solution is the cheapest because there is no hardware or software to be
purchased and there is no setup except for asking everyone to send their pictures. The downside however
is that it depends on everyone to remember to send their photos after the event as well as be willing to
take the time to do it. Guests will be much more willing to help the host with photos when it is not a
hassle to themselves. This solution has one of the highest levels of effort required by each guest since
they must upload their photos to a computer and send them in a timely manner after the event.
TAMU CSCE 483 Final Report
6/64
After looking at the three solutions above we came up with our solution as it takes the best of each
solution and sacrifices little. The benefit of our solution over the disposable cameras is that we offer our
service for free, so the only cost would be the option of buying a storage medium for the photos. This cost
is dramatically less than the cost of buying a large number of cameras and the number of photos that
every guest can take is not limited. By hosting our service online we can allow guests to connect to an
event by simply using a 6 digit code rather than needing various login information and the host does not
have to do any setup. This provides huge setup benefits over the installation version of our software. The
downside being a slight decrease in privacy since the photos must pass through our servers. The benefit
over having the users email their photos after the event is that with our app users can take pictures like
they would be doing already and a copy is automatically sent to the host which requires no extra work for
the guest. Therefore we have taken the best of all the solutions and really only sacrificed a little privacy in
doing so.
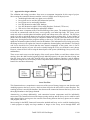
3
3.1
Final design
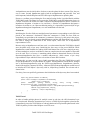
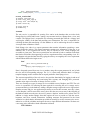
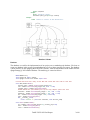
System description
TOSS will be comprised of six main parts: an Android phone, two services, an API abstraction layer, a
storage medium, and a database. The Android phone will be the main method of interaction for users. The
first web service will be the other method of interaction for the user (frontend), and will control user
account creation, login, and photo displays. The second web service will be strictly backend-oriented,
handling incoming photos, authenticating device IDs and event IDs, and communicating with the API
abstraction layer. The storage medium will be decided by the user at the creation of each event. Storage
mediums may be Photobucket, Dropbox, Facebook, or a user’s private server. The database will store
user accounts, event IDs, and links to photos.
Figure of System Architecture
The Android application will be developed by Gregory. The app will consist of the default camera
component, a screen to input an event ID code, and a screen to choose which pictures should be sent to
the web service using REST. The Android application will send each photo as a REST call, with image
data, tags and comments, device ID, event ID, and time taken present.
The frontend web service will be built using Python and the Django Web Framework. It will handle the
creation of user accounts and events, the display of photos, and the downloading of all pictures taken at an
event. Kira will handle the technical design of the web service front end. Hao will be in charge of
‘branding’ the website and creating a uniform look and feel throughout the project. The Python web
service will interact with the database to manage account and event creation. It will also interact with the
TAMU CSCE 483 Final Report
7/64
API abstraction layer to retrieve photos from their respective storages. Event creation will assign a unique
identification code to each event, generated through an md5 algorithm. The host of an event will
distribute a QR code to his guests. The QR code will translate into an event code, which maps to the
unique event ID.
The photo service (backend) will be implemented in Java and Jersey. Jersey is a framework for creating
REST applications. Maven will be used to manage dependencies and builds. The web service will be
created using Grizzly, a lightweight Java server. Patrick will be working on the photo acceptance and
event ID authentication. Josh will be managing the storage of photos in the user’s Dropbox, Facebook, or
Photobucket account. The decision for splitting the photo-handling service and the user interface service
was made by Gregory, to reduce load on the UI while many pictures were being uploaded. This service
will communicate with the Android application, database, and Python service. The Android app will send
the image, device ID, and event ID, which will be read by the Java service. We will look up the event ID
in the database to determine its authenticity. The device ID may be logged to prevent spammers from
abusing our system. After the event ID has been verified, the photo will be sent to the API abstraction
layer to be placed in its respective storage.
The inclusion of several different storage options for the user allows for more flexibility and privacy than
other services may allow. Josh will be in charge of integrating our web services with Facebook’s,
Dropbox’s, and Photobucket’s APIs. The list of planned storages is as follows:
Facebook
Photobucket
Dropbox
Private Server
The standard services (Facebook, Dropbox…) will be simple to set up. The host for the event will provide
his credentials to the specific account to allow our services to upload the guests’ photos directly to the
account. The private server option is a more technical option for the truly privacy-conscious user. This
option will allow the users to bypass all of our services. Instead of giving his guests an event ID, he will
distribute a link to his private server, which will collect and display photos sent to it.
The mySQL database will contain information related to user accounts, event IDs and time constraints,
and photo links. Zach will set up and maintain the database. The Python web service, Java web service,
and API abstraction layer will communicate with the database. The Android apps will never interact
directly with the database.
Zach purchased a server NFOservers.com and installed 12.04 LTS Ubuntu distribution. Gunicorn, Nginx,
Supervisor, and Virtual Environment are installed on the Linux machine. Most of our development work
will be done through this server.
TAMU CSCE 483 Final Report
8/64
3.2
Complete module-wise specifications
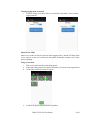
Android Application: start screen, tagging screen, photo effects screen, and reviewing screen.
Android Application
Requires Android version 4.0 and above because we are using slider switches in our application
which is only supported in version 4.0 and above.
Using Spring API for performing REST calls.
Using SimpleXML for serializing app data.
Using ZXing Barcode scanner in order to read QR codes.
Decided to use a camera intent vs a camera API because the camera intent provides a user
interface that is already similar to the default camera app and takes the least amount of effort to
implement. The only downside is that we are unable to customize the camera screen.
Using Aviary API for photo editing.
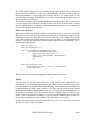
The relationship between the Android Application, Photo Service, and API Abstraction Layer is
shown.
Photo Service
The photo service has been being developed using Java, Jersey (REST), and Grizzly (server). Maven is
being used as a dependency handler and build environment. The decision to use Java (as opposed to
Python, for example), was based on Java’s speed and Patrick’s familiarity with the language. Java, being
a compiled language, is considerably faster than Python, which is interpreted. Jersey was chosen as a
TAMU CSCE 483 Final Report
9/64
RESTful service because it seemed to be the most widely-used, and as such, had the greatest amount of
documentation available to us. Grizzly was used as the server due to its simple and lightweight nature.
Since it is developed by Oracle, and is contained within the GlassFish project, documentation was also
abundant. An additional bonus for each of these technologies is that they are all contained within the
Central Maven Repository, enabling rapid deployment with minimal hassle. Using a Jersey/Grizzly
Maven archetype, we were able to get a simple REST service up fairly quickly. Maven also resolves most
of Java’s class path headaches when compiling and running. In short, each component’s compatibility
with Maven created a very pleasant development environment.
The photo service, as of this writing, has two main actions. The first is event code validation, in which a
user’s
Android
app
will
send
a
REST
GET
call
of
the
form
http://toss.myphotos.cc:18081/validationService/<code>. Plans for the next iteration of design include
implementing a caching system to avoid interacting with the database too frequently. The second function
is to receive photo and event information from the Android application via Multiparts and pass the
relevant data to Josh, who will be managing the API abstraction layer required to transmit the photos to
Dropbox and Facebook.
The communication between the Android application and the Jersey photo service takes place through a
REST framework. The REST call for the photo uploading is a POST method using the Multipart media
type to the URL http://toss.myphotos.cc:18081/photoUpload/.The communication between the photo
service and the API abstraction program is implemented over sockets.
The interaction between the Android and the Jersey photo service uses JSON for the code validation
function. The photo uploading function uses Multipart data, consisting of an InputStream to contain the
photo data, a FormDataContentDisposition object containing the file details, and a String with the
EventID. JSON was chosen due to its simple nature and widespread usage. Multipart is used largely
because nothing else we tried was successful. Multipart was the most commonly-used method of
transmitting files, but it was not trivial to implement. We had been attempting to convert the image to a
byte array and send it via JSON, but the connection timed out. Fortunately, Greg discovered how to use
Multiparts.
Maven dependencies included in the Jersey photo service:
Artifact ID
jersey-container-grizzly2-http
jersey-media-multipart
commons-io
json
mysql-connector-java
org.apache.commons.codec
junit
Group ID
(org.glassfish.jersey.containers)
(org.glassfish.jersey.media)
(org.apache.commons)
(org.json)
(mysql)
(org.apache.directory.studio)
(junit)
API Abstraction Layer
As has been previously mentioned, TOSS allows users to store photos in one of two services, Dropbox or
an FTP server. Java was chosen for implementing this functionality for two reasons. First, and perhaps
most importantly, it is well understood by Josh, who is responsible for the API abstraction. Second, Java
remains in prolific use. Most of the locations where we will be storing photos have a Java API.
TAMU CSCE 483 Final Report
10/64
Originally the API abstraction was to be written using the Jersey/Java photo service. However, as we did
more research into what specific API’s required to function properly, we found that, when it came to the
API abstraction layer specifically, the Jersey/Java service was wholly unnecessary -- in other words it
would be easier to implement the abstraction layer entirely in Java.
We decided to implement Dropbox first, primarily for practical reasons. Because the APIs we intend on
using change so quickly, the documentation needed to properly integrate these programs into TOSS fail to
keep up. As a result, figuring which puzzle piece goes where can be a Sisyphean effort. Dropbox,
however, was the exception which proved the rule. We wanted to get a basic version of TOSS working as
quickly as possible, and Dropbox provided well written and easily comprehensible documentation for our
purposes.
The photo to be uploaded is passed to the API abstraction layer through a socket using a TossObject, a
class shared by both Patrick and Josh. A TossObject contains several pieces of pertinent information
useful for uploading the photo. It contains the device id of the device which is attempting to upload the
file; the event ID, which will determine, among other things, where the photo is to be stored; a photo
comment to be attached to the photo; a photo’s tags; and, lastly, a byte array representation of the photo
which can be turned into an InputStream for the Dropbox API upon upload.
Patrick will pass Josh a TossObject through a server socket Josh will create. Josh wiill then extract the
information from the TossObject, interpret it, and send the photo where it needs to go.
Web Service
The web service is implemented with Django, Nginx, and Gunicorn.
Django is a formidable web display engine which has been proven to be effective in very large
implementations which scale from single person websites to the largest of newsrooms which have
constant updating documents and display them in real time to their massive userbases.
o This engine was chosen for its ability to scale and its simplicity of implementation.
Additionally, having a moderate expert in Django makes it something that was an
obvious choice for our team. There is no reason for us to choose less secure and more
complicated environments when we have something that works well and is well known
and documented.
Nginx is a premier content management system. It handles the presentation of information,
images, content, etc to the user. Nginx very carefully handles the control of url access and flow
redirecting the user as needed and making the web service as secure as possible from actual file
access.
o Easy implementation with Django and built in security makes it the obvious choice.
Gunicorn (Green Unicorn) was chosen as a scalable web engine which has good interactions with
Django and large precedence.
o Apache tends to not work as well with scalable Django applications which made us lean
more towards Gunicorn for doing the implementation we desired.
TAMU CSCE 483 Final Report
11/64
Web Service: Account System Flow
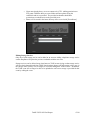
User Accounts
The web service will require users who want to create events to create a user account with our
service. They will be directed to a form prompting them for a username, which must be unique in
our database, an email, which must follow valid email format, a password, and a password
confirmation, to avoid typos. A new user entry in the Users table in the database will be created.
The user’s unique username will serve as a key. The username will be tied to all events they have
created as well as any APIs they have added to their account. An existing user will be able to
login and logout of our web service. They will also be able to do basic account tasks like add
APIs, change passwords, and deactivate their account. A logged in user will have access to all of
the events they've created and all their corresponding photos without being prompted for the
event id and event password unlike users who are not logged in.
TAMU CSCE 483 Final Report
12/64
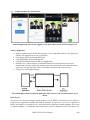
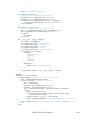
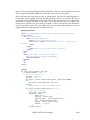
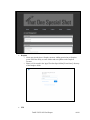
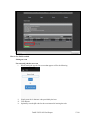
Web Service: Event System Flow
Events and Event Codes
The web interface allows for users, who are registered within our site, to add storage locations for
their photos and then create events which allow other users to upload photos during a time frame
to those locations. In the photo above, the second image to the left is the event creation form. In
this form you are automatically given a list of all added API points to select from, the ability to
choose your own event code, and set a password for the event. Event codes are first come, first
serve, and expiring codes. This process was chosen as a simple interface for hosts of all
demographics to be able to create in a simple manner which follows an intuitive flow.
Photo Retrieval
The web service will provide photo retrieval capabilities to both users who have accounts as well
as those who do not. Users who have accounts and are logged in to the service will be able to
access all photos of their own events. Those who do not have user accounts or are not the host of
TAMU CSCE 483 Final Report
13/64
that event, guests, will be able to look up an event and corresponding photos using the event id
and event password provided to them by the event host. With valid ids and passwords they will
have access to that event’s information like name, description, and photos. The web service will
interact with the API abstraction layer to retrieve the photos from their corresponding storages to
allow users to download photos.
Website Front-end
We used bootstrap as a base for our website front-end. Bootstrap contains HTML and CSS-based
design templates for typography, forms, buttons, and interface components as well as java
extensions. The advantage of using bootstrap is its compatibility with the latest versions of all
major browsers. Bootstrap is modular and consists essentially of a series of less stylesheets that
implement the various components of the bootstrap toolkit. A stylesheet called bootstrap.less
includes the components stylesheets. Developers can adapt the Bootstrap file itself, selecting the
components they wish to use in their project. There are a wide variety of features such as fonts,
backgrounds, tables, headings and so on. In addition to the regular HTML elements, Bootstrap
contains other commonly used interface elements. These include buttons with advanced features
like grouping of buttons or buttons with drop-down options, make and navigation lists, horizontal
and vertical tabs, navigation, breadcrumb navigation, pagination, etc., labels, advanced
typographic capabilities, thumbnails, warning messages and progress bars.
Simplified Database Schema
Database
Mysql was chosen as our Database Backend for its well documented and well implemented history. We
chose to proceed with this DB as a result of its inclusion in all versions of Python and Java as well as its
security and scalability. Various other DBs were examined such as CouchDB but our lack of knowledge
in them led us to choose a sql which is well known.
Our schema is a simple 6-7 table implementation which, while possible to expand, is quite complete in its
current form. We use an events table to store all events, an API table to store each API the user adds and
can use for an event, a photo table to store all the photos that are added, and a user table for all the users.
Additionally, there are various Django built in tables.
TAMU CSCE 483 Final Report
14/64
3.3
Approach for design validation
The validation and testing procedures focus more on component integration for this stage of project.
Stress testing the connections between modules is critical. Notable areas of the project are:
Android application and Jersey photo service (REST)
Jersey photo service and Java API Abstraction (sockets)
Jersey photo service and mySQL database
Java API Abstraction and mySQL database
Java API Abstraction and the various APIs (Dropbox, Facebook, FTP server)
Web service front end (Django) and mySQL database
Each of these areas is important to the overall functioning of the system. The Android application needs
to be able to communicate with the Jersey service quickly even under high loads. The Jersey service
needs to be able to send the photo information quickly and without error to the API layer. The API layer
needs to be able to upload the photos to the various storage mediums without delay. A large buildup of
photos stored in memory while waiting for Dropbox to handle our request could cause the server to start
using swap, slowing down all the programs running on the server. The API layer also needs to be able to
update the information (photo location) stored in the database. This information will be being retrieved by
the Django web service at regular time intervals to update the frontend gallery and slideshow. The Django
web service should be less critical than the more internal components of the system, since it can be
assumed that the majority of users will not be excitedly hitting the F5 key to refresh the event’s photos.
However, almost all users will be using the internal parts of the system (Android app, Jersey service, API,
and database).
There are two main ways to test the integrity of the overall system. Either we could have a chain of tests
running, where the data from the beginning (mock Android program) is the same data that is being sent
from the Jersey service to the API, from the API to the storage mediums (Dropbox), and all database
interactions along the way. Since many of these component share resources on the same system, it may be
beneficial to test them concurrently.
Stress Test Flow
This illustration shows a comprehensive stress-test of the system. Dummy images are sent from the mock
Android program to the Jersey service, which are then relayed to the API, which is sent to Dropbox. The
resulting location is stored in the database. Not shown are the connections between the Jersey service and
the mySQL database or the Django frontend.
Alternatively (or perhaps additionally), each connection between components could be individually
stress-tested. The connection between the image-spewing mock-up and the Jersey service could be tested
and evaluated before moving on to the extreme socket testing between the Jersey photo service and the
API program, and so on.
Stress testing for the REST framework between the Android and Jersey service could be simulated using
a mock program to rapidly toss large numbers of images to the Jersey service through REST and
TAMU CSCE 483 Final Report
15/64
Multipart. This test program could play the part of the Android phone, mimicking the actions of a
thousand simultaneous TOSS users.
The Android application will need to be stress-tested by itself. Is it capable of submitting a hundred
queued photos to the Jersey service? Will the app crash or slow down? Will the photos reach their
destination? Will we receive a broken pipe error or timeout?
The sockets between the Jersey service and the API abstraction could be tested individually by having the
Jersey service spam large numbers of InputStreams very rapidly through the socket. Ensuring that the
socket does not break under the load is important. Perhaps even more important would be to implement a
‘self-healing’ socket implementation. If the connection between Jersey and the API Abstraction is lost,
the programs need to be able to detect that and automatically set the socket back up. Human intervention
each time the service breaks would take far too long.
The limits of the various APIs need to be explored a little more carefully. Meticulous research would
probably be more appropriate than spamming Dropbox with a thousand photos a minute before knowing
their policies. In order to determine whether or not an online storage medium will meet our requirements,
we should see if limits exist on data sent, calls made, or frequency of calls. Once we are sure of the
official policies of these services, we can begin stress-testing the relationship between the API
Abstraction and the various storage mediums.
Testing the database interactions could be done by having the API program quickly populating a dummy
table of photo information. The efficiency of this interaction could be measured by accuracy (was
everything stored properly), memory usage (both peak and average) and cpu usage (peak and average).
It would probably be best to test each area individually, making sure we are within limits for each
connection between components. Once we are confident in the paired performance of our different
modules, we can test the system as a whole, using the same mock data for each stage.
4
Implementation notes
Android Application
Services
The Android app uses services for both event code validation and photo uploading since both
consist of making REST calls to the photo service. The reason for this is that Android cannot
perform networking activities on the main thread since the main thread handles the UI. This
would cause the UI to freeze while performing our REST operations. To start the validation
service we send an Intent to it with a reference to the object that will receive the result of the
validation and the event code to be validated.
final Intent intent = new Intent( Intent.ACTION_SYNC, null, activity,
ValidateEventCodeService.class);
intent.putExtra(com.toss.rest.photocaptureapp.Defines.RECEIVER_KEY,
mRESTResultReceiver);
intent.putExtra( com.toss.rest.photocaptureapp.Defines.EVENT_CODE_KEY, strEventCode );
activity.startService(intent);
When a service is started in this way it will automatically run in a separate thread which will
satisfy our requirement. Similarly for the photo upload service we start it with the following
intent.
final Intent intent = new Intent( Intent.ACTION_SYNC, null, getApplicationContext(),
PhotoUploadService.class);
TAMU CSCE 483 Final Report
16/64
intent.putExtra(com.toss.rest.photocaptureapp.Defines.RECEIVER_KEY, mRESTResultReceiver
);
intent.putExtra( com.toss.rest.photocaptureapp.Defines.EVENT_ID_KEY,
m_EventMgr.GetPrimaryEventID() );
intent.putExtra( com.toss.rest.photocaptureapp.Defines.PHOTO_PATH_KEY, strPhotoPath);
intent.putExtra( com.toss.rest.photocaptureapp.Defines.COMMENTS_KEY, strComments);
intent.putExtra( com.toss.rest.photocaptureapp.Defines.TAGS_KEY, aTags);
startService(intent);
In this Intent we pass along the object that will receive the result of the photo upload, the event id
to which the photo belongs, the path to the photo stored on the phone, any comments entered by
the user and a list of tags that were optionally added by the user. The service must implement the
onHandleIntent function in order to extract the data from the Intent.
protected void onHandleIntent(Intent intent);
The RESTResultReceiver referenced in both of the previous examples is actually an interface
which is implemented by the callers of the services. The implementor must implement the
following function which allows it to receive the result from the service.
protected void onReceiveResult(int resultCode, Bundle resultData);
The resultCode is a user defined code to indicate the if there were any problems while running the
service and the Bundle is a mapping of Strings to values that are returned by the service.
Android Code Validation Service
In order to perform the REST calls from an Android device we used an already developed
framework call Spring. In order to use this framework we need what is called a RestTemplate.
The RestTemplate contains information on how to process the messages that will be sent. In the
case of code validation we must add a String message converter to the template. That way any
message received using the template can be translated into a String.
m_RestTemplate = new RestTemplate();
// Add the String message converter
m_RestTemplate.getMessageConverters().add(new StringHttpMessageConverter());
We can then use the template to perform a GET REST call and format the result as a String. The
photo service contains a special URL “/validationService/{eventCode}” that will return a JSON
representation of the event with the corresponding event code as a String.
// Create the url to the validation service
String strUrl = Defines.BASE_URI + "validationService/" + strEventCode;
String strResult = "";
try
{
// Make the HTTP GET request, marshaling the response as a String object
strResult = m_RestTemplate.getForObject( strUrl, String.class, "");
}
catch( RestClientException e)
{
strResult = "failed connection";
}
TAMU CSCE 483 Final Report
17/64
The String result is converted into a JSON object which allows us to extract each attribute of the
event. These attributes are then packaged into a Bundle and returned. The caller of the service
which implemented RESTResultReceiver will be able to pull the information from the Bundle
and do use it to join the event or inform the user that the code was invalid.
Android Photo Upload Service
In performing a photo upload we send with each picture a unique identifier for the phone or
device uploading the photo. This unique identifier is achieved by using the TelephonyManager
which returns a unique identifier if the device is a phone. However, if the device is not a phone
then we use the slightly less reliable way by getting the Serial number of the device. The Serial
number is less reliable because some manufacturers do not include the Serial number of the
device in the software of the phone.
final TelephonyManager tm = (TelephonyManager)
getBaseContext().getSystemService(Context.TELEPHONY_SERVICE);
// use a device ID, but these are only available on devices with telephony hardware
String strDeviceID = tm.getDeviceId();
// in case we are on software without telephony hardware, use the serial number
if( strDeviceID.isEmpty() )
strDeviceID = android.os.Build.SERIAL;
We also extract the time from the photo and send it with the photo. This allows the photo service
to simply redirect the photo and not actually need to reconstruct it. We do this by using the
ExifInterface of the photo which contains all the meta data of the photo.
ExifInterface photoExif;
try {
photoExif = new ExifInterface( strPhotoPath );
} catch (IOException e1) {
e1.printStackTrace();
return;
}
String strDateTime = photoExif.getAttribute( ExifInterface.TAG_DATETIME );
To transfer the photo we must create a stream out of the photo so we do that by converting the
photo to a FileSystemResource which is from the Spring framework and is similar to an
InputStream.
FileSystemResource file = new FileSystemResource(strPhotoPath);
We cannot pass ArrayLists through REST since it is a Java specific structure so we convert the
list of tags to a string delimited by “|”.
// convert the list of tags to a string where the tags are seperated by a |
String strTags = aTags.size() > 0 ? StringUtils.collectionToDelimitedString( aTags,
"|") : "";
In order to create a Multi-part to send we will use a LinkedMultiValueMap which is from the
Spring framework and allows us to add items with a mapping from a String key to the data
regardless of type. So we will place the file, comments, tags, device id and photo time into the
map.
// create a multi-part map that will contain all the data and be sent to the server
MultiValueMap<String, Object> parts = new LinkedMultiValueMap<String, Object>();
TAMU CSCE 483 Final Report
18/64
Similarly to the Code Validation Service we use a RestTemplate however we need to add an
additional Message Converter for Multi-part form data since that is the format we use for sending
the photo data to the server. This will allow Spring to convert our map to http.
m_RestTemplate = new RestTemplate();
// Add the String and Form(multi-part) message converter
m_RestTemplate.getMessageConverters().add(new StringHttpMessageConverter());
m_RestTemplate.getMessageConverters().add(new FormHttpMessageConverter());
We can then use the template to perform a POST REST call to the special photo upload Url
“/photoUpload/”. This will return a status that will determine if the upload was a success or if it
failed and the reason why it failed. During testing a bug arose where the first photo sent after
joining an event would fail due to a “Broken Pipe,” researching the problem showed that it was
an issue in the current Spring framework. Due to time constraints we simply created a fix until the
problem is resolved in the framework. We will continue to attempt to send the photo if the POST
fails due to a ResourceAccessAcception which is a “Broken Pipe.”
// the status of the photo upload
String strStatus = "";
boolean bAttemptSend = true;
while( bAttemptSend )
{
try
{
// Make the HTTP POST request
strStatus = m_RestTemplate.postForObject(m_strUrl, parts, String.class
);
bAttemptSend = false;
}
catch( ResourceAccessException e)
{
// Need to retry, for some reason the first attempt at sending a photo
to
// the socket
// will throw this exception. Determined that it is a issue with the
Spring
// Framework
}
catch( Exception e)
{
// failed to upload the image
strStatus = "failure";
bAttemptSend = false;
}
}
We create an empty bundle and return it with a result code based on the status returned by the
POST. The caller of the service which implemented RESTResultReceiver will be able to use the
result code to inform the user if there was a problem.
Photo Review Grid
In order to show the photos that were taken in review mode we needed to create a grid view with
photo thumbnails with a checkbox on each of them. We accomplished this by using a GridView
with a custom Adapter which will draw an image with a checkbox for each item in the grid.
TAMU CSCE 483 Final Report
19/64
m_adapter = new ImageAdapter(this);
m_adapter.SetImageList( m_aPhotoPaths );
GridView gridview = (GridView) findViewById(R.id.viewPhotoGrid);
gridview.setAdapter( m_adapter );
The adapter is used to grab an element for each item in the grid. In our case we use a custom
object that contains a photo and a checkbox. When the Adapter is queried for an item it creates a
SelectableImage which is our image checkbox combination if it does not exist. We also create
click listeners for both the photo and the checkbox. Clicking on the photo will take the user to the
photo edit screen so they can make changes. Clicking on the checkbox will select/unselect the
photo. The code for this function is provided below.
// create a new ImageView for each item referenced by the Adapter
public View getView(int position, View convertView, ViewGroup parent)
{
SelectableImage imageControl;
if (convertView == null)
{ // if it's not recycled, initialize some attributes
// Create the new Selectable image
imageControl = new SelectableImage();
convertView = mInflater.inflate( R.layout.photo_review_item, null);
imageControl.imageview = (ImageView)
convertView.findViewById(R.id.thumbImage);
imageControl.checkbox = (CheckBox)
convertView.findViewById(R.id.itemCheckBox);
// Add the image to the list
if( position >= m_aImages.size() )
{
// fill in images until the the size is equal to the position
for( int i = m_aImages.size(); i < position; i++)
m_aImages.add( new SelectableImage() );
}
m_aImages.add( position, imageControl);
convertView.setTag(imageControl);
} else {
imageControl = (SelectableImage) convertView.getTag();
}
imageControl.checkbox.setId(position);
imageControl.imageview.setId(position);
imageControl.checkbox.setOnClickListener(new OnClickListener() {
public void onClick(View v) {
CheckBox cb = (CheckBox) v;
int id = cb.getId();
// set the check and set internal selection flag
m_aImages.get( id ).SetSelected( !m_aImages.get( id ).IsSelected() );
cb.setChecked( m_aImages.get( id ).IsSelected() );
//inform review activity that photo selected
m_pReviewActivity.SelectPhoto( m_aImagePaths.get( id ), m_aImages.get(
id
) .IsSelected() );
}
});
imageControl.imageview.setOnClickListener(new OnClickListener() {
TAMU CSCE 483 Final Report
20/64
public void onClick(View v) {
int id = v.getId();
m_nCurrentIDEditing = id;
// Open the edit screen with the thumbnail link
Intent intent = new Intent();
intent.putExtra( com.toss.photocaptureapp.Defines.PHOTO_PATH_KEY,
m_aImagePaths.get( id ) );
intent.setClass( mContext, PhotoViewerActivity.class);
m_pReviewActivity.startActivityForResult(intent, EDIT_PHOTO );
}
});
// set the image
imageControl.imageview.setImageBitmap( getThumbnailBitmap(
m_aImagePaths.get(position), ( m_nScreenWidth - 4 * SPACING ) / 3 ) );
// set the state of the checkbox
imageControl.checkbox.setChecked( imageControl.IsSelected() );
imageControl.id = position;
return convertView;
}
Photo editing using Aviary
To allow the user the add effects to their photos we integrated the Aviary photo editor into our
app. Aviary is free to use and we launch the photo editor by sending an Intent to it containing the
path to the photo, the path of where to store the edited photo and and the API secret which
corresponds to our app.
Intent intentEdit = new Intent( this, FeatherActivity.class );
intentEdit.setData( Uri.parse("file://" + m_strPhotoPath ) );
intentEdit.putExtra( Constants.EXTRA_OUTPUT, Uri.parse("file://" + m_strEditedPhotoPath
) );
intentEdit.putExtra( Constants.EXTRA_IN_API_KEY_SECRET, "e38460e3dccdb447" );
startActivityForResult( intentEdit, EDIT_PHOTO_REQUEST );
When the Activity returns we can determine from the returned Intent if any changes were made.
If the user decides to save then we will replace the original photo with the new edited photo.
Photo Service
The Jersey/Grizzly photo service is relatively simple. The function of this service is to validate event
codes and redirect photo uploading from the Android phone. This is accomplished using REST calls,
multipart data for the photos, and sockets. Grizzly/Jersey were chosen for the widespread documentation,
lightweight nature, and compatibility. The REST framework is of course handled by Jersey, which is
hosted on the Grizzly server. The photo service runs on the URL “http://toss.myphotos.cc”, using port
number 18081. The photo service as well as the API abstraction layer both use Maven as the build
manager and environment. Creating the Maven project with Grizzly/Jersey already set up was simple:
mvn archetype:generate -DarchetypeArtifactId=jersey-quickstart-grizzly2 \
-DarchetypeGroupId=org.glassfish.jersey.archetypes -DinteractiveMode=false \
-DgroupId=com.example -DartifactId=simple-service -Dpackage=com.example \
-DarchetypeVersion=2.7
(source: https://jersey.java.net/documentation/latest/getting-started.html)
TAMU CSCE 483 Final Report
21/64
Maven allowed us to download and include Jar dependencies without much hassle. Simply editing the
pom.xml contained at the root of the directory was sufficient to import third party libraries. Third party
libraries that were included in the photo service are as follows:
jersey-bom
jersey-container-grizzly2-http
jersey-media-multipart
commons-io
json
mysql-connector-java
org.apache.commons.codec
junit
Threading in the photo service was handled by Grizzly. For each REST call that connects to the service,
Grizzly will spawn a new thread to handle the request. This allows the photo service to operate even
under a relatively heavy load.
The validation service is a REST function that will take in a single six-character event code, check to
make sure the event is valid, and return the relevant information to the Android phone in a JSON format.
The requirements for event validity are:
Event code must correspond to an existing event
Event must have already started (current time > start of event)
Event must not have ended (current time < end of event)
Event must not be disabled (‘disabled’ is a flag contained within the toss_event database table)
If the validation of the event code was successful, the REST service will return a JSON object containing
the event code, event ID, event start time, event end time, event name, whether tagging is enabled or not,
and a return code. The return code is added to the JSON regardless of the success of the database query.
The database querying code used for both the photo service and API layer was provided by Greg.
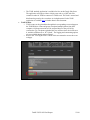
JSON return code for validation REST call
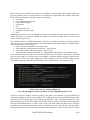
Note: All code snippets will be screenshots, as syntax highlighting may be seen.
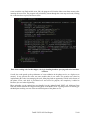
In order to reduce the amount of calls the photo service made to the database, Greg and I decided to
implement a caching system for event validation. The caching system currently holds 100 different events
in memory before recycling space in the caching map and queue. If the event being requested is in the
queue map, the photo service will simply return a JSON of the in-memory CacheObject (after making the
necessary time/disabled checks, of course). If the event is not in the cache, the photo service will query
the database for the relevant information, create a CacheObject, insert it into the cache map and queue,
and return to the user the retrieved event information. If the number of events in memory plus the current
TAMU CSCE 483 Final Report
22/64
event exceed the cap (final variable set at 100), the program will clear the oldest event from memory after
inserting the new event. The program will periodically iterate through the event map and cache, looking
for events that have expired, and remove them.
Part of the caching code. In this snippet, the logic detailing database querying and cache insertion
is shown.
Overall, the cache speeds up the performance of event validation in the photo service, at a slight cost to
memory. In my opinion, the cache was more trouble than it was worth. The greatest cost related to
implementing this cache was managing the code. Many bugs had an opportunity to hide in this feature of
the photo service, and while it performed well and served its purpose, the complexity it added to
Resource.java was rather frightening.
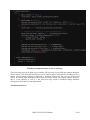
Photo uploading via the Android app was handled via the “/photoUpload” REST call. Multipart Form
Data was used to transmit the image from the phone to the REST server. Figuring out how to actually get
the Multiparts working was one of the most difficult parts of the photo service.
TAMU CSCE 483 Final Report
23/64
Alien-looking Multipart REST call definition.
We had originally tried many different forms of Media types, such as Base64 strings as plain text and
JSON formats. These would usually result in a timeout condition, which would break a pipe on the
Android App, crashing it. The only Media type that performed well were Multiparts.
One of the steps of implementing the Multipart code (in addition to the unintuitive method declaration)
was to register the MultiPartFeature class within the ResourceConfig of the Grizzly server. That was truly
unintuitive, as many of the Multipart tutorials assumed intrinsic knowledge concerning the relationship
between ResourceConfig and Multipart.
Checks within the photo upload method are:
Is the user banned? If yes, disallow his photo to be uploaded
Is the socket connected to the API layer functional?
Is the output stream associated with the socket non-null?
Once the photo service had received a Multipart, it would send the picture data across the socket to the
API layer. The serialization of this data used Java’s ObjectOutputStream and a custom-made class, known
as TossObject. The TossObject class held the picture data in a byte array, which the API layer would then
use to upload to the relevant storage medium.
I ran into an interesting scenario while implementing the ObjectOutputStream between the photo service
and the API layer: Java requires that the serialized class definition be exactly the same on one side as the
other. Simply having identical text would not cut it. Java would complain about mismatched objects while
attempting to send the serialized TossObject across the ObjectOutputStream. The solution suggested by
Zach worked well. He suggested using symlinks. Symbolic linking TossObject.java between the photo
service and the API layer worked well. Originally, I naively made the symlink an absolute path, which
broke for Greg when he pulled the latest changes. Fixing the symlink to a relative path fixed the problem.
Java must use a hash for each class file it compiles and compares them against objects coming in across
the ObjectOutputStream.
TAMU CSCE 483 Final Report
24/64
TossObject serialization. Photo service to API layer.
The socket used between the photo service and the API layer runs on port 9090 and connects during the
service start-up. This means that the API layer service must already be running before the photo service is
started. I had originally planned to implement a ‘heartbeat’ between the two services, which would
remove the start-up order dependency and would solve broken socket issues during runtime. However,
due to a time shortage as well as a fear that more bugs would be introduced during heartbeat
development, this feature was not implemented.
API Abstraction Layer
TAMU CSCE 483 Final Report
25/64
API Abstraction Layer - Web Service - Photo Service Communication
API Abstraction Layer
Conceptually, the API Abstraction Layer functions as a bridge, though what it connects depends on how
it is used. During uploading the abstraction layer bridges the gap between Patrick’s Photo Service and
where the photos are to be stored. During download, it works as a bridge between the Web Service and
where the photos are already stored. Before the API Abstraction Layer’s functionality can be discussed,
we must discuss two things: TOSS Objects and TOSS Threads.
TOSS Object
TOSS Objects are the primary way the Photo Service interacts with the abstraction layer. A TOSS
Objects only contains fields and a constructor with which to initialize those fields. Unlike most
classes, helper methods are not required here. The TOSS Object is merely a repository of
information. It will not need to manipulate information in any way.
Fields
A TOSS Object contains five fields. The first three are strings, which store the Device ID of the
device which uploaded the photo; the validated Event ID which will determine where the photo
needs to be stored; and a photo comment, a brief block of text users can add to their photos. The
fourth field is an ArrayList of Strings which stores the different tags the user may have added to
the photo.
The fifth is a byte array which contains the photo to be uploaded. Initially this field was of type
InputStream. An InputStream is a Java class which facilitates the reading of bytes from various
locations.
TAMU CSCE 483 Final Report
26/64
An InputStream was the initial choice for how to store the photo for three reasons: First, they are
easy to create. Second, InputStreams tend to both be straightforward and powerful). Last, and
most important, both the Dropbox and FTP APIs require InputStreams to upload a photo.
However, a problem occurred during the first round of testing (before I provided Patrick with the
TOSS Object code). The Photo Service passes the TOSS Object to the API Abstraction Layer via
a socket. To do this, the socket uses what is called an ObjectOutputStream. (Where a subclass of
InputStream designates a location to be read from, a subclass of OutputStream designates a
location to be written to.) As I discovered during testing, it is impossible to pass an object of type
InputStream through an OutputStream, so a new method had to be devised.
Constructor
Initializing the first four fields was straight forward: parameters corresponding to each field were
placed in the constructor’s declaration. When the constructor is called, the four fields are
immediately set equivalent to the constructor’s parameters. However, by this point in the project,
the Photo Service was already creating InputStreams to send the API Abstraction Layer, so I did
not want to change the constructor of the TOSS Object, which asks for an InputStream
representation of a file.
Because using an InputStream would not work, it was determined that the TOSS Object should
store the photo using a byte array. Initializing the byte array at first proved difficult. While
InputStreams contain methods for reading all the information from a file into a single byte array,
for these methods to work we would have to know at compile time the exact number of bytes that
are to be read. This is, of course, is something which cannot be determined. However, the class
ByteArrayOutputStream does have a method, toByteArray(), which returns a byte Array
representation of bytes which will later to be written to some other locations.
Realizing this, we came up with a new, slightly convolute) plan. The class TOSS Object would
accept an InputStream as a representation of a photo. That InputStream would then be changed
into a ByteArrayOutputStream using the IOUtils.copy(InputStream, OutputStream) function,
found in the Apache Commons IO library. Afterward, the ByteArrayOutputStream would be used
to initialize the TOSS Object’s byte array with its, toByteArray() method. The relevant code is
shown below.
For clarity, lines not specifically pertinent to the initialization of the byte array have been omitted.
import org.apache.commons.io.IOUtils;
public class TossObject implements Serializable{
public byte [] byteArray;
public
TossObject
(String
device,
String
event,
String
comment,
ArrayList<String> tags, InputStream inputStream){
ByteArrayOutputStream output = new ByteArrayOutputStream();
IOUtils.copy(inputStream, output);
byteArray = output.toByteArray();
}
}
TOSS Thread
In order to handle multiple photos for multiple events in real time, the API Abstraction Layer
uses Java threads. When the abstraction layer receives a TOSS Object though the upload socket,
it immediately passes the TOSS Object to a thread; that thread will upload the photo stored in the
TOSS’s byteArray field to either Dropbox or an FTP server.
TAMU CSCE 483 Final Report
27/64
The TOSS Thread constructor has one parameter, which accepts a TOSS Object. Two things
happen when this constructor is called. First, the TOSS Object is copied locally. Second, a
ByteArrayInputStream is created using the byteArray stored in the TOSS Object. As has
previously been mentioned, an InputStream (or a subclass of InputStream) is needed to upload
files to Dropbox or the FTP server.
The thread’s run method (which initiates the thread) is incredibly simple. First, it retrieves the
Event ID stored in the TOSS Object. Second, it looks up the Event ID in the cache or (failing
that) the MySQL database to determine where the photo should be stored. Last, it uploads the
photo to either Dropbox or the FTP client.
DbxException.RetryLater
When multiple photos are uploaded to Dropbox very quickly, the server can become overloaded.
When this occurs, the code which uploads the photo to Dropbox will through an exception of type
DbxException.RetryLater. When this occurs, the only solution is to wait a length of time and try
again. After contacting the Dropbox developer team for some advice, it was determined that the
amount of time the code should delay between uploads should increase exponentially. This is
done using the following code.
public int delay = 2;
final long delayExponent = 2;
public void handleDbxException(DbxException ex){
if(ex instanceof DbxException.RetryLater){
System.out.println("Retry Later.");
delay = (int) Math.pow(delay, delayExponent);
Delay(delay);
();
}
}
public void Delay(long time){
System.out.println("Delay: " + time + " milliseconds");
Thread.sleep(time);
}
When the file has been successfully uploaded to Dropbox, delay is reset to two.
ZipItUp
The final piece of the API Abstraction Layer is the ZipItUp class, which facilities the
downloading of files from Dropbox and FTP clients. There are three functions of importance
here, downloadFiles64(), downloadFiles(), and addToZip(). DownloadFiles64() is a method used
to download all the files from a client. To do this, it first passes the client to the to the overloaded
downloadFiles() method. If downloadFiles is only given a client, it will retrieve OutputStreams of
all the photos stored there. If it is also given an ArrayList of Strings (where each String in the
ArrayList denotes the name of the photo) it will only retrieve the OutputStreams of the specified
photos . These OutputStreams are added to a Zip File using the addToZip function. Then the
downloadFiles() method returns the created Zip File in the format of a byte Array.
Finally, downloadFiles64() encodes the returned byte array in base 64 so it can be read by the
Web Service, which is written in Python.
TAMU CSCE 483 Final Report
28/64
For clarity, the catching of exceptions through try and catch statements are not shown.
private ZipOutputStream zos = null;
public byte[] downloadFiles64(DbxClient client){
Base64 base64 = new Base64();
byte[] byteArray = downloadFiles(client);
byte[] encodedByteArray = base64.encodeBase64(byteArray);
encodedByteArray;
}
public byte[] downloadFiles(DbxClient client){
ByteArrayOutputStream outputStream = new ByteArrayOutputStream();
zos = new ZipOutputStream(outputStream);
DbxEntry.WithChildren listing = null;
listing = client.getMetadataWithChildren("/");
for (DbxEntry child : listing.children) {
if(!child.isFile())
continue;
ByteArrayOutputStream output = new ByteArrayOutputStream();
client.getFile('/'+child.name, null, output);
addToZip(child.name, output);
}
zos.close();
return outputStream.toByteArray();
}
public void addToZip(String fileName, ByteArrayOutputStream file){
ZipEntry ze = new ZipEntry(fileName);
zos.putNextEntry(ze);
zos.write(file.toByteArray(), 0, file.size());
file.close();
zos.closeEntry();
}
Web Service
The web service has three main responsibilities, accounts, events, and photos. The web service is built on
a Django web framework. There are several important files that make up the Django framework. The
‘views.py’ contains all of the functionality of the web service, ‘models.py’ contains the Django models
that build up the database, ‘forms.py’ contains all of the forms used in ‘views.py’ to retrieve structured
data from the website front-end. The website front end is built using html and bootstrap css. There is a
corresponding html file and corresponding Django view in ‘views.py’ for every webpage on the website.
The following code snippets are an example of how the account creation web page is represented in the
Django web framework. Each webpage with a form has a forms.py entry, and every webpage has an entry
in view.py and html file.
forms.py
class UserCreationForm(forms.ModelForm):
username = forms.CharField(max_length = 200, required=True)
email = forms.CharField(max_length = 200, required=True, validators=
[validators.validate_email])
password1 = forms.CharField(label='Password', widget=forms.PasswordInput)
password2 = forms.CharField(label='Password confirmation',
widget=forms.PasswordInput)
class Meta:
model = User
TAMU CSCE 483 Final Report
29/64
fields = ('username', 'email')
def clean_password2(self):
# Check that the two password entries match
password1 = self.cleaned_data.get("password1")
password2 = self.cleaned_data.get("password2")
if password1 and password2 and password1 != password2:
raise forms.ValidationError("Passwords don't match")
return password2
def save(self, commit=True):
# Save the provided password in hashed format
user = super(UserCreationForm, self).save(commit=False)
user.set_password(self.cleaned_data["password1"])
if commit:
user.save()
return user
def __init__(self, *args, **kwargs):
self.helper = FormHelper()
self.helper.form_class = 'form-horizontal'
self.helper.label_class = 'col-lg-2'
self.helper.field_class = 'col-lg-8'
self.helper.form_method = 'post'
self.helper.form_action = 'account_creation'
self.helper.layout = Layout(
Fieldset(
'Create Account',
'username',
'email',
'password1',
'password2',
),
FormActions(
Submit('submit','Create Account'),
),
)
super(UserCreationForm, self).__init__(*args, **kwargs)
views.py
def account_creation(request):
if request.method == 'POST': #If form has been submitted
form = UserCreationForm(request.POST)
if form.is_valid(): # Validation rules pass
user = form.save()
user = authenticate()
username = form.cleaned_data['username']
password = form.cleaned_data['password1']
user = authenticate(username = username, password = password)
if user:
django_login(request,user)
if not request.session.exists(request.session.session_key):
request.session.create()
request.session['username'] = user.username
return HttpResponseRedirect('/account_management/') # Redirect after
POST
return render(request, 'account_creation.html', {'form' : form}) # Redirect
after POST
else:
TAMU CSCE 483 Final Report
30/64
form = UserCreationForm()
return render(request,'account_creation.html', {'form':form})
account_creation.html
{%
{%
{%
{%
extends "base.html" %}
load crispy_forms_tags %}
crispy form form.helper %}
block content %}
{% crispy form %}
{% endblock %}
Accounts
The web service is responsible for creating User entries in the database that are tied to both
Storage Services (APIs) and Events. Creating a user account involves a Django form, a view, and
a model. The Django form is responsible for collecting structured data from the webpage and
verifying the validity of the data and providing error information. The view is responsible for
collecting the data and transferring it to the database as well as redirecting the user to another
view upon form validation or failure.
Each Django view takes in a request parameter that contains information pertaining a users
session within the website. This request parameter contains user information. If the user is an
authentic user, a user registered on our site, they are allowed to view certain webpages not
accessible to guest users. These access permissions are enforced by both a condition in the html
that blocks certain links from appearing as well as a requirement on the corresponding views. If a
user happens to bypass the html check by typing the url they are caught by the views requirement
which redirects them to the login screen.
html
{% if user.is_authenticated %}
views.py
@login_required(login_url='/login/')
Data is frequently passed from one view to another using this request parameter for use in both
the view and its corresponding webpage. The {% %} syntax used within the html is a Django
template language used to read the data in request parameters from Django views.
The account responsibility of the web service also provides functionality for logging in and out of
the web service, deactivating and reactivating their account, and changing their password.
Another major aspect of accounts is Storage Services or APIs.
There are currently two types of storage services available to users, Dropbox, and FTP. The web
service is responsible for collecting the data required for accessing the user’s storage service
account and storing it in the database. Adding a Dropbox storage requires the user to log into their
Dropbox account and give our application permission to access their account, once this is done
we use Dropbox’s API to access their access_token. We then save a new entry in the API table of
the database which stores the user, the service_name as ‘dropbox’ and the access_token. The FTP
addition is simply another Django form that requires the user to provide us with the servers
hostname, and server account information including username and password. In the forms
validation we check that the information provided can actually be used to connect to the server,
otherwise we fail the validation and require the user to input different information. We then save
a new entry in the API table with the information collected.
FTP Validation
TAMU CSCE 483 Final Report
31/64
try:
# Check that ftp connection possible
ftp = FTP(cleaned_data.get('url'))
ftp.login(cleaned_data.get('username'),cleaned_data.get('password'))
ftp.quit()
except:
raise forms.ValidationError("The FTP credentials provided are invalid.")
Events
Users who have an account on our website can create an event. The form and views are similar to
the ones discussed except the storage option of the form is auto-filled with the storage services
connected to that user’s account. After event creation the user is directed to a page which contains
a list of all their events they’ve created which each links to a more detailed event page.
Each
event
has
a
corresponding
event_view
webpage
whose
url
is
‘toss.myphotos.cc/event_view/[event_id]’. Owners of these events can access these event pages
through the ‘Events’ tab of the website. Guests can access these webpages through a form that
collects the event id and the event password. The corresponding view checks the database to see
if there is an event with the credentials provided and if there it is it redirects the user to that events
page, if there isn’t it prompts the user to input new information. If the user happens to know the
format of the urls and tries to access the web page by typing in the url manually the view for that
event page they are redirected back to the form to input the credentials. This is done by having
the view that validates form data append an ‘event_password’ variable to the request that it sends
to view that shows the event webpage. Within the event webpage view if this variable is not the
password for that event it rejects the request and redirects it back to the form. Owners of events
are able to bypass the password requirement because the view also checks if the request user is
the owner of the event.
views.py
# View to get event with event id and password
def get_event(request):
if request.method == 'POST':
form = GetEventForm(request.POST)
if form.is_valid():
event_id = form.cleaned_data['event_id']
event_password = form.cleaned_data['event_password']
try:
Event.objects.get(id = event_id, password = event_password)
request.session['event_password'] = event_password
return HttpResponseRedirect('/event_view/'+ event_id + '/') # Get
event page with photo information
except Event.DoesNotExist:
return render(request,'get_event.html', {'is_invalid': True,
'form': form})
return render(request,'get_event.html', {'form' : form})
else:
form = GetEventForm()
return render(request,'get_event.html', {'form' : form})
# View that shows the event page corresponding to id
def show_event(request, event_id):
try:
is_host = True
current_event = Event.objects.get(id = event_id)
# If user trying to access event is not the host, make sure they entered
the correct password
if request.user != current_event.host:
TAMU CSCE 483 Final Report
32/64
is_host = False
if request.session['event_password'] != current_event.password:
return HttpResponseRedirect('/get_event')
...
Photos
Each event page displays a list of the photos that are in the database that have the corresponding
event id. The table is created using a jquery plug-in called DataTable. It provides the user with a
clean looking interactable table. The photo_table is an html table that is populated with data from
the show_event view.
event_view.html
<head>
<meta http-equiv="content-type" content="text/html; charset=utf-8" />
<style type="text/css" title="currentStyle">
@import "{% static "css/photo_table.css" %}";
</style>
<script type="text/javascript" language="javascript" src="{% static
"js/jquery.js" %}"></script>
<script type="text/javascript" language="javascript" src="{% static
"js/jquery.dataTables.js" %}"></script>
<script type="text/javascript" charset="utf-8">
var oTable;
oTable = $('#photo_table').dataTable();
</script>
</head>
…
<table cellpadding="0" cellspacing="0" border="0" class="display"
id="photo_table">
<thead>
<tr>
<th>Device Id</th>
<th>Event Name</th>
<th>Photo Number</th>
<th>Time of Upload</th>
<th>Storage Type</th>
<th>Comments</th>
<th>Select</th>
</tr>
</thead>
<tbody>
{% for photo in photos %}
<tr>
<td>{{photo.device_id}}</td>
...
views.py
# View that shows the event page corresponding to id
def show_event(request, event_id):
...
return render(request,'event_view.html', {'event':current_event,
'photos':event_photos, 'is_host':is_host, 'banned_photos':
banned_photos})
If the request user is the event host then they are allowed to both ban and unban device ids, this is
done by using a form to collect the checkbox data in the html file and returning it back to the
view. The view then creates a new entry in the banned_devices table. Similarly if a user wants to
unban a device we remove it from the table. Photos from a banned_device are still displayed to
the host, with their device in red to marked banned, however these photos are not displayed to
TAMU CSCE 483 Final Report
33/64
guests. This is done by populating two different data lists in the view. The event host can see both
the event_photos and banned_photos list wheras guests can only see event_photos.
Both event hosts and event guests are able to upload photos. The form for uploading photos is
created using a jQuery plugin called File Upload by blueimp. The files are sent from the form to
the upload view by appending them to the request FILES. For each of the files a new entry in the
Photo table is created. The photo is then sent to the API abstraction layer to be added to the
storage service for that event. This is done by creating a socket to connect to the API Abstraction
layer on port number 9091. We send a JSON object over the socket that contains the event id,
sequence number, and the photo data encoded in base 64.
upload_photos.html
...
<form action="upload_photos" method="POST" enctype="multipart/form-data">
{% csrf_token %}
<div class="input-group">
<span class="input-group-btn">
<span class="btn btn-primary btn-file">
Browse… <input id="fileupload" type="file" name="files[]"
multiple>
</span>
</span>
<input type="text" class="form-control" readonly>
</span>
</div>
<br>
<button type="submit" class="btn btn-primary">
<i class="glyphicon glyphicon-upload"></i>
<span>Upload</span>
</button>
<br>
<br>
</form>
...
views.py
def upload_photos(request, event_id):
if request.method == 'POST':
# Connect to API Server
hostname = 'localhost'
api_port = 9091
api_socket = socket.socket(socket.AF_INET, socket.SOCK_STREAM)
try :
api_socket.connect((hostname, api_port))
except :
print 'Unable to connect to API Abstraction'
...
for photo in request.FILES.getlist('files[]'):
# Add photo to database
photo_name = photo.name
new_photo = Photo (
device_id = '0',
event_id = current_event,
sequence_number = current_sequence_num+1,
time = datetime.datetime.now(),
storage = current_event.storage,
comment = 'PC Upload'
)
new_photo.save()
TAMU CSCE 483 Final Report
34/64
current_sequence_num = current_sequence_num+1
# Send photo to API Abstraction to upload to storage
file_data = photo.read()
event_id = event_id
data = {'event_id': event_id,'sequence_number': current_sequence_num,
'photo': base64.b64encode(file_data)}
msg = json.dumps(data)
try:
api_socket.send(msg +'\n')
print 'Photo sent to API Abstraction'
except:
print 'Cound not send photo to API Abstraction'
try :
api_socket.send('CLOSE\n')
api_socket.close()
except :
print 'Unable to close API Abstraction socket'
return HttpResponseRedirect('/event_view/'+ event_id + '/')
return render(request,'upload_photos.html')
Both event hosts and event guests are able to download photos. They are able to select the photos
they want to download using the checkbox, or download all photos. In either case the data is sent
back to the view. For the case of selectively downloading photos the photo sequence numbers are
sent. In both cases the web service connects to the API Abstraction Layer with a socket to port
number 9092. A JSON object is sent over the socket containing the event id and a list of selected
photos, in the case of download all, the selected photos contains a list of all photos in that event.
We then wait for a message back from the API abstraction layer that contains a zip file. We
decode the zip file from base 64 and write the zip file to memory. The view then returns a
response to the user with the zip file.
views.py
def show_event(request, event_id):
...
msg_data = {'event_id': event_id, 'sequence_number': selected_photos}
msg = json.dumps(msg_data)
hostname = 'localhost'
api_port = 9092
api_socket = socket.socket(socket.AF_INET, socket.SOCK_STREAM)
try :
api_socket.connect((hostname, api_port))
try:
api_socket.send(msg +'\n')
print 'Message for all photos sent to API Abstraction'
except:
print 'Cound not send message to API Abstraction'
try:
zip_data = api_socket.makefile()
print 'Photos recieved'
zip_file =
base64.b64decode(zip_data.readline().replace('\n',''))
s = StringIO.StringIO()
s.write(zip_file)
response = HttpResponse(s.getvalue(), mimetype =
"application/x-zip-compressed")
response['Content-Disposition'] = 'attachment;
filename=TOSS_photos.zip'
print 'Closing socket'
api_socket.send('CLOSE\n')
api_socket.close()
TAMU CSCE 483 Final Report
35/64
return response
except:
print 'Exception caught'
traceback.print_exc(file=sys.stdout)
except :
print 'Unable to connect to API Abstraction'
Database Schema
Database
The database we used for the implementation of our project was a standard mysql database. We chose to
create our database in this system for standardization as well as future proofing our system. The database
is built primarily by the django/python end of the software. After the initialization of the models files the
django manage.py will build the database. The models.py is created as follows:
BEGIN MODELS.PY{
from django.db import models
from django.contrib.auth.models import User
# Stores API with user name, access API and create new ones tied to that user
class API(models.Model):
service_name = models.CharField(max_length=64)
uid = models.CharField(max_length=128, null = True)
storage_space = models.BigIntegerField()
#These fields are specifically for ftp as they require plain text auth
username = models.CharField(max_length = 256, null = True)
password = models.CharField(max_length = 256, null = True)
url = models.CharField(max_length = 256, null=True)
user = models.ForeignKey(User)
def __unicode__(self):
return u'%s %s' % (self.user.username, self.service_name)
class Event(models.Model):
id = models.CharField(max_length=32, primary_key=True)
host = models.ForeignKey(User)
start = models.DateTimeField()
TAMU CSCE 483 Final Report
36/64
end = models.DateTimeField()
storage = models.ForeignKey(API)
code = models.CharField(max_length = 32, null = True)
name = models.CharField(max_length = 128)
description = models.CharField(max_length = 256)
password = models.CharField(max_length=32)
tags = models.BooleanField()
disabled = models.BooleanField(default = False)
def __unicode__(self):
return u'%s' % (self.name)
class Banned_Devices(models.Model):
device_id = models.CharField(max_length=128)
event = models.ForeignKey(Event)
class Photo(models.Model):
device_id = models.CharField(max_length=128)
event_id = models.ForeignKey(Event)
sequence_number = models.IntegerField()
time = models.DateTimeField()
comment = models.CharField(max_length = 512, blank = True)
storage = models.ForeignKey(API)
class Tags(models.Model):
photo = models.ForeignKey(Photo)
tag = models.CharField(max_length = 512)
class Event_Emails(models.Model):
event_id = models.ForeignKey(Event)
email = models.EmailField()
}ENDMODELS.PY
If someone was to try and use this project without django, the create statements for SQL are shown below
so that they can generate the proper structure for the application.
The following statement (BEGIN to COMMIT;) builds our entire database as is used in production.
BEGIN;
CREATE TABLE `toss_api` (
`id` integer AUTO_INCREMENT NOT NULL PRIMARY KEY,
`service_name` varchar(64) NOT NULL,
`uid` varchar(128),
`storage_space` bigint NOT NULL,
`username` varchar(256),
`password` varchar(256),
`url` varchar(256),
`user_id` integer NOT NULL
)
;
ALTER TABLE `toss_api` ADD CONSTRAINT `user_id_refs_id_6f1bf5ec` FOREIGN KEY
(`user_id`) REFERENCES `auth_user` (`id`);
CREATE TABLE `toss_event` (
`id` varchar(32) NOT NULL PRIMARY KEY,
`host_id` integer NOT NULL,
`start` datetime NOT NULL,
`end` datetime NOT NULL,
`storage_id` integer NOT NULL,
`code` varchar(32),
`name` varchar(128) NOT NULL,
TAMU CSCE 483 Final Report
37/64
`description` varchar(256) NOT NULL,
`password` varchar(32) NOT NULL,
`tags` bool NOT NULL,
`disabled` bool NOT NULL
)
;
ALTER TABLE `toss_event` ADD CONSTRAINT `storage_id_refs_id_31c46367` FOREIGN KEY
(`storage_id`) REFERENCES `toss_api` (`id`);
ALTER TABLE `toss_event` ADD CONSTRAINT `host_id_refs_id_21e0dcd2` FOREIGN KEY
(`host_id`) REFERENCES `auth_user` (`id`);
CREATE TABLE `toss_banned_devices` (
`id` integer AUTO_INCREMENT NOT NULL PRIMARY KEY,
`device_id` varchar(128) NOT NULL,
`event_id` varchar(32) NOT NULL
)
;
ALTER TABLE `toss_banned_devices` ADD CONSTRAINT `event_id_refs_id_d01a63b3` FOREIGN
KEY (`event_id`) REFERENCES `toss_event` (`id`);
CREATE TABLE `toss_photo` (
`id` integer AUTO_INCREMENT NOT NULL PRIMARY KEY,
`device_id` varchar(128) NOT NULL,
`event_id_id` varchar(32) NOT NULL,
`sequence_number` integer NOT NULL,
`time` datetime NOT NULL,
`comment` varchar(512) NOT NULL,
`storage_id` integer NOT NULL
)
;
ALTER TABLE `toss_photo` ADD CONSTRAINT `storage_id_refs_id_b7ba9f6d` FOREIGN KEY
(`storage_id`) REFERENCES `toss_api` (`id`);
ALTER TABLE `toss_photo` ADD CONSTRAINT `event_id_id_refs_id_3dc33457` FOREIGN KEY
(`event_id_id`) REFERENCES `toss_event` (`id`);
CREATE TABLE `toss_tags` (
`id` integer AUTO_INCREMENT NOT NULL PRIMARY KEY,
`photo_id` integer NOT NULL,
`tag` varchar(512) NOT NULL
)
;
ALTER TABLE `toss_tags` ADD CONSTRAINT `photo_id_refs_id_68985eb2` FOREIGN KEY
(`photo_id`) REFERENCES `toss_photo` (`id`);
CREATE TABLE `toss_event_emails` (
`id` integer AUTO_INCREMENT NOT NULL PRIMARY KEY,
`event_id_id` varchar(32) NOT NULL,
`email` varchar(75) NOT NULL
)
;
ALTER TABLE `toss_event_emails` ADD CONSTRAINT `event_id_id_refs_id_388a5a18` FOREIGN
KEY (`event_id_id`) REFERENCES `toss_event` (`id`);
COMMIT;
After generating the proper sql tables in a database named toss, the application will be ready to go. The
java created to access our database is reliably written but requires this precise structure. The
django/python of course also requires the exact structure as it works on the database using model/class
object style access and even the slightest change will make it not function at all.
5
Experimental results
Much of our testing was done by hand. Unit testing was not used outside of the default Maven unit tests.
Each of the team members was responsible for testing his or her own section internally. Testing the
TAMU CSCE 483 Final Report
38/64
interactions between sections was performed by the owners of the processes. For example, testing done
between the Android and Java backend (photo service and API layer) was performed by Greg and Patrick.
Website testing was performed by Kira. During development of the website, she would view the TOSS
site, verify the feature she was developing performed as intended, and attempt to break the code with
incorrect inputs. Some of the most intense debugging sessions for the website occurred while writing the
Python socket code. The interaction between the website and the Java backend required diligent testing
and thorough examination. Throughout development of the product, team members would use the website
to create test events to verify their portions of the code. Having the entire team interacting with a ‘rollingrelease’ style of website allowed us to provide feedback to Kira continuously. We were our own betatesters. Minor cosmetic bugs (such as the ‘Sumbit’ button), functional bugs (‘Logging in takes us back to
the wrong page’), and UI changes (‘background is too dark’) were all reported by other members of the
team and diligently fixed by Kira.
Zach was in charge of the administrative tasks concerning the server as well as photo uploading via email.
During the project, he would monitor the server’s ability to handle loads and react accordingly, killing
processes that had become too memory-hungry or CPU-intensive. This ensured that our website ran
smoothly and without incident. Email testing was performed while in development, like many of the other
components of this project. Originally, the email photo-upload functionality required the user to send the
md5 event ID as the subject line. Through testing, we were able to determine that this was likely going to
be an area of trouble for the common user. Zach modified the Python email script to allow the user to
input the 6 character event code, making it much more user-friendly.
Greg hand-tested every possible combination of event settings (FTP vs Dropbox, tagging enabled or not,
etc), attempted to validate the event through the smartphone, and begin uploading pictures. Through this
method, we were able to determine that both of the storage mediums worked well throughout the event
from start to finish. Greg was also able to find and solve bugs concerning the global tagging mode and the
user interface on the phone. Using many different event configurations let us test the correctness of the
validation function contained in the Photo Service. After Greg created events with expired codes and
codes that had not yet started, we were able to discover a few bugs in the validation function. We tested
the photo-queuing ability of the Android app by taking several photos sequentially and uploading them to
the server. In the original Design Validation specification, we had mentioned putting a hundred photos
through the Android phone’s queue. We did not test the app this extensively due to time limitations, but
we saw no indication that a large queue of photos would inhibit the Android.
We did, however, test the capabilities of photo uploading between the website and API layer extensively.
The website and API layer were able to easily handle uploads of 100 pictures simultaneously, taking
roughly 31 seconds to complete the operation. A much more excessive test case of 1000 simultaneous
photo uploads was attempted, which resulted in an OSerror number 24 (Too many open files) after three
minutes of operation. A slightly more sane test of 500 simultaneous uploads was completed without
incident after 2 minutes 31 seconds. The next test was 750 simultaneous photo uploads, which completed
successfully 3 minutes 22 seconds. Timed tests on small upload/download amounts were also completed;
the results are shown below. In these tests, one photo would be uploaded, then two photos at a time, then
three...all the way up to ten photos at a time.
TAMU CSCE 483 Final Report
39/64
Upload times between the website and API layer. Each photo uploaded was an exact duplicate (the
‘Penguins.jpg’ contained in the Windows 7 Sample Pictures). Size: 760 KB
Download times recorded for the website/API layer. Again, the photos were exact duplicates
(‘Penguins.jpg’).
TAMU CSCE 483 Final Report
40/64
Previous graphs shown on one axis.
These event times were tested using FTP using the same event, known as PatsEvent, which at the end of
testing, contained 1678 photos at a total size of 1.3G. The extreme use of a single event for much of the
stress-testing between TOSS components helped to prove an additional point: our databases have no
problem with large events.
The time required for both upload and download progress linearly, as expected. The slight variations in
time are caused by network latency, and do not deviate enough from the linear pattern to strongly affect
upload or download times.
The validation function of the Photo Service was tested using the Android application and a Chrome
browser extension known as Postman. The Photo Service, as mentioned before, uses REST to receive
messages from the Android application. The REST call to validate an event code is:
http://toss.myphotos.cc:18081/validationService/1234AF
‘1234AF’ refers to the event code the user wishes to validate. The Photo Service will return a JSON string
containing information relevant to the event code.
{
"EventName":"ironflash test event 4",
"ReturnCode":100,
"TaggingEnabled":true,
"EventStartTime":1395710580000,
"EventID":"3dfb34af3e230d2d0f9440679abe188d",
"EventEndTime":1403140980000,
"EventCode":"1234AF"
}
Here are the results for testing some of the various events we have created:
Code
Start
End
Disabled?
Return Code
NOTVAL
5/10/14
5/30/14
0
200
123456
3/2/14
5/8/14
0
100
TOSSME
4/27/14
4/28/14
0
200
TAMU CSCE 483 Final Report
41/64
12345AG
4/14/14
6/4/14
1
200
EXPIRE
3/30/14
4/20/14
0
200
FTPTES
4/22/14
5/8/14
0
100
Please note that the validation service testing was performed on 4/27/14.
A return code of 100 means the event is currently valid and active. A return code of 200 is a generic
failure code. We could have split this return code into different numbers to allow for more detailed error
messages (i.e. “Can not connect to an expired event”), but for simplicity’s sake kept a single error return
code. One interesting case to notice is the ‘TOSSME’ event. Even though today is 4/27/14, the validation
function returned ‘200’. This was due to the specific time the event was set to start. The ‘TOSSME’ event
was set to start at 20:47:00 today, but the current time is 17:38:00. An event that has the ‘disabled’ flag
set to true will return 200 even if it is within valid time.
We did also have a small beta-testing group that used our program to collect photos for their event. Josh
was a main part of AggieCon 45, and was able to demo our program among some of the Con-goers. Five
users uploaded a grand total of twelve photos, which was somewhat under the expected turnout, but we
were able to get feedback on the performance of the project. Greg’s app was the most exposed to the
users, since the event was already created and this was prior to photo downloading via the website. The
only part of our product Con-goers had to interact with was the Android application. The app was
successful, with the only complaint being that somebody got the error message ‘Unfortunately, the TOSS
server is not working’. This was due to a connectivity issue in the building where AggieCon was being
held, and the Android app incorrectly informed the user that our server was down. The message was fixed
to provide the user with correct information: ‘Unable to communicate with the TOSS server’.
All in all, our product does what it promises: it converges all photos taken and sent with the
corresponding event code, and allows users to download the photos collected by the entire group. The
time constraints for events are correct. The restrictions on disabled events are correct. Banned devices are
rightfully prevented from uploading more photos. The Photo Service and API layer can handle
sufficiently large numbers of simultaneous uploads and downloads (750). Multiple storage mediums
(Dropbox and FTP) may be chosen for any given event. The website went through multiple iterations,
each one improving the usability and interface. Overall, our product is feature-complete.
TAMU CSCE 483 Final Report
42/64
Photo Service and API layer shown running in a terminal window.
6
User’s Manuals
Software Installation
The TOSS System is comprised of two components, a website and an Android application. In order to use
the TOSS website users must have a browser installed capable of supporting JavaScript. In order to use
the Android application users must have an Android device. To install the TOSS Android application
users must download and install the TOSS application, available for free from the Google Play Store:
QR Code:
https://play.google.com/store/apps/details?id=com.toss.photocaptureapp
Operation Instructions
TAMU CSCE 483 Final Report
43/64
The operation instructions following will refer to a user wishing to create a TOSS event for their hosted
event as ‘host’, and a user who is a guest of a TOSS event as a ‘guest’.
Creating an Account
Hosts must first create an account on the TOSS website (www.toss.myphotos.cc). Guests do not
have to create accounts.
TAMU CSCE 483 Final Report
44/64
Adding Storage Services
After account creation hosts will need to add a storage service for TOSS to use to store event
photos. This storage service will be responsible for storing all of the photos gathered using TOSS.
Storage services allow TOSS to operate freely by mitigating hosting and storage costs. TOSS
currently supports DropBox, and FTP.
TAMU CSCE 483 Final Report
45/64
Dropbox
o Hosts must already have a Dropbox account. Adding permissions to Dropbox
grants TOSS the ability to create folders and store photos on the Dropbox
account.
o Photos will be stored in the 'Apps/That One Special Shot/[Event Name]' directory
of the Dropbox folder.
FTP
TAMU CSCE 483 Final Report
46/64
o
o
Hosts must already have a server to connect to by FTP. Adding permissions to
FTP grants TOSS the ability to create folders and store photos using the
credentials and server provided. The provided credentials should have
permissions to read and write on the provided server.
Photos will be stored in the home directory of the server inside [Event Name].
Editing Storage Services
Only one of each storage service can be added to an account. Adding a duplicate storage service
such as DropBox will replace the previous credentials with the new ones.
Storage services can be deleted at any time however TOSS events relying on that storage service
will have their photos deleted from TOSS. Note that these photos will still remain as they were in
the storage itself, but they will no longer be accessible through the TOSS website. In addition,
the TOSS event will no longer be able to be uploaded to until a new storage is provided for that
event by editing the event.
TAMU CSCE 483 Final Report
47/64
Creating an Event
After storage service additions hosts will need to create a TOSS event to correspond with their
hosted event. An event has the following major components:
Code
o
Each TOSS event will have a unique 6 digit code chosen by the host. Hosts will
provide either this code or a QR of the code to guests. This code will be required
to access the TOSS event for uploading photos through the TOSS mobile
application.
o Event codes can be updated at any time, freeing that code’s use to any other
TOSS event.
Storage
o Each TOSS event will have a corresponding storage service in which TOSS
stores the event’s photos.
o Storage services can be updated at any time however all existing photos in that
event with that storage medium will be removed from the database.
Event ID and Password
o Each TOSS event will be auto-assigned a permanent event ID. Hosts will provide
this event ID and a password of their choosing to guests. These credentials will
be required by guests to access the TOSS event’s webpage on the TOSS website.
o Event ID and password are permanent and cannot be changed.
TAMU CSCE 483 Final Report
48/64
TAMU CSCE 483 Final Report
49/64
Viewing an Event
Hosts can view all of their created events through the Events tab of the TOSS website. The event
name links to its respective event page. The event webpage allows hosts to edit the event, ban and
unban devices, download photos, and upload photos.
TAMU CSCE 483 Final Report
50/64
Guests can view a TOSS event with the event ID and password provided to them by the host.
The event webpage allows guests to upload photos, view event photos, and download event
photos.
TAMU CSCE 483 Final Report
51/64
Editing an Event
TOSS events can be edited at any time. All of the event’s attributes can be edited except for the
event ID, and the event password, these values are permanent. Changing the event code will
change the code required by guests to upload photos to that event. Changing the event storage
will remove all existing event photos from TOSS (note that this does not remove the photos from
the storage service it only makes them inaccessible from the TOSS website), future photo uploads
TAMU CSCE 483 Final Report
52/64
will be stored on the new storage service .Changing the event tagging will change the tagging
availability for any future photo uploads.
Hosts can also ban and unban device IDs from their TOSS event. Banning a device ID will block
the corresponding Android device from uploading any photos to that particular event. Existing
photos by the banned device ID will be marked in red text meaning they will not be viewable or
downloadable by guests. Unbanning a device ID will restore that device’s upload capabilities and
also make existing photos uploaded by that device available for viewing and downloading by
guests once more. Note that device ID 0 is reserved for website uploads. Banning device ID 0
will not prevent guests from uploading photos through the website however photos uploaded this
way will not be available for guest viewing or download.
TAMU CSCE 483 Final Report
53/64
Uploading Photos to Events
TOSS events can be uploaded to through the TOSS Android application, the TOSS website, or by
email. The TOSS Android Application is available for free on the Google Play Store.
TOSS Android Application
TAMU CSCE 483 Final Report
54/64
o
The TOSS Android Application is available for free on the Google Play Store.
The application will require either a 6 digit event code, or a QR Code to be
scanned in order for TOSS to connect to a TOSS event. This code is created and
distributed to guests by the event host. An in-depth tutorial for the TOSS
application is available here or further down in this document.
TOSS Website
o TOSS events can be uploaded to through their corresponding event webpage on
the TOSS Website. Hosts and guests can upload multiple photos from their
computer. All photo extensions will be accepted however they will all be
converted to .jpg. The photos uploaded this way will have their device ID set to
0, and their comment set to ‘PC Upload’. The tagging and commenting options
are not available through website upload.
o Refer to the ‘Viewing an Event’ section of this user manual to access the event
webpage.
TAMU CSCE 483 Final Report
55/64
Email
o TOSS events can be uploaded to through email. Emails should be sent to
‘[email protected]’ with the subject line as either the TOSS event code, or
the TOSS event id. The photos requiring upload can be attached individually up
to 25 mega-bytes. Only jpg and png is supported, also no zip files will be
excepted. If you receive a reply stating ‘No image received’ either the code or id
provided is incorrect or the attachment extensions are not supported.
Downloading Photos from Events
TOSS event photos can be downloaded and viewed through the TOSS website. Clicking the
‘Download Selected Photos’ button will download all the photos selected using the checkbox
column. Hosts will be able to download both unbanned and banned device ID photos in this
fashion and Guests will only be able to download unbanned device ID photos. Clicking the
‘Download All Photos’ button will download all photos. Both hosts and guests will be able to
download only unbanned device ID photos in this fashion. In both instances the photos will be
automatically downloaded as a zip file called ‘TOSS_photos.zip’, do not deviate from this during
the process or it will cancel the download.
TAMU CSCE 483 Final Report
56/64
How to Use TOSS Android
Joining an event
Not currently joined to an event.
i.
When starting the app the first screen that appears will be the following.
ii.
iii.
iv.
Simply enter the 6 character code provided by the host
Click Submit
Optionally scan the QR code for the event instead of entering the code
TAMU CSCE 483 Final Report
57/64
Currently joined to an event
i.
From the settings screen click the menu button on the phone
ii.
iii.
From the setting select “Join a new event”
Follow steps from the section “Not currently joined to an event”
Capture Modes
Tagging mode
Tagging mode allows the user to add tags and comments to a photo before it is uploaded.
The tags can be used later when searching for the photo online. Tagging mode is a feature
that can be disabled or enabled by the host of an event so it may not always be available.
Tags may be separated by commas, spaces, or hash marks ‘#’.
TAMU CSCE 483 Final Report
58/64
Turning tagging mode on and off
i.
From the setting screen there will be a switch titled “Tag Mode” if the event has
tagging enabled
Photo Review Mode
Photo review mode can only be turned on when tagging mode is turned off. When photo
review mode is on the user is allowed to take photos continually and then review them
before uploading.
Using review mode
i.
With review mode turned on start taking photos
ii. When done taking photos click back on the phone or close the camera application
iii. All the photos that were taken will appear
iv.
Uncheck the photos that should not be uploaded
TAMU CSCE 483 Final Report
59/64
v.
Click select to upload the photos that are checked
Turning photo reviewing on and off
When tag mode is turned off the switch for review mode will appear. Switch the switch
to on to enable photo reviewing.
Instant Mode
Turning instant mode on and off
Instant mode in automatically turned on when both tagging mode and reviewing mode
are off
Photo Editing
Photos that are taken while in tagging mode and photo review mode can be edited using
the built in Aviary photo editor.
How to edit a photo
From the tag screen
Click the “Edit Photo” button underneath the thumbnail of the photo
TAMU CSCE 483 Final Report
60/64
From the review photo screen
Click the photo thumbnail
Photo edit screen
From this screen the currently edited photos can be seen. Until “Save Photo” is clicked
changes will not be saved. User can undo changes by clicking the “Undo Last Edit”
button. Clicking the “Edit Photo” will open up the Aviary photo editor with which the
photo can be edited.
TAMU CSCE 483 Final Report
61/64
When done making changes to the photo click “Done”
7
Course debriefing
Team Management Style
The team lead came up with initial task breakdowns and assigned each individual tasks to complete.
These tasks were well thought out and divided amongst members in equal distribution and with the
person’s qualifications in mind. Each person was responsible for the tasks both specifically assigned to
them as well as any side tasks that pertained to the main tasks. We kept communication open through
Google Groups and Bitbucket commit messages. Through these communication outlets we each were able
TAMU CSCE 483 Final Report
62/64
to monitor the progress of all other tasks and were able to offer help to those progressing slowly when our
own tasks were completed.
Thoughts on Repeating the Project
We would have spent more time ensuring that each team member understood the architecture of the
system above their individual components especially the communication routes between components. We
struggled with integrating our system components because some components were developed as standalone programs that required intensive integration and rewriting, and also because of coding language
barriers between components. However, despite our difficulties with integration we were able to complete
our system.
We also would have liked to have better coordination when it came to repository control and testing
framework. Confusion concerning merging, branching, and committing to the repository could
occasionally create problems. Creating a testing framework could have helped us benchmark our program
more effectively as well as verify the correctness of our functions.
Safety and Ethical Concerns
The only real ethical or safety concern was privacy. Since the photos being taken at the event were being
sent out and saved on a server both host and guest privacy could be breached. It may be possible that a
guest might not want their photo being shared. To accommodate this concern we added the option of
turning tagging on and off at an event level by the host of the event. This way the host can ensure that no
one from the event is tagged in photos. Also we assume implicit consent to appear in event photos by
guests at the event. Some other aspects that could affect privacy is the inclusion of meta-data in photos,
which we did not have time to perform stripping on, and also our tracking of device ids which is required
for device banning.
Testing the Product
Testing the product was mostly done by hand. We had little automated testing being done on any portion
of our project. It might have been good to try a more test-driven development approach, just to see if we
were missing out on anything. However, it should be mentioned that our testing-by-hand strategy was
very effective. Many bugs were found and solved using this method. Many user interface improvements
were also decided upon while hand-testing. The product works as it is intended, we were able to save time
by hand-testing, and we were able to view and use the UI on a regular basis, allowing us to consistently
improve it. We also tested TOSS during AggieCon. Although we only received 12 photos, we received a
lot of outsider feedback on the user interface as well performance.
Testing procedures for the Android application included creating every possible combination of event
settings and attempting to connect to each event to capture photos. Greg was able to verify that the
storage options worked as well as the tagging option set at the event level. He also tested attempting to
join events that had expired codes as well as codes that had not started yet. One aspect not thoroughly
tested was the ability to for the application to handle large amounts of photos being sent to the Photo
Service. Greg would have added unit testing given additional time.
Throughout developing the Web Service Kira tested each functionality she added by hand, using fake
data. She was able to find and correct a lot of using this method. The team also found a lot of userinterface issues she had missed do to familiarity. The only aspect requiring more testing would be the
upload and download of photos. Testing during development was difficult due to component
incompatibilities so testing was rushed after development as it was one of the last tasks completed. The
Web Service was developed on a separate database then the one the API Abstraction Layer was
developed on.
TAMU CSCE 483 Final Report
63/64
8
Budgets
The budget remained relatively the same as the one proposed. We required the purchase of an additional
Android Device, for development purposes as well as an android developer license for application
distribution on the Google Play Store.
Due to the software nature of our product there are no associated costs for mass production. We do
however require a virtual server to host our service which will require subscription costs as well as
possible upgrade costs. These costs can be mitigated or subsidized through donations or advertisement
placements on our website.
Product
Quantity
Cost
Virtual Server from NFOServers
6 Months
$52.45
Tomsplanner Subscription (Gant charts)
3 Months
$27.00
Android Developer License
1
$25.00
Android Device
1
$50.00
Possible Server Upgrade
Varies
Varies
Detailed Cost Breakdown
TAMU CSCE 483 Final Report
64/64