1
1
PROJECT NR.
2014 - 1
AVAILABILITY
Open
Study: Information Technology
Mailing adress: Postboks 4 St. Olavs plass, 0130 Oslo
Visiting adress: Holbergs plass, Oslo
Phone: 22 45 32 00
Fax: 22 45 32 05
MAIN PROJECT
TITLE OF THE MAIN PROJECT
Tingtun PDF checker
DATE
21.05.2014
NUMBER OF PAGES / APPENDIX
74
PROJECT PARTICIPANTS
COUNSELOR
Thomas Martin Axelsson - s180352
William Samuelsen - s177841
Kim-Andre Kristiansen – s180362
Boning Feng
EMPLOYER
CONTACT
Tingtun
Mikael Snaprud
SUMMARY
Refactoring of a user interface for an application which checks PDF
documents for barriers has been the main goal of this project. The
implementation has been developed in Django to prepare a better user
interface application which is easier to maintain. The project has also
built a module to deal with user management.
Product web site:
http://tt5.s.tingtun.no:7842/pdfchecker/
3 STIKKORD
Accessibility checker
Django
Webapplication
2
Table of content
1.0 Introduction to main project .................................................................................................................. 4
2.0 Process documentation .......................................................................................................................... 9
3.0 Product documentation ........................................................................................................................ 34
4.0 Test report ............................................................................................................................................ 65
5.0 User manual .......................................................................................................................................... 69
6.0 Sources .................................................................................................................................................. 73
3
1.0 Introduction to main project
1.0 Introduction to main project .................................................................................................................. 4
1.1 Group and counselor .......................................................................................................................... 4
1.2 Course and assignment ....................................................................................................................... 5
1.2.1 Deadlines...................................................................................................................................... 6
1.3 Employer ............................................................................................................................................. 7
1.3.1 System .......................................................................................................................................... 7
1.4 Requirement specification .................................................................................................................. 8
Before we start of presenting our project, let us quickly mention that this document is written in
English as requested by our employer. The main reason for this is that the company we have
been working with employ people from around the world, and to make this project as useful to
them as possible, it was desired that we made some additional effort on the documentation
process.
Secondly the document is written in a manner that require a certain technical knowledge to
properly understand when reading. Apart from the section “5.0 User manual”, the document is
intended for sensors of the course, and for the developers of the application we have been
working with.
1.1 Group and counselor
For this project we decided to proceed with the members from previous projects, as we know
each other well and function rather efficient as a team. Other projects have yielded fair results or
better, and considering we all have somewhat high ambitions for what we hope to achieve, it
was a rather easy decision. Within the group it has always been room for everyone to express
their opinion or come with ideas or suggestions. We also have a history of minimal conflict, and
whenever we have disagreed on something we have always been able to discuss matters in a
sophisticated and democratic way.
(Subjects we have been working together on previously are Prototyping, Practical information
technology, Human-machine interaction, Information technology services and Information
architecture. In IT services, which was the most comprehensive of these, we were exploring a
4
system applied by libraries across the country, and made extensive charts mapping all of its
functionality, collected user data through interviews and observations, and finally made
suggestions on how the system could have been improved based on what we had learned. In
Information architecture we had to browse through databases of scientific papers published by
authors worldwide, in order to solve the given problem. )
The project started with a group consisting of four members total, but after approximately two
months into the project one of our members temporarily resigned his studies for medical
reasons, and we finished the project with only three members.
Boning Feng has been our councilor for this project. He is one of the teachers at this course and
hold a degree within electronics and computer security. He has been of assistance to us
throughout the project, and has provided valuable input on different topics, and has given
feedback in regard to the documentation standard set by the course leaders. He has also
involved himself in giving feedback on the final report, and supervised the project in general.
1.2 Course and assignment
The course: “Applied computer technologies” is mainly focused on the principles behind
universal design for computer systems and web services. Here we learn how to plan for, shape,
develop and evaluate these kind of systems for people without and with certain disabilities and
for older people, to ensure these services are accessible to as many as possible. Even if there
is a lot of theory involved when learning about these concepts, the course is driven by project
work, both individually and in groups.
Furthermore the course includes both basic and optionally more advanced work with multiple
relevant programming languages like Java, PHP, HTML, SQL and a few more. There is also
quite a bit general teaching about different programming languages, even if we don’t learn each
and every one of them. Sometimes only some sample code is shown to give the general idea of
a language to understand how it differ from other, how it evolved into what it is and what it is
used for.
5
This project gives us an opportunity to use everything we have learned the past five semesters,
and extend our ability to expand our knowledge on our own. At the same time we would get
great experience with how we might end up working after ended studies.
The task given was simple enough: Contact different companies that work with some type of IT
service or development, and ask if they have a project available for students. Optionally the
course leaders provided some projects to choose from, but ideally each group would take
matters into their own hands. There is a multitude of companies of different sizes who launch
similar projects every semester, as it allows them to get in direct touch with students who are
applying for jobs as soon as they are done with their studies.
1.2.1 Deadlines
The schedule for the project was as follows:
1: Status report (25.10.2013)
The first milestone was to form a group, and to begin the process of applying to projects.
2: Project draft (06.12.2013)
At this point it was required to specify any idea or problem that would define the project. The
course leaders would then evaluate whether or not this was suited for a main project. If
approved, the group would be assigned a counselor based on what kind of assistance the group
would need.
3: Pre-project report (24.01.2014)
Here a more detailed description of the system and employer was to be handed in. Any relevant
problem was to be listed as well as how we intended to solve this. The pre-project report also
included a schedule for how far we expected to be with the project along the spring semester.
4: Main project report (27.05.2014)
Eventually the documentation describing the execution of the entire project from beginning to
end was to be turned in. The course have set a documentation standard for this report, and this
standard was the base for the structure of this document.
6
5: Presentation (10.06.2014)
At the end of the project each group was to present their project for their fellow students and
teachers.
In addition to this, each group was to make a project web site where all the documents, meeting
notes, models, project log and any other relevant written work is available online.
1.3 Employer
For our main project we have been working with Tingtun AS, a Norwegian company located in
Lillesand. It was founded in 1996, and deliver technical consultancy services in the area of
eGovernment1 and training. Currently they cooperate with a total of six people worldwide. The
services are based on an open policy, to promote participation and to deploy Open Source
Software, and open standards to develop universally designed and transparent eGovernment
services. Since 2004 Tingtun has provided research based advisory services on to Norwegian
government agencies as well as to the European Commission, and the United Nations.
Our main contact person in Tingtun has been Mikael Snaprud, who have been monitoring our
progress and provided direct or indirect feedback. We have had contact as frequent as almost
every week during the project. We have also had regular contact with one of the developers
named Anand Pillai, who work with Tingtun from India. He have provided more technical support
when this has been needed. The project was initiated with a face to face meeting with the group
and Mikael.
1.3.1 System
The system we have been working with in this project is the web-based accessibility checker
Tingtun provides. The application is designed to check either a document found on a URL or an
uploaded PDF file for barriers in regard to WCAG2. The purpose of this is to provide a tool to
control whether or not PDF documents are accessible to as many as possible, and to see if they
are within the boundaries of required universal design set by their nations laws. The application
1
2
Digital interaction between a government and citizens
Guidlines for web content accessibility
7
will list all detected barriers and explain them, allowing the users to more easily improve their
services in regard to universal design.
1.4 Requirement specification
This project have revolved around rebuilding the front-end of this system. Tingtun is generally
confident about the user interface of their web service, but there are several underlying issues
with the current solution. Firstly the process of implementing new functionality is currently rather
complicated, and one of the more important focuses for us have been to solve this. Currently
the front-end is written in PHP, and the employer have requested that the new solution should
be written in Django3. Furthermore there has been a requirement to improve the way any
information provided by the application is represented to the user. Currently the output is quite
technical, and Tingtun want to improve readability for users with lower technical competence so
they can more easily improve their services based on the feedback.
The requirement specification is a summary of all the objectives we have developed in
collaboration with our employer. These requirements was the foundation of the work we did, and
testing the final result towards these requirements determined the success of the entire project.
All the specific requirements are listed in the section 4.0 Test report, along with a breakdown of
each as well as detailed information on how these were tested, but here are a short introduction
to what we hoped to achieve in regard to our employers requests:
First and foremost we were to rebuild the user interface with Django, to make the front-end
easier to maintain and at the same time allow implementation of new functionality to require a
lot less effort. Also the code was to be written as efficient and performance-optimized as
possible, and should work equally fast or faster than the current solution. At the same time, the
application should not have any dependencies for specific platforms or browsers, and should
work regardless of client details. The system should also secure itself by controlling whether or
not a file contain malicious code, and reject any that might be harmful.
Another important requirement was the added functionality. Tingtun requested that we
implemented support for the user to check multiple PDF files or URL links at the same time by
3
Python.based development framework
8
simply adding all the relevant inputs in a list before starting the check process. At the same time
the system should verify that the same file or link is inserted multiple times, to prevent
unnecessary traffic towards the server.
It was also requested that the system support different user logins. Regular users should not be
required to sign in to use the application, but you would need to sign on to a registered user in
order to access statistics
2.0 Process documentation
2.0 Process documentation .......................................................................................................................... 9
2.1 Preparation for the project ............................................................................................................... 10
2.1.1 Working conditions .................................................................................................................... 10
2.1.2 Communication .......................................................................................................................... 11
2.1.3 Documentation .......................................................................................................................... 12
2.1.4 Backup ........................................................................................................................................ 14
2.1.5 Qualification building ................................................................................................................. 14
2.1.6 Risk analysis ............................................................................................................................... 15
2.2 Beginning of the project ................................................................................................................... 17
2.2.1 Status report .............................................................................................................................. 17
2.2.2 Project draft ............................................................................................................................... 17
2.2.3 Pre-project report ...................................................................................................................... 18
2.2.4 Requirement specification ......................................................................................................... 18
2.3 Planning............................................................................................................................................. 20
2.3.1 Activity and work plan ............................................................................................................... 20
2.3.2 System description (current solution) ....................................................................................... 21
2.3.2 System description (new solution) ............................................................................................ 24
2.4 Development process ....................................................................................................................... 26
2.4.1 Development tools..................................................................................................................... 28
2.5 Requirement specification and its role ............................................................................................. 29
2.6 Conclusion ......................................................................................................................................... 32
2.6.1 Product and future development .............................................................................................. 32
9
2.6.2 Time estimation ......................................................................................................................... 33
2.6.3 Learning outcome ...................................................................................................................... 33
The following section is a detailed description of how the project was executed from the
beginning to end. It is expected that the reader have read the section: “1.0 Introduction to main
project” before proceeding, as it contain important information about the group and the employer
as well as background and goal for the project.
2.1 Preparation for the project
In this section we will cover anything concerning how we prepared for this project, and how we
worked as a group in terms of communication, capacity building, tools and technologies.
2.1.1 Working conditions
Once the question whether to keep our former group or not was settled, we started having
regular meetings. We knew we had a big task ahead of us, and even if progress was a little slow
in the early stages we figured it would be easier to keep up with the deadlines set by the course
leaders the more we prepared.
We tried to meet at school at least once a week in the months prior to the finale of the autumn
semester. Essentially it was what we did in earlier projects, and it seemed like a good idea to
proceed with what we were familiar to and had positive experiences with. At school we had
anything we needed close at hand: A place for all members to sit together with power supply for
our laptops as well as a reliable internet connection, group rooms with whiteboard where we
could brainstorm, and the possibility to arrange meetings on rather short notice before, between
and after classes. In this period, most of the work we did was whenever the whole group was
gathered. That way everyone had all the information they needed to start the thought and work
process, and could prepare any questions they had for our first meetings with our councilor.
We have had some considerable setbacks in terms of illness within the group. The most
significant was when one of our group members had to take a break from his studies
because of medical reasons. This is further discussed in 2.1.6 Risk Analysis.
10
2.1.2 Communication
Communication within the group have not been problematic at any point. Whenever we have
started a new project, we have created a new Facebook group where we can easily arrange
meetings or distribute the work to be done. Also we have been using this page to inform the rest
of the group of anything unexpected like illness. This medium have proven to be very useful as
all of us check their Facebook on a regular basis, and get a notification whenever there is an
update on this particular project page.
Furthermore we have from time to time used the program Skype for digital conversations and
instant messages. This have been especially useful whenever we have days where no meeting
have been planned, but something came up resulting in the need of a discussion, or if
somebody have a question when working alone and are unable to progress without input from
other members. At this point, the instant message function in Skype have been more useful than
waiting for a reply on our group Facebook page.
On those few occasions where a member have been unavailable on both Facebook and Skype,
we have used regular cellular phones to reach each other.
When it comes to communication with our group councilor it has mostly been by email, but on
several occasions we have talked on the phone as well.
Communication with our employer have been rather frequent. Mikael have desired to involve
himself to quite some extent, and we have had meetings with him close to every week, or each
second week when there have been busy times for either party, during holidays or if there have
been little progress to report since last meeting. These meetings have been very useful to the
group as well as the employer, as it have been easy to discuss progress and challenges. These
meetings have mostly been by phone, but as it have required a speaker for everyone in the
group to participate at once, we started using Skype on our end at some point during the
project. Skype allows you to call cell phones for a small fee, which is still cheaper than a regular
phone call. This have also improved the quality of the conversation.
Anand have also been frequently involved, even if it have been mostly by mail. Throughout the
project we have been using Tingtuns’ own web-based platform for internal communication,
called Tingtun Box. Essentially it works as a file sharing medium similar to Dropbox, where
11
registered users gain access to certain folders and functionality. Example of this is the possibility
of starting a discussion, similar to a regular online forum. When we have had questions to
Anand in regard to coding or other technical matters, starting a discussion in the Box have been
the favored way to do this as it allows access to the topic for all relevant people, and anyone
can leave comments. Also it have been easy to come back later if a similar topic arise.
Prior to each meeting the group have set up an agenda for topics to discuss, so each party can
prepare answers or gather information. This method have been extremely useful, and have kept
each meeting as short and relevant as possible. The agendas have consisted of anything that
might have turned up since last meeting, as well as a paragraph called “closing of actions”. After
each meeting, the group have made a note summarising any topic that was brought up. This
note is divided into sections for better overview. The first section have always been “actions”,
which will cover anything the group and employer agree to set as a goal to achieve until the next
meeting.
2.1.3 Documentation
Our documentation is a result of a process that have been ongoing throughout the project. Even
if the majority of the current content have been written within the last month of the project, we
have made sure to take notes along the way so the process could be described as accurately
as possible at the end of the project.
The first thing the group did was to take a look at the documentation standard that was set by
the course leaders. The idea was to get an impression of what was to be handed in, and start
the thought process among the members on how to best reach this goal. A helpful tool here
were the older projects published by former students on the HiOA main project web site. This
gave a good impression of documentation length, structure, use of models and of the general
content. At this point the group developed an initial draft of the report. This draft did not contain
any written material at the early stages, but rather served as an overview of all the sections and
topics mentioned in the older reports. Even if it at the time was unclear whether or not a certain
topic would be relevant for the final report, it was very easy to determine at a later point when
we had more information.
12
The most important tool we have applied for documentation is Google Documents. It is a webbased document service that provide all the essential office functionality similar to that of
Microsoft Word, Excel, Powerpoint etc, and lets you download a certain file in any format and
file type you could want. What makes this service extremely useful for a project like this is the
possibility for multiple users to edit the same document simultaneously, with all changes
automatically saved and updated live for anyone who have the document open. Also it allows for
“Read only” privileges to anyone who receive a direct link to the document by one of the users.
This have been useful for sharing the document with our employer whenever we have
requested feedback on certain topics, and generally providing access so they can monitor our
progress.
Throughout the project we have kept a project log where we make a short note of anything that
have been done each time one or more group members have achieved anything that can be
defined as progress for the project as a whole. When a project stretches over a longer period it
is easy to forget details, or the order of which work is done. The purpose of this log was to have
a way to keep track of our progress which we could fall back on when we eventually committed
to the writing process, so less of the early work was forgotten.
Another helpful routine we have established have been to write meeting summary notes after
each meeting with our employer. Essentially what we did was to edit the agenda for the
meeting, from what we planned to discuss to what we actually discussed. The meeting notes
have been made in Markdown on the Tingtun Box. Markdown (.md) is a plain text formatting
syntax designed so that it can optionally be converted to HTML with a simple tool, and lets the
user create structured documents online with the use of a few symbols (# = heading, ## = subheading with underline etc). This have made it exceptionally easy to create and share these
notes with our employer, and when we have made agendas prior to a meeting, sharing it with
our employer have been as easy as sending a link to the box. He have then been able to edit
the file in any manner he have deemed necessary, whether it was to add further topics for
discussion or simply urge us to elaborate further so he can better prepare for the meeting. This
way the meeting notes have always been available to anyone at all times, and it have been
another way for us to keep track of what happened when, and the order and manner of which
things have been done.
13
2.1.4 Backup
We have taken measures to ensure that none of the work done throughout the project would get
lost. We created a Dropbox-folder at the beginning of the project, and all our work have been
stored here. Dropbox is a cloud-service that allow registered users to open a folder in their local
files, and all content of a particular Dropbox-folder will be synchronized with any other user who
have access to the same folder. The content is also available on the web on the Dropbox
website, once the user log in. This means that all members have access to all files as long as
they have been on a computer with internet available. The group have also occasionally taken
other backup independent of the Dropbox version.
The documentation have also always been available online through Google Documents. This
service automatically saves any changes made to a document, and store them on the cloud.
Also here have the group consistently taken backup locally and with Dropbox for good measure.
2.1.5 Qualification building
As agreed with the employer, the new solution would be built in the Python framework Django.
The group had no experience with either Python or Django before the project started, but as we
accepted the task, we were determined that the whole group had to learn and study both these
tools in depth.
To give us a head start, the developer working for the employer recommended that we started
off by reading and working with the official tutorial for both Python and Django. The whole group
do have experience with other programming and scripting languages such as PHP, C and Bash,
so diving into a new programming language seemed manageable at first. But as the project
progressed, we soon discovered Python is a lot bigger than we imagined. Considering this, the
group had to agree to only learn the basics of Python, to be able to use Django efficiently. We
both used video tutorials and the official Python tutorial to learn the basic.
The official Django tutorial provided us with a basic understanding of the complicated Django
spiderweb, but as we progressed, this was not nearly enough to start designing the solution.
This meant that we had to use unofficial tutorials to learn what was needed. One of the biggest
sources of information that we throughout this project is Stack Overflow4, which is a question
4
Question and answer site for professional and enthusiast programmers
14
and ask site, containing loads of relevant information about both Django and Python. We used
this actively to find relevant questions to our project, and their answers. And also asked
questions ourselves.
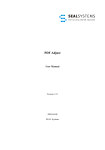
2.1.6 Risk analysis
At an early stage in the project the group discussed the possibility that something might go
wrong throughout the semester, how different events would affect the progress, how they could
be avoided or how they would be dealt with if they arose.
At this point of time we were not aware of how much we would actually use the risk analysis to
solve problems which arise. After some time, one of the group members had to resign from the
group due to health issues. We were aware that he had some problems related to his health,
but never imagined that it would lead to him leaving the group. As the group got reduced from
four to three members, the amount of the project still seemed manageable, and the remaining
group were still motivated to continue. But after a short while another member unfortunately also
experienced health issues which made it hard for him to contribute to the project in such a way
that was expected on beforehand. The effect of this lasted for several months. While this were
happening, the remaining two members experienced reduced motivation, and the project goals
seemed hard to reach. All these problems were brought up with the employer, and the group
reorganized the workload to provide more effective results.
The risk related to “Electronic crash” turned out to be relevant, as one of our group members
experienced his laptop charger gradually failing and eventually stopped working altogether. This
was a problem since the laptop itself was an older model, and the plug for the charger was a
non-standardised size and could not be replaced with a universal charger. As a result he
needed a new computer, which took about a week to fix. In the meantime he used the
computers available at school and his stationary computer at home. There was also need to
download all the relevant tools on the new laptop. Despite this, thanks to good routines for
backing up all files on Dropbox no work was lost as a result of these technical problems.
15
Figure -1 Risk Analysis
16
2.2 Beginning of the project
The project have been driven by working towards the milestones set by the course leaders, so
each group have a perspective of how far they are on their way to the final deadline. For this
purpose this section is divided into paragraphs describing the first phase of the project and each
of the initial stages in the same order we have handed in material throughout this period.
2.2.1 Status report
Our first hand-in was to be delivered October the 25th, 2013. Essentially it was a presentation of
the group for the course leaders, which also was to include information about our effort and
progress towards finding a project. At this point we had been in touch with multiple potential
employers without any yield, and we were urged to define exactly what kind of project would
interest us in case we would need assistance in our search.
For this project we did not want to limit ourselves in regard to what kind of knowledge we
already had. Even if we prefered to work within the boundaries of what we had most experience
with like system analysis and user interaction, we were prepared to make the necessary effort to
complete a project that would require knowledge of more heavy programming.
We had already decided to continue with our former group, and all our focus was set to finding a
suited project. Note that at this point in the project the group still consisted of four members.
2.2.2 Project draft
The next deadline to meet was December the 6th, 2013. At this point it was required to have
settled on a project to work with, and this hand-in focused on describing the given problem as
accurately as possible. Here we described our employer and the service they provide, as well
as the current plan for what they hoped to get out of such a project. Prior to this deadline we
had been in touch with Mikael in Tingtun AS, and he was very enthusiastic about the idea of a
project like this. He had held a similar project some time back, which turned out to be rather
useful.
Once contact with Tingtun was established, it did not take long before we had taken a more
detailed look at what the project would require, and the group mutually decided that we would
17
accept the given task. It was within the boundaries of what knowledge we had or what we
expected to be able to learn ourselves, and the overall topic was very appealing to us.
We were all eager to get a head start towards the approaching deadlines, so as soon as we had
settled with the project, we sat down and started the thought processes on how to solve it. The
main focus at this stage was to establish a proper requirement specification. Initially we had a
somewhat superficial perspective of what the project would require, so a priority was to arrange
a proper meeting with Mikael. He also was happy to start as soon as possible, and at 19th
December, which was the first opportunity we had, we met with Mikael here in Oslo at HiOA.
The objective of the meeting was to properly meet and introduce ourselves to each other, share
more information about the project and the system, discuss different ideas for the project
execution as well as starting the work on establishing a more precise requirement specification.
2.2.3 Pre-project report
Once the spring semester begun the project continued and we were already focused on our
next hand-in, which was due the 24th of January, 2014. This time around we were required to
hand in a more detailed description of the project, and present the requirement specification we
had developed with our employer. The pre-project report ended up looking much like the “1.0
Introduction to main project” in this report, although somewhat shorter.
2.2.4 Requirement specification
The three first hand-ins all resulted in a defined requirement specification, which would ensure
that the group were on the the same page as the employer in regard to what would be the goal
of the project, and what the final product would look like. Testing towards these requirements
have determined the success of the project, as discussed in the section “2.5 Requirement
specification and its role” and “4.4 Testing towards requirement specification”.
The requirements we have been working towards are:
User functionality
R.1: The end user should be able to upload PDF-documents or link to documents online
R.2: The application shall list the detected barriers found in the PDF documents
18
R.3: The application GUI5 Should follow WCAG guidelines
R.4: The application shall refer to the WCAG guidelines when presenting the detected
barriers
R.5: The user should be given a structured list of the detected barriers
R.6: The user interface of the PDF-checker should be easy to use for end users, and should
not require any training prior to interaction with the application
R.7: Administrators should be able to access statistics collected by the PDF-checker
System functionality
R.8: The system code should be written efficient and performance optimized, and the
application should be as fast or faster than the existing solution
R.9: The PDF-checker should be developed according to selected coding standards and
easy to maintain for administrators
R.10: The system should provide an authentication and access control mechanism to match
logins to specific users roles. This should include a regular user, a reporter role who can
access statistics, and an admin role, or superuser with all privileges
System properties
R.11: The system should not have any browser or platform specific dependencies, and
should work the same way regardless of client details
R.12: The system should be secure against malicious PDF files uploaded by the user, and
should reject these if they contain exploits or any code that can harm the system
New functionality
R.13: The user should be able to upload multiple PDF files and check these
simultaneously, where a single test run will return test results for each selected file
R.14: The system should prevent the user from uploading the same document multiple
times during the same check to prevent unnecessary traffic to the server
R.15: The user should be able to insert multiple URLs and check these simultaneously
R.16: The user interface should support multiple languages
R.17: The application should support accessibility tools such as screen readers
5
Interface where user interact with electronic devices through graphical icons and visual indicators
19
R.18: The application should provide suggestions on how to remove any detected barriers
Additional
R.19: Continuous use of the application should trigger a mechanism where the system
informs the user about how they can contribute to further development through donations or
payed services
2.3 Planning
Once the pre-project report was delivered, the next phase of the project commenced. This
phase was crucial in regard to how efficient we were able to progress once development and
documentation started.
The main issue with our planning was, as mentioned in “2.1.1 Working conditions” (last
paragraph), the loss of one group member. The whole planning phase revolved around the fact
that we had the resources of four people, similar to all our former projects. We were well aware
that our last member had some notable health issues, and even if we did take this into
consideration, we made plans as if the group would continue as a whole. When he eventually
announced that he would be unable to complete the project with us, we proceeded with the
original plan.
2.3.1 Activity and work plan
To plan the process properly, the group made a activity and a work plan. The activity plan
described all the different tasks the group planned to in detail, and also which members of the
group who were in charge of these. This made it possible for us to set realistic goals and
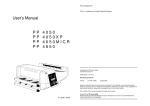
progress with work each week. We also visualized the activities in a work plan spreadsheet
(Figure 2-1.) which contains all the different phases of the project, and their connected activities.
By showing the deadlines of the activities and also how many weeks we had to finish each one
of them, it made it easy for us to plan ahead and keep to the schedule.
After two months into the project, we still kept our pace aligned with the work plan. But when
one of the group members left, we had to reassign and reorganize all the tasks. At first it
seemed manageable to keep going with the original work plan, but four months into the project
we were two weeks behind schedule. We still kept going though, and did hope that we could
20
catch up with the plan, but after a couple of more weeks we understood that we fell quite a
length behind the original plan. In collaboration with the employer we decided that measures
had to be taken, and agreed to cut several requirements. As originally planned we would finish
all documentation at the 20th of May, which would give us a couple of more days to reassure
the report were complete. But in the start of May we were told the report had to be delivered the
21th to be able to print it properly. This meant that we had to pick up the pace again.
Figure -1. Spreadsheet based on the work activity plan.
2.3.2 System description (current solution)
Our first objective was to analyse and properly describe the system. The goal here was to
develop a low-fidelity prototype to easier illustrate what we intended to change, and to get there
we needed an overview of the design and the relevant functionality. As mentioned earlier
Tingtun wanted the current design to remain more or less intact as they are happy with the way
things appear now, so what we did was to break the user interface down to the individual
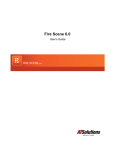
components. Here is a screenshot of the PDF checker before any tests start:
21
Figure 2-2. A screenshot of the current PDF-checker solution.
This is the first step of the process of checking a PDF file. It provides the option to either upload
a PDF from your local files, or link to a file that exists online. The page checker appear just like
this one, except there is only one input field for a URL. The menu on the left side of the screen
is fixed, meaning it is displayed regardless of where in the checking process the user is. This
means that it is very easy to switch between the different types of tests, as well as running
consecutive tests after the first. The “Check” button will start the process of checking the PDF or
URL, depending on selected test.
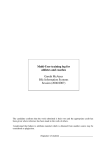
Next is a screenshot showing the result of a PDF check in the old version:
22
Figure 2-3. Screenshot of the PDF-checker result page
The top half of the result page consist the same menu as the previous step, and a summary of
which tests were conducted, the ratio of which they failed or passed and a total number of
detected barriers. Here are also three buttons that leave the user with options for either printing
the result, export the result as CSV which will produce a file with comma separated values, or
linking to this specific test result with a generated URL.
To more accurately describe the actual process behind this, we made a sequence diagram to
show exactly what happens where, without being too technical. This diagram show how the
system handle a PDF file a user upload from their local files:
23
Figure 2-4. Sequence diagram of the PDF-checker
2.3.2 System description (new solution)
As soon as we considered our understanding of the existing solution to be adequate, we started
discussing how we would improve it in regard to the current design and functionality as well as
the requirement specification we developed in collaboration with our employer.
First of all we started looking at the requirement where we were supposed to add the support of
checking multiple PDF files or URLs simultaneously. Since Tingtun desired to keep the existing
design as much as possible, we needed to find a discrete solution to add this feature. After a
session with brainstorming we settled on a solution we felt would meet the criterias. To illustrate
how we intended to approach this we developed a series of wireframes. This type of model
would act as the low-fidelity prototype we needed to progress. The model itself would not cover
design features such as colors, fonts etc, but rather represent the functionality the user is
presented with, and how buttons, input fields and other functions the user can use to interact
with the application. The model would also give an impression of how they are positioned
relative to each other. This wireframe is based on the PDF checker:
24
Figure 2-5. Wireframe based on the PDF-checker
The basic idea was that the user is presented with an interface very similar to the current
solution as shown in figure 2-2, with only a single input field each for upload or URI. Then when
the user have inserted the first link or file, a button will appear with the functionality to add more
input fields or add more files to the list. Originally we set the maximum input fields to be 5, as it
would be most design friendly, and at the same time not make too much of an impact on the
server traffic. To be clear: The boxes with stapled lines in the model as well as the gray buttons
(“Upload more files” and “Add +”) are not displayed to the user by default. They only appear
when certain requirements are met. The reason for this is first and foremost that this will keep
the user interface as clean and user friendly as possible, while at the same time preserving the
design of the current solution so users who are familiar with the application will encounter
minimal changes.
25
Figure 2-6. Wireframe representing the result page of the PDF-checker
The next wireframe represent how we intended to handle the result when the user check
multiple PDF files or URIs at the same time. Essentially the model is based on figure 2-3, which
describe the result of a single checked file. The main difference is that the user is presented with
a list of all files checked, shown in the upper right corner of the screen. The user can then easily
toggle between the different results by selecting files from this list.
2.4 Development process
Once the planning process came to an end we started looking at the code for the existing
solution, to get a better understanding of what we could use and what we needed to develop.
The first objective was to get a basic structure similar to the existing solution. Since Tingtun was
satisfied with the current design, we were able to extract most of the former HTML and CSS and
reuse it in the new solution. The first step was to implement the static structure in a HTML file.
Then we had to figure out how to display the fields which would take the input containing either
a URL to a PDF-file or uploading it locally.
26
After some time, we were able to display both the required fields, and also found a solution to
handling input from more than one field at a time. As this section of the development
progressed, we decided to focus on how we should make it possible for the user to add more
fields at will. When discussing this in the group and researching for a solution to the problem,
we agreed that the easiest way to do this was by using Javascript code because there already
existed solutions for this, that we could redefine to fit in with our forms.
As the group have limited experience with Javascript, we did not want to use anymore time on
this than needed. This solution were based on a Javascript jQuery function which clones the
fields by clicking on a button. When presenting this to employer, he seemed happy with the
solution and suggested making some minor changes to the HTML and CSS code in such a way
that the cloned fields had a structure which is satisfactory to universal design. This part of the
project were one of the most time consuming problems we faced, and in the end we ended up
not using this at all because we would rather prioritize the main functionality. But even though, it
is still possible to use this in the future to make the current solution even better.
When we decided that the process of displaying the fields were adequately, we continued on to
figure out how to handle the files that were uploaded through the file upload field. The first issue
to this problem, were where the files should be stored. We did not care for the problem
regarding sending the files to the backend to retrieve the results just yet, but rather saving it to a
predefined folder. We discovered that the best option for this was the built-in function Django
provides. When this was accomplished, we continued on with handling the file and URL input
extracted from the fields. To ensure that both of these fields only contain valid data, we used a
Django function which covers this. At this point we did not know how we should proceed by
connecting to the backend and sending the input from the fields, so as agreed we asked the
developer working for the employer about this, and he promised to be back with us shortly.
As we waited for the guide to this, we started working with the user registration and login site.
Now that we were already comfortable working with fields, it was quite easy for us to set up a
registration site containing predefined fields, such as username and password. These were also
added as models to ensure that all the data would be saved to the database properly. When
handling this data, we first assured that the code checked in the data input in the fields were
valid and then saved it. At the same time the password gets hashed properly to ensure that the
security is satisfying.
27
The login function was straightforward, and was easy to produce. Basically it justs checks the
input password and username, and if the login is successful, saves the user information in a
session so this can be used later on in any applications inside the project.
Simultaneously as we got an introduction on how to connect to the server backend and send a
URL to the uploaded file, and retrieve the tests made to the document, we started working on a
cookie function which would provide regular users with information regarding a donation request
to the company. By using the included Django cookie functions, we were able to create a
function with a cookie which counts each visits to the site.. And then, after a defined number of
visits, shows donate information or some other message.
When receiving the guide containing information about how to connect to the server and retrieve
results from singular tests, we started the work with sorting all the tests out.
2.4.1 Development tools
Several tools have been used to develop the application and interact with the servers. In this
chapter we describe them briefly .
To interact with the server set up by the employer, we have both used Putty and WinSCP. As
Putty is a command tool with a way to easy connect to servers, we used this to issue a various
set of commands related to Python and Django. While WinSCP were used to visualize the filetree and also give us an easy way to edit files.
When programming, the members of the group have used different text editors after own
preferences. Everyone made sure the different text editors provided proper spacing and soft
tabbing, and also gave response to certain syntax error. Considering how sensitive Python is,
this was important to prevent errors in the code.
VirtualEnv is a virtual environment package, designed for Django. This makes it possible to work
on several Django projects without worrying about affecting other projects. Even though there
28
was only one project throughout this project, for future work around this application, VirtualEnv
can be an important tool.
In addition to the implemented debug tool Django provides, which is described in the 4.1.2
section in the test report, we have also used a Python debugging tool called ‘pdb’. This tool was
used in the cmd windows to test seperate files, and proved very helpful when creating the
server.py file which is described in detail in the 3.7 section of the product report .
2.5 Requirement specification and its role
The success of the project have been determined by looking at the requirement specification to
see which objectives are completed and which remains after the final deadline. As described
earlier the project encountered several setbacks along the way, and the consequences of this is
clearly indicated here. Note that even if a requirement was not met, there was put a lot of effort
into trying to meet it, and much of this work is done in a way to enable future development.
#
Description
Completed Comment
R.1
The end user should be able to Yes
upload PDF-documents or link to
documents online
The application is able to receive,
temporarily store and then send a
PDF file to the server
R.2
The application shall list the
detected barriers found in the
PDF documents
Partially
R.3
The user interface of the
Yes
We were able to list some of the
detected barriers found in the PDF
documents. The problem was to
collect the test results of all the
applied tests. The application did
receive some information so there
were some level of success here, but
eventually we ran out of time and
were unable to complete this section
in time before the report were sent in
for printing. To be able to complete
this requirement later on, it is mostly
copy pasting code we have already
made to display all detected barriers,
and at the point that this report is
read the application may be
completed
The user interface of the application
29
R.4
R.5
application should follow WCAG
guidelines
The application shall refer to the Partially
WCAG guidelines when
presenting the detected barriers
The user should be given a
structured list of the detected
barriers
The user interface of the PDFchecker should be easy to use
for end users, and should not
require any training prior to
interaction with the application
R.7 Administrators should be able to
access statistics collected by the
PDF-checker
R.8 The system code should be
written efficient and performance
optimized, and the application
should be as fast or faster than
the existing solution.
R.9 The PDF-checker should be
developed according to selected
coding standards and easy to
maintain for administrators
R.10 The system should provide an
authentication and access
control mechanism to match
logins to specific users roles.
This should include a regular
user, a reporter role who can
access statistics, and an admin
role, or superuser with all
privileges
R.11 The system should not have any
browser or platform specific
dependencies, and should work
the same way regardless of
R.6
Partially
Yes
meets the WCAG guidlines
There was some difficulties in listing
the server output from a test, even if
the application received the
information from some of the tests.
But in the end we were able to refer
to one of the WCAG guidelines. As
stated in R.2, this may be finished by
the time this report is read as the
code surrounding this problem is
mostly done
This requirement is also related to
R.2, and at this point there is only
one barrier listed. But as stated
earlier this may also be finished
when this report is read
As we have followed mostly the
same design found in the current
solution, the user interface should be
easy to use
No
Discussed in further development
Yes
See test documentation for more
information
Yes
The code contains comments and
follow both Python and Django
guidelines
Yes
Except for statistics discussed in R.7
Yes
See test documentation for more
information
30
client details
R.12 The system should be secure
No
against malicious PDF files
uploaded by the user, and should
reject these if they contain
exploits or any code that can
harm the system
R.13 The user should be able to
No
upload multiple PDF files and
check these simultaneously,
where a single test run will return
test results for each selected file
R.14 The system should prevent the No
user from uploading the same
document multiple times during
the same check to prevent
unnecessary traffic to the server.
R.15 The user should be able to insert No
multiple URLs and check these
simultaneously
R.16 The user interface should
No
support multiple languages
R.17 The application should support Yes
accessibility tools such as screen
readers
R.18 The application should provide No
suggestions on how to remove
any detected barriers
R.19 Continuous use of the
Yes
application should trigger a
mechanism where the system
informs the user about how they
can contribute to further
development through donations
or payed services
Requirement have been left out in
collaboration with the employer, as
we did not have time to focus on this
As time became an issue this was
one of the requirements we had to
leave out. Even if we had planned a
solution for design, how to handle
the information and started coding it,
we realized how much it would
require to complete this, and decided
along with our employer that our time
was better spent elsewhere. We still
used a lot of time on this
requirement, and the outcome of this
have been discussed in further
development in the product
documentation
As R.13 was left out, this
automatically followed as it was no
longer relevant
This requirement was also left out for
the same reason as R.13.
One of the requirements we only
were to focus on if we had any
leftover time
Reached as far as we came with the
applications
Another one of the requirements we
only were to focus on if we had any
leftover time
Function explained properly in
product documentation
31
In retrospect it is clear that the group and the employer had too high ambitions for what they
hoped to achieve with this project, and in result there are multiple requirements that could
not be met as there was not enough time to complete them all. Even if some of the
requirements only are considered “nice-to-have”-features, the group did spend a lot of time
and effort in trying to complete them. What could have been done differently would have
been settle with fewer requirements, but also to dismiss unrealistic requirements at an even
earlier stage of the project. The group also underestimated the time required to fulfill some
of these, which led to some notable delay in regard to the original work plan.
2.6 Conclusion
As the project came to an end and most of the work was done, it was time to look back at
the semester and evaluate the execution of the project. There were a multitude of things
that went wrong or could have been done differently, but overall we were happy with our
own performance all things in consideration. The loss of a group member and health issues
in the group were the greatest challenge to overcome, as our overall work capacity got
reduced. The project we had accepted was already of considerable size, even for four
members.
Tingtun was also satisfied with the project outcome. Even if there were several unmet
requirements, much of the foundational work have been done to complete these. It was a
matter of making the best out of a situation that made the project considerably harder to
complete.
Throughout the project the group and the employer have been in close contact, and Tingtun
have provided valuable input along the way and have gladly shared their knowledge and
experience, to help the group in the right direction when they have struggled.
2.6.1 Product and future development
We have managed to develop a user interface to present checks of PDF-files, but do not
display all the results in regard to passed and failed tests found in the PDF-files. Even
though, we have come so far that it is quite easy to finish this, and the group will try to have
it done at the end of the project so the employer may benefit from this. We do wish we have
finished this in time for the deadline, so we could have displayed a fully working application.
32
We have also managed to make a user interface with registers users based on input
information, and provide a login function which can be used in further development. Users
can also be managed in the Django admin interface.
The application we developed met many of the requirements we set for it, even if time got a
little short at the end of the project. At the same most of the requirements that remain have
been met in some degree, and in regard to future development it will require a lot less effort
to complete these. We have also made sure that the code is commented and easy to
maintain for administrators.
2.6.2 Time estimation
When estimating the time for the different activities, the group did not leave a lot of room for
mistakes. The result of this, was that the group fell behind on all of the activities when
certain mishappens occurred. To try to catch up, the tasks were reorganized and the work
plan was revised. Looking back on how the project phases were planned, the work
regarding learning Python and Django should have been started earlier. Both the framework
and programming language did require a lot more work than we estimated early on,
considering we had no experience with either before the project started. The requirements
should also have been revised earlier, when our group capacity fell considerably.
2.6.3 Learning outcome
The learning outcome of the project were considerable for all members of the group.
Learning new technologies like Python and Django will surely be useful in the future, and
gave us more experience towards solving difficult problems by using a series of different
tools.
By encountering challenges which had an impact on the process, trying to solve this by
reorganizing tasks, gave us more experience towards analysing situations and discussing
solutions which would have a positive impact on the project.
33
The group has, as mentioned, worked on several projects earlier, but not on a scale like this
one. By introducing more elements, the teamwork improved regarding analysing and
problem solving.
The fact that it was requested to write the project report in English was not a problem for the
group, as we consider our knowledge of the language to be average or better. It have taken
some extra time to write the report, but overall we are confident in the general language.
We have also learned a lot along the way in regard to vocabulary, both general and more
technical terminology.
The group have also discovered the value of our frequent creation of meeting notes as well
as the project diary, which have helped us a lot to keep track of everything that have been
done, when and in what order. Without these the main report would most likely contain less
details of the early stages of the project.
3.0 Product documentation
3.0 Product documentation ........................................................................................................................ 34
3.1 Preface .............................................................................................................................................. 35
3.2 Tools, technologies and framework.................................................................................................. 35
3.2.1 Python ............................................................................................................................................ 36
3.2.2 Django ............................................................................................................................................ 36
3.3 Architecture ...................................................................................................................................... 38
3.4 Database ........................................................................................................................................... 38
3.5 Front-end/Back-end .......................................................................................................................... 41
3.5.1 The SOAPpy call (server.py) ........................................................................................................... 41
3.6 Graphical user interface (GUI) .......................................................................................................... 45
3.6.1 Templates....................................................................................................................................... 45
3.6.2 Static files ....................................................................................................................................... 48
3.6.3 Urls ................................................................................................................................................. 49
34
3.6.4 Views .............................................................................................................................................. 50
3.6.5 The PDF Checker ............................................................................................................................ 50
3.6.5.1 Forms ...................................................................................................................................... 50
3.6.5.2 View and template .................................................................................................................. 51
3.6.6 Authentication ............................................................................................................................... 56
3.6.6.1 Forms ...................................................................................................................................... 56
3.6.6.2 View and template .................................................................................................................. 57
3.7 Users ................................................................................................................................................. 61
3.7.1 Handle users through the admin interface ................................................................................ 61
3.7.2 Further development with users ................................................................................................... 63
3.7.3 Further Development with the PDF-checker ................................................................................. 64
3.1 Preface
This part of the report describes the product in detail. What it does, how it works and how it can
be maintained by future developers.
To be able to understand this document, a basic understanding of IT is required. As Python and
Django are both advanced programming tools, the reader should also have experience with
coding, so that it is possible to understand each section of this document in depth. The second
section describes Django in detail, and is aimed at readers who have little or no experience with
this framework at all. Even though some technical knowledge is required, we have still aimed to
make this document as easy to understand as possible.
3.2 Tools, technologies and framework
Several languages and tools have been used to develop this application. In the next sections all
tools used will be described, to give the reader an idea of how they work and interact with each
other.
35
3.2.1 Python
The high-level programming language Python have been used, in collaboration with Django, to
handle the database, presenting different templates, presenting fields in templates and
connecting to the server to retrieve results. This language let us express concepts in fewer lines
than most other programming languages, which makes for an easy to understand application
and also one which is easy to maintain. At this point both Python 2.7.6 and Python 3.4 are both
eligible versions, but we have chosen to work with Python 2.7.6, considering Python 3.4 still lack
some functionality and is not as stable as Python 2.7.6.
3.2.2 Django
Django is a high level Python web framework. This framework offers several built-in functions
which makes for rapid web development and a nice and clean set up. When the developers
interact with Python and Django, commands are called in cmd, powershell (Windows) or
terminal (Linux). These commands create Django projects, and applications inside the projects.
Commands are also used for instructing Django to initiate its lightweight development server.
Doing this makes it possible to visualize the application and debug it with Djangos built-in debug
function (figur1).
Figure -1. Command line example of running the Django server
36
When creating a Django project and an application, several python files are generated. Some
of these have a preset range of functionality (figur2).
Figure 3-2. An example of the files generated in a Django project.
The settings.py file is one of the most important files in a Django project. It is global for the
project and all added applications. This file contains information about host/domain names, path
to storage of files, included applications, and middleware. The administrator can edit this file in
accordance to the Django documentation. The documentation describes the usage of each
section in detail. The ORM (Object-relational mapping) and the Admin interface are popular and
effective tools provided by Django. The ORM offers powerful database management, and also
supports several databases as MySQL, PostgreSQL, Oracle and SQLite. The Admin interface
provides the user with database management.
At this point of time, Django version 1.7 is in a development phase, and the group have
therefore chosen to work with Django version 1.6.1. If the administrator at a later point wishes to
37
transfer over to Django version 1.7 when this is deployed, keep in mind to read the changelog
thoroughly to avoid errors in the application.
A simplified example of a Django request made by a user is shown in figure 3-3.
Figure 3-3. An example of a Django request
The most central files of an application is shown, and also their relations to each other.
Throughout this documentation, we will explain all files and their content in detail. If the structure
of files is confusing, please feel free to backtrack to the figures showing the mapping of the files.
3.3 Architecture
In the Django project consists of two applications, “pdfchecker” and “authentication”. The
“pdfchecker” naturally consists of the interface handling the registration of the PDF-files through
a URL and a fileupload field, and “authentication” consists of registering personal information to
the database and login interfaces for the users.
3.4 Database
The group has in accordance with the employer chosen SQLite as the database in this
development process. As SQLite already is the default choice in Django, there was no point
38
choosing a different type. SQLite is also already included in Python, so there was no need to
install this manually. If there is a need for changing the current database to something else, this
is possible through changing the “Database” section in the settings.py file. It is also possible to
include multiple databases if needed. If these databases are external, the username and
password for these must be included, and also migrate them through the command line using
cmd or terminal. More info about this can be found in the “Multiple Databases”-section in the
Django documentation6. The models.py file is used for creating database tables and fields in
Django through user requests. Each class represents a table, and the content inside these
represents the fields. It is also possible to add tables manually and fields manually, either
through the CMD/Terminal windows, or through the admin interface. After making changes to
the database by deleting or adding new tables, the ‘python manage.py syncdb’ command
needs to be run to update the database properly. There is one major drawback regarding
databases in Django. After creating a table with fields, it is not possible to add more fields to the
table without deleting the table and then adding it again. To solve this issue, it is possible to use
several tools not included in Django, such as south but we have not explored this any further in
this project.
Regarding requirement R.14, which asks for a function that supports multiple file upload, and
also a list displaying the field names, storing the field names in a database was required. To
solve this problem, a class was made in the models.py file containing a field which stores the
path of the file. When either saving images or files through Django, the ‘MEDIA_ROOT’ and
‘MEDIA_URL’ in the settings file determines where to store them. And this is also defined in this
Django project, as shown in figure 3-4.
Figure 3-4. ‘MEDIA_ROOT’ and ‘MEDIA_URL’ which defines the location of stored files
But to be able to use the path of the file names in other sections of the application, these need
to be stored in the database, and therefore a table with this field had to be created.
6
https://docs.djangoproject.com/en/dev/topics/db/multi-db/
39
Figure 3-5. The models.py file in the application ‘pdfchecker’
The table that is created by the class, is called ‘handle_UploadPdf’ and only contain one field to
store the path of the saved PDF file. In line 4, an attribute which determines an additional path
to where the file should be stored. The path defined will not overwrite the path in the
‘MEDIA_ROOT’ but be an addition to this. As of now, the additional path is not defined, but the
thought behind it, is that the administrator can use this to define unique paths based on the time
and date they were uploaded. This way it could be easier to maintain an archive of the stored
files. Unfortunately, as we were never able to complete R.14, this file is not included in our
current function which handles the uploaded files. But we still decided to keep the content, for
further development.
To be able to satisfy requirement number R.10, which asks for a set of user roles, we decided to
create a separate application to deal with these. This application, called “authentication” is split
into two views, “registration” and “login”. Both of these interact with the database in different
ways.
First of all, the user must be able to register to the application with sufficient personal info. The
administrator of the application will then have an overview over who is currently using the
interface. Django provides a User object which consists of several attributes. The default
attributes are the following:
username
password
email
first_name
last_name
These attributes will be accurate considering user information, and have therefore been
implemented in both the models.py and forms.py file.
40
Figure 3-6. The models.py file in the application ‘authentication-
The figure above displays the main content of the models.py file. First, the User object is
imported from the implemented Django authentication models. Then, a class is made containing
a user model which is linked in a one to one relationship to the User object. A one to one
relationship will ensure that minor problems will occur when various applications are used in the
future.
3.5 Front-end/Back-end
The back-end in the Tingtun PDF Checker is running a SOAP service on a Tingtun server. The
communication between the back-end and the front-end is done with “SOAPpy”, a Python
package that provides tools for building SOAP servers and clients. In the front-end a SOAPpy
call with the url of the pdf file is sent to the server. If the url is valid, the server returns results in
a string which is a representation of a Python dictionary. The task for the front-end will then be
to parse and present the results. The current solution is using PHP/Apache, and the new
solution is using Django/Python to perform this task.
3.5.1 The SOAPpy call (server.py)
A typical interaction of a SOAPpy call is displayed in figure 3-7.
Figure 3-7. A typical interaction of a SOAPpy call
The SOAPpy call begins with SOAPpy being imported, and the server defined with the Tingtun
server as first parameter. The result variable includes the url of the pdf document, the url of
tingtun and the client ip.
41
Figure 3-8. Converting the SOAP result into a Python dictionary
The next step is to convert the SOAP result into a Python dictionary. This is done with
“result._asdict()”. ‘header’, ‘validok’, ‘downloadok’, ‘result’ are the main keys in the dictionary.
The keys ‘validok’ and ‘downloadok’ indicates if the pdf document is validated and downloaded
successfully. No error will be returned if the value of these keys are 1 (True). The value 0
(False), on the other hand will return an error. The actual result is located in the key ‘result’, and
will be the key used to present the result.
Figure 3-9. Creating another dictionary containing applied tests.
The line on 11 in figure 3-9, creates another dictionary with the main key ‘result’. The keys of the
“res” dictionary are tests applieded by the PDF checker.It contains the actual test results as well
as a mix of meta data. The keys that start with EGOVMON.PDF and WCAG.PDF are the test ids
that are important, they containt the result. The “filterkeys” loops through the dictionary and
filters out the keys that start with these strings.
Figure 3-10. The structure of each test is displayed in this figure.
42
The structure of each test is displayed in figure 3-10. It returns a SOAPpy array that contains a
dictionary with the result. The key to notice is the ‘result’ on line 21. If the value is 0 the test is a
PASS. If the value is 1 the test represents a FAIL.
Figure 3-11. A loop that adds variables failed and passed to the values of res[k][i][‘result].
To receive all the tests that have failed and passed, a loop is defined. The variables failed and
passed will then be added accordingly to the values of res[k][i][‘result]’. Because the tests can
have more than one position (for instance, a test can have res[k][0][‘result], and
res[k][1][‘result’]), a while loop needs to be implemented. The while loop loops through all of the
positions existing in a test.
Figure 3-12. Total applied tests.
The total applied tests. Just a simple addition of passed and failed.
43
Figure 3-13. An if statement which is created for each test.
In order to represent each test with the current result, an if statement is created for each test.
Because a test can have both failed and passed tests, two dictionary containers are defined on
line 39 and 40 (these will be used later). On line 45 a dictionary for the test WCAG.PDF.01 is
created. On line 55 the dictionary is updated with values such as description, id, and number of
failed and passed tests. These values will be used in order to display the details of the result.
The last segment of the code is to see if there were any failed tests. If there were
(failed_WCAG01 is greater than 0), copy the dictionary for the test WCAG.PDF.01 to the list
dictionary_failed. If not, copy it to the dictionary_passed.
44
Figure 3-14. All the data contained are returned in a list to the view in Django.
Last but not least, if the key ‘result’ exists, and there were tests conducted. All of the variables,
dictionaries and dictionary containers are returned in a list to the view in Django. If not, the
returned value is a string named ‘passed’.
3.6 Graphical user interface (GUI)
As the employer is already satisfied with the current design on their solution, changes were
limited and only implemented in collaboration with the employer.
3.6.1 Templates
In the Django settings.py file, it is required to add the path to the folder containing the templates
for each application. In figure 3-15 on line 14, the path used for the template folder is displayed.
Figure 3-15. Path to the folder containing the templates.
The “pdfchecker” application have three templates: base, index and results. The base template
consists of the static structure obtained from the current application. The static structure would
include the menu, header, footer, and the sub menu (figure 3-16).
45
Figure 3-16. Base template HTML output.
The base template is created with a content block. Django provides this with “{% block content
%} and “{% endblock %}”.
Figure 3-17. Base template is created with the content block.
Child templates can then easily extend the base template, and input the content in the block.
46
Figure 3-18. Extending child templates.
This django function gives administrators an easy method to implement other child templates
without having to duplicate code. The “pdfchecker” application features this method by
extending the base template, and in a child template presenting the URL and fileupload fields in
the content block. To use the base template, the method in Django is created in the child
template (figure 3-18). In the “pdfchecker” application the method would be called as such:
{%extends 'pdfchecker/base.html' %}, and then again add the “{% block content %} and “{%
endblock %}” with the desired code between these commands.
This method is also used in the authentication templates, however the base template is edited,
and the submenu removed. This basically means that the only thing displayed in the base
template is the header, footer, menu and the content block.
47
Figure 3-19. Base template of the application ‘authentication’
3.6.2 Static files
To handle the static files, such as media and CSS files, django offers a path to these, which is
configured in the settings.py file. All according images and CSS files in the Django project is
located in the “static” folder.
Figure 3-20. Path to the folder of the static files.
To be able to call these files in a HTML template, python is needed. First of all, the static files
need to be loaded at the top of the base HTML template, as shown in figure 3-20. After this, all
the different static files need to be properly called from the right location, this includes all
pictures and files. An example is shown in figure 3-21.
48
Figure 3-21. Loading the static files in a template.
3.6.3 Urls
There are several urls.py files, one for each Django project, and one for each application. The
urls.py file in the Django project (figure 3-22) displays all URL paths, and their respective
connections.
Figure 3-22. Urls.py file of the project.
To get an understanding of how the views are connected to the urls, the ‘pdfchecker’ urls.py file
will be used as an example (figure 3-22)
Figure 3-23. Urls.py file of the application ‘pdfchecker’
The url lines are built up by several attributes. At line 8, the first thing to notice is the “r’^$’”. This
49
determines the path. If it only contains a ‘$’, it will be the index template for the ‘pdfchecker’. The
next attribute in the line, is the view function the path is connected to. In this case, it is the
function ‘upload’, which is described later in this section. All paths also have a name attribute.
This is used for keeping each defined url unique, to prevent any problems if the same view is
used in different urls.
So the path of the shown url is as following:
pdfchecker = /pdfchecker/
3.6.4 Views
A view in Django is a Python function that take a web request and return a web respons. The
view is basically the core of the application, and everything connected to handling and
displaying forms, templates and messages are handled here. The web respons can be html,
image, lists, dictionaries or almost anything.
3.6.5 The PDF Checker
3.6.5.1 Forms
Both requirement R.1 and R.14 which states that there should be possible to upload PDF files
through URL’s and local file locations, naturally requires two fields which makes these
operations possible. To be able to display these fields in the ‘pdfchecker’ template, they need to
be determined in the forms.py file located in the ‘pdfchecker’ application (figure 3-24).
Figure 3-24. Forms.py file of the application ‘pdfchecker’.
As both of these fields need to be handled separately, two form objects are created. The
‘UploadPdf’ object, contains a file field set in a variable called ‘docfile’. This field has one defined
attribute, called label. Which naturally displays the label name to the field in the template. The
other object, ‘UploadPdfUrl’, contains an URL field set in a variable called ‘docurl’.
50
3.6.5.2 View and template
Figure 3-25. The first part of the views.py file in the application ‘pdfchecker’. The modules and forms are imported
here.
The first thing to do, is to import all corresponding modules, models and forms from their
location. A function called ‘connect’ is imported from a file called server.py.
Figure 3-26. Continuing on the views.py file, the first part of the function is displayed. The forms are factored into
‘formsets’ and data and files are requested.
Inside the function upload(), the first thing that is done, is the creation of FormSet, which makes
it possible to handle several forms at once. Both the form ‘UploadPdf’ and the database model
51
‘handle_UploadPdf’ are stored in formsets in line 25 and 26. This is done early on so they can
be displayed in the template properly. On line 29, the if-statement activates if a ‘POST’ is
requested, and both data and files are requested from the from the file and URL fields.
Figure 3-27. Checks if the URL is valid and creates a timestamp. Data is sent to the server.py file.
If the URL is valid (data was inputted in the URL field by user). The data is then extracted and
saved in a variable called ‘url_input’. On line 48 the ‘url_input’ is sent to a function called
connect in the server.py file. The function will either return a string with ‘passed’ or a list with
dictionaries that contain the result.
Figure 3-28. If the data returned is passed, the rendered template will be ‘result_success.html.
If the returned value is ‘passed’ the context will not contain result, and the rendered template will
be ‘result_success.html’.
52
Figure 3-29. If result is returned, the rendered template will be result_failed.html.
If the list with dictionaries is returned the context will be timestamp, result from connect(), and
formURL, and the rendered template will be result_failed.html.
Figure 3-30. ‘result_failed.html’ template is displayed.
The result_failed.html template interface is displayed in figure 3-30.
53
Figure 3-31. HTML extracted from the current solution with applied, failed and passed tests.
The html is extracted from the current solution. This corresponds to the Applied Tests in the
result_failed.html template. In order to display the total number of applied, failed and passed
tests, a for loop goes through result, and extracts the correct value in the list. In position [0] in
the list from the function connect(), a dictionary with these values are defined.
Figure 3-32. A for loop goes through the URLs in the handles.
The same principle occurs for the formset file, however, in order to receive the url of the
uploaded pdf file a loop must be created and go through the urls of the handle,
‘handle.docfile.url for handle in handles’. The context and response is similar to the formURL,
and will therefore not be explained.
54
To satisfy requirement R19, which asks for information regarding donations to the firm, based on
a set amount of visits to the site, we have designed a cookie function. This function is
implemented in the upload view, and is shown in figure 3-33.
Figure 3-33. Cookie function which is in affect after the ‘upload’ function displays the index template.
As shown, the function is activated when the user is redirected to the /pdfchecker/ containing
the upload forms. First of all, a ‘page_visits’ cookie is created, which contains an INT, this is set
to 0 as default. On to line 79, if the ‘last_visit’ cookie exists, the data from this cookie is
requested, and the value is sent to a python datetime object. On line 85 the ‘last_visit_item’
variable which contains the datatime object, is compared to the datetime.now. If there has been
more than a day since the last visit, we add one to the ‘page_visits’ cookie, and then update the
‘last_visit’ cookie.
55
If the ‘page_visits’ cookie is less than 100, the donate information is displayed through the
Django framework messages. Now less than a 100 visits does not really makes sense, but this
is just for showing how the function works. The administrator is free to change this to a number
which makes more sense, and also add donate information which is suitable.
On to line 93, if there never were a ‘last_visit’ cookie to begin with, this is created. Then the data
is returned to the user, updating the cookies properly.
3.6.6 Authentication
3.6.6.1 Forms
To be able to both handle the register and login forms displayed in the Database section of this
document, and meet requirement R.10, we need a view and forms with according functions. The
register fields which is the same as in models.py showed in the database section are defined in
the forms.py file, as shown in figure 3-34.
Figure 3-34. Forms.py file from the ‘authentication’ application.
At the top of this file we import django standard forms to be able to define what we want. Then
we also import the object User from the already defined models in django.contrib.auth and the
‘UserCreationForm’ form from django.contrib.auth.forms. The User_Information class from
models.py is also imported.
At line 5 we define the class which will contain the forms we wish to represent in the registration
template. The ‘UserCreationForm’ is given as an argument here to ensure that the passwords
fields is displayed as they should, and that the hashing of the passwords, which is done in the
view, works properly.
56
On to line 8, a Meta class is defined. In this class, the model is defined as the User object, and
we have included all the usual attributes in the fields. The password fields does not need to be
defined as they are part of the ‘UserCreationForm’. It is possible to extend the fields with other
attributes if needed.
3.6.6.2 View and template
Figure 3-35. Views.py file from the ‘authentication application. This file handles the register forms, and saves the
input user data to the databse.
Over to the view.py file shown in figure 3-35, first of all, we need to import the User_Form class
from forms, so we can use this in the view. This is done at line 8.
Then, a function called register is created. In line 12, we request the context and save it in the
variable “context”.. If the request method is ‘POST’, the data entered in the fields in the template
will be requested and saved in the variable “user_form”, as shown on line 15. On line 17 the
django function ‘is.valid()’ checks if the form contains valid data, if it does it uses the .save()
function to successfully save the data to the database. Then, on line 21, the password entered
by the user is hashed for security reasons. And the object gets updated. Now, after all this is
57
finished the user receives a success message which outputs that the process is finished and the
user registered successfully.
When this function is called all the data are as mentioned save in the database. It is now
possible to use this data in other functions. All data are also displayed in the admin interface,
which is covered later in this section.
Now if the request method never was ‘POST’ from the start, the user is redirected to the register
template which contains the user form. To be able to display this, a variable called “user_form” is
created, this contains all the fields specified in the forms.py file. This variable also has to be
represented in the template itself.
Figure 3-36. Register template which displays the register attributes.
On line 37, the user_form is displayed. The “.as_p” connected to the variable, determines how
the form is displayed. In this case the form is displayed as paragraphs in HTML. Another thing
that is important to notice in this figure, is the “csrf_token”. This is a middleware provided by
django to ensure that cross site forgery does not happen. It is implemented in all the forms we
have made so far, and it’s important to ensure that this is also used in any future forms.
58
As an example to how this data can be used, we have also made a login function which
compares the data input and redirects the user to the pdfchecker, as shown in figure 3-37.
Figure 3-37. A function also in the views.py file from the application ‘authentication’. Input data is compared to
database data.
.On line 40, we request the context into a variable as usual. Then the function checks if the
request method is ‘POST’, if it is, the username and password data are both obtained from the
login form. Then a variable is made containing ‘TRUE’ or ‘FALSE’ depending on the obtained
data is correct. This variable uses the Django middleware ‘authenticate’ 7to perform this
operation. Then the function checks if we have a user object, and then if this object is active.
This is also an implemented Django function. How to activate and deactivate accounts are
covered in the admin interface section of this document. Now, if the user is active, the user logs
in and is redirected back to the ‘pdfchecker’ template. If the user is disabled, they will be
redirected and a response explaining the problem will be shown. The user will also be made
aware of any invalid login details, which then also formats the fields, making them blank. If the
7
https://docs.djangoproject.com/en/dev/topics/auth/
59
request was never a ‘HTTP POST’ in the first place the user is redirected to the login.html
template, displaying the login fields (figure 3-38).
By logging in, the user’s ID gets saved in the session, and from here it is possible to make
further use of this session. This is described in the 3.6.2 section.
Figure 3-38. The login template from the ‘authentication’ application.
60
The major thing to notice here compared to the other templates, is that the fields are just regular
HTML fields. This is because we really only want to compare the data put in these fields to the
data in the database. Other than that, this is just a regular template with a ‘POST’ form.
3.7 Users
To meet requirement R.10, which require several different roles of users. Each with defined set
of permissions, Django provides an admin interface which covers all of these. As stated in the
requirement, there were also the question about shown statistics. The group has unfortunately
not been able to focus on this, but there are plenty of room for developing this further, by using
the various options described in this section in combination with Django packages who focus on
retrieving statistics.
3.7.1 Handle users through the admin interface
To be able to understand the easiest way to manage users, an introduction to the admin
interface is required. First of all, we have activated the admin interface through the several steps
described in the django documentation. This includes, marking it as active in the
‘INSTALLED_APPS’ section in the settings.py file, and also including it in the urls.py file for the
Django project. The interface is accessible through the path /admin/.
After users have registered through the register portal, the interface provides a wide range of
options regarding user management.. First of all, to be able to log in to the admin interface, an
active user with a superuser status is required. To create one manually without interacting with
the admin interface, it is possible to do so through the CMD/Terminal windows. The following
command will start the superuser prompt: ‘python manage.py createsuperuser’.
Logging in with a active superuser account will display the two sections, ‘user’ and groups’. The
‘groups’ sections does not contain any data at this point, but it is possible to create groups
manually in the interface and connect different users to these.
61
Figure 3-39. The user section in the Django admin interface.
An example of the user section is displayed in figure 3-39. There are several functions included
here. The admin can do searches, defining part of or the whole of user attributes. It is also
possible to filter by user status. If the admin want to add users manually, it is possible to do so
by pressing the ‘Add user’ button, here a username and password has to be defined to create
the user successfully. The action bar at the top over the ‘Username’ provides a delete function
which will delete all the users marked in the checkbox. If any of the usernames are clicked on, a
new window appears, with more options, as shown in figure 3-40.
Figure 3-40. Changing user information in the Django admin interface.
62
Here, all personal info about the account is stored. And it is also possible to do various changes
to these. The most important section to notice here are ‘Permissions’. By checking or
unchecking these boxes, the administrator decides if the user is active or not, or if it has a staff
or superuser status. There are also several options not included in figure 3-40, where the
administrator can pinpoint the user permissions, such as adding timestamps, sessions and so
on.
3.7.2 Further development with users
Backtracking to the login section, there are several uses of the saved session. One example of
its uses is shown in figure 3-41.
Figure 3-41. An example on of a function which checks if a user is logged in.
Here, a logged_in function is made. Let us assume that this example is connected to the
/pdfchecker/ path in urls.py. Now, the Django authenticate framework will check if the user
session is ‘TRUE’, if it is not a ‘HttpResponse’ message will be shown to the user informing
about the required authentication. If the user is already logged in, a redirect to the /pdfchecker/
path will automatically happen. These views can be connected to the urls patterns in the urls.py
file as a addition to the already defined views.
Now, this doesn’t mean that it is required to make whole functions to restrict access. It is also
possible to restrict access to content in templates, by doing the following showed in figure 3-42.
Figure 3-42. An example of how to hide content from users who are not logged in.
The Django authentication middleware is used as the statement on line 1 in the example.
63
3.7.3 Further Development with the PDF-checker
To increase the user experience, and the effectiveness of the application, it is possible to allow
the users to upload several PDF files in one instance. This can be done by using a javascript
jQuery function, which clones the fields by interacting with an OnClick-button. The javascript
function itself, would look like something displayed in figure 3-43.
Figure 3-43. Javascript function which can be used to duplicate forms.
When implementing this in the ‘pdfchecker’ index template, the javascript code should look like
something presented in figure 3-44.
Figure 3-44. Adding the javascript function in a template.
The ‘add_more’ should be replaced with the button that activates this function. At the
‘cloneMore’ the ‘div’ name is set for ‘table’, this should be replaced with the div name were the
forms are duplicated. An example of how the forms should be displayed in a template is shown
in figure 3-45.
64
Figure 3-45.An example on how the forms should be displayed when using the javascript function.
The ‘management_form’ at line 1, is used to keep track of all the additional forms that are
created. If this is not included, a validation flag will be raised. By making a for-loop, the forms
are displayed properly when cloned. This is also needed to be able to extract the data from the
forms properly.
4.0 Test report
4.0 Test report ............................................................................................................................................ 65
4.1 Preface .............................................................................................................................................. 65
4.1.2 Requirements and connected tests ............................................................................................... 66
4.1.3 Testing under development ....................................................................................................... 67
4.2 Test phases........................................................................................................................................ 67
4.2.1 Test phase one (T1) .................................................................................................................... 68
4.2.2 Test phase two (T2) .................................................................................................................... 68
4.2.3 Test phase three (T3) ................................................................................................................. 69
4.3 Conclusion ......................................................................................................................................... 69
4.1 Preface
Quality assurance, goals of testing
To ensure that every requirement is met, the group will conduct several tests. Each test will
consist of checking a predetermined set of requirements. Considering this, the group will mark
each requirement with test numbers which are connected to each test.
The test are divided into these phases:
65
T1 = Regular testing of functionality.
T2 = Comparison testing to the current application.
T3 = Testing the requirements to see if they meet the WCAG requirements.
4.1.2 Requirements and connected tests
User functionality
R.1: The end user should be able to upload PDF-documents or link to documents online T.1, T.2
R.2: The application shall list the detected barriers found in the PDF documents T.1, T.2
R.3: The application GUI should follow WCAG guidelines T.3
R.4: The application shall refer to the WCAG guidelines when presenting the detected barriers
T.1, T.2, T.3
R.5: The user should be given a structured list of the detected barriers T.1, T.3, T.4
R.6: The user interface of the PDF-checker should be easy to use for end users, and should not
require any training prior to interaction with the application T.3
R.7: Administrators should be able to access statistics collected by the PDF-checker T.2
System functionality
R.8: The system code should be written efficient and performance optimized, and the
application should be as fast or faster than the existing solution T.1, T.2
R.9: The PDF-checker should be developed according to selected coding standards and easy to
maintain for administrators T.1, T.2
R.10: The system should provide an authentication and access control mechanism to match
logins to specific users roles. This should include a regular user, a reporter role who can access
statistics, and an admin role, or superuser with all privileges T.1, T.2
System properties
R.11: The system should not have any browser or platform specific dependencies, and should
work the same way regardless of client details T.1
R.12: The system should be secure against malicious PDF files uploaded by the user, and
should reject these if they contain exploits or any code that can harm the system T.1
New functionality
66
R.13: The user should be able to upload multiple PDF files and check these simultaneously,
where a single test run will return test results for each selected file T.1, T.2 (Requirement left
out)
R.14: The system should prevent the user from uploading the same document multiple times
during the same check to prevent unnecessary traffic to the server T.1 (Requirement left out)
R.15: The user should be able to insert multiple URLs and check these simultaneously T.1, T.3
(Requirement left out)
R.16: The user interface should support multiple languages T.1, T.3 (Requirement left out)
R.17: The application should support accessibility tools such as screen readers T.1, T.2, T.3
R.18: The application should provide suggestions on how to remove any detected barriers T.1,
T.3
Additional
R.19: Continuous use of the application should trigger a mechanism where the system informs
the user about how they can contribute to further development through donations or payed
services T.1
4.1.3 Testing under development
While developing the new solution, we tested the application regularly to ensure that
everything worked properly. To discover errors and get feedback on these, the implemented
debug function in django were set to ‘TRUE’. Django returns information about the found
errors, and refers to the file and line where the errors were found. This is an effective way to
fix discovered errors. However, the information regarding some of these errors were not as
self-explanatory as we hoped. Even though we looked in the Django documentation for an
in depth explanation, it did not seem like the problem had any connection to the provided
information. When encountering these, we quickly solved the problems by researching for
questions asked related to the errors on sites such as stack overflow.
4.2 Test phases
Test one (T1), will cover all the regular functions of both the ‘pdfchecker’ and ‘authentication’
application. When checking the PDF-checker, we will ensure that the forms are shown properly,
and that the links to the PDF documents are sent properly to the backend. The results retrieved
from the backend shall be shown accordingly in the GUI.
67
Test two (T2) covers comparing the groups solution to the already existing solution. This to
ensure that the new solution is as good or better as the existing one, in forms of interacting with
the GUI and also the speed of checking the PDF.
Basically, test three (T3), is done just to ensure that all the regular WCAG 2.0 guidelines are
met.
4.2.1 Test phase one (T1)
When doing the regular testing of the ‘pdfchecker’ application, we used a set of different PDFfiles to ensure that all the results were presented in the way we wanted them to. One of the
PDF-files were set up in such a way that all of the available tests in the backend were done.
To check that everything regarding the ‘authentication’ application worked properly, we
registered several different users and then proceeded to try logging in with them. When
performing this testing, we encountered a problem. After registering users, it was not possible to
log in with them. When checking the admin interface for clues, it seemed like the users were
registered properly.. But when investigating further, the password did not get hashed as it
should when registering. After researching the problem in the Django documentation and on the
web, a solution to it was found. By not using the password fields implemented in the ‘User’
object and rather use the built in authentication form ‘UserCreationForm’, which contains
password fields as default, the problem was solved.
Both of the applications have been tested in all the major browsers; Chrome, Firefox, Internet
Explorer, Opera and Safari.
To ensure that all related Django and Python code is easy to understand and maintain,
comments have been used as a tool to explain how code works.
4.2.2 Test phase two (T2)
In general the current solution compared to the groups, is very similar in ways of design. So
when interacting with the GUI the results provided was satisfactory. But as the GUI is not yet
entirely finished, the testing of this is limited.
68
To ensure that the application is as fast or faster than the current application, we tested both
application with different PDF-files, and timed the response time. The result showed that the
response on the new application were very similar to the current application.
4.2.3 Test phase three (T3)
To be able to determine if the current application meet the WCAG 2.0 guidelines, a series of
websites offers a tool where the user input a URL to the site which will be checked. And then
outputs the errors found and refer to related WCAG 2.0 guidelines.
In good spirit, we chose the Page Checker provided by the employer. At first we had several
errors in both the ‘authentication’ and the ‘pdfchecker’ applications, but these were quickly
resolved. In the end, the only error we were left with, were a label error which we believe is an
error we cannot do anything with considering it has something to with the Django middleware
used to display the fields.
4.3 Conclusion
All of the test phases have provided us with results which we have used to improve both of the
application. And have also ensured that requirements like R.3, R.8 and R.11 have been
successfully met. A test phase where users would be involved, is something that was planned in
minor detail early in the project, but as the project came to an end, there was no time for this. It
would surely have been useful in regard to user feedback, leaving information which could have
been used to improve the application.
5.0 User manual
5.0 User manual .......................................................................................................................................... 69
6.0 Sources .................................................................................................................................................. 73
This manual will help users get started with Tingtun Accessibility Checker, and how it can be
used to check the accessibility of PDF-documents. We have tried to make it as short and
concise as possible.
69
The first thing seen when opening the PDF checker is a screen that look like this:
Figur 5-1. The index of the PDF-checker.
When this screen is displayed, the options of inserting either a URI or uploading a PDF are
available.
This field allows you to insert a web address. If the PDF document you wish to
check exist somewhere on the internet, you can choose this option to type in or copy the
address to that document.
70
If the user rather want to check a PDF file that is stored on a personal
computer, the secondary option here allows the user to choose among the files stored locally on
a hard drive. When clicking “Browse” a window will open. From here navigate to the folder
where the PDF-file is stored, select it and click “Open” to complete this step.
Finally, when either step
or
is completed the
test can be run by clicking the “Check” button next to the chosen option.
This will take you to a new page that shows you the result of the tests
71
Figur 5-2. Result page of the PDF-checker.
The result will include information about the number of tests applied to the
document selected, and show the ratio between the number of tests that passed and failed.
72
Here you can find a list of each test that was applied to the document. Each of
these can be selected to display information about why this test was passed or failed, and if it
was the latter, it is possible to get more information on how to improve the content to solve this.
6.0 Sources
Django tutorial
http://www.tangowithdjango.com/
https://docs.djangoproject.com/en/1.6/ref/contrib/csrf/
Python
https://wiki.python.org/moin/ForLoop
https://docs.python.org/2/tutorial/controlflow.html#the-range-function
http://www.tutorialspoint.com/python/python_while_loop.htm
StackOverflow:
http://stackoverflow.com/questions/10902340/multiple-file-upload-django
http://stackoverflow.com/questions/501719/dynamically-adding-a-form-to-a
djangoformsetwith-ajax
http://stackoverflow.com/questions/23722209/djang-admin-interface-invalid-password
format-or-unknown-hashing-algorithm
http://stackoverflow.com/questions/22958250/upload-file-through-url-in-django
http://stackoverflow.com/questions/23564252/need-the-uploaded-file-in
django?noredirect=1#comment36173977_23564252
Timestamp:
http://www.cyberciti.biz/faq/howto-get-current-date-time-in-python/
https://docs.djangoproject.com/en/dev/topics/i18n/timezones/
Javascript
http://jsfiddle.net/hQ7y5/
http://api.jquery.com/hide/
73
Tools:
http://www.putty.org/
http://www.tylerbutler.com/2012/05/how-to-install-python-pip-and-virtualenv-on-windowswith-powershell/
https://pypi.python.org/pypi/pip
http://winscp.net/eng/index.php
http://notepad-plus-plus.org/
http://komodoide.com/komodo-edit/
From Wikipedia:
http://en.wikipedia.org/wiki/E-Government
http://en.wikipedia.org/wiki/Markdown
http://en.wikipedia.org/wiki/Graphical_user_interface
Youtube:
https://www.youtube.com/watch?v=3DccH9AMwFQ (part 1-10)
https://www.youtube.com/watch?v=4Mf0h3HphEA&list=PLEA1FEF17E1E5C0DA
Other:
http://www.techrepublic.com/blog/web-designer/effective-design-principles-for-webdesigners-repetition/
http://www.w3.org/Provider/Style/URI
74


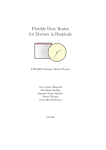
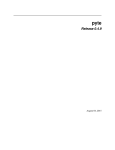

![Terms of Reference [ 462 KB]](http://vs1.manualzilla.com/store/data/005818895_1-55ed04ecdfa99aee80736235a8d4f256-150x150.png)
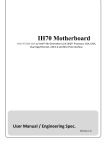
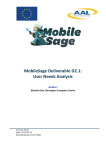


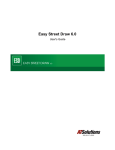
![Section VII - Technical Specifications [ 920 KB]](http://vs1.manualzilla.com/store/data/005668651_1-8dca2c6e1104d59f56f239e80ee70ed9-150x150.png)