1
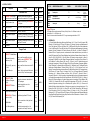
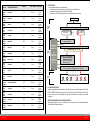
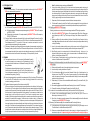
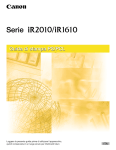
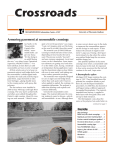
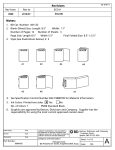
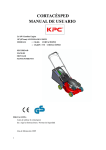
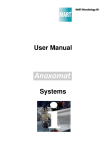
TM
For the Detection, Enumeration and Identification of UTI Pathogens
1. INTENDED USE
MICROPROTM BCS (Broth Culture System) is a complete system that detects, enumerates and identifies
most pathogens involved in Urinary tract infections, in less than five hours. It consists of (1) Broth Culture
System that uses a Turbidimetry-based analyzer for the detection and enumeration of UTI pathogens (2) ID
System for Biochemical identification of the UTI organisms.
2. INTRODUCTION
Urinary tract infection or UTI, is a major cause of morbidity in humans and one of the most frequently
encountered infections that needs to be detected and diagnosed at the very earliest. These infections can
occur at different points in the urinary tract, including bladder where it is called cystitis, in the urethraurethritis and in severe cases when infection moves upwards and affects the kidneys, where it is known as
pyelonephritis. Symptoms of a lower urinary tract infection can include painful urination and either frequent
urination or urge to urinate (or both); while the symptoms of pyelonephritis include fever and flank pain in
addition to the symptoms of a lower UTI. About 40% of women and 12% of men have a urinary tract infection
at some time in their life. The main causative agent of most UTI's is Escherichia coli, though other bacteria,
viruses or fungi may rarely be the cause. Most of the UTI are caused by the eight common urinary
pathogens that account for approximately 97% of infections. The primary pathogen involved is Escherichia
coli. The fairly common secondary pathogens are Enterococcus faecalis, Klebsiella pneumoniae, Proteus
mirabilis, Proteus spp., Pseudomonas aeruginosa. The secondary pathogen which is rarely involved is
Citrobacter spp. The common urethral or genital florae include the Lactobacillus, alpha haemolytic
streptococci, Gardrerelle vaginalis, Corynebacteria spp. etc.
Diagnostic testing of UTI includes urinalysis and urine culture. Urinalysis is a screening test, while the urine
culture is considered the gold standard and the only way to make conclusive diagnosis of an UTI. Antibiotic
sensitivity can also be performed with these cultures, making them useful in the selection of an appropriate
antibiotic for treatment. Conventional diagnostic methods include quantitative culture on solid media, Gram
staining of selected colonies and biochemical identification testing. This process can take more than twenty
four to forty-eight hours before the microorganisms can be reported to the physicians.
80C
20C
REF
Store at
0
2-8 C
Manufacturer
Catalogue
Number
Consult
Instructions
for use
LOT
Batch
Number
Use by
PS
Production Site
EC REP
Authorised Representative
A Division of
PS
Registered Office:
Gitanjali, Tulip Block, Dr. Antonio Do Rego Bagh, Alto
Santacruz, Bambolim Complex P.O., Goa-403 202, India.
E-mail: [email protected]
EC
Manufacturing Unit:
Plot No. S-126, Phase III B, Verna Ind.
Estate, Verna, Goa - 403 722, INDIA.
REP
Qarad b.v.b.a. Cipalstraat 3, B-2440 Geel, Belgium
Page 12 of 12
MICROPROTM BCS comprises of a novel way to detect and diagnose UTI by the Turbidimetry-based
Bacterial broth culture detection. This system ensures that the entire process of detection and
enumeration of UTI organisms is completed in four hours.
TM
Apart from this a separate MICROPRO ID kit is available for the biochemical identification of UTI
pathogens. The Biochemical analysis of UTI organisms can be completed in less than twenty- five
minutes.
3. SPECIMEN COLLECTION AND PREPARATION
(a). First morning voided, midstream and clean catch urine is recommended for testing. Urine from first
morning catheterization or suprapubic taps can also be used. Follow standard recommended procedures
for collection of urine specimen. (b). Fresh urine should be used for testing. If a delay in testing is
anticipated, store the specimen immediately at 2-8ºC and ensure that the test is performed within 3 hours.
(c). It is recommended that sterile containers are used to collect specimen. Contamination of specimen
must be avoided.
Page 1 of 12
4. SYSTEM CONTENTS
S.No.
Component
Purpose
Installation Pack
Qty.
Cat. No.
1 pack
MSIP01
1 unit
MA0001
1
MICROPROTM BCS Analyzer Turbidimetry- based analyzer system for
+ one cable cord and two fuses detection and enumeration of UTI pathogens
2
Blanking Cuvettes (3 ml)
Cuvettes for zero blanking the MICROPROTM
BCS Analyzer
2 Nos.
MABC01
3
Printer Paper Roll
Paper Roll for Printing the test results
1 No.
MAPR01
4
MICROPROTM ID Well stand
Stand for ID Test wells
1 No.
MIDS01
5
Fixed Volume Micropipette
100 µL
Micropipette for dispensing urine specimen
into Barcoded Cuvette (A) & Testing vial (B)
1 No.
MAFP01
6
Fixed Volume Micropipette
300 µL
Micropipette for dispensing the Broth culture
growth into ID Test wells
1 No.
MIFP03
7
User Manual
Reagent Packs
1
2
3
b) Test Vials (B) - green cap
(1.5 ml)
Ready to use, Broth culture test vials for ID
test only
c) 100 µL Microtips
Gamma - Sterile microtips with filter barrier
for use with 100 µL Fixed volume pipette
MICROPROTM- ID kit
a) 8 different ID reagents
(5 ml)
Reagents for biochemical identification of
the UTI pathogens
b) MICROPROTM ID wells
Breakable test wells for use in the
Biochemical ID Test
Quality Control kit consisting
of
TM
a) MICROPRO UTI Control - Eight different lyophilized UTI Controls
red cap (0.5 ml)
Media for reconstitution of the lyophilized
UTI Controls
b) Buffer Media
c) 1 mL Micropipette tips
Page 2 of 12
Sterile filter barrier microtips for 1 mL
Micropipette for the Quality Control test
TRT5
TRV5
TR01
COTT25
COTV25
COT001
VAT30
VAV30
VA001
ANTIMICROBIAL AGENT
Trimethoprim
Trimethoprim /
Sulphamethoxazole
Vancomycin
SYMBOL
DISC CONTENT
TR
5 mcg
COT
1.25 /23.75 mcg
VA
30 mcg
PACK SIZE
5 Carts
5 Vials
Single vial
5 Carts
5 Vials
Single vial
5 Carts
5 Vials
Single vial
TM
1 No.
MICROPROTM- Broth Culture
kit
Ready to use, Barcoded, Broth culture
TM
a) Barcoded Cuvettes (A) cuvettes for use on MICROPRO BCS
black cap (3 ml)
Analyser & also for ID Test
CAT. NO.
2 x 25
Nos.
MBCS01
2 x 25
Nos.
8x1
Nos.
MIDR01
12 wells
x 25 Nos.
8x1
Nos.
Biogram Pack size:
5 Cartridges (Each cartridge contains 50 discs) & Vials (5 vials = 5 x 100 discs in each vial
and single vial = 1 x 100 discs in vial).
Discs in routine use should be stored at 2-8°C. Longer term storage should be at -20°C.
17. REFERENCES
(1). Practical Medical Microbiology, Mackie and MacCartney, Vol 2, 13 th ed, Churchill Livingston 1989,
Edited by J,G Collee Duguid, A.G. Fraser, B.P. Marmion. (2). Detection, Prevention and Management of
Urinary Tract infections, C.M Kunin, 4th Edition, 1987, (3). McPherson RA, Ben-Ezra J. Basic examination
of urine. In: McPherson RA, Pincus MR, eds. (Henry's Clinical Diagnosis and Management by Laboratory
Methods.) 22nd ed. Philadelphia, PA: Elsevier Saunders; 2011:chap 28. (4). Hooton TM, Bradley SF,
Cardenas DD, et al. Diagnosis, prevention, and treatment of catheter-associated urinary tract infection in
adults: 2009 International Clinical Practice Guidelines from the Infectious Diseases Society of America. Clin
Infect Dis. 2010; 50(5):625-663. (5). Ban KM, Easter JS. Selected urologic problems. In: Marx JA,
Hockberger RS, Walls RM, et al, eds. Rosen's Emergency Medicine: Concepts and Clinical Practice. 7th
ed. Philadelphia, Pa: Mosby Elsevier; 2009: chap 97. (6). Dean AJ, Lee DC. Bedside laboratory and
microbiologic procedures. In: Roberts JR, Hedges JR, eds. Clinical Procedures in Emergency Medicine.
5th ed. Philadelphia, Pa: Saunders Elsevier; 2009:chap 68. (7). MacFaddin, Jean F. "Biochemical Tests for
Identification of Medical Bacteria." Williams & Wilkins, 1980, pp 173 – 183. (8). Bachoon, Dave S., and
Wendy A. Dustman. Microbiology Laboratory Manual. Ed. Michael Stranz. Mason, OH: Cengage Learning,
2008. Exercise 15, "Normal Flora of the Intestinal Tract" Print. (9). Bergey's Manual of Systematic
Bacteriology, Vol. 1. Baltimore, Williams and Wilkins, 1984. (10). Nicola F1, Centorbi H, Bantar C,
Smayevsky J, Bianchini H., Utility of pyrrolidonyl-arylamidase detection for typing Enterobacteriaceae and
non-fermenting Gram-negative bacteria, Rev Argent Microbiol. 1995 Oct-Dec;27(4):204-9. (11). Gordon J,
McLeod JW. Practical application of the direct oxidase reaction in bacteriology. J Pathol Bacteriol 1928;
31:185-90. (12). Koneman EW, Allen SD, Janda WM, Schreckenberger PC, Winn WC Jr. Color atlas &
textbook of diagnostic microbiology. 5th ed. Philadelphia: JB Lippincott, 1997. (13). L Essers and K
Radebold, Rapid and reliable identification of Staphylococcus aureus by a latex agglutination test. J Clin
Microbiol. Nov 1980; 12(5): 641–643. (14). Kloos, W.E. and P.B. Smith. Staphylococci. 1980. Manual of
Clinical Microbiology, 3rd ed. E.H. Lennette, A. Balows, W.J. Hausler, Jr. and J.P. Truant, ed. ASM,
Washington, D.C. (15). Finegold, S.M. and E.E. Sweeney. 1961. New Selective and Differential Medium for
Coagulase-Positive Staphylococci Allowing Rapid Growth and Stain Differentiation. J. Bacteriol.; 81:636641. (16). Data on file: Microxpress (P) Ltd.
MSQC01
1 No.
10 Nos.
Page 11 of 12
CAT. NO.
FFT200
FFV200
FF0001
GENT10
GENV10
GEN001
IPMT10
IPMV10
IPM001
LET5
LEV5
LE01
LZT30
LZV30
LZ001
MRPT10
MRPV10
MRP001
MZT75
MZV75
MZ001
MXFT5
MXFV5
MXF01
NITT300
NITV300
NIT0001
NXT10
NXV10
NX001
OXT1
OXV1
OX01
PIT100
PIV100
PI0001
PTZT100
PTZV100
PTZ0001
TEIT30
TEIV30
TEI001
TET30
TEV30
TE001
TGCT15
TGCV15
TGC001
TOBT10
TOBV10
TOB001
Page 10 of 12
ANTIMICROBIAL AGENT
SYMBOL
DISC CONTENT
Fosfomycin
FF
200 mcg
Gentamicin
GEN
10 mcg
Imipenem
IPM
10 mcg
Levofloxacin
LE
5 mcg
Linezolid
Meropenem
Mezlocillin
LZ
30 mcg
MRP
10mcg
MZ
75mcg
Moxifloxacin
MXF
5 mcg
Nitrofurantoin
NIT
300 mcg
Norfloxacin
NX
10 mcg
Oxacillin
OX
1mcg
Piperacillin
PI
100 mcg
Piperacillin/Tazobactam
PTZ
100/10 mcg
Teicoplanin
TEI
30 mcg
Tetracycline
TE
30 mcg
Tigecycline
TGC
15 mcg
Tobramycin
TOB
10 mcg
PACK SIZE
5 Carts
5 Vials
Single vial
5 Carts
5 Vials
Single vial
5 Carts
5 Vials
Single Vial
5 Carts
5 Vials
Single Vial
5 Carts
5 Vials
Single Vial
5 Carts
5 Vials
Single vial
5 Carts
5 Vials
Single vial
5 Carts
5 Vials
Single vial
5 Carts
5 Vials
Single vial
5 Carts
5 Vials
Single vial
5 Carts
5 Vials
Single vial
5 Carts
5 Vials
Single vial
5 Carts
5 Vials
Single vial
5 Carts
5 Vials
Single vial
5 Carts
5 Vials
Single vial
5 Carts
5 Vials
Single vial
5 Carts
5 Vials
Single vial
5. TEST PRINCIPLE
The entire system is based on three fundamentals:
(a). Proprietary broth culture medium to support growth of typical UTI pathogens.
(b). Detection and enumeration of UTI based on Turbidimetry.
(c). Identification of the UTI pathogen based on well-characterized biochemical tests.
Urine Specimen
100 µl
(a)
100 µl
Step 1: Inoculate same Urine Specimen in Barcoded Cuvette A & Test Vial B
Barcoded Cuvette
(Broth Medium)
A
B
Test Vial
(Broth Medium)
Step 2: Measure Initial OD (A0)
of Barcoded Cuvette A
MICROPRO
BCS
ANALYZER
(b)
(for
measuring
Initial OD-A0
and
Final OD-A1
of Barcoded
Cuvette A)
After Initial OD (A0)
Step 3: Incubate Barcoded Cuvette A & Test Vial B for four hours
INCUBATOR (35 - 37 0C)
Step 4: After incubation, gently swirl
the Barcoded Cuvette (A) to
homogenize the contents.
Measure Final OD (A1) of the
Barcoded Cuvette (A)
After Final OD (A1)
Step 5: If POSITIVE results in Barcoded Cuvette A,
Proceed for ID testing of Barcoded Cuvette A & Test Vial B
(c)
6.
MICROPRO ID TEST
A
A
A
B
B
B
Catalase Test
VP Test
PYR Test
Oxidase Test
TDA Test
Indole Test
STORAGE AND STABILITY
(a).Store the Barcoded Cuvettes (A)-black cap, Test Vials (B) -green cap and the ID reagents at 2-8 ºC. (b).
DO NOT FREEZE. Avoid exposure to light. (c). The shelf life of the Barcoded Cuvettes (A)-black cap, Test
Vials (B) -green cap and the ID reagents is as per expiry date mentioned on respective carton/ bottle
packaging.
7. MATERIAL REQUIRED BUT NOT PROVIDED WITH THE KIT
Bacteriological Incubator (at 35 - 37 °C), Marker Pens, Timer, Tissue Paper, 70% IPA, Bactericidal Handrub,
Gloves, Masks and Removable Stickers.
Page 3 of 12
8. PRECAUTIONS
(a). For laboratory use only. (b). Bring all reagents and specimen to room temperature (20 - 300C) before
use. (c). Do not use the kits beyond expiry date.(d).Carefully read the User Manual and package inserts
before use. (e).Take Universal Precautions. All human body fluids should be treated as potentially
infectious. (f).Always be prepared for any accidental spillage. In case of accidental spillage clean the area
thoroughly and wipe with 70% IPA at least three times. (g).It is recommended that basic Personal Protective
Equipment like gloves and masks are used at all times. (h).Use a Bactericidal Handrub before and after test
procedure. (I). Visually examine the Barcoded Cuvettes (A) with black caps and the Test Vials (B) with green
caps to ensure there is no physical damage, microbial contamination, discoloration, precipitation,
evaporation or other signs of deterioration. If any of these is observed, do no use these reagents and
contact Service provider immediately. (j)The Barcoded Cuvettes (A) and the Test Vials (B) are capped
tightly, open carefully to avoid injury due to breakage of glass. (k).Minimize exposure to light. (l).Ensure that
the broth culture media (Barcoded Cuvettes (A), the Test Vials (B)) attain room temperature before
inoculation and for Biochemical Identification test.
9. CLEANING AND DECONTAMINATION
(a). Spills of potentially infectious material should be cleaned up immediately with absorbent paper tissue
and the contaminated area should be decontaminated with disinfectants such as 0.5% freshly prepared
sodium hypochlorite (10 times dilution of 5% sodium hypochlorite i.e. household bleach) before continuing
work. (b). Sodium hypochlorite should not be used on an acid-containing spill unless the spill-area is wiped
dry first. Materials used to clean spills, including gloves, should be disposed off as potentially biohazardous
waste e.g. in a biohazard waste container.
10. TEST PROCEDURE
TM
The user is requested to familiarize with the working of the MICROPRO BCS Analyzer before
TM
embarking on the Test Procedure. (Kindly refer the MICROPRO BCS Analyzer user manual).
1. Detection and Enumeration of the UTI pathogens
The detection and enumeration procedure involves the following steps:
A). Inoculation of the Barcoded Cuvettes (A) -black cap and the Test Vials (B)- green cap with the patient's
urine specimen
Note: (a). After inoculation only the Barcoded Cuvettes (A)-black cap, are to be used for testing on the
MICROPROTM BCS Analyzer. (b)The Test Vials (B)-green cap along with the Barcoded Cuvettes (A)TM
black cap are for Biochemical identification of the UTI organisms using MICROPRO ID kit.
1. Retrieve the required number of Barcoded Cuvettes (A)- black cap and the Test Vials (B)- green
cap corresponding to the number of samples to be tested and place it on a stand or a flat clean table
top. Kindly note that a single set of Barcoded Cuvette (A)- black cap and the Test Vial (B)- green
cap is to be used for one patient.
2. Write patient IDs/names specifically within the space indicated on each set of Barcoded Cuvette
(A)- black cap and the Test Vial (B)- green cap.
3. Retrieve the required number of 100 µl micropipette tip pouches from the pack. A pair of microtip is
to be used for testing one patient sample. The Individual microtip pouches must be opened just
before the inoculation process so as to minimize contamination risk.
4. Open the black cap of the Barcoded Cuvette (A) and the green cap of the Test Vial (B) of one
patient and keep aside. Do not remove the yellow coloured rubber stopper.
5. Pipette out 100 µl of well-mixed urine from the sample container and transfer it to the opened
Barcoded Cuvette (A) by piercing the pipette microtip through the stopper of the Cuvette and
pressing the plunger of micropipette up to the bottom. Do not release the plunger. Holding the
rubber stopper tight in its place, slowly remove the microtip, ensuring that the rubber stopper does
not come out along with the microtip. Ensure that urine is mixed well with the broth in the Barcoded
Cuvette (A) by gently swirling it.
Page 4 of 12
TM
16. BIOGRAM Antibiotics Disc as per CLSI standards
SYMBOL
DISC CONTENT
PACK SIZE
Amikacin
AK
30 mcg
5 Carts
5 Vials
Single vial
Ampicillin
AMP
10 mcg
5 Carts
5 Vials
Single vial
Amoxicillin/Clavulanate
AMC
20/10 mcg
5 Carts
5 Vials
Single vial
Aztreonam
AT
30 mcg
Cefazolin
CZ
30 mcg
Cefepime
CPM
30 mcg
5 Carts
5 Vials
Single vial
Cefotaxime
CTX
30 mcg
5 Carts
5 Vials
Single vial
Cefotaxime/Clavulanic acid
(Not as per CLSI)
CEC
30/10 mcg
5 Carts
5 Vials
Single Vial
Cefoxitin
CX
30 mcg
5 Carts
5 Vials
Single vial
Ceftazidime
CAZ
30 mcg
Ceftazidime/Clavulanic acid
(Not as per CLSI)
CAC
CTRT30
CTRV30
CTR001
Ceftriaxone
CTR
30 mcg
CXMT30
CXMV30
CXM001
Cefuroxime
CXM
30 mcg
Ciprofloxacin
CIP
5 mcg
Clindamycin
CD
2 mcg
5 Carts
5 Vials
Single vial
CLT10
CLV10
CL001
Colistin
CL
10 mcg
5 Carts
5 Vials
Single vial
ETPT10
ETPV10
ETP001
Ertapenem
ETP
10 mcg
5 Carts
5 Vials
Single Vial
CAT. NO.
AKT30
AKV30
AK001
AMPT10
AMPV10
AMP001
AMCT30
AMCV30
AMC001
ATT30
ATV30
AT001
CZT30
CZV30
CZ001
CPMT30
CPMV30
CPM001
CTXT30
CTXV30
CTX001
CECT30
CECV30
CEC001
CXT30
CXV30
CX001
CAZT30
CAZV30
CAZ001
CACT30
CACV30
CAC001
CIPT5
CIPV5
CIP01
CDT2
CDV2
CD01
ANTIMICROBIAL AGENT
30/10 mcg
5 Carts
5 Vials
Single vial
5 Carts
5 Vials
Single vial
5 Carts
5 Vials
Single vial
5 Carts
5 Vials
Single Vial
5 Carts
5 Vials
Single vial
5 Carts
5 Vials
Single vial
5 Carts
5 Vials
Single vial
Page 9 of 12
14. PERFORMANCE DATA
Internal Evaluation
TM
A) In an in-house evaluation, 110 urine specimens were tested simultaneously both on MICROPRO
BCS and on standard solid Agar medium.
Total Samples = 110
TM
MICROPRO BCS
PLATE CULTURE
Positive for UTI
14
14
Negative for UTI
76
70
Contamination
20
26
From the above evaluation it is observed that
TM
l
For Positive UTI samples: MICROPRO BCS showed 100% correlation with PLATE CULTURE
TM
l
For Negative samples: 76 samples were reported negative by MICROPRO BCS and 70 samples
by PLATE CULTURE.
TM
l
Contamination was observed in 20 samples tested by MICROPRO BCS and 26 samples by
PLATE CULTURE method.
B) Precision: Stability studies were performed on Broth culture media (Barcoded Cuvettes (A) and Test
vials (B) for color change, pH, conductivity and OD at 546 nm for three different temperatures 2-8oC,
Room temperature and 37oC for a period of 15 days and no variation was observed in color and
marginal variation was observed in the other parameters
C) Performance: Repeatability and Reproducibility were performed with same sample inoculated in five
Barcodes Cuvettes (A) and Initial and Final OD measured. Despite Variation in Initial and Final OD for
the same sample inoculated in five cuvettes, the result obtained is same, owing to the delta OD, which
diminishes the variation from Cuvette to Cuvette resulting in 100% reproducibility of results.
15. REMARKS
(A) False negative results can occur if the contents of the Barcoded Cuvette (A)
are not mixed properly prior to measuring the Final absorbance A1 as the
culture growth tends to settle down in the Barcoded Cuvette (A)/Test Vial (B)
during incubation.
To dislodge the cultures settled during incubation, the correct way is to:
Hold the cap of the Barcoded Cuvette (A)/ Test Vial (B) and gently swirl it to
form a homogeneous suspension. Do not shake vigorously or turn the vial
Fig 1
upside down during shaking. ( See Fig 1)
(B) Use only the gamma sterile tips provided for the sample pipette (100 µl). Avoid using ETO sterilized tips
as, there will be ETO residue left on the tip surface which might get added into the broth during
inoculation, leading to growth inhibition.
(C) Procedure for dispensing sample in Broth culture cuvettes (A&B):
(1) Place your thumb over the top of the pipette plunger and press down to the first stop. Hold the plunger
in this position. (2) Place the pipette tip into the sample at the proper immersion depth and release the
pressure on the plunger slowly. Be sure that the pipette is either vertical or within 20°off vertical. This will
allow the piston to rise, aspirating sample fluid into the pipette tip. Do not remove your thumb from the
plunger abruptly or let the plunger rise up quickly. This will result in aspirating incorrect sample
volumes.(3) Once the plunger reaches the starting position, pause for a second or two to ensure that the
aspiration of the sample fluid is complete. Be sure there are no bubbles in the tip. (4) Remove the
pipette tip from the sample volume. (5) To dispense, pierce the cuvette stopper with the pipette tip and
then press the plunger down slow and steadily pass the first stop all the way to the bottom of the piston
stroke. Wait 1-2 seconds to allow complete dispensing of the sample fluid. Do not release the plunger
now. (6) Remove the pipette tip from the Broth culture cuvette and then release the plunger. (7) Press
the ejector button to remove the pipette tip or carefully pull the tip off with your fingers and disposed of
the tip in the proper biohazard container according to the safety requirements of your facility.
Page 8 of 12
Note: For detailed pipetting procedure, refer Section 15 C.
6. Using a fresh microtip, pipette out 100 µl of well mixed urine from same sample container and
transfer it to the opened Test Vial (B) by piercing the micropipette tip through the stopper of the Test
Vial and pressing the plunger of micropipette up to the bottom. Do not release the plunger. Holding
the rubber stopper tight in its place, slowly remove the microtip, ensuring that the rubber stopper
does not come out along with the microtip. Ensure that urine is mixed well with the broth in the Test
Vial (B) by gently swirling the urine-broth mixture inside the vial.
7. Repeat step 4-6 for all urine samples to be tested. Use fresh microtips each time.
8. The Barcoded Cuvettes (A) and the Test Vials (B) must be recapped with their original black and
green cap respectively and placed in the cuvette stand (card board fitment) supplied with the kit.
TM
B) Blanking the MICROPRO BCS Analyzer
Blanking is to be done once a day or when the machine gets switched OFF during the procedure.
TM
9. Switch ON the MICROPRO BCS Analyzer. The red power display LED will blink, Press power
button followed by the “NEXT” key. The Analyzer will display “Insert Blank and press NEXT or
EXIT”.
10. Retrieve one Blanking Cuvette provided with Analyzer. Clean the Blanking Cuvette with the dry
tissue. Note: Always make sure to clean the Cuvette with a clean dry tissue paper before blanking
or taking OD readings.
11. Insert it in the reading chamber carefully ensuring that the arrow mark on the Blanking Cuvette
aligns with the arrow mark next to the reading chamber of the Analyzer and press “NEXT”.
12. After Blanking, enter the lot number details of the Barcoded Cuvette (A) - black cap, in the
Analyzer followed by the expiry details which is also mentioned on the Barcoded Cuvette (A) black cap, in the Analyzer and press “NEXT”.
13. The main menu will be displayed, using the scroll down Arrow key, bring the cursor from Lot
number to “Initial Absorbance” and press “NEXT”
TM
C) Measuring Initial Absorbance (Ao) of inoculated Barcoded Cuvette (A)-black cap on the MICROPRO
BCS Analyzer
14. Retrieve one Barcoded Cuvette (A) inoculated with patient's urine sample.
15. Insert it carefully in reading chamber as in Step No.11.
16. The initial absorbance (Ao) for the particular Barcoded Cuvette (A) will be displayed on the
Analyzer screen. Press “NEXT” key as this will ensure recording of the Initial absorbance (Ao)
value in the memory of the Analyzer. Remove the Barcoded Cuvette (A) from the reading chamber
and place it in the cuvette stand.
17. Repeat steps (14-16) for rest of the inoculated Barcoded Cuvettes (A).Do not insert Test Vial (B) in
the reading chamber.
18. After measuring (Ao) values of all the Barcoded Cuvettes (A), do not switch OFF the Analyzer.
19. Proceed for Incubation of the Barcoded Cuvettes (A) and the Test Vials (B).
D) Incubation of the inoculated Barcoded Cuvette (A)-black cap and the Test Vials (B)-green cap
20. Incubate all the inoculated Barcoded Cuvettes (A) and the Test Vials (B) for 4 hours in a
Bacteriological Incubator (at 35 - 37 ºC).
21. After 4 Hrs. of incubation, proceed to measure the Final absorbance (A1) values of the Barcoded
TM
Cuvettes (A) on the MICROPRO BCS Analyzer.
E) Measuring Final Absorbance (A1) of the incubated Barcoded Cuvettes (A)-black cap
22. In the display menu of the Analyzer using the scroll down Arrow key, bring the display cursor to
“Final Absorbance” in the Main Menu and press “NEXT”.
23. Retrieve one incubated Barcoded Cuvette (A), before inserting it in Analyzer for measuring Final
absorbance, kindly note it is imperative to gently swirl the Barcoded Cuvette (A) to disperse
Page 5 of 12
culture in the broth. Do not shake the cuvette vigorously as this may result in false negative
results. Check Section15 Remarks. After mixing the contents, follow the procedure as in step
(11).
24. On valid identification of the Barcoded Cuvette (A), the Analyzer will display the patient name,
sample ID, test ID and Final absorbance. Press “NEXT” key as this will ensure recording of the
Final absorbance (A1) value in the memory of the Analyzer. Remove the Barcoded Cuvette (A)
from the reading chamber and place it in the Cuvette stand.
25. Repeat steps (23-24) for rest of the incubated Barcoded Cuvettes (A).
26. After completing the Final absorbance (A1) for all the incubated Barcoded Cuvettes (A) scroll
down in main menu to bring the display cursor to “Results” and press “NEXT”. The results will be
displayed Sample Id Wise and the print out can be taken. Details of the “Result” menu
management is mentioned in the MICROPROTM BCS Analyzer user manual.
F) Result interpretation of Barcoded Cuvettes (A)-black cap
There are five types of results expected for the urine samples in MICROPROTM BCS Analyzer, and based on
these results further action is recommended.
Result reported in
S.No. MICROPROTM BCS
Analyzer
Interpretation of the
results
1
Negative
Negative for UTI
2
103 < 105 CFU/ml
Threshold or Evolving
UTI infection
3
105 < 107 CFU/ml
Positive (Frank UTI)
4
107 < 108 CFU/ml
Further Action
No further action required.
Report with printout of result.
Proceed for Biochemical identification
testing as recommended in Biochemical ID Kit packinsert.
Proceed for Biochemical identification
testing as recommended in
Biochemical
ID Kit packinsert.
Positive (Frank UTI with
High Count)
Proceed for Biochemical identification
5
> 108 CFU/ml
Very High Count.
testing as recommended in Mixed infection possible. Biochemical ID Kit packinsert.
Negative Test results:
·
The Barcoded Cuvettes (A) with Negative results along with its Test Vials (B) are to be discarded as per local
disposal guidelines, and sample to be reported negative with printout of the result.
Page 6 of 12
Positive Test results:
·
The Barcoded Cuvette (A) with Positive results along with the corresponding Test Vial (B) are to be retained
TM
in the Cuvette stand and then proceed for Biochemical identification testing using MICROPRO ID Kit.
Note (a) ODs displayed on the instrument screen are for indicative purpose only.
11. BIOCHEMICAL IDENTIFICATION OF UTI PATHOGENS
TM
The MICROPRO ID test helps in identifying the eight possible UTI pathogens namely E. coli,
Enterococcus faecalis, Streptococcus pyogenes, Proteus mirabilis, Proteus spp., Pseudomonas
TM
aeruginosa, Citrobacter spp., Klebsiella pneumoniae. For the Test procedure refer the MICROPRO IDkit Pack insert.
12. ANTIBIOTIC SUSCEPTIBILITY TEST
After the completion of Biochemical Identification tests, proceed for Antibiotic Susceptibility Test in four
steps as follows:
TM
Step 1) After completing Biochemical Identification tests about 1 ml of broth will remain in MICROPRO
Barcoded Cuvette (A). Centrifuge the cuvettes at RCF of 5000 g for 10 minutes at room temp. A
visible pellet will be observed. Discard the supernatant carefully by inverting the cuvette and retain
the pellet.
With a sterile loop, touch the pellet and transfer it to the tube of saline/peptone water. Dissolve the
inoculum thoroughly to avoid clumping of the cells. Adjust turbidity of inoculum to match the
standard, i.e., McFarland 0.5 equals approximately 10*8 CFU/mL.
Step 2) Proceed for inoculation on Mueller-Hinton Agar plate. Visually examine the Mueller Hinton Agar
plates prior to use, ensure that the plates are: free from visible contamination, poured to a uniform
depth of approximately 4mm, not excessively wet and not cracked or dry. Sterile Ready Prepared
®
Mueller- Hinton Agar Plates (Cat no. SP0012011) is available with MICROXPRESS .
Within 15 minutes of preparing the adjusted inoculum, dip a sterile cotton swab (Steristik, Cat no.
AC0003) into the inoculum. Rotate the swab several times and press firmly on the inside wall of the
tube above the fluid level to remove excess inoculum from the swab. Streak the swab over the
entire surface of the Mueller Hinton agar plate. Rotate the plate approximately 60° then repeat
streaking motion. Rotate 60° again and repeat streaking for the third time. Complete inoculation by
running the swab around the rim of the agar.
Step 3) Dispense the required number of antibiotic disks to the agar surface with a sterile forcep or disc
dispenser (forceps can be sterilized by flaming with alcohol. Avoid using over-heated forceps). Do
not relocate any antibiotic disk after contact with the agar. After application, ensure that the
antibiotic disk has made complete contact with the agar surface by touching the top of the disk with
TM
forceps. Antibiotic discs (Biogram ) recommended for UTI pathogens (as per CLSI) are available
®
with MICROXPRESS . (Refer antibiotics list mentioned in Section 16 ).
Step 4) Keep the plates in the incubator set at 35-37° C for overnight and then look for zone of inhibition as
TM
per CLSI guidelines. Refer Biogram Packinsert for detailed AST analysis.
13. QUALITY CONTROL PROCEDURES
TM
TM
Quality control of MICROPRO BCS system can be performed with MICROPRO UTI Control kit which is
available separately (Cat No MSQC01).
Quality control is to be performed for each batch to ensure that (1) Barcoded Cuvettes (A), Test Vials (B), the
MICROPROTM ID Kit reagents and the MICROPROTM BCS Analyzer are working as per specifications. For
TM
the Test procedure refer the MICROPRO UTI Control Kit pack insert.
Page 7 of 12