1
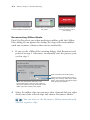
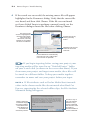
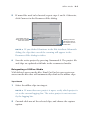
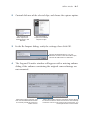
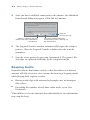
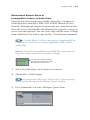
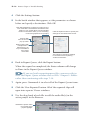
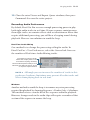
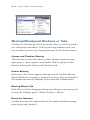
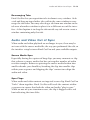
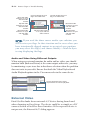
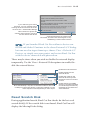
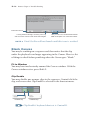
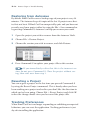
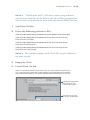
17
Bonus Chapter:
Troubleshooting
Sometimes things go wrong. What follows is a simple, general list of
troubleshooting situations.
Note P Beyond this list and the Final Cut Pro 7 User Manual,
there are active Final Cut Pro user groups and online forums
to research for solutions. Start your search by looking for the
Support and Online Communities sections at
http://www.apple.com/finalcutstudio/resources/.
Offline Media
An offline media error occurs when Final Cut Pro loses track of the
source media file for a clip. Outside of the rare file corruption, this
usually occurs under the following circumstances:
1. The source media file has been renamed outside of Final Cut Pro.
2. The source media file has been moved via the Finder to another
location on the same or a different hard drive.
3. The source media file has been deleted.
Except for scenario three, you can use the Reconnect feature to
relink a clip to its source media file. If the media file was deleted or
has become corrupted, you may reingest the source media from tapebased or tapeless media.
B–1
1
B–2 Bonus Chapter: Troubleshooting
Offline clips in the Browser
have red slashes on their icons.
Offline clips in a sequence
turn white.
Offline clips in the Viewer
or Canvas display with a
red warning.
Reconnecting Offline Media
Final Cut Pro alerts you when media goes offline with the Offline
Files dialog. If you ignore this dialog, the clips will remain offline
until you reconnect them to their source media files.
1 If you see the Offline Files warning dialog, click Reconnect and
proceed to step 3. Otherwise, to manually start the process, proceed to step 2.
Opens the Reconnect Files dialog.
Select the appropriate checkbox in the
Forget Files section and save the project to
stop future offline warnings about the current
offline clips when opening the project.
Clicking Continue closes this warning
dialog. The currently offline clips remain
offline, and this dialog will appear again
when opening the project.
2 Select the offline clips to reconnect; then Control-click (or right-
click) one of the selected clips and choose Reconnect Media.
You can also use the Reconnect Media command with
selected sequence clips.
Offline Media B–3
Note P Reconnecting media works best with master and affiliate clips, as the multiple uses of the same clip will be relinked.
Independent clips require one-by-one attention during the
reconnect process.
3 In the Reconnect Files dialog, click Search to have Final Cut Pro
search for any media file with the same name as the underlined
offline clip.
The offline clips that are selected or were
previously offline appear in the top half.
The underlined clip is
the item that will be
reconnected first.
The underlined selection
advances to the next
directory of offline clips,
skipping all clips in the
currently selected
directory.
Skips over the
underlined clip, which
will remain offline. The
underlined selection
moves to the next clip.
The buttons activate depending on
the type of media selected. You may
choose to reconnect a
combination of offline
(as shown here), online,
or render files.
Click Locate to manually
search for a clip.
Clicking Search
instructs Final Cut Pro
to search the connected
volumes for a media file
that matches the offline
clip’s original source
media filename.
Lets you speed up the reconnect process by restricting the search to
a specific volume and directory. Select the checkbox, and then specify
a location via the pop-up menu to the right. Utilize this when connected
to a large storage network or if your system is dual-boot partitioned for
Boot Camp.
Note P You will be required to click Locate if Final Cut Pro
failed to find a matching source media file on a prior search.
B–4 Bonus Chapter: Troubleshooting
4 If the search was successful, the missing source file will appear
highlighted in the Reconnect dialog. Verify that the correct file
was found, and then click Choose. If the file was not found
or if you clicked Locate to perform a manual search, use the
Reconnect dialog to locate the file before clicking Choose.
The result of the
search is highlighted if
the automatic search
was successful;
otherwise, manually
navigate to and select
the source media file.
Preview the clip by
clicking the Play
button.
Deselect if the source
media file has been
renamed.
Leave selected to automatically
reconnect as many offline clips
in this search as possible.
If you begin ingesting before saving your project, your
ingesting media will be stored in an “Untitled Project” folder
on your scratch disk (as shown in the screen shot above). If you
then name your project and ingest more media, these files will
be stored in a different folder. To keep your media together,
remember to name and save your project before you ingest.
Note P If file attributes such as Reel or Media Start timecode
values in the chosen media files do not match what Final Cut
Pro was expecting for the selected offline clips, the File Attribute
Mismatch dialog will appear.
Clicking Continue
notates the clip(s)
as having conflicts
in the Reconnect
Files dialog and
continues the
reconnect process.
This error may or
may not indicate
that the wrong
source media file
was chosen. Click
Try Again to
choose a different
source media file.
Offline Media B–5
5 If more files need to be located, repeat steps 3 and 4. Otherwise,
click Connect in the Reconnect Files dialog.
The offline clips for
which source media
files were found.
Clicking Connect
relinks the clips to
the chosen source
media files.
Note P If you clicked Continue in the File Attribute Mismatch
dialog, the clips that caused the warning will appear in the
Reconnect Files dialog in italics.
6 Save the active project by pressing Command-S. The project file
and clips are updated with links to the reconnected media.
Reingesting of Offline Media
With deleted source media files, Final Cut Pro lets you create new
source media files that will automatically relink to the offline clips.
Tape Based
1 Select the offline clips to reingest.
Note P If more than one project is open, verify which project is
set as the current logging bin. The active project is not necessarily the logging bin.
2 Control-click one of the selected clips, and choose the capture
option.
B–6 Bonus Chapter: Troubleshooting
The command is
Batch Capture for
selected clips in the
Browser.
The command is
Capture for selected
sequence clips.
3 In the Batch Capture dialog that appears, verify the settings; then
click OK.
4 Select a source reel in the Insert Reel dialog; then load the respec-
tive source tape into your deck/camera before clicking Continue.
Final Cut Pro begins recapturing the clips from this source tape.
5 If additional source reels are needed, Final Cut Pro will return to
the Insert Reel dialog, where you will repeat step 4.
6 If no additional source reels are needed, click the Done button
that will appear in the Insert Reel dialog.
7 Save the active project by pressing Command-S. The project file
and clips are updated with links to the reingested media.
Tapeless
1 Select the offline clips to reingest.
If you are retransferring media because of an offline/
online quality workflow, open Log and Transfer and set the
desired Import Preferences for transcoding before proceeding.
Note P If more than one project is open, verify which project is
set as the current logging bin. The active project is not necessarily the logging bin.
Offline Media B–7
2 Control-click one of the selected clips, and choose the capture option.
The command is
Batch Capture for
selected clips in the
Browser.
The command is
Capture for selected
sequence clips.
3 In the Re-Import dialog, verify the settings; then click OK.
Choose All Selected Items, or if your
selection contains online and offline clips,
choose All Offline Items in Selection.
4 The Log and Transfer window will appear with a missing volume
dialog if the volumes containing the original camera footage are
not mounted.
Mount the missing volumes, and
then use the Add Volumes button
to manually locate the volume or
folder archive.
Mount the missing volumes, and then use the Search
for Volumes button to have Final Cut Pro automatically
locate the volume. If the volume cannot be found, you
will be placed into manual mode.
B–8 Bonus Chapter: Troubleshooting
5 After you have established connection to the volumes, the Additional
Items Found dialog may appear. Click Add or Continue.
Stops the
retransfer process.
Adds any additional clips that
reference the same media files to
the selection.
Ignores the additional clips and
continues the process, affecting only
the selected items.
6 The Log and Transfer window automatically begins the reingest
process. Close the Log and Transfer window after the transfer
completes.
7 Save the active project by pressing Command-S. The project file
and clips are updated with links to the reingested media.
Beeping Audio
Beyond hardware limitations such as a slow hard drive or a limited
amount of RAM, there are a few reasons for hearing a beeping sound
while playing back sequence audio:
Having audio clips with mismatched sample rates or incompatible codecs
Exceeding the number of real-time audio tracks set in User
Preferences
What follows is a list of solutions that individually or in combination
may stop the beep.
Beeping Audio B–9
Mismatched Sample Rates or
Incompatible Codecs of Audio Clips
Final Cut Pro’s Easy Setups expect audio clips to have a sample rate
of 48 kHz and be encoded as AIFF, WAV, or BWF (Broadcast Wave
Format). Although you can preview practically any QuickTime media
file in the Viewer, all audio files should match the sequence’s settings to
ensure real-time playback. You can create clips with the correct settings
from within Final Cut Pro by using the File > Batch Export command.
Outside Final Cut Pro, you may use Soundtrack Pro,
Compressor, or iTunes to create compatible AIFF, 48 kHz
audio clips.
Note P Final Cut Pro will play back AIFF files of various settings that do not match the sequence’s settings.
The green line indicates that the
clip’s sample rate does not match
the sequence’s sample rate.
1 Select the audio clip(s) in the Browser to convert.
2 Choose File > Batch Export.
If you missed selecting a clip in step 1, you may drag
additional audio clips to the Export Queue window.
3 Press Command-A to select all Export Queue items.
B–10 Bonus Chapter: Troubleshooting
4 Click the Settings button.
5 In the batch window that appears, set the parameters as shown
below and specify a destination. Click OK.
Click Set Destination to specify a location for the
new media files. The default is the Render Files
folder on your scratch disk. A recommended
location is the folder where you are collecting
music and graphics for the project.
Click the Options button to specify the
settings for the chosen AIFF format.
Choose AIFF
from the Format
pop-up menu.
When working with
multiple files in a
batch export, you
may use a different
file-naming
convention.
The majority of sequence settings
in Final Cut Pro are expecting
48 kHz/16-bit audio.
6 Back in Export Queue, click the Export button.
When the export has completed, the Status column will change
to Done in the Export Queue window.
If you are batch exporting many files, you may wish to
close the Export Queue window and use File > Import > Folder
rather than continuing with steps 7–10.
7 Again, press Command-A to select all of the Export Queue items.
8 Click the View Exported button. All of the exported clips will
open into separate Viewer windows.
9 Use the drag hand of each file to add the audio file(s) to the
active project in the Browser.
Release the pointer when
you see the active
project highlight.
Beeping Audio B–11
10 Close the extra Viewer and Export Queue windows; then press
Command-S to save the active project.
Exceeding Audio Preferences
By default, Final Cut Pro reserves enough processing power to play
back eight audio tracks in real time. If your sequence contains more
than eight tracks, or contains effects such as transitions or filters that
require additional processing, you will hear a beeping sound during
playback. Here are two solutions to avoid the beep.
Real-Time Audio Mixing
One method is to change the processing ceiling for audio. In
Final Cut Pro > User Preferences, select the General tab. Increase
the number of Real-time Audio Mixing tracks.
Increase the number of audio
tracks that will play back in real
time before requiring rendering.
Leave Audio Playback Quality at Low.
This does not affect the export, share,
or output-to-tape functions.
Note P Although you can increase the number of tracks in this
preference, hardware limitations may prevent all audio tracks and
effects from playing back in real time.
Mixdown
Another method to avoid the beep is to remove any extra processing
required for playback by choosing Sequence > Render Only > Mixdown.
This method creates a render file of the sequence audio for playback.
However, changes made to the audio clips will require a rerender of that
section of the sequence to remove the beep.
B–12 Bonus Chapter: Troubleshooting
Missing/Misaligned Windows or Tabs
Windows or tabs may go AWOL on you by either a careless keystroke
or a wild mouse movement. With any missing window or tab, you
may usually reactivate it by choosing the item in the Window menu.
Canvas and Timeline Missing
This situation occurs when there is either no open sequence or no
open project. Open a project, and double-click a sequence in the
Browser to bring the Canvas and Timeline back.
Viewer Missing
Don’t panic. The Viewer appears when you need it. Double-click any
clip in the Browser or sequence to open the Viewer. Also, you may force
the window to return by choosing Viewer from the Window menu.
Missing Effects Tab
If the Effects tab has disappeared from your Browser, you may reveal
it using the Window menu. Choose Window > Effects.
Reset the Interface
Quickly rearrange the windows back to the standard window arrangement by pressing Control-U.
Audio and Video Out of Sync B–13
Rearranging Tabs
Final Cut Pro lets you reposition tabs in almost every window. Grab
a tab and drag on top of other tabs within the same window to rearrange the tab order. You may also drag a tab from one window to the
tab area of another window to place it in a different area of the interface. A third option is to drag the tab outside any tab area to create a
window containing only that tab.
Audio and Video Out of Sync
When audio and video playback are no longer in sync, there may be
an issue with the source media file, the way you performed the edit, or
the interface setup between Final Cut Pro and your available outputs.
Source Media Sync
Especially during the capture of long clips, you may encounter a clip
that references source media that has an irregular number of audio
or video samples. Before recapturing the source media broken into
smaller chunks, you should try breaking the clip into smaller clips
within your sequence and slipping the clips’ content to realign the
audio and video.
Sync Flags
When audio and video content are ingested as one clip, Final Cut Pro
“links” them together. Final Cut Pro will track the content within
a sequence to ensure that both the video and audio “play in sync.”
When an out-of-sync situation occurs, the clip is flagged with a red
box indicating the time delta.
B–14 Bonus Chapter: Troubleshooting
Move the video
content to re-sync
with the audio
content.
Control-clicking the sync
flag in the video track
Control-clicking the sync
flag in an audio track
Slip the video
content to re-sync
with the audio
content.
Move the audio
content to re-sync
with the video
content.
Move the audio
content to re-sync
with the video
content.
Slip the audio content
to re-sync with the
video content.
Slip the audio
content to re-sync
with the video
content.
If you used the above source media sync solution, you
will receive sync flags. In that situation and in cases where you
have intentionally slipped content to an out-of-sync position,
you may select the clip(s) and choose Modify > Mark In Sync
to stop displaying the flags.
Audio and Video Using Different Outputs
When using any external monitor for audio and/or video, you should
monitor both (look and listen) at the same output; otherwise, you may
be monitoring a sync issue due to hardware selection when the problem
does not exist in your edit. Ensure that both the Video Playback and
Audio Playback options in the View menu refer to the same device.
Look at and listen to the same
output device to monitor playback.
External Video
Final Cut Pro looks for an external A/V device during launch and
when choosing an Easy Setup. The device could be as simple as a DV
camera/deck or a FireWire-based interface. If the expected device is
not present, the External A/V dialog appears.
Reset Scratch Disk B–15
If you select to ignore future
warnings, you may reinstate future
warnings in the A/V Devices tab under
Final Cut Pro > Audio/Video Settings.
Click Continue to ignore this
warning and proceed to use Final
Cut Pro without the device.
Verify that the device is powered and
connected, and then click Check Again to retry
establishing contact with the device.
If you launched Final Cut Pro without a device connected and clicked Continue in the above External A/V dialog,
but now need to ingest from tape, choose View > Refresh A/V
Devices, or simply save your project and restart Final Cut Pro
with the device connected and powered on.
There may be times when you wish to disable the external display
temporarily. Use the View > External Video options to enable/disable the external device.
Disable the external device.
Enable playback to the
external device.
Update the image on the
external device only when
the Show Current command
is used.
Show the Multiclip n-Up view on the external device when the
multiclip is in the active Viewer or when the multiclip is in the
active sequence with Playhead Sync set to Open.
Update the list of available
devices in the Video Playback
and Audio Playback items by
refreshing the connections to
video interfaces.
Reset Scratch Disk
During application launch, Final Cut Pro checks for the last used
scratch disk(s). If the scratch disk is not found, Final Cut Pro will
display the Missing Disks dialog.
B–16 Bonus Chapter: Troubleshooting
Exit Final Cut Pro.
If using external storage, connect, power up,
and mount the volume. Then click Check Again.
Note P Lets you set a new scratch disk location.
Refer to Chapter 3 for more information.
Final Cut Pro will not launch until this issue is resolved.
Blank Canvas
You may be working on a sequence and then notice that the clip
under the playhead is no longer appearing in the Canvas. Here is a list
of things to check before panicking when the Canvas goes “blank.”
Fit to Window
You may have inadvertently zoomed the Canvas window. With the
Canvas window active, press Shift-Z.
Clip Enable
You may disable one or more clips in the sequence. Control-click the
clip, and ensure that Clip Enable is selected in the shortcut menu.
Enabled clip
Disabled clip
Clip Enable’s keyboard shortcut is Control-B.
Blank Canvas B–17
Track Visibility
Ensure that the video tracks are not disabled. Check the Track Visibility
controls for each track.
Disabled track
Enabled track
Image, Image+Wireframe, and Wireframe
You may have inadvertently pressed the W key with the Canvas
active. The W key cycles the Canvas through three modes: Image,
Image+Wireframe, and Wireframe. When the Canvas is set to Wireframe
and the clip under the playhead is not selected, the Canvas will display
black. With the Canvas active, either press the W key or choose Image
from the Canvas’s View pop-up menu.
The default setting, which displays the video frame only.
These two display modes allow for graphical modification
of some Motion tab parameters by displaying a wireframe
of the selected clip under the playhead.
Channels
The Canvas may be set to display only the alpha channel. Click the
Canvas’s display pop-up menu and choose RGB.
The default setting, which displays
the RGB channels of the clip.
Displays only the alpha channel of the clip.
Displays the alpha channel overlaid
on the RGB channels.
These options control the background color displayed in the
Viewer or Canvas window when there is no clip or when a clip
is modified such that it does not occupy the entire frame.
B–18 Bonus Chapter: Troubleshooting
Restoring from Autosave
By default, Final Cut Pro saves a backup copy of your project every 30
minutes. The Autosave keeps 40 copies of the last 25 projects on a firstin, first-out basis. If Final Cut Pro unexpectedly quits and you have not
recently saved your project either by using the File > Save command or
by pressing Command-S, Autosave can help you recover your work.
1 Open the project you wish to recover from the Autosave Vault.
2 Choose File > Restore Project.
3 Choose the version you wish to recover, and click Restore.
4 Press Command-S to update your project file to this version.
If you immediately realize that this is the incorrect version, do not press Command-S. Close the project without saving; then start over from step 1.
Reverting a Project
You can regress a project to the last time you pressed Command-S
by using the Revert Project command. This is handy when you have
been working on a project and realize you don’t like the direction in
which you’ve been going. Choose File > Revert Project and click OK
to lose the changes made since you last saved the project file.
Trashing Preferences
When Final Cut Pro is no longer responding or exhibiting unexpected
behaviors, you can reset the application. Trashing preferences is just
shy of reinstalling the application.
Trashing Preferences B–19
Note P “Trashing
the prefs” will delete some setup information and any favorites in the Effects tab. You will be prompted to
select some setup details the next time you launch Final Cut Pro.
1 Quit Final Cut Pro.
2 Delete the following preferences files:
/Users/[username]/Library/Preferences/com.apple.FinalCutPro.plist
/Users/[username]/Library/Preferences/Final Cut Pro User Data/
Final Cut Pro 7.0 Prefs
/Users/[username]/Library/Preferences/Final Cut Pro User Data/
Final Cut Pro Obj Cache
/Users/[username]/Library/Preferences/Final Cut Pro User Data/
Final Cut Pro Prof Cache
Note P The version number of the Prefs file may be different
on your system.
3 Empty the Trash.
4 Launch Final Cut Pro.
When you trash the preferences of Final Cut Pro, you must reset the Easy Setup for
your system and the scratch disk. These settings can be changed later via the Easy
Setup, Audio/Video Settings, and System Settings items of the Final Cut Pro menu.
Choose the appropriate
Easy Setup for your
Final Cut Pro system.
Use this pop-up menu
to set your scratch disk.
B–20 Bonus Chapter: Troubleshooting
Last Resort
There are many components to the software of a Final Cut Pro
system (not to mention additional third-party hardware/software
components that you may add to your system). When trouble arises,
check out the support articles and forums at http://www.apple.com/
support/finalcutpro/. In your research, you may find that reinstalling
only the Final Cut Studio applications and associated updates may
restore performance or clear up some errors.
And when it comes to a system that is operating correctly, there are
some generally accepted principles that we’ll review next.
Never update any part of your computer’s software without
a backup/restore workflow in place.
Whether you are using Final Cut Pro in a video post-production
business or in your home for editing videos of your family, updating/
installing software is an action with some associated risk. Always
back up your projects and any unrecoverable media before updating
system software, any component of Final Cut Studio, or third-party
drivers. Care is taken at many levels by all manufacturers to provide
a trouble-free update experience; however, not every situation can
be fully tested before delivery. Exercise caution before updating or
installing software. Be prepared to reinstall at least your Final Cut
Studio software, if not your computer’s entire hard drive contents, if
incompatibilities arise. And with that . . .
Never update your software while working on a deadline.
When money and your reputation are on the line, updating anything
on your system when a deadline is quickly approaching is just asking
for a visit from a guy named Murphy. If it ain’t broke, don’t fix it.