1
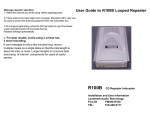
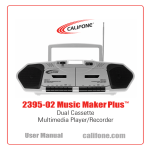
The lightning flash and arrowhead within the triangle is a warning sign
alerting you of "dangerous voltage" inside the product.
USER MANUAL
WARNING:
CAUTION
To SHOCK
reduce the risk of electric shock, do not remove cover (or back). No
RISK OF ELECTRIC
DO NOT OPENuser-serviceable parts inside. Refer servicing to qualified service personnel.
CAUTION:
The exclamation point within the triangle is a warning sign alerting you of
important instructions accompanying the product.
WARNING:
TO REDUCE THE RISK OF FIRE OR ELECTRIC SHOCK, DO NOT EXPOSE THIS
APPLIANCE TO DRIPPING OR SPLASHING LIQUIDS.
THE MAINS PLUG IS USED AS THE DISCONNECT DEVICE AND IT SHALL REMAIN
READILY OPERABLE. TO COMPLETELY DISCONNECT THE POWER INPUT, THE
MAINS PLUG OF THE APPARATUS MUST BE DISCONNECTED FROM THE MAINS
COMPLETELY. THE MAINS PLUG SHOULD NOT BE OBSTRUCTED OR SHOULD BE
EASILY ACCESSED DURING INTENDED USE.
CAUTION
DO NOT EXPOSE TO DRIPPING
OR SPLASHING LIQUIDS!
PLEASE NOTE: YOU WILL FIND THE
RATING LABEL FOR THIS PRODUCT
LOCATED ON THE REAR OF THE UNIT.
CAUTION: GROUNDING OR POLARIZATION. THE PRECAUTIONS SHOULD BE TAKEN
SO THAT THE WIDER BLADE OF THE AC PLUG MUST MATCH THE SLOT IN
RECEPTACLE "WALL SOCKET".
NOTE: CAUTION SYMBOLS ARE PRINTED ON BOTTOM OF UNIT.
PLEASE REFER TO INSTRUCTION MANUAL.
THE APPARATUS SHOULD NOT BE EXPOSED TO DRIPPING OR SPLASHING
AND NO OBJECTS FILLED WITH LIQUIDS SHOULD BE PLACED ON THE APPARATUS.
UNDER THE ENVIRONMENT WITH ELECTROSTATIC DISCHARGE, THE BLUETOOTH® FUNCTION
MAY STOP TEMPORARY AND THE USER NEEDS TO MANUALLY PRESS THE PLAY KEY AGAIN
TO GO ON LISTENING THE MUSIC.
BATTERY SHALL NOT BE EXPOSED TO EXCESSIVE HEAT SUCH AS SUNSHINE,
FIRE OR THE LIKE.
CAUTION
DANGER OF EXPLOSION IF BATTERY IS INCORRECTLY REPLACED.
REPLACE ONLY WITH THE SAME OR EQUIVALENT TYPE.
PBT600
High Power Rechargeable Wireless Boombox
E-2
OPERATION
LOCATION OF CONTROLS/ POWER SOURCES
2
1. Main Speaker (Left/ Right)
2. Slot for placing your Smartphone/ Tablet
3. Handle
4. Function keys panel
5. Display key
6. Mode key
7. Stop / Prog. key
8. MEM - / Folder - key
9. MEM + / Folder + key
10. Power key (On/ Standby)
11. LCD display
12. Next / Tune + key
13. Back / Tune - key
14. Play / Pair key
15. Function Key
16. USB MP3 Socket
17. SD-Card Socket
18. Microphone Input Socket
19. Microphone Volume Knob
20. Bass Knob
21. Treble Knob
22. Volume Control Knob
23. Telescopic antenna
24. Aux input-1 socket
25. USB Charging Socket
26. Aux-Input 2 socket
27. DC Power Socket
28. Charge Indicator LED
29. Reset hole
3
1
1
Enlarge view of the
4 Function keys panel:
5 6 7 8 9 10
12
14
11
13
16
20
17
18
21
15
19
22
23
24 25 26 27 28 29
Rechargeable Battery:
- This unit runs via internal rechargeable Lithium-ion battery.
- It can be also recharged with the provided AC-Charger.
- Please ensure your country’s AC-Charger is within the AC-Adaptor’s voltage range.
- Insert the small DC plug of the AC-Charger into the DC Socket at the back of the unit.
- Plug the AC-Charger into a wall outlet with AC power.
- The unit is charging if the charging LED indicator is on.
- Once the unit is fully charged, the charging LED indicator will automatically switch off.
- Once the unit has been charged, it can simply be unplugged and taken anywhere to be used.
- Total play time when fully charged can go upto 5-6 hours, depending on the type of music played
and the loudness level.
- When the unit is not being used, we suggest to keep it plugged in and charging.
IMPORTANT
PLEASE FULLY CHARGE THE UNIT BEFORE FIRST USE!
FOR BEST RESULT, FULLY CHARGE THE UNIT BEFORE USE EACH TIME.
IF THE BATTERY IS FULLY DRAINED, PLEASE ALLOW IT TO RECHARGE
FOR A FEW HOURS BEFORE USE.
E-3
USB charging port
This unit is equipped with a DC 5V USB charging port on the back panel. To utilize this function,
simply connect the device you would like to charge (eg: Smartphone or Tablet ) to a USB cord
and plug it into the USB charging port.
The device will be charged automatically when it is successfully connected, even during playback.
The USB port should only be used when the AC-Charger is plugged into the unit.
FUNCTION KEY
Pressing the FUNCTION Key repeatedly will allow you to select one of the different source
functions, as follows :
AUX-1
AUX-2
USB
BT
FM
CARD
Bluetooth
Radio
MP3
SD-Memory Card
Input
Input
player
MP3 player
Jack
Jack
Radio
- Press “FUNC” key repeatedly until display shows FM.
- To improve radio reception, extend and adjust position of the telescopic antenna.
- After tuning into a desired station, use “MODE” key to select (MONO/ STEREO) mode.
In some cases, when the reception is poor, we recommend to use “MONO” mode
for better clarity.
Manual Frequency Adjustment (Scan Mode)
- Press & immediately release “TUNE+” or “TUNE-“ Key to manually adjust the radio frequency
1 step at a time.
- When the desired station is reached, it can be saved into one of the “MEMORY” positions.
(See “Radio Memory” section for further details).
Automatic Frequency Adjustment (Seek Mode)
- Press & Hold (For 2 seconds) “TUNE+” or “TUNE-“ key to seek the next available radio station
frequency.
- When the desired station is reached, it can be saved into one of the “MEMORY” positions.
(See “Radio Memory” section for further details).
Radio Memory
- After tuning into a desired station, it can be stored into one of the 20 available memory positions.
- Short Press “PROG.” key to go to memory tuning mode.
- Press & release “MEM+” or “MEM –“ key to choose the desired memory storage
position you would like to store into (CH01 to CH20).
- Short Press “PROG.” key again to confirm selection.
- To erase a saved radio station, simply replace it with a new station in same memory position.
Recalling a saved memory station
- Short press “MEM+”/ “MEM-“key to find (recall) a desired memory position (CH01 to CH20).
E-4
OPERATION
OPERATION / SPECIFICATIONS
Bluetooth® wireless playback (A2DP Wireless Audio Streaming)
This unit can wirelessly playback audio from any device with Bluetooth A2DP function within approx.
30 feet (10m).
Simply pair your device to this unit to enjoy Wireless Audio Streaming.
USB THUMB DRIVE & SD CARD FLASH MEMORY (MP3 PLAYBACK)
The following chart shows how to use USB/SD mode:
KEY
For USB thumb drive & SD Card
Press repeatedly until "USB" or "CARD" is displayed
FUNC.
DISPLAY
Playback time » Folder # » Track #
FOLDER +/ FOLDER -Choose folder location on your USB/ SD Card (Not usable in RANDOM play mode)
Skip to next song (Not usable in REPEAT 1 mode)
NEXT
Skip to pervious song (Not usable in REPEAT 1 mode)
BACK
Start or pause Playback
PLAY/ PAUSE
»
»
NORMAL PLAY» REPEAT 1»REPEAT ALLREPEAT
FOLDERRANDOM
PLAY
MODE
(NOTE: RANDOM PLAY is limited to songs within a selected folder only.)
Stop playback
STOP
NOTE:
It takes time to "Open & Verify" a large USB-Drive/ SD-Card, and count all the song files.
If there are many files, it can take up to 60 seconds for this process.
IMPORTANT: REMOVAL OF USB DRIVES & SD CARDS
Never remove SD cards or USB drives from the unit during playback.
Always STOP playback, then press “FUNCTION” key to switch to another mode (RADIO/BT)
before removing your USB/SD memory to prevent damage to your song files and memory
devices itself.
Using Audio Line-in Connection (Aux-input)
This unit comes with 2 Aux-input sockets (AUX IN 1/AUX IN 2), allowing you to connect two
external devices at the same time.
You can switch between the 2 Aux-Input sources to “mix” your music.
- Connect your external device to this unit using a standard stereo headphone (3.5mm to 3.5mm)
cable.
- Press “FUNCTION” key repeatedly until display shows “AUX-1”/ “AUX-2”, depending on which
socket you have plugged into.
- Switch on your external device & activate playback on it.
- Playback of external device will start momentarily. Adjust the volume control of the main unit
and your external device to the desired level.
- Playback control can be done only through your external device.
- Remember to switch off the unit when you finish using the external device.
How to pair your device to this unit?
- Switch on the unit, and press “FUNC” key repeatedly until display shows BT
- The "BT" symbol in the LCD display indicates the pairing status:
Searching
Pairing
Connected
Flashing slowly
Flashing rapidly
BT symbol stays on
- To force the unit to go into "SEARCHING" mode, press and hold the "PAIR" key for 2 seconds
until the "BT" symbol begins flashing slowly.
- Switch on Bluetooth® function of the device you would like to pair with (Your Smartphone /Tablet
/Laptop).
- Go to your device's Bluetooth® Setting. DEVICE NAME: (BT GHETTO BOX)
- Add or search for devices. Make connection on your device (eg. Press "CONNECT").
- If asked for a pass code, enter “0000”.
*This is a one-time event per device. To pair your unit with another device,
please repeat the above steps. The unit remembers up to 5 devices.
There is no need to repeat this pairing procedure for up to 5 devices,
even if unit is powered off.
The unit will also automatically pair with the LAST paired device if it is found
when the unit is powered on and switched to Bluetooth® mode.
Note that only one device can be paired at any given time, but the unit will remember
up to 5 devices in memory.
Disabling Bluetooth® Connection:
To unpair a Bluetooth® device that has already been paired, press & hold “PAIR” key for a few
seconds until pairing status changes from “CONNECTED” to “SEARCHING”.
(The BT symbol starts flashing slowly)
Sound Control:
- Adjusting loudness can be done by rotating the Volume Knob on this unit or the device you
have already paired with.
Note: if there is no playback, ensure the volume on both devices is not set to 0.
Sound Effect (Music Equalization)
To enhance the quality of music, this powerful sound system comes with two additional
equalization functions. At anytime during playback, you can rotate the bass and treble knobs:
for stronger Low frequencies (BASS) or High frequencies (TREBLE).
Microphone input
This unit comes with a microphone input function. To utilize this function, simply connect your
microphone to the 6.3mm (1/4”) input socket at the front of this unit. You can adjust the Mic volume
by rotating the microphone volume knob. This function works perfectly during playback of all
input sources including Bluetooth®, FM radio & Aux-Input, so you can sing along with any source
or device.
E-5
System Reset
When electrostatic discharge (ESD) occurs at the front surface (whether metal or plastic)
or near any part or any button of this unit, there may be a possibility that the product may
stop operation and/ or shut down immediately.
This is a normal condition and intended to protect the unit and internal components against
damage. In such a case, please reset the unit using the system reset hole (at the rear
of unit), simply insert a paper clip into the reset hole for 2 seconds to revert the unit to normal
operation.
Specifications
Power Supply : ............... Rechargeable Lithium 3.7V/ 2Ah X 2 PCS (Built-in)
AC-Charger Input : ......... AC 100-240V ~ 50/60 Hz
AC-Charger Output = DC-Input of unit : ...... DC 9V
, 1.5A
Recharge Power : .......... USB 5V - (minimum 500mA)
Speaker : ...................... 4"x2
Frequency : .................. FM 87.5- 108 MHz
MP3 : ............................ 16-320 kbps (max. 999 Files/ 99 Folders)
E-6
E-8