1
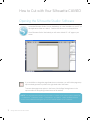
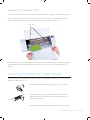
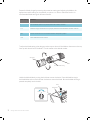
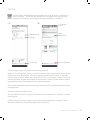
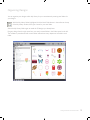
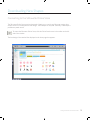
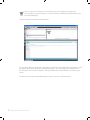
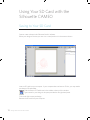
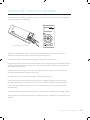
Getting started with your
Connecting your Silhouette CAMEO
1
Check Included Items
The Silhouette CAMEO comes with the items shown in the following list. Check that all the items
have been included before starting. If you are missing any items listed below, please contact
[email protected].
Silhouette CAMEO
electronic cutting tool
Silhouette Studio‰
software
USB cable
A/C adapter and
power cable
Instructional DVD
blade with
ratchet cap
12” cutting mat
Take the Silhouette CAMEO from the box and remove the three strips of packing tape and foam support
as indicated by the following diagrams. These strips of tape and foam are used to hold the moving parts of
the Silhouette in place during shipment.
remove tape
1
Getting Started with Silhouette CAMEO
remove foam
2
Install the Silhouette Studio‰ Software
PC Installation
1. Insert the included Silhouette Studio® CD into the CD drive of your computer.
2. Proceed through the installation process by following the on-screen prompts. If the installation window
does not automatically appear, browse to the CD drive in My Computer and double-click the setup.exe
program to run it.
3. If a “New Hardware Found” dialog box appears, follow the recommended instructions to accept your
system’s installation of the Silhouette driver.
Mac® Installation
1. Insert the included Silhouette Studio® CD into the CD drive of your computer.
2. Drag and drop the Silhouette Studio® application icon into the applications folder to install Silhouette
Studio®.
3
Connect the Silhouette CAMEO
Once the Silhouette Studio® software is installed, connect the Silhouette CAMEO to the power supply.
Then connect the Silhouette to your computer with the included USB cable as shown in the diagram.
1
2
power
Turn the machine on by pressing the power button. If your PC displays a “New Hardware Found” dialog
box, follow the recommended instructions to accept your system’s installation of the Silhouette driver.
Getting Started with Silhouette CAMEO
2
How to Cut with Your Silhouette CAMEO
Opening the Silhouette Studio® Software
Locate the Silhouette Studio® icon on the desktop, or in the Start Menu on your PC (in
the Applications folder on a Mac®). Double-click the icon to run the application.
Once Silhouette Studio® has loaded, you will notice a blank 12” x 12” page on your
screen.
If you would like to change the page dimensions or orientation, you will find the page setup
options already opened in a panel on the right-hand side of the screen.
To access these page setup options in the future, click the Page Settings button in the
options toolbar in the upper right-hand corner of the window.
NOTE: To change the measurement units from the U.S. system to the metric system, choose File
-> Preferences… (Silhouette Studio® -> Preferences… on a Mac®). Under the Measurements
section of the preferences dialog box you will find several different units of measure.
3
Getting Started with Silhouette CAMEO
Getting Started with Silhouette CAMEO
4
Select All
Deselect All
Ungroup
Group
Show Library
Show Library and
Drawing Area
Drawing Area
Library
Online Store
Text Tool
Eraser Tool
Knife Tool
Polygon Tool
Curved Shape Tool
Freehand Tool
Line Tool
Rectangle Tool
Rounded Rectangle
Ellipse Tool
Select Tool
Point Edit Tool
New Drawing
Save to SD Card
Open Save
Delete
Send to Back
Duplicate
Bring to Front
Offset
Weld
Zoom In
Send to Silhouette
Print
Undo
Zoom to Selected Area
Paste
Redo Zoom Out Drag Zoom
Copy Cut
Fit to Window
Fill Pattern
Fill Gradient
Fill Color
Options Home
Silhouette Studio®
Color Preference
Line Color
Rotate
Line Style
Move Scale Replicate
Cut Style
Modify Offset
Text
Align
Page Options
Panel
Page Tools
Cut Settings
Registration Marks
Grid Settings
Auto Trace
Drawing Text
To cut letters or words using any font on your computer, choose the text tool from the toolbar on the left-hand side of the screen. With the text tool selected, click anywhere on the page to begin typing.
After clicking on the page with the text tool, a blinking cursor will appear. Begin typing any letters/
words/phrases you choose.
While you are typing/editing text, the text options panel will appear on the right-hand side of the
screen. In this panel you can change the font, text size, weight, justification, character spacing and
line spacing. Use the mouse to highlight your text before making adjustments to the font, size,
weight, etc.
To finish typing your text, click anywhere off the page. This will end the text editing mode and
deselect the text. If you need to make a change to the text, double-click the text on the page using
the Select Tool (found on the left-hand toolbar).
To move your text around the page, click and drag it to a new location.
To resize your text, select the text and then click and drag one of the corner control handles.
To rotate your text, select the text, then click and drag the green circle displayed above the object.
5
Getting Started with Silhouette CAMEO
Drawing Simple Shapes
Silhouette Studio® has built-in functions to draw simple shapes such as circles, squares, rectangles,
lines, polygons, and freehand line art. Each of these tools can be found in the toolbar on the left-hand
side of the Silhouette Studio® window.
Lines
To draw a line, choose the Line Tool on the left-hand toolbar. Either click and drag with the mouse to draw a line, or click once to start the line and click a second time to end.
Hold SHIFT while creating a line to make a perfectly vertical, horizontal, or 45° line.
Rectangles/Squares
To draw a rectangle, choose the Rectangle Tool from the left-hand toolbar. Either click and drag with the mouse to draw a rectangle, or click once to set one corner and click a second time to set the opposite corner.
Hold SHIFT while creating a rectangle to make a perfect square.
Hold ALT (OPTION on Mac®) to draw the rectangle from the center instead of one corner.
Hold SHIFT + ALT (SHIFT + OPTION on Mac®) to draw a perfect square centered on your original
click.
Getting Started with Silhouette CAMEO
6
Cutting Your Design
Preparing the Cutting Mat
Remove the non-stick liner from the cutting mat.
Position your paper or other media on the cutting mat according to the diagram shown in Silhouette
Studio®.
If you don’t see an image of the cutting mat under your document on the screen, click the Page Setup button in the options toolbar in the upper right-hand corner of the window.
Position your image on the screen where you want it to cut on the mat. Be sure to keep your design
within the red margins on your page.
7
Getting Started with Silhouette CAMEO
Preparing the Silhouette to Cut
Turn the Silhouette CAMEO on by pressing the power button and waiting for the machine to start up.
Once it is ready, use the up and down arrow buttons on the Silhouette to scroll through the menu
system on the LCD display until you reach the menu selection “Load cutting mat”.
white rollers
Feed the cutting mat into the Silhouette by lifting the Silhouette lid, placing the mat centered between
the white rollers, and pressing the Enter button (while “Load cutting mat” is selected on the LCD
display).
Adjusting the Rollers for Smaller Media
By adjusting the white rollers on the main roller shaft, the Silhouette CAMEO can cut the following
media sizes: A4, letter, 12”, 13”.
Locate the release lever on the right side and turn it clockwise.
Twist the sliding roller so the pinchers are NOT in the notches.
Slide the roller to the desired media size and twist again to lock
the pinchers into place.
Return the release lever to the upright position to lock it in place.
Getting Started with Silhouette CAMEO
8
Prepare the blade plunger by removing the protective covering and adjusting the blade to the
appropriate number setting for the material you plan to cut. Refer to Silhouette Studio® for
recommended blade settings for different materials.
Blade setting
Material
1
Thin materials such as vinyl and smooth heat transfer material
2-3
Medium-weight materials such as paper, cardstock and flocked heat transfer material
4-6
Thicker materials such as textured cardstock and pattern papers
7-10
Thick materials such as canvas
To adjust the blade setting, place the grey ratchet cap on the end of the blade so the arrow on the cap
lines up with the red line on the blade. Turn the ratchet to the desired number.
ratchet cap
blade
numbered blade setting
Unlock the blade holder by turning the lock lever counter-clockwise. Place the blade housing in
the blade holder and turn the lock lever clockwise to secure the blade. Be sure the blade housing is
pressed completely into the holder.
blade
blade holder
loosen
fasten
lock lever
9
Getting Started with Silhouette CAMEO
Cutting
Click the Send to Silhouette button on the toolbar at the top of the screen, or choose File -> Send to Silhouette... The Send to Silhouette panel (A) will appear on the right side of the screen and an illustration of the cutting mat will appear beneath your workspace.
(A)
(B)
Change Settings
Cut Settings
button
Select
Media Type
Cut Page
Cut Settings
Send to Silhouette
Click the change settings link to access the cut settings panel (B).
Within the Cut Settings panel, you will notice a list of common media types including various weights
of paper, vinyl, and other materials. Choose the appropriate media type from the list. If the media
you are cutting (or a similar media) does not appear in the list, you can choose “Custom” from the list
and manually adjust the speed and thickness for the Silhouette. Generally, thicker materials require a
higher thickness and intricate designs require a slower cutting speed.
Once you have chosen the appropriate cut settings, click the Send to Silhouette button at the bottom
of the right panel.
Click the Cut Page link to begin cutting.
Once the Silhouette is done cutting, the LCD display will read “Unload media”. Press Enter to unload
the cutting mat.
Carefully peel away your cutout design. Peel the leftover paper/media off the cutting mat. Use a
Silhouette scraper tool to scrape excess paper pieces from the mat.
Getting Started with Silhouette CAMEO
10
My Library
Browsing Designs
Click the My Library button to view the Silhouette designs you have on your computer. Silhouette Studio® includes 50 free designs to help you get started.
Click the Show All Designs shortcut in the left panel of My Library to view all 50 designs included
with your software.
balloons
banner
banner
baseball
basketball
believe in yourself
bird
birthday card
bone
bookmark
boombox
butterfly
button
Christmas tree
flower
football
frame
frame
heart bag
heart
kite
lamp
lotus flower
love you
maple leaf
Click the icon next to the My Library folder
to expand the folder and view its contents. This
folder initially contains the 50 free designs included.
11
Getting Started with Silhouette CAMEO
Use the View as Icons button and View as List button to change the view of your designs in the right panel. In List View, you can sort by name, design type, artist name, and date downloaded.
Organizing Designs
You can organize your designs within My Library for your convenience by creating new folders for
your designs.
With the My Library folder highlighted, click the New Folder button in the toolbar at the top of the My Library window, then type a name for your new folder.
Select the My Library folder again to reveal the 50 designs you already have.
Drag any design from the right panel into your newly created folder in the folders panel on the left.
The numbers in parentheses next to each folder indicate how many shapes are included in each
folder.
balloons
banner
banner
baseball
basketball
believe in yourself
bird
birthday card
bone
bookmark
boombox
butterfly
button
Christmas tree
flower
football
frame
frame
heart bag
heart
kite
lamp
lotus flower
love you
maple leaf
lotus flower
Getting Started with Silhouette CAMEO
12
Searching Designs
At the top of the My Library window you will find a search box. Click in the text box and type a
keyword to search your library of images. Search results will display in the right panel of My Library.
search box
If you would like to view the keywords and description for a shape used for searching, right click
(Control Click on Mac®) and choose Show Properties. At the bottom of My Library details about
the highlighted shape will appear. Shapes downloaded from the Silhouette Online Store will contain
several keywords and a description or instructions.
Using Designs in My Library
Using the folders in My Library, navigate to a design that you’d like to cut. Double-click the design to
place it on your page in the software.
This will automatically close My Library which can be easily re-opened by clicking the My Library button on the left toolbar again.
To close My Library without pasting a design, click the Close button in the upper right-hand corner of
the My Library area.
13
Getting Started with Silhouette CAMEO
Downloading New Shapes
Connecting to the Silhouette Online Store
The Silhouette Online Store contains thousands of designs to cut with your Silhouette ranging from
simple cutouts to intricate patterns and designs. Most shapes are only 99¢. Generally, a free shape is
posted every week as well.
To access the Silhouette Online Store, click the Online Store button in the toolbar on the left side of the window.
The free design of the week will be displayed on the home page that appears.
Getting Started with Silhouette CAMEO
14
Browsing for new designs
The Silhouette Online Store works like any other web page and can be navigated by clicking on
various links to browse new releases, popular designs, etc. The home page contains popular and new
designs that you may be interested in.
For now, try downloading a free design by clicking this week’s free design button on the home page,
or searching for the free design named “butterfly_1510”.
Click on the design in the search results to view details about the design.
Click the Add to Cart button to add this free design to your shopping cart.
Locate the shopping cart icon in the upper right-hand corner of the window and click it to view your shopping cart. Your shopping cart total should be $0.00.
Click the Checkout button to proceed. At this time the system will ask you to sign in before
downloading. Creating a new account only takes a few seconds. Click the Sign up Free link on the
login page to create a new account.
15
Getting Started with Silhouette CAMEO
Creating an account
Several different account types exist. Once you’re more familiar with the Silhouette Online Store, you
may wish to purchase a subscription and download dozens of designs each month.
In order to create a free account and buy designs one at a time, choose the “Pay as you go” option.
You will be asked for your name, email and password in order to create an account. Type your
information and click the Sign Up button.
Getting Started with Silhouette CAMEO
16
Once your account is created, you will need to access your shopping cart again and try the checkout process once more. You will be asked to validate your password each time you download designs.
Type your password to authorize the download.
As your design begins to download, it will appear in the Recent Downloads folder of My Library which
will appear on the screen showing the download progress. Any new designs you download from
the Silhouette Online Store will appear in this special folder and can be moved to any folder of your
choice.
Double-click your newly downloaded design to paste it into your current document.
17
Getting Started with Silhouette CAMEO
Using your download card
If your Silhouette came with a download card, you may use it to purchase designs from the Silhouette
Online Store. To do this, click the My Account link at the top of any page within the Store.
From the My Account page, click the Add a Download Card to My Balance link. A screen will appear
where you can type the code found beneath the scratch-off surface of your download card.
Type your download code and press the Apply Card button.
The dollar amount on your download card will be applied to your balance on your account and will
appear in the upper right-hand corner of every page. Once your download card has been transferred
to your online balance, the card is no longer needed and can be discarded.
With credits on your account, you can now shop through the Silhouette Online Store and download
designs without using a credit card.
Getting Started with Silhouette CAMEO
18
Using Your SD Card with the
Silhouette CAMEO
Saving to Your SD Card
Open or create a shape in the Silhouette Studio® software.
Resize your design to the size you want it to cut and position it in the corner as shown.
Insert an SD card into your computer. If your computer does not have an SD slot, you may need to
purchase an SD card reader.
Click the Save to SD Card button in the toolbar at the top of the window.
Type a name for your design in the space provided on the right-hand panel.
Click on the link to save your design.
Remove the SD card from your computer.
19
Getting Started with Silhouette CAMEO
Using an SD Card in your Silhouette
With the Silhouette CAMEO turned on, insert your SD card into the slot on the side of the machine.
Load your media into the Silhouette.
Insert the SD Card into SD card slot
With the SD card inserted and your cutting mat/media loaded, press the Pause button on the
Silhouette CAMEO control panel to enter the SD card settings menu.
Use the Up and Down arrow buttons to highlight “Select File” and press Enter.
Using the Up and Down arrow buttons and the Enter button, navigate through the available folders on
your SD card to locate the file you want to cut. Many files will render a preview of the shape on the
right side of the LCD display.
Press Enter to choose a shape. On the main SD card settings menu you will now see the chosen
filename in brackets below the option “Select File”.
Use the Up and Down arrow buttons to select “Settings” and press Enter.
Using the Up and Down arrow buttons and Enter button, navigate through the various settings
including media settings (cut speed and force), cut size, number of copies, and the starting point.
Press the left arrow button to return to the main SD card settings menu once you’ve chosen the
desired settings.
Use the Up and Down arrow buttons to select “Cut” from the menu and press Enter to begin cutting.
When the cutting is completed, press Enter to unload your media. Remove the SD card when you are
finished.
Getting Started with Silhouette CAMEO
20
Where to Find More Information
Complete User’s Manual
View the complete, illustrated User’s Manual within Silhouette Studio® by clicking Help -> User’s
Manual.
Website
Visit the tutorials section of www.silhouetteamerica.com for help with specific features and step-bystep instructions on how to cut different media types with the Silhouette CAMEO.
Blog
Visit the official Silhouette blog at blog.silhouetteamerica.com for ideas of new projects you can
create. Many blog posts contain step-by-step instructions for advanced uses of Silhouette products
and software.
Newsletter
Sign up for the Silhouette newsletter at www.silhouetteamerica.com to receive product updates and
special offers via email.
Customer Service
If you have any further questions, feel free to contact customer service:
Silhouette America, Inc.
[email protected]
(800) 859-8243 (US only)
(801) 983-8937
21
Getting Started with Silhouette CAMEO
Getting Started with Silhouette CAMEO
22
SILH-CAM-GUIDE-SS
www.silhouetteamerica.com