1
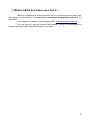
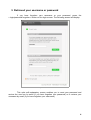
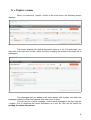
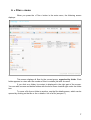
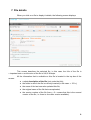
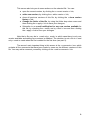
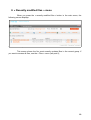
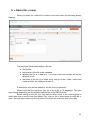
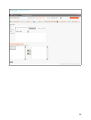
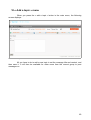
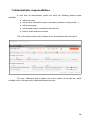
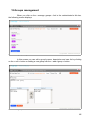
FBOX Trial Master File
User Manual
Telemedicine Technologies
88 rue du Dôme
92 100 Boulogne Billancourt
David RAPIN
updated August 26, 2008
Table of Contents
1.What is FBOX and where can I find it ?..............................................................................3
2.Logging in to FBOX.............................................................................................................4
3.Retrieved your username or password...............................................................................5
4.Main screen (« recent activity » menu)...............................................................................6
5.« Topics » menu..................................................................................................................7
6.« Files » menu.....................................................................................................................8
7.File details...........................................................................................................................9
8.« Recently modified files » menu......................................................................................11
9.« Add a file » menu...........................................................................................................12
10.« Add a topic » menu......................................................................................................14
11.Administrator responsabilities.........................................................................................15
12.Groups management......................................................................................................16
13.Users management.........................................................................................................17
14.« My Account » menu.....................................................................................................19
1
1. What is FBOX and where can I find it ?
FBOX is a collaborative working tool that lets you communicate and share files
with people you work with. It is a forum and a document management system at the
same time.
It is available as a website at the following URL: http://fbox.tentelemed.com.
You can access it with you favorite Web browser, though we recommend the
usage of a browser that respects standards, like Firefox.
2
2. Logging in to FBOX
When you access FBOX with your favourite browser, you should be able to see
the following screen:
Illustration 1: login screen
You need to have an account created to access the whole site. If you don't have
one, you should contact your system administrator and request one. For an account
creation, the following information will be requested:
●
first name
●
last name
●
username
●
password
●
personnal e-mail
If you already have an account, enter you username and password and press
the « login » button.
If you have forgotten your username or your password, press the
« login/password forgotten » button, and see part 3.
3
3. Retrieved your username or password
If you have forgotten your username or your password, press the
« login/password forgotten » button on the login screen. The following screen will display:
Illustration 2: username and password retrieve screen
This quite self-explanatory screen enables you to reset your password and
recieve the new one by email (if you have forgotten your password) or to recieve your
username by email (if you have forgotten your username).
4
4. Main screen (« recent activity » menu)
After you have successfully logged in, the following screen displays:
Illustration 3: main screen
The first thing that you can notice on the top-left of the screen is a group name
and a group description. This reflects the current selected group. A group represents an
actual working group, containing users. A group has its own files and discussions that
cannot be seen from outside the group. Each user (including you) is member of groups,
which he can switch from using the « group » drop down menu (left from the
« disconnect » button in the status bar).
The next element that you can notice is the title bar, with two links: « forum »,
which brings you back to this page, and « my account », which will be described at part 14.
The title bar also contains two flags which allow you to change the site language to
French or English.
Below the title bar is the status bar. This bar contains the name of the current
connected user (you), the time and date of your previous login, and the drop down menu
that allows you to change the current group.
The main menu contains the following choices: « recent activity » (the currently
displayed screen), « topics », « files », « recently modified files », « add a file » and « add
a topic ». Each of these menus will be discribed in the following parts of this document.
The bottom of the screen displays the five last active topics, and the five last
updated files. In the current case, there is only one topic, thus, it is displayed. If more than
five topics exist, you may find all existing topics via the « topics » menu (see part 5).
5
5. « Topics » menu
When you press the « topics » button in the main menu, the following screen
displays:
Illustration 4: topics screen
The screen displays all existing discussion topics in a list. For each topic, you
may click on the topic title (or the « show » button) to display the content of the topic (all its
messages):
Illustration 5: content of a topic
The messages that you added to the topic appear with a yellow icon while the
messages added by other users appear with a blue icon in front.
You can use the « add a message » link to add a message to the topic and the
« export » link to download the whole discussion as a text file (this can be usefull for
printing the whole discussion).
6
6. « Files » menu
When you press the « Files » button in the main menu, the following screen
displays:
Illustration 6: file tree screen
This screen displays all files for the current group, organised by folder. Each
folder appears in a tree with the number of files it contains just after its name.
If you click on a folder, its content is displayed in the right part of the screen.
You can add, rename and delete folders with the three forms located right under the folder
tree.
To move a file from a folder to another, use the file details screen, which can be
opened by clicking on the title or the « details » link of a file (see part 7).
7
7. File details
When you click on a file to display it details, the following screen displays:
Illustration 7: details screen for a file
This screen describes the selected file, in this case, the title of the file is
« important note » and the size of the file is 246,3 Kilobyte.
All the information that is available on this file is located in the top box of the
screen:
●
a short description of the file (just under the title);
●
the folder in which the file is currently located (in this case: « 123 »);
●
the name of the last user who updated this file;
●
the original name of the file that was uploaded;
●
the version number of the file (here, « 2 » means that this is the second
version of the file, i.e. there is one older version available).
8
This screen also lets you do some actions on the selected file. You can:
●
open the current version, by clicking the « current version » link;
●
add a new version, by clicking the « add a version » link;
●
show all previous versions of this file, by clicking the « show version
history » link;
●
Change the folder of the file, by using the folder drop down menu and
then clicking the « apply » link to save your changes;
●
Subscribe to an e-mail notification for any new version available for
this file, by checking the « notifiy me by e-mail » box and then clicking
the « apply » link to save your changes.
Note that a file may be in « read only » mode, in which case there is only one
version available and adding new versions is disabled. The decision to set a file to « read
only » mode is made when the file is added for the first time (see part 9).
The second main important thing in this screen is the « comments » box, which
contains all the comments that have been made by users on the different versions of this
file. You may add a comment yourself by clicking on the « add a comment » link.
9
8. « Recently modified files » menu
When you press the « recently modified files » button in the main menu, the
following screen displays:
Illustration 8: recently modified files screen
This screen shows the five most recently updated files in the current group. If
you want to access all files, use the « Files » menu (see part 6);
10
9. « Add a file » menu
When you press the « add a file » button in the main menu, the following screen
displays:
Illustration 9: file add screen
The requiered fields when adding a file are:
●
the file title;
●
the location of the file to be uploaded;
●
whether the file is « read only » (in which case new version will not be
allowed) or not;
●
the folder of the file (if no folder exist, first go to the « Files » menu and
create a folder, as explained at part 6);
A description can also be added for the file, but it is optionnal.
Please note that the maximum size for a file is set to 10 Megabyte. This size
may change depending on the technical specificities of the FBOX server.
Before saving a new file, you may want to select users in the current group to
notify them that a new file was just added. If so, click on the « select users to notify be email » link and select users by moving them to the right row of the list (see next page).
11
Illustration 10: file add screen with user notification
12
10.« Add a topic » menu
When you press the « add a topic » button in the main menu, the following
screen displays:
Illustration 11: topic add screen
All you have to do to add a new topic is set the message title and content, and
then save it. It will then be available for other users from the current group to post
messages on.
13
11.Administrator responsabilities
A user with an administrator profile will have the following actions made
available:
●
add a new user;
●
edit a user's information (name, username, password, email, profile ...);
●
add a new group;
●
edit a group's name, description and user list;
●
block a user's access to the site.
This is the default screen that is shown to an administrator when he logs in:
Illustration 12: admin main screen
The only difference with a classic user is the content of the title bar, which
contains links to the previously listed administrator actions.
14
12.Groups management
When you click on the « manage groups » link in the administrator's title bar,
the following screen displays:
Illustration 13: group management screen
In this screen you can edit a group's name, description and user list by clicking
on the « edit » button or adding a new group with the « add a group » button.
Illustration 14: group edit screen
15
13.Users management
When you click on the « manage users » link in the administrator's title bar, the
following screen displays:
Illustration 15: user management screen
In this screen you can either add a new user or edit an existing one. In both
cases, the following screen will display:
Illustration 16: user edit screen
16
The user edit screen lets you change a user's account data, and control the
level of right (the profile) of that user.
The « Has access to site » checkbox lets you disable a user's access to the
whole site without having to delete his account.
An adapted profile may be chosen for a user to control what he see/modify in
the site. The currently available profiles (and respective rights) are:
●
File R/W + Discussion R: see files and discussions, add and update files;
●
File R + Discussion R/W: see files and discussions, add messages and
topics;
●
File R/W + Discussion R/W: see files and discussions, add messages,
topics, add and update files;
●
File R + Discussion R: see files and discussions;
●
Admin: everything, including administrator actions (manage users and
groups).
Once a user has been changed, use the « save » button to save your changes.
17
14.« My Account » menu
When you click on the « my account » link in the title bar, the following screen
displays:
Illustration 17: own account edit screen
In this screen, you can change you display name, your username (the word you
use to log in to the site) and your password.
You can also see what your profile is. Your profile defines the actions you have
the right to do in the site (see part 13), but you won't be able to change it, only
administrators can.
18