1
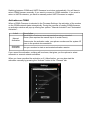
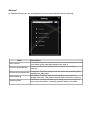
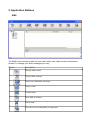
User Manual
Consumer OneClick Internet
for Gobi 2000
Sierra Version 1.8
21st May 2010
WebToGo Mobiles Internet GmbH
81371 München, Oberländerstr. 2a
Table of Content
1. General
2. Starting OneClick Connection Manager
1. Area "Menus and Connections"
2. Area "Statistics"
3. Connection Management
4. Settings
1. Profile
2. Network
1. Select Connection
2. Select Network
3. History
4. PIN
1. Activate/Deactivate PIN
2. Change PIN
5. Info
6. Firmware
7. General
5. Application Buttons
1. SMS
2. Browser
3. E-Mail
4. GPS
6. Radio Button
7. Update
8. Help
1. General
This document contains the User Manual for the customized version of WebToGo Consumer
OneClick Internet version 1.8 for Sierra Wireless Gobi 2000 Modules.
The WebToGo OneClick Internet application will allow the user to perform basic functions like
connect/disconnect to a mobile network, enter a PIN-code/APN/Username/Password. There
are also some advanced options like choosing the network technology, downloading firmware,
tracking GPS location and SMS functionality.
1.1 System Requirements
This Version of Consumer OneClick Internet for Gobi 2000 requires
• Sierra Wireless Gobi 2000 3G Module
• Sierra Wireless Gobi 2000 Driver package Version 1.1.90 or higher
Please note the following:
• This version of OneClick Internet will only work with one Sierra Gobi 2000 Wireless
modem at a time.
This Version of Consumer OneClick Internet for Gobi 2000 is compatible with
• Windows XP 32 bit SP3
• Windows Vista 32Bit SP2 and Vista 64Bit SP1
• Windows 7 32Bit and 64Bit
1.2 Supported Languages
Consumer OneClick Internet v1.8 for Gobi2000 supports the following languages:
German, English, Spanish, French, Polish, Russian, Italian, simplified Chinese and
traditional Chinese.
1.3 Installing or upgrading OneClick Internet
If you have a previous version of OneClick Internet you should uninstall it first:
• Go to Control Panel and select “Add or Remove Programs”.
• Select “OneClick Internet” and click on “Remove”.
• Launch the OneClick Internet installation package.
• Follow the on-screen installation instructions.
Please note the following:
• OneClick Internet does not install the drivers for the Gobi2000 Sierra devices – A
DriverInstaller executable is provided separately.
1.4 Installation steps
When you double-click the Installer file for OneClick Internet for Gobi2000 it will start extracting
the files to install and show you the following dialog.
Then a dialog will be shown which allows you to select to install the application in different
languages. As a default always the language of the OS will be use if available.
The next step will ask you to accept the license agreement. Please read the license
agreement carefully and click “Accept”, if you agree. Otherwise please click reject to cancel
the installation.
If you accept the license agreement and click accept, the installer will ask you for the directory
to install the application. If you want you can select a different directory to install now by
clicking the “Browse” button.
After clicking install, a green bar will show you the progress of the installation. The following
dialog will be shown as soon as the installation has been successfully installed on your
computer.
Now you can start OneClick Internet from the Windows Program Menu or double click the
desktop icon.
1.5 Installation Options
A silent installation of the OneClick Internet Connection Manager can be started by adding the
parameter silent behind the name of the installer on the command line, e.g.:
C:\>Consumer_Sierra_V1.8_20100520 silent
2. Starting OneClick Connection Manager
OneClick Connection Manager offers everything you need to manage the mobile Internet
communication on your Laptop:
•
Internet Connection and Email download
•
SMS Manager
•
Managing contacts from SIM and Outlook
•
GPS Management
After installing WebToGo OneClick Internet a new entry will be placed in the program
menu. Straight after installation the main window of the application is visible on your
screen. If this is not the case you can start the application from "Start -> Programs ->
WebToGo OneClick Internet" or click the desktop icon of OneClick Internet.
Whenever the application is active a status icon will also appear in the toolbar in the
bottom right-hand corner of your desktop.
The main window of OneClick Connection Manager is at the heart of the application. Here
you can see the status of your OneClick Connection Manager, how much time you have
spent on the internet and which data throughput you should expect. You can connect to
the internet and send emails or short messages from this window.
The main application is split into two areas:
•
Area "Menus and Connection Management"
•
Area "Statistics"
Area "Menus and Connections"
This area is split in 2 sub-areas.
Area A
Icon
Area B
Icon
Description
Minimize
Then OneClick Internet icon will appear in system tray menu.
Close
Clicking this icon will close the application.
Description
Indicator of network signal strength, followed by the Network name,
Network mode, and device name
Connect
Button to connect or disconnect
SMS
Button only enabled if no mobile Internet connection is active. Link to the
integrated SMS application.
Web
Link button to preferred browser
Email
Link button to preferred Email application
GPS
Button to open the GPS tool
Radio
Button to switch on and of the radio
Statistics
Button to open the Statistics
Settings
This button opens the Settings for
•
•
•
•
•
•
•
Profile (managing your profiles)
Network (selecting connection and network)
History (data volume transferred)
PIN (PIN settings)
Firmware
Info
General
Update database (optional feature)
• Update database (roaming partner)
• Install drivers and new version of OneClick Internet
Help
Here you can open the help menu.
Connecting to modem
Status
Ready, you can establish connection
Connected
Failure
Area "Statistics"
Statistics provide advanced information about your connection. All shown data values are
approximate values.
Data In:
The amount of data received via the mobile Internet connection
Data Out:
The amount of data sent via the mobile Internet connection.
Total:
The amount of data sent via the mobile Internet connection.
Speed:
The current speed of the data transfer.
Max. Speed:
The maximum speed of the data transfer observed.
Time:
The duration of the current connection.
3. Connection Management
1. Launch OneClick Connection Manager and wait until detection has been completed.
If you see a detection problem, please reinsert your data card and tap on the
connect button. If Pin security is active, a window will pop up asking you to enter
your SIM PIN.
You can deactivate PIN security in the application if no connection is active: Settings
-> PIN -> Deactivate PIN.
2. By default the software comes with no connection profile. You can modify the
access details by selecting the "Settings" menu.
3. Now tap on the connect button. That's it.
In the upper status line you can find the indicator for the signal strength, the name of the
Mobile Network Operator you are using, a roaming indicator, and the radio technology you
are using.
In the status line below the button row you can see the current status of you connection
and the device.
4. Settings
To access the Settings menu tap in main window on the button:
A dialog will open showing registers for the following settings:
1.
2.
3.
4.
5.
6.
7.
Profile
Network
History
PIN
Info
Firmware
General
Profiles
You are free to create your own connection profile. Once a new profile has been created it
will appear in the dropdown menu Profiles. You can select it by tapping on Set Profile to
use it.
Button
Description
Create a new profile
Edit a current profile
Delete a profile
Save a profile
Set the Profile you want to use
Label
Profile Name
APN
Username
Password
DNS
Proxy settings
Description
Profile name, should be unique
Access Point Name of your network operator. For more details contact
your network operator. When you are registered to a CDMA network, the
APN will not appear.
Username. For more details contact your network operator.
Password. For more details contact your network operator.
Domain Name Server. For more details contact your network operator.
Necessary Proxy Settings of your network. For more details contact your
network administrator.
Network
You are offered two options: "Select Connection" and "Select Network".
When you are registered to a CDMA network, you will not be able to select the network. All
CDMA network will be shown instead.
Select Connection
Three different settings are available here:
Label
Select
automatically
Only use GPRS
Only use
UMTS/HSDPA
Description
Selects the best suited network available
Use only GPRS for a connection
Use only UMTS/HSDPA for a connection.
Select and tap Register. If the change is successful you will retrieve a message "Network
changed successfully".
Close the window and wait until you see signal strength in the main window. After that you
can establish a connection.
Select Network
In this dialog you may select any available network. It is useful when you are abroad.
Automatic mode will select the preferred network of your network operator.
If you select Network selection you will get a list of network options.
1. Automatic Selection
2. Retrieving Networks...
The marked network is the network you’re currently registered with.
PLEASE NOTE:
The network list will only appear if the connection setting is "Only use GPRS" or "Only use
UMTS/HSDPA".
Select the network and tap on the register button. If the change is successful you will see
the message "Network changed successfully".
Close this window and wait until you see the signal strength in the main window, then you
can establish the connection.
History
The history will show you the data volume transferred in a certain time frame.
Select a time frame to see the data volume sent/received in the selected period.
Tap on "Reset" to reset the counter.
PIN
You can Activate/Deactivate PIN or Change PIN.
1. Activate/Deactivate PIN
2. Change PIN
Activate/Deactivate PIN
Usually you have to enter the PIN each time you start WebToGo OneClick Internet using a
modem card. Deactivate the PIN to avoid doing this each time.
Change PIN
This dialog lets you change your PIN.
Label
Current PIN
New PIN
Verify PIN
Description
Enter your current PIN
Enter your new PIN
Enter once again the new PIN
Info
This window shows SIM card, modem and system Information:
Firmware
OneClick Internet will select the correct Firmware matching your operator automatically, if
a special firmware for your operator is available and a SIM card is inserted. If no specific
firmware for your operator is available, it will select the generic firmware. Once a firmware
has been selected, it will appear in “Current Profile”.
You are free to load your desired firmware. You can select a new firmware manually by
clicking the “Select New Profile” dropdown menu, selecting a firmware from the menu and
pressing the “Change“ button to load it. If you want to return to automatic firmware
selection, please choose “Automatic(UMTS)” in the dropdown menu.
Switching between CDMA and UMTS firmware is not done automatically. You will have to
select CDMA firmware manually, if you want to connect to CDMA networks. If you want to
return to UMTS networks, you have to manually select UMTS firmware in respect.
Activation on CDMA
When a CDMA Firmware is selected in the Firmware Settings, the activation of the modem
on the CDMA network starts automatically. During the process of loading CDMA firmware,
an activation window will pop up offering two options: "Manual Activation" and "Automated
Activation":
Label
Manual
Activation
Automatic
Activation
Description
Speak with a Customer care representative using a standard
phone.(Also requires the manual input of certain items).
Please enter the activation code, your phone number and the system ID
given in the product documentation.
Use your modem to start an automated activation session
If you cancel the activation, a dialog will be shown, that gives you the options to select
automatic or manual network activation.
When you have cancelled the activation or if it failed before, you can also start the
activation manually by pressing the “Activate” button in the “General” tab.
General
In General settings you can set options to connect automatically and for roaming:
Label
Description
If selected, OneClick Internet will launch automatically when the
Auto Launch
user starts up the operating system and logs in.
If selected, OneClick Internet will connect automatically on
Connect Automatically
start-up.
If selected, OneClick Internet will reconnect automatically after
Reconnect Automatically
standby and hibernate.
If disabled, OneClick Internet will not allow connections in
Allow roaming
foreign networks. This feature avoids high costs when roaming.
If selected, a dialog will inform you when you are moving from
Roaming Alert
your home network to a roaming network when connected.
5. Application Buttons
SMS
The SMS Center window is split into menu bar, folder view, folder content and preview
window. To manage your short messages you may:
Button
Description
Manage SMS folders
Change SMS settings
Create new SMS/MMS messages
Reply to SMS
Forward SMS
Move SMS to a folder
Delete SMS
Send and receive SMS/MMS (if supported)
Manage Phone book contacts on SIM
1. Folder
By using this menu, you may change the folder structure of the SMS Center:
Button
New Folder
Rename
Remove
Description
Creates a new folder, name has to be unique
Renames an existing folder
Removes an existing folder (including the messages)
PLEASE NOTE: Predefined folder can't be deleted or modified.
2. Settings
The settings window lets you change the deletion mode. You may choose whether to
delete an SMS from the SMS Center, from the SIM or decide whether this should be asked
at all. You may also activate an alarm signal when a new SMS arrives.
3. New SMS
The "New Message" window is used to enter the SMS text. You may also enter texts by
copy & paste from other applications. The status bar at the lower right corner indicates the
length of the SMS for your convenience: the first number tells you how many parts the
SMS consists of (one part has max. 160 characters/unicode70), the second number
counts down from 160/70 characters. The number in parenthesis () counts the total
number of characters.
The recipient for your SMS has to be entered in the "To" field. This can be either entered
by typing digits or by clicking the "To" button to select a recipient from the address book.
Recipient addresses may be taken from the SIM address book or from your email client's
contact folder. Just select an address and click OK. To send the message click
"Send/Receive".
4. Reply
Highlight a message to which you want to reply, e.g. in the inbox folder, then click the
"Reply" button. The "New Message" window opens and the recipient address is already
filled in the "To" field. Continue as before when sending a new message.
5. Forward
Highlight a SMS, which you want to forward. Click the "Forward" button. The "New
Message" window opens, however the message text is already copied. Continue as before
when sending a new message.
6. Move SMS...
Highlight the SMS to be moved and click the "Move SMS" button. A small window opens
that lets you select the destination folder. Select the folder to which the message should be
moved, then click "Move".
7. Delete
Highlight the SMS which you want to delete. Click "Delete" to remove the message.
8. Send/Receive
Messages will be sent and/or received by clicking on this button.
9. Addresses
This button opens the address book. You may add new contacts to your personal address
book or you may change existing addresses, delete addresses or exchange them with
your SIM card and your e-mail client application, or export the data set.
Button
New Contact
Modify
Delete
Copy
Export
Description
New contact
Modify a contact.
Delete contacts, mark one or more and press on the button.
Synchronisation with MS Outlook.
To export addresses you may select between two export formats:
• CSV (comma separated text format, usually read by spread sheet
applications)
• VCard (business card format, used by MS Outlook and other
applications)
Web Browser
This button allows the user to open the Web Browser and surf the Internet once the
connection is established. The used browser will be the system default browser which is
set in the System Internet options.
E-Mail
This button will open the E-Mail application once the connection is established. The used
application will be the system default E-Mail client which is set in the System options.
GPS
Pressing the GPS button will lead you to the GPS Window. Press button 'get GPS' then
GPS will be started, indicated by the rotating GPS button, to search for Latitude and
Longitude Data.
If Latitude and Longitude Data are displayed, then the user can press the button 'Track Me'
to open Google Maps showing him his Position on a map.
Latitude: Gives the location of a place on Earth (or other planetary body) north or south of
the equator.
Longitude: is the geographic co-ordinates most commonly used in cartography and global
navigation for east-west measurement.
6. Radio Button
The Radio button allows you to switch on and off the radio of your mobile broadband
device to save power or to switch to airplane mode.
If the radio is switched off the button becomes red. If it is on, it is green. In case the radio
is disabled by a hardware switch or if the device is not available, the button will be
disabled.
7. Update
One Click Internet provides a build-in online update functionality that allows for an
automatic update of OneClick Internet application, device drivers, and APN database.
The update is triggered by pressing the update button. The application will check on the
WebToGo server, if updates are available, and offer them for download if suitable.
In order to start the update, select a file from the list of available updates and press OK.
8. Help
OneClick Internet provides a build-in online help that can be opened by pressing the help
button on the main windows.


![MC95XX Series Regulatory Guide [English] (P/N 72-118502](http://vs1.manualzilla.com/store/data/005760097_1-2f741b3a88b00c5f81d3f7718b174271-150x150.png)