1
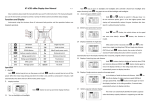
CONTENTS
ABOUT THE USER MANUAL............................................................................................................. 2
FUNCTION SUMMARY & BUTTON DEFINITION ...................................................................... 3
FUNCTION SUMMARY .......................................................................................................................... 3
FULL VIEWING AREA........................................................................................................................... 4
NORMAL VIEWING AREA .................................................................................................................... 4
BUTTON DEFINITION ....................................................................................................................... 5
NORMAL OPERATION ....................................................................................................................... 5
ON/OFF.............................................................................................................................................. 5
DISPLAY INTERFACE ........................................................................................................................... 6
PUSH CRUISE CONTROL...................................................................................................................... 6
TURN ON/OFF BACKLIGHT.................................................................................................................. 7
PAS LEVEL SELECTION ....................................................................................................................... 7
BATTERY INDICATOR .......................................................................................................................... 7
ERROR CODE DISPLAY ........................................................................................................................ 8
USER SETTING .................................................................................................................................... 9
PREPARATION BEFORE STARTING ...................................................................................................... 9
GENERAL SETTING .............................................................................................................................. 9
1、Distance and Riding Time Clearing............................................................................... 9
2、Wheel Size Setting.............................................................................................................. 9
3. Speed-limit Setting ......................................................................................................... 10
4、KM/H, MPH Setting .......................................................................................................... 11
FAQ ........................................................................................................................................................ 12
QUALITY ASSURANCE AND WARRANTY SCOPE ................................................................... 12
WARRANTY:....................................................................................................................................... 12
OTHER ITEMS: ................................................................................................................................... 12
ERROR CODE DEFINITION ........................................................................................................... 13
TABLE 1 ................................................................................................................................................ 13
About the User Manual
Dear users,
To ensure better performance of your e-bicycle, please read
through the C100 product introduction carefully before using it.
We will use the most concise words to inform you of all the
details (including hardware installation, setting and normal use
of the display) when using our display. Meanwhile, the
introduction will also help you solve possible confusion and
malfunction.
Outlook and Size
Material and Color
C100 products are made of black PC material. Under the
temperature of -20℃ to 60℃, the shell material can ensure normal
usage and good mechanical performance of the products.
Real product and dimension figure (unit: mm)
2
Function Summary & Button Definition
Function Summary
C100 provides a wide range of functions and indicators to fit the
users’ needs. The indicated contents are as follow:
◆ ODO Display;
◆ Riding Distance Display;
◆ Riding Time Display;
◆ Max Speed Display;
◆ 6KM/H Display;
◆ Backlight Open;
◆ Assist Level;
◆ Battery Indicator;
◆ Error Code Display;
● Wheel Diameter Setting;
● KMH, MPH Switching;
● Max Speed Limit Setting;
3
Full Viewing Area
Normal Viewing Area
4
Button Definition
C100 has four buttons. They are ON/OFF, SET, UP and
DOWN.
Normal Operation
ON/OFF
Press ON/OFF and start the display , The display will
provide power supply for the controller.
With display on,more than 3 seconds press ON/OFF to turn
off power supply of the e-bicycle. With the display off,the
display and controller no longer consume battery power. The
leakage current is no more than 2µA。
※ If more than 5 minutes without use of the e-bicycle, the
display will automatically shut down.
5
Display Interface
Press SET to switch the displaying information. The order
is: ODO →Riding Distance →Riding Time →Max Speed.
ODO Display
Max Speed Display
Riding Distance Display
Riding Time Display
Push Cruise Control
Hold UP for 2 seconds and enter into the mode of power
assist walk. The e-bicycle will go on at a uniform speed of
6km/h. It shows“6KM”on the screen.
6
Turn on/off Backlight
With the display on, press ON/OFF and turn on the
backlight. Meanwhile, the controller will turn on the headlight.
When the surrounding light is not enough or it is in the evening,
you can turn on the backlight. And press ON/OFF again, turn
off the backlight.
PAS Level Selection
Press UP or DOWN, switch the e-bicycle Assist Level to
change output power of the motor. The power ranges from 0~5
levels. The default value is level 3.
Battery Indicator
When the battery capacity is high, the six battery segments
are all light. When the battery is in low voltage, the outside edge
of the battery frame will flash at 1 Hz. It indicates that the
battery is severely low in voltage condition and needs to be
recharged immediately.
Low Voltage Flash
7
Error Code Display
If there is something wrong with the electronic control
system, the display will show the error code automatically. See
Table 1 for detailed error code information.
※ Display return to normal only after problem being fixed
and bike will not run before fixing the problem.
8
User Setting
Preparation before Starting
Make sure the connector is linked properly to the motor
controller on the bike and the power is on.
General Setting
1、Distance and Riding Time Clearing
★
Hold UP/DOWN/SET for 1 seconds to clear Total
Distance、Riding Distance, Riding time and Max
Speed.
★
Hold DOWN for 3 seconds to clear Riding
Distance and Riding time and Max Speed.
2、Wheel Size Setting
★
Hold SET for 10 seconds and enter into wheel
diameter setting.
Selectable values include:16,20,24,26,700C,28.
Press UP or DOWN to select the suitable value,
to ensure the accuracy of display about speed and
mileage. Default diameter value is 700C.
9
※ Press UP or DOWN to choose the wheel diameter
setting, press SET to exit the setting.
3.
Speed-limit Setting
Change Max Speed could set the limit riding speed. When
speed over this value, controller will cut off the power which
supply to motor, to protect the safety of rider. Max Speed default
value is 25km/h.
★
Hold UP /DOWN for 3 seconds and enter into
the speed-limit setting interface:
★ Press UP or DOWN to enter into speed-limit value
selection. Reference speed limit values 12~40KM/H.
10
4、KM/H, MPH Setting
Hold DOWN for 9 seconds to switch KM/H and MPH
selection.
(Default is KM/H)
KM/H, MPH Setting
※ Press SET to exit the above setting interface.
11
FAQ
Q: Why the display is not able to start up?
A: Checking the connector that between display and controller.
Q:How to deal with the error code?
A: Fix it to the maintenance place immediately
Quality assurance and Warranty scope
Warranty:
1、 Any quality problems in normal case and in
guarantee period, our company will responsible for
the warranty.
2、 The warranty time is 18 months from date of
purchasing.
Other items:
The following items are not belong to warranty scope
1、 It can not be demolished.
2、 The damage caused by wrong installation or
operation.
3、 Shell is broken when display is out of the factory.
4、 Shell is broken when display is out of the factory.
5、 Force majored (such as fire, earthquake, etc.) or
natural disasters like lightning, etc caused by fault
or damage.
12
6、 Beyond Warranty period.
Error code definition
Error code
Definition
33
Current Abnormality
34
Throttle Abnormality
35
Motor Abnormality
36
Motor Hall Signal Abnormality
39
Low voltage
37
Temperature Abnormality
Controller Communication
38
Abnormality
Table 1
13