1
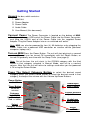
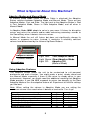
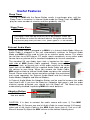
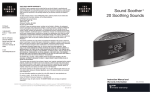
SOUND+SLEEPTM MINI
White/Silver Version (Also available in Black)
Owner’s Manual
- Getting Started
- Product Features
- Technical Reference
- Warranty Information
©2015 Adaptive Sound Technologies, Inc.
To Our Customers,
Thank you and congratulations on your purchase of the SOUND+SLEEP MINI
(MINI) from Adaptive Sound Technologies, Inc. (ASTI). You now own the highest
quality, travel-friendly Sleep Therapy System on the market today with four
unique features: the ability to listen to the noise in your environment and adapt its
sound generation accordingly; the ability to create dynamic sound compositions
that do not repeat; power management system allowing battery only or AC
operation with battery backup; and the ability to conveniently listen to your music,
movie soundtracks, etc.
MINI is unique, and the result of serious efforts by sleep, audio, electronics, and
software specialists. Natural sound ecosystems were captured with professional
recording equipment and are reproduced in real-time using the latest in
advanced electronics. MINI has 12 unique sound categories with 4 sounds in
each for a total of 32 natural SoundStories, 4 fan sounds & 12 white/pink/brown
noises. This convenient product, with a compact yet rugged design, will provide
you with a truly enjoyable listening experience whether you are sleeping, reading,
or relaxing during travel or at home.
If you have any suggestions or ideas on how we can make our products better,
please let us know.
Sam J. Nicolino Jr.
President and CEO, ASTI
Write down your Serial Number:
(label looks like this)
Record your serial number here. You
can find it on the bottom of the unit.
Refer to these numbers whenever you
contact ASTI regarding this product.
Model Number: ASM1014
(your number will be different)
Name/Part Number: ________________________________________
Serial Number: ___________________________________________
Date of Purchase: _________________________________________
Protect your warranty:
Please complete your warranty registration with your reseller using their
recommended procedure.
2
Table Of Contents
Getting Started .................................................................. 4
What is Special About this Machine? .............................. 5
Adaptive Modes and Manual Mode ........................................... 5
Using Adaptive Features ........................................................... 5
Useful Features ................................................................. 6
Sleep Timer ............................................................................... 6
External Audio Mode ................................................................. 6
Display Lights ............................................................................ 7
Power Options ........................................................................... 7
Battery Backup .......................................................................... 7
Headphone Jack ....................................................................... 7
Technical Information....................................................... 8
Specifications ............................................................................ 8
How to Restore Factory Settings .............................................. 8
Trouble Shooting ....................................................................... 8
Customer Support ..................................................................... 8
SoundStory List ......................................................................... 9
Quick Start Guide ...................................................................... 9
Safety, Warranty, and Certifications.............................. 10
Safety Instructions ................................................................... 10
One Year Limited Warranty ..................................................... 11
FCC Declaration ...................................................................... 12
Adaptive Sound Technologies, Inc.
3
Getting Started
Unpack the box, which contains:
1.
2.
3.
4.
5.
MINI Unit
Power Adapter
Power Cable
Audio Cable
User Manual (this document)
Connect Power The Power Connector is located on the bottom of MINI.
Gently push the non-USB end of the Power Cable into the Power Connector,
next plug the USB-A end of the Power Cable into the supplied Power
Adapter. Plug the Power Adapter into an un-switched wall outlet.
Note: MINI can also be powered by four (4) AA batteries or by plugging the
Power Cable into a powered USB connector on another device (personal
computer, laptop, etc.).
Turn on MINI Press the Power Button. The unit will start playing in a second
or two. The unit can be turned Off immediately with the Power Button, or
turned Off gradually over time with the Sleep Timer (see page 6).
Note: Out of the box, the unit starts in the OCEAN category with the third
sound in that category selected, in Manual Mode, and set to a nominal
volume. After that, the unit will return to settings used when you last powered
it Off using the Power Button.
Press The Select Category Button to select the desired sound
category, press the Select Sound Button to select the desired sound in that
category, and adjust the volume with the Volume Up/Down Buttons.
Power Button
On/Off
Audio Input
Jack (3.5mm)
Timer Button
30/60/90
minutes
Volume Buttons
Up & Down
Category
Lights (6x)
Green => upper
Red => lower
Headphone
Jack (3.5mm)
Select
Category Button
Select
Sound Button
4
What is Special About this Machine?
Adaptive Modes and Manual Mode
In Internal Audio Mode (when no Audio Cable is attached) the Adaptive
Button switches between Adaptive Mode and Manual Mode. There are two
Adaptive Modes, Fast and Slow. The light next to the Adaptive Button is Red
in Fast Adaptive Mode, Green in Slow Adaptive Mode, and off when in
Manual Mode.
In Adaptive Mode, MINI adapts to noise in your room. It listens for disruptive
noises and raises the volume and/or adds enhancing secondary sounds to
the SoundStory when it detects intrusive noises.
In Manual Mode the unit still listens but does not significantly change its
volume in response to noise. Instead, it maintains a relatively constant
volume level determined by the Volume Up/Down Buttons.
Adaptive Button
(selects Mode)
Microphone
Light Red: Fast Adaptive Mode
Light Green: Slow Adaptive Mode
Light Off:
Adaptive Off
(Manual Mode)
Using Adaptive Features
The Adaptive Button allows the unit to be customized to suit personal
preference and each situation. You might prefer a quiet, steady sound and
use Manual Mode, especially if there is little noise, or steady noise, in your
environment. However, you might need the additional masking that Adaptive
Mode provides. If you find MINI responds to noises too abruptly try the Slow
Adaptive Mode or turn the adaptive feature off. Experiment to find the settings
you like best.
Note: When setting the volume in Adaptive Mode you are setting the
maximum volume it can reach when it detects a loud noise. Turn it up!
Activity/Environment – Starting Points
Sleeping, quiet room, sensitive sleepers
Sleeping, noisy room, average sleepers
Sleeping, noisy room, good sleepers
Reading or Studying, quiet room
Reading or Studying, noisy room
Used as background sound for entertainment
Used for speech privacy
5
Adaptive
Off
On
On
Off
On
Off
On
Type
Slow
Fast
Slow
Fast
Useful Features
Sleep Timer
Turning On MINI with the Power Button results in continuous play, until the
Sleep Timer is turned on. In Internal Audio mode the Sleep Timer sets MINI to
play for some number of minutes and then gradually shut Off.
Sleep Timer
Button
The Sleep Timer can be set to 30, 60 or 90 minutes. Press the
Timer Button to select the desired interval. No lights means that
the unit will play until you turn it Off. (Both lights lit => 90 minutes)
External Audio Mode
When no Audio Cable is plugged in to MINI it is in Internal Audio Mode. When an
Audio Cable is plugged in, the unit automatically switches to External Audio
Mode and MINI can be used to listen to an external audio source. This allows
you to listen to an MP3 player, PC audio, movie soundtrack, or any other audio
source from any device with a standard headphone or line-out connector.
The standard 3.5 mm Audio Input Jack is located on the upper
right side of MINI (Audio Cable supplied). Simply connect the
headphone jack, or line-out jack, of the audio source to the Audio
Input Jack on the MINI with the supplied Audio Cable and adjust
the volume to your liking. When you remove the Audio Cable,
MINI switches back to Internal Audio Mode and plays the selected
Sound. Please note that volume and other settings are maintained
and saved separately for External Audio Mode and the Internal
Audio Modes (Adaptive and Manual Modes).
In External Audio Mode the Adaptive Button can be used to increase the audio
input level 6 dB. If you turn the Boost on (Adaptive light green), and the audio
material sounds distorted, you should turn the Boost off. The Boost may be
automatically disabled if operating MINI with weak batteries.
Adaptive Button
(6 dB Boost)
- see text above
CAUTION: It is best to connect the audio source with care: 1) Turn MINI
volume down 2) Connect one end of Audio Cable to sound source 3) Connect
other end of the Audio Cable to the MINI Audio Input Jack 4) Turn on 6 dB
Boost if desired 5) Adjust the MINI volume to the desired listening level.
6
Display Lights
When any button is pressed or the Audio Cable is inserted or removed, the lights
on the front panel will come on and then automatically go off after 30 seconds in
Internal Audio Mode or 5 seconds in External Audio Mode. In Internal Audio
Mode you can choose to have the lights on all the time. To do so, when you turn
the MINI unit On, press and hold the Power Button down for about 2 seconds
until the Timer lights go on then release the Power Button.
Note: The display lights are white for the Timer Button and Select Sound
Button. The display lights are red or green for the Adaptive Button and the
Select Category Button.
Power Options
The MINI unit contains a sophisticated power management system. This
convenient and unique system allows you to power MINI in a variety of ways,
provides for battery only operation, has battery backup capability, and
extends the life of batteries used to power the device. The four options are:
1.
2.
3.
4.
Use four (4) “AA” batteries (install in bottom of MINI unit)
Use the supplied Power Adapter and Power Cable
Use both 1 and 2 above (battery backed up AC power)
Use the supplied Power Cable only (connect to laptop, etc.)
When you plug in the Power Cable and have the batteries installed, the
system will only draw power from the Power Cable unless that power is
interrupted. In that case the MINI power automatically switches to the
batteries providing true battery back up. The audio from the MINI unit will not
pop or click during the switchover. If the batteries become too weak to
operate the device at the current volume level, the volume level is
automatically and gradually reduced. This extends the useful life of the
batteries, and eliminates jarring sounds from being produced when the
batteries die under all but the most extreme cases. In general, MINI will
automatically and quietly shutoff when the batteries are exhausted.
Battery Backup
The MINI power management system uses the AA batteries if there is an AC
power failure. When used for this purpose battery life is up to four years;
however, ASTI recommends you change the batteries every year or two to
minimize the possibility of battery leakage damaging your MINI unit.
Note: When you operate the MINI unit from batteries only, perhaps because
an AC outlet is not available, the batteries are supplying power to the MINI
system and will last for a time determined by many factors including mode of
operation, volume settings you use, and battery quality.
Headphone Jack
A standard 3.5 mm Headphone Jack is located on the
lower right side of the MINI unit. When you plug in
headphones MINI will mute the speaker.
7
Technical Information
Specifications
Unique Sounds
Speaker Compensation
Audio Input Jack
Headphone Jack
Power Requirements
Product Dimensions
48
multi-band parametric EQ
3.5 mm
3.5 mm
5 Volts, 500 mA, DC
5.37" x 4.62" x 2.55"
How to Restore Factory Settings
Turn the MINI unit Off. Remove batteries if installed. Connect the Power
Adapter and Power Cable. Turn MINI On. Wait a few seconds, then press and
hold the Power Button down again until the SoundStory lights flash
(approximately 2 seconds), then release the Power Button.
Trouble Shooting
If your unit exhibits a problem, try the actions below to resolve the problem.
SYMPTOM
No operation when
power switch is
pressed
POSSIBLE CAUSE
Disconnected Power
Cable
SOLUTION
Check the power connection on the
bottom of the MINI unit and at the Power
Adapter. Both ends of the cable must be
firmly seated.
Faulty wall outlet
Try another un-switched wall outlet.
Batteries are dead or too Replace batteries and power on again
weak to operate MINI
(use of Power Cable is optional).
No batteries installed
Install new batteries.
Unit is On, but no
Volume is set too low
Press or hold Volume Up button down to
increase MINI volume level.
sound
System is in External
Provide audio input signal, or disconnect
Audio Mode but has no
the Audio Cable from the Audio Input
audio input signal
Jack to switch to Internal Audio Mode.
Adaptive light
Batteries are dead
Remove Power Cable and remove dead
flashing repeatedly
batteries. Insert new batteries.
Unit goes On briefly Batteries are very weak
Replace batteries or use Power Cable
but then goes Off
(see Power Options on previous page)
Other unexpected
Try the “factory reset”
1) Remove batteries
behavior
procedure
2) Plug Power Adapter into an AC outlet
and connect Power Cable
3) Press and hold Select Sound Button
4) Press the Power Button
5) Release Power Button
6) Release Select Sound Button
Customer Support
If you have problems or questions, please contact your reseller or visit:
www.astisupport.com
8
SoundStory List
The Ocean category has 4 sounds to choose from: 1) ocean waves and lapping water
2) add gurgling water 3) also add seagulls, seals, buoy bells 4) also add foghorns
The Rain category has 4 sounds to choose from: 1) Rainfall 2) Rainfall plus wind and
light thunder 3) Add more wind and thunder 4) Add heavier thunder
The Lea category has 4 sounds to choose from: 1) Crickets and wind 2) Add bird
wings and splashing 3) Also add song birds and bees 4) Also add frogs
The Brook category has 4 sounds to choose from: 1) Flowing water and wind 2) Add
bird wings and splashing 3) Also add song birds and frogs 4) Add more of everything
The Home category has 4 sounds to choose from:
1) Bath 2) Air conditioner 3) Washer 4) Fireplace
The Ride category has 4 sounds to choose from:
1) Plane ride 2) Car ride 3) Train ride 4) Paddle boat ride
The Baby category has 4 sounds to choose from:
1) Undersea whales 2) Invasion of the whales 3) Heartbeat 4) Aviary
The Fan category has 4 sounds to choose from:
1) Box fan 2) Mellow fan 3) Attic fan 4) Oscillating fan
The Crowd category has 4 sounds to choose from:
1) Restaurant 2) Open air market 3) Coffee shop 4) Ball game
The Brown (noise) category has 4 different brown noises to choose from
The Pink (noise) category has 4 different pink noises to choose from
The White (noise) category has 4 different white noises to choose from
Quick Start Guide
9
Safety, Warranty, and Certifications
Software Licensing
The software contained in the SOUND+SLEEP MINI Adaptive Sound Sleep
Therapy System is licensed to you, not sold to you. This is only to protect our
intellectual property and has no affect on your ability to use the SOUND+SLEEP
MINI unit wherever you please.
Safety Instructions
Read and adhere to all safety and operating instructions before use. Keep this booklet
for future reference.
1. WARNING: Do Not Operate Heavy Machinery or Motor
Vehicles While Using this Device.
2. The unit should be cleaned regularly with a soft, dry cloth. The grill may be vacuumed to
remove excessive dust or particle build-up. Do not use any liquids or sprays (including
solvents, chemicals or alcohol) or abrasives to clean.
3. Be careful not to have liquid or particulate material enter the microphone opening
that is behind the round hole just to the left of the Adaptive Button.
4. The unit should not be used near water, such as a bathtub, swimming pool, faucet or
basin to avoid electrocution.
5. Be careful to avoid dropping objects or spilling liquids onto the unit. If liquid is spilled on
the unit, unplug and turn it upside down immediately. Allow it to dry thoroughly (one week)
before plugging it into a wall outlet again. Following these instructions does not ensure
that the unit will be operational.
6. Do not reach for the unit if it has fallen into water. Unplug it immediately at the wall outlet,
and if at all possible drain water before retrieving the unit.
7. The unit should be situated away from heat sources such as radiators, heat registers,
stoves or other appliances (including amplifiers) that produce heat.
8. Avoid placing the unit in areas that are exposed to direct sunlight or close to heat-radiating
products such as electric heaters. Do not place unit on top of stereo equipment that
radiates heat.
9. Avoid placing in areas that are dusty, humid, moist, lack ventilation, or are subject to
constant vibration.
10. The unit may be subject to interference from external sources such as transformers,
electric motors or other electronic devices. To avoid distortion from such sources, place
the unit as far away from them as possible.
11. Do not apply excessive force when using any switches or controls.
12. The unit should only be used with the power adapter provided or AA batteries.
13. Power cords should be routed to avoid being walked on or pinched by items placed on or
against them.
14. Unplug the power adapter from the outlet when the unit is unused for long periods of time
or when moving the unit.
15. Do not attempt to service the unit yourself beyond what is described in the operating
instructions.
10
One Year Limited Warranty
Adaptive Sound Technologies, Inc., hereinafter referred to as ASTI, warrants this product
against defects in materials and/or workmanship under normal use for a period of ONE (1)
YEAR from the date of purchase by the original purchaser (“Warranty Period”). If a defect
arises and a valid claim is received within the Warranty Period, at its option, ASTI will either
1) repair the defect at no charge, using new or refurbished replacement parts, or 2) replace
the product with a current product that is close in functionality to the original product. A
replacement product or part, including a user-installable part installed in accordance with
instructions provided by ASTI, is covered by the remaining warranty of the original purchase.
When a product or part is exchanged, the replacement item becomes your property and the
replaced item becomes ASTI’s property.
Obtaining Service: To obtain warranty service please call, or email, your reseller. Please be
prepared to describe the product that needs service and the nature of the problem. All
repairs and replacements must be authorized in advance by your reseller. A purchase
receipt must accompany all returns. Service options, parts availability and response times
will vary.
Limits and Exclusions:
This Limited Warranty applies only to the SOUND+SLEEP Mini Sleep Therapy System, and
the included Power Adapter.
This warranty does not apply to: a) damage caused by failure to follow instructions relating to
the product’s use or to the installation of components; b) damage caused by accident,
abuse, misuse, fire, floods, earthquake or other external causes; c) damage caused by
service performed by anyone who is not a representative of ASTI; d) accessories used in
conjunction with a covered product; e) a product or part that has been modified to alter
functionality or capability; f) items intended to be periodically replaced by the purchaser
during the normal life of the product including, without limitation, batteries or light bulbs; or g)
any and all pre-existing conditions that occur prior to the effective date of this Limited
Warranty relating to any product sold “as is” including, without limitation, floor demonstration
models and refurbished items.
ADAPTIVE SOUND TECHNOLOGIES, INC. SHALL NOT BE LIABLE FOR
INCIDENTAL OR CONSEQUENTIAL DAMAGES RESULTING FROM THE USE
OF THIS PRODUCT, OR ARISING OUT OF ANY BREACH OF THIS
WARRANTY. TO THE EXTENT PERMITTED BY APPLICABLE LAW, ASTI
DISCLAIMS ANY AND ALL STATUTORY OR IMPLIED WARRANTIES,
INCLUDING, WITHOUT LIMITATION, WARRANTIES OF MERCHANTABILITY,
FITNESS FOR A PARTICULAR PURPOSE AND WARRANTIES AGAINST
HIDDEN OR LATENT DEFECTS. IF ASTI CANNOT LAWFULLY DISCLAIM
STATUTORY OR IMPLIED WARRANTIES, THEN TO THE EXTENT
PERMITTED BY LAW, ALL SUCH WARRANTIES SHALL BE LIMITED IN
DURATION TO THE DURATION OF THIS EXPRESS WARRANTY.
Some geographic areas disallow the exclusion or limitation of
incidental or consequential damages or the length of an implied
warranty. As a consequence, some of the above exclusions or
limitations may not apply to buyers residing in those areas. This
warranty grants specific legal rights to buyers, but other rights may
also be granted, which vary from country to country, state to state,
etc.
11
FCC Declaration
This equipment has been tested and found to comply with the limits for a Class B Digital
Device, pursuant to Part 15 of the FCC Rules. These limits are designed to provide
reasonable protection against harmful interference in a residential installation. This
equipment generates, uses, and can radiate radio frequency energy, and if not installed and
used in accordance with the instructions, may cause harmful interference to radio
communications. However, there is no guarantee that interference will not occur in a
particular installation.
If this equipment does cause harmful interference to radio or television reception, which can
be determined by turning the equipment off and on, the user is encouraged to try to correct
the interference by one or more of the following measures:
• Reorient or relocate the receiving antenna.
• Increase the separation between the equipment and receiver.
• Connect the equipment to an outlet on a circuit different from the one to which the
receiver is connected.
• Consult the dealer or an experienced radio/TV technician for help.
Declaration of Conformity
Trade Name:
Model Name:
Responsible Party:
Address:
Telephone Number:
ASTI SOUND+SLEEP Mini Sleep Therapy System
ASM1014
Adaptive Sound Technologies, Inc.
1475 South Bascom Ave, Campbell, CA 95008 USA
1-408-377-3411
This device complies with Part 15 of the FCC Rules. Operation is subject to the following two
conditions: (1) This device may not cause harmful interference, and (2) this device must accept
any interference received, including interference that may cause undesired operation.
Changes or modifications not expressly approved by the party responsible for compliance could
void the user’s authority to operate the equipment.
ASTI Sleep
Therapy System
ASM1014
© 2015 Adaptive Sound Technologies, Inc. All Rights Reserved. Adaptive
Sound, Adaptive Sound Sleep Therapy System, Ecotones, Adaptive Sound
Technologies, and the ASTI logo are trademarks or registered trademarks of
Adaptive Sound Technologies, Inc. All other marks are trademarks or
registered trademarks of their respective owners. Use of this product is
protected by one or more of US patent #5781640, #8379870, #8280067,
#8280068, #8243937 and possibly other US and international patents.
12