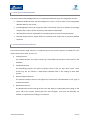
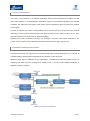
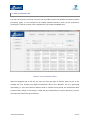
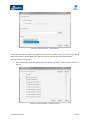
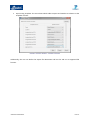
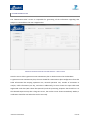
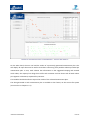
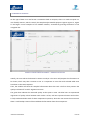
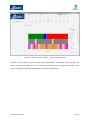
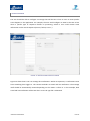
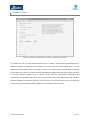
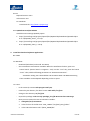
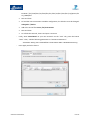
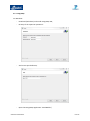
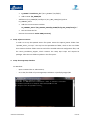
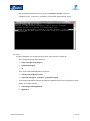
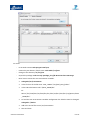
1
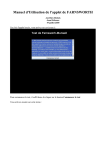
OPTIRAIL USER MANUAL Deliverable nº: D5.2 EC-GA Number: 314031 Project full title: Development of a Smart Framework Based on Knowledge to Support Infrastructure Maintenance Decisions in Railway Corridors Work Package: WP5 Type of document: Deliverable Date: 23/03/2015 Transport; Grant Agreement No 314031 Partners: CARTIF (ES), UGR (ES), OSTFALIA (DE), MERMEC (IT), EVOLEO (PT), SINTEF (NO) Responsible: EVOLEO Title: D5.2. OPTIRAIL User Manual Version: 1 Deliverable D5.2 OPTIRAIL User Manual DUE DELIVERY DATE: M24 ACTUAL DELIVERY DATE: M24 Page: 2 / 42 Document History Vers. Issue Date Content and changes 01 23/09/2014 First version Author Pedro Ribeiro, Saulo Sobreiro, Hugo Pereira, Igor Trindade 02 23/03/2015 Updated document sections according Pedro Ribeiro, Saulo Sobreiro, to the actual OptiRail tool features. Hugo Pereira, Igor Trindade Installation Manual also updated after testing in both windows and Linux OS. Document Authors Partners Contributors EVOLEO Pedro Ribeiro, Saulo Sobreiro, Hugo Pereira, Igor Trindade MERMEC François Defossez UGR Christoph Bergmeir CARTIF Marta Galende, Francisco Barrientos OSTFALIA Martin Krone SINTEF Andreas Okland Dissemination level: RE Document Approvers Partners Approvers EVOLEO Pedro Ribeiro VIAS Manuel Menéndez MERMEC François Defossez UGR José Manual Benítez CARTIF Gregorio Sainz OSTFALIA Frank Klawonn SINTEF Andreas Okland LTU Roberto Villarejo ADIF Miguel Rodríguez Executive Summary OPTIRAIL is a framework which aims obtain higher levels of safety and service in railway infrastructures, "optimal" life cycle for the management of railway infrastructure maintenance, better quality of service and, therefore, higher level of client satisfaction, improved level of availability of the railway infrastructure. OPTIRAIL will also ensure a more effective planning of the management and activities of infrastructure maintenance based on the information stored in the monitoring and maintenance management systems. The main goal of this document is to provide an overview of the OptiRail software architecture, its features, user interfaces and the manual installation and configuration procedures for both Windows and Linux operating systems. TABLE OF CONTENTS 1. OptiRail Architecture overview .................................................................................................................... 9 1.1 OVERVIEW: SERVICE-ORIENTED ARCHITECTURE .......................................................................................... 9 1.1.1 LEVEL A: DATA AND KNOWLEDGE........................................................................................................................ 10 1.1.2 LEVEL B: BUSINESS LOGIC SERVICES..................................................................................................................... 10 1.1.3 LEVEL C: USER INTERFACE .................................................................................................................................... 11 1.2 OVERVIEW: PROCESSING SEQUENCES ....................................................................................................... 11 1.2.1 OVERVIEW: EXPORT ............................................................................................................................................. 12 2. USER INTERFACE......................................................................................................................................... 13 2.1 LOGIN ......................................................................................................................................................... 13 2.2 FILE SUBMISSION ........................................................................................................................................ 14 2.3 LOOK UP INFORMATION ............................................................................................................................ 15 2.4 MAINTENANCE PLAN .................................................................................................................................. 18 2.5 GRAPHICAL ANALYSIS ................................................................................................................................. 20 2.6 NOTIFICATIONS........................................................................................................................................... 23 2.7 OPTIRAIL MAINTENANCE TOOLKIT ............................................................................................................. 24 2.7.1 ADD TRACK........................................................................................................................................................... 24 2.7.2 MANAGE SEQUENCES .......................................................................................................................................... 25 2.7.3 NOTIFIER .............................................................................................................................................................. 26 3. Tool Instalation .......................................................................................................................................... 27 3.1 OPTIRAIL SERVER INSTALLATION ................................................................................................................ 27 3.2 OPTIRAIL CLIENT INSTALLATION ................................................................................................................. 37 3.3 OPTIRAIL CONFIGURATION ........................................................................................................................ 41 3.3.1 MULTI MACHINE SETUP ....................................................................................................................................... 41 3.3.2 WINDOWS AND CUSTOM LINUX SETUP............................................................................................................... 42 3.3.3 DATABASE SETUP ................................................................................................................................................. 42 3.3.4 TROUBLESHOOTING ............................................................................................................................................. 42 <NAME OF DELIVERABLE> PAGE 7 Acronyms <NAME OF DELIVERABLE> PAGE 8 1. OPTIRAIL ARCHITECTURE OVERVIEW This section will present an overview of the OptiRail architecture, details concerning sequence processing and associated exports. 1.1 OVERVIEW: SERVICE-ORIENTED ARCHITECTURE In the following image, Figure , an overview of the system architecture is presented. It represents a service-oriented architecture where three levels can be found, as described in the D5.1 validation document. These levels are related to the three layers: Level A – Data and Knowledge Services Level B – Business Logic Services Level C – User Interface FIGURE 1: OPTIRAIL SYSTEM OVERVIEW <NAME OF DELIVERABLE> PAGE 9 1.1.1 LEVEL A: DATA AND KNOWLEDGE The level A, Data and Knowledge Services, is composed by different types of management services: Database Handler Service, which should grant a correct a correct access to the PostgresSQL database data for any service; File Management Service in conjunction with a file transfer service, to maintain and manage raw data files, scripts, heavier structures, data exports and backups; Authentication Service, responsible for controlling the user sessions and permissions; Scientific Engine Service, which allows the execution of R scripts with a previously defined sequence. 1.1.2 LEVEL B: BUSINESS LOGIC SERVICES The level B, Business Logic Services, is composed by all the services required to handle the user needs. The actual services, by role, are: Lookup Services The Lookup Services are used to retrieve any searchable rail data that can be found in the database. Scheduling Services The Scheduling Services are used to prepare actions to be run after some event. Those events may be, for instance, a date-based scheduled task or the ending of some data process. Decision Support Services The Decision Support Services will support the construction and adaptation of any type of maintenance plans. Notification Services The Notification Services shall grant the users the ability to understand what’s going on the server side of the system, warning him with text messages. Each user will subscribe any number of notifications according to its interests. <NAME OF DELIVERABLE> PAGE 10 1.1.3 LEVEL C: USER INTERFACE The level C, User Interface, is a modular application which will load application modules into the main client interface. The OptiRail Client application requires a successfully login before any module is loaded. The Client will also support some native system notifications with no need of any module to be loaded. In order to improve the system interoperability and to prevent the user to be held in any module workspace, all the systems communications will be asynchronous. This allows the user to run more than one request at the same time on different modules. Applying the current modularity concept, any developer may also add custom modules to this system, with no need to fully understand how the Level B, Business Logic, layer works. 1.2 OVERVIEW: PROCESSING SEQUENCES Processing sequences are organized sets of R based algorithms whose objectives are to compile all available railway characteristics and generate new analysis on that structure. Whenever new data is submitted to the application, a predefined processing sequence will run, analysing that data and even creating new models from it. A map of all available sequences in OptiRail is shown in Figure 2. FIGURE 2: AVAILABLE SEQUENCES <NAME OF DELIVERABLE> PAGE 11 It is important to note that those sequences shouldn’t all be active at the same time, as it would create unnecessary processing. The OptiRail Maintenance Toolkit allows the user to configure which sequences are active (more on chapter 2.7). 1.2.1 OVERVIEW: EXPORT Some R based algorithms automatically generate files with data extracted from the OptiRail SQL database. Such files are xlsx format files, whose structure follow the templates used by RAMSYS. This allows RAMSYS to integrate the data generated by OptiRail’s processing sequences. These files are stored on the server machine, in the “OPTIRAIL_SERVER_ROOT/data_files/exports/” folder. The type of files generated are: Aligned geometrical auscultation; Work Orders; Work Orders generated in the decision support system maintenance plans; Other files can be found in the “OPTIRAIL_SERVER_ROOT/data_files/” directory. They are also generated during sequence runtime but do not follow any specific template, being only produced to ease R processing or server-client communication. That being said, they are human readable and contain information that can be adapted to other frameworks. <NAME OF DELIVERABLE> PAGE 12 2. USER INTERFACE This section shows how information can be manipulated, configured and displayed in OptiRail Client application. The functionalities presented are login, file submission, lookup information, maintenance plan and notifications. Additionally, it is explained how the user should proceed to perform each of those steps. 2.1 LOGIN The following image (Figure 3) is a common one, the user login panel. The interface itself is as standard as it could be, in spite of providing some hidden functionalities FIGURE 3: LOGIN SCREEN As soon as a user logs in successfully, a navigation menu should appear in the left side off the screen, containing all the functionalities available to that user. From now on, the most common interactions between the user and the data will be shown, while explaining the application functionalities. <NAME OF DELIVERABLE> PAGE 13 2.2 FILE SUBMISSION Next is an example in how a user can upload a given dataset, like an auscultation or work order info, to the application. The service responsible for this functionality is “Submit File”, accessible in the user navigation bar. FIGURE 4: SUBMIT FILE MODULE SCREEN To upload a document, the user must fill three fields: the track to which the data set belongs; the local path to the document; and the type of data the document refers to (auscultations, work orders, and so on). As the user submits the file and its parameters, the file transfer from the client to the OptiRail server will be initiated. The file will then be stored in server file system and a reference to it is saved in the SQL based database, so that the application knows how to access it in the future. Additionally, if there are any configured processing sequences configured for the selected file type, then such sequences will be automatically triggered upon file transfer completion. <NAME OF DELIVERABLE> PAGE 14 2.3 LOOK UP INFORMATION The user can access the “Look Up” service to see any table stored in the database resultant from data processing. Figure 5 is an example of the LookUp Module interface, which can be accessed by pressing the “Look Up” button in the navigation bar, just under the OptiRail icon. FIGURE 5: LOOK UP MODULE SCREEN With the navigation bar at the top, the user can select the type of data he wants to see. In this example the user accesses the aligned auscultation data in the database. The UI is generated dynamically, i.e. if the user selects a different track or a different time period, the auscultation dates presented may change. In the output, a table with the selected data is shown. Moreover, the user can export the data he has just looked up. <NAME OF DELIVERABLE> PAGE 15 FIGURE 6: EXPORT WIZARD – MAIN SCREEN In case the user wants to export the geometrical data on his screen to a file, he can do so by clicking in the export button on the upper right side of the screen. This will open the Export Wizard. The user has two main options: Export manually (or normal export): The user defines the table as well as which columns to export. FIGURE 7: EXPORT WIZARD – NORMAL EXPORT <NAME OF DELIVERABLE> PAGE 16 Export using Template: The user selects which table to export and matches its columns to the template columns. FIGURE 8: EXPORT WIZARD – TEMPLATE EXPORT Additionally, the user can define the export file destination and has xlsx and csv as supported file formats. <NAME OF DELIVERABLE> PAGE 17 2.4 MAINTENANCE PLAN The “Maintenance Plan” service is responsible for generating all the information regarding that subject. It is accessible in the user navigation bar. FIGURE 9: DECISION SUPPORT SYSTEM MODULE – INPUT FORM Here the user is able to generate a new maintenance plan or load one stored in the database. To generate a new maintenance plan, the user should fill a maintenance plan configuration form that holds information like tamping operation cost, renewal operation cost, number of trimesters to analyse, traffic information per day, and others. Additionally, he must choose the input table with segmented track data (with values like Q0 and b) and the processing sequence that should run. As the selected sequence may take a long time to run, the results are not shown immediately. Rather, a notification should be sent when the results are ready. <NAME OF DELIVERABLE> PAGE 18 FIGURE 10: DECISION SUPPORT SYSTEM MODULE – OUTPUT INFO DISPLAY On the other hand, the user can load the results of a previously generated maintenance plan. This will display all input data used as well as show data concerning each possible solution provided per maintenance plan. In turn, each solution has information on the suggested tamping and renewal work orders, the capacity loss along the track for each trimester and two charts with all work orders per segment or kilometre, separated by trimester. This module should also allow to export the results of the selected maintenance plan. The data generated in each maintenance plan is available in xlsx format, on the service file system (more on this in chapter 1.2.1). <NAME OF DELIVERABLE> PAGE 19 2.5 GRAPHICAL ANALYSIS As this type of data in its raw format is sometimes hard to interpret, there is a need to expose in a user friendly manner, which is exactly the Graph Analysis Module purpose. Figures Figure 11, Figure 12 and Figure 13 are examples of this module interface, accessible by pressing the button on the navigation bar. FIGURE 11: GRAPH ANALYSIS MODULE – SEGMENT EVOLUTION Initially, the user selects the dataset he wants to analyse. The server will prepare the information to be shown, which may take a minute or two. It is important to note that each selected table must have been in the same sequence. Then, the module will show the compiled information about the track. The first chart presents the quality evolution off a track’s segment over time. The green dots indicate the measured quality at that point in time. The blue lines are exponential regressions of quality values between work orders. At last, red lines represent known work orders. To help understand what each of these components represent, when the user moves the mouse over them a small tooltip screen will show additional information about that component. <NAME OF DELIVERABLE> PAGE 20 FIGURE 12: GRAPH ANALYSIS MODULE – TRACK EVOLUTION The second chart is a view on track quality evolution over time. It shows quality index for the entire track on a given date. The play button starts an automatic presentation of this evolution. The amount of information presented depends on the track length and therefore a zoom functionality was implemented so that such large amounts of data are always readable. To zoom in/out just scroll over the plot’s x axis. <NAME OF DELIVERABLE> PAGE 21 FIGURE 13: GRAPH ANALYSIS MODULE – TRACK CHARACTERISTICS The last chart presents the track’s infrastructure characteristics. All available track properties are shown in the top list, which the user can move to the bottom list to arrange the properties to be seen. This graph also has both zoom and on mouse over functionalities. <NAME OF DELIVERABLE> PAGE 22 2.6 NOTIFICATIONS The user should be able to configure a message that will be sent to him as soon as some specific event happens in the application. For example, the user could configure an email to be sent to him when a specific type of sequence finishes its processing, which in turn could contain some information on the actual sequence (success, failure, errors…). FIGURE 14: NOTIFICATIONS MODULE SCREEN Figure 14 shows how a user can manage his notifications. Similar to sequences, a notifications must have something that triggers it. The contact methods are email and live notification. The message itself should be automatically written depending on the matter it refers to. In this example, both email and live notification will be sent when a new rail type file is submitted. <NAME OF DELIVERABLE> PAGE 23 2.7 OPTIRAIL MAINTENANCE TOOLKIT This toolkit is a way to configure some database parameters without the need to change them manually. It can only be used in the machine where the OptiRail server is running. The OptiRail Maintenance Toolkit has three functionalities. 2.7.1 ADD TRACK FIGURE 15: OPTIRAIL MAINTENANCE TOOLKIT – ADD TRACK Allows the user to add additional tracks to the OptiRail framework. The parameters “Start” and “End” should be within the limits in the geometrical files and “Increment” is the asset length in those files. Therefore, the user can define a smaller section of a real track to be analysed, allowing a more focused study. <NAME OF DELIVERABLE> PAGE 24 2.7.2 MANAGE SEQUENCES FIGURE 16: OPTIRAIL MAINTENANCE TOOLKIT – MANAGE SEQUENCES This allows the user to setup which sequences will run when a new curvature/geometrical file is added to OptiRail. It should be setup taking into account how much information there is in the database for the new file’s track. For instance, if there is no infrastructure data previously submitted for this track, then there is no point in doing homogeneous segmentation because it will just end up in an error. Another possible error is if there are less than four geometrical auscultation files submitted to the database for that track, an error would occur while determining the subseries because exponential regression requires 4 or more points. To ease this process, there is a small text on the screen recommending which configuration is adequate in each situation. <NAME OF DELIVERABLE> PAGE 25 2.7.3 NOTIFIER FIGURE 17: OPTIRAIL MAINTENANCE TOOLKIT – NOTIFIER Allows the user to configure the “OptiRail Email”, i.e., the email that will send notifications. It should be devoted to this purpose only. The “server” field is the smtp service provider address. Many service providers were tested but some failed to meet the application needs, thus, Microsoft services are recommended here. <NAME OF DELIVERABLE> PAGE 26 3. TOOL INSTALATION This chapter presents the installation method for the OptiRail Software. Such is separated into two major components, Client and Server, having each of them their own installation procedure. 3.1 OPTIRAIL SERVER INSTALLATION The server installer requires several steps in order to be successfully set up and ready to use. To install it manually some steps must be followed: 1. Required software packages: 1.1. Java Recommended Version: 8 Architecture: x64 For Windows: Download link: http://www.oracle.com/technetwork/java/javase/downloads/index.html For Linux: Download jdk-8uversion-linux-x64.tar.gz from link above 1.2. PostgreSQL Recommended Version: 9.3 Architecture: x64 For Windows: Download Link: http://www.enterprisedb.com/products-services-training/pgdownload <NAME OF DELIVERABLE> PAGE 27 1.3. R Required Version: 3.0.2 Architecture: x64 For Windows: Download Link: http://www.r-project.org/ 1.4. OptiRail Server Alpha Release Available at SourceForge OptiRail project: https://sourceforge.net/projects/optirail/files/OptiRail-Alpha-Releases/OptiRail-AlphaR-v1.1.0/OptiRail_Server_1.1.0.zip https://sourceforge.net/projects/optirail/files/OptiRail-Alpha-Releases/OptiRail-AlphaR-v1.1.0/OptiRail_Client_1.1.0.zip 2. Install the download software applications: 2.1. Java For Windows: Download (link above) and install Java 8 x64; Set Java Runtime Environment Variables: When the installation finishes, open Java Control Panel: (Control Panel > Programs > Java). On the “Java” tab, press the button “View”. Then, add the following parameters to “Runtime Parameters”: -Xms256m -Xmx5g -XX:+UseParallelGC -XX:PermSize=256m -XX:MaxPermSize=5g These variables can be adjusted depending on the PC specs. For Linux: In the terminal, execute sudo apt-get install rpm; Create the java directory if it doesn't exist: sudo mkdir /usr/java Change to the directory: cd /usr/java Unpack the package: sudo tar zxvf <package_dir>/jdk-8uversion-linux-x64.tar.gz Now you must create the Java environment variables: sudo gedit /etc/environment In the first line of the file write: JAVA_HOME="/usr/java/<java_folder>" In the PATH declaration add “:$JAVA_HOME/bin” <NAME OF DELIVERABLE> PAGE 28 Ex:PATH="/usr/local/sbin:/usr/local/bin:/usr/sbin:/usr/bin:/sbin:/bin:/usr/games:$JA VA_HOME/bin" Save and close. To load the new environment variables configuration, the .bhashrc must be changed: sudo gedit ~/.bashrc Add at the end of file: source /etc/environment Save and close. To refresh the terminal, close it and open a new one. Lastly, write ControlPanel on your new terminal. On the “Java” tab, press the button “View”. Then, add the following parameters to “Runtime Parameters”: -Xms256m -Xmx5g -XX:+UseParallelGC -XX:PermSize=256m -XX:MaxPermSize=5g Press Apply and Ok to close it. <NAME OF DELIVERABLE> PAGE 29 2.2. PostgreSQL For Windows: Download (link above) and install PostgreSQL x64; Be wary of the superuser password… And service port definition; Open the PostgreSQL application “Stack Builder”; <NAME OF DELIVERABLE> PAGE 30 Select your PostgreSQL installation. Select “pgJDBC” tool, under “Database Drivers”. Other tools may be chosen as well, but this one is mandatory. For Linux: Execute in the terminal: sudo gedit /etc/apt/sources.list.d/pgdg.list Add the line deb http://apt.postgresql.org/pub/repos/apt/ precise-pgdg main and save it; Back in terminal, execute: wget --quiet -O https://www.postgresql.org/media/keys/ACCC4CF8.asc | \ sudo apt-key add - After the step above is completed, execute the following commands: sudo apt-get update sudo apt-get install postgresql-9.3 For everything to work fine, one change has to be made in the file pg_hba.conf. To change it write the follows commands: sudo gedit <path_to_file>/pg_hba.conf. Default folder is /etc/postgresql/<version>/main/pg_hba.conf (Suggestion: use the command locate to find the file. Ex: locate pg_hba.conf) In the file, in the line “local all postgres peer”, change “peer” to “md5” and save. (Source: http://www.postgresql.org/download/linux/ubuntu/) <NAME OF DELIVERABLE> PAGE 31 2.3. R For Windows: Download (link above) and install R 3.0.2 x64; Copy R packages to the R library folder: Copy all contents from /server_installation_support/packages_r/ to your R library folder (which by default is C:\Program Files\R\R-3.0.2\library) For Linux: Open file sources.list: sudo gedit /etc/apt/sources.list Add on the last line of the file : deb http://cran.rstudio.com/bin/linux/ubuntu precise/ Save and close it In the terminal, execute: sudo apt-key adv --keyserver keyserver.ubuntu.com --recv-keys E084DAB9 sudo add-apt-repository ppa:marutter/rdev sudo apt-get update sudo apt-get upgrade sudo apt-get install r-base-core=3.0.2-1precise0 (precise corresponds to ubuntu version) sudo apt-get install libcurl4-gnutls-dev sudo apt-get install libpq-dev sudo apt-get install libxml2-dev mkdir -p ~/R/x86_64-pc-linux-gnu-library/3.0.2 Copy R packages to the R library folder: Copy all contents from /server_installation_support/packages_r_linux/ to your R library folder (which by default is <home_dir>/R/x86_64-pc-linux-gnu-library/3.0.2/ Declare environment variable: sudo gedit /etc/environment Add on first line: R_LIBS_USER=”<path_to_dir>/R/x86_64-pc-linux-gnu-library/3.0.2” (Path by default) Add to PATH :$R_LIBS_USER/rJava/jri/x64 <NAME OF DELIVERABLE> PAGE 32 R_HOME=”<installation_dir>” (Ex: R_HOME=”/usr/lib/R”) Add to PATH: :$R_HOME/bin Add libR.so (in R_HOME/lib) and libjri.so (in R_LIBS_USER/rjava) path to LD_LIBRARY_PATH: Add this to environment variables: LD_LIBRARY_PATH="$LD_LIBRARY_PATH$R_HOME/lib:$R_LIBS_USER/rJava/jri:" Save and close the file Execute the command: sudo R CMD javareconf 3. Setup software structure In order to set up the OptiRail Server file system extract the Optirail_Server folder from “OptiRail_Server_1.1.0.zip”. That zip has the OptirailServer folder, which is the root folder that contains the base folder structure and all the needed code and configuration files, and the server_installation_support, which contains the setup SQL scripts and required R packages. Place the root folder anywhere in the file system. 4. Setup the PostgreSQL database For Windows: Open command line as administrator; Go to the /bin folder of your PostgreSQL installation: cd path\to\postgres\bin <NAME OF DELIVERABLE> PAGE 33 Import OptiRail database structure: psql -U USERNAME DBNAME < path\to \OptiRail_Server_1.1.0\server_installation_support\db_offset\optirail_dp.sql For Linux: To import database, the terminal must be used. Thus write the commands: First, change the postgresql password: sudo -u postgres psql postgres \password postgres \q Then, import the OptiRail database structure: sudo service postgresql restart sudo psql -U postgres -d postgres -f <filename>.pgsql To manage the database could be installed the pgadmin3 (GUI tool) and follow the steps above. To do that, execute: sudo apt-get install pgadmin3 pgadmin3 <NAME OF DELIVERABLE> PAGE 34 5. Setup environment variables For Windows: The OptiRail Server requires some environment variables in order to work properly which are described in the following table. EV Name OPTIRAIL_SERVER_ROOT FZ_USERS_ROOT EV Value Path to the OptiRail root folder (see above step “3. Setup software structure”). Ex: C:/OptiRail_Alpha_R_1.1.0/Dpl_OptiRail_Server_1.1.0 Path to the FTP users shared folder. Ex: C:/OptiRail_Alpha_R_1.1.0/Dpl_OptiRail_Server_1.1.0 /data_files/ftp_users Path to “bin/x64” folder in the R installation (see above step “2.3. R”). Path Ex: C:/Program Files/R/R-3.0.2/bin/x64 Path to “/x64” JRI installation in the rJava package (see above step “2.3. R”). Path R_HOME Ex: C:/Program Files/R/R-3.0.2/library/rJava/jri/x64 Path to root R installation (see above step “2.3. R”). R_LIBS_USER Ex: C:/Program Files/R/R-3.0.2 Path to R packages root (see above step “2.3. R”). Ex: C:/Program Files/R/R-3.0.2/library For Linux: Declare environment variable: sudo gedit /etc/environment Add in the first line: OPTIRAIL_SERVER_ROOT=”<path_to_dir>/OptiRail-Alpha-R-v1.1.0 /OptiRail_Server_1.1.0" FZ_USERS_ROOT="/<path_to_dir>/OptiRail-Alpha-R-v1.1.0/ OptiRail_Server_1.1.0 /data_files/ftp_users" Now is need to add a script shell file on /etc/profile.d to load the environment variables: sudo gedit /etc/profile.d/myenvvars.sh <NAME OF DELIVERABLE> PAGE 35 Now add the following lines : #! /bin/bash source /etc/environment After saving the file, change the file permissions: sudo chmod 777 /etc/profile.d/myenvvars.sh 5.1. Replace environmental variables in database Connect to the optirail database using pgadmin3; For each row in the table “scripts”, replace the tag $OPTIRAIL_SERVER_ROOT$ in column “filepath” with the actual value defined above; 5.2. Setup Executables: For Windows: The executable “OptiRail_Server_1.1.0/launcher.bat” launches all OptiRail Services and the file “OptiRail_Server_1.1.0/OptiRail_Maintenance_Toolkit/ OptiRail_Maintenance_Toolkit.jar”. At your option, create a shortcut for these files in your desktop. For Linux: You can also copy the files in “/installation_folder/linux_runnables/” to your desktop. To run those executables, you should declare them as runnable. To do that execute sudo chmod 777 <executable name>. Additionally, set the file “/OptiRail_Server_1.1.0/OptiRail_Maintenance_Toolkit/ toolkit_launcher.sh” as executable. To execute the OptiRail services, double click on the file server_launcher.sh and choose “Run in Terminal”. You also need to install xdotool: sudo apt-get install xdotool At last, restart your machine. <NAME OF DELIVERABLE> PAGE 36 3.2 OPTIRAIL CLIENT INSTALLATION The client software installation requires some simple steps in order to be successfully set up and ready to use. To install it manually the steps are: 1. Required software packages The required software packages for the OptiRail Client to run are: 1.1. Java Recommended Version: 8 Architecture: x64 For Windows: Download link: http://www.oracle.com/technetwork/java/javase/downloads/index.html For Linux: Download jdk-8uversion-linux-x64.tar.gz from link above 1.2. OptiRail Client Alpha Release Available at SourceForge OptiRail project. File: OptiRail_Client_1.1.0.zip 2. Java For Windows: Download (link above) and install Java 8 x64; Set Java Runtime Environment Variables: When the installation finishes, open Java Control Panel: (Control Panel > Programs > Java). On the “Java” tab, press the button “View”. Then, add the following parameters to “Runtime Parameters”: -Xms256m -Xmx5g -XX:+UseParallelGC -XX:PermSize=256m -XX:MaxPermSize=5g These variables can be adjusted depending on the PC specs. <NAME OF DELIVERABLE> PAGE 37 For Linux: In terminal execute sudo apt-get install rpm; Create the java directory if don't exist: sudo mkdir /usr/java Change to the directory: cd /usr/java Unpack the package: sudo tar zxvf <package_dir>/jdk-8uversion-linux-x64.tar.gz Now have to create the Java environment variables: sudo gedit /etc/environment In the first line of the file write: JAVA_HOME="/usr/java/<java_folder>" In the PATH declaration add “:$JAVA_HOME/bin” Ex: PATH="/usr/local/sbin:/usr/local/bin:/usr/sbin:/usr/bin:/sbin:/bin:/usr/games:$JAVA _HOME/bin" To load the new environment variables configuration the .bhashrc must be changed: sudo gedit ~/.bashrc Add at the end of file: source /etc/environment Save and close. <NAME OF DELIVERABLE> PAGE 38 To refresh the terminal, close it and open a new one. Lastly, write ControlPanel on your new terminal. On the “Java” tab, press the button “View”. Then, add the following parameters to “Runtime Parameters”: -Xms256m -Xmx5g -XX:+UseParallelGC -XX:PermSize=256m -XX:MaxPermSize=5g Press Ok and Apply to close it. 3. Setup software structure In order to set up the OptiRail Client file system extract the Optirail_Client folder from “OptiRail_Client_1.1.0.zip” to any path in the file system. 4. Setup environment variables For Windows: The OptiRail Client requires an environment variable in order to work properly. That EV is described in the following table. EV Name OPTIRAIL_CLIENT_ROOT EV Value Path to the OptiRail root folder (see above step “3. Setup software structure”). Ex: C:/OptiRail_Alpha_R_1.1.0/Dpl_OptiRail_Client_1.1.0 For Linux: Declare environment variable: sudo gedit /etc/environment Add in the first line: OPTIRAIL_CLIENT_ROOT="/<path_to_dir>/OptiRail-Alpha-R-v1.1.0/ OptiRail_Client_1.1.0" Now is need to add a script shell file on /etc/profile.d to load the environment variables: sudo gedit /etc/profile.d/myenvvars.sh Now add the following lines : #! /bin/bash source /etc/environment After saving the file, change the file permissions: <NAME OF DELIVERABLE> PAGE 39 sudo chmod 777 /etc/profile.d/myenvvars.sh 4.1. Setup Executables: For Windows: The executable “OptiRail_Client_1.1.0/ OptiRailJarLoader.jar” launches the OptiRail Client. At your option, create a shortcut for this file in your desktop. For Linux: You can also copy the files in “/installation_folder/linux_runnables/” to your desktop. To run those executables, you should declare them as runnable. To do that execute sudo chmod 777 <executable name>. Additionally, set the file “/OptiRail-Alpha-R-v1.1.0/ OptiRail_Client_1.1.0/ client_launcher.sh” as executable. To execute the OptiRail client, double click on the file client_launcher.sh and choose “Run in Terminal”. You also need to install xdotool: sudo apt-get install xdotool At last, restart your machine. <NAME OF DELIVERABLE> PAGE 40 3.3 OPTIRAIL CONFIGURATION OptiRail uses configuration files to manage server – client communications as well as database access, ftp and smtp configurations. This allows the user to adapt OptiRail to his current infrastructure and network setups. On the server side, there are two configuration files, “optirail.cfg” and “users.properties”, both in the “OPTIRAIL_SERVER_ROOT/config/” folder. On the client side there is only “optirail.cfg” in the “OPTIRAIL_CLIENT_ROOT/config/” folder. 3.3.1 MULTI MACHINE SETUP All those files are configured by default to work with OptiRail server and client together in the same machine. To configure OptiRail to work in different machines then follow the steps: Server side configuration: In optirail.cfg file: 1. Write the server machine IP in the “server_address” and “remote_host” tag values; 2. Adapt “users_cfg_file” and “keystore_file” file paths to your current setup; 3. Open the ports 21, 22, 990, 1090-1109 and 5432 on the firewall (and eventually in the anti-virus). If the default ports present in this file are changed, they should be opened in the firewall; In users.properties files: 1. Adapt “homedirectory” to your current setup; <NAME OF DELIVERABLE> PAGE 41 Client side configuration: In optirail.cfg file: 1. Write the client machine IP in the “client_address” tag values; 2. Write the server machine IP in the “server_address” and “remote_host” tag values; 3. Open the ports 21, 22, 990 and 1080-1089 on the firewall (and eventually in the antivirus). If the default ports present in this file are changed, they should be opened in the firewall. Any changes to the service ports in the server side configuration should be done in this file as well. 3.3.2 WINDOWS AND CUSTOM LINUX SETUP Additionally, the OptiRail default configuration setup is prepared for specific installation paths, namely the ones followed in the installation for Linux video. If the installation was made in the same, but in Windows or for a different directory in Linux, follow this steps: Server side configuration: In optirail.cfg file: Adapt “users_cfg_file” and “keystore_file” file paths to your current setup; In users.properties files: Adapt “homedirectory” to your current setup; 3.3.3 DATABASE SETUP Verify if the parameters defined during the PostgreSQL installation are the same as the ones present in the OptiRail Server configuration file “optirail.cfg”, namely the tags db_host, db_port, db_user and db_password. 3.3.4 TROUBLESHOOTING A typical problem in brand new setups is the firewall blocking communications between services. The OptiRail Server framework was projected to use the ports 1080 to 1109, in spite of only 1080-1105 are being used in the current release (more info at $OPTIRAIL_SERVER_ROOT$/config/optirail.cfg). Additionally, PostgreSQL Service uses 5432 port by default. Another typical situation may happen due to white spaces or invalid characters in file or folder paths. <NAME OF DELIVERABLE> PAGE 42