1
Using NetBeansTM IDE 5.5
Your Guide to Getting Work Done in NetBeans IDE
Welcome to the Using NetBeans™ IDE 5.5 guide. This guide is designed to give you
a more detailed introduction to the IDE than is available in the Quick Start guide by
exploring the main aspects of the IDE. This guide is geared mostly to newcomers to
NetBeans IDE 5.5, whether you are new to using IDEs or an experienced IDE user
that is switching over from a different development environment. However, readers
of this guide are assumed to have at least a basic understanding of the Java
programming language and related technologies.
Note – This guide does not cover the IDE's Java EE features or module development
features. For more information about using NetBeans IDE for these purposes, see the
Java EE Applications Learning Trail and the NetBeans Modules and
Rich-Client Applications Learning Trail at
http://www.netbeans.org.
Setting Up Projects .......................................................................5
Basic IDE Concepts .................................................................6
Projects ................................................................................6
Ant ......................................................................................9
Creating a Project ..................................................................10
Setting the Main Project ...................................................11
Importing Projects .............................................................12
Setting the Target JDK in a Project .......................................12
Managing a Project's Classpath .............................................13
Managing Dependencies Between Projects ......................15
Setting up Free-form Projects ................................................16
Editing and Running Ant Scripts ......................................16
Using NetBeansTM 5.5 IDE
1
Managing the Classpath in Free-form Projects .....................18
Specifying the Classpath for Project Sources ...................18
Specifying the Classpath for Custom Tasks .....................19
Creating and Editing Files .........................................................21
Creating Java Files .................................................................22
Using File Templates ........................................................22
Using GUI Templates .......................................................23
Editing Java Files in the Source Editor .................................23
Code Completion ..............................................................24
Code Templates ................................................................25
Special Code Template Syntax .........................................26
Editor Hints .......................................................................26
Refactoring ........................................................................26
Working With Import Statements .....................................28
Formatting Java Source Code ...........................................29
Navigating in the Source Editor ............................................29
Navigating Within a Java File ..........................................29
Search and Selection Tools ...............................................31
Navigating Between Documents ......................................31
Configuring the Editor ...........................................................32
Building Applications .................................................................35
Using Ant Build Scripts .........................................................35
Building Projects, Packages, and Files ..................................36
Fixing Compilation Errors .....................................................37
Filtering Output Files .............................................................38
Customizing the Build Process ..............................................38
Build Files in Standard Projects ........................................39
Build Files in Free-form Projects ......................................40
Writing Custom Ant Tasks ...............................................41
Mapping Custom Ant Targets to Project Commands .......42
Running Applications .................................................................43
Running Projects and Files ....................................................43
Customizing Runtime Options ..............................................44
Setting the Runtime Classpath ..........................................45
Setting the Main Class and Runtime Arguments ..............46
Setting JVM Arguments ...................................................46
Debugging Applications .............................................................47
Basic Debugging ....................................................................48
Using NetBeansTM 5.5 IDE
2
Starting a Debugging Session ...........................................48
Debugger Windows ..........................................................49
Stepping Through Your Code ...........................................50
Working With Breakpoints ....................................................51
Setting a Breakpoint ..........................................................52
Setting Conditions for a Breakpoint .................................52
Customizing the Output for a Breakpoint .........................53
Breakpoint Types ..............................................................54
Setting Watches .....................................................................54
Connecting to Databases ............................................................55
Setting Up Your Resources ...................................................56
Bundled databases .............................................................56
Other databases .................................................................57
Connecting to Databases .......................................................57
Adding Database Drivers ..................................................57
Establishing a Database Connection .................................58
Working with a Database Connection ...................................59
Setting Up a Database Connection Pool ................................60
Configuring the IDE ...................................................................63
Setting IDE Default Settings .................................................63
Configuring General Java Settings ...................................65
Working With File Types .................................................66
Configuring Ant Settings ..................................................67
Enabling and Disabling IDE Functionality ...........................67
Disabling Modules ............................................................67
Installing New Modules from the Update Center .............69
Boosting NetBeans Performance ...........................................69
Configuring IDE Startup Switches ...................................69
Tuning JVM Switches for Performance ...........................71
Quick Reference ..........................................................................75
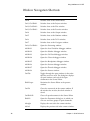
Window Navigation Shortcuts ...............................................76
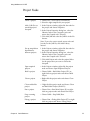
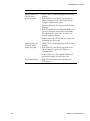
Project Tasks ..........................................................................77
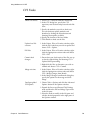
VCS Tasks .............................................................................79
Configuring Tasks .................................................................80
Source Editor Tasks ...............................................................82
Source Editor Abbreviations for Java Files ......................83
Source Editor Abbreviations for JSP and Servlet Files ....86
Source Editor Abbreviations for XML and DTD Files ....88
Using NetBeansTM 5.5 IDE
3
Special Code Template Syntax .........................................89
Build Tasks ............................................................................90
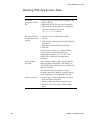
Running J2SE Application Tasks ..........................................91
Running Web Application Tasks ...........................................92
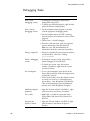
Debugging Tasks ...................................................................94
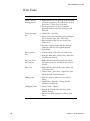
JUnit Tasks ............................................................................96
Using NetBeansTM 5.5 IDE
4
CHAPTER
1
Setting Up Projects
This section covers the basics of setting up your IDE to start developing your own
projects. The process of managing project contents and properties is centered around
the Projects window. The most common tasks in setting up a project are creating a
project, setting the project's target JDK, and configuring the project's properties such
that resource libraries are available to it.
This section covers:
Chapter 1
■
Basic IDE Concepts
■ Projects
■ Ant
■
Creating a Project
■ Setting the Main Project
■ Importing Projects
■
Setting the Target JDK in a Project
■
Managing a Project's Classpath
■ Managing Dependencies Between Projects
■
Setting up Free-form Projects
■ Editing and Running Ant Scripts
■
Managing the Classpath in Free-form Projects
■ Specifying the Classpath for Project Sources
■ Specifying the Classpath for Custom Tasks
Setting Up Projects
5
Using NetBeansTM 5.5 IDE
Basic IDE Concepts
Before you start setting up your project, let's take a minute to get acquainted with
some of the basic concepts involved with using the IDE.
Projects
In the IDE, you always work inside of a project. An IDE project is a group of Java
source files and associated information about what belongs on the classpath, how
to build and run the project, and so forth. You can create standard projects that
use an IDE-generated Ant script to build the project, or create free-form projects
that are based on your existing Ant scripts. The IDE stores project information in
a project folder which includes an Ant build script and properties file that control
the build and run settings, and a project.xml file that maps Ant targets to IDE
commands.
Note: Though the IDE puts source directories within the project folder by default,
your source directories do not necessarily need to be located in the project folder.
6
Chapter 1
Setting Up Projects
Using NetBeansTM 5.5 IDE
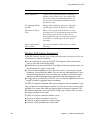
The following table summarizes the major differences between standard projects
and free-form projects.
Chapter 1
Standard Projects
Free-Form Projects
The IDE uses a NetBeans-generated
Ant build script to build, run, clean,
test, and debug your application.
The IDE uses targets in an existing
Ant script to build, run, clean, test,
and debug your application. If the
Ant script does not contain targets for
some of these functions, the functions
are unavailable. You can write targets
to implement these functions, either
in your Ant script or in a secondary
Ant script.
Some standard IDE projects (Java
Application, Java Class Library, Web
Application, Enterprise Application,
and EJB Module) are created with
only one source folder, you can add
more.
Standard IDE projects with existing
sources (Java Application, Web
Application, Enterprise Application,
and EJB Module) can have any
number of source folders. Source
folders can be added and removed
after project creation. You can also
create dependencies with other
NetBeans projects.
You can also use multiple source
folders in standard projects by
creating a separate project for each
source folder and create dependencies
between the projects.
Each project can have any number of
source folders. Source folders can be
added and removed after project
creation. You can also create
dependencies with other NetBeans
projects.
Setting Up Projects
7
Using NetBeansTM 5.5 IDE
Standard Projects
Free-Form Projects
The project classpath is controlled by
the libraries you add to the project.
You can add libraries in the Libraries
pane of the Project Properties dialog
box or by right-clicking the Libraries
node of your project in the Projects
window and choosing Add Library.
Any changes are immediately
registered in the IDE-generated Ant
script.
The project classpath is controlled by
your Ant script. The classpath settings
in the Classpath page of the Project
Properties dialog box only tell the IDE
which classes to make available for
code completion and refactoring.
When you change the classpath
settings in the Ant script, you have to
update the settings in the project's
properties.
The build process is customized by
setting basic options in the Project
Properties dialog box or by
overwriting targets in the NetBeansgenerated Ant script.
All compilation and runtime options
are set in the Ant build script.
The IDE builds one JAR file (for J2SE
projects) or WAR file (for web
projects) for your project.
The IDE builds as many output files
as are specified in the project's Ant
script.
The IDE contains the following standard project templates:
Java application
icon
Java application
icon
Java application
icon
Java Application. Template for creating a skeleton J2SE project with a
main class.
Java Class Library. Template for creating a skeleton Java class library
without a main class.
Java Project with Existing Sources. Template for creating a J2SE
project based on your own Java sources.
Web Application. Template for creating a skeleton web application.
Web application
icon
Web Project with Existing Sources. Template for creating a web
Web application project based on your own web and Java sources.
icon
Enterprise Application. Template for creating a skeleton enterprise
application.
Enterprise
application icon
8
Chapter 1
Setting Up Projects
Using NetBeansTM 5.5 IDE
Enterprise Application with Existing Sources. Template for
importing an enterprise application into a standard IDE project.
Enterprise
application icon
EJB Module. Template for creating an Enterprise JavaBeans module.
EJB module icon
EJB module icon
EJB Module with Existing Sources. Template for importing an
enterprise JavaBean module into a standard IDE project.
The IDE contains the following free-form project templates:
Free-form
project icon
Java Project with Existing Ant Script. Template for creating a
J2SE project based on your own Java sources, built using your
own Ant build script.
Free-form
project icon
Web Project with Existing Ant Script. Template for creating a
web project based on your own web and Java sources, built
using your own Ant build script.
Free-form
project icon
EJB Module with Existing Ant Script. Template for importing
an EJB module into an IDE project that uses your own Ant build
script.
Ant
Apache Ant is a Java-based build tool used to standardize and automate build
and run environments for development. The IDE's project system is built directly
on top of Ant. All of the project commands, like Build Main Project or Debug
Main Project, call targets in the project's Ant script. You can therefore build and
run your project outside the IDE exactly as it is built and run inside the IDE.
It is not necessary to know Ant to work with the IDE. You can set all the basic
compilation and runtime options in the project's Project Properties dialog box and
the IDE automatically updates your project's Ant script. If you are familiar with
Ant, you can customize a standard project's Ant script or write your own Ant
script for a project.
Even if you are an expert at using Ant, you probably still need to look in the Ant
manual every once in a while. You can install the Ant manual directly in the IDE
help system by going to the NetBeans Update Center and installing the Ant
Documentation module. See Installing New Modules from the Update Center for
more information on using the Update Center.
If you are looking for resources on learning Ant, see
http://ant.apache.org/resources.html.
Chapter 1
Setting Up Projects
9
Using NetBeansTM 5.5 IDE
Creating a Project
To create a new project, choose File > New Project (Ctrl-Shift-N). When the New
Project wizard appears, simply select the right template for your project and
complete the remaining wizard steps.
For instructions on using the New Project wizard, see the following documents:
■
Quick Start Guide
■
Quick Start Guide for Web Applications
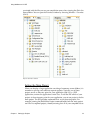
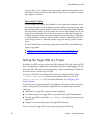
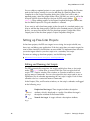
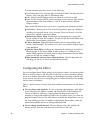
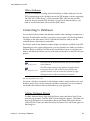
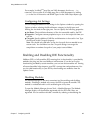
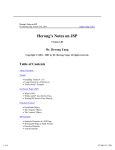
When you finish creating a project, it opens in the IDE with its logical structure
displayed in the Projects window and its file structure displayed in the Files
window:
■
The Projects window is the main entry point to your project sources. It shows a
logical view of important project contents such as Java packages and Web pages.
You can right-click any project node to access a contextual menu of commands for
building, running, and debugging the project, as well as opening the Project
Properties dialog box. The Projects window can be opened by choosing Window >
Projects (Ctrl-1).
■
The Files window shows a directory-based view of your projects, including files
and folders that are not displayed in the Projects Window. From the Files window,
you can open and edit your project configuration files, such as the project's build
script and properties file. You can also view build output like compiled classes,
JAR files, WAR files, and generated Javadoc documentation. The Files window
can be opened by choosing Window > Files (Ctrl-2).
In addition, you can use the Favorites window to access any location on your
computer. This is convenient when you want to access files and directories that are
outside of your project directories. The Favorites window does not know anything
about project classpath and membership, so no project-related commands like
Compile File are available. You can open a class file in the Favorites window by
double-clicking the file, however because there is no classpath information
10
Chapter 1
Setting Up Projects
Using NetBeansTM 5.5 IDE
associated with that file you may see compilation errors when viewing the file in the
Source Editor. You can open the Favorites window by choosing Window > Favorites
(Ctrl-3).
Projects and Files windows
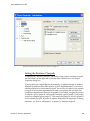
Setting the Main Project
When you develop a large application consisting of numerous source folders, it is
common to split up your code into separate projects. Typically, one of these
projects serves as the entry point for your application and, if it is a J2SE
application, contains the application's main class. To tell the IDE which of your
projects is the main entry point for your application, you set one project to be the
main project. The IDE provides commands that act on the main project. For
example, running the Build Main Project command builds both the main project
and all of its required projects, thereby ensuring that all of your compiled classes
Chapter 1
Setting Up Projects
11
Using NetBeansTM 5.5 IDE
are up-to-date. To set a project as the main project, right-click the project node in
the Projects window, and choose Set as Main Project. Only one project can be the
main project at any time.
Importing Projects
You can import your project into NetBeans by using the project templates in the
New Project wizard to create a NetBeans project based on your project type. After
choosing the project type in the New Project wizard, choose the project template
that uses existing sources, or if the project you want to import already has an Ant
script, choose the template that uses your existing Ant script. Step through the
wizard to locate the sources you want to import to create your project. Depending
on which template you choose, the IDE creates a either a standard project with
your existing sources or a free-form project using your existing sources and Ant
script.
For more information on importing source code into the IDE, see the following
step-by-step guides:
■
■
Importing Existing Java Source Code into NetBeans 5.5
Importing a 3rd Party Project as a Free-Form Project
Setting the Target JDK in a Project
By default, the IDE uses the version of the J2SE platform (JDK) with which the IDE
runs as the default Java platform for compilation, execution, and debugging. You can
view your IDE's JDK version by choosing Help > About and clicking the Detail tab.
The JDK version is listed in the Java field.
You can run the IDE with a different JDK version by starting the IDE with the
--jdkhome jdk-home-dir switch from the command line or in your IDEHOME/etc/netbeans.conf file. For more information, see Configuring IDE
Startup Switches.
In the IDE, you can register multiple Java platforms and attach Javadoc and source
code to each platform. Switching the target JDK for a standard project does the
following:
■
Offers the new target JDK's classes for code completion.
■
If available, displays the target JDK's source code and Javadoc documentation.
■
Uses the target JDK's executables (javac and java) to compile and execute your
application.
■
Compiles your source code against the target JDK's libraries.
You can switch the target JDK of your project by doing the following:
12
Chapter 1
Setting Up Projects
Using NetBeansTM 5.5 IDE
■
Standard projects. In standard projects you switch the target JDK in the Libraries
panel of the Project Properties dialog box.
■
Free-form projects. In free-form projects you have to set the target JDK in the Ant
script itself, then specify the source level in the Sources page of the Project
Properties dialog box. You set the source level in the Project Properties dialog box
because this is what the IDE uses to determine the JDK to use for your Javadoc
and sources for your project. If the IDE cannot find a JDK corresponding to the
source level specified, the IDE’s default JDK is used.
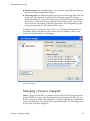
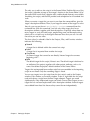
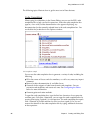
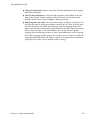
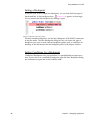
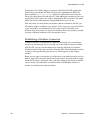
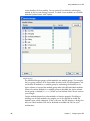
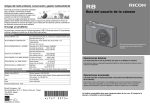
To register a new Java platform, choose Tools > Java Platform Manager from the
main menu. Specify the directory that contains the Java platform as well as the
sources and Javadoc needed for debugging.
Java Platform Manager
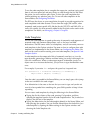
Managing a Project's Classpath
Adding a group of class files to a project's classpath tells the IDE which classes the
project should have access to during compilation and execution. The IDE also uses
classpath settings to enable code completion, automatic highlighting of compilation
errors, and refactoring. You can edit the classpath declarations for an existing project
in the Project Properties dialog box.
Chapter 1
Setting Up Projects
13
Using NetBeansTM 5.5 IDE
14
■
Standard projects. In standard projects, the IDE maintains separate classpaths for
compiling and running your project, as well as compiling and running JUnit tests
(for J2SE applications). The IDE automatically adds everything on your project's
compilation classpath to the project's runtime classpath. You can add JAR files,
libraries, and dependent projects to the project's compilation classpath in the
Compile tab of the Project Properties dialog box. You can also right-click the
Libraries node in the Projects window and add JAR files, libraries and projects to
your project.
■
Free-form projects. In free-form projects, your Ant script handles the classpath
for all of your source folders. You declare the classpath in the New Project wizard
when you set up your free-form project. The classpath settings for free-form
projects only tell the IDE what classes to make available for code completion and
refactoring. You can declare the classpath for free-form projects using the Java
Sources Classpath panel in the Project Properties dialog box. For more, see
Managing the Classpath in Free-form Projects below.
Chapter 1
Setting Up Projects
Using NetBeansTM 5.5 IDE
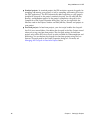
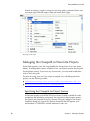
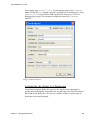
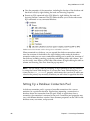
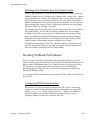
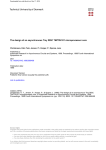
If you have attached Javadoc and source files to a JAR file in the Library Manager,
the IDE automatically adds the Javadoc and source files to the project when you
register the JAR file on a project's classpath. You can step into classes and look up
Javadoc pages for the classes without configuring anything else.
Project Properties dialog box
Managing Dependencies Between Projects
If each of your source roots is a separate standard project, you have to set up the
classpath dependencies between the projects. Typically you set up one main
project containing the project main class (in J2SE projects), and several required
projects. A required project is a project that has been added to another project's
classpath. When you clean and build a project, the IDE also cleans and builds its
required projects. The required project's Javadoc and sources are also made
available to the receiving project.
Chapter 1
Setting Up Projects
15
Using NetBeansTM 5.5 IDE
You can add any required projects to your project by right-clicking the Libraries
node in the Projects window, or you can add them by specifying them in the
Compile tab in the Project Properties dialog box. When you want to add a
required project, select the project folder whose JAR files you want to add to the
Project
classpath (the file chooser displays the icon for IDE project folders
folder icon). When adding projects in the Project Properties dialog box, make sure
that the Build Projects on Classpath checkbox is selected.
If you want to add a free-form project to the classpath of a standard project, you
have to add the free-form project's JAR file to the standard project's classpath. To
do this, you must first declare all of the free-form project's output files in the
Output panel of the free-form project's Project Properties dialog box.
Setting up Free-form Projects
In free-form projects, the IDE uses targets in an existing Ant script to build, run,
clean, test, and debug your application. If the Ant script does not contain targets for
some of these functions, the functions are unavailable. To implement these functions
you write targets either in your Ant script or in a secondary Ant script.
For more on setting up free-form projects, see the following article:
■
Advanced Free-Form Project Configuration
Editing and Running Ant Scripts
The IDE automatically recognizes Ant scripts and displays them as Ant script
Ant icon) rather than as normal XML files. You can right-click Ant
nodes (
scripts in the Projects window, Files window, or Favorites window to access a
pop-up menu of commands. You can also expand the Ant script node to see an
alphabetical list of subnodes representing the Ant script's targets. Each of these
subnodes also has a contextual menu of commands.
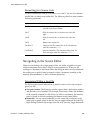
In the Projects, Files, and Favorites windows, an Ant script's subnodes are flagged
in the following ways:
Emphasized
Ant target
Normal Ant
Target
16
Emphasized Ant target. These targets include a description
attribute, which is displayed as a tooltip. You define the target's
description attribute in the Source Editor.
Normal Ant target. A target without a description attribute.
Chapter 1
Setting Up Projects
Using NetBeansTM 5.5 IDE
The only way to edit an Ant script is in the Source Editor. Double-click any of the
Ant script's subnodes to jump to that target's location in the Source Editor. All of
the normal XML search tools, selection tools, and keyboard shortcuts are available
for editing Ant scripts, and the IDE provides code completion for all standard Ant
tasks.
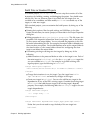
When you create a target that you want to run from the command line, give the
target a description attribute. Then, if you forget the names of the targets or what
they do, you can run the ant -projecthelp <script> command from the
command line. With this command, Ant lists only those targets that have a
description attribute, together with their descriptions. Especially when there are
many targets in your Ant build script, emphasizing some and de-emphasizing
others can be a useful way to distinguish between those that you use a lot and
those that you use less often.
The font style of a subnode's label in the Projects, Files, and Favorites windows
indicates the following:
■
■
■
■
Normal
A target that is defined within the current Ant script.
Italics
A target that is imported from another Ant script.
Greyed out
An internal target that cannot be run directly. Internal targets have names
beginning with '-'.
Bold
The default target for the script, if there is one. The default target is declared as
an attribute of the project, together with other project attributes, such as its
name. You define the project's default attribute in the Source Editor.
Targets that are imported from another script but are overridden in the importing
script are not listed. Only the overriding target is listed.
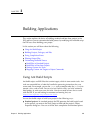
You can run targets in an Ant script from the Ant script's node in the Projects
window, Files window, or Favorites window. To do so, right-click the Ant script
node and choose a target from the Run Target submenu. Targets are sorted
alphabetically. Only emphasized targets are listed. Choose Other Targets to run a
target that has not been emphasized with a description attribute. Internal targets
are excluded from these lists because they cannot be run independently.
Chapter 1
Setting Up Projects
17
Using NetBeansTM 5.5 IDE
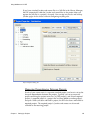
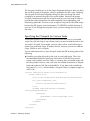
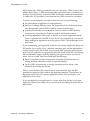
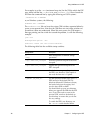
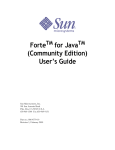
Instead of running a target by using the Ant script node's contextual menu, you
can simply right-click the target's node and choose Run Target.
Running an Ant target
Managing the Classpath in Free-form Projects
In free-form projects, your Ant script handles the classpath for all of your source
folders. To make project sources available to Ant, you need to specify the classpath
for the project sources. If you have any custom tasks, you also need to add these
tasks to Ant's classpath.
For more on using your own Ant scripts to compile, run, and debug free-form
projects, see the following articles:
■
Importing Existing Java Source Code into NetBeans IDE 5.0
■
Advanced Free-Form Project Configuration
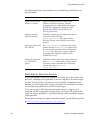
Specifying the Classpath for Project Sources
In free-form projects you tell the IDE what classes to make available for code
completion and refactoring and specify the classpath for these project sources.
You specify the classpath in the Java Sources Classpath settings in the Project
Properties dialog box. You do this because by default the IDE ignores your
environment's CLASSPATH variable whenever it runs Ant.
18
Chapter 1
Setting Up Projects
Using NetBeansTM 5.5 IDE
The classpath variable you set in the Project Properties dialog box does not affect
the actual classpath of the project, which is specified in the Ant script. Declaring
the classpath in the Project Properties dialog box does not change the actual
compilation or runtime classpath of the source folders. However, the project
classpath variable must match the classpath used by your Ant script in order to
provide the correct information for code completion, error highlighting, and
refactoring commands. You have to set an explicit classpath in your build scripts
because the IDE ignores your environment's CLASSPATH variable whenever it
runs Ant. If you change the classpath of one, you must change the class path of
the other
Specifying the Classpath for Custom Tasks
In free-form projects, you can call up and run custom Ant tasks in your build
script. For your Ant script to use customs tasks, you must include the tasks in the
Ant script's classpath. For example, you may add a task to your build script to
format your code with Jalopy. In order to do this, however, you have to add the
Jalopy JAR file to Ant's classpath.
You can add custom tasks to Ant's classpath within the IDE by doing either of the
following:
■
Providing an explicit classpath to the tasks in your build script. This is the
recommended method for specifying the location of JAR files that contain
custom tasks used by your Ant script, as it ensures that your build scripts will
be fully portable. You can write your tasks and include instructions to compile
them and produce a JAR file in the build file. To use these tasks, include the
long form of taskdef, which includes a classpath. Here is a simple example of
such a task:
<project name="test" default="all" basedir=".">
<target name="init">
<javac srcdir="tasksource" destdir="build/taskclasses"/>
<jar jarfile="mytasks.jar">
<fileset dir="build/taskclasses"/>
</jar>
<taskdef name="customtask" classname=
"com.mycom.MyCustomTask">
<classpath>
<pathelement location="mytasks.jar"/>
</classpath>
</taskdef>
</target>
</project>
Chapter 1
Setting Up Projects
19
Using NetBeansTM 5.5 IDE
The advantage of this method is that no special preparation is needed to begin
using the script. The script is entirely self-contained and portable. This method
also makes it easier to develop your tasks within the IDE, as the script compiles
them for you automatically.
To make your build scripts even more robust, use a property instead of a hardcoded location to specify the classpath to your tasks. You can store the property
in the build script itself or in a separate ant.properties file. You can then change
the classpath setting throughout your script by simply changing the value of
the specified property.
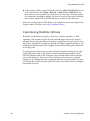
■
Configuring the Ant Classpath property in the Options window. If you cannot
declare a classpath in your build script, or you are using third-party build
scripts which you cannot alter, you can add tasks to Ant's classpath in the IDE
in the Options window.
Note: When you modify the Ant classpath in the Options window, when you run
Ant in the IDE the task is on Ant's classpath for all projects.
20
Chapter 1
Setting Up Projects
CHAPTER
2
Creating and Editing Files
Creating and editing Java source code is the most important function that the IDE
serves, since that's what developers generally spend most of their day doing.
NetBeans IDE provides a wide range of tools that can complement any developer's
personal style, regardless of whether you prefer to code everything by hand or want
the IDE to generate large chunks of code for you.
This section covers the following topics:
Chapter 2
■
Creating Java Files
■ Using File Templates
■ Using GUI Templates
■
Editing Java Files in the Source Editor
■ Code Completion
■ Code Templates
■ Special Code Template Syntax
■ Editor Hints
■ Refactoring
■ Working With Import Statements
■ Formatting Java Source Code
■
Navigating in the Source Editor
■ Navigating Within a Java File
■ Search and Selection Tools
■ Navigating Between Documents
■
Configuring the Editor
Creating and Editing Files
21
Using NetBeansTM 5.5 IDE
Creating Java Files
NetBeans IDE contains templates and wizards that you can use to create all kinds of
source files, from Java source files to XML documents to resource bundles.
Perhaps the easiest way to create a file (once you have already created a project) is to
right-click the project node of the project for which you want to create the file in the
Projects window. You can then choose the desired file type from the New pop-up
menu when you right-click the project node. The New submenu contains shortcuts
to commonly-used templates and a File/Folder command that you can use to open
the New File wizard and access all NetBeans templates.
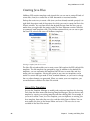
Choosing a template from the New menu
The New File wizard enables you to create a new file based on the IDE’s default file
templates. The file templates are grouped by type. In addition to the default file
templates, you can customize the templates the IDE uses to create files and also
create your own templates. Having the option to use your own templates can be
useful if a certain file type needs to have standard elements, or you want to change
the way other elements are generated. When you create your own templates, you
can make them available in the New File wizard.
Using File Templates
You use the Template Manager to modify and create new templates by choosing
Tools from the main menu and choosing Template Manager. You can create a new
template by copying an existing template and then clicking Edit. For example, if
you want to create a new Java class template, you can duplicate an existing Java
class template, then select the new class and then click Open in Editor. You can
now modify the class in the Source Editor and save it. The new class is now
available in the New File wizard.
22
Chapter 2
Creating and Editing Files
Using NetBeansTM 5.5 IDE
If you have an existing template that you would like to add to the IDE, click Add
and locate the file on your system. The file is now available as a template in the
New File wizard.
Using GUI Templates
If you want to visually edit a Java GUI form using the IDE's GUI Builder, you
have to create the form's source file using the IDE's Java GUI Forms templates.
This template group contains templates for AWT and Swing forms. For example,
you cannot create a normal Java class file and then change it to extend JPanel and
edit it in the GUI Builder.
For more information about creating Java GUIs in the IDE, see the following:
■
GUI Building in NetBeans IDE 5.5
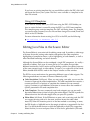
Editing Java Files in the Source Editor
The Source Editor is your main tool for editing source code. It provides a wide range
of features that make writing code simpler and quicker, like code completion,
highlighting of compilation errors, syntax highlighting of code elements, as well as
other advanced formatting and search features.
Although the Source Editor can be considered a single IDE component, it is really a
collection of editors. Each type of source file has its own editor that provides
different functionality. In this section we'll be dealing with the Java editor, but many
of the same concepts apply to other editors. To open a Java source file in the Source
Editor, double-click the file's node in the Projects window or Files window.
The IDE has many mechanisms for generating different types of code snippets. The
following mechanisms are some of the most commonly used.
Chapter 2
■
Code Completion (Ctrl-Space). When you are typing your code, you can use the
shortcut to open up the code completion box. The code completion box contains a
context-sensitive list of options to complete the statement you are currently
typing. Continue to type additional characters to narrow down the number of
options presented in the code completion box.
■
Code Templates. For many commonly used code snippets you can use multikeystroke abbreviations instead of typing the entire snippet. The IDE expands the
abbreviation into the full code snippet after you press the spacebar.
■
Editor Hints (Alt-Enter). If the IDE detects an error, such as missing code, the IDE
can suggest missing code to fix the error, and then insert that code where
necessary. When the insertion point is in the line marked as containing an error,
the IDE displays a lightbulb icon in the margin to indicate a suggested fix for that
line. Use the keyboard shortcut or click the lightbulb to display the suggestion.
Select the hint you want and press Enter to have the fix generated in your code.
Creating and Editing Files
23
Using NetBeansTM 5.5 IDE
The following topics illustrate how to get the most out of these features.
Code Completion
When typing Java identifiers in the Source Editor, you can use the IDE’s code
completion box to help you finish expressions. When the code completion box
appears, a box with Javadoc documentation also appears displaying any
documentation for the currently selected item in the code completion box. You
can disable the Javadoc box in the Options window.
Code completion example
You can use the code completion box to generate a variety of code, including the
following:
■
■
■
■
Fill in the names of classes and class members, as well as any necessary import
statement.
Browse Javadoc documentation of available classes.
Generate whole snippets of code from dynamic code templates. You can
customize code templates and create new ones. See Configuring the Editor
below for more information.
Generate getter and setter methods.
To open the code completion box, type the first few characters of an expression
and then press Ctrl-space. Alternately, you can open the code completion box by
pausing after typing a period (.) in an expression. The code completion box opens
with a selection of possible matches for what you have typed so far. You can
narrow the selection in the code completion box by typing additional characters
in the expression.
24
Chapter 2
Creating and Editing Files
Using NetBeansTM 5.5 IDE
To use the code completion box to complete the expression, continue typing until
there is only one option left and press Enter, or scroll through the list and select
the option you want and then press Enter. To close the code completion box
without entering any selection, press Esc. To turn off code completion in the
Source Editor, see Configuring the Editor.
The IDE uses the classes on your compilation classpath to provide suggestions for
code completion and other features. Classes from the target JDK version, other
commonly used project-specific APIs like the Servlet, JSP, JSTL and XML APIs, as
well as the sources you have manually added to the classpath can be used in code
completion. For details, see Managing a Project's Classpath.
Code Templates
You can use code templates to speed up the entry of commonly used sequences of
reserved words and common code patterns, such as for loops and field
declarations. The IDE comes with a set of templates, and you can create your own
code templates in the Options window. For more on how to configure how code
templates are implemented in the Source Editor, see Configuring the Editor. For
more on the syntax used for creating your own code templates, see Special Code
Template Syntax.
A code template can be composed of bits of commonly used text, or it can be
more dynamic, generating a skeleton and then letting you easily tab through it to
fill in the variable text. Where a code snippet repeats an identifier (such as an
object name in an instance declaration), you just have to type the identifier name
once.
For example, if you enter forc and press the space bar, it expands into
for (Iterator it = collection.iterator(); it.hasNext();) {
Object elem = (Object) it.next();
}
Once the code is expanded in the Source Editor, you can simply press tab to jump
to the next variable in the code snippet.
If an abbreviation is the same as the text that you want to type and you do not
want it to be expanded into something else, press Shift-spacebar to keep it from
expanding.
You can access code templates by doing the following in the Source Editor:
■
■
Chapter 2
Typing the first few letters of the code, pressing Ctrl-spacebar, and then
selecting the template from the list in the code completion box. The Javadoc box
displays the full text of the template.
Typing the abbreviation for the code template directly in the Source Editor and
then pressing the spacebar. You can find the abbreviations for the built-in Java
code templates by opening the Editor settings in the Options window and
choosing the Code Templates tab.
Creating and Editing Files
25
Using NetBeansTM 5.5 IDE
Special Code Template Syntax
When you create code templates, there are several constructs that you can use to
customize the way the code template behaves. The Special Code Template Syntax
table lists the most useful of these constructs. You can look at the default IDE code
templates for the abbreviations fori, forc, and newo in the Source Editor
Abbreviations for Java Files table to see these constructs in action.
Editor Hints
When the IDE detects an error for which it has identified a possible fix, a
lightbulb icon appears in the left margin of that line. You clan click the lightbulb
or press Alt-Enter to display a list of possible fixes. If one of those fixes suits you,
you can select it and press Enter to have the fix generated in your code.
Often, the “error” is not a coding mistake but a reflection of the fact that you have
not gotten around to filling in the missing code. In those cases, the editor hints
simply automate the entry of certain types of code.
Refactoring
Refactoring is the restructuring of code, using small transformations, in which the
result does not change any program behavior. Just as you factor an expression to
make it easier to understand or modify, you refactor code to make it easier to
read, simpler to understand, and faster to update. Just as a refactored expression
must produce the same result, the refactored program must be functionally
equivalent with the original source.
Some common motivations for refactoring code include:
■
■
■
■
Making the code easier to change or easier to add a new feature
Reducing complexity to promote understanding
Removing unnecessary repetition
Enabling use of the code for alternate or more general needs
Most refactoring commands are accessible from the Refactor menu on the main
menu bar. You can also right-click in the Source Editor or on a class node in the
Projects window and choose a command from the Refactor submenu. You can use
the Undo command to roll back all the changes in all the files that were affected
by the refactoring.
26
Chapter 2
Creating and Editing Files
Using NetBeansTM 5.5 IDE
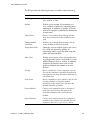
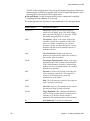
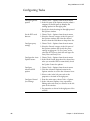
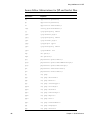
The IDE provides the following features to facilitate code refactoring:.
Chapter 2
Command
Description
Find Usages
Finds all occurrences of the name of the specified
class, method, or field.
Rename
Enables you to rename all occurrences of a
class, variable, or method to something more
meaningful. In addition, it updates all source
code in your project to reference the element by
its new name.
Safely Delete
Deletes a code element after making sure that
there are no references to that element in your
code.
Change Method
Parameters
Enables you to change the parameters and the
access modifier for the given method.
Encapsulate Fields
Generates accessor methods (getters and setters)
for a field and optionally updates all
referencing code to access the field using the
getter and setter methods.
Move Class
Enables you to move a class into another class
or package and to move a static field or a static
method from one class to another. In addition,
it updates all effected source code in your
project to reference the element in its new
location
Pull Up
Moves a method to a class's superclass. You can
also use this command to declare the method in
the superclass and keep the method definition in
the current class.
Push Down
Moves a method to a class's subclass. You can also
use this command to keep the method
declaration in the current class and move the
method definition to subclass.
Extract Method
Creates a new method based on a selection of
code in the selected class and replaces the
extracted statements with a call to the new
method.
Extract Interface
Creates a new interface based on a selection of
methods in the selected class and adds the new
interface to the class's implements clause
Creating and Editing Files
27
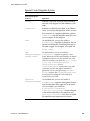
Using NetBeansTM 5.5 IDE
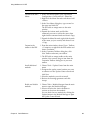
Command
Description
Extract Superclass
Creates a new superclass based on a selection of
methods in the selected class. You can have the
class created with just method declarations, or
you can have whole method definitions moved
into the new class.
Use Supertype Where
Possible
Change code to reference objects of a superclass
(or other type) instead of objects of a subclass.
Move Inner to Outer
Level
Moves a class up one level. If the class is a toplevel inner class, it is made into an outer class and
moved into its own source file. If the class is
nested within the scope of an inner class, method,
or variable, it is moved up to the same level as
that scope.
Convert Anonymous
Class to Inner
Converts an anonymous inner class to a named
inner class.
Working With Import Statements
In the IDE, there are several ways to help you make sure that your Java class has
all the necessary import statements:
■
■
■
■
For the whole file, by pressing Alt-Shift-F (Fix Imports) when the insertion
point is in the file in the Source Editor.
Individually, by pressing Alt-Shift-I (Fast Import) when the insertion point is in
the referenced class name in your code.
If you use code completion to fill in the name of class, any necessary import
statements are automatically added. You can also use code completion to use a
customized code template. You can modify the variables in the custom code
template to add the required import statement when that template is used.
If suggested as an editor hint in the IDE, you can click the lightbulb icon in the
margin to add the suggested import statements.
The IDE's Fix Imports command adds import statements that are needed by your
code and removes unused import statements. It does not, however, remove fullyqualified class names from code and replace them with import statements. The
Fast Import command, on the other hand, enables you to choose how you want
the import handled in your code.
The IDE's Fast Import command enables you to:
■
■
■
28
Generate an import statement for the class.
Generate an import statement for the package.
Generate a fully qualified name in the code.
Chapter 2
Creating and Editing Files
Using NetBeansTM 5.5 IDE
Formatting Java Source Code
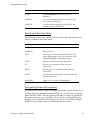
The IDE automatically formats your code as you write it. You can also reformat
specific lines of code or even entire files. The following table lists some common
formatting commands.
Keyboard Shortcut
Description of Command
Ctrl-Shift-F
Reformat the entire file or whatever text is
selected in the Source Editor.
Ctrl-T
Shift the current line or selection one tab to the
right.
Ctrl-D
Shift the current line or selection one tab to the
left.
Ctrl-E
Remove the current line.
Ctrl-Shift-T
Comment out the current line or all selected lines
with line comments ("//").
Ctrl-Shift-D
Remove comments. This command only works for
lines that begin with line comments ("//").
Navigating in the Source Editor
When you are dealing with a large group of files, the ability to quickly navigate
within and between source files is critical to your productivity. When you are
working in a document in the Source Editor, the Navigate menu contains commands
that enable you to quickly jump to elements within a document according to the
currently selected element, as well as between documents.
Navigating Within a Java File
The IDE provides several mechanisms to make it easier to view and navigate a
given Java file:
■
■
Chapter 2
Navigator window. The Navigator window appears below the Projects window
and provides a list of members (for example, constructors, fields, and methods)
in the currently selected Java file. When you click on an element, the insertion
point is placed at the line containing that element in the Source Editor.
Bookmarks. You can create bookmarks in your source file to help you easily
jump back to specific places in the file. You can toggle bookmarks on and off by
right clicking the line in the margin of the file or by choosing Toggle Bookmark
Creating and Editing Files
29
Using NetBeansTM 5.5 IDE
■
(Ctrl-F2) in the Navigate menu. You can move between those places where your
insertion point has been by using the Alt-K and Alt-L keyboard shortcuts, or by
choosing Back or Forward in the Navigate menu.
Navigate Menu. Use the Navigate menu to access commands for quickly
navigating between elements in your code.
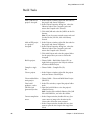
The following table lists shortcuts to some commands in the Navigate menu.
30
Keyboard Shortcut
Description of Command
Alt-Shift-O
Go to Class. Opens the Fast Open dialog box,
which lets you quickly open a file. Start typing a
class name in the dialog box. As you type, all files
that match the typed prefix are shown.
Alt-O
Go to Source. Jumps to the source code for the
currently selected class, method, or field, if the
source is available. Alternately, you can hold
down the Ctrl key and hover the mouse over the
identifier and then click the identifier when it is
underlined in blue.
Alt-G
Go to Declaration. Similar to the previous
shortcut, this opens the file where the variable at
the insertion point is declared.
Ctrl-B
Go to Super Implementation. Jumps to the super
implementation of the currently selected method
(if the selected method overrides a method from
another class or is an implementation of a method
defined in an interface).
Alt-L
Forward. Go to the next location in the jump list
for the currently selected file. The jump list is a
history of all locations where you made
modifications in the Editor.
Alt-K
Back. Go to the previous location in the jump list
for the currently selected file.
Ctrl-G
Go to line. Enter any line number for the current
file and press Enter to jump to that line.
Ctrl-F2
Toggle Bookmark. Add a bookmark (bookmark
icon) to the line of code that the insertion point is
currently on. If the line already contains a
bookmark, this command removes the bookmark.
F2
Next Bookmark. Go to the next bookmark.
Chapter 2
Creating and Editing Files
Using NetBeansTM 5.5 IDE
Keyboard Shortcut
Description of Command
Shift-F2
Previous Bookmark. Go to the previous
bookmark.
Alt-Shift-L
Go to the next jump list location in all files (not
the currently selected file).
Alt-Shift-K
Go to the previous jump list location in all files
(not the currently selected file).
Search and Selection Tools
The following list gives you a quick overview of the search and selection tools
that are available in the Source Editor:
Keyboard Shortcut
Description of Command
Ctrl-Shift-O
Switch to the Search Results window.
Ctrl-Shift-P
Find in Projects.
Ctrl-F
Search for text in the currently selected file. The
Source Editor jumps to the first occurrence of the
string and highlights all matching strings.
Ctrl-H
Replace text in the currently selected file.
F3
Find the next occurrence of the word you
searched for.
Shift-F3
Find the previous occurrence of the word you
searched for.
Ctrl-F3
Search for the next occurrence of the word that the
insertion point is on.
Alt-Shift-H
Toggle on/off search result highlighting.
Navigating Between Documents
The Source Editor makes it easy to manage large number of open documents at
one time. Each open document is represented by its own tab in the area directly
below the IDE's toolbar. The tabs appear in the order in which you opened the
documents, however, you can change a tab's position by simply grabbing and
dragging it to the desired location along the row of tabs. Use the left and right
buttons in the top-right corner to scroll through the row of tabs.
Chapter 2
Creating and Editing Files
31
Using NetBeansTM 5.5 IDE
To switch between open files, do any of the following:
■
■
■
Use the drop-down list at the top-right of the Source Editor. The drop-down list
displays all of your open files in alphabetical order.
Press Alt-Left and Alt-Right to move one editor tab to the left or right.
Press Ctrl-Tab to open the IDE window manager, which contains icons for each
open document in the Source Editor as well as all open windows like the
Projects window.
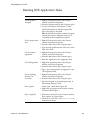
Other useful IDE features that assist you in navigating your documents include:
■
■
■
■
■
Go to Class. Choosing Go to Class in the Navigate menu opens up a dialog box
enabling you to quickly locate a class by name. When you choose a class the
source file is opened in the Source Editor.
Maximize the Source Editor. Double-click any document tab or press ShiftEscape to hide all other IDE windows. If you have split the Source Editor, only
the partition you maximize is displayed.
Clone a document. Right-click the document tab in the Source Editor and
choose Clone Document. This enables you to have two partitions displaying the
same document.
Split the Source Editor. Grabbing any document tab and drag it to the left or
bottom margin of the Source Editor. A red box shows you where the new
Source Editor partition will reside once you drop the document. Source Editor
panes can be split any number of times.
Move documents between Source Editor partitions. Grab the document tab
and drag it to the row of tabs in the destination partition.
Configuring the Editor
You can configure Source Editor settings in the Options window by choosing either
Editor or Fonts & Colors in the left pane. Use the tabs to choose the editor settings
you want to modify. Some editor settings can be modified according to the file type.
In this section, we will focus on configuring the Java editor, but many of the settings
are the same for all editors.
Here is a quick overview of some of the more common customizations to the Source
Editor:
32
■
View or change code templates. To view or change code templates, select Editor
in the left pane of the Options window and then click the Code Templates tab.
Choose an editor by choosing a language from the drop-down menu. For
example, to change code templates used in the Java editor, choose Java from the
drop-down menu. You can now add, remove or modify the abbreviations you can
use when editing Java files. To modify a code template abbreviation, select the
abbreviation and edit the text in the Expanded Text field.
■
View or change recorded macros. Click the Macros tab to add, modify and
remove macros. Enter the code for macro in the Macro Code area.
Chapter 2
Creating and Editing Files
Using NetBeansTM 5.5 IDE
Chapter 2
■
Change the indentation used in your code. Click the Indentations tab to modify
indentation properties.
■
Turn off code completion. To turn off code completion, select Editor in the left
pane of the Options window and then click the General tab and unselect the
checkbox for the Auto Popup Completion Window property.
■
Modifying fonts and colors. You can use the Options window to set the font size
and color for code. In the Options window, choose Fonts & Colors in the left pane
and click the Syntax tab. Select All Languages from the Language drop-down
menu, select Default as the element type, and modify the Font property to change
the font size for all text in the Source Editor. You can also choose a specific
language from the drop-down menu to limit your modifications to that language
and modify language-specific settings. For example, you can select Java from the
Language drop-down menu and select a category to change the font and color of
each type of Java code, such as method names or strings.
Creating and Editing Files
33
Using NetBeansTM 5.5 IDE
34
Chapter 2
Creating and Editing Files
CHAPTER
3
Building Applications
This section explains the basics of building standard and free-form projects in the
IDE, and how you can customize the build process by modifying the Ant build script
the IDE uses when building your project.
In this section you will learn about the following:
■
Using Ant Build Scripts
■
Building Projects, Packages, and Files
■
Fixing Compilation Errors
■
Filtering Output Files
■
Customizing the Build Process
■ Build Files in Standard Projects
■ Build Files in Free-form Projects
■ Writing Custom Ant Tasks
■ Mapping Custom Ant Targets to Project Commands
Using Ant Build Scripts
Ant build scripts are XML files that contain targets, which in turn contain tasks. Ant
tasks are executable bits of code that handle the processing instructions for your
source code. For example, you use the javac task to compile code, the java task to
execute a class, and so forth. You can use Ant's built-in tasks, use tasks written by
third parties, or write your own Ant tasks. You do not need to know Ant to work
with the IDE. If you are looking for resources on learning Ant, see
http://ant.apache.org/resources.html.
You use Ant build scripts to build your project in the following ways:
■
Chapter 3
Standard projects. In standard projects the IDE generates the build script based
on the options you enter in the New Project wizard and the project's Project
Properties dialog box. You can set all the basic compilation and runtime options
Building Applications
35
Using NetBeansTM 5.5 IDE
in the project's Project Properties dialog box and the IDE automatically updates
your project's Ant script. If you know how to work with Ant, you can customize
a standard project's Ant script or write your own Ant script for your project.
■
Free-form projects. In free-form projects, the IDE relies on your existing Ant
script to provide targets for IDE actions, such as building, running, and
debugging.
Building Projects, Packages, and Files
Compilation in the IDE is simple. Once you have ensured that your project's
compilation classpath is set correctly., you need only select the project, package, or
file you want to compile and choose the appropriate Build or Compile command.
The IDE then compiles the files.
To compile a project, package, or file in the IDE, select it in the Projects window and
do one of the following:
■
In the main menu, choose Build > Build Main Project (F11) to build the main
project. Alternately, you can click the Build button in the toolbar.
■
In the main menu, choose Build > Clean and Build Main Project (Shift-F11) to
clean and build the main project. Alternately, you can click the Clean & Build
button in the toolbar.
■
In the Projects window, right-click the project node and choose Build Project to
build the project.
■
In the Projects window, right-click the project and choose Clean Project to clean
the project.
■
In the Projects window, right-click the package and choose Compile Package (F9)
to compile a package.
■
In the Projects window, right-click the file and choose Compile File (F9) to
compile a file. Alternatively, choose Build > Compile File (F9). Note that if you
are using a free-form project, this command is disabled by default. You have to
write an Ant target for compiling the currently selected file in the IDE and map it
to the Compile File command.
Whenever you invoke compile commands, the IDE displays the output including
any compilation errors encountered in the Output window, as described in the
following section.
If you expand a standard project's project directory node in the Files window, you
will notice that the IDE compiles classes to the build folder. In addition, the IDE
builds a JAR file for Java projects from your project sources automatically. The JAR
file is generated to the dist directory of your project folder. In free-form projects,
your Ant script controls output file creation.
36
Chapter 3
Building Applications
Using NetBeansTM 5.5 IDE
Fixing Compilation Errors
The IDE displays output messages and any compilation errors in the Output
Window. This multi-tabbed window is displayed automatically whenever you
generate compilation errors, debug your program, generate Javadoc documentation,
and so on. You can also open this window manually by choosing Window > Output
(Ctrl-4).
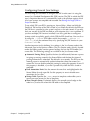
One important function of the Output window is to notify you of errors found while
compiling your program. The error message is displayed in blue underlined text and
is linked to the line in the source code that caused the error, as illustrated in the
image below. The Output window also provides links to errors found when running
Ant build scripts. Whenever you click an error link in the Output window, the
Source Editor jumps to the line containing the error automatically. You can also use
the F12 and Shift-F12 keyboard shortcuts to move to the next and previous error in
the file.
Output window showing compilation errors
Every action that is run by an Ant script, such as compiling, running, and debugging
files, sends its output to the same Output window tab. If you need to save the
messages displayed in the Output window, you can copy and paste it to a separate
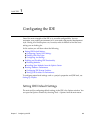
file. You can also set Ant to print the command output for each new target to a new
Output window tab by choosing Tools > Options, clicking the Ant node in the
Miscellaneous category, and deselecting the checkbox for the Reuse Output Tabs
from Finished Processes property.
Chapter 3
Building Applications
37
Using NetBeansTM 5.5 IDE
Filtering Output Files
When you create a JAR file or a WAR file, you usually want to include just the
compiled .class files and any other resource files located in your source directory,
such as resource bundles or XML documents. The default filter does this for you by
excluding all .java, .nbattrs, and .form files from your output file.
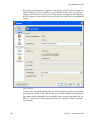
You can create additional filters using regular expressions to control the Output files.
To specify which files to exclude, right-click your project in the Projects window and
choose Properties to open the Project Properties dialog box. In the left pane, click on
Packaging. In the right pane, enter regular expressions in the text box to specify the
files to exclude when packaging the JAR or WAR files. In addition to the default
expressions, here are some additional regular expressions you can use:
Regular Expression
Description
\.html$
Exclude all HTML files
\.java$
Exclude all Java files
(\.html$)|(\.java$)
Exclude all HTML and Java files
(Key)|(\.gif$)
Exclude all GIF files and any
files with Key in their name
For a guide to regular expression syntax, see jakarta.apache.org.
Customizing the Build Process
By customizing your Ant script you can customize how your project is built. For
example, you can write an Ant target that compiles the currently selected file and
then map the target to the IDE's Run File command.
In standard projects, Ant scripts are stored in your project folder. The main Ant
script for a standard project is build.xml. The IDE calls targets in build.xml
whenever you run IDE commands. This file contains a single import statement that
imports targets from build-impl.xml. In build.xml, you can override any of the
targets from build-impl.xml or write new targets.
In free-form projects, the IDE uses targets in an existing Ant script to build, run,
clean, test, and debug your application. If the Ant script does not contain targets for
some of these functions, the functions are unavailable. To implement these functions
you write targets either in your Ant script or in a secondary Ant script. You can then
map commands in the IDE to these targets.
38
Chapter 3
Building Applications
Using NetBeansTM 5.5 IDE
Build Files in Standard Projects
In standard projects, build-impl.xml is the Ant script that contains all of the
instructions for building, running, and debugging the project. You should never
edit this file. You can, however, open it to examine the Ant targets that are
available to be overridden, and then modify build.xml to override any of the
targets, or write new targets.
With standard projects, you can customize the build process by doing any of the
following:
■
■
■
Entering basic options, like classpath settings and JAR filters, in the New
Project wizard when you create a project, or afterwards in the Project Properties
dialog box.
Editing properties in nbproject/project.properties. This file stores Ant
properties with important information about your project, such as the location
of your source and output folders. You can override the properties in this file.
Be careful when editing this file. For example, the output folder is deleted every
time you clean your project. You should therefore never set the output folder to
the same location as your source folder without first configuring the clean
target to not delete the output folder.
Customizing existing or creating new Ant targets by doing any of the
following:
■
Add instructions to be processed before or after an Ant target is run. Each of
the main targets in build-impl.xml also has a -pre and -post target that
you can override in build.xml. For example, to get RMI working with
regular projects, type the following in build.xml:
<target name="-post-compile">
<rmic base="${build.classes.dir}" includes="**/Remote*.class"/>
</target>
■
■
Change the instructions in an Ant target. Copy the target from buildimpl.xml to build.xml and make any changes to the target.
Create new targets in build.xml. You can also add the new target to the
dependencies of any of the IDE's existing targets. Override the existing target
in build.xml then add the new target to the existing target's depends
property. For example, the following adds the new-target target to the run
target's dependencies:
<target name="new-target">
<!-- target body... -->
</new-target>
<target name="run" depends="new-target,myprojname-impl.run"/>
Notice that you do not need to copy the body of the run target into
build.xml.
Chapter 3
Building Applications
39
Using NetBeansTM 5.5 IDE
The following table lists some common tasks for redefining a JAR file that you
may find useful:
To perform this task
Follow these steps
Specify which files are
added to a JAR file.
Right-click the project node in the Projects
window and choose Properties. Click the
Packaging subnode (under Build) and configure
the filter and compression settings using the
Exclude from JAR File field. For more, see
Filtering Output Files
Change a JAR file's
name and location.
In the Files window, go to the nbproject folder in
your project folder and open
project.properties in the Source Editor.
Enter the full path to the JAR file in the dist.jar
property.
Specify the manifest file
for a JAR file.
In project.properties, type the name of the
manifest file in the manifest.file property. The
file name must be specified relative to the project's
build.xml file. Note that if you are using the
Java Application template, the IDE creates a
manifest file for you.
Disable the generation
of a JAR file for a
project.
In the Files window, open your project folder and
open build.xml. Override the jar target to have
no contents and no dependencies. For example,
add the following to build.xml:
<target name="jar" />
Build Files in Free-form Projects
In free-form projects, the IDE uses targets in an existing Ant script to build, run,
clean, test, and debug your application. If the Ant script does not contain targets
for some of these functions, the functions are unavailable. To implement these
functions you write targets either in your Ant script or in a secondary Ant script.
You can then map commands in the IDE to these targets.
If you want to run an IDE command and you do not have a target for that
command, the IDE can generate the target for you. When the IDE generates the
target, the target is generated in a separate build script and automatically mapped
to the command.
For examples of writing Ant targets in free-form projects, see the following article:
■
40
Advanced Free-form Project Configuration
Chapter 3
Building Applications
Using NetBeansTM 5.5 IDE
Writing Custom Ant Tasks
You can use custom Ant tasks to expand on the functionality provided by Ant's
built-in tasks. Custom tasks are often used to define properties, create nested
elements, or write text directly between tags using the addText method.
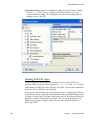
To create a custom Ant task in the IDE, press Ctrl-N and select the Custom Task
template from the Ant Build Scripts folder. When you create the custom Ant task
file, the template opens in the Source Editor. The template contains sample code
for many of the common operations performed by Ant tasks. After each section of
code, the template also shows you how to use the task in an Ant script.
Chapter 3
Building Applications
41
Using NetBeansTM 5.5 IDE
Mapping Custom Ant Targets to Project Commands
In free-form projects, you map IDE commands to targets in your Ant script. By
doing so, you can, for example, add an item for a Debug Project target to the
project's contextual menu.
Click Build and Run in the left panel of the Project Properties dialog box.
Run targets in the Project Properties dialog box
For each command, choose an Ant target from the drop-down. The drop-down
contains each of the targets in your Ant script. However, if your Ant script uses
an <import> statement to import targets from another Ant script, the targets do
not show up in the drop-down list in the Project Properties dialog box. To map
commands to these targets, type the names of the targets into the list.
You map other commands, like those that run on individual files, by editing the
project.xml file manually. For details, see Advanced Free-form Project
Configuration.
42
Chapter 3
Building Applications
CHAPTER
4
Running Applications
Because the IDE is built entirely on top of Ant, it uses an Ant script to run your
applications.
■
Standard projects. If you are using a standard project, the IDE generates the build
script based on the options you enter in the project's Project Properties dialog box.
For Java applications, you can set the project's main class, runtime arguments, VM
arguments, and working directory in the Project Properties dialog box.
■
Free-form projects. If you are using a free-form project, the IDE uses your
existing Ant script to run your application. You can write a target that executes
the currently selected file in the IDE and map it to the Run File command.
This section covers the following topics:
■
Running Projects and Files
■
Customizing Runtime Options
■ Setting the Runtime Classpath
■ Setting the Main Class and Runtime Arguments
■ Setting JVM Arguments
Running Projects and Files
For Java projects, you typically set the project that contains the program's main class
as the main project. For web projects, the main project is the project that is first
deployed. To run a project, package, or file, choose one of the following:
Chapter 4
■
In the main menu, choose Run > Run Main Project (F6) to run the main project.
Alternately, you can use the Run Main Project button in the toolbar.
■
In the Projects window, right-click the project and choose Run Project to run a
project. Note that for Java projects, the project must have a main class.
Running Applications
43
Using NetBeansTM 5.5 IDE
■
In the Projects window, right-click the file and choose Run File (Shift+F6) to run
a file. Alternatively, choose Run > Run File > Run filename (Shift+F6) in the
main menu to run a runnable class. Note that if you are using a free-form project,
this command is disabled by default. You have to write an Ant target for running
the currently selected file in the IDE and map it to the Run File command.
When you run the project the IDE displays any compilation errors and output in the
Output window. For more, see Fixing Compilation Errors.
Customizing Runtime Options
By default, the IDE does not specify a main class, runtime arguments, or JVM
arguments. The runtime classpath of each standard project contains the project's
compiled classes and everything in the project's compilation classpath. You can view
the project's compilation classpath by opening the Project Properties dialog box and
selecting the Libraries node in the Categories pane and then clicking the Compile tab
in the right pane.
To change project runtime options, open the Project Properties dialog box by rightclicking the project node in the Projects window and choosing Properties. Next,
select the Libraries node in the Categories pane and click the Run tab in the right
pane of the dialog box. Note that to access settings for the main class, program
arguments, the working directory for program execution and VM options, you have
to select the Run node. In the next section we'll take a closer look at how to configure
the runtime classpath
44
Chapter 4
Running Applications
Using NetBeansTM 5.5 IDE
.
Specify the runtime settings in the Project Properties dialog box
Setting the Runtime Classpath
To add projects, libraries, JAR files, and folders to the project's runtime classpath,
use the buttons on the right side of the Run-time Libraries list in the Project
Properties dialog box.
If your project uses special libraries dynamically at runtime through an indirect
interface or reflection (like JDBC drivers or JAXP implementations), you have to
add these libraries to the runtime classpath. You also have to adjust your runtime
classpath if the runtime dependencies between your projects do not match the
compilation dependencies between the projects. For example, imagine that project
A compiles against project B, and project B compiles against project C, but project
A does not compile against project C. This means that project A only has project B
on its runtime classpath. If project A requires both project B and project C during
execution, you have to add project C to project A's runtime classpath.
Chapter 4
Running Applications
45
Using NetBeansTM 5.5 IDE
In free-form projects, your Ant script handles the classpath for all of your source
folders. The classpath settings for free-form projects in the Project Properties
dialog box only tell the IDE what classes to make available for code completion
and refactoring. For more, see Managing the Classpath in Free-form Projects.
Setting the Main Class and Runtime Arguments
To set the project's main class, select the Run node in the Categories pane of the
Project Properties dialog box and type the fully-qualified name in the Main Class
field (for example, org.myCompany.myLib.MyLibClass). The main class must
exist in the project or in one of the JAR files or libraries in the project's runtime
classpath. Afterwards, type any necessary runtime arguments in the Arguments
field.
If you use the Browse button to choose the project main class, the file chooser
only shows classes in your project source directory. If you want to specify a class
in one the libraries on the classpath, you have to type the fully-qualified name of
the class in the Main Class field.
Setting JVM Arguments
You can specify JVM arguments for the project in the Project Properties dialog
box. Open the Project Properties dialog box and click Run in the Categories pane
and then type a space-separated list of JVM arguments in the VM Options field.
You can set system properties by typing the following in the VM Options field:
-Dname=value
46
Chapter 4
Running Applications
CHAPTER
5
Debugging Applications
Debugging is the process of examining your application for errors. You debug by
setting breakpoints and watches in your code and running it in the debugger. You
can execute your code one line at a time and examine the state of your application in
order to discover any problems.
The IDE uses the Sun Microsystems JPDA debugger to debug your programs. When
you start a debugging session, all of the relevant debugger windows appear
automatically at the bottom of your screen. You can debug an entire project, any
executable class, and any JUnit tests. The IDE also lets you debug applications are
running on a remote machine by attaching the debugger to the application process.
When you run or debug web applications, JSP pages, or servlets, you can use the
HTTP Monitor to monitor data flow. The HTTP Monitor appears by default and
gathers data about HTTP requests that the servlet engine processes. For each HTTP
request that the engine processes, the monitor records data about the incoming
request, the data states maintained on the server, and the servlet context. You can
view data, store data for future sessions, and replay and edit previous requests. For
details on the HTTP Monitor, choose Help > Help Contents in the main menu.
For free-form projects, you have to write an Ant target for the Debug Project
command. You can also write targets to debug specific files and map these targets to
the project's commands.
In this section you will learn about:
Chapter 5
■
Basic Debugging
■ Starting a Debugging Session
■ Debugger Windows
■ Stepping Through Your Code
■
Working With Breakpoints
■ Setting a Breakpoint
■ Setting Conditions for a Breakpoint
■ Customizing the Output for a Breakpoint
■
Setting Watches
Debugging Applications
47
Using NetBeansTM 5.5 IDE
Basic Debugging
In this section, we will use a simple example to demonstrate how to start a
debugging session, step through your code manually, and monitor variables and
method calls. We will leave more advanced functions like setting breakpoints and
watches for the following sections.
Our example for this section is the Array Fill application. This application is very
simple. It creates an array of sampleBeans, each one of which has two properties,
firstName and lastName. It then assigns values to the properties of each bean and
prints out the values.
The first thing you want to do is run the application to see if it throws any
exceptions. Download and extract the ArrayFill example .zip archive
(http://www.netbeans.org/files/documents/4/446/ArrayFill.zip). To
open the ArrayFill project in the IDE, press CTRL-Shift-O, locate the extracted
ArrayFill folder and click Open Project Folder. The ArrayFill project opens in the
IDE and the logical strucure of the project is visible in the Projects window.
In the Projects window, expand the arrayfill package under the Source Packages.
The arrayfill package contains two classes: ArrayFill and SampleBean. Rightclick ArrayFill.java and press Shift-F6 to execute it. The output that appears in
the Output window should be similar to the following:
java.lang.NullPointerException
at arrayfill.ArrayFill.loadNames(arrayFill.java:27)
at arrayfill.ArrayFill.main(ArrayFill.java:34)
Exception in thread "main"
Java Result: 1
Starting a Debugging Session
When you start a debugging session in the IDE, the IDE compiles the files that
you are debugging, runs them in debug mode, and displays debugger output in
the Debugger windows. To start a debugging session, select the file that you want
to debug and choose one of the following commands from the Run menu:
■
■
■
Debug Main Project (F5). Runs the main project until the first breakpoint is
encountered.
Step Into (F7). Starts running the main project's main class and stops at the first
executable statement.
Run to Cursor (F4). Starts a debugging session, runs the application to the
cursor location in the Source Editor, and pauses the application.
If more than one project is open in the IDE, make sure that Array Fill is set as the
main project by right-clicking the ArrayFill node in the Projects window and
choosing Set Main Project from the contextual menu. Press F7 to step into the
48
Chapter 5
Debugging Applications
Using NetBeansTM 5.5 IDE
main project's main class. If the main class for the project is not set, the IDE
prompts you to set it. Then the IDE opens the file in the Source Editor, displays
the Output window and Debugger windows, and stops just inside the main
method.
Debugger Windows
Let's take a minute to look at the Debugger windows. The Debugger windows
automatically open whenever you start a debugging session and close when you
finish the session. By default, the IDE opens three Debugger windows: the Local
Variables window, Watches window, and Call Stack window.
Debugger windows with the Local Variables window fronted
You can open other Debugger windows by choosing from the Window >
Debugging menu. When you open a Debugger window during a debugging
session, it closes automatically when you finish the session. If you open a
Debugger window when no debugging session is open, it stays open until you
close it manually. You can arrange Debugger windows by dragging them to the
desired location.
The following table lists the Debugger windows.
Chapter 5
Name
Shortcut
Description
Local Variables
Alt-Shift-1
Lists the local variables that are
within the current call.
Watches
Alt-Shift-2
Lists all variables and
expressions that you elected to
watch while debugging your
application.
Call Stack
Alt-Shift-3
Lists the sequence of calls made
during execution of the current
thread.
Debugging Applications
49
Using NetBeansTM 5.5 IDE
Name
Shortcut
Description
Classes
Alt-Shift-4
Displays the hierarchy of all
classes that have been loaded by
the process being debugged.
Breakpoints
Alt-Shift-5
Lists the breakpoints in the
current project.
Sessions
Alt-Shift-6
Lists the debugging sessions
currently running in the IDE.
Threads
Alt-Shift-7
Lists the thread groups in the
current session.
Sources
Alt-Shift-8
Lists the source directories on
your project classpath. You can
set whether to step into or step
over classes by deselecting their
source folders here. The IDE
automatically steps over JDK
classes; if you want to step into
them, select the JDK sources in
this window.
Stepping Through Your Code
You can use the following commands in the Run menu to control how your code
is executed in the debugger:
■
■
■
■
■
■
50
Step Over (F8). Executes one source line. If the source line contains a call,
executes the entire routine without stepping through the individual
instructions.
Step Into (F7). Executes one source line. If the source line contains a call, stops
just before executing the first statement of the routine.
Step Out (Alt-Shift-F7). Executes one source line. If the source line is part of a
routine, executes the remaining lines of the routine and returns control to the
caller of the routine.
Pause. Pauses application execution.
Continue (Ctrl-F5). Continues application execution. The application will stop
at the next breakpoint.
Run to Cursor (F4). Runs the current session to the cursor location in the Source
Editor and pauses the application.
Chapter 5
Debugging Applications
Using NetBeansTM 5.5 IDE
In our example, use the F7 key to step through the code one line at a time. The
NullPointerException occurred in the loadNames call, so when you step to
that call, watch the value of the names array in the Local Variables view. Each of
the beans have a value of null. You can continue stepping through the
loadNames method - the names beans are null throughout.
Stepping into your code in the debugger
The problem here is that while the line
SampleBean[] myNames=new SampleBean[fnames.length];
initiates the array that holds the beans, it does not instantiate the beans
themselves. The individual beans have to be instantiated in the loadNames
method by adding the following code:
names[i]=new SampleBean();
before the line names[i].setLastName(lnames[i]); in the loadNames
method.
Working With Breakpoints
Most applications are far too big to examine one line at a time. More likely, you set a
breakpoint at the location where you think a problem is occurring and then run the
application to that location. You can also set more specialized breakpoints, such as
conditional breakpoints that only stop execution if the specified condition is true or
breakpoints for certain threads or methods.
In this section, we will use the ArrayFill class from the last example, so you will
have to recreate the bug by commenting out the code you added above.
Chapter 5
Debugging Applications
51
Using NetBeansTM 5.5 IDE
Setting a Breakpoint
If you just want to set a simple line breakpoint, you can click the left margin of
breakpoint icon) appears in the margin.
the desired line. A line breakpoint icon (
You can remove the line breakpoint by clicking it again.
Setting a breakpoint in the source editor
For more complex breakpoints, use the New Breakpoint (Ctrl-Shift-F8) command
in the Run menu. The New Breakpoint dialog box lets you choose the type of
breakpoint you want to create and set breakpoint options such as conditions for
breaking or the information that the breakpoint prints to the Output window.
Setting Conditions for a Breakpoint
Conditional breakpoints only stop execution if a specified boolean expression is
true. If you want to set a conditional breakpoint, open the New Breakpoint dialog
box and enter an expression in the Condition field.
52
Chapter 5
Debugging Applications
Using NetBeansTM 5.5 IDE
For example, open ArrayFill.java, set the insertion point in the loadNames
method call in the main method, and press Ctrl-Shift-F8. In the dialog box, enter
myNames!=null in the Condition field and click OK. Then press F5 to start
debugging the project. The execution should break within the loadNames
method.
Setting a conditional breakpoint
Customizing the Output for a Breakpoint
In the New Breakpoint dialog box, you can also specify what information is
printed when a breakpoint is reached. Enter any message in the Print Text field at
the bottom of the dialog box. You can use variables to refer to certain types of
information you want displayed.
Chapter 5
Debugging Applications
53
Using NetBeansTM 5.5 IDE
Breakpoint Types
The following table lists the different breakpoint types that are available.
Type
Description
Line
You can break execution when the line is reached,
or when elements in the line match certain
conditions.
Method
When you set a breakpoint on a method name,
application execution stops every time the method
is executed.
Exception
You have several options for setting a breakpoint
on an exception. You can break whenever a
specific exception is caught, whenever a specific
exception is not handled in the source code, or
whenever any exception is encountered regardless
of whether the application handles the error or
not.
Variable
You can stop execution of your application
whenever a variable in a specific class and field is
accessed (for example, the method was called
with the variable as an argument) or modified.
Thread
You can break application execution whenever a
thread starts, stops, or both.
Class
When you set a breakpoint on a class, you can
stop the debugger when the class is loaded into
the virtual machine, unloaded from the virtual
machine, or both.
Setting Watches
A watch enables you to track the changes in the value of a variable or expression
during application execution. To set a watch, select the variable or expression you
want to set a watch on in the Source Editor, then right-click and choose New Watch
(Ctrl-Shift-F7).
You can also create fixed watches in the Watches view. While a normal watch
describes the content of a variable, a fixed watch describes the object that is currently
assigned to the variable. To create a fixed watch, right-click any item in the Local
Variables or Watches view and choose Create Fixed Watch.
54
Chapter 5
Debugging Applications
CHAPTER
6
Connecting to Databases
This section explains the basics of creating a connection to a database in the IDE that
you can then use in your project.
This section covers the following topics:
■
Setting Up Your Resources
■ Bundled databases
■ Other databases
■
Connecting to Databases
■ Adding Database Drivers
■ Establishing a Database Connection
■
Working with a Database Connection
■
Setting Up a Database Connection Pool
Once you have set up the connection to your database, you can perform the
following simple operations that are related to JDBC-compliant databases:
■
Connect to a database
■
Create, browse and edit database structures
■
Write, edit and execute SQL commands on a connected database
■
Enter SQL queries and see the results immediately
■
Connect to multiple databases concurrently
■
Migrate table schemas across databases from different vendors
You can use the database connection you create when developing projects in the IDE.
You can also use the IDE to help you set up a database connection pool and register
the resources with the Sun Java System Application Server to use in your
application.
Chapter 6
Connecting to Databases
55
Using NetBeansTM 5.5 IDE
Setting Up Your Resources
You use Java™ Database Connectivity (JDBC™) technology to connect to a database.
The JDBC application programming interface (API) is Sun Microsystems' API for
connecting to databases that support Structured Query Language (SQL). The JDBC
API is a package of object-oriented objects that includes Connection, ResultSet,
and Statement. Each object contains various API methods, for example,
connect(), close(), and prepareStatement(). You will use these objects and
methods later in this section. To do so, you need to use a database that supports
SQL.
A database runs in a database server. You can use the database server bundled with
the Sun Java System Application Server or any JDBC-compliant SQL server. Once
you have your server resources, you need to make them available to the IDE and
your project.
Bundled databases
If your IDE is bundled with the Sun Java System Application Server, or you have
installed and registered the Sun Java System Application Server with the IDE, you
already have one of the following databases servers. The database servers include
several sample databases.
■
Derby. The Derby database is bundled with the Sun Java System Application
Server 8.2 and above. If Sun Java System Application Server 8.2 is registered
with the IDE, you can start and stop the Derby server and create databases
directly from the main menu by choosing Tools > Derby Database > Start Derby
Server. When you start the server, you will see something similar to the
following in the Output window:
Server is ready to accept connections on port 1527.
■
Pointbase. The Pointbase database is bundled with the Sun Java System
Application Server 8.1. If Sun Java System Application Server 8.1 is registered
with the IDE, you can start and stop the Pointbase database server directly from
the main menu by choosing Tools > Pointbase Database > Start Local Pointbase
Database. When you do this, you will see something similar to the following in
the Output window:
Starting Server C:\Program Files\Java\jdk1.5.0_01\bin\java
Server started, listening on port 9092, display level: 0 ...
56
Chapter 6
Connecting to Databases
Using NetBeansTM 5.5 IDE
Other databases
You are not limited to working with the Pointbase or Derby databases. For the
IDE to communicate with a database server, the IDE requires a driver supporting
the JDBC API ("JDBC driver"), which translates JDBC calls into the network
protocols that are used by SQL databases. To work with other databases, you
need to install the database server and the JDBC driver.
Connecting to Databases
You use the Databases node in the Runtime window when creating a connection to a
database. If the Runtime window is not open, you can open it by choosing Window
> Runtime in the main menu (Ctrl-5). Expand the Databases node to see the
available drivers and database connections.
The Drivers node in the Runtime window displays the drivers available to the IDE.
Depending on your system configuration, you may already have Derby or Pointbase
database drivers available. If the driver for your database server is not listed, you
need to add the driver before you can work with your database in the IDE and your
projects.
Icon
Description
Loadable driver icon
The driver can be loaded by the IDE and you can connect
to the database.
Unloadable driver icon
The IDE cannot connect to the database using this driver
because the driver's JAR or ZIP file isn't placed in the
specified location. You can correct the location by rightclicking the driver node and choosing Customize.
Table showing database driver icons
You create a database connection in the Runtime window using the driver for your
database server. Once you have created a database connection, you can connect to
and modify the database and use the database in your application.
Adding Database Drivers
To add a database driver, right-click the Drivers node and choose New Driver
from the pop-up menu. The New JDBC Driver dialog box appears. Click Add and
browse to the location of your database driver and select the database driver's
JAR or ZIP file. When you select the driver, the Driver Class and Name appear in
the dialog box.
Chapter 6
Connecting to Databases
57
Using NetBeansTM 5.5 IDE
If the Driver Class field is empty or incorrect, click Find. The IDE searches the
JAR file that you selected and finds all classes that implement the JDBC API
Driver interface (java.sql.Driver). Select the correct driver class from the
Driver Class drop-down list and click OK. After adding the new driver, when you
expand the Drivers node a new node is displayed for the new driver. The nodes
under the Drivers node represent the registered drivers you can use.
Note that when you have made your database driver available to the IDE, you
still need to make it available to your project. At this stage, you can use the IDE to
access and modify your database, but you cannot access and modify your
database from your project. To access your database from your project, you need
to create a database connection that your project can use.
Establishing a Database Connection
In order to establish a connection to a database, first make sure your database
server is up and running. If you are using one of the database servers bundled
with the IDE, you can start the database by choosing the Derby or Pointbase
database from the Tools menu and then choosing Start. When the database server
is ready, a message indicating the server has started appears in the Output
window.
Before you can open a connection to a database on your database server, you first
need to supply the connection details for the connection. You only need to supply
the details to create a connection once, and after setting up the initial connection
you can easily use the database connection node in the Runtime window to
connect to and disconnect from a database.
58
Chapter 6
Connecting to Databases
Using NetBeansTM 5.5 IDE
To create a database connection, right-click the driver node and choose Connect
Using to open the New Database Connection dialog box.
New Database Connection dialog box
Specify the Database URL and the username and password for your database
server. For example, if you are connecting to the database sample on your local
installation of the bundled Derby database, your Database URL will look like this:
jdbc:derby://localhost:1527/sample
Click OK after you enter the required connection details. When you click OK, two
things happen:
■
■
The IDE opens a connection to the database.
A database connection node appears under the Databases node.
Working with a Database Connection
Each database connection node in the Runtime window represents a connection to a
database. You need to set up a separate connection to each database on your
database server that you want to use. You can use the database connection node to
do the following:
Chapter 6
■
Check the status of the database connection. The database connection icon is
whole when the database is connected.
■
Open or close a connection to the database by right-clicking the node and
choosing Connect or Disconnect.
Connecting to Databases
59
Using NetBeansTM 5.5 IDE
■
View the properties of the connection, including the location of the database and
the drivers used, by right-clicking the node and choosing Properties.
■
Execute an SQL command in the SQL Editor by right-clicking the node and
choosing Execute Command. The SQL Editor enables you to write and execute
SQL commands on any connected database.
Databases node in the Runtime window showing drivers and database connections
When connected to a database, you can expand the database connection node to
view the structure of the database. By right-clicking nodes under the database
connection node you can access commands enabling you to modify the structure of
the database, including creating, populating and deleting tables and columns. You
can also easily view the data in the tables and columns by right-clicking the table or
column and choosing View Data from the pop-up menu.
Note – You can create a table by executing an SQL command in the SQL Editor or
by using the Create Table dialog box. If you use the Create Table dialog box, you
cannot set the auto_increment property, which means that you have to add a new
value for the primary key manually whenever you add values to populate the table.
Setting Up a Database Connection Pool
A database connection pool is a group of reusable connections that a server
maintains for a particular database. Applications requesting a connection to a
database obtain that connection from the pool. When an application closes a
connection, the connection is returned to the pool. Connection pool properties may
vary with different database vendors. Some common properties are the URL for the
database name, user name, and password.
60
Chapter 6
Connecting to Databases
Using NetBeansTM 5.5 IDE
When setting up a database connection pool, you also create a JDBC resource (also
called a data source). A JDBC resource provides applications with a connection to a
database. Typically, there is at least one JDBC resource for each database accessed by
an application. It is possible to have more than one JDBC resource for a database.
To create a connection pool, you need to check that you have the following:
■
An open enterprise application or web application.
■
Access to a running database server. The proper drivers for the database server
must be registered with the IDE in order to connect to the database.
■
A database connection for your database. You can see the available database
connections by expanding the Databases node in the Runtime window.
■
A running deployment server such as the Sun Java System Application Server,
which is registered with the IDE. If your server is not registered you can use the
Server Manager to register the server by going to Tools > Server Manager in the
main menu.
If you are deploying your application to the Sun Java System Application Server, the
IDE enables you to easily set up a database connection pool and the required data
sources using the New File wizard. You can create JDBC resources and connection
pools for your application by opening the New File wizard in the IDE and choosing
the Sun Resources category and then selecting the type of resource you want to
create. You can use the New File wizard to do the following:
■
Create a connection pool by extracting the connection information from an
existing database connection or from a connected database
■
Create a JDBC resource using an existing connection pool or create a new
connection pool within the wizard
When you use the New File wizard to set up your connection pool, the IDE
generates the necessary files based on the specified connection. The resources are
registered with the Sun Java System Application Server when you deploy your
application to the server.
If you are deploying your application to a server other than the Sun Java System
Application Server, you need to set up your resources by editing the source file for
the resource.
Chapter 6
Connecting to Databases
61
Using NetBeansTM 5.5 IDE
62
Chapter 6
Connecting to Databases
CHAPTER
7
Configuring the IDE
One of the main strengths of the IDE is its versatile configurability. You can
customize your working environment to fit your needs and personal development
style. Having all of these options can, however, make it difficult to find the exact
setting you are looking for.
In this section you will learn about the following:
■
Setting IDE Default Settings
■ Configuring General Java Settings
■ Working With File Types
■ Configuring Ant Settings
■
Enabling and Disabling IDE Functionality
■ Disabling Modules
■ Installing New Modules from the Update Center
■
Boosting NetBeans Performance
■ Configuring IDE Startup Switches
■ Tuning JVM Switches for Performance
To configure project-level settings such as a project's properties and JDK level, see
Setting Up Projects.
Setting IDE Default Settings
The main tool for configuring default settings in the IDE is the Options window. You
can open the Options window by choosing Tools > Options from the main menu.
Chapter 7
Configuring the IDE
63
Using NetBeansTM 5.5 IDE
IDE settings are grouped into categories in the Options window. When you open the
Options window, you are in the Basic view by default. In Basic view, you click on a
category in the left pane to display the settings options in the right pane. Depending
on the category, you can click on the tabs or nodes in the right pane to see additional
settings.
Options dialog box
To access more advanced settings, click the Advanced Options button at the bottom
of the Options window. In this Advanced view, you select a node in the left pane of
the window and the properties you can modify are displayed in the right pane. An
ellipsis (...) button next to the property indicates that a property editor is available
for a property.
64
Chapter 7
Configuring the IDE
Using NetBeansTM 5.5 IDE
Configuring General Java Settings
The first thing you should do to configure the IDE is make sure it is using the
correct Java Standard Development Kit (JDK) version. The JDK in which the IDE
runs is important because it is automatically used as the platform against which
all of your sources are compiled and executed. See Setting the Target JDK in a
Project for details.
To see which JDK your IDE is running on, choose Help > About and click the
Detail tab. The location of the JDK is listed as Java Home. By default, the IDE uses
the JDK that is specified in your system's registry as the most recent. If you only
have one version of the JDK installed on your computer, this is not a problem. If
you have multiple JDK versions installed, it can be a good idea to configure a
startup switch to explicitly specify which JDK the IDE should use. You can do so
by using the --jdkhome JDK folder switch (for example, --jdkhome c:\
jdk1.5.0_04) on the command line, or by specifying the JDK location in your
netbeans.conf file.
Another important tool in defining Java settings is the Java Sources node in the
Advanced view in the Options window. The Java Sources node, which is located
under the Editing node, contains general settings for how the IDE handles Java
source files. The following settings are available in the Java Sources node:
■
■
■
■
Chapter 7
Automatic Parsing Delay. Specifies the time (in milliseconds) between a pause
in typing or moving around in the Source Editor and the time that internal
parsing information is refreshed. The default is two seconds. The IDE uses the
internal parser to automatically update information about the current Java
source file. You can disable automatic parsing by setting this property to zero. If
this property is disabled, a Java file is parsed only when the file is saved or
compiled.
Error Annotation Limit. Sets the amount of errors that are highlighted in the
Source Editor for each open file. Set this property to zero to disable error
annotation for Java files.
Strings Table. Specifies the _USER_ macro in templates and enables you to
create your own macros for use in templates.
Show Compile Status. If selected, displays the compile status badge on the
node for a Javaclass file when that file needs to be compiled.
Configuring the IDE
65
Using NetBeansTM 5.5 IDE
■
Default Encoding. Specifies the default encoding that the IDE uses to display
and save .java files. Type an encoding name or leave blank to use your
system's default encoding. This setting does not affect the encoding used to
compile classes in the IDE.
Setting Java sources properties in the Options dialog box
Working With File Types
The IDE recognizes the standard file extensions for most types of files. For
example, it knows that files with the extensions .htm, .html, and .shtml should
all be treated as HTML files. Many file types, like XML, can have nonstandard file
extensions that the IDE does not recognize.
If you want to treat all files with a certain file extension as a certain type of file, go
to the Options window, click the Advanced button and expand IDE Configuration
> System > Object Types. The Object Types node contains all of the file types that
the IDE is currently configured to work with. You can use the Extensions and
MIME Types property to specify which file extensions should be treated as a
given type of file.
66
Chapter 7
Configuring the IDE
Using NetBeansTM 5.5 IDE
For example, JavaHelpΤΜ map files are XML documents that have a .jhm
extension. You can treat all JavaHelp map files as XML documents by adding
.jhm to the list of Extensions and MIME Types for the XML Object object type.
Configuring Ant Settings
You can configure additional Ant settings in the Options window by opening the
Options window, selecting the Miscellaneous category in the left pane and
clicking the Ant node in the right pane. You can specify the following properties:
■
■
■
Ant Home. The installation directory of the Ant executable used by the IDE.
Properties. Configures custom properties to pass to an Ant script each time you
call Ant.
Classpath. Specify additional JAR files and directories to be used in Ant. Type
the full path in the Classpath property.
Note: You should only add items to the Ant classpath that are needed to run
custom tasks. You should not use the Classpath settings to manage the
compilation or runtime classpath of your project source folders.
Enabling and Disabling IDE Functionality
NetBeans IDE is a fully modular IDE, meaning that its functionality is provided by
modules that plug into the core NetBeans infrastructure. If you do not use the
functionality provided by certain modules, you can turn those modules off. Turning
off unused modules helps improve your IDE's startup time and performance. You
can also add functionality to your IDE by downloading new modules from the
Update Center.
Disabling Modules
The Module Manager is the most convenient tool for enabling and disabling
modules. Disabling a module only causes the IDE to ignore the module. The
module is not deleted and it can be enabled again at any time.
To open the Module Manager, choose Tools > Module Manager. The Module
Manager displays all the modules registered with the IDE and if they are
registered. You can enable or disable a module by selecting or deselecting the
Chapter 7
Configuring the IDE
67
Using NetBeansTM 5.5 IDE
active checkbox for that module. You can uninstall a module by selecting the
module in the list and clicking Uninstall. To check if new modules are available
from the Update Center, click Update.
Module Manager
The Module Manager groups related modules into module groups. For example,
the Java group contains all of the modules that deal with Java development. You
can disable all modules in a module group by unchecking the checkbox in its
Active column, or expand the module group node to disable individual modules.
When only certain modules in a module group are disabled, the Active column
for the group is checked [boolean]. When you are finished, click Close to activate
your changes.
Certain modules depend on other modules to function properly. Disabling or
enabling one of these modules may require you to also disable or enable the
modules upon which it depends. If this is the case, the IDE displays a dialog that
tells you which modules will also be disabled or enabled and asks for your
confirmation.
68
Chapter 7
Configuring the IDE
Using NetBeansTM 5.5 IDE
Installing New Modules from the Update Center
You can add functionality to your IDE by downloading new modules from the
NetBeans Update Center. To connect to the Update Center, choose Tools > Update
Center from the main window. In the Update Center wizard, select the Update
Centers that you want to connect to. Make sure that your proxy information is
properly configured and that you can connect to the Internet. You can edit your
proxy configuration using the Proxy Configuration button on the wizard page.
Click Next when you are ready to proceed.
The second page of the wizard shows you all of the modules that are available on
the Update Centers. The wizard only displays modules that are not already
installed in your IDE or newer versions of modules that are already installed.
Select any module to see detailed information about the module, including a
description, the version number of the module on the Update Center, and the
version number of the module already installed on your system.
To download a module for installation, select the module in the left pane and
click the Add button. When you are ready to proceed, click the Next button to
view the modules' certificates and install the modules.
Boosting NetBeans Performance
You can monitor your IDE's performance with the Memory toolbar. To view the
Memory toolbar, right-click anywhere in the toolbar area and select Memory in the
pop-up menu. The Memory toolbar has a slide that shows you how much of the
IDE's memory is currently being used and how close it is to automatically
performing garbage collection. You can manually initiate garbage collection by
clicking the Memory toolbar.
You can boost NetBeans performance by adjusting the JVM switches with which you
start the IDE.
Configuring IDE Startup Switches
You can use Java startup switches to configure the IDE. You can add startup
switches to the IDE on the command line or by entering them in a special file
called netbeans.conf, which is located in the etc folder in the NetBeans
installation folder. You can enter IDE-specific startup switches and pass
arguments directly to the JVM in which the IDE runs.
Chapter 7
Configuring the IDE
69
Using NetBeansTM 5.5 IDE
For example, to set the -Xmx (maximum heap size) for the JVM in which the IDE
runs, either add the line -J-Xmx64m to your netbeans.conf file or launch the
IDE from the command line by typing the following on UNIX systems:
./netbeans.sh -J-Xmx64m
or, on Windows systems, the following:
netbeans.exe -J-Xmx64m
The netbeans.conf file can have the various JVM switches separated either by
spaces or on separate lines. Note that the JVM does not start when switches are
passed that it does not understand. When this error occurs, the JVM returns a
message pointing out the switch that caused the problem, as with the following
example:
java -foo
Unrecognized option: -foo
Could not create the Java virtual machine.
The following table lists the available startup switches.
70
Startup Switch
Description
-h
--help
Print descriptions of common startup
parameters.
--cp:p additional_classpath
Prefix the specified classpath to the IDE's
classpath.
--cp:a additional_classpath
Append the specified classpath to the
IDE's classpath.
--fontsize size
Set the font size, expressed in points, in
the IDE's user interface. If this option is
not used, the font size is 11 points.
--jdkhome jdk_home_dir
Use the specified version of the Java™ 2
SDK instead of the default SDK. By
default on Microsoft™ Windows systems,
the loader looks into the registry and
uses the latest SDK available.
You should back up your user directory
before you upgrade the SDK that the IDE
uses. If you later need to revert to the
previous JDK, switch to the backed up
user directory to ensure that you do not
lose any settings.
To switch the IDE's user directory, use
the -userdir switch detailed below.
Chapter 7
Configuring the IDE
Using NetBeansTM 5.5 IDE
Startup Switch
Description
-Jjvm_flag
Pass the specified flag directly to the
JVM.
-J-Dsun.java2d.noddraw=true
Prevent the use of DirectX for rendering.
This switch might prevent problems that
occur on some Microsoft Windows
systems with faulty graphics cards.
-JDnetbeans.debugger.jpda.tran
sport=dt_shmem userdir
Force the IDE to use the shared memory
connection when starting a debugging
session with the Debug > Start command.
This parameter has no effect when you
attach the debugger to an already
running process.
--laf UI_class_name
Selects the given class as the IDE's look
and feel. The following are two examples
of look and feel classes:
• com.sun.java.swing.plaf.motif.Mo
tifLookAndFeel
• javax.swing.plaf.metal.MetalLook
AndFeel
--locale
language[:country[:variant]]
Use the specified locale.
--open file
Open the file in the Source Editor.
--open file:line number
Open the file in the Source Editor at the
specified line.
--userdir userdir
Explicitly specify the userdir, which is
the location in which user settings are
stored.
You can determine the current user
directory in the About dialog box.
Choose Help > About and then click the
Detail Tab. The tab lists the location of
the User Dir as well as other product
details.
Tuning JVM Switches for Performance
JVMs offer a variety of standard and non-standard switches that tune memory
allocation and garbage collection behavior. Some of these settings can benefit the
performance of the IDE.
Chapter 7
Configuring the IDE
71
Using NetBeansTM 5.5 IDE
Note that -X and especially -XX JVM switches are officially "unsupported"
because they are often JVM or JVM-vendor specific. The switches discussed in
this section are available for Sun Microsystems J2SE 1.4.2 and J2SE 1.5. Users of
other JVM implementations may need to remove these switches in order to run
the IDE.
The following settings should produce better-than-factory setting performance on
most systems. With the exception of setting the "permanent area" size, these
switches have been the defaults for the IDE for some time, and should already be
present in your netbeans.conf file.
■
■
■
■
-J-Xverify:none
This switch turns off Java bytecode verification, making classloading faster and
eliminating the need for classes to be loaded during startup solely for the
purposes of verification. This switch significantly improves startup time.
-J-Xms32m
This setting tells the Java virtual machine to set its initial heap size to 32
megabytes. By telling the JVM how much memory it should initially allocate for
the heap, we save it growing the heap as the IDE consumes more memory.
-J-Xmx128m
This setting specifies the maximum amount of memory that the Java virtual
machine should use for the heap. Placing a hard upper limit on this number
means that the Java process cannot consume more memory than physical RAM
available. This limit can be raised on systems with more memory - the 128
megabyte setting helps to ensure that the IDE performs tolerably on 256Mb
systems. Note: Do not set this value to near or greater than the amount of
physical RAM in your system or it will cause severe swapping during major
collections.
-J-XX:PermSize=20m
This is a more exotic JVM switch, but one which also improves startup time.
This setting sizes the "permanent area" of memory, where classes are kept. Since
we know that all of IDE's classes take up a specific amount of memory, we give
the JVM a hint as to how much memory it will need. This setting eliminates
major garbage collection events during startup on many systems. Users of
SunONE Studio or other IDEs that include more modules may want to set this
number higher.
Listed below are some additional JVM switches which have either anecdotally or
measurably impacted NetBeans performance on some, not all, systems. Your
mileage may vary, but they may be worth a try.
■
72
-J-XX:CompileThreshold=100
This switch will make startup time slower, by instructing the HotSpot JVM to
compile many more methods down to native code sooner than it otherwise
would. The reported result is snappier performance once the IDE is running,
since more of the UI code will be compiled rather than interpreted. This value
represents the number of times a method must be called before it will be
compiled.
Chapter 7
Configuring the IDE
Using NetBeansTM 5.5 IDE
■
■
Chapter 7
-J-XX:+UseConcMarkSweepGC -J-XX:+UseParNewGC
Try these switches if you are having problems with intrusive garbage collection
pauses. This switch causes the JVM to use different algorithms for major
garbage collection events (also for minor collections, if run on a multiprocessor
workstation), ones which do not "stop the world" for the entire garbage
collection process. If you are using the PermSize switch, you should also add
the line -J-XX:+CMSClassUnloadingEnabled to your netbeans.conf file
so that class unloading is enabled (it isn't by default when using this collector).
Note: It is unclear as yet if this collector helps or hurts performance on
uniprocessor machines.
-J-XX:+UseParallelGC
Some tests have shown that, at least on systems fairly well equipped with
memory, the durations of minor garbage collections is halved when using this
collection algorithm, on uniprocessor systems. Note that this is paradoxical this collector is designed to work best on multiprocessor systems with gigabyte
heaps. No data is available on its effect on major garbage collections. Note: this
collector is mutually exclusive with -J-XX:+UseConcMarkSweepGC . The
measurements supporting the use of this algorithm can be found on the
performance web site.
Configuring the IDE
73
Using NetBeansTM 5.5 IDE
74
Chapter 7
Configuring the IDE
CHAPTER
8
Quick Reference
This section lists common tasks for application development, keyboard shortcuts for
use in the IDE, and abbreviations for coding in the Source Editor. You can see a
complete list of keyboard shortcuts by choosing Menu > Keyboard Shortcuts from
the main menu.
You can also modify and assign keyboard shortcuts for IDE actions in the Options
window. To view or change shortcuts for IDE actions, open the Options window and
choose Keymap in the left pane. In the right pane, select the action and enter or
change the keyboard shortcut in the Shortcuts text area.
This section covers:
Chapter 8
■
Window Navigation Shortcuts
■
Project Tasks
■
CVS Tasks
■
Configuring Tasks
■
Source Editor Tasks
■ Source Editor Abbreviations for Java Files
■ Source Editor Abbreviations for JSP and Servlet Files
■ Source Editor Abbreviations for XML and DTD Files
■ Special Code Template Syntax
■
Build Tasks
■
Running J2SE Application Tasks
■
Running Web Application Tasks
■
Debugging Tasks
■
JUnit Tasks
Quick Reference
75
Using NetBeansTM 5.5 IDE
Window Navigation Shortcuts
76
Keys
Action
Ctrl-0
Switches focus to the Source Editor.
Ctrl-1/Ctrl-Shift-1
Switches focus to the Projects window.
Ctrl-2/Ctrl-Shift-2
Switches focus to the Files window.
Ctrl-3/Ctrl-Shift-3
Switches focus to the Favorites window.
Ctrl-4
Switches focus to the Output window.
Ctrl-5
Switches focus to the Runtime window.
Ctrl-6
Switches focus to the To Do window.
Ctrl-7
Switches focus to the Navigator window.
Ctrl-8/Ctrl-Shift-8
Opens the Versioning window.
Alt-Shift-1
Opens the Local Variables debugger window.
Alt-Shift-2
Opens the Watches debugger window.
Alt-Shift-3
Opens the Call Stack debugger window.
Alt-Shift-4
Opens the Classes debugger window.
Alt-Shift-5
Opens the Breakpoints debugger window.
Alt-Shift-6
Opens the Sessions debugger window.
Alt-Shift-7
Opens the Threads debugger window.
Alt-Shift-8
Opens the Sources window.
Ctrl-Tab
Toggles through the open windows in the order
that they were last used. The dialog box displays
all open windows and each of the open
documents in the Source Editor.
Shift-Escape
Maximizes the Source Editor or the present
window.
Ctrl-F4
Closes the current tab in the current window. If
the window has no tabs, the whole window is
closed.
Ctrl-Shift-F4
Closes all open documents in the Source Editor.
Shift-F4
Opens the Documents dialog box, in which you
can save and close groups of open documents.
Alt-right
Displays the next tab in the current window.
Alt-left
Displays the previous tab in the current window..
Chapter 8
Quick Reference
Using NetBeansTM 5.5 IDE
Project Tasks
Chapter 8
To perform this task
Follow these steps
Create a project.
1. Choose File > New Project (Ctrl-Shift-N).
2. Select the right template for your project.
Add a JAR file to a
standard project's
classpath.
1. In the Projects window, right-click the node for
the project and choose Properties.
2. In the Project Properties dialog box, select the
Libraries node in the Categories pane and
ensure the Compile tab is selected.
3. Click Add JAR and select the JAR file in the file
chooser.
Note: If you also want to attach source code and
Javadoc for the JAR file, click Add Library
instead.
Set up compilation
dependencies
between projects.
1. In the Projects window, right-click the node for
the project and choose Properties.
2. In the Project Properties dialog box, select the
Libraries node in the Categories pane and
ensure the Compile tab is selected.
3. Click Add Project and select the project folder
for the project that you want to add to the
classpath.
Open required
projects.
• In the Projects window, right-click the project
node and choose Open Required Projects.
Build a project.
• Choose Build > Build Main Project (F11) or
right-click any project node and choose Build
Project.
Clean a project.
• Right-click the project node and choose Clean
Project.
Clean and build a
project.
• Right-click the project node and choose Clean
and Build Main Project (Shift-F11).
Run a project.
• Choose Run > Run Main Project (F6) or rightclick any project node and choose Run Project.
Stop a running
project.
• Choose Build > Stop Build/Run.
Debug a project.
• Choose Run > Debug Main Project (F5) or rightclick any project and choose Debug Project.
Quick Reference
77
Using NetBeansTM 5.5 IDE
78
To perform this task
Follow these steps
Specify sources for a
JAR file on the
project classpath.
1. Choose Tools > Library Manager from the main
window.
2. If the JAR file is not already registered in the
Library Manager, create a new empty library
using the Add Library button.
3. Select the library in the left panel of the Library
Manager.
4. In the Classpath tab, click Add JAR/Folder and
specify the location of the JAR file containing
the compiled class files. Note: A library can
contain multiple JAR files.
5. In the Sources tab, add the folder or archive file
containing the source code.
Specify Javadoc for
a JAR file on the
project classpath.
1. Choose Tools > Library Manager from the main
window.
2. If the JAR file is not already registered in the
Library Manager, register the JAR file as
described above.
3. In the Javadoc tab, click Add ZIP/Folder and
specify the location of the Javadoc files.
Set the main project.
• Right-click the project node and choose Set
Main Project.
Chapter 8
Quick Reference
Using NetBeansTM 5.5 IDE
CVS Tasks
Chapter 8
To perform this task
Follow these steps
Check out sources.
1. Select CVS > Checkout from the main menu.
2. In the CVS dialog box, specify the CVS
repository root location and password and click
Next.
3. Specify the modules you wish to check out.
You can checkout specific modules and
branches by clicking the Select button and
choosing from options available.
4. Specify the location of the local folder.
5. Click Finish to check out the files.
Update local file
versions.
1. In the Project, Files or Favorites window, rightclick the file's node that you wish to update and
choose CVS > Update.
Diff files.
1. In the Project, Files or Favorites window, rightclick the appropriate revision node and choose
CVS > Diff.
Commit local
changes.
2. Ensure that your local copies of the files are up
to date by right-clicking and choosing CVS >
Update before proceeding.
3. Right-click the files or directories you wish to
commit and choose CVS > Commit.
Merge revisions.
1. In the Project, Files or Favorites window, rightclick the appropriate revision node and choose
CVS > Merge Changes from Branch.
2. In the Merge Changes from Branch dialog box,
specify the options for the merge and click
Merge.
Configure global
VCS options.
1. Choose Tools > Options and click the Advanced
Options button in the Options window.
2. Expand the Server and External Tool Settings
node and then the Diff and Merge Types node
in the left pane.
3. Select the node to modify in the left pane and
edit the desired properties in the right pane of
the Options window.
Quick Reference
79
Using NetBeansTM 5.5 IDE
Configuring Tasks
To perform this task
Follow these steps
Configure general
options
1. Choose Tools > Options from the main menu.
2. In the left pane of the Options window, select a
category in the left pane to display the
settings options in the right pane.
3. Specify the desired settings in the right pane of
the Options window.
80
Set the IDE's web
browser
1. Choose Tools > Options from the main menu.
2. Select the General category in the left pane of
the Options window and select the desired
browser from the Web Browser drop-down list.
Configure proxy
settings
1. Choose Tools > Options from the main menu.
2. Select the General category in the left pane of
the Options window and specify the proxy
settings in right pane. To use a proxy server,
select the HTTP Proxy check box and type the
Proxy Host and Proxy Port.
Configure the Auto
Update feature
1. Choose Tools > Options from the main menu.
2. In the Check Period drop-down list, choose how
often you want the IDE to automatically check
the Update Center for updates.
Configure
Advanced IDE
options
1. Choose Tools > Options from the main menu.
2. Click the Advanced Options button in the
Options window to see the the Advanced view.
3. Select a node in the left pane and set the
properties as desired in the right pane.
Configure General
Java Settings
1. From the main menu, choose Tools > Options.
2. In the Advanced Options view, expand the
Editing node and select Java Sources in the left
pane of the window.
1. Set properties as desired in the right pane of the
window.
Chapter 8
Quick Reference
Using NetBeansTM 5.5 IDE
Chapter 8
To perform this task
Follow these steps
Customize the IDE's
Menus
1. In the Advanced Options view, expand IDE
Configuration > Look and Feel > Menu Bar.
2. Right-click the Menu Bar node and choose Add
> Menu.
3. In the New Menu dialog box, type a name for
the menu and click OK.
The IDE adds an empty menu to the main
window.
4. Expand the Actions node and find the
command you want to add to the menu, then
right-click the command node and choose Copy.
5. Expand the Menu Bar node, right-click the node
of the menu you just created, and choose Paste
> Copy.
Customize the
toolbar in the IDE
1. From the main window, choose View > Toolbars
> Customize, or right-click the IDE toolbar and
choose Customize.
2. In the Customize Toolbars dialog box, click
New Toolbar and name your toolbar.
3. The IDE adds an empty toolbar to the main
window. You can now drag an item from the
Customize Toolbars dialog box to your new
toolbar.
Install additional
modules
1. Choose Tools > Update Center from the main
menu.
2. Designate the update center location you want
to connect to in the Update Center wizard and
click Next.
3. Select the modules you wish to install.
4. Review the licensing agreement and click
Accept.
Enable and disable
modules
1. Choose Tools > Module Manager from the main
menu to open the Module Manager.
2. Select or deselect the Active checkbox to
activate or deactivate that module.
You can check for new modules by clicking the
Update button in the Module Manager to open
the Update Center Wizard.
Quick Reference
81
Using NetBeansTM 5.5 IDE
Source Editor Tasks
82
To perform this task
Follow these steps
Open a file that is
not available in the
Projects window or
the Files window.
1. Choose File > Open File (Ctrl-O).
2. In the file chooser, navigate to the file and then
click Open.
Maximize a tab in
the Source Editor.
Do one of the following:
• Double-click a file's tab in the Source Editor.
• Make sure that the Source Editor window has
focus and then press Shift-Escape.
• Choose Window > Maximize.
Revert a maximized
Source Editor to its
previous size.
Do one of the following:
• Double-click a file's tab in the Source Editor.
• Press Shift-Escape.
• Choose Window > Restore.
Display line
numbers.
Choose View > Show Line Numbers.
View two files
simultaneously.
1. Open two or more files.
2. Click the tab of one of the files and drag it to
the side of the window where you want the file
to be placed. Once the red preview box appears
indicating the correct location for the window,
release the mouse button to drop the window.
The window can be split horizontally or vertically,
depending on where you drag the tab.
Split the view of a
single file.
1. Right-click the document's tab in the Source
Editor and choose Clone Document.
2. Click the tab of the cloned document and drag
it to the part of the window where you want the
copy to be placed.
Format code
automatically.
• Right-click in the Source Editor and choose
Reformat Code.
If any text is selected, only that text will be
reformatted. If no text is selected, then the whole
file is reformatted.
Chapter 8
Quick Reference
Using NetBeansTM 5.5 IDE
Source Editor Abbreviations for Java Files
Abbreviation
Expansion
ab
abstract
bo
boolean
br
break
ca
catch {
cl
class
cn
continue
df
default;
dowhile
do {
${cursor}
} while (${condition});
En
Enumeration
eq
equals
Ex
Exception
ex
extends
fa
false
fi
final
fl
float
forc
for (Iterator it =
collection.iterator(); it.hasNext();) {
Object elem = (Object)
it.next();
}
fore
for (Iterator it =
collection.iterator(); it.hasNext();) {
Object elem = (Object)
it.next();
}
fori
for (int i = 0; i < ${arr
array}.length; i++) {
${cursor}
}
Chapter 8
fy
finally
ie
interface
Quick Reference
83
Using NetBeansTM 5.5 IDE
Abbreviation
Expansion
if
if (${condition}) {
${cursor}
} else {
}
im
implements
iof
instanceof
ir
import
le
length
newo
Object name = new Object(args);
Ob
Object
pe
protected
pr
private
psf (or Psf)
private static final
psfb (or Psfb)
private static final boolean
psfi (or Psfi)
private static final int
psfs (or Psfs)
private static final String
pst
printStackTrace();
psvm
public static void main(String[] args) {
${cursor}
}
84
pu
public
re
return
serr
System.err.println ("
sout
System.out.println ("
St
String
st
static
sw
switch (
sy
synchronized
tds
Thread.dumpStack();
th
throws
Chapter 8
Quick Reference
Using NetBeansTM 5.5 IDE
Abbreviation
Expansion
trycatch
try {
${cursor}
} catch (Exception e) {
}
tw
throw
twn
throw new
wh
While (
whilei
while (it.hasNext()) {
Object elem = (Object)
it.next();
${cursor}
}
Chapter 8
Quick Reference
85
Using NetBeansTM 5.5 IDE
Source Editor Abbreviations for JSP and Servlet Files
86
Abbreviation
Expansion
ag
application.getValue("
ap
application.putValue("
ar
application.removeValue("
cfgi
config.getInitParameter("
jg
<jsp:getProperty name="
jspf
<jsp:forward page="
jspg
<jsp:getProperty name="
jspi
<jsp:include page="
jspp
<jsp:plugin type="
jsps
<jsp:setProperty name="
jspu
<jsp:useBean id="
oup
out.print("
oupl
out.println("
pcg
pageContext.getAttribute("
pcgn
pageContext.getAttributeNamesInScope("
pcgs
pageContext.getAttributesScope("
pcr
pageContext.removeAttribute("
pcs
pageContext.setAttribute("
pg
<%@ page
pga
<%@ page autoFlush="
pgb
<%@ page buffer="
pgc
<%@ page contentType="
pgerr
<%@ page errorPage="
pgex
<%@ page extends="
pgie
<%@ page isErrorPage="
pgim
<%@ page import="
pgin
<%@ page info="
pgit
<%@ page isThreadSafe="
pgl
<%@ page language="
pgs
<%@ page session="
Chapter 8
Quick Reference
Using NetBeansTM 5.5 IDE
Chapter 8
Abbreviation
Expansion
rg
<request.getParameter("
sg
session.getValue("
sp
session.putValue("
sr
session.removeValue("
tglb
<%@ taglib uri="
Quick Reference
87
Using NetBeansTM 5.5 IDE
Source Editor Abbreviations for XML and DTD Files
88
Abbreviation
Expansion
?xm
<?xml version="1.0" encoding="UTF-8"?>
!do
<!DOCTYPE>
!cd
<![CDATA[|]]>
!at
<!ATTLIST |>
!el
<!ELEMENT |>
!en
<!ENTITY |>
pu
PUBLIC "|"
sy
SYSTEM "|"
!at
<!ATTLIST |>
!el
<!ELEMENT |>
!en
<!ENTITY |>
!no
<!NOTATION |>
pu
PUBLIC "|"
sy
SYSTEM "|"
cd
CDATA
em
EMPTY
en
ENTITY
ens
ENTITIES
fi
#FIXED
im
#IMPLIED
nm
NMTOKEN
nms
NMTOKENS
nn
NOTATION
pc
#PCDATA
Chapter 8
Quick Reference
Using NetBeansTM 5.5 IDE
Special Code Template Syntax
Code Template Syntax
Construct
Chapter 8
Explanation
${cursor}
Indicates where the insertion point should go
after the code snippet has been added to your
code.
${Identifier}
Indicates an identifer that needs to be filled in
when you use the code template. When you use
this construct in a template definition, replace
Identifier with the identifer name that you
want to appear in the template.
index
An attribute that you can use within a
${Identifier} segment to designate that an
unused variable name should be generated in
the code snippet. For example, you could use
${ind index}.
type=
"FullyQualifiedType"
editable="false"
An attribute that you can use within a
${Identifier} segment to generate a class
name. When you use the code template, an import
statement for the class is also inserted into your
code. For example, you could use ${cce itype=
"java.lang.ClassCastException"
editable="false"} to have
ClassCastException inserted into your code
and make sure that the import statement is
generated, if necessary. Specifying editable=
"false" ensures that ClassCastException is
not selected for editing once the template is
inserted into your code.
instanceof=
"FullyQualifiedType"
An attribute that you can use within a
${Identifier} segment to designate the type
that the identifier must represent an instance
of. For example, you could use
${collection instanceof=
"java.util.Collection"} where collection
is the default identifier in the template and
java.util.Collection is the class of which
the identifier must represent an instance.
Quick Reference
89
Using NetBeansTM 5.5 IDE
Build Tasks
90
To perform this task
Follow these steps
Add a JAR file to a
project's classpath.
1. In the Projects window, right-click the node for
the project and choose Properties.
2. In the Project Properties dialog box, select the
Libraries node in the Categories pane and
ensure the Compile tab is selected.
3. Click Add JAR and select the JAR file in the file
chooser.
Note: If you also want to attach source code and
Javadoc for the JAR file, click Add Library
instead.
Add an IDE project
to a project's
classpath.
1. In the Projects window, right-click the node for
the project and choose Properties.
2. In the Project Properties dialog box, select the
Libraries node in the Categories pane and
ensure the Compile tab is selected.
3. Click Add Project and select the project folder
for the project that you want to add to the
classpath.
Build a project.
• Choose Build > Build Main Project (F11) or
right-click any project in the Projects window
and choose Build Project.
Compile a single
file.
• Choose Build > Compile File (F9).
Clean a project.
• In the Projects window, right-click the project
node and choose Clean Project.
Clean and build the
main project.
• Choose Build > Clean and Build Main Project
(Shift-F11).
View build
products, such as
JAR files and
generated Javadoc.
1. In the Files window, expand the project folder
node.
2. Open the build folder to view the project's
compiled classes.
Note: Javadoc files and built libraries, like JAR
files and WAR files, are in the dist folder.
Correct compilation
errors.
• In the Output window, double-click any Java
syntax error to jump to the location in the
source code where the error occurred.
• In the Output window, double-click any Ant
error to open the Ant script in the target that
failed.
Chapter 8
Quick Reference
Using NetBeansTM 5.5 IDE
Running J2SE Application Tasks
Chapter 8
To perform this task
Follow these steps
Set the runtime
classpath.
1. Right-click the project node in the Projects
window and choose Properties.
2. Select the Libraries node in the Categories pane.
3. Use the Add Project, Add Library, or Add
JAR/Folder buttons to add the required file
type to the project's classpath.
Note: By default, the project's runtime classpath
contains the project's compiled sources and
everything on the compilation classpath.
Set the project main
class
1. Right-click the project node in the Projects
window and choose Properties.
2. Select the Run node in the Categories pane.
3. Type the fully qualified name of the class in the
Main Class field.
Set the runtime
arguments.
1. Right-click the project node in the Projects
window and choose Properties.
2. Select the Run node in the Categories pane.
3. Enter the arguments in the Arguments field.
Set JVM arguments.
1. Right-click the project node in the Projects
window and choose Properties.
2. Select the Run node in the Categories pane.
3. Type a space-separated list of arguments in the
VM Arguments field.
Set the working
directory for
execution.
1. Right-click the project node in the Projects
window and choose Properties.
2. Select the Run node in the Categories pane.
3. Type the full path to the working directory in
the Working Directory field.
Run a project.
• Choose Run > Run Main Project (F6).
• Right-click any project in the Projects window
and choose Run Project.
Run a single file.
1. Select one or more files in the Projects window,
Files window, or Source Editor.
2. Choose Run > Run File > Run your_filename
from the main menu.
Quick Reference
91
Using NetBeansTM 5.5 IDE
Running Web Application Tasks
92
To perform this task
Follow these steps
Set request
parameters for JSP
files.
1. In the Projects or Files window, navigate to the
project's JSP file.
2. Right-click the JSP file and choose Properties.
3. Type the necessary parameters in the Request
Parameters property field in the
URL_query_string format.
Set execution URIs
and parameters for
servlets.
1. Select the servlet in the Projects or Files
window.
2. Choose Tools > Set Servlet Execution URI in the
main menu.
3. Type the execution URI and parameters.
4. Click OK.
Note that you can only set a request URI for a
servlet if it has servlet mappings in the
deployment descriptor (web.xml file). The
default URI is defined in the deployment
descriptor.
Set the runtime
classpath.
In the Projects window, right-click the Libraries
node and choose Add Project, Add Library, or
Add JAR/Folder, to add the necessary item to the
project's classpath.
Note that by default, the project's runtime
classpath contains the project's compiled sources
and everything on the compilation classpath.
Set the web server.
1. In the Projects window, right-click the project
node and choose Properties.
2. Select the Run node in the Categories pane.
3. Select the web server from the Server dropdown.
Chapter 8
Quick Reference
Using NetBeansTM 5.5 IDE
Chapter 8
To perform this task
Follow these steps
Set the context path
and relative URL.
1. In the Projects window, right-click the project
node and choose Properties.
2. Select the Run node in the Categories pane.
3. Type the desired path in the Context Path field
and, optionally, a relative URL.
Run a project.
• Choose Run > Run Main Project (F6)
• Right-click any web project in the Projects
window and choose Run Project.
Run a single file.
1. Select one or more files in the Projects window,
Files window, or Source Editor.
2. Choose Run > Run File > Run your_filename
from the main menu.
Quick Reference
93
Using NetBeansTM 5.5 IDE
Debugging Tasks
94
To perform this task
Follow these steps
Start a local
debugging session.
• To debug the main project, choose Run >
Debug Main Project (F5).
• To debug any individual project, right-click the
project and choose Debug Project.
Start a remote
debugging session.
1. On the computer where program is located,
start the program in debugging mode.
2. On the computer where the IDE is running,
open the projects that contain the source for the
program.
3. Choose Run > Attach Debugger.
4. Select the connector type, enter any required
process information, and then click OK.
Note: See your VM documentation for
information about the connectors it provides.
Debug a single file.
• Select any runnable file in the Projects window
and choose Run > Run File > Debug
your_filename.
Finish a debugging
session.
• To finish the current session, choose Run >
Finish Debugger Session (Shift-F5).
• To finish any session, open the Sessions
window (Alt-Shift-6), right-click the session,
and choose Finish.
Set a breakpoint.
• To set a line breakpoint, open the file in the
Source Editor and click in the left margin on the
desired line (Ctrl-F8).
• In the Source Editor, select the element of code
on which you want to set a breakpoint and
choose Run > New Breakpoint (Ctrl-Shift-F8).
Then set the breakpoint type and additional
options in the New Breakpoint dialog box.
Modify breakpoint
properties.
• Open the Sessions window (Alt-Shift-6), rightclick the session, and choose Customize.
Set a watch.
• Right-click a variable or expression in the
Source Editor and choose New Watch (CtrlShift-F7).
Suspend and
resume a thread.
• Open the Threads window (Alt-Shift-7), rightclick the thread, and choose Suspend or
Resume.
Chapter 8
Quick Reference
Using NetBeansTM 5.5 IDE
Chapter 8
To perform this task
Follow these steps
Manage which JDK
classes the
debugger steps into.
• Open the Sources window (Alt-Shift-8) and
select the checkbox for the archive file or
directory containing the JDK sources.
• Open the Sources window (Alt-Shift-8) and
uncheck the checkbox for the source directories
you do not want to step into.
Pop a call from the
call stack.
• To pop the most recent call from the call stack,
choose Run > Stack > Pop Topmost Call.
• To pop multiple calls, open the Call Stack
window (Alt-Shift-3), right-click the call that
you want to remain at the top of the call stack,
and choose Pop to Here.
View information
for a call on the call
stack.
• To move one level away from the main routine,
choose Run > Stack > Make Callee Current
(Ctrl-Alt-up arrow).
• To move one level toward the main routine,
choose Run > Stack > Make Caller Current
(Ctrl-Alt-down arrow).
• To make a call current, double-click the call in
the Call Stack window.
Quick Reference
95
Using NetBeansTM 5.5 IDE
JUnit Tasks
96
To perform this task
Follow these steps
Create a test for
existing sources.
1. Right-click the class or package node for which
you wish to generate a test and choose Tools >
JUnit Tests > Create Tests (Ctrl-Alt-J).
2. Set the parameters for the test skeleton
generator in the Create Tests dialog box and
click OK.
Create an empty
test.
1. Choose File > New File.
2. Select JUnit in the Categories pane and Empty
Test in the File Types pane. Click Next.
3. Enter a name for the test class in the Class
Name field.
4. Select the target package from the Package
combo box and set any required options.
5. Click Finish.
Run a test for a
class.
1. Select the node of the class you wish to test.
2. From the Main menu, choose Run > Run File >
Test filename (Ctrl-F6).
Run tests for an
entire project.
• Right-click the node of the project for which
you wish to run tests and choose Test Project
(Alt-F6).
Edit a test.
1. Right-click the node for the source whose test
you wish to edit.
2. Choose Tools > JUnit Tests > Open Test (CtrlAlt-K) from the contextual menu.
Debug a test.
1. Select the class for whose test you wish to
debug.
2. Choose Run > Run File > Debug Test for
filename (Ctrl-Shift-F6).
Configure JUnit.
1. Choose Tools > Options.
2. Expand the Testing node and select JUnit
Module Settings.
3. Edit the necessary properties and then click
Close.
Chapter 8
Quick Reference