1
Minimal Kiosk Browser Manual
Kweb 1.6
Content
Part One: What You Really Need to Know About Kweb
Introduction........................................................................................................................................2
Installation and Usage........................................................................................................................3
Kweb's User Interface........................................................................................................................6
a) Introduction..................................................................................................................................6
b) The Toolbar – All Icons Explained..............................................................................................6
c) The Multifunctional Text Entry Field – URLs and Much More..................................................7
d) Styling the Toolbar......................................................................................................................9
e) Functions Only Available from the Keyboard...........................................................................10
f) Functions Inside the Browser Window......................................................................................10
g) Kweb's Menu Page and Control Panel......................................................................................10
h) Calling Other Programs from Kweb..........................................................................................12
i) Keyboard Commands.................................................................................................................12
Media Support..................................................................................................................................14
PDF Support......................................................................................................................................15
Download Manager..........................................................................................................................16
Part Two: Advanced Configuration and Usage
Personalizing and Configuring Kweb and its Helper Applications.............................................17
Browser Configuration..................................................................................................................17
Helper Programs Settings..............................................................................................................20
Configuring Kweb3 With Environment Variables.........................................................................23
Creating User Defined Keyboard Commands...............................................................................23
The :Command Editor.....................................................................................................................25
Understanding the :Command Interface........................................................................................25
Editing Predefined :Command Pages............................................................................................25
Creating your Own :Command Pages...........................................................................................25
Using Kweb as Front End for Embedded Applications................................................................27
Introduction....................................................................................................................................27
Starting in Kiosk Mode..................................................................................................................27
Remote Control of Kweb for Presentation Applications...............................................................28
Kweb's Special Command Links and Command Forms...............................................................29
A Few Tricks and Tips...................................................................................................................30
Appendix
Kweb's History..................................................................................................................................32
Kweb's Components.........................................................................................................................33
How to Install a Working Version of Youtube-dl...........................................................................34
(c) 2013-2014 by Günter Kreidl
1
Introduction
Minimal Kiosk Browser (kweb & kweb3) is a slim and efficient web browser based on the webkit
engine, written especially for the Raspberry Pi. It offers:
• HTML5 support
• PDF support via Evince, Xpdf or Mupdf
• asynchronous download using wget or the download manager uGet
• full media support (audio, video, playlists) using omxplayer
• omxplayerGUI, a window based front end for omxplayer
• web media support for HTML5 video or for websites supported by youtube-dl
• opening HTML, text and PDF documents, images (GIF, JPG, PNG) and all kinds of media
directly from your file system
• a special command interface, which supports any kind of program from inside an html file
• lots of different fine tuning options
• a menu and a control panel page to access all configuration options in one place
• GPU acceleration for web video and image decoding in kweb3
Kweb can be used
1. as a browser for your desktop
2. to replace your desktop completely
3. as front end for embedded applications (kiosk mode)
The design principle of kweb was to keep it as simple as possible and to make the most of the
limited resources of the Raspberry Pi (processing power and memory). Instead of blowing up the
program with lots of functions, it uses other, already existing programs for things it cannot do by
itself. Nevertheless it offers some unique possibilities which you will not find in any other web
browser. These features make it possible to use kweb as a replacement for your desktop and as a
front end for embedded applications.
Kweb and kweb3 (written in C) and its helper programs (written in Python) are open source
programs and you can download a separate source code distribution besides the Debian package
distribution.
The complete documentation now consists of 3 documents:
The Kweb Manual (PDF, this one)
The OmxplayerGUI Manual (PDF)
The Kweb Changelog (HTML)
All three are installed together with the program and can be opened from inside the browser.
2
Installation and Usage
Install kweb from the command line or a terminal with the following commands:
wget http://steinerdatenbank.de/software/kweb1.6.tar.gz
tar xzf kweb1.6.tar.gz
cd kweb1.6
./debinstall
Note: The version number may change. You'll always find the latest version and installation
instructions at: http://www.raspberrypi.org/forums/viewtopic.php?t=40860. Please use this forum
thread for any kind of questions and problem reports.
If you had already installed an earlier version of kweb > 1.5, you can always update to the newest
version from inside kweb (built-in update function).
Kweb is now installed as a Debian package and needs the package installer gdebi. The installation
script checks, if it is installed on your system and will install it, if it is not found. To deinstall kweb
run one of the following commands:
./remove
./removeall
sudo dpkg r kweb
At the end of the installation process your system will be checked, if programs needed by kweb are
installed. Please check the output of this script carefully and install any missing programs.
Minimum requirements are:
omxplayer, youtube-dl, wget, mupdf or xpdf, leafpad, lxterminal
Except for youtube-dl, all these programs should already be installed on your Raspbian distribution.
Note: To install a really working version of youtube-dl read the last chapter in the Appendix.
Installation of the following programs is recommended:
evince and/or xpdf for better PDF support.
uget-gtk as GUI based download manager
tint2 as task bar, if you want to use kweb from the command line or as desktop replacement.
xterm, if you want to use kweb's old method of playing videos full screen without a GUI or if you
prefer a simpler terminal needing less resources.
The following command line will install all programs at once:
sudo aptget install evince xpdf xterm ugetgtk tint2
The installation of kweb will only take a few seconds. Afterwards you will find two new entries in
the internet section of your applications menu:
Minimal Kiosk Browser
Minimal Kiosk Browser (GTK 3)
Both programs (kweb and kweb3) have identical functions, but they use different interface libraries
and webkit engines:
kweb uses GTK+2 and the default webkitkgtk-1.0 engine of the stable Debian Wheezy release. It's
very stable and should be the preferred version at the moment.
3
kweb3 uses GTK+3 and the new hardware accelerated webkitgtk-3.0 engine introduced by the
Raspberry Pi Foundation with the publication of the new web browser epiphany. Kweb3 can make
use of all the new features like playing HTML5 web video inside the browser window, but will also
suffer from all weaknesses of the new engine. Currently there are a number of bugs and they may
even lead to crashes. But kweb3 will automatically profit from all epiphany updates in the future
and so may become the preferred version when all the current bugs of the new webkit library are
fixed. Kweb3 requires a recent Raspbian image or a fully updated Raspbian version (using distupgrade).
Everything said in this manual about kweb also applies to kweb3 (except where noted differently).
Together with kweb, omxplayerGUI is installed as a separate application and you will find it in the
media section of the application menu. It's usage is described in a separate manual.
Kweb can also be started from a terminal or script like this:
kweb [options] [url]
“options” is a single string, starting with a “-” followed by a number of characters, each one for a
certain configuration setting. But this is only required, if you use kweb as front end for an
embedded application and want to define its behaviour. Using the browser configuration page inside
kweb is much easier and recommended for normal use. “url” can be any domain name or full file
path or any valid “http://” of “file://” URL.
If you want to start kweb from the command line (for casual use without starting the desktop or as a
desktop replacement), run the following command:
xinit ./ktop
(Don't try to start it this way from a terminal running inside your desktop!)
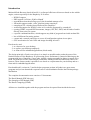
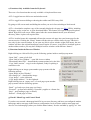
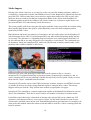
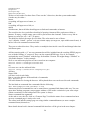
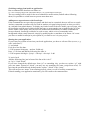
This will start X-Windows, the openbox window manager, the small task bar tint2 and kweb. The
image below shows an example of a desktop session with two programs running on top of (and
opened from within) kweb.
4
Installing from source
wget http://steinerdatenbank.de/software/kweb1.6src.tar.gz
tar xzf kweb1.6src.tar.gz
cd kweb1.6src
sudo make install
preparekweb
Note: The version number may change. You'll always find the latest version and installation
instructions at: http://www.raspberrypi.org/forums/viewtopic.php?t=40860. Please use this forum
thread for any kind of questions and problem reports.
To remove it again, run
sudo make remove
or
sudo make removeall
The source distribution already contains the compiled binaries and you don't have to compile them
first using 'make'. If you want to modify the source code and compile new version you'll need to
install some .-dev packages. Start with
sudo aptget install libwebkitdev libwebkitgtk3.0dev libwebkitgtkdev
5
Kweb's User Interface
a) Introduction
Kweb's user interface is very simple: a toolbar and an URL entry field, nothing else. No menus, no
dialogs etc. Everything you need is just a mouse click away.
Kweb also supports a rich set of keyboard shortcuts, usually called in combination with the left ALT
key.
Nevertheless kweb and its helper programs are highly configurable using special web pages (similar
to the “about:config” function of firefox and other browsers): the “Configuration” page for the
browser itself and the “Settings” page for fine tuning the helper programs. Both pages (and many
more) are available from kweb's menu page, which is also the default homepage (if not set
differently).
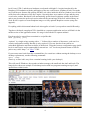
b) The Toolbar – All Icons Explained
The first 9 icons are command buttons; clicking them will result in immediate action.
“Open” - opens a file browser to select a file to show in kweb. HTML and text files (.txt) as well as
images (JPEG, PNG and GIF) will be directly opened and shown inside the browser. Alls kinds of
audio and video files, including m3u and pls playlist files, will be played with omxplayerGUI. PDF
files will also be opened with either evince, xpdf or mupdf. And if the “X” option is activated in the
browser configuration, all kind of executable files (scripts or binaries) are also opened and
executed.
“Back” - go back to the previous web page.
“Stop” - stop loading the current page. You may know the annoying habit of many websites to
continuously load more stuff (mostly crap like ads) which nobody needs and which will only slow
down your computer's performance. The stop button
“Reload” - reload current page.
“Home” - display your homepage. If you have a homepage.html file in the root of your user
directory, this will be used as your personal homepage. You can define any local HTML file or any
web site as your homepage in your browser configuration. If nothing is defined, kweb's menu page
will be shown as your homepage.
“Play” - if the web page currently displayed contains embedded video, clicking on this button will
call omxplayerGUI, which will try to extract and play the video in a separate window or full screen.
This will work with embedded HTML5 video tags and with all websites supported by youtube-dl.
Youtube-dl needs a few seconds to extract the video address, so you have to wait a little while.
HTML5 video may also start playing inside your browser window (I really hate these videos
starting automatically when you open a web page), but you should immediately stop this, as the arm
processor of the Pi cannot play them without support of the GPU.
“Zoom in” - magnify content by 10%.
“Zoom out” - scale down by 10%.
“Zoom 100%” - display content in original size
6
The last six icons are toggle buttons, that you can use to enable or disable some important options:
“Full Zoom” - zoom every element within the web page (full zoom), when enabled, or zoom only
text elements. The background of this option (introduced in version 1.3) is the fact, that webkit gets
extremely slow (by a factor of about 10), if full zoom mode is enabled, zoom is not set to 100% and
the web page contains colour runs (and perhaps some other graphical elements). This may really
freeze your Rpi for some time. Otherwise many web pages will not be displayed correctly, when
zoomed, if full zoom is not enabled. You can always select, what's best, with a single mouse click.
“Javascript” - enable or disable the use of Javascript and reload current web page. It's a good
practice (speed!) on the Raspberry Pi to only enable Javascript when a web page really needs it to
be displayed correctly. Often Javascript is only used to open a lot of crap (ads) or to spy on you (did
you know that you can be identified with a certainty of about 90% even if cookies are disabled?). A
Google search page, for example, will load twice as fast with Javascript disabled without any loss of
functionality.
“Cookies” - enable / disable support of cookies. Cookies are in many cases only used to spy on you.
It's good practice to only enable them, when you really need them, e. g. when you enter a web site
with user name and password.
“DL-Manager” - .If enabled, use uGet as download manager with a GUI (if installed), otherwise
use wget for downloads. Downloads are disabled by default. Clicking on a link that cannot be
displayed by kweb or its helper programs (media files or PDF), will never start a download. You
have to right click a link and select “Download” from the pop-up menu to start downloading
anything. All downloads go into the “Downloads” folder in your user directory, but this can be
changed on the settings page.
“Omxplayer” - if enabled (default), omxplayer(GUI) will be used for all kinds of audio and video
stream content accessible via links. If you disable it, the gstreamer support built into the webkit
library will be used for audio and video links and try to reproduce the media content inside the
browser window. Without hardware acceleration (kweb), this should only be used for audio. In
kweb3 this can also be used for many video formats.
“Commands” - if enabled, kweb's command execution interface is active and can be used to issue
commands from inside web pages (files only). It's usually switched off (vetoed), when the browser
starts and you have to enable it if you want to use commands. This is, for example, required if you
want to edit the browser configuration or helper programs settings. For use in embedded
applications it can also be enabled when starting the browser from the command line or a script,
All these functions can also be called with keyboard short cuts (see below for details).
c) The Multifunctional Text Entry Field – URLs and Much More
The use of the text entry field seems obvious. Type a web site address into it an hit the “Return” key
to navigate to it. “http://” will be inserted automatically, if it's missing and no “://” is found inside
your text entry. If the URL starts with a “/”, it will be expanded to a “file://” URL.
Besides “http://”, kweb supports “https://”, “file://”, “rtp://”, “rtsp://”, “rtmp” and “mmsh://” type of
URLs (not “ftp://”, as it is not supported by the engine, but many public ftp sites also support http
access). And there's one more option: URLs starting with “file://~/” will be expanded to your user
directory, e.g. “file:///home/pi/...”. Using a “file://” URL pointing to a directory will display the
directory content inside the browser window.
While you are browsing (by clicking links), the entry field always shows the full URL of the
currently displayed web page.
7
BTW, there is a nice keyboard short cut that you may use, when you want to enter a new URL.
Pressing ATL+i will empty the entry field and activate it for text input (placing the cursor at the
start of the field).
Auto-completion of a web address you are typing is beyond the scope of kweb. You will have to do
all typing yourself.
So far the text entry field does exactly what you expect it to do and as you know it from any other
browser. But there is much more to it:
If you start a text entry with a question mark, your remaining text is used as argument for a web
search. Entering, for example,
?raspberry pi
will search the web for “raspberry pi”. By default, kweb uses https://startpage.com as web search
site, which is nothing else than a completely anonymous search using Google. If you prefer Google
to be spying on you, you can select this option in the browser configuration.
There's again a smart keyboard short cut, ALT+?, which will clear the entry line and activate it,
putting a question mark in front.
If you start a text entry with a equal sign, the currently displayed web page will be searched for the
text following the equal sign, e. g.
=raspberry pi
will search the currently displayed web page for all occurrences of “raspberry pi”. Hitting the
Return key repeatedly will jump to the next occurrences of your search terms.
And you can again use a keyboard short cut to start a page search, pressing ALT+=.
But that's not all. Perhaps you know URLs like “about:config”, which are used by many browsers to
access the browser's configuration page. In kweb this has been shortened to:
:c
which will open its configuration page. But there are many more similar short commands and you
can even extend them with your own “:commands”. Besides “:c”, the following commands are
predefined:
:s – open settings page for kwebhelper and omxplayerGUI
:m – open kweb's menu page, giving access to all other pages
:p – open kweb's control panel, showing all other pages at the same time
:o – open omxplayerGUI's web interface
:k – open “about kweb” info page
:b – open bookmarks page (editable)
:a – open application page (editable)
:e – open the “:Command” editor, which assists you in creating your own “:command” pages.
And again there is a matching keyboard short cut, ALT+:, which clears the entry line and puts a
colon in front.
Since version 1.5.1 support for spell checking is enabled for all kinds of web text input. By default,
your current system language will be used. You can change that at run time by entering a command
like this in the URL entry field:
!en_US
(to switch to US English, for example). Multiple language support is also possible like this:
!en_US,de_DE
You must have the matching aspell/myspell/hunspell dictionaries installed; otherwise it won't work.
8
Language codes are either two or three letter codes, optionally followed by an underscore and a
country code (en, en_GB, en_US, de_LU etc.). Install enchant-lsmod and run:
enchantlsmod listdicts
to get a list of available spell checking dictionaries on your system and their language codes.
As you may have already expected, there's also a matching new keyboard command: ALT+! will
empty the entry line and put an exclamation mark in front.
There's one more option, that comes very handy, if you use kweb as a replacement for your your
desktop. Putting a “#” in front (keyboard short cut ALT+#), will turn the text entry line into a
command line.
#leafpad
for example, will open the text editor leafpad,
#top
will open a terminal and run the “top” command inside that terminal. Multiple arguments are also
supported. Known desktop (GUI) programs are started directly, everything else will run inside a
terminal.
d) Styling the Toolbar
If you do not like the way the toolbar looks like you may modify it in lots of different ways.
1) There are some options available in the configuration page:
I = use only icons without text
T = use only text buttons without icons
S = use always small Icons.
2) Using the Appearance application (lxappearance):
You may select a font and font size (for the text of the buttons), choose a symbol theme or set the
icon size (if the “S” option is not used).
Note: Currently the Appearance application doesn't work correctly with GTK+3 any more. This
will affect kweb3: the icon size is therefore fixed to small or large icons. Text styling also has some
issues. And while changes in appearance are immediately applied to running GTK+2 applications,
GTK+3 programs have to be restarted for the changes to take effect.
Note 2: kweb and kweb3 use only system icons of different origin as required by GTK+2 and
GTK+3 and so the toolbar in both programs may look a bit differently. Some symbol themes don't
include all icons needed by kweb3. Choose another one in this case.
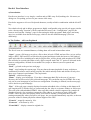
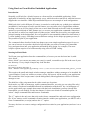
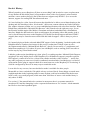
Examples using different symbol themes and icon sizes in kweb and kweb3 or simple text buttons:
9
e) Functions Only Available from the Keyboard
There are a few functions that are only available via keyboard short cuts:
ALT+f: toggle between full screen and window mode
ALT+k: toggle between hiding or showing the toolbar and URL entry field.
By going to full screen mode and hiding the toolbar you are in fact switching to kiosk mode.
ALT+c: download a complete copy of the currently displayed web page (no file:// URLs) including
all images, styles, scripts etc. to your download folder. This feature uses wget with special options
added. Wget will create a new folder named after the current domain inside your download
directory, where it places all required files.
ALT+h: localize home; this command will turn the current web page into your home page for the
current session. Clicking the “Home” button will then always return to that web page. But this is
true only for the current window. If you open any link in a new window (right click menu), the new
window will have the original homepage restored again. Of course, it can also be localized again to
another address and so you may have multiple browser windows with different “homes”.
f) Functions Inside the Browser Window
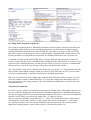
Right clicking on a link will offer you the following options inside a small pop-up menu:
“Open Link” - same as left click
“Open Link in New Window” - open link in new window
“Download Linked File” - download the content pointed to by the link
“Copy Link Location” - copy it to the clipboard, ready for pasting it
somewhere else
Right clicking on an image opens another pop-up menu with the
following options:
“Open Image in New Window”
“Save Image As” - download the image
“Copy Image” - to the clipboard
“Copy Image Address” - to the clipboard
Right clicking into an “empty area” of a web page opens another
pop-up menu with the following options:
“Back” - go back to previous page (or frame)
“Forward” - go forward in history (if possible), applies to a frame also
“Stop” - stop loading a page (or frame)
“Reload” - reload page or frame
g) Kweb's Menu Page and Control Panel
If you have not created a homepage.html file in your user directory and have not configured another
homepage and/or start page in the browser configuration, kweb will start with its menu page and
also use it as its homepage (when you click the home button). It's also available by typing “:m” into
10
the entry field or with the keyboard short cut ALT+m.
This page will give you access to all predefined pages (one at a time), the documentation, and also
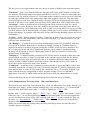
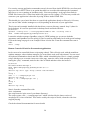
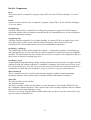
offer a few special functions. The upper part looks like this (when opened, with the bookmarks page
as default content):
Clicking on one of the first 8 menu buttons will load the selected page into the frame below the
menu bar. Clicking on one of the following two buttons will open either one of the manuals with
your preferred PDF application. And the last button will display a kweb news page coming from the
internet.
Details about most pages will be explained later on and also how you can edit the bookmarks page,
for example.
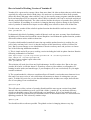
At the bottom of the page is another menu bar with a few special functions:
Here is a short explanation of these commands, although many details will be explained (and better
understood) later on:
“Edit Settings as Root”: will open another kweb instance with a special configuration as root and
open the settings page for the helper programs (kwebhelper and omxplayerGUI). You will better
understand later on, why editing them as root simplifies things.
“Refresh Configuration Page” and “Refresh All Other Pages”: all configuration pages and all
editable pages (like the bookmarks page) have to be recreated after changes have been applied. In
most cases this happens automatically, but sometimes you need to call the refresh manually. These
are convenient commands to do this from one place.
“Edit Styles (CSS)”: all predefined (and user created) pages are styled with a common CSS file. If
you want to edit font sizes, colours etc., you can do that with this command, if you know a bit about
CSS styles. Leafpad will be opened (as root) to edit the CSS file.
Note: The default CSS file (about.css) will be overwritten, when you update kweb. If you want to
keep your style edits across updates, create a copy and restore it after updating kweb.
“Check for Program Update”: This checks, if a program update is available. A terminal will open
and either display the message “your version is up to date” or announce the availability of a new
version, which can be downloaded and installed directly from within that terminal, if you agree to
do so. All future updates will be available in this way.
“Control Panel Mode” will open the control panel, which offers the same functionality as the
menu page, but everything on one web page. It takes a bit longer to load (in fact, it loads 8 pages at
once).
11
h) Calling Other Programs from Kweb
One of the development goals of Minimal Kiosk Browser has been that it can be used as front end
for embedded applications or even as a desktop replacement. For this reason it supports special
command links and command forms inside HTML files (not inside web pages served via HTTP),
that can be used to start programs or execute rather complex commands with a simple mouse click.
It's also possible to execute all browser functions, for which keyboard short cuts exist, this way.
Command execution (from inside HTML files), is always disabled, when the browser starts (for
security reasons, but this can be overridden when starting from the command line or a script). If you
want to use the command interface, you must activate it first. If you try to execute a command link
and execution is vetoed, an error message will be shown in the browser window.
The “Applications” page (to be called from the menu page or with the “:a” command from the entry
line) provides some simple examples which you can test. You'll learn later on, how you can create
your own command pages or use these functions for embedded applications.
But even if you don't care about calling other programs from inside the browser window, you will
come into contact with the command interface, if you use the configuration and settings pages to
tune your browser or the helper programs. The kweb distribution itself makes extensive use of the
command interface.
i) Keyboard Commands
In earlier versions of kweb, keyboard short cuts had to be enabled from command line options; now
they are enabled by default (but can be reduced or disabled completely for embedded applications).
One the next page you'll find a list of all keyboard commands. They have to be used in combination
with the Left ALT-Key (except in Kiosk mode if the “A” option is not set).
There are also user definable commands ALT+0 … ALT+9. To enable them create a folder named
“kwebcontrol” in your home directory. It may contain files named “kweb0.html”, “kweb1.html”
etc., which are opened, when you use the matching keyboard commands. They can be used for
things like starting programs, open certain websites (via redirection) and so on.
12
Toolbar Commands
o
Open File
b
Back
s
Stop Loading
r
Reload
h
Home
p
Play Web Video
+
Zoom +10%
-
Zoom -10%
z
Zoom 100%
g
General Zoom
t
Text Zoom only
j
Javascript
n
No Javascript
e
Enable Cookies
d
Disable Cookies
u
Uget Download Manager
w
Wget Download
x
omXplayer on
y
omxplayer off
a
Activate command execution
v
Veto command execution
Program Commands
q
Quit Program
c
Save Full Copy of Current Web Page
f
Toggle Full Screen
k
Toggle Kiosk Mode
l
Localize Home
Open Commands
m
Open Menu Page
0 ... 9
Open User Defined Pages
Insert Commands
i
Insert new URL
:,#,=,?,! Insert :,#,=,?,!
13
Media Support
Playing video inside a browser, as you may be used to on powerful desktop computers, tablets or
even phones, is impossible with the small ARM processor of the Raspberry Pi without help from the
powerful GPU. Until recently there was no browser engine that could use the GPU to play video
inside the browser window, but that has changed now thanks to the efforts of the Raspberry Pi
Foundation and the people from collabora.com. Kweb3 makes use of that new engine and so can
play most HTML5 web videos directly inside the browser.
This is not possible with kweb (using the old engine) and this is also not possible for websites using
those horrible flash based video players, which hopefully soon will vanish completely and be
replaced by HTML5 video.
But both kweb and kweb3 can make use of omxplayer, the only media player for the Raspberry Pi
with full support by the GPU. It's still unsurpassed by any other method regarding quality and use
of resources. The gstreamer-1.0 OpenMax plug-in used by the new webkit engine (and kweb3) is
far less efficient and so you may still prefer to use omxplayer even in kweb3. For comfortable use
of omxplayer, kweb uses omxplayerGUI, which can play all kinds of media content (audio, video,
playlists) either within a window or full screen.
Each time you click a link pointing to some kind of media content (a file or a stream),
omxplayerGUI is called automatically to play that content (if supported by omxplayer), and. of
course, omxplayerGUI can play all kinds of media directly from your file system, when you select
them with the “Open” command from the toolbar.
OmxplayerGUI can also extract video URLs from many websites, using its own HTML5 extractor
or youtube-dl for lots of websites using flash based players, and play these videos. This always
happens when you click the “Play” button in the toolbar on appropriate web pages.
OmxplayerGUI is installed as a separate application together with Minimal Kiosk Browser and can
also be used standalone. Therefore it comes with its own manual. Look there for further details.
It should be noted, that kweb's old method of playing video always full screen without any GUI
elements is still supported. There's even a preset “nogui” for this mode installed on your system,
which can be activated with a mouse click. Embedded applications (presentations, for example) will
often prefer this method, which also allows tricks that make it look like a video is running inside the
browser window.
14
PDF Support
Although not part of any HTML specification, PDF has become the most important document
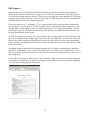
format on the internet. Some browsers support it out of the box, but most need a special plug-in to
view PDF documents inside the browser. There are no such plug-ins for the Raspberry Pi, but kweb
supports a plug-in like behaviour. If you click on a link to a PDF document, it will be downloaded
automatically and opened in a separate program.
Even links of the form “…pdf#page=17” are supported and will not only open the document but
also navigate to a special page (17 in this example). This is a less known feature supported by the
original Adobe Acrobat plug-in and a few other PDF plug-ins. I've created search engines for the
web that give page specific search results and use this option to open PDF documents directly on
the page matching the search result.
All PDF documents are saved in your “Downloads” folder (usually inside your home directory, but
that can be changed on the settings page). If you click the same PDF link a second time, kweb will
discover that it has already downloaded the file and will open it directly. There's one disadvantage
to this solution: you should delete files that you don't need any more from your “Downloads” folder
from time to time.
A standard Raspbian distribution has mupdf installed, but it is highly recommended to install the
much more comfortable evince or xpdf. Kwebhelper will use evince, if it is installed, then it will
look for xpdf and use mupdf as last resort. You can also select the PDF program you want to use on
the settings page.
Evince takes a bit longer to load, but gives the “smoothest” PDF experience. Even PDF documents
consisting of scanned pages (as images) are halfway usable with evince, while xpdf and mupdf get
very slow when displaying such documents.
15
Download Manager
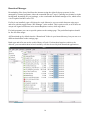
Downloading files of any kind from the internet (using the right click pop-up menu) is also
managed by external programs, either the command line tool “wget” (running in a terminal or in the
background, depending on your settings), or the comfortable download manager uGet, which offers
a lot of options and has a nice GUI.
If uGet is not installed, wget will always be used. Otherwise you can switch between using wget
and uGet with the toggle button “DL-Manager” in the toolbar. This is quite useful, as uGet does not
accept self-signed certificates in its current Raspbian version, while wget does.
For both programs you can set special options on the settings page. The predefined options should
be fine for most usages.
All Downloads go by default into the “Downloads” folder in your home directory, but you can set a
different destination on the settings page.
Both wget and uGet can use the cookie library of kweb. If a download requires cookies to be
allowed, you can enable them in kweb and they will also be used by both download applications.
16
Personalizing and Configuring Kweb and its Helper Applications
In the beginning kweb required a homepage.html file in the users home directory, which was used
as start page and home page (to be opened when you click the “Home” button in the toolbar). The
idea behind this was, that the user could so simply add some functionality which was missing in
kweb due to its simplicity, like a personal bookmarks collection. But this required some knowledge
about creating HTML pages and I'm quite sure, that only a very low percentage of all kweb users
have created their own homepage file.
This concept is still supported and is quite useful for developers of embedded applications that use
kweb as its front end. But version 1.6 offers other and simpler options to create your own bookmark
collection, for example, without blowing up the main program by adding databases etc.
Kweb still needs some kind of “Home” where it returns to when you click the “Home” button. This
can be a homepage or any other local html file or any web address. This was always possible but
required starting kweb with command line arguments. In version 1.6 you can now use the browser
configuration page to define your personal homepage. This will be stored in a configuration file
which kweb reads when it starts. If no homepage is set, kweb's menu page will be used and this may
well suit many users.
Kweb's “Home” function has become even more flexible now: With the “Localize” keyboard
command (ALT+l), you can turn the currently displayed web page into your active homepage for
the current session. If you open another browser window, it will have the original homepage again,
but can itself be localized etc.
All of the fine tuning options of the browser, which could only be set with command line arguments
in the past, can now be set on the configuration page. The next chapter will explain the browser
configuration in more detail.
Browser Configuration
You can call the browser configuration page from kweb's menu page or with the “:c” command.
To modify anything you have to activate the “Commands” execution with the right most toggle
button in the toolbar (or with ALT+a).
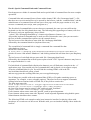
The upper part of the configuration page looks like this (default settings):
17
Each one of the global program options on the left side can be enabled or disabled. They are divided
into subsections and most should be easy to understand (and if you don't understand them you won't
need them, I suppose). The character to be used in a configuration string (for script or command
line use) is shown at the right (in parentheses). Here's a list of the global options with some
additional information:
Z = enable full zoom on start instead of text zoom only, which is the default
J = enable javascript (default is disabled)
E = enable cookies (default is disabled)
W = use wget for downloads (default is uGet)
Y = disable video and audio being played with omxplayer (by default it is enabled)
I = use only icons for the toolbar (default is to use both icons and text labels)
T = use only text labels for the toolbar
S = use small icons for the toolbar (often no effect)
X = allow executables to be started from the "open" command
A = use left ALT-key for keyboard commands in kiosk mode also
H = use URL, if supplied, as homepage instead of the usual homepage.html file. This can be either a
file://... or http://... URL
L = enable command link interface on http://localhost... which must be given as second argument
like “http:localhost/” or “http://localhost:8080/”. The path must end with a slash. Command links
will have to add “homepage.html?...” to that argument. This is a security risk and should be used
with care. Normally command links only work inside “file://...” URLs.
G = use Google as search engine instead of using it via startpage.com
V = show current URL in window title
M = don't maximize kweb window on start (except in kiosk mode).
K = run browser in kiosk mode
18
N = set this, if you want to use kweb in kiosk mode without a window manager. The default
window size (see below) must match the screen resolution. Not everything may work as expected.
Only suitable for some kinds of embedded applications (like digital signage, slideshows etc.).
P = disable private browsing (enabled by default)
B = enable page cache for history (faster “back”, but costs resources)
F = enable special webkit features: plugins, OpenGL ES support, hardware accelerated compositing,
which are disabled by default. The current webkit library may not really support these options
completely, but this may change in future versions.
Note: the meaning of this option is different in kweb3. Here it enables hardware acceleration for
image decoding and resizing, which is not considered stable at the moment. The other experimental
options are enabled in kweb3 by default.
There's one more option character, “C”, which does not appear on the configuration page, because it
can only be used inside a command line options string, never in a configuration file. It activates the
command execution when the browser starts. Therefore developers of embedded applications will
usually have to call kweb with a command line configuration for their applications.
In the middle column there are three different kinds of settings. In the first part you can define the
cache settings of the browser and this will result in more or less resources which the browser will
use (especially memory). Only one option can be selected.
The next part sets a default window size. In combination with the “Don't Maximize” option it will
set the size of your browser window when the browser opens. It's also important for embedded
applications, when a certain screen size is needed (especially, when no window manager is used).
Again only one of these options can be selected.
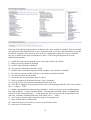
The lowest part is the selection of supported keyboard commands. By default, all are used. For
developers of embedded applications it may be useful, to disable some or all commands, by clearing
the input field or by reducing it to a few selected commands. The meaning of all possible keyboard
commands is explained in the right part of the configuration page.
On the bottom you'll find an entry field for an URL. This will be your start page, when the browser
opens, and also be used as your homepage, if the option “use URL as homepage” on the left side is
enabled.
If you are finished with setting your configuration, click the “Save Configuration” button. Next time
you start the browser it will use these configuration settings.
In the lower part of the web page you will find some example configurations called “Presets”,
which can be selected by a mouse click.
19
After selecting one of the example configurations you have to reload the page (from the toolbar or
with ALT+r) to see the actual configuration. You can, of course, also modify such an example
configuration and save the result. Again the browser needs to be restarted to use the new
configuration.
Helper Programs Settings
Kweb's helper applications (now kwebhelper and omxplayerGUI) have even more fine tuning
options than kweb itself. In the past the user had to edit a Python file (kwebhelper_settings.py) to
make use of these possibilities and I'm quite sure, that only a small fraction of kweb's users really
dared to do this. This is still possible, of course, but now all helper configuration can be done
through a web interface, kweb's settings page. It's also possible to define presets, which can be
selected with a simple mouse click .
Any changes in the settings will take effect immediately; you don't have to start kweb again. But if
an instance of omxplayerGUI is running, while you are editing its settings, you will have to restart it
to use the new settings.
To modify anything you have to activate the “Commands” execution with the right most toggle
button in the toolbar (or with ALT+a).
Kweb's helper programs kwebhelper.py (responsible for PDF support, downloads and Kweb's
command execution interface) and omxplayergui.py use the same global settings file (another
Python script, kwebhelper_settings.py). Therefore the configuration for both programs is managed
by the same settings page, which can be opened via the “:s” command from the entry line or with
the keyboard short cut ALT+s. Here we'll only describe the sections that are used for configuring
global options, the PDF interface, download options and the command execution. All settings for
omxplayerGUI (playing video and audio, including embedded web video) are described in detail in
the omxplayerGUI manual.
There's one thing to consider when doing any kind of editing in this area. The settings are stored in
the protected part of your file system (for security reasons) and any change requires root rights,
which is realized via sudo. If you have set up your pi to ask for a password when using sudo (which
you should, for security reasons), you will be asked for your password (inside a terminal) each time
you change some settings value or issue certain commands. This is not very comfortable, if you
want to apply a lot of changes. But there is a solution for this: if you click the button “Edit Settings
as Root” (in different places), a second, specially configured kweb browser will be started in root
mode (via gksudo). You will be asked for your password only once and then may apply any number
of changes.
On top of the web page, you'll see a few buttons with “presets”, which can be chosen with a mouse
click. After selecting a preset, you have to reload the web page to see, which options have been set.
Two presets are predefined: “default” (default settings) and “nogui” (windowless mode). You'll see
later, how you can create your own presets.
20
Each option can be modified and (has to be!) saved separately.
GLOBAL OPTIONS
Download directory, where the downloads, PDF files, playlists etc. go;
if empty, a folder 'Downloads' in the user's home dir will be taken (and created, if it doesn't exist).
dldir:
save
You can enter a path to another directory, e. g. on a hard disk connected to your Raspberry Pi, where
all your downloaded files, PDF documents and some temporary files should be stored.
PDF OPTIONS (kwebhelper)
Preferred pdf reader: either evince, xpdf or mupdf. If left empty, the program will try to find the
best PDF reader
Selecting an installed program of your choice will speed it up a bit
save
pdfprog:
Additional options for pdf program (must match the selected program!):
pdfoptions: Enter one element per line!
save
This will allow to open pdf files on a local server as files instead of downloading them first;
will only work with "http://localhost" links
pdfpathreplacements: Enter one element per line in the form value1=value2
save
A very special option, disabled by default. If you have a local web server on your Raspberry Pi,
which includes a collection of PDF documents, accessing them from kweb would usually require to
download them to your downloads folder first and thus create duplicates in your file system. To
avoid this, you can use this option. If your PDF files are served from
“http://localhost:8073/Ebooks1” and they are placed in '/var/www/Ebooks1', for example, enter:
http://localhost:8073/Ebooks1=file:///var/www/Ebooks1
kwebhelper will then send the file paths directly to your PDF reader instead of downloading the
files to the “Downloads” folder in your user directory first. You can add more than one replacement
path, one per line.
DOWNLOAD OPTIONS (kwebhelper)
Defines if wget will run in a terminal (visual control) or in the background:
show_download_in_terminal:
True
False
save
Options for wget:
wget_options: Enter one element per line!
21
--no-check-certificate
--no-clobber
--adjust-extension
--content-disposition
save
Options for download manager uget:
uget_options: Enter one element per line!
--quiet
save
COMMAND EXECUTION OPTIONS (kwebhelper)
If this is set to "True", all Desktop (GUI) programs will be executed without starting a terminal first
check_desktop:
True
save
False
Direct commands will be executed without starting a terminal first.
Use it for background commands or programs with a GUI that are not desktop programs or if
check_desktop is set to "False"
direct_commands: Enter one element per line!
kwebhelper.py
omxplayergui.py
kwebhelper_set.py
omxplayer
gksudo
save
You should not delete the predefined programs from this list, but can add your own.
Preferred terminal to run commands in, must be set (xterm or lxterminal)
preferred_terminal:
save
lxterminal
Set the following to False, if you don't want to run 'sudo' commands inside a terminal,
but only if a password is not required (you may break command execution otherwise):
sudo_requires_password:
True
False
save
set the following to "True", if you want to run all commands from a script file.
may help with complex command links, but will require more disk accesses.
run_as_script:
True
False
save
After editing a number of options you can save the complete actual settings as a preset, that can
later be loaded with a simple mouse click.
22
To save a preset, enter a name and click “Save Preset”. To overwrite it again later with different
settings, simply use the same name. To delete a preset, enter its name and click “Delete Preset”.
To load a preset, simply click on the button with its name. Reload the page afterwards to see the
active settings. This function is also available at the top of the settings page.
Configuring Kweb3 With Environment Variables
kweb3 can be controlled by the same environment variables as epiphany, but uses different defaults:
WEBKIT_DISABLE_TBS=0
This enables fast scrolling, disabled in kweb3 (=1) because of problems with iframes.
WEBKIT_DISABLE_CAIRO_BUFFER_POOL=0
Disabled in kweb3 (=1) for smoother video playback
WEBKIT_DISABLE_DIRECT_PAINT=1
Makes video playback slower but could fix some video problems. Enabled (=0) in kweb3.
SC_useJIT=0
disables the Javascript JIT compiler. Enabled (=1) by default in kweb3
The following options are enabled in kweb3 (=1) if you set the "F" (experimental) option in the
browser configuration. Setting them to "0" will disable them independently from the option:
ENABLE_IMAGE_DECODING_WITH_OMX=1
means that OMX (i.e. the HW) is used for image decoding.
WEBKIT_OMX_IMAGE_RESIZE=1
means that the resizing images is done using the HW.
These functions may still contain bugs and cause crashes.
Creating User Defined Keyboard Commands
The keyboard short cuts ALT+0 … ALT+9 can be used for commands you create yourself. To
enable them, create a folder “kwebcontrol” inside your home directory. For each command you
want to use, create a small HMTL file inside that folder named kweb0.html, kweb1.html and so on.
Here are two simple examples that show what you can do with such files,
Starting programs
Create a text file with the following content and save it as “kweb1.html” (for example) inside the
kwebcontrol folder:
<!DOCTYPE html PUBLIC "//W3C//DTD HTML 4.01 Transitional//EN" "http://www.w3.org/TR/html4/loose.dtd"> <html><head> <meta content="text/html; charset=UTF8" httpequiv="contenttype"> <meta httpequiv="cachecontrol" content="maxage=0" /> <meta httpequiv="cachecontrol" content="nocache" /> <meta httpequiv="expires" content="0" /> <meta httpequiv="expires" content="Tue, 01 Jan 1980 1:00:00 GMT" /> <meta httpequiv="pragma" content="nocache" /> 23
</head> <body> <iframe src="file:///homepage.html?cmd=lxterminal" width="2px" height="2px" frameborder="0"></iframe> <iframe src="file:///homepage.html?kbd=b" width="2px" height="2px" frameborder="0"></iframe> </body></html>
Now lxterminal will be opened from your browser, when you press ALT+1. Replace lxterminal with
any program of your choice for other commands.
Opening websites
To open favourite websites with a keyboard command we need to create a redirection page. Enter
the following into a text editor and save the file as kweb5.html, for example:
<!DOCTYPE html PUBLIC "//W3C//DTD HTML 4.01 Transitional//EN" "http://www.w3.org/TR/html4/loose.dtd">
<meta httpequiv="ContentType" content="text/html; charset=UTF8" /> <meta httpequiv="refresh" content="0;URL=http://www.raspberrypi.org/forums/" /> <html><head> </head> <body> </body></html>
Now pressing ALT+5 will open the Raspberry Pi forum. Replace the URL with anything you like to
create your own redirection pages.
24
The :Command Editor
Understanding the :Command Interface
The “:x” commands (x may be a name of any length, but for the predefined ones we use a single
character) which you can call from your entry line or simply open by clicking on an appropriate link
inside your :Command editor page (':e'), are simply html files in a certain directory
(/usr/local/share/kweb) using a special rule of name building. The “:e” command, for example, is
realized by the file
kweb_about_e.html
inside that folder. If you want to add a static command page to your system, say “:me”, you can
simply create an HTML file named “kweb_about_me.html” and move it to that folder.
There also user editable command files (bookmarks ':b', applications ':a'). These are created from
simple text files, which you can edit with leafpad and then rebuild (generate) the pages again with
your additions or changes. You can also create your own editable :command pages from the editor
page.
Editing Predefined :Command Pages
A very simple user editable command page is the bookmarks page (:b), which will be opened by
default on the menu page. To add your own links and or modify the existing ones, click on the Edit“
button at the bottom of the bookmarks page. Leafpad will be opened with the appropriate text file,
which looks like this:
#!mode=link #!spacer= #!target=top #<h2>Bookmarks</h2> Raspberry Pi Forum=http://www.raspberrypi.org/forum Omxplayer Download=http://omxplayer.sconde.net/ Youtube=http://www.youtube.com/
Ignore the first lines for now and simply add lines at the bottom in the form
name=link address
where 'name' can be anything and 'link address' must be a valid “file://” or “http://” URL.
Save the changes and on the bookmarks page click “Generate page”. Reload the bookmarks page
afterwards and it will contain your new bookmarks.
Creating your Own :Command Pages
Let's assume you want to add a command “:r” for web
radio stations. Open the editor page (from the menu
page or with :e)
and at the bottom you enter “r” into the 'Name:' field
and click “Create Command”.
Now reload the editor page. Your new command “:r”
will appear in the list of user editable command pages.
Click on the “Edit” button beside it and the following
text will appear in leafpad:
25
#!mode=mixed #!spacer= #!target=top #<h2>Untitled</h2>
We have a look at the first three lines. These are the 3 directives, that the system understands:
#!mode may be either =
button
everything will appear as a button, or
link
everything will appear as a link, or
mixed
which means, that web links should appear as links and commands as buttons.
The next directive lets you define what kind of spacing element will be put between links or
buttons. If empty, a single empty space will be put between the elements. To have every link or
button on a new line, use “<br>” as spacer.
The third line defines the target for web links, The value must be one of those:
“top” (default), “blank”, “parent” or it may remain empty (no target set, open within same frame). It
has no effect on command execution links.
There are no other directives. They can be set multiple times inside a text file and change behaviour
in different parts.
All lines starting with a “#” are not comments but will be included into the resulting HTML page as
text, with the leading “#” removed. They can also contain HTML tags. Line 4, for example,
surrounds the word “Untitled” with the tags for headline 2 format. We might change “Untitled” to
“My Radio Stations” in this example.
Now we can add some playlists we have stored on our computer:
Station 1=file:///home/pi/station1.m3u
Station 2=file:///home/pi/station2.m3u
etc.
Of course we can also add web links:
Station 3=http://somestation.com/playlist.pls
All lines
Name=URL
will later result in web links.
But we can also add two different kinds of commands:
Quit Browser=?q
will add a button for closing the browser. All keyboard short cuts can be used in such commands.
The last kind are command line commands like the following:
Shut Down Computer=sudo shutdown h now
Almost any kind of command line can be turned into a command link (button) this way. You can
open other desktop programs, run programs without a GUI inside a terminal or your own scripts
within a terminal or in the background. The syntax is always:
Name=command line arguments
At the end we save the file, click on “Generate Page” besides the name of our command and now
our new command page is ready to be used.
The editor itself and the settings page are using similar command buttons (or more complex
command forms) themselves.
More details about kweb's internal command link interface will be given in the next chapter.
26
Using Kweb as Front End for Embedded Applications
Introduction
Normally you'll look for a (kiosk) browser as a front end for an embedded application, if this
application is backed by an http (application) server, which does the actual work, while the browser
supplies the user interface. Older Popcorn Media Players are an example of such configurations.
With kweb, this is a bit different. Of course, it can also be used in this way (which gives unlimited
possibilities), but because of kweb's special features you can realize a lot of applications without
needing a server at all. You simply create one or more html files and use kweb's built-in command
options (as special kinds of links, buttons etc.) to execute your application commands. Sometimes
you may have to add a few simple bash or Python scripts, which may be used by your application,
perhaps running in the background. It's even possible to run commands without user interaction (e.
g. when loading a page). Switching between different settings for the helper programs (presets) is
also possible as part of your application.
The :command editor described in the last chapter can create simple application pages for you or
you can at least use it to produce the kind of special links you need to execute your commands
(copy and paste them into your application and modify their design, for example). The more
complex options require to be built manually using a bit of HTML coding.
Starting in Kiosk Mode
You'll start your application from the command line (of course you can also boot into it) with:
xinit ./kiosk
where “kiosk” (you can use any name you want) is a small, executable script file in the root of your
user directory. A very simple example may look like that:
#!/bin/sh
matchboxwindowmanager &
kweb KHCUA+zbhrqfpoklgtjneduwxy file:///usr/local/share/kweb/kweb_about_a.html
This requires the small and simple window manager matchbox-window-manager to be installed. It's
a good solution, if only one window at a time (on top, full screen) will be used by your application.
The second line of the scripts starts it (in the background). Most applications will need a window
manager to run.
The third line of the script starts kweb with a certain set of options:
kiosk mode, use URL as homepage, enable command interface, no cache (we are using files only)
and a subset of keyboard commands allowed in combination with the ALT key. As homepage we
use the application page example that comes with the kweb installation (you may already have
learned how you can modify it in the last chapter). It shows two kinds of command options “in
action”: simple command links and browser commands.
The “C” option is the only one, that only works from a command line and not from a configuration
file. If you want to use the command execution interface within your application, you MUST call it
from a command line (or script) and use the “C” option.
You may also have to create a settings configuration best suited to your application (and save it as a
preset).
27
For security reasons application commands can only be used from inside HTML files, not from web
pages served via HTTP. There is an option that allows to overrides this and maps the command
interface to a server running on localhost (only). You can open http:// web pages from links in
HTML files but not file:// links from inside web pages served via http://. The best way to add web
content to your application is therefore by using iframes inside HTML files.
This should give you a basic idea how to create kiosk applications based on files only. Of course,
you can use other window managers as well, depending on the needs of your application.
There's one such example installed with kweb into your user directory, named “ktop” (short for
kweb desktop). It is used to open kweb in desktop mode and looks like this:
#!/bin/sh openbox configfile ~/.config/openbox/LXDErc.xml startup tint2 & kweb CZFD+zbhrqfpoklgtjneduwxyavcsmi:#=?!
It starts the window manager OpenBox, using it's LXDE settings (so we can use both the
appearance and OpenBox tool for styling it), tint2 as task bar and finally kweb with special settings.
Look at the image on page 4 as an example of how it looks like. From the command line start it
with:
xinit ./ktop
Remote Control of Kweb for Presentation Applications
kweb can now be controlled from a script using xdotool. This will only work with the matchboxwindow-manager; other window managers I've tested don't work well with xdotool. You can send
all keyboard commands to kweb and also URLs which it should display. Here's a simple example
script, which goes to a certain vimeo.com video page, starts the video (with omxplayerGUI) by
issuing the “play” command, waits for the video to finish and then closes the browser.
#!/bin/sh
matchboxwindowmanager &
kweb KAC+zbhrqfpoklgtjneduwxyavcsmi:#=?! &
sleep 5
xdotool key alt+i type "http://vimeo.com/110416910 " sleep 5 echo "" > ~/.omxplayergui.run xdotool key alt+p while [ f ~/.omxplayergui.run ] do sleep 2 done xdotool key alt+q
Start it from the command line with
xinit ./scriptname
(the script must be in the root of your home directory).
The script creates a file “~/.omxplayergui.run” which is deleted by the latest version of
omxplayerGUI, when it finishes. This can be used by the script to decide, when the video has
stopped playing.
Check the xdotool documentation for more details
28
Kweb's Special Command Links and Command Forms
Kweb supports two kinds of command links and a special kind of command form for more complex
operations.
Command links and command forms all start with a dummy URL “file:///homepage.html?”, a file
that does not even exist and will never be opened by the browser. And the “command links” and the
submit button of a command form will not open a new page at all (the page remains as it is), but
execute a command (run a script, start a program etc.).
The first kind of command links executes browser commands, the same you can call from the
keyboard (see the list of keyboard short cuts). The following link (appearing as a button) will close
the browser (end your application), when clicked:
<a href="file:///homepage.html?kbd=q"><button>Quit Browser</button></a>
All possible keyboard commands may be used (not all of them make sense), but you can restrict
their use with the command line options (see the example above).
The href source of the link always starts with file:///homepage.html?kbd=
followed by the command character (keyboard short cut).
The second kind of command link is simply a command line command like that:
sudo shutdown -h now
turned into a link like that:
<a href="file:///homepage.html?cmd=sudo%20shutdown%20h%20now">Shutdown</a>
which will create a link named “Shutdown” and clicking on that link will shut down your Raspberry
Pi.
The href source of such links always starts with: file:///homepage.html?cmd=
followed by the command line with all spaces replaced with “%20”. Special characters may have to
be escaped with their %.-code.
For both kinds of command links (displayed as buttons) you will find some examples in the “:a”
applications page. You can add your own commands here and let kweb (via its support scripts)
create the command links for you. You will find the resulting HTML code in the file
/usr/local/share/kweb/kweb_about_a.html
and can copy/paste the resulting links into your own application page.
Not all things are possible with such command links (URLs or file paths containing spaces as
arguments , for example, or user selectable options). Therefore kweb now supports commands
coming from form elements inside a HTML file, if they follow certain rules.
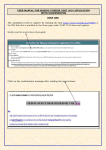
The form must start with:
<form acceptcharset="utf8" enctype="application/xwwwformurlencoded" method="get" action="file:///homepage.html" name="anyname">
the first form element must be named "cmd" and begin with "formdata":
<input name="cmd" value="formdata" type="hidden">
Form elements whose names start with "quoted" result in quoted arguments
Form elements whose names start with "dquoted" result in quoted arguments using double quotes
Submit buttons should not have a name.
The following HTML code example results in an interactive interface for playing videos with
omxplayer in a certain area of the screen. With this trick you can simulate running videos inside the
browser.
29
<form acceptcharset="utf8" enctype="application/xwwwformurlencoded" method="get" action="file:///homepage.html" name="omxwindow"> <input name="cmd" value="formdata omxplayer win" type="hidden" Aspect ratio: <select name="dquoted"> <option value="10 150 441 473">4:3</option> option value="10 150 585 473">16:9</option> </select> Video URL (file or stream) or file (full path):<br> <input size="60" name="quoted"><br> <input value="Play" type="submit"><br> </form> <form acceptcharset="utf8" enctype="application/xwwwformurlencoded" method="get" action="file:///homepage.html" name="stop"> <input name="cmd" value="formdata killall omxplayer.bin" type="hidden">
< input value="Stop playing" type="submit"> </form>
Inside the browser this form looks like that:
The kweb installation makes extensive use of the command interface itself: editing browser
configuration or helper settings, the editor for :command pages, the menu and control panel pages
etc.
A Few Tricks and Tips
Running a video, when an HTML page is loaded:
Add an invisible, small iframe to your page, whose 'src' element contains the URL of the video to
play, e. g.
src=”file:///home/pi/myvideo.mp4”
How this video will be played (full screen or inside a window), will depend on your settings for
omxplayerGUI.
Executing a command, when an HTML page is loaded:
This is done in a similar way; we use an iframe again, but this time the 'src' gets a command link:
src=”file:///homepage.html?cmd=omxplayergui.py%20--preset=nogui%20av%20/home/pi/myvideo.mp4”
This will start the same video, but this time we send a command to omxplayerGUI and include the
option to use the preset “nogui”, which means, that our video is played full screen without opening
a GUI (kweb's old method).
Running your own script commands in the background:
If you need some small shell or Python scripts for your application, that should run in the
background without a terminal being opened, you have to add them (full path like
'/home/pi/myscript.sh' ) to the list of direct_commands in your settings.
Sending the content of a multi line HTML textarea to an application script:
kwebhelper.py will replace all Carriage Returns and Line Feeds with “%0D” and “%0A” in a
decoded command string. This makes it possible to send the content of a multi line HTML textarea
via command line to your script as a command line argument.
30
Switching settings from inside an application:
Run a command like that from an iframe src:
src=”file:///homepage.html?cmd=sudo%20kwebhelper_set.py%20loadpreset%20nogui”
The new settings will be used for the next command or media action (and all others following
them). It's possible to switch between presets more than once.
Adding more responsiveness with JavaScript:
If the commands do not open other programs and don't run in a terminal, the user will see no result.
And any command execution will not result in another web page being opened, as when you click
on a normal form submit button. To display any kind of result to the user inside your web page, a bit
of JavaScript could be used, which reloads the page or opens another one or modifies the src of an
iframe with a certain delay, after the user has clicked an action button or a hidden command has
been performed. JavaScript could also be used to run a whole series of commands in the
background within certain intervals, simply by modifying the scr attribute of an iframe. Of course
you have to enable JavaScript in your options if you want to use it in your project.
Booting into your application:
If you want your system to boot into your kweb application, you have to edit two files (as root, e. g.
with “sudo nano”):
1) /etc/inittab
Look for a line like that:
1:2345:respawn:/sbin/getty --noclear 38400 tty1
Put a “#” in front and add the following line after it:
1:2345:respawn:/bin/login -f pi tty1 </dev/tty1 >/dev/tty1 2>&1
2) /etc/rc.local
Add the following line just in front of the line with “exit 0”
su -l pi -c "xinit ./kiosk"
If you have changed the default user from “pi” to something else, you have to replace “pi” with
your user name. Instead of “kiosk” you may use any matching file name (script must exist!). To
boot into the predefined kweb desktop mode, replace “./kiosk” with “./ktop”.
This will not prevent “startx” from running properly, when you call it from the command line.
If kweb running your application terminates, you will return to the command line.
31
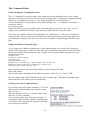
Kweb's History
When I started to use my Raspberry Pi there was one thing I had in mind: to create a replacement
for my Kaiboer K200 media player (a Popcornhour clone) with a few features I missed on this
machine: a more modern browser (the Syabas browser supports only HTML 3.2) to access the
internet, support for reading PDF documents and more ….
So I was looking for a slim, fast web browser that should also be able to run without booting to the
desktop and also should provide a “kiosk mode” (full screen content without any kind of interface
like window elements, toolbar etc.) to create embedded applications with a browser interface. When
Ralph Glass published his “Minimal Web Browser” this seemed to be the right way to go. It was
based on the webkit engine (like Midori, Chromium and others) and added only a minimalistic
interface. Ralph also had some nice ideas to add support for streaming video and youtube. And it
was by far the fastest browser on the Raspberry Pi with full JavaScript support and also HTML5
support (there may be faster browsers which lack this kind of support – there's always a price to
pay).
So I started playing with the code and added PDF support. In the beginning I worked together with
Ralph but then he somehow lost interest in his project. At that time I forked it into my own
development and called it “Minimal Kiosk Browser” (kweb). I'm not really a C programmer and
hadn't done anything in C for about 20 years, but with Ralph's code as starting point I was able to
realize step by step, what I had in mind.
I added a python script (kwebhelper.py), that “glued” everything together: Minimal Kiosk Browser,
omxplayer (the only media player on the Raspberry Pi with hardware support), mupdf or xpdf for
PDF support, youtube-dl to access videos from youtube and other video websites …. and in fact
any other program you want to use (kweb's command execution links). kwebhelper.py is a kind of
replacement for the plug-in support which all or most browsers on the Raspberry Pi are missing. It
could be configured by the user in many ways to match his needs.
I wrote this for my own use, but soon decided to make it available for other people.
Meanwhile we have reached the 15th public release version of kweb. Some things are much more
sophisticated than in the beginning and a lot more Python code has been added. But the browser
itself is still a very small program (a little more than 1000 lines of source code and the binary is
only about 38 KB).
For version 1.5 the manual had to be rewritten in most parts; there's a separate manual for
omxplayerGUI and the changelog is also a separate document now. For version 1.6 both manuals
have been revised and expanded again.
32
Kweb's Components
kweb
The browser itself, a compiled C program, using GTK+2 for the GUI and webkitgkt-1.0 as web
engine.
kweb3
Another version of the browser, a compiled C program, using GTK+3 for the GUI and webkitgkt3.0 as web engine.
kwebhelper.py
A Python script which is responsible for calling other programs to support kweb: PDF support,
downloads and the built-in command execution interface are handled that way. It also contains the
browser configuration manager.
omxplayergui.py
A Python program responsible for all media handling. It contains GUIs for an audio player and a
video player, but can also use the old kweb method of playing videos always full screen.
OmxplayerGUI is also installed and can be used as a standalone media player.
kwebhelper_settings.py
This small Python script contains all global variables ( = configuration options) of kwebhelper.py
and omxplayergui.py. It is run each time one of these programs is started and overwrites all global
variables. The experienced user may edit this file (as root), to create his own configuration. But it is
much easier to use kweb's settings page for it.
kwebhelper_set.py
Another Python script that manages helper settings, handles presets and creates web pages from the
settings file and user editable templates (:Commands). It manages files in the protected area of the
file system and therefore as to run as root (via sudo). You may be asked for a password each time a
command is executed that uses kwebhelper_set.py, if you have set up your system this way.
dbuscontrolm.sh
This is a modified version of a shell script from the omxplayer github, supporting multiple
omxplayer instances with separate names. It handles all dbus commands to omxplayer.
Static files
The kweb installer creates a folder
/usr/local/share/kweb
and copies a number of files into this folder or creates them there. This includes HTML files for
the :commands, manuals and more. This is also the place where settings templates and user editable
pages will be stored (by kwebhelper_set.py).
To remove all content from that folder and the folder itself, you have to use the “removeall” script
when you want to deinstall kweb.
33
How to Install a Working Version of Youtube-dl
Youtube-dl is a great tool to extract videos from more than 100 video websites that try to hide them,
especially by using some kind of flash player. It's main use is to download videos from youtube
(hence the name) and many other websites., but it is also used by many programs (and that includes
kweb and omxplayerGUI) to extract the video URL(s) so that the video can be accessed and played
directly (no download required). The video websites and the developers of youtube-dl are always in
a race condition. If something on a website is changing that may require a change in the (Python)
code of youtube-dl. And the developers are also adding new websites to their code all the time.
For this reason youtube-dl has a built-in update function that should be run from time to time:
sudo youtubedl U
Unfortunately this kind of updating youtube-dl doesn't work any more on many linux distributions
including new Ubuntu releases and the current Raspbian. And without this update function youtubedl becomes almost useless within a short time.
If you have had installed youtube-dl some time ago and the update function is working for you,
you're lucky and may leave it as it is (but the last part of this tutorial may still be of interest for
you). But on recent images or new installations it doesn't work any more and you have to choose
one of the following installation methods.
1) This is simple and will get you a working version including the built-in update function. Run the
following commands in a terminal:
sudo wget https://ytdl.org/latest/youtubedl O /usr/bin/youtubedl
sudo chmod a+x /usr/bin/youtubedl
and don't forget to update it quite often with:
sudo youtubedl U
This solution will work, but it has one big disadvantage: It will be rather slow. Due to the way
youtube-dl is built, it will take about 12 seconds to extract a video address on a Raspberry Pi
running in turbo mode (and much longer, if your Raspberry Pi is not overclocked). So you might
consider solution 2.
2) The second method is a bit more complicated but will install a version that runs almost twice as
fast (and if you access a lot of web videos that will mount up to hours of waiting time you can
spare). To make life easier for you, the kweb distribution now includes two scripts, that will take
care of everything. From a terminal run
ginstallytdl
This will remove older versions of youtube-dl and install the most recent version from github
instead. After the installation process you'll find a folder “youtube-dl” in your home directory,
which you shouldn't remove (this would break your installation). If git is not installed in your
system it will also be installed and you shouldn't remove it afterwards because it is also needed for
updating youtube-dl. This is done by another script:
updateytdl
You should run this as often as possible. The github version is changing almost every day.
34