1
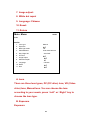
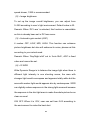
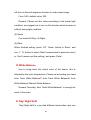
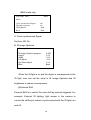
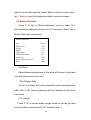
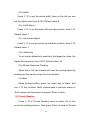
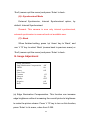
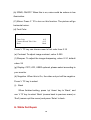
2040 OSD Menu Manual
CCTV Cameras
http://www.securitycamera2000.com
Menu Functions:
Up
L
Menu
R
Down
Menu: Menu options / Return to previous menu
Up / Down: Up key or Down key, is option keys vertically for
menu.
L / R: Left or Right key, is option keys horizontally or revising
specification.
“ ” is Return to previous menu, for sub-menu setting.
Main menu:
1. Lens: Manual lens
2. Exposure:
3. BLC mode: OFF
4. White Balance: Auto white balance
5. Day & Night switch: Auto
6. Function:
01
7. Image adjust:
8. White dot repair
9. Language: Chinese
10. Reset:
11. Return
Main Menu
SONY
CCD
600TVL
1. Lens type
Manual
2. Exposure
3. Back light mode
Off
4. White Balance
Auto white balance
5. Day/ Night Sift
Auto Shift
6. Function
7. Image adjust
8. White dot repair
9. Language
Chinese
10. Reset
11. Quit
A. Lens
There are three lens types, DC (DC drive) lens, VD (Video
drive) lens, Manual lens. You can choose the lens
according to your needs, press “Left” or “Right” key to
choose the lens type.
B. Exposure
Exposure
02
Electronic shutter: Auto
Image brightness: 0-----255
Auto Gain Control: High
D-WDR: OFF
Return: return
Exposure
Electric Shutter
Image Brightness
Auto
0------255
AGC
High
D-WDR
Off
Back
Back
(1)>Electric shutter
Electric shutter is used to set camera’s shutter speed, that is the
number of the video output for each second (e.g. 1/50 means this
camera can record 25 pcs pictures in 1 second). You can set both
low and fast shutter speed on this camera by AUTO,
1/50~1/100000, and FLK, depends on user’s need. When the
IRIS is on, the default shutter mode is ‘AUTO’; when the manual
IRIS is on, the default shutter mode is also ‘AUTO’.
Remark: We suggest to set the shutter speed higher when the
light condition is low to enhance the picture’s brightness; when
the shooting environment is brighter and object’s movement
speed is comparatively higher, we suggest to set the shutter
03
speed slower, 1/250 is recommended.
(2) > Image brightness
To set up the image overall brightness, you can adjust from
0~255 according to user’s light environment. Default value is 50.
Remark: When ‘DC Lens’ is selected, this function is unavailable
as this is already been set in DC lens menu.
(3) > Automatic gain control (AGC)
4 modes: OFF, LOW, MID, HIGH. This function can enhance
picture brightness but also will enhance its noise, please set this
according to your actual need.
Remark: When ‘Day/Night shift’ set to ‘Auto Shift’, AGC is fixed
value and cannot be set.
(4) > D-WDR
Wide Dynamic Range is to balance the image light when there is
different light intensity is one shooting scene, the area with
stronger light would overexpose and appears totally white but the
area with weaker light would appears dim by underexpose. WDR
can digitally reduce exposure in the strong light area and increase
the exposure in the dim light area to make the whole picture be as
clear as usual.
ON/ OFF. When it is ‘ON’, user can set from 0-63 according to
the environment to make the best shot.
04
(5) > Back
When finished setting, press ‘UP’ ‘Down’ button to ‘Back’, and
use ‘L’ ‘R’ button to select ‘Back’(means back to previous menu)
or ‘End’ (means quit the setting), and press ‘Enter’.
C. Back Light Mode
1. Back light compensation
Press ‘L’ ‘R’ key in ‘Back Light Mode’ menu to select ‘Back
Light Compensation’ and press ‘Enter’ to enter in ‘Back Light
Compensation’ sub- menu
Black Light Compensation
Select area
Area display
Back Light Area Gain
Brightness
Set Width
L/R Adjust
Up/ Down Adjust
Back
Area 1
On
0-255
0~15
0~15
0~15
0~15
(1) Select Area. To set back light area, 2 options: Area 1, Area 2
(2) Area display. On
(3) Back light area gain
To set back light area brightness enhancement, from 0-255,
default value: 42
(4) Height setting
05
Press ‘L’ ‘R’ to adjust back light compensation area from
left to right, from 0-15, default value: 4.
(5) Set Width
Press ‘L’ ‘R’ to set back light compensation area’s width,
base on the left, to set from 0-15, default value: 3
(6) L/R adjust
Press ‘L’ ‘R’ to set back light compensation area’s up/
down, base on the top, to set from 0-15, default value: 3
(7) UP/Down adjust
Press ‘L’ ‘R’ to set back light compensation area’s up/
down, from 0-15, default value: 3
2 Anti exposure
Press ‘L’ ‘R’ key in ‘Back Light Mode’ menu to select ‘Anti
exposure’ and press ‘Enter’ to enter to ‘Anti exposure’ sub-menu
Anti Exposure
Value
Mode
Back
0-255
All day
Back
(1) Anti exposure
Here to set the sensitivity for anti exposure. When the light is
lager or equal to the pre-set value, the light sensor in the camera
06
will turn on the anti-exposure function to make clear image.
From 0-55, default value; 200
Remark: Please set this value according to the actual light
condition, we suggest not to turn on this function when the area is
without strong light condition.
(2) Mode
Can select All Day / At Night
(3) Back
When finished setting, press ‘UP’ ‘Down’ button to ‘Back’, and
use ‘L’ ‘R’ button to select ‘Back’(means back to previous menu)
or ‘End’ (means quit the setting), and press ‘Enter’.
D. White Balance
Use to bring back the actual color of the scene, this is
effected by the color temperature. Please set according you need,
Auto Track White Balance1/ Auto Track White Balance2/ Auto
White Balance/ Manual White Balance
Remark: Normally, Auto Track White Balance1 is enough for
most of the users
E. Day/ Night Shift
Day/ Night shift is to provide different mode when user use
07
in day or night scene. 4 Modes: Color mode, B&W mode,
External Shift, Auto Mode.
(1) Auto Mode
Press ‘L’ ‘R’ key in ‘Day/ Night Shift’ menu to select ‘Auto
Mode’ and press ‘Enter’ to enter to ‘Auto Mode’ sub-menu.
Auto Mode
Day to Night Setting
Time-delay
sec.
Night to Day Setting
Night to Day Time Delay
0-255
1-30
0-255
1-30
(A) Time-Delay
This is to set the time delay for shifting from color to B&W, or
B&W to color mode. The shift between color and B&W is to
control by the light sensor of the camera in the scene, when
the light brightness is in the critical value, the camera would
probably shift from color to B&W constantly, to set a time
delay value can avoid this to happen, the camera will only
shift mode when it sense the light brightness is satisfied
throughout the pre-set time period. This is also for protecting
the camera’s life and quality. Time-delay value: 0-30 second.
Default value: 1 second.
Remark: We suggest to set this value higher in the scene that
light brightness is frequently changed, and visa versa.
(b) Day to Night Setting
08
To set the start position when shifting, value: 0-255. Default value:
42
(c) Night to Day setting
To set the end position when shifting, value 0-255. Default value:
156
Remark: To set a ‘Night to Day’ and ‘Day to Night’ value is to
avoid the camera shift constantly to make it unusable. Please do
not set the same value for both as this will also makes the camera
to shift from color to B&W constantly, ‘start position’ value should
always higher than ‘end position’ value.
(d) Back
After finishing setting, press ‘Up’ ‘Down’ key to move to ‘Back’,
and use ‘L’ ‘R’ key to select ‘Back’ (means back to previous
menu) or ‘End’ (means to quit this setting), and press ‘Enter’ key
to back.
(2) Color mode
Press ‘L’ ‘R’ key in ‘Day/ Night Shift’ menu to select ‘Color
Mode’. In color mode the camera will forced to execute color
mode only.
(3) B&W Mode
Press ‘L’ ‘R’ key in ‘Day/ Night Shift’ menu to select ‘B&W
Mode’. In B&W mode the camera will forced to execute
09
B&W mode only.
Day/Night Shift
Mode
Color synchronized Signal
IR Image Optimize
IR Brightness
Back
B&W
Off
On
High
Back
A. Color synchronized Signal
Set from Off/ On.
B. IR Image Optimize
IR Image Optimize
IR Image Optimize program
Height
Width
L/R Adjust
Up/ Down Adjust
Back
0-255
0-15
0-15
0-15
0-15
Back
When the IR light is on and the object is overexposed on the
IR light, user can set the value in IR Image Optimize and IR
brightness to reduce overexposure.
(4) External Shift
External Shift is to control the color shift by external triggered. For
example: External IR lighting, light sensor in the camera to
control the shifting to makes it synchronized with the IR light’s on
and off.
10
Remark:This function is reserved and not available right now.
F. Function
Function
关1.Camera title
2.Motion detection
3.Private area Shading
4.Car reverse line
6.Communication
8.Back
Off
Off
Off
Off
Back
(1) Camera Title
Press ‘L’ ‘R’ key in ‘Function Camera title’ menu to select ‘On’,
and press ‘enter’ to enter to camera title setting menu.
Camera title
0 1 2 3 4 5 6 7 8 9
A B C D E F G H I J K
L M NO P Q R S T U V
X Y Z → ← ↑ ↓ ( )
 ̄ - _ ■ / = & : ~ , ‥
←
→
Clear
Position
Quit-------------------------------
(a) >For camera title, user can used number, capital letter, and
symbol to set a 15 characters title.
(b) > ‘←
→’ is to move from left to right
(c) > ‘Clear’ is to clear the camera title
(d) > ‘Position’ is to set the title’s position. Click ‘up, down, left,
11
right’ to move title’s position, press ‘Enter’ to back to main menu.
(e) > ‘Quit’ is to end title setting and back to previous menu
(2) Motion Detection
Press ‘L’ ‘R’ key in ‘Motion Detection’ menu to select ‘On’,
now the motion detection function is on. Then press ‘Enter’ key to
Motion Detection’s sub menu.
Motion Detection
Area
Diplay Area
Height
Width
L&R Adjust
UP&Down Adjust
Sensitivity
Motion Detection Track
Back
Area 1
On
0-15
0-15
0-15
0-15
0-255
Off
Back
(A)>Area
Select detect area and set in this area, all 4 areas in total and
can only set one area at a time.
(B)> Display Area
To set to activate the motion detection in the selected area,
when this is Off, motion detection will not activate in this area,
vice versa.
(C)> Height
Press ‘L’ ‘R’ to set the area’s height, base on the top you can
set the bottom’s value from 0-100. Default value: 4
12
(D)> Width
Press ‘L’ ‘R’ to set the area’s width, base on the left you can
set the right’s value from 0-100. Default value: 4
(E)> L& R Adjust
Press ‘L’ ‘R’ to set the area’s left and right position, from 0-15.
Default value: 1
(F)> Up & down Adjust
Press ‘L’ ‘R’ to set the area’s up and down position, from 0-15.
Default value: 1
(G)> Sensitivity
To set motion detection’s sensitivity, the larger the value, the
higher the sensitivity, from 0-255. Default value: 38
(H)> Motion Detection Tracking
When this is ON, the camera will track the moving object by
drawing red line on the screen for its movement.
(I)> Back
When finished setting, press ‘up’ ‘down’ key to ‘Back’, and
use ‘L’ ‘R’ key to select ‘Back’ (means back to previous menu) or
‘End’ (means quit the menu) and press ‘Enter’ to back.
(3) Private Shading
Press ‘L’ ‘R’ in ‘Private Shading’ menu to select ‘On’ to turn
on private shading function. Then press ‘Enter’ to enter to ‘Private
13
shading’ sub-menu.
Private Shielding
Area
Display Area
Height
Width
L&R Adjust
UP& Down Adjust
Area color
Back
Area 1
Off
0-255
0-255
0-255
0-255
0-15
Back
(A)> Area
Select private shading area and set in this area, all 8 areas
settable.
(B)> Display Area
When this is Off, private shading will not activate in this area,
vice versa.
(C)> Height
Press ‘L’ ‘R’ to set the area’s height, base on the top you can
set the bottom’s value from 0-255.
(D)> Width
Press ‘L’ ‘R’ to set the area’s width, base on the left you can
set the bottom’s value from 0-255.
(E)> L&R Adjust
Press ‘L’ ‘R’ to set the area’s left and right position, from
0-155.
14
(F)> UP & Down Adjust
Press ‘L’ ‘R’ to set the area’s up and down position, from
0-255.
(G)> Area Color
To set shading area’s color. Value: 0-15
(H)> Back
When finished setting, press ‘up’ ‘down’ key to ‘Back’, and
use ‘L’ ‘R’ key to select ‘Back’ (means back to previous menu) or
‘End’ (means quit the menu) and press ‘Enter’ to back.
(4) Reverse Car Line
Press ‘L’ ‘R’ key in ‘Reverse Car Line’ to select ‘On’ and this
function is On, press ‘Enter’ to enter its setting
Reverse Car Line
Upper Left
Lower Left
Upper Right
Lower left
Top
Bottom
Line width
Back
75
27
113
170
13
69
9
Back
To adjust the position and range of car reverse line.
(5) Communication
This camera supports RS485 communication protocol,
user can used RS485 controller to control this camera.
15
Communication
Camera ID
Baud Rate
Protocal
Display ID
ID Position
Back
0-255
2400
PELCO-D
Off
Back
(a)> Camera ID
To set camera’s address ID to distinguish it from other
cameras. This ID is also the exclusive ID for controlling this
camera. Value: 0-255
(b)> Baud Rate
Communication speed, 2400, 4800, 9600, 19200, 38400,
57600 optional
(c)> ID Display
To set to display the camera’s ID or not when the camera is
turned on. When this is ON, there will be ‘CAM.XXX ( xxx means
camera’s ID)’ displayed on the upper left side on the screen.
Default: OFF.
(d) > Communication Protocol
PELCO-D, PELCO-P, NEXTCHIP optional.
(e)> Back
When finished setting, press ‘up’ ‘down’ key to ‘Back’, and
use ‘L’ ‘R’ key to select ‘Back’ (means back to previous menu) or
16
‘End’ (means quit the menu) and press ‘Enter’ to back.
(6)> Synchronized Mode
External Synchronize, Internal Synchronized option, by
default: Internal Synchronized.
Remark: This camera is now only internal synchronized,
external synchronize is reserved and not available now.
(7)> Back
When finished setting, press ‘up’ ‘down’ key to ‘Back’, and
use ‘L’ ‘R’ key to select ‘Back’ (means back to previous menu) or
‘End’ (means quit the menu) and press ‘Enter’ to back.
G. Image Adjustment
Image Adjustment
Edge Illumination Compensation
2DNR
Mirror
Font Color
Contrast
(2)>DEFFECT
Sharpen
Display
Negative
Back
Off
On
Off
155
24
CRT
Off
Back
(a) Edge Illumination Compensation. This function can increase
edge brightness without increasing the overall picture’s brightness
to make the picture clearer. Press ‘L’ ‘R’ key to turn on this function,
press ‘Enter’ to its menu, value from 0-255.
17
(b) 2DNR, ON/OFF. When this is on, noise could be reduce in low
illumination.
(C) Mirror. Press ‘L’ ‘R’ to turn on this function. The picture will go
horizontal mirror.
(d) Font Color
Font Color
Font Color
Camera ID and Title Color
Back
0-15
0-15
Back
Press ‘L’ ‘R’ key can choose menu’s font color from 0-15
(e) Contrast. To adjust image contract, value: 0-255
(f) Sharpen. To adjust the image sharpening, value: 0-31, default
value: 24
(g) Display: CRT, LCD, USER optional, please select according to
your monitor
(h) Negative. When this is On, the video out put will be negative.
Press ‘L’ ‘R’ key to select
(i)
Back
When finished setting, press ‘up’ ‘down’ key to ‘Back’, and
use ‘L’ ‘R’ key to select ‘Back’ (means back to previous menu) or
‘End’ (means quit the menu) and press ‘Enter’ to back.
H. White Dot Repair
18
Use when there is bad pixel in the CCD, turn off IRIS first and
press ‘Enter’ key to repair white dot. The camera will repair itself,
after it is done, press ‘Up’ ‘Down’ key to back to previous menu.
I. Language
Set menu language. 4 languages optional: Simplified
Chinese, Traditional Chinese, Japanese, English. Press ‘L’ ‘R’ to
select. It takes a few seconds to change the selected language.
J. Reset
Press ’Enter’ key to enter to ‘Reset’ menu, after reset, all setting
will resume to factory default.
Reset
Factory Default
Default
Back
Factory
Back
(a)> Factory Default
Move to ‘Factory Default’ and press ‘Enter’, the system will
resume to factory default. Please pay attention that when you
reset to factory default, color case would happen and this is
normal.
(b)> Back
19
When finished setting, press ‘up’ ‘down’ key to ‘Back’, and
use ‘L’ ‘R’ key to select ‘Back’ (means back to previous menu) or
‘End’ (means quit the menu) and press ‘Enter’ to back.
K. Quit
When finished setting, press ‘up’ ‘down’ key to ‘Back’, and
use ‘L’ ‘R’ key to select ‘Back’ (means back to previous menu) or
‘End’ (means quit the menu) and press ‘Enter’ to back.
20