1
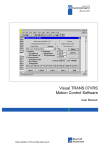
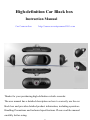
High-definition Car Black box
Instruction Manual
Car Camcorders
http://www.securitycamera2000.com
Thanks for your purchasing high-definition vehicle recorder.
The user manual has a detailed description on how to correctly use the car
black box and provides detailed product information, including operation,
Handling Precautions and technical specifications. Please read the manual
carefully before using.
We wish this product can meet your need and enter into long business
relationship with you.
Product Picture and Function
1. Infrared LED
2. RESET button
3. USB Slot
4. HDMI Slot
5. Micro SD card slot
6. 2.7 inch 16:9 LCD
7. Speaker
8. POWER button
9. Mounting hole
19. REC/OK button
Provided Accessories
●Instruction Manual*1
●Car charger*1
10.Lens (Rotatable)
11.Av-out slot
12. DOWN button
13.Microphone
14.MENU button
15.MODE button
16. SOS button
17. UP button
18. Blue Indicator (Recording)
Red Indicator (Charging)
●Car Mount*1
●AV cable *1
2
●USB Cable*1
To Power On/Off
1. Manual Switch On
Press and hold the power switch for 3 seconds to switch on and 3 seconds to
switch off the front camera.
*Note: The battery’s capacity is limited. Users are recommended to use the car
charger to support recording*
2. With Car Charger
Insert car charger into cigarette lighter only after starting up the engine.
Camera will switch on and begin recording automatically. To switch off, stop
the car engine or remove the car charger. Camera will save and switch off
automatically.
TO charge the built-in battery:
When car charger is attached, the camera will record and charge the battery
simultaneously. Alternatively, please use provided USB cable to charge
connecting a computer. The indicator will flash red when charging.
Features introduce:
DVR have three modes: Video recording Mode, Camera Mode, Preview mode,
please choose the mode you need.
A) Video Recording mode
Camera enters into default video recording mode when switched on manually
or connected the car charger. Press the REC button once to begin recording. To
stop recording, press the REC button once again. The indicator will flash blue
when recording.
*Noted: please insert Micro SD card before using the machine. The indicator
will flash when recording and the video files will be saved in Micro SD card. *
B) Camera Mode
In video recording mode, press MODE button once to switch to camera mode.
To take a photo, press REC button once. To return to video recording mode,
3
press MODE button twice.
C)Preview/Playback Mode
In video recording mode, press MODE button twice or in camera mode, press
MODE button once to switch to preview/playback mode.
Use the UP or DOWN button to go through the saved files. To play/pause a
video recording, press the REC button once. After playbacking a video file or
pictures, press the DOWN button once to go back the preview interface. To
return to video recording mode, press MODE button once or twice to return to
camera mode.
D) To delete a video recording/photo
In preview/playback mode, press MENU button enter into delete interface.
Using the UP button and DOWN button to choose the file that you want to
delete, then press the REC button to confirm . When you are playing the video
or photo, press the UP button and DOWN button to zoom the picture and adjust
the volume.
Video record setting
In video recording mode, press MENU button once to enter into video record
setting interface. Use the UP button and DOWN button to choose the options
as below, then Press REC button once to confirm the option that is being
chosen.
1) Resolution:1920*1080P;1440*1080P;1280*720P;848*480P;
640*480P;320*240P
2) Loop record:OFF/1min/2min/3min/5min/10min/15min
3) Exposure:+2/3,+1/3,+0.0,-1/3,-2/3,-1.0,-4/3,-5/3,-2.0
4) Motion detection:On/off
5) Audio record:On/off
6
Date stamp:On/off
In video recording mode, press MENU button twice to enter into system setting
interface— Press the UP button and DOWN button to choose the
4
options—press REC button to quit the interface.
1) Date/time:year/month/date/time
Press UP and DOWN button to adjust year, month, date. REC button for
confirm. When you choose the YY/MM/DD, press DOWN button can
option the date style, Including YY/MM/DD, MM/DD/YY and
DD/MM/YY.
2) Auto power off:off/1min/3min
3) Beep sound: On/off
4) Lamp setting:On/off
5) Language:Traditional Chinese/Simplified
Chinese/Japanese/English/Russian/Italian/ German/French
6) TV Mode:PAL/NTSC
7) Frequency:50HZ/60HZ
8) Format:Ok/ cancel
9) Default setting:Ok/ cancel
10) G-sensor:Off/High/Medium/Low
11) Off-screen:off/1min/2min/3min/5min/10min/15min
12) Delay off:off/1min/2min/3min/5min/10min/15min
13) Version:(L5000.201×.×.××.V1.0×)
Camera Setting
In camera mode, press MENU button once, —Use UP or DOWN button to
select the preferred resolution —Press REC button once to confirm the
option—press REC button twice to go back to the camera mode.
Viewing and transferring files on computer
Connect the main camera to a computer using the provided USB cable. Camera
switches on automatically and 3 options appear as 1.)USB Disk 2.) PC Camera
3.)REC Mode
1. ―USB Disk‖ Press REC button once and computer will auto detect the
camera. No software installation is required. Go to ―My Computer‖ and search
for ―Removable Disk‖. The name of drive will vary according to computers.
5
Click on it and you should see one folder ―DCIM‖. Click on the folder you
wish to view and a list of files will show. Click on any file to view.
2. PC Camera – Works as a camera for the computer.
3. REC Mode – Switches to video recording mode.
Technical Specifications
1. Video resolution of front camera:
FULL HD- 1920 x 1080P;1440 x 1080P
HD - 1280x720P
VGA –848 x 480P; 640x480P; 320 x 240P.
2. Photo resolution: VGA/1.3M/2M/3M/5M/8M/10M/12M
3. Video Format: H.264 MOV
4. Photo Format: JPEG
5. Rotation angle of front camera: 120 degrees
6. Interface: USB2.0 & TV-OUT&HDMI
7. Microphone/ Speaker: Built-in
8: Storage: Micro SD card, support up to 32GB.
9. G-sensor function: yes
10. Battery: inbuilt rechargeable battery 200MA
Notes:
1. Camera does not have internal memory. Please insert micro SD card for
video recording/taking photos.
2. This DVR video mode can choose cycle recording, when the memory card is
full already, DVR will remove the front video files, save the latest video clips.
3. Camera will shut off automatically when battery level is low.
4. Please use the attached car charger which containing 12-24V switch to 5V
adapter, if the output voltage is greater than 5V, the DVR will be burned.
Warning:
We won’t take the responsibility for any accidents if customers
change the attachment and don’t operate in accordance with the
manual.
6