1
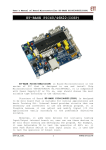
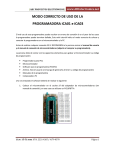
คูมือการใชงาน ET-PGMPIC USB ET-PGMPIC USB ET-PGMPIC USB is a PIC Microcontroller Programmer that is Microcontroller from Microchip Co., Ltd. Its specifications are equivalent to PicKit 2 Programmer of Microchip because it can program many numbers of PIC Microcontroller that is FLASH Memory (Can see numbers of PIC Microcontroller at ET-PGMPIC USB in file README of Software Program PicKit 2). The remarkable specification of ET-PGMPIC USB Programmer is USB Interface that is more convenient to apply and high speed to program, so it takes a short time to program. Moreover, it can upgrade new Firmware versions from Microchip (www.microchip.com). The specifications that are mentioned above, ETT designs additional Module suite for Emulator Programming because it can program data into Target Board directly, so it is more convenient to develop program because we do not take off any IC Pin and it can protect IC Pin from broken or bending efficiently. • Specifications of ET-PGMPIC USB - Support applications of PIC Microcontroller Connecting with computer through USB Port Use Power Supply from USB Port (Only Board ET-PGMPIC USB) Can program through Text Tool 40PIN or 20PIN Port ICSP for In-Circuit Serial Programming LED to display state operation Can program by pressing Switch PROGRAM on programmer Can program through Emulator Modules -1- คูมือการใชงาน ET-PGMPIC USB Meaning of vocabularies in the User’s Manual Vocabulary Target Board Emulator Module PIC Micro ICD2 ICSP TEXT TOOL Meaning Board Microcontroller connects with ET-PGMPIC USB through Connector ICD2 or ICSP. Module replaces Microcontroller on Target Board for programming. IC PIC Microcontroller Programmer and Debugger of Microchip Co., Ltd. The method to program by directly interfacing signal programs; VPP, VDD, GND, PGD and PGC with signal Pin of Microcontroller for programming Socket to insert IC for programming • Structure of Board ET-PGMPIC USB 2 4 3 5 1 6 88 7 -2- คูมือการใชงาน ET-PGMPIC USB Details 1. USB Port Connection It is a Port to connect signal from Board ET-PGMPIC USB with computer. 2. LED to display state operations; POWER, TARGET, and BUSY -3- คูมือการใชงาน ET-PGMPIC USB BUSY: It is a red LED to display state operation of programmer. It will be ON when Program is running such as reading/writing Flash Memory of PIC microcontroller. • TARGET: It is a yellow LED to display Power Supply status of Target Board. POWER: It is a green LED to display Power Supply status of Board. 3. TEXT TOOL 40PIN PIC 28/40PIN PIN 1 1 PIC Micro • Support IC PIC Microcontroller 28PIN up to 40PIN DIP TYPE • Put IC top-justification as shown in the picture Always tightly lock IC 4. TEXT TOOL 20PIN PIC 8-20PIN 1 PIC Micro PIN 1 • Support IC PIC Microcontroller 8PIN up to 20PIN DIP TYPE • Put IC top-justification as shown in the picture Always tightly lock IC -4- คูมือการใชงาน ET-PGMPIC USB 5. JUMPER T/B to select to supply power to Port ICD2 and ICSP ET-PGMPIC USB can program by putting IC into TEXT TOOL; normally, there are Port ICSP and ICD2 that can be interfaced with components external board or on board Microcontroller (TARGET Board) as required for programming. So, it is necessary to have circuit to verify and control voltage that is supplied to Port ICSP and ICD2 for ET-PGMPIC USB because it protects Power Supply between Board ET-PGMPIC USB and TARGET Board from crashing. +5V USB T ชุดตรวจสอบและควบคุมแรงดัน VDD ของพอรต ICSP และ ICD2 +VDD TARGET B - - In case of programming IC on TEXT TOOL, we must set Jumper on T side to verify voltage that comes from USB. In case of programming IC by interfacing signal from Port ICSP or ICD2, we must set Jumper on B side. In this case, circuit will verify voltage of TARGET Board. If there’s voltage at TARGET Board, it will control circuit not supply power from Board ET-PGMPIC USB; on the other hand, if there’s no any voltage at TARGET Board, circuit will supply power to TARGET Board. 6. Socket for interfacing signal ICD2 is a port of signal programming that is arranged under standard of ICD2 (programmer suit and debugger of Microchip Co., Ltd.). It can interface with Board Microcontrollers that have the same port arrangement of ICD2. Moreover, it can interface with ETT Emulator Modules as shown in the picture below. -5- คูมือการใชงาน ET-PGMPIC USB Interfacing signal from ET-PGMPIC USB and Emulation Module through Connector ICD2 7. Port ICSP is a port of signal programming as same as Port ICD2 but its signal arrangement differs from Port ICSP because it uses Connector 6PIN for interfacing signal programming. If Board Microcontroller has not Connector ICD2, we recommend user to directly connect signal from this port. • ICSP 1 VPP VDD GND PGD PGC AUX • • • • VPP (Programming Voltage): It is signal voltage for programming. VDD (Power Supply Positive Voltage): It is voltage for supplying IC. GND: It is Ground Pin. PGD (Programming Data): It is signal Data Pin for programming. PGC (Programming Clock): It is signal Clock Pin for programming. AUX: It is reserved. 8. Switch PROGRAM It can program by pressing Switch and its specifications are equivalent to pressing Button “Write” on Software PICKit 2. We Program PICkit picture can use this function by setting specifications of PICkit 2 Programmer in Menu Programmer -> Write on Button and then tick sign [√] as shown in the below. -6- คูมือการใชงาน ET-PGMPIC USB • Software for using with ET-PGMPIC USB Programmer In the part of Software Board ET-PGMPIC USB, it uses Software “PICkit 2 Programmer” from Microchip Co., Ltd. First of all, we must install program .NET Framework (dotnetfx) and then follow by Program PICkit2Setup as follow; -7- คูมือการใชงาน ET-PGMPIC USB Application of Software Program PICkit 2 Programmer Tool Bar Configuration VDD Target PROGRAM Memory EEPROM DATA Menu Command for managing File - Import Hex- To load the appropriate hex file into Program PICkit2 for programming. Export Hex- To Export hex file that is read from Microcontroller for saving as file. -8- คูมือการใชงาน ET-PGMPIC USB - Exit- To exit from program Menu Command to select family of Microcontroller (DEVICE FAMILY) - Baseline (12-bit Core)- To program with 12-bit Core - Flash devices Microcontroller Mid-range (14-bit Core)- To program with 14-bit Core Flash devices Microcontroller PIC18F- To program with PIC18F Flash devices Microcontroller PIC18F_J- To program with PIC18FXXJXX Flash devices Microcontroller PIC18F_K- To program with PIC18FXXKXX Flash devices Microcontroller PIC24- To program with PIC24 Flash device Microcontroller dsPIC33- To program with dsPIC33 Flash devices Microcontroller Menu Command for function programming (PROGRAMMER) -9- คูมือการใชงาน ET-PGMPIC USB - Read Device- To read data from Program memory, data EEPROM memory, ID locations, and Configuration bits. o Its specifications are equivalent to Button - Write Device- To write data into Program memory, data EEPROM, ID locations, and Configuration bits. o Its specifications are equivalent to Button - Verify- To verify data in Program memory, Data EEPROM, ID locations and Configuration bits of Microcontroller and Code Hex File that is in Buffer of program PICkit2. o Its specifications are equivalent to Button - Erase- To erase data in memory of Microcontroller. o Its specifications are equivalent to Button - Blank Check- To check available space area of Program memory, data EEPROM, ID locations and Configuration bits and determine whether it is blank or not. o Its specifications are equivalent to Button - Verify on Write- It is a function to verify data in Program memory, data EEPROM, ID locations, and Configuration bits while writing data. - Hold Device in Reset- To maintainss state at RESET Pin to be Logic “0” (MCLR = 0) - Write on PICkit Button- It is a function programming by pressing Switch (PROGRAM) on Board ET-PGM USB. NOTE: If user wants to use these functions, must tick sign in front of the preferable functions. - VDD Target- It is a faction to supply power into Target devices and control signal RESET (MCLR). -10- คูมือการใชงาน ET-PGMPIC USB Control voltage at VDD of Target - Tick sign [√], it means that it supplies voltage to Target Board. - Not tick any sign [√], it means that it does not supply voltage to Target Board. Adjust voltage VDD Target from 2.5 to 5 Volt. Control state of MCLR - Tick sign [√], it means that it supplies Logic “0” to MCLR. - Not tick any sign [√], it means that it does not supply any Logic “0” to MCLR. - Auto Import Hex + Write Device- Function of this Button Command can be both Import Hex File and Write data. - Read Device + Export Hex File- Function of this Button Command can be both Read data from memory of Microcontroller and Export data to be Hex File. Menu Command of TOOL for programming Enable Code Protect (Ctrl+P): It is a function to protect code program memory. Enable Data Protect (Ctrl+D): It is a function to protect data EEPROM. -11- คูมือการใชงาน ET-PGMPIC USB Set OSCCAL: It uses value from Register OSCCAL to modify frequency OSC internal PIC. Target VDD Source: Should be set at Auto-Detect position. - Auto-Detect: To check voltage of destination components automatically. - Force PICkit2: To configure voltage VDD that is supplied to Target come from Board PICkit2. - Force Target: To configure voltage VDD that is supplied to Target come from voltage of its Target. Fast programming: To program quickly. Check Communication: To check the connection between ET-PGMPIC and Computer. Troubleshoot…: It is a function Help and give some advice or solution when problem has occurred. Download PICkit 2 Firmware: It is a function to download new Firmware version of PICkit2 into Board ETPGMPIC USB; it is used to Update Firmware. Menu Command of Help PICkit 2 User’s Guide: It is User’s Manual of PicKit2 that is PDF File. LPC Demo Board Guide: It is User’s Manual of Board Low Pin Count Demo Board of MICROCHIP. PICkit 2 on the web: It is data of PICkit2 on website of MICROCHIP. ReadMe: It is File ReadMe of Program PICkit 2 to shown details and numbers of PIC MCU that are supported by PICkit 2. About: It is details of Software PICkit 2. EEPROM Data Program PICkit 2 can modify data in EEPROM of PIC Micro because there’s window to modify data, so we just click -12- คูมือการใชงาน ET-PGMPIC USB mouse at the data position that we want to modify. When we write data, EEPROM of PIC Micro will be changed follow the modified data as shown in the picture below. • The method to program 1. Connect USB Cable between Board ET-PGMPIC USB and Computer. 2. Put the preferable IC PIC MCU into TEXT TOOL or Emulator Modules for programming. If programming on TEXT TOOL PIC 28/40PIN PIN 1 1 PIN 1 *NOTE: If programming on Jumper T/B on T position. -13- TEXT 1 TOOL, PIC Micro PIC Micro PIC 8-20PIN we must set คูมือการใชงาน ET-PGMPIC USB If programming on Target Board by Emulator Module ET-PGMPIC USB TARGET Board If programming through Emulator Module, we should interface Power Supply for TARGET Board to protect power supply from USB not enough and should shift Switch on Module to PRG position for connecting signal programming. *NOTE: If programming on Emulator Module, we must set Jumper T/B on B position. 3. Open Program PICkit 2 by double click Icon PICkit2. 4. Program PICkit 2 checks IC on TEXT TOOL; if it is number that is supported by PICkit 2 and its connections are correct, it will display the found number of PIC Micro in the blank Device as shown in the picture below. -14- คูมือการใชงาน ET-PGMPIC USB 5. First of all, we must erase the old data in PIC Micro, click button command Erase and we will see data in the blank of Program Memory and EPPROM data that will be FF value. 6. Import Hex File as required, click menu command File-> Import Hex. 7. We will see data in the blank Program Memory and EEPROM Data are changed follow the loaded Hex File data. 8. Click Button Command Write to start writing program Hex File into memory of PIC Micro. -15- คูมือการใชงาน ET-PGMPIC USB 9. We can click Button Verify if we want to check and determine whether the written data into PIC Micro is correct or not. If we select “Enable Code Protect”, it makes Verify processing failed because reading Code program is protected, so we can not verify it. • Emulation Module Suite It is additional accessories of ET-PGMPIC USB Programmer that can support programming on Board Microcontroller (TARGET Board) without taking off any IC Pin. It is more convenient to develop program and protects IC Pin from broken and bending. There are 6 Emulator Modules; 14-PIN, 18-PIN, 20-PIN, 28PIN (narrow pin), 28PIN (wide pin), and 40-PIN. So, it can support many sizes of PIC Microcontroller from MICROCHIP as shown in the picture below. -16- คูมือการใชงาน ET-PGMPIC USB Sizes of Emulator Module 14-PIN 18-PIN 20-PIN 28-PIN (narrow pin) -17- คูมือการใชงาน ET-PGMPIC USB 28-PIN (wide pin) 40-PIN RUN PRG RUN PRG Each module has Switch to select modes; PROGRAM Mode (PRG) and RUN Mode (RUN). If we want to program, we must shift Switch to PRG position; on the other hand, if we want to run, we must shift Switch to RUN position as shown in the picture below. Running Mode Programming Mode Some Module has Jumper 18F/16F to select number of PIC Microcontroller; we must set Jumper corresponding with the used number as shown in the picture below. 16F 18F สําหรับไมโครคอนโทรลเลอรตระกูล PIC16Fxxx สําหรับไมโครคอนโทรลเลอรตระกูล PIC18Fxxx If we programming through these modules, we must set Jumper T/B to B position as shown in the picture below. -18- คูมือการใชงาน ET-PGMPIC USB T B Pin arrangement of Port ICD2 AUX PGC PGD GND VDD VPP/MCLR The feature of programming through Emulator Modules TARGET BOARD ET-PGMPIC USB -19- คูมือการใชงาน ET-PGMPIC USB The feature of programming by interfacing signal Program with signal Pin of Microcontroller directly GND VPP/MCLR PGD PGC VDD MCLR/VPP VDD PGD GND PGC PIC Micro Problems and Solutions Problem The error connection between computer and Board PICkit2, it will display error message as shown in the picture below. Solution - Check the connection of USB Cable between computer and Board ET-PGMPIC USB. -20- คูมือการใชงาน ET-PGMPIC USB - Click Tools -> Check Communication to verify the connection again. Problem The error of voltage verification at Target Board, it will display Error Message as shown in the picture below. Solution - If programming through Text Tool, we must check Jumper T/B that must be set at T position only. - If using through Emulator Module, we must check Jumper T/B that must be set at B position only and then check Power Supply of Target Board. If there’s no any power supply at Target Board, we must supply power to it. Problem It can not find any Microcontroller. Solution - Check IC in Text Tool whether it is correct or not and Pin 1 of IC is in the correct position or not. -21- คูมือการใชงาน ET-PGMPIC USB - If programming by Emulator Module, we must check connection of Cable and then check voltage at Target Board that must be supplied power. Problem The mistake of Hex File that is Import has not Configuration, this problem occurs in the step of design and compile program. Solution - Must set Configuration value in the step of design and compile program successfully. -22-