1
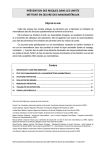
EPC-12 Configuration Software User Manual When the installation is complete, click on Close button to exit setup. 3 Entering to Program You can start the program by double-clicking on the EPC-12 Configuration Software shortcut or by selecting it from the Start menu. When you start the program for the first time, Login screen will appear and you will be asked to enter your User name and Password 4 Device Definitions Menu 4.1 Add / edit device In order for you to be able to configure device settings and to monitor your meters by connecting to your device after you logged in to the program with your User name and Password, you must enter the connection settings. If you are using the program for the first time or there isn't a device that you previously defined, Add device screen will be opened automatically. You can enter a name for your device in the Device name field (EPC-12 on 1st floor for example). Afterwards, you can select the type of your device. You can select the Connection Type as Modbus/TCP or Modbus/Serial. The screen will change according to this choice. When you select the connection type as Modbus/TCP; click on Connect button after you entered IP address, TCP port no, NAD (Device address), Poll delay and Time out information of your device. When you select the connection type as Modbus/Serial; click on Connect button after you entered Com port, Baud rate, Parity, NAD (Device address), Poll delay and Time out information of your device. After you click on Connect button, entered connection settings that you entered will be saved to the system automatically. This ensures that you will be able to connect to your device by selecting it according to its name from a list and you will not be asked to enter any settings when you close and re-open the program. Additionally, you can select your language on this window. After you selected your Language and entered your User name/Password information, click on Login button. Note : If you are starting the program for the first time; enter admin as the User name and 1234 as the Password. You can change your password from the User Operations menu under Settings menu. If you don't enter a User name and Password or you enter the wrong ones, a warning message will appear as displayed in the screen shot below. Login to the program by entering your User name and Password correctly 2 EPC-12 Configuration Software User Manual If the device you're trying to connect is not EPC-12, a warning message will be displayed as below. 4.2 Disconnect Disconnect option under the Device definitions menu is used to end the currently ongoing connection. 4.3 Close Close option under the Device definitions menu is used to exit from the program. 4.4 Connecting To A Previously Saved Device, Deleting A Device and Editing Device Connection Settings If there is a device connection which you defined previously, Add device screen will not be displayed automatically after you entered your User name and Password. In order to connect to a device that you defined previously, you can connect to that device by selecting your device and clicking on Connect button as shown below. If you want to connect to a device that you didn't define beforehand, you can add a new device in the Add / Edit Device screen under Device definitions menu and connect to it. If you want to delete a device that you defined previously, you must select it as shown below and click on the delete button (X icon). You will be asked to confirm the deletion before the defined device is deleted. If you want to change the connection settings of a device that you previously defined, you must select it as shown below and click on the edit button (Pen icon). You can change settings on the appearing window. If you want to connect to a device while you are already connected to another device, you must end your current connection by clicking on Disconnect option under Device definitions menu. Afterwards, you can connect to a new device after you clicked on Add / Edit device button again and created a new device or if there are connections that you defined beforehand, you can select these devices and connect to them by clicking on Connect button as shown below. 5 Main page (Instantaneous Values) When you start to use the program after the connection with the device has been established, Instantaneous Values page will open automatically. The definition of the device that you are currently connected to, device ID, version, serial number, date-time-tariff information of the device, log record number that the device will do next and alarm information can be read on this screen. Additionally, you can read counter values with tariffs and as totals with unit information. You can refresh the screen manually by clicking on the Refresh button or you can make the displayed information on the screen refresh automatically every 10 seconds by clicking on the Auto Refresh option. When you select Auto Refresh button, the menus will appear passive until display refreshes once. After the refresh occurs once, the menus will become active. When you select the Refresh button, you will not be allowed to access the menus until the display refreshes. When the connection is successfully established; an information message including the ID, version and serial no information of the device will be displayed. Attention : The most appropriate screen resolution for the program is 1024x768 pixels. If the screen resolution is not set to the appropriate value, some values may not be displayed out of page. 3 EPC-12 Configuration Software User Manual 6.1.2 General Settings You can set a new password, activate/deactivate an existing password, change log recording period, activate/deactivate DST (Daylight Savings Time) or synchronize the device date/time and your computer date/time by clicking on General Settings under Device Configurations menu. In order to prevent you from forgetting the changes that are committed in this menu, changed settings will be marked red after each change. Apply button will not be clickable unless you make any changes. When you change any of the settings and click on Apply button, you will be asked to confirm the changes that you committed. The committed changes will not be in effect if you don't answer the confirmation with Yes. 6 Settings Menu 6.1 Device Configurations You can adjust the settings for your EPC-12 device by selecting Device Configurations from the Settings menu. RS-485 Parameters, General Settings, Unit and Multiplier Settings, Tariff Settings, Write/Delete Index Settings can be found under Device Configurations menu. 6.1.3 Unit and Multiplier Settings You can set multipliers and denominators for the pulses that come to EPC12 inputs and define units for the counters that you are reading by clicking on Unit and multiplier settings under Device Configurations menu. In order to prevent you from forgetting the changes that are committed in this menu, changed settings will be marked red after each change. 6.1.1 RS-485 Parameters RS-485 parameters are necessary settings for the communication between your EPC-12 device and a PC. You can set these parameters from the menu settings on the EPC-12 device or by using EPC-12 Configuration Software. When you select RS-485 Parameters from Device Configurations, a screen will be displayed as below. When you change the RS-485 Parameters, Apply button will not be clickable until you check the box next to Settings you have committed here will change the settings on the device . Please confirm!. When you change these settings while you are connected to your device via Modbus/Serial, the settings you committed in the Add / Edit device window will be changed according to EPC-12 RS-485 settings by the program and the connection will be automatically reestablished. 6.1.4 Tariff Settings Holiday, Saturday, Sunday and Weekday tariff can be programmed (8 for each) under tariff settings. You can name the tariffs that you entered with numbers from 1 to 8. You can select any tariff (for example T1 tariff) more than once provided that it doesn't conflict with another tariff's time slot. If there is a previously set time slot, you will not be allowed to create another tariff in this set time slot. If you don't create any tariff, the device will save the incoming pulses to T1 tariff. Tariffs which are set as holiday tariffs are prioritized over Saturday, Sunday and weekday tariffs. If the 5th of June is set as holiday tariff and this tariff is set as T7, T7 tariff will be active when June 5th comes. If there is a tariff which is set as Saturday, Sunday or weekday in this time slot, that tariff will be deactivated for this day. You can delete a previously set tariff by selecting it and clicking on the X button on the Tariff settings window. If you are connected to your EPC-12 device via Modbus/TCP, you will lose your connection when you change the Baud Rate and Parity settings in RS-485 parameters and you will be asked to enter your Modbus TCP Gateway settings according to EPC-12 RS- 485 settings. When you enter your Modbus Gateway settings according to EPC-12 device and click on OK button, the connection will be reestablished. 4 EPC-12 Configuration Software User Manual Factory Settings User name : admin Password : 1234 6