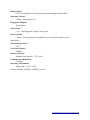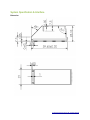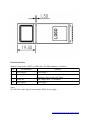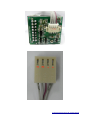
1
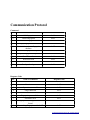
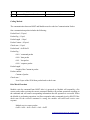
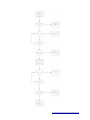
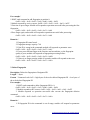
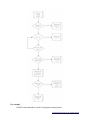
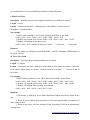
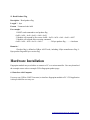
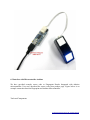
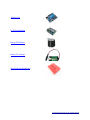
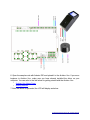
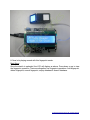
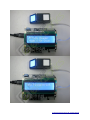
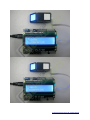
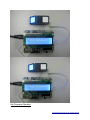
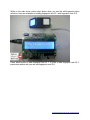
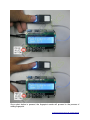
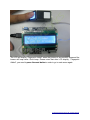
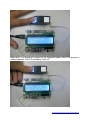
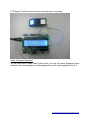
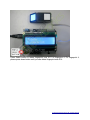
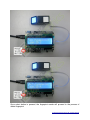
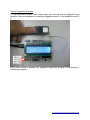
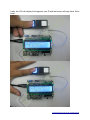
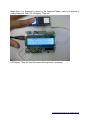
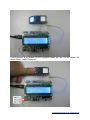
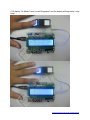
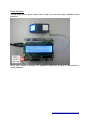
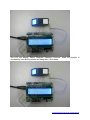
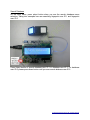
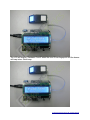
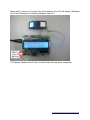
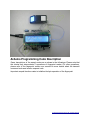
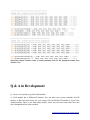
Advanced Fingerprint Module for Arduino
System Overview
FINGERPRINT background highlight optic fingerprint verification. It consists of optical
fingerprint sensor, high performance DSP processor and Flash. It boasts of functions such as
fingerprint Login, fingerprint deletion, fingerprint verification, fingerprint upload, fingerprint
download, etc. Compared to products of similar nature, FINGERPRINT enjoys the following
unique features:
● Self-proprietary Intellectual Property
Optic fingerprint collectiton device, module hardware and fingerprint algorithm are all selfdevelopment.
● High Adaptation to Fingerprints
When reading fingerprint images, it has self-adaptive parameter adjustment mechanism, which
improves imaging quality for both dry and wet fingers. It can be applied to wider public.
● Algorithm with Excellent Performance
FINGERPRINT module algorithm is specially designed according to the image generation
theory of the optical fingerprint collection device. It has excellent correction & tolerance to
deformed and poor-quality fingerprint.
● Easy to Use and Expand
User does not have to have professional know-how in fingerprint verification. User can easily
develop powerful fingerprint verification application systems based on the rich collection of
controlling command provided by FINGERPRINT module. All the commands are simple,
practical and easy for development.
● Low Power Consumption
Operation current <80mA, specially good for battery power occasions.
● Integrated Design
Fingerprint processing components and fingerprint collection components are integrated in the
same module. The size is small. And there are only 4 cables connecting with HOST, much easier
for installation and use.
Technical Specifications
Operating Voltage:
4.3V∼6V
Future Electronics Egypt Ltd. (Arduino Egypt).
Rating Voltage:
6.5V(exceeding this value will cause permanent damage to the module)
Operating Current:
<80mA(Input voltage 5V)
Fingerprint Template:
768 templates
Search Time:
<1.5s(200 fingerprint, average value in test)
Power-on Time:
<200ms(Time lapse between module power-on to module ready to receive
instructions)
Tolerated Angle Offset:
±45°
User Flash Memory:
64KByte
Interface Protocol:
Standard serial interface (TTL level)
Communication Baud Rate:
57600bps
Operating Environment:
Temperature: -10℃∼+40℃
Relative humidity: 40%RH∼85%RH(no dew)
Future Electronics Egypt Ltd. (Arduino Egypt).
System Specification & Interface
Dimension
Future Electronics Egypt Ltd. (Arduino Egypt).
Electrical Interface
Module is connected to HOST via 4PIN cable. The PIN definition is as follows:
No.
Pin Defination
Remarks
1 Power supply +
Power supply +
2 Module Tx
Open circuit output, need to use pull-up impedance in
application (Typical value:10K Ohm)
3 Module Rx
Wide voltage input, 7V affordable
4 Power supply Power supply Notes:
The PIN close to the edge of circuit board is PIN4: Power supply -.
Future Electronics Egypt Ltd. (Arduino Egypt).
Future Electronics Egypt Ltd. (Arduino Egypt).
Communication Protocol
Command
No.
Name of command
1
Add fingerprint
2
Delete fingerprint
3
Search fingerprint
4
Empty fingerprint database
5
Search information in fingerprint
database
6
Download fingerprint template
7
Upload fingerprint template
8
Read ID number
9
Read user flash
10
Write user flash
11
Read product logo
Response Code
No.
Name of command
1
Receive correct
2
Receive error
3
Operation successful
4
Finger detected
5
Time out
6
Fingerprint process failure
7
Parameter error
8
Fingerprint matching with this ID
found
9
No matching fingerprint with this ID
Command code
0x40
0x42
0x44
0x46
0x4B
0x50
0x52
0x60
0x62
0x64
0x80
Response code
0x01
0x02
0x31
0x32
0x33
0x34
0x35
0x37
0x38
Future Electronics Egypt Ltd. (Arduino Egypt).
10
11
Fingerprint found
Fingerprint unfound
0x39
0x3A
Coding Method
The communication between HOST and Module must be coded as Communication Packet.
One communication packet includes the following:
Packet Head(2 bytes)
Packet flag(1 byte)
Packet length(1 byte)
Packet Content(N bytes)
Check sum(1 byte)
Packet head:0x4D 0x58
Packet flag:
0x10:command packet
0x20:data packet
0x21:last packet
0x30:response packet
Packet length:
Length of the Content in packet
Packet content:
Content of packet
Check sum:
Low 8 bytes of the SUM from packet head to check sum.
Brief Work Flowchart
Module waits for command from HOST after it is powered on. Module will respond by a Rx
correct packet after receiving the correct command. Module will perform operations according to
the command and will return corresponding information after the operation is successful. When
the Module is performing operation, it will not respond to other command given by HOST. If the
check sum for the received command is wrong, the module will send back receive error
response.
Module receive correct packet:
0x4D + 0x58 + 0x30 + 0x01 + 0x01 + 0xD7
Future Electronics Egypt Ltd. (Arduino Egypt).
Module receive error packet:
0x4D + 0x58 + 0x30 + 0x01 + 0x02 + 0xD8
Command Description
1. Add fingerprint
Description:Add fingerprint at the designated position
Length:3 bytes
Format:Command code 0x40 + high byte of the to-be-added fingerprint ID + low byte of the
to-be-added fingerprint ID
Flowchart:
After module receives the command to add fingerprint, it goes to the status of adding fingerprint.
The flowchart is as follows:
Future Electronics Egypt Ltd. (Arduino Egypt).
Future Electronics Egypt Ltd. (Arduino Egypt).
For example:
1 HOST send command to add fingerprint at position 0:
0x4D + 0x58 + 0x10 + 0x03 + 0x40 + 0x00 + 0x00 + 0xF8
2 Module responds by receive correct: 0x4D + 0x58 + 0x30 + 0x01 + 0x01 + 0xD7
3 First time to press finger. Module will respond as operation successful after processing the first
fingerprint:
0x4D + 0x58 + 0x30 + 0x02 + 0x40 + 0x31 + 0x48
4 Press finger again, and module will respond as operation successful after processing:
0x4D + 0x58 + 0x30 + 0x02 + 0x40 + 0x31 + 0x48
Remarks:
1. Fingerprint ID starts from 0
2. Fingerprint storage capacity: 768
3. If the ID is wrong in the command, module will responds as parameter error:
0x4D + 0x58 + 0x30 + 0x02 + 0x40 + 0x35 + 0x4C
4. If user press different finger at the first time and second time, or the fingerprint
quality is poor, module will responds as fingerprint processing failure:
0x4D + 0x58 + 0x30 + 0x02 + 0x40 + 0x34 + 0x4B
5. If there is no finger pressing within 10 seconds, module will respond as time-out.
0x4D + 0x58 + 0x30 + 0x02 + 0x40 + 0x33 + 0x4A
2. Delete Fingerprint
Description: Delete the fingerprint of designated ID
Length:3 bytes
Format:Command code 0x42 + high bytes of the to-be-deleted fingerprint ID + low bytes of
the to-be-deleted fingerprint ID
For example:
1. HOST send command to delete fingerprint ID No. 0;
0x4D + 0x58 + 0x10 + 0x03 + 0x42 + 0x00 + 0x00 + 0xFA
2. Module responds as RX correct: 0x4D + 0x58 + 0x30 + 0x01 + 0x01 + 0xD7
3. Module responds as operation successful after execute the fingerprint deletion
command:
0x4D + 0x58 + 0x30 + 0x02 + 0x42 + 0x31 + 0x4A
Remarks:
1. If fingerprint ID in the command is out of range, module will respond as parameter
error:
Future Electronics Egypt Ltd. (Arduino Egypt).
0x4D + 0x58 + 0x30 + 0x02 + 0x42 + 0x35 + 0x4E
3. Search Fingerprint
Description: Searching for designated fingerprint within range
Length:5 bytes
Format:Command code 0x44 + search high bytes of starting ID + search low bytes of low
bytes + high bytes of the number of fingerprints searched + low bytes of the number of
fingerprints searched
Flowchart:
After receiving the command to search fingerprint, module will get ready to status of searching
fingerprint. See below flowchart:
Future Electronics Egypt Ltd. (Arduino Egypt).
For example:
1. HOST send command to search 16 fingerprints starting from 0:
Future Electronics Egypt Ltd. (Arduino Egypt).
0x4D + 0x58 + 0x10 + 0x05 + 0x44 + 0x00 + 0x00 + 0x00 + 0x10 + 0x0E
2. When the fingerprint is placed on the sensor window, module will respond as operation
successful:
0x4D + 0x58 + 0x30 + 0x02 + 0x44 + 0x31 + 0x4C
3. If the fingerprint is found, module will return the following:
0x4D + 0x58 + 0x30 + 0x04 + 0x44+ 0x39 + high bytes of ID for the found fingerprint +
low bytes of ID for the found fingerprint + check sum
4. If no matching fingerprint is found, module will return the following:
0x4D + 0x58 + 0x30 + 0x02 + 0x44 + 0x3A + 0x55
Remarks:
1. The number of the fingerprints that are searched starts from the ID of the first
fingerprint, for example, the search starts from fingerprint ID 0. the number of fingerprints
searched is 0x10,then the fingerprint ID actually being searched is 0∼0x0F, altogether 0x10
fingerprints.
2. If the ID in the command is wrong, module will responds as parameter error:
0x4D + 0x58 + 0x30 + 0x02 + 0x44 + 0x35 + 0x50
3. If the fingerprint quality is poor, module will respond as fingerprint processing failure:
0x4D + 0x58 + 0x30 + 0x02 + 0x44 + 0x34 + 0x4F
4. If there is no finger placing on the sensor with 10 seconds, module will respond as time
out:
0x4D + 0x58 + 0x30 + 0x02 + 0x44 + 0x33 + 0x4E
4. Empty Fingerprint Database
Description: Empty all fingerprints in fingerprint database
Length:1 byte
Format:Command code 0x46
For example:
1. HOST send command to empty fingerprint database:
0x4D + 0x58 + 0x10 + 0x01 + 0x46 + 0xFC
2. Module will respond as Rx correct: 0x4D + 0x58 + 0x30 + 0x01 + 0x01 + 0xD7
3. Module will respond as operation successful after executing command to empty
fingerprint
database:
0x4D + 0x58 + 0x30 + 0x02 + 0x46 + 0x31 + 0x4E
5. Search Fingerprint Database Information
Future Electronics Egypt Ltd. (Arduino Egypt).
Description:Search and see if there is fingerprint matching the designated ID
Length:3 bytes
Format:Command code 0x4B + high byte of the to-be-searched fingerprint ID + low
byte of the to-be-searched fingerprint ID
For example:
1. HOST send command to search fingerprint with ID 0:
0x4D + 0x58 + 0x10 + 0x03 + 0x4B + 0x00 + 0x00 + 0x03
2. Module will respond as Rx correct: 0x4D + 0x58 + 0x30 + 0x01 + 0x01 + 0xD7
3. If there is fingerprint with ID 0, module will return the following:
0x4D + 0x58 + 0x30 + 0x02 + 0x4B + 0x37 + 0x59
4. If there is no fingerprint with ID 0, module will then return the following:
0x4D + 0x58 + 0x30 + 0x02 + 0x4B + 0x38 + 0x5A
Remarks:
1. If the fingerprint ID in the command is out of range, module will respond as parameter
error:
0x4D + 0x58 + 0x30 + 0x02 + 0x4B + 0x35 + 0x57
6. Download Fingerprint Template
Description:Download a fingerprint into the module
Length:3 bytes
Format:Command code 0x50 + high byte of the to-be-downloaded fingerprint ID +
low byte of the to-be-downloaded fingerprint ID
For example:
1. HOST send a command to download a fingerprint to the position for ID 0:
0x4D + 0x58 + 0x10 + 0x03 + 0x50 + 0x00 + 0x00 + 0x08
2. Module will respond as Rx correct: 0x4D + 0x58 + 0x30 + 0x01 + 0x01 + 0xD7
3. HOST send the first data packet (packet content 128):
0x4D + 0x58 + 0x20 + 0x80 + ……128 bytes of data…… + check sum
4. Module will respond as Rx correct: 0x4D + 0x58 + 0x30 + 0x01 + 0x01 + 0xD7
5. HOST send the second data packet (packet content 128):
0x4D + 0x58 + 0x21 + 0x80 + ……128 bytes of data…… + check sum
6. Module will respond as Rx correct: 0x4D + 0x58 + 0x30 + 0x01 + 0x01 + 0xD7
7. Module will respond as operation successful: 0x4D + 0x58 + 0x30 + 0x02 +0x50 +
0x31 + 0x58
Remarks:
1. If the fingerprint ID in the command is wrong, module will respond as parameter error:
Future Electronics Egypt Ltd. (Arduino Egypt).
0x4D + 0x58 + 0x30 + 0x02 + 0x50 + 0x35 + 0x5C
7. Upload Fingerprint Template
Description:Upload fingerprint template with the designated ID
Length:3 bytes
Format:Command code 0x52 + high byte of the to-be-uploaded fingerprint ID + low byte of
the to-be-uploaded fingerprint ID.
For example:
1. HOST send a command to upload a fingerprint to the position for ID 0:
0x4D + 0x58 + 0x10 + 0x03 + 0x52 + 0x00 + 0x00 + 0x0A
2. Module will respond as Rx correct: 0x4D + 0x58 + 0x30 + 0x01 + 0x01 + 0xD7
3. Module send the first data packet
0x4D + 0x58 + 0x20 + 0x80 + ……128 bytes of data…… + check sum
4. HOST will respond as Rx correct 0x4D + 0x58 + 0x30 + 0x01 + 0x01 + 0xD7
5. Module send the second data packet
0x4D + 0x58 + 0x21 + 0x80 + ……128 bytes of data…… + check sum
Remarks:
1. If the fingerprint ID in the command is wrong, module will respond as parameter error:
0x4D + 0x58 + 0x30 + 0x02 + 0x52 + 0x35 + 0x5E
8. Read ID Number
Description:Read module ID number
Length:1 byte
Format:Command code 0x60
Example:
1. HOST send a command to read Module ID number:
0x4D + 0x58 + 0x10 + 0x01 + 0x60 + 0x16
2. Module will respond as Rx correct: 0x4D + 0x58 + 0x30 + 0x01 + 0x01 + 0xD7
3. Module will respond by 24-byte ID number after executing the command:
0x4D + 0x58 + 0x30 + 0x19 + 0x60 + ……24-byte ID number…… + check sum
Remarks:
1. ID number is set by manufacturer. User can read ID number only. Each module has
Future Electronics Egypt Ltd. (Arduino Egypt).
its own ID number. User can tell different module by reading ID number.
9. Read User Flash
Description:Read the content of the designated address in user flash in the module
Length:4 bytes
Format:Command code 0x62 + read high bytes of the address + read low bytes of
the address + read the number
For example:
1. HOST send command to read 10 data starting from ADD 0 in user flash:
0x4D + 0x58 + 0x10 + 0x04 + 0x62 + 0x00 + 0x00 + 0x0A + 0x25
2. Module will respond as Rx correct: 0x4D + 0x58 + 0x30 + 0x01 + 0x01 + 0xD7
3. Module will respond by the data it read:
0x4D + 0x58 + 0x30 + number of data read + 0x62 + ……data read…… + check sum
Remarks:
1. The memory is 64K bytes in user flash (ADD 1~0xFFFF). Maximum 128Byte data can
be read at one time.
10. Write User Flash
Description:Write data in the designated address in user Flash
Length:N+4 bytes
Format:Command code 0x64 + high bytes of the address where data to be written + low bytes
of the address where data to be written + number of data to be written + ……N bytes of data to
be written……
For example:
1. HOST send a command to write 2 Byte data in to the ADD 0 in user Flash
0x4D + 0x58 + 0x10 + 0x06 + 0x64 + 0x00 + 0x00 + 0x02 + 0x00 + 0x00 +0x21
2. Module will respond as Rx correct: 0x4D + 0x58 + 0x30 + 0x01 + 0x01 +0xD7
3. Module will respond after executing the command:
0x4D + 0x58 + 0x30 + 0x02 + 0x64 + 0x31 + 0x6C
Remarks:
1. The memory is 64K bytes in user flash. Maximum 128Byte data can be written at one
time.
2. Please do not let address go beyond limit. It will cause unpredictable consequences if
there is data outflow.
3. Please do not power off when writing in Flash. Powering off will cause unpredictable
consequences.
Future Electronics Egypt Ltd. (Arduino Egypt).
11. Read Product Flag
Description:Read product flag
Length:1 byte
Format:Command code 0x80
For example:
1. HOST send command to read product flag
0x4D + 0x58 + 0x10 + 0x01 + 0x80 + 0x36
2. Module will respond by Rx correct: 0x4D + 0x58 + 0x30 + 0x01 + 0x01 + 0xD7
3. Module will respond after executing command:
0x4D + 0x58 + 0x30 + 0x19 + 0x80 +
……24-byte product flag…… + checksum
Remarks:
1 Product flag is defined as 24Byte ASCII code, including 8-Byte manufacturer flag, 8Byte product flag and 8-byte version flag.
Hardware Installation
Fingerprint module may used either to connect to PC or to microcontroller. User may download
the example source code or example GUI in fingerprint product page.
6.1 Interface with Computer
User may use (USB to UART Converter) to interface fingerprint module to PC. GUI Application
is also provided for user easy use.
Future Electronics Egypt Ltd. (Arduino Egypt).
6.2 Interface with Microcontroller Arduino
We have provided example source code to Fingerprint Reader Integrated with Arduino
microcontroller. User may download the source code from product page. Figure below is an
example connection between Fingerprint and Arduino Microcontroller.
Tools and Components
Future Electronics Egypt Ltd. (Arduino Egypt).
Arduino Uno
LCD Keypad Shield
Buzzer-PCB Mount
Battery 9V with cap
Mini Solderless Breadboard
Future Electronics Egypt Ltd. (Arduino Egypt).
6. Open the sample code with Arduino IDE and upload it to the Arduino Uno. If you are a
beginner to Arduino Uno, make sure you have already installed the driver on your
computer. You can refer to the link below for getting started with the Arduino Uno.
•
Arduino Uno Home Page
•
Getting Started
7. After the sketch is uploaded, the LCD will display as below:
Future Electronics Egypt Ltd. (Arduino Egypt).
8. Now, letʼs playing around with this fingerprint reader.
Main Menu
Once the sketch is uploaded, the LCD will display as above. Press down or up to view
the fingerprint operation. There are altogether five fingerprint operations. Add fingerprint,
delete fingerprint, search fingerprint, empty database & search database.
Future Electronics Egypt Ltd. (Arduino Egypt).
Future Electronics Egypt Ltd. (Arduino Egypt).
Future Electronics Egypt Ltd. (Arduino Egypt).
Add Fingerprint Operation
Future Electronics Egypt Ltd. (Arduino Egypt).
While on the main menu, press select button when you see the add fingerprint menu
selection. Here are examples on adding fingerprint user ID 1 and fingerprint user ID 5.
Press Select button to add fingerprint user ID 1. In order to add fingerprint user ID 5,
press down button until you see add fingerprint user ID 5.
Future Electronics Egypt Ltd. (Arduino Egypt).
Once select button is pressed, the fingerprint reader will proceed to the process of
adding fingerprint.
Future Electronics Egypt Ltd. (Arduino Egypt).
The LCD will display “Fingerprint Added” when the process is successfully done and the
buzzer will beep twice. Short beep. Please noted that after LCD display “Fingerprint
Added”, you need to press the reset button in order to go to main menu again.
Future Electronics Egypt Ltd. (Arduino Egypt).
Mean while, if no fingerprint is placed on the fingerprint reader, there is no process of
adding fingerprint. The LCD will display “Time out.”
Future Electronics Egypt Ltd. (Arduino Egypt).
LCD display “Time Out” and the buzzer will beep twice. Long beep.
Delete Fingerprint Operation
On the main menu, press select button when you see the delete fingerprint menu
selection. Here are examples on adding fingerprint user ID 2 and fingerprint user ID 4.
Future Electronics Egypt Ltd. (Arduino Egypt).
Press Select button to delete fingerprint user ID 2 or fingerprint 4. For fingerprint 4,
please press down button until you see delete fingerprint user ID 4.
Future Electronics Egypt Ltd. (Arduino Egypt).
Once select button is pressed, the fingerprint reader will proceed to the process of
delete fingerprint.
Future Electronics Egypt Ltd. (Arduino Egypt).
The LCD will display “Delete Fingerprint Operation Success” when the process is
successfully done and the buzzer will beep twice. Short beep.
Future Electronics Egypt Ltd. (Arduino Egypt).
Search Fingerprint Operation
On the main menu, press select button when you see the search fingerprint menu
selection. Here are examples on searching fingerprint user ID 1 and fingerprint user ID
5.
Once select button is pressed, the fingerprint reader will proceed to the process of
searching fingerprint.
Future Electronics Egypt Ltd. (Arduino Egypt).
The LCD will display “Search FPrint Operation Success” when the process is
successfully done.
Future Electronics Egypt Ltd. (Arduino Egypt).
Lastly, the LCD will display the fingerprint user ID and the buzzer will beep twice. Short
beep.
Future Electronics Egypt Ltd. (Arduino Egypt).
Mean while, if no fingerprint is placed on the fingerprint reader, there is no process of
adding fingerprint. The LCD will display “Time out.”
LCD display “Time Out” and the buzzer will beep twice. Long beep.
Future Electronics Egypt Ltd. (Arduino Egypt).
If the fingerprint is not added into the fingerprint reader yet, the LCD will display “No
Match Found, Invalid Fingerprint”
Future Electronics Egypt Ltd. (Arduino Egypt).
LCD display “No Match Found, Invalid Fingerprint” and the buzzer will beep twice. Long
beep.
Future Electronics Egypt Ltd. (Arduino Egypt).
Empty Database
On the main menu, press select button when you see the empty database menu
selection.
Once select button is pressed, the fingerprint reader will proceed to the process of
empty database
Future Electronics Egypt Ltd. (Arduino Egypt).
The LCD will display “Empty Database Operation Success” when the process is
successfully done and the buzzer will beep twice. Short beep.
Future Electronics Egypt Ltd. (Arduino Egypt).
Search Database
On the main menu, press select button when you see the search database menu
selection. Taking into examples here are searching fingerprint user ID 1 and fingerprint
user ID 5.
Press Select button to search database user ID 1 or database user ID 5. For database
user ID 5, please press down button until you see search database user ID 5.
Future Electronics Egypt Ltd. (Arduino Egypt).
Once select button is pressed, the fingerprint reader will proceed to the process of
searching fingerprint.
Future Electronics Egypt Ltd. (Arduino Egypt).
The LCD will display “Database Found” when the user ID has fingerprint and the buzzer
will beep twice. Short beep.
Future Electronics Egypt Ltd. (Arduino Egypt).
Mean while, if the user ID doesnʼt has the fingerprint, the LCD will display “Database
Not Found” Examples on Searching Database User ID 3.
LCD display “Database Not Found” and the buzzer will beep twice. Long beep.
Future Electronics Egypt Ltd. (Arduino Egypt).
Arduino Programming Code Description
Some descriptions of the sample code are as shown in the followings: Please note that
this tutorial only demonstrate 5 operations of fingerprint reader. For other operations,
please refer to the fingerprint reader user manual for more details about the transmit
command code and receive respond code.
Important sample function codes to initialize the byte operation of the fingerprint.
Future Electronics Egypt Ltd. (Arduino Egypt).
Important sample function codes to send command code for the fingerprint reader from
Arduino Uno
Q & A in Development
Q:How to correspond my product with Module?
A:Each module has a different ID number. You can make your system remember this ID
number, so that each time before use your system will read Module ID number to check if the
module matches. There is user flash in the module, where user can write some related user info
to be distinguished from other modules.
Future Electronics Egypt Ltd. (Arduino Egypt).
Q:How to record the correspondence between fingerprint data and fingerprint owner?
A:User is responsible for setting up the correspondence between fingerprint data and
fingerprint owner. For example, if the maximum capacity in your system is for 100 people with 2
fingerprints for each person in your system, you make your own rules of managing the
fingerprints and the owners, such as Person No. 0’s No.0 fingerprint corresponding to the
fingerprint template in ADD 0 in the module; Person No. 0’s No. 1 fingerprint corresponding to
the fingerprint template in ADD 1 in the module; Person No. 1’s No. 0 fingerprint corresponding
to the fingerprint template in ADD 2 in the module, etc.When searching, module will respond by
the address of the matching fingerprint template to determine the fingerprint owner. If the
module returns ADD 4 of the matching fingerprint, it means it matches with Person No. 2’s No. 0
fingerprint. There is a 64Kbyte user Flash to store relevant information. You can set up a table to
record all people’s related information. Please update this table if user adds or deletes
fingerprints.
Q:How to improve the speed of response?
A:When searching fingerprints, module will respond by operation successful after detecting the
finger. HOST can give indication after receiving the operation successful response, such as buzz
for some period of time (such as 400ms). By doing so, User may feel much quicker.
Q:How to make it easier to use?
A:There are plenty of ways to make module easier to use:
1. Try to use the THUMB or INDEX finger, because the size is big and the fingerprint quality is
better.
2. Try to place the finger in alignment with the sensor window
3. When use, try to place the fingerer at the same position as when it enrolls.
4. Avoid direct sunshine when use.
Q:How to decrease power consumption?
A:Power off the module when it is not being used. Power on the module when system
requires fingerprint verification. It takes a very short time to start the module.
Module responds quickly.
Q:For login and search command, if there is no finger placed, it takes long to get a
response. What to do if I want the module to execute other functions?
A:User will have to wait until the current command is executed. Or user can power
off the module and re-power on. It takes a very short time to start the module.
Module responds quickly.
Q:If there is an existing fingerprint in a certain address, and what will happen if I add
Future Electronics Egypt Ltd. (Arduino Egypt).
fingerprint at this same address?
A:The old fingerprint will be covered.
Q:How to set different user authorization?
A:You can set by yourself in your program. For example, if your setting is that
fingerprints 0-9 are for Administration, the 10 fingerprints have to be all verified
when login or delete fingerprint.
Future Electronics Egypt Ltd. (Arduino Egypt).