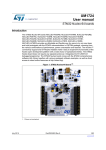
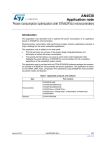
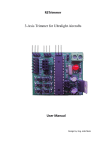
1
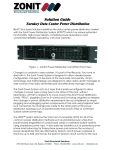
1. POINTS OF ATTENTION UPON DELIVERY 1.1. All chairs All chairs are packed in a box on a pallet. Remove all packaging before preparing the chair. Mounting the backrest in the correct position: For transportation purposes the backrest is assembled on the chair but not yet connected to the backrest motor. To connect this you need to assemble the mounting pin at the sub frame of the backrest and the backrest motor. Service Information Fitform 574 Vario Nordic - 2013 1 Positioning the adjustable headrest: The headrest of the chair is adjustable. Adjust the headrest by taking the top of the headrest (on both sides) into your hands and moving it forwards or backwards. (This can also be done by the user while sitting in the chair). 1.2. Chairs with revolving platform For transportation purposes the revolving platform is always locked Service Information Fitform 574 Vario Nordic - 2013 2 1.3. Chairs with swivelling side panel To prevent transport damage, the pivot part of the chair has been protected with a so-called ‘transport protection screw’. Remove this ‘transport protection screw’ before using the swivelling side panel. Fully extend the footrest. When there is a tilt function on the chair: move the chair into its maximum tilting position. Remove the transport safety screws located at the front of the chair (on the inside of the mounting plate, one on each side). The transport safety screws can be identified by their red stickers. 2. DISASSEMBLY – ASSEMBLY INSTRUCTIONS Whenever it is not possible to deliver the Fitform 574 Vario Nordic at your client as a fully mounted chair, we recommend that you transport the chair in parts and to assemble it on location. Below you will find the easiest, safest and most reliable method to do this, described from a completely mounted chair. 2.1. Disassembly of the side panels (required time: approx. 5 minutes) Loosen the Velcro attachment of the rear flap. Service Information Fitform 574 Vario Nordic - 2013 3 2.2. Remove the rear wing bolts with which the side panels are connected to the mechanism (both left and right) Extend the footrest completely by using the hand control (if the chair also has a tilt function, tilt the chair by using the hand control to maximum level backwards) Remove the front wing bolts with which the side panels are connected to the mechanism (both left and right) Take the cable of the hand control out of the supply unit and carefully remove both side panels. Disassembly of the backrest (required time: approx. 3 minutes) Take the cable of the backrest motor out of the supply unit. Remove the mounting bolts of the back hinges and gently shove the backrest backwards off the mechanism. Service Information Fitform 574 Vario Nordic - 2013 4 2.3. 2.4. Assembly of the backrest (required time: approx. 3 minutes) Gently shove the backrest forwards into the mechanism at the desired sitting depth Place the mounting bolts into the holes that correspond with the desired sitting depth and fasten them Connect the cable of the backrest motor into the supply unit Assembly of the sidepanels (required time: approx. 5 minutes) Hang the side panel with the hand control on the mechanism and connect the cable of the hand control into the supply unit. Please make sure that the cable cannot get entangled anywhere in the mechanism! Hang the other side panel on the mechanism as well. Service Information Fitform 574 Vario Nordic - 2013 5 Extend the footrest completely by using the hand control (if the chair also has a tilt function, tilt the chair by using the hand control to maximum level backwards) Fasten the front wing bolts with which the side panels get connected to the mechanism (both left and right) Fasten the rear wing bolts with which the side panels get connected to the mechanism (both left and right) Fasten the Velcro attachment of the rear flap Service Information Fitform 574 Vario Nordic - 2013 6 3. INSTALLING THE REVOLVING PLATFORM UNDER AN EXISTING CHAIR Let the chair rise to the stand-up position. Place the chair on its left side ( be aware of the hand control). Take off the two side bars . Mount the complete new base (which consists of a ground plate, a locking mechanism, two side bars with wheels and the connected Bowden cable) at the desired sitting height. The extra double support wheels should be in the back. Service Information Fitform 574 Vario Nordic - 2013 7 Mount the handling mechanism on top of the upper frame with four plate screws. Keep approx 5 cm room for the clamps of the seat plate. (Lead the Bowden cable around the motors and supply unit.) Put the four gliders underneath the seat cushion plate and mount the operating cassette at approx. 25 cm from the front side of the plate on the right side. Connect the cord from the operating mechanism with the handling mechanism and adjust the length of the cord with the clip. Service Information Fitform 574 Vario Nordic - 2013 8 Attach the operating mechanism to the upper frame of the chair mechanism with an elastic, from the cord recess to the hole on top of the upper frame side bar. On the right side in the back, attach the bowden cable to the upper frame with an elastic in the rear hole on top of the upper frame side bar. Put the prepared seat cushion plate back onto the chair mechanism. Service Information Fitform 574 Vario Nordic - 2013 9 4. REPLACING UPHOLSTERED PARTS & COVERS 4.1. Replacing the upholstered seat cushion The loose seat cushion is positioned on the seating frame with Velcro. It is therefore very easy to take it out en replace it. 4.2. Replacing only the cover of the seat cushion The cover has a zipper. If you unzip, the cover automatically comes loose. You can replace the cover en tighten the zipper. 4.3. Replacing the backrest The back rest can easily be taken off the metal back frame. The upholstered cushion can also be taken out without removing the complete backrest. Service Information Fitform 574 Vario Nordic - 2013 10 4.4. Replacing only the cover of the backrest The cover of the backrest can easily be removed without taking out the backrest. All you have to do is unzip and then loosen the Velcro. Into the cover there is a 4.5. Replacing the armrest Open the zipper that is hidden on the side panel. Behind the zipper at the top of the side panel you find a grip bolt. If you loosen this bolt, the armrest can be moved up and down. In the highest position you can easily take the armrest out. Service Information Fitform 574 Vario Nordic - 2013 11 4.6. Replacing only the cover of the armrest For replacing the cover of the armrest you could take it out first, but it can also be done while it is still mounted on the chair. Loosen de Velcro and take the cover of. Place a new cover by tightening the Velcro. 4.7. Replacing the cover of the footrest (large part) Use the hand control to let the footrest come out. The cover of the large footrest has the foam sewed in. Take off the Velcro all around and the complete cover comes off. Replace the new cover by tightening the Velcro all around. 4.8. Replacing the cover of the footrest (small part) Use the hand control to let the footrest come out. The cover of the small footrest has the foam sewed in. Take off the Velcro all around and the complete cover comes off. Replace the new cover by tightening the Velcro all around. 4.9. Replacing the cover of the side panel In order to replace the cover of the side panel, this has to be disassembled. Instructions you will find in 2.1. After a side panel is disassembled you take off the Velcro all around and the complete cover comes off. Replace the new cover by tightening the Velcro all around. Assemble the side panel as described in 2.4 Service Information Fitform 574 Vario Nordic - 2013 12 4.10. Replacing the hand control In order to replace the hand control you have to disassemble the side panel with the hand control. You can find the Instructions under 2.1. When the side panel is loose, mount the new hand control into the side panel, the wire goes through the hole in the side panel. Hang the side panel on the mechanism and connect the cable of the hand control into the supply unit. Please make sure that the cable cannot get entangled anywhere in the mechanism! Assemble the side panel as instructed under 2.4. 5. CHANGING THE MEASUREMENTS OF THE CHAIR 5.1. Changing the sitting height Move the chair to the stand-up position. Tilt the chair to one of the sides (please be careful where to put the hand control!) Loosen the 4 slide block screws: 2x on the left side en 2x on the right Set slide blocks to the required height: use the scales on the inside of the side blocks and make sure that left and right are at the same height. Tighten the screws Move up the chair again and position the chair in the neutral position. Service Information Fitform 574 Vario Nordic - 2013 13 5.2. Changing the sitting depth Loosen flap on the back. Loosen back frame hinge bolts Adjust back hinge to the required seat depth: in increments of 2 cm see scale. Re-install hinge bolts into the seat frame. 5.3 Changing the armrest height Open the zipper on the side panel of the chair Find the grip bolt inside and screw it loose Now you can adjust the armrest height Tighten the knob again and close the zipper Service Information Fitform 574 Vario Nordic - 2013 14 5.4 Changing the length of the footrest Use the hand control to let the footrest come out. Loosen the flap on the back and on the side (both fixed with Velcro) Loosen the U-profile side screws. Adjust footrest to the required dimensions (overall length footrest should not exceed 40 cm) NOTE: The footrest must not touch the floor in collapsed position (minimum distance to the ground: 1 cm.) Tighten the screws and attach the flaps. Service Information Fitform 574 Vario Nordic - 2013 15 5.5. Changing the riser movement The stand-up movement of the Fitform Vario 574 Nordic can be adjusted to 4 different movements, from straight up to tilting far forward. Disconnect the 230 V cable from the power socket Lay the chair to its back. Remove the M8 nut on the outside of the strips (wrench nr. 13). Carefully tap the hinge bolt from the inner strip; use a nylon hammer. The lower frame can now be moved apart. This will allow you to replace the bearing bushes on the tube with ease. Remove the bearing bushes and the nylon washer. Reposition the bearing bushes to the required position (Note: they go into the outer strip!) Note: The hole in the inner strip must match the hole in the outer strip (install the 1st hole of the inner strip onto the 1st hole of the outer strip, the 2nd hole of the inner strip onto the 2nd hole of the outer strip, etc). (1st hole = stand-up position 2) (2nd hole = stand-up position 3) (3rd hole = stand-up position 4) (4th hole = stand-up position 5) Hinge point facing front : the stand-up movement will tilt more Hinge point facing back : the stand-up movement will be more upright Check whether the holes of the other shears also match (on the opposite side of the mechanism). Install the hinge screw, the nylon washer, the lock washer and the M8 locknut. Service Information Fitform 574 Vario Nordic - 2013 16 6. TECHNICAL SPECIFICATIONS Body : wooden frame with MDF Backrest : metal frame with webbing Seat frame : plywood with steel no-sag springs Seat cushion : polyurethane moulded foam densitiy 65 Back cushion : polyurethane moulded foam densitiy 65 Mechanism : standard up to 175 kg. body weight Drive system : Linak 3 motors 6000 N. (CE) 24 VDC with PDS gear system overload protection complies with AND Standard Hand control : very light pushbuttons with coloured icons Service Information Fitform 574 Vario Nordic - 2013 17 7. TROUBLESHOOTING 7.1 Warning The mechanism has been fitted with a very powerful motor (4000-6000 Newton). Always take utmost care when working on the chair to ensure that you do not get trapped between the moving parts of the mechanism. The motors operate at a (safe) voltage of 24 Volts. Only the power cable and a part of the transformer are at 230 Volts. 7.2 Technical wiring specifications motors, power supply and hand control Electronic wiring: 2 1 3 4 7 5 8 6 1. Supply unit in grey 5. Connection cable divider in grey 2. Medium size motor = backrest 6. Different connection cables in grey 3. Smallest motor = footrest 7. Main cable in black 4. Longest motor = riser-tilt function 8. Handcontrol in black with colours & pictures. Service Information Fitform 574 Vario Nordic - 2013 18 Mechanism components: Service Information Fitform 574 Vario Nordic - 2013 19 Mechanism components list: Benstøtte stol oppreis Fitform Nordic 45cm mekanisme Benstøtte stol oppreis Fitform Nordic 51cm mekanisme Benstøtte stol oppreis Fitform Nordic 57cm mekanisme Benstøtte stol oppreis Fitform Nordic 63cm mekanisme Betjeningspanel stol oppreis Fitform Nordic 3motors u tilt Betjeningspanel stol oppreis Fitform Nordic Tilt 3motors Bøyle stol oppreis Fitform Nordic feste av betjboks Elektronikk stol oppreis Fitform Nordic Endestopper stol Fitform oval Festesplint motor stol Fitform kort Festesplint motor stol Fitform lang Festesplint motor stol Fitform medium Firkantmutter stol Fitform M8 Fotplate stol oppreis Fitform Nordic sb51 u trekk Fotplate stol oppreis Fitform Nordic sb57 u trekk Fotplate stol oppreis Fitform Nordic sb63 u trekk Fotplate stol oppreis Fitform Nordicsb45 u trekk Glidenagle stol Fitform Lamellstopper stol Fitform med M8 Løfteramme stol oppreis Fitform Nordic sb45 Løfteramme stol oppreis Fitform Nordic sb51 Løfteramme stol oppreis Fitform Nordic sb57 Løfteramme stol oppreis Fitform Nordic sb63 Kabel stol oppreis Fitform Nordic motor Motor stol oppreis Fitform lNordic løft/tilt Motor stol oppreis Fitform Niordic rygg Motor stol oppreis Fitform Nordic benstøtte Nettkabel stol oppreis Fitform Nordic Armlen stol oppreis Fitform Nordic hreg u trekk hø Armlen stol oppreis Fitform Nordic hreg u trekk ve Ryggramme stol oppreis Fitform Nordic std sb45 rh84 Ryggramme stol oppreis Fitform Nordic std sb51 rh84 Ryggramme stol oppreis Fitform Nordic std sb57 rh84 Ryggramme stol oppreis Fitform Nordic std sb63 rh84 Ryggramme stol oppreis Fitform Nordicstd sb45 rh72 Sikkerhetskjerm stol Fitform liten Sikkerhetskjerm stol Fitform stor Underdel / ben stol oppreis Fitform Nordic løfteramme hreg hø/ve Understell stol oppreis Fitform Nordic svingbart sb45 hreg automatisk låsing montsett Understell stol oppreis Fitform Nordic svingbart sb51 hreg automatisk låsing montsett Understell stol oppreis Fitform Nordic svingbart sb57 hreg automatisk låsing montsett 170kg Understell stol oppreis Fitform Nordic svingbart sb63 hreg automatisk låsing montsett 250kg Utløser t/svingskive Fitform Service Information Fitform 574 Vario Nordic - 2013 FP671-45 FP671-51 FP671-57 FP671-63 FN506-1 FN505 FN619-77 FN508 FV-ES01 FV-BPA3 FV-BPA1 FV-BPA2 FV-RM81 FN670-51 FN670-57 FN670-63 FN670-45 FV-GLN1 FV-LST3 FP-VM3-45 FP-VM3-51 FP-VM3-57 FP-VM3-63 FN-MK FN500 FN503 FN501 FN-NK FN680-H FN680-V FN50-4584 FN50-5184 FN50-5784 FN50-6384 FN50-4572 FV-VPK2 FV-VPK1 FV690 FN120-45 FN120-51 FN120-57 FN120-63 FV01 20 Chair components list: Sidevange oppreis stol Fitform Nordic u trekk hø Sidevange oppreis stol Fitform Nordic u trekk ve Pute nakke standardkonfigurasjon stol oppreis Fitform Nordic alle mod hud Pute nakke standardkonfigurasjon stol oppreis Fitform Nordic alle mod stoff Pute sete stamdardkonfigurasjon stol oppreis Fitform Nordic 45cm hud sort Pute sete stamdardkonfigurasjon stol oppreis Fitform Nordic 45cm stoff grå Pute sete stamdardkonfigurasjon stol oppreis Fitform Nordic 51cm hud sort Pute sete stamdardkonfigurasjon stol oppreis Fitform Nordic 51cm stoff grå Pute sete stamdardkonfigurasjon stol oppreis Fitform Nordic 57cm hud sort Pute sete stamdardkonfigurasjon stol oppreis Fitform Nordic 57cm stoff grå Pute sete stamdardkonfigurasjon stol oppreis Fitform Nordic 63cm hud sort Pute sete stamdardkonfigurasjon stol oppreis Fitform Nordic 63cm stoff grå Pute rygg stamdardkonfigurasjon stol oppreis Fitform Nordic 45cm rh72 hud sort Pute rygg stamdardkonfigurasjon stol oppreis Fitform Nordic 45cm rh72 stoff grå Pute rygg stamdardkonfigurasjon stol oppreis Fitform Nordic 45cm rh84 hud sort Pute rygg stamdardkonfigurasjon stol oppreis Fitform Nordic 45cm rh84 stoff grå Pute rygg stamdardkonfigurasjon stol oppreis Fitform Nordic 51cm hud sort Pute rygg stamdardkonfigurasjon stol oppreis Fitform Nordic 51cm stoff grå Pute rygg stamdardkonfigurasjon stol oppreis Fitform Nordic 57cm hud sort Pute rygg stamdardkonfigurasjon stol oppreis Fitform Nordic 57cm stoff grå Pute rygg stamdardkonfigurasjon stol oppreis Fitform Nordic 63cm hud sort Pute rygg stamdardkonfigurasjon stol oppreis Fitform Nordic 63cm stoff grå Armlen stol oppreis Fitform Nordic hreg u trekk ve Armlen stol oppreis Fitform Nordic hreg u trekk hø Skumpolstring ryggpute stol oppreis Fitform Nordic Skumpolstring setepute stol oppreis Fitform Nordic Service Information Fitform 574 Vario Nordic - 2013 FN685-H FN685-V FN100-S08 FN100 FN140-45-S08 FN140-45 FN140-51-S08 FN140-51 FN140-57-S08 FN140-57 FN140-63-S08 FN140-63 FN610-4572-S08 FN610-4572 FN610-4584-S08 FN610-4584 FN610-5184-S08 FN610-5184 FN610-5784-S08 FN610-5784 FN610-6384-S08 FN610-6384 FN680-V FN680-H FN619 FN649 21 7.3 Instructions for the Linak actuator software “Hot plugging” the handcontrol IMPORTANT If you intent to place or remove the hand control from the control box, you ALWAYS need to take the 230 Vac. cable from the wall socket first. If you forget, there is a slight chance that the control box will be damaged permanently. Software error When you hear a repeating beep sound from the control box and the actuators do not function at all, a software error has occurred. You need to press the two red buttons simultaneously for 10 seconds. As soon as the sound is gone, the procedure is completed. In case this error occurs again immediately, there is another problem (such as: cable blockage f.i.) Safety lock If it is important that the hand control cannot be operated (f.i. by the user), you can activate a safety lock. To do so, press the red tilt button and the blue open backrest button simultaneously for 8 seconds. If you hear 1 beep, the safety lock is activated. If you hear 2 beeps, the safety lock is switched off again. Programming the neutral position If you would like to program a new neutral position between rising and tilt, this can be done by positioning the chair in the neutral position that you would like to program. Then press the 3 buttons of the left row on the hand control for 8 seconds. If you hear a beep, the new neutral position is programmed. Service Information Fitform 574 Vario Nordic - 2013 22 7.4 Troubleshooting - What to do? The easiest way to solve (electronic) failures, is to replace parts. This costs relatively little time, so the user replacement. Problem: Chair does not operate: Verify that the power plug is plugged in and/or that there is power. When the chair still does not operate, replace the transformer, supply unit or the hand control. Problem: Chair operates only partly: First check whether the motor of the malfunctioning part is defective. This can be done by replacing the respective motor. How to change the motor: Unplug the 230 VAC cable from the socket. To change the main motor or the footrest motor, place the chair on its left side. To change the backrest motor you can leave the chair upwards. Disconnect the 24 VDC cable from the motor. Undo the pins in front and back of the motor. Replace the motor and mount the pins. Connect the new motor to the switch box. Note: When it is hard to undo the pins you can rock the frame a bit by hand, so there will be less stress on the pins. If changing the motor does not have the desired effect, check the wiring (are the plugs well-connected, etc.). If this does not solve the problem, replace the hand control. 7.4 User safety Wellco has fitted the chair with a safety switch for the safety of the user. It is operated by software and ensures that the footrest cannot extend when the chair is in the stand-up position; it also ensures that the footrest automatically retracts when the chair is in the relax position and the user wants to move the chair to stand up. In The Fitform 574 Vario Nordic this is controlled by software. Ensure that the chair is moved entirely to the lower position. IF NOT, THE FOOTREST WILL NOT EXTEND ! 7.5 Chair maintenance Every chair comes with a user manual. The manual also informs you on how to best maintain the chair. Lubricants will dry out at high temperatures! Although only minimal lubrication is required, the occasional drop of light aerosol oil may be needed to solve the problem of a creaking chair. Service Information Fitform 574 Vario Nordic - 2013 23