1
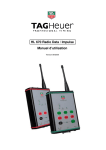
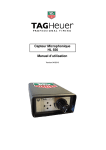
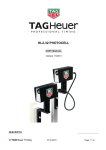
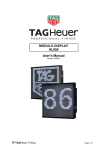
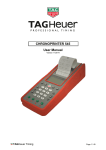
Mini-Display HL975 User Manual Version 11/2014 TAGHeuer Timing Page 1 / 20 Chapter 1. Concept 2. MiniDisplay description 3. HL975 Manager 3.1. 3.2. 3.3. Manager Tools Written Configuration Printer Emulator 4. Operation Mode 4.1. Parameters 4.1.1. Display Address 4.1.2. Default Line colour 4.1.3. Display delay 4.1.4. Display Time mode 4.1.5. RS232 PC 4.1.6. RS232 AUX 4.2. Option 4.2.1. « 2 Inputs » option (Menu TIMING) 4.3. Synchro 4.3.1. Automatic Synchro at Zero : 4.3.2. Manual time of day synchronisation : 4.3.3. Slave synchro : 4.3.4. Synchro with HL975 Manager :: 4.4. PTB Mode 4.5. Speed Mode 4.6. Counter Mode 4.7. Start Light Mode 4.8. Display Mode 4.8.1. Advertising programming 4.9. Clock Mode 4.10. Count Down Mode 5. Mode change without PC 6. Configurations 6.1. 6.2. 6.3. 6.4. 6.5. Synchronise MiniTimer – MiniDisplay Two MiniDisplays in series with MiniDisplay Manager Speed and Running time using two MiniDisplays Net Time with intermediate Start-Finish with MiniDisplay and MiniDisplay software 7. Recommendations for Use 8. Technical specification 8.1. 8.2. 8.3. Characteristics of HL975 Available colours Pin out RS232 TAGHeuer Timing 3 3 4 4 4 4 5 5 5 5 5 5 5 5 6 6 6 6 6 7 7 7 8 9 10 11 12 12 13 13 14 14 14 15 16 17 18 18 18 18 18 Page 2 / 20 1. Concept The new Matrix Display HL975 was developed to meet requirements in terms of visibility, flexibility and high performance. This new concept of Display also incorporates many options combining precision and comfort for all timekeepers. With its revolutionary design, and storage system, this new Display is easy to transport and install in all circumstances. Important! Do not forget to register your product online at: http://www.tagheuer-timing.com/tools/product-register The Mini Display is delivered with the « HL975 Manager » for programming the different modes via PC. Once the MiniDisplay is programmed, it is possible to select the mode, and use it without a PC. 2. MiniDisplay description The MiniDisplay can be installed on a camera tripod, with its 1/4" inch Whitworth tripod mount. It consists of 2 LED Matrix boards of 8x24 LEDs. The Mini Display has 2 physical configurations: Closed : can be used as a double sided display of 2x 4 characters Open: provides a single sided display of 1x 8 characters Located At the back of the display, you will find: Power plug (Power supply HL940-3) 4 position selector (OFF, 1 to 3 Brightness) This selector allows you to select desired mode when running without a PC Two Sub-D9p connector o Inner : Input RS232 / RS485 / Synchro IN o Outer : Output RS232 / Synchro OUT One option Socket (« 2 impulse Inputs », « Ethernet » or « GSM ») Power LED Port RS232-AUX Selector Port RS232-PC Power Connector TAGHeuer Timing Page 3 / 20 3. HL975 Manager The HL975 Manager allows you to configure the MiniDisplay. 3.1. Manager Tools On the Top Manager Toolbar, you have several tools available. Setting to connect the Manager to the MiniDisplay Manager Setting MiniDisplay / Manager user’s manual Information – Manager version Quit Manager 3.2. Written Configuration On the bottom right toolbar you have several tools to save & load the settings: Write setting / configuration into the MiniDisplay Save setting / configuration into a file Load setting / Configuration file Quit and display the chrono print emulator 3.3. Printer Emulator On your right of the Manager, you have an exact copy of the information that the MiniDisplay will provide via the thermal printer available as an accessory Several options are available: Update Printer Manager with the actual run Save the Printing information Clear the Printing information (no impact on the MiniDisplay) Load the Printing information Print the Printing information into a TXT File Put an “X” in front of the time. This information is only for the Manager and does not modify the MiniDisplay data Warning information in front of a time. This information is only for the Manager and does not modify the MiniDisplay data Accept a time / remove signal Warning and “X”. This information is only for the Manager and does not modify the MiniDisplay data TAGHeuer Timing Page 4 / 20 4. Operation Mode The Mini Display has several operating modes, depending on which timing option is required. 4.1. Parameters The same parameter settings are set for all operating modes: 4.1.1. Display Address Each display has its own user-configurable address. This configurable address is used in the standard communication protocol. If you select line 0, it allows for an automatic daisy chaining (linking) of several displays. When the HL975 is connected directly to the MiniDisplay for example, in Training mode, you will display on line 1: running time and Line 2: bib number By putting the selection line = 0, the first HL975 be considered as n°1 and the second HL975 as n°2 and so on. 4.1.2. Default Line colour User selectable default LED colour (see chapter 8.2). 4.1.3. Display delay Determines the length of time each message or item of data is displayed for. The delay is between 0.5 to 9.5 sec. 4.1.4. Display Time mode This menu is only available when the « 2 inputs » option is installed. Two modes of display: HH:mm:ss Hours, Minutes and seconds (total of 8 characters) mm:ss.dc Minutes, seconds, 1/10 and 1/100 of seconds (total of 8 characters) 4.1.5. RS232 PC Several communication baud rates are available from 2400 to 57600 bps. This COM port is the main communication port of the display. It is also used as Input when several displays are linked together. 4.1.6. RS232 AUX Several communication baud rates are available from 2400 to 57600 bps This COM port is used as an auxiliary bus and as an output when several displays are linked together (see chapter 8). Several selections are available Printer: To connect a serial printer E.g. TAG Heuer HL200 PC – RS232 Data: To connect the HL975 to a PC or other timing device Display: to connect another display, E.g. a second HL975 PC & Display: to connect a PC / Timer device or Display. Remarks The « HL975 Manager » can be connected both to the RS232-PC or RS232-AUX It is very useful when you can to use the « HL975 Manager » and the MiniDisplay is synchronized in « Slave » mode. TAGHeuer Timing Page 5 / 20 4.2. Option 4.2.1. « 2 Inputs » option (Menu TIMING) This option ensures highly accurate measurements from the MiniDisplay HL975. The settings for this option are available in the menu « Timing » within the « HL975 Manager ». Quartz thermo-compensated 12,8MHz, Accuracy +/- 0.5 ppm at 25°C +/- 1.5 ppm between -20°C and +55°C Connection 2 x 4mm banana plug connectors Configuration Mapping « 1-2 », « 3-4 », « 5-6 », « 7-8 » Time base 1 sec to 1/100'000 sec Locking input from 0.01 sec to 9.99 sec Input Status Inputs / Output / Locked Input = Transmit (open for photocells) Output = Receiving (from other timing devices such as CP540, HL440 or HL940). Locked = Input locked for Transmitting / Receiving 4.3. Synchro Several modes of synchro are available with the MiniDisplay. It is used to synchronize the mini display with time of day. By default, the synchro is set automatically at Zero, and is the same at each Mode Change. 4.3.1. Automatic Synchro at Zero : The time base starts automatically at zero after loading a new mode. This synchronisation is not precise and should not be used if the Mini display is connected to other Timing devices. 4.3.2. Manual time of day synchronisation : Thanks to the « 2 Inputs » option (HL975-2), it is possible to synchronize the MiniDisplay manually. - When switching ON the HL975, keep input 1 closed During the welcome message, introduce the (dd/mm/yy) – Day/Month/Year, followed by Time of day (HH:mm) Impulse on Input 1 : selects the field Impulse on Input 2: changes the fields At the end of the process, an impulse to input 1 will synchronize the MiniDisplay TAGHeuer Timing Page 6 / 20 4.3.3. Slave synchro : The MiniDisplay HL975 is fully integrated with our other Timing Devices including the CP540, HL440 and HL940. Connection RS232 (PC and AUX) of the Mini Display could be used to synchronize the MiniDisplay in Slave (or Master). (chapter 8.2), thanks to the Synchro signal. Connect the RS232-PC of the HL975 to RS232-AUX of the MiniDisplay Press Input 2 of the «2 inputs» option and switch ON the Mini Display The HL975 will display «SYNC EXT», until the synchro signal is given to the HL975 by the Mini Timer. Warning It is necessary that the Master and Slave Timing Device are in same baud rate. 4.3.4. Synchro with HL975 Manager :: Thanks to « HL975 Manager », which can be downloaded free of charge from our website, (www.tagheuer-timing.com), it is possible to synchronize the MiniDisplay, with a pre-defined time / date or as Slave (chapter 4.3) Attention All timing devices must be synchronised together via the serial (RS232) connection. Incorrect synchronisation will cause incorrect information or no information at all. 4.4. PTB Mode This mode requires the option « 2 inputs » (HL975-2) This is the classic mode for all TAG Heuer Timing devices. It allows you to record the sequential time of day on the inputs or via another timing device such as CP540, HL440 or HL940, which is connected by RS232. Warning It is important that the input configuration (Mapping, Input Status) is set correctly (see chapter 4.2.1) In this Mode, the time of the day will be displayed according to default colours and time delay (chapter 4.1) - Delay Time (0.5 to 9.5 sec) - Display Time mode (hh :mm :ss or mm :ss.dc) - Default colour Once the PTB mode is selected, the HL975 will display « PTB », then «Ext Init» By default and without modification the MiniDisplay will be synchronized automatically at zero It is possible to synchro with high precision. Three modes are available (see chapter 4.3) - Manual, with the « 2 inputs » option. - Slave, thanks to Mini timer / Chronoprinter 540 / Start Clock HL940 - With the « HL975 Manager » Warning All the times are memorized into the MiniDisplay. NOTE – all stored times are erased when the MiniDisplay is either switched off or the mode is changed! Times can not be recovered through the « HL975 Manager » application TAGHeuer Timing Page 7 / 20 4.5. Speed Mode This mode does not require the « 2 inputs » option. The time impulses could be sent by other timing devices such as a MiniDisplay. This mode allows you to display a running time, a lap time, or a speed. Once the Speed mode is selected, the HL975 will display « Speed », then «Ext Init» By default and without modification the MiniDisplay will be synchronized automatically at zero It is possible to synchro with high precision. Three modes are available (see chapter 4.3) - Manual, with the « 2 inputs » option. - Slave, thanks to MiniDisplay / Chronoprinter 540 / Start Clock HL940 - With the « HL975 Manager » Two speed settings are available, and have their own parameters. For each speed setting the parameters are: - Speed calculator unit You have to choose between m/s, km/s, miles/h, and knots - Start / Finish Channel (input number) For each speed parameter, it is possible to select channel numbers for start and finish. In case of using the Display alone, with « 2 inputs » option, the channels used should be 1 and 2 (by default). It is possible to send a timing frame via the RS232-PC from a CP540, HL440, or HL940. The channels could be used simultaneously. Example: Speed measurement with only one input: Start = 1, Finish = 1. Speed measurement on return: Speed 1: between input 1 and 2, Speed 2: between input 2 and 1 F (finish channel): takes the same channel used for Start. On this mode, the Finish is not considered as Start (see « S ») but only as Finish. It is necessary to give an impulse to restart the calculation (Speed or Net Time). It is used as “Start – Finish” on one channel. - Distance to calculate the speed Distance is defined in meters/miles between 0.001 and 9999.999 - Display format. Parameters to set the format for Speed and Net Time Speed: display precision (999.999, 999.99, 999.9, 999) Net Time: Display precision (HH:MM:SS or MM:SS.DC) Running Time: with a “*” (*HHH:MM:SS or *MM :SS .DC) The Running Time will be displayed with the colours set into the Parameters (chapter 4.1). Display colours (speed / net time superior / inferior) Parameters to define colours of the Speed and Net Time. It allows you to display the Speed (or Net Time) with different colours depending on the last value. Colour >: If the new speed is greater than the previous one Colour =<: if the speed is lower than previous the one - - Display line N° for Speed or Net Time Parameter settings to define between Speed and Net Time. You need to take into consideration the display address by default (Menu Parameters, 3.1.1). It is possible to display Speed or Net Time (Running Time) on the MiniDisplay or to another linked display. TAGHeuer Timing Page 8 / 20 Both Speed parameters (« Speed 1 », « Speed 2 ») are managed independently. The Display Address should be related to the Parameters of MiniDisplay (Chapter 4.1). Warning All the times are memorized into the MiniDisplay. NOTE – all stored times are erased when the MiniDisplay is either switched off or the mode is changed! Times can be recovered through the « HL975 Manager » application Remark If there are any address parameter conflicts with the display, the parameters set Speed 1 will override the parameters set Speed 2. 4.6. Counter Mode This mode does not necessarily require the « 2 inputs » option. The timing impulses can be sent from another timing device such as a MiniDisplay. At each impulse (Input 1, or 2) the display will increment or decrement the displayed value These 2 inputs could be from « 2 inputs » option (HL975-2) or from another timing device such as a CP540, HL440, or HL940. Once the Count-Down mode is selected, the HL975 will display «COUNTER», then «Ext Init» By default and without modification the MiniDisplay will be synchronized automatically at zero It is possible to synchro with high precision. Three modes are available (see chapter 4.3) - Manual, with the « 2 inputs » option. - Slave, thanks to MiniDisplay / Chronoprinter 540 / Start Clock HL940 - With the « HL975 Manager » The « HL975 Manager » Allows you to initialize 2 parameters Type of display: 1 x 8 characters (Single Sided) 2 x 4 characters (Double Sided) A start Value: 0 – 9999 (for a display 2x4 characters) 0 – 65’535 (for a display 2x8 characters) When another timing device is connected by RS232 (CP540, HL440 or HL940), it is necessary to set correctly the Status Input and Serial port RS232-AUX Warning All the times are memorized into the MiniDisplay. NOTE – all stored times are erased when the MiniDisplay is either switched off or the mode is changed! Times can be recovered through the « HL975 Manager » application TAGHeuer Timing Page 9 / 20 4.7. Start Light Mode With this mode there are two different functions available. a) Start Light (Sequence Manual, ON and OFF The MiniDisplay is able to run a Start Light sequence. All the 5 lights can be controlled independently and the user is able to configure their own sequence, delays, and colours. b) Count-down sequence (CntDown) The count-down sequence is a repetition (loop) of your chosen lights and delays. Trigger 1 settings allows the user to determine the length of each count-down sequence Eg – Set Trigger 1 to 60 – this will mean that each count-down sequence is a 60 second countdown and then loop again for another 60 seconds and so on. Trigger 6 determines the length of time the user needs the final start light (start light 6) to be illuminated for before returning to the count-down sequence of the next loop. Eg – Set Trigger 6 to 10 – this will mean the final light sequence will display for 10 seconds before returning to the count-down loop The interval time should be a minimum of 10 seconds (including the last zone) (Trigger 1 – Trigger 6 > 10 sec) An impulse on the input 1 allows the user to start the first count down. This is always at the full minute. An impulse on input 2 resets the sequence It is recommended to synchronize the MiniDisplay with the main timing device (chapter 4.3) This mode requires the « 2 inputs » option. The time impulses could be sent by other timing devices such as a MiniTimer. Three options are available: Sequence: Manual Switch ON all the LEDs the same colour: Light 1: impulse on Input 1 Light 2: impulse on Input 2 Sequence: ON Six lights will be switched ON Sequence: OFF Six lights will be switched OFF Sequence : CntDown Start sequential For the first 5 lights, it is possible to set (excluding the sequence CntDow) - Up to 11 colours (see chapter 8.1) Trigger o Time: using a delay from the previous impulse. o Random: Time set between Min / Max. The MiniDisplay automatically sets a time in this interval. o Input 1 : when the impulse is on input 1 from the « 2 Inputs » option or other timing devices (HL440, CP540, HL940) o Synchro: when several displays are linked together. The Display above sends a « SYNCH » impulse that will be used for the next Display. TAGHeuer Timing Page 10 / 20 o Disable: it is possible to disable on of the Start Light. At the end of the sequence, the MiniDisplay will send a frame with the actual start time. It could be used for any software or other timing device where start time is required. Input 2 (« 2 Inputs » option or other timing devices) is used to reset the Start Light. Warning All the times are memorized into the MiniDisplay. NOTE – all stored times are erased when the MiniDisplay is either switched off or the mode is changed!. Times can be recalled through the « HL975 Manager » application Important At the end of the start sequence, a frame with Time of the Day is sending to the RS232 Serial port. This time has a +/- 0.01 precision and is identify as channel n°8 It could use on any timing software. 4.8. Display Mode This mode does not require the « 2 inputs » option. Display Mode is a simple interface using the MiniDisplay with normal TAG Heuer protocol (THDIS08) to write messages to the display It is also possible to store, recall, and display up to 16 adverts, memorized into the MiniDisplay, and can activate directly from the « HL975 Manager » or from the Chronoprinter 540. The Parameters set on the chapter 4.1will be used. Warning The Display mode sends a data string to the display on the address defined by default on the menu Parameter of the MiniDisplay (see chapter Erreur ! Source du renvoi introuvable.) It allows you to send a pre-programmed message (up to 16), and display information directly from the « HL975 Manager » or from the TAG Heuer ChronoPrinter 540. The standard protocols of communication are: THDIS08. Only the following characters could be used: ABCDEFGHIJKLMNOPQRSTUVWXYZ1234567890/\()’:.* -+abcdefghijklmnopqrstuvwxyz. It is possible to send immediately a message (limited to 8 characters) to the Display, with the « HL975 Manager ». TAGHeuer Timing Page 11 / 20 4.8.1. Advertising programming Thanks to the «HL975 Manager» it is possible to programme up to 16 advertising « messages », and display them directly with the «HL975 Manager» or directly with the Chronoprinter 540. With the «HL975 Manager» it is possible to: - Display a programmed message Run a Programme already stored in the MiniDisplay - Load a message from the MiniDisplay Read and edit a message stored in the MiniDisplay - Store a message in the MiniDisplay Save an edited message into the MiniDisplay. Only saved messages will be able to be displayed. - Delete a programme which is displayed Delete what is currently displayed on the MiniDisplay. This command does not erase any stored programme. It is possible to edit any advertising programme. Several commands are available with the right click of your mouse. Colour ( £Cxx ) xx = Colour available (refer to the chapter 8.2) Scrolling speed: (£Sxx) xx = Speed (01 : fast, 09 : slow) Pause (£Pxx) Xx = pause time in 0.1 sec. 4.9. Clock Mode This mode does not require « 2 Inputs » option. Warning If you require highly accurate time we recommend that you use the « 2 Inputs » option Refer to the technical characteristic (chapter 8). Thanks to the « 2 Inputs » option, it is possible to display the time of day with good accuracy. It is possible to synchro with high precision. Three modes are available (see chapter 4.3) - Manual, with the « 2 inputs » option. - Slave, thanks to MiniDisplay / Chronoprinter 540 / Start Clock HL940 - With the « HL975 Manager » With the GPS Option installed, a new menu will be available in the Minidisplay Manager. In order to set GMT offset, you should use the MiniDisplay Manager. Every time you start the Clock mode, the display will look for a synchro signal automatically. Ensure that the antenna is placed in direct view to the sky. TAGHeuer Timing Page 12 / 20 Note that the UTC leap second will be updated automatically. This may take a few seconds. 4.10. Count Down Mode This mode does not necessarily require the « 2 inputs » option. You have to pre-define the time allocated with as a synchro (HH:MM:SS) (refer to the chapter 4.3) Thanks to the « 2 inputs » option, you have the possibility to decrement every second the pre-defined time. The input 1 and 2 are used as follow - Input 1: start the count-down (it is possible to use any other timing devices (HL440, CP540, HL940). - By shorting either input 1 or 2 for 5 seconds, you will reset the display to the pre-defined time - Using the input 1 and 2 (in short impulse) could be used. But the time memorized into the MiniDisplay will be taken from Synchro 0, and not correspond to the Count-Down value. 5. Mode change without PC Once modes are set, they are memorized into the MiniDisplay and can be recalled without a PC. Use the 4 positions rotary switch to select the mode: 1) Switch ON the MiniDisplay : selector at position 1 2) The last Mode is displayed on the HL975. During this time, turn the selector to position 4 (max) and come back to position 3. 3) The Mode will blank. 4) Change the selector between the position 4 and 3 to change mode with the following order. PTB – SPEED – COUNTER– FEU – DISPLAY – CLOCK – CNTDWN – DEMO 5) Once the desired mode is selected, validate it by moving the selector to position 1. In Display Mode, it is possible to selection advertising with the 4 positions rotary switch. 1) Switch ON the MiniDisplay : selector at position 2 2) Once the Mode Display is displayed, turn the selector in position 1. 3) Change the selector between the position 2 and 1 to change the advertising number 4) Once the desired advertising is selected, just keep the selector in position 1 during several second. TAGHeuer Timing Page 13 / 20 6. Configurations Several configurations are possible. The MiniDisplay is developed to be totally integrated into the TAG Heuer Timing Portfolio. Please see some examples of configurations 6.1. Synchronise MiniTimer – MiniDisplay 6.2. Two MiniDisplays in series with MiniDisplay Manager TAGHeuer Timing Page 14 / 20 6.3. Speed and Running time using two MiniDisplays TAGHeuer Timing Page 15 / 20 6.4. Net Time with intermediate TAGHeuer Timing Page 16 / 20 6.5. Start-Finish with MiniDisplay and MiniDisplay software TAGHeuer Timing Page 17 / 20 7. Recommendations for Use Installation: The MiniDisplay HL975 is a full colour LED display. Although the MiniDisplay can be used indoors and outdoors, optimal viewing and protection is best when the display is in the shade or covered from direct sunlight and rain. Never immerse the MiniDisplay in water. Important: A display board set in direct sunlight for a few hours can become very hot. We recommend handling precautions such as gloves at all times. 8. Technical specification 8.1. Characteristics of HL975 - Power Fuse Consumption - Working temperature Weight Visibility Dimensions : Quartz External 15VDC / 4.5 A. 8A internal Standby: 200mA (all LED OFF) Max: 5A (8 characters on, at maximum brightness) - Tamb= 20°C –20°C to +60°C 2.0 Kg up 50m (164 feet) 600 x 110 x 60 mm (23.62” x 4.33” x 2.36”) – Open 8MHz, +/- 1% at 25°C 8.2. Available colours Code 0 1 2 3 4 5 6 7 8 9 10 11 8.3. Pin out RS232 Pin 1 2 3 4 5 6 7 8 9 TAGHeuer Timing Colours Black (LED off) Red Green Yellow Blue Magenta Cyan White Orange Turquoise Rose Light Blue RS232 PC RS485_A Tx Rx nc GND RS232 AUX RS485_B / SYNC_IN SYNC_OUT Tx Rx GND Page 18 / 20 9. OPTIONS 9.1. GPS Module. Art. Nr. HL975-GPS The MiniDisplay HL975 can be equipped with an optional GPS module. Connect the GPS antenna and sync automatically the accurate Time of Day with the “Clock” mode. Requires at least Firmware version A.04. 9.2. 2 Inputs Module. Art. Nr. HL975-2 This option ensures highly accurate measurements for the display i.e. Start – Stop, Split – Lap, Speed etc.. TAGHeuer Timing Page 19 / 20 TAG Heuer PROFESSIONAL TIMING 6A Louis-Joseph Chevrolet 2300 la Chaux-de-Fonds Switzerland Tel : 032 919 8000 Fax : 032 919 9026 E-mail: [email protected] Http: //www.tagheuer-timing.com TAGHeuer Timing Page 20 / 20