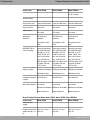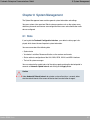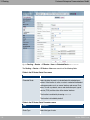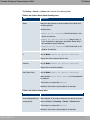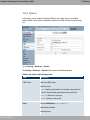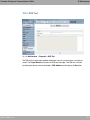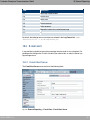
1
Manual
Funkwerk Enterprise Communications GmbH
Manual
bintec R200-Serie
Reference
Copyright© Version 7.1, 2009 Funkwerk Enterprise Communications GmbH
bintec R200-Serie
1
Manual
Funkwerk Enterprise Communications GmbH
Legal Notice
Aim and purpose
This document is part of the user manual for the installation and configuration of funkwerk devices. For
the latest information and notes on the current software release, please also read our release notes,
particularly if you are updating your software to a higher release version. You will find the latest release
notes under www.funkwerk-ec.com .
Liability
This manual has been put together with the greatest possible care. However, the information contained in this manual is not a guarantee of the properties of your product. Funkwerk Enterprise Communications GmbH is only liable within the terms of its conditions of sale and supply and accepts no liability for technical inaccuracies and/or omissions.
The information in this manual can be changed without notice. You will find additional information and
also release notes for funkwerk devices under www.funkwerk-ec.com .
Funkwerk devices make WAN connections as a possible function of the system configuration. You
must monitor the product in order to avoid unwanted charges. Funkwerk Enterprise Communications
GmbH accepts no responsibility for data loss, unwanted connection costs and damage caused by unintended operation of the product.
Trademarks
funkwerk trademarks and the funkwerk logo, bintec trademarks and the bintec logo, artem trademarks
and the artem logo, elmeg trademarks and the elmeg logo are registered trademarks of Funkwerk Enterprise Communications GmbH.
Company and product names mentioned are usually trademarks of the companies or manufacturers
concerned.
Copyright
All rights reserved. No part of this manual may be reproduced or further processed in any way without
the written consent of Funkwerk Enterprise Communications GmbH. The documentation may not be
processed and, in particular, translated without the consent of Funkwerk Enterprise Communications
GmbH.
You will find information on guidelines and standards in the declarations of conformity under
www.funkwerk-ec.com .
How to reach Funkwerk Enterprise Communications GmbH
Funkwerk Enterprise Communications GmbH, Südwestpark 94, D-90449 Nuremberg, Germany,
Phone: +49 180 300 9191 0, Fax: +49 180 300 9193 0
Funkwerk Enterprise Communications France S.A.S., 6/8 Avenue de la Grande Lande, F-33174
Gradignan, France, Phone: +33 5 57 35 63 00, Fax: +33 5 56 89 14 05
Internet: www.funkwerk-ec.com
2
bintec R200-Serie
Table of Contents
Funkwerk Enterprise Communications GmbH
Table of Contents
bintec R200-Serie
Chapter 1
Introduction . . . . . . . . . . . . . . . . . . . . . . . . . . . 1
Chapter 2
About this guide. . . . . . . . . . . . . . . . . . . . . . . . . 3
Chapter 3
Installation. . . . . . . . . . . . . . . . . . . . . . . . . . . . 6
3.1
Setting Up and Connecting. . . . . . . . . . . . . . . . . . . . . .
6
3.2
Cleaning. . . . . . . . . . . . . . . . . . . . . . . . . . . . . .
8
3.3
Support Information . . . . . . . . . . . . . . . . . . . . . . . . .
8
Chapter 4
Basic configuration . . . . . . . . . . . . . . . . . . . . . . . 9
4.1
Presettings . . . . . . . . . . . . . . . . . . . . . . . . . . . .
9
4.1.1
Preconfigured data . . . . . . . . . . . . . . . . . . . . . . . . .
9
4.1.2
Software update . . . . . . . . . . . . . . . . . . . . . . . . . .
9
4.2
System requirements . . . . . . . . . . . . . . . . . . . . . . .
10
4.3
Preparations . . . . . . . . . . . . . . . . . . . . . . . . . . .
10
4.3.1
Gathering data . . . . . . . . . . . . . . . . . . . . . . . . . .
10
4.3.2
Configuring a PC . . . . . . . . . . . . . . . . . . . . . . . . .
14
4.3.3
Installing BRICKware . . . . . . . . . . . . . . . . . . . . . . .
15
4.4
Configuring the Gateway . . . . . . . . . . . . . . . . . . . . .
17
4.5
Testing the Configuration . . . . . . . . . . . . . . . . . . . . .
18
Chapter 5
Reset . . . . . . . . . . . . . . . . . . . . . . . . . . . . . 19
Chapter 6
Technical data . . . . . . . . . . . . . . . . . . . . . . . . 21
6.1
Scope of supply . . . . . . . . . . . . . . . . . . . . . . . . .
21
i
Table of Contents
ii
Funkwerk Enterprise Communications GmbH
6.2
General Product Features . . . . . . . . . . . . . . . . . . . . .
22
6.3
LEDs . . . . . . . . . . . . . . . . . . . . . . . . . . . . . .
27
6.4
Connections . . . . . . . . . . . . . . . . . . . . . . . . . . .
30
6.5
Pin Assignments . . . . . . . . . . . . . . . . . . . . . . . . .
33
6.5.1
Serial Interface . . . . . . . . . . . . . . . . . . . . . . . . . .
33
6.5.2
Ethernet interface . . . . . . . . . . . . . . . . . . . . . . . . .
33
6.5.3
ADSL interface
. . . . . . . . . . . . . . . . . . . . . . . . .
34
6.5.4
ISDN S0 port . . . . . . . . . . . . . . . . . . . . . . . . . . .
35
Chapter 7
Access and configuration. . . . . . . . . . . . . . . . . . . 36
7.1
Access Options. . . . . . . . . . . . . . . . . . . . . . . . . .
36
7.1.1
Access via LAN . . . . . . . . . . . . . . . . . . . . . . . . .
36
7.1.2
Access via the Serial Interface . . . . . . . . . . . . . . . . . . .
39
7.1.3
Access over ISDN . . . . . . . . . . . . . . . . . . . . . . . .
41
7.2
Logging in . . . . . . . . . . . . . . . . . . . . . . . . . . . .
41
7.2.1
User names and passwords in ex works state . . . . . . . . . . . .
42
7.2.2
Logging in for Configuration . . . . . . . . . . . . . . . . . . . .
42
7.3
Configuration options . . . . . . . . . . . . . . . . . . . . . . .
43
7.3.1
Express Setup Wizard for beginners . . . . . . . . . . . . . . . .
44
7.3.2
Funkwerk Configuration Interface for advanced users . . . . . . . . .
44
7.3.3
SNMP shell . . . . . . . . . . . . . . . . . . . . . . . . . . .
58
7.4
BOOTmonitor . . . . . . . . . . . . . . . . . . . . . . . . . .
58
Chapter 8
System Management . . . . . . . . . . . . . . . . . . . . . 61
8.1
State . . . . . . . . . . . . . . . . . . . . . . . . . . . . . .
61
8.2
Global Settings . . . . . . . . . . . . . . . . . . . . . . . . . .
64
8.2.1
System . . . . . . . . . . . . . . . . . . . . . . . . . . . . .
64
8.2.2
Passwords . . . . . . . . . . . . . . . . . . . . . . . . . . . .
66
8.2.3
Date and Time . . . . . . . . . . . . . . . . . . . . . . . . . .
67
bintec R200-Serie
Table of Contents
Funkwerk Enterprise Communications GmbH
bintec R200-Serie
8.2.4
System Licences . . . . . . . . . . . . . . . . . . . . . . . . .
72
8.3
Interface Mode / Bridge Groups
. . . . . . . . . . . . . . . . . .
74
8.3.1
Interfaces . . . . . . . . . . . . . . . . . . . . . . . . . . . .
75
8.4
Administrative Access . . . . . . . . . . . . . . . . . . . . . . .
77
8.4.1
Access . . . . . . . . . . . . . . . . . . . . . . . . . . . . .
77
8.4.2
SSH . . . . . . . . . . . . . . . . . . . . . . . . . . . . . .
78
8.4.3
SNMP . . . . . . . . . . . . . . . . . . . . . . . . . . . . . .
82
8.5
Remote Authentication . . . . . . . . . . . . . . . . . . . . . .
83
8.5.1
RADIUS . . . . . . . . . . . . . . . . . . . . . . . . . . . . .
83
8.5.2
TACACS+ . . . . . . . . . . . . . . . . . . . . . . . . . . . .
89
8.5.3
Options . . . . . . . . . . . . . . . . . . . . . . . . . . . . .
92
Chapter 9
Physical interfaces . . . . . . . . . . . . . . . . . . . . . . 94
9.1
Ethernet Ports . . . . . . . . . . . . . . . . . . . . . . . . . .
94
9.1.1
Port Configuration . . . . . . . . . . . . . . . . . . . . . . . .
95
9.2
ISDN Ports . . . . . . . . . . . . . . . . . . . . . . . . . . .
97
9.2.1
ISDN Configuration . . . . . . . . . . . . . . . . . . . . . . . .
98
9.2.2
MSN Configuration . . . . . . . . . . . . . . . . . . . . . . . . 101
9.3
ADSL Modem . . . . . . . . . . . . . . . . . . . . . . . . . . 103
9.3.1
ADSL Configuration . . . . . . . . . . . . . . . . . . . . . . . . 104
Chapter 10
LAN . . . . . . . . . . . . . . . . . . . . . . . . . . . . .
10.1
IP Configuration . . . . . . . . . . . . . . . . . . . . . . . . . 107
10.1.1
Interfaces . . . . . . . . . . . . . . . . . . . . . . . . . . . . 107
10.2
VLAN . . . . . . . . . . . . . . . . . . . . . . . . . . . . . . 110
10.2.1
VLANs . . . . . . . . . . . . . . . . . . . . . . . . . . . . . 112
10.2.2
Port Configuration . . . . . . . . . . . . . . . . . . . . . . . . 113
10.2.3
Administration . . . . . . . . . . . . . . . . . . . . . . . . . . 114
107
iii
Table of Contents
iv
Funkwerk Enterprise Communications GmbH
Chapter 11
Wireless LAN . . . . . . . . . . . . . . . . . . . . . . . .
115
11.1
WLANx . . . . . . . . . . . . . . . . . . . . . . . . . . . . . 115
11.1.1
Radio Settings . . . . . . . . . . . . . . . . . . . . . . . . . . 116
11.1.2
Virtual Service Sets
11.2
Administration . . . . . . . . . . . . . . . . . . . . . . . . . . 127
11.2.1
Basic settings . . . . . . . . . . . . . . . . . . . . . . . . . . 127
Chapter 12
Routing . . . . . . . . . . . . . . . . . . . . . . . . . . .
12.1
Routes . . . . . . . . . . . . . . . . . . . . . . . . . . . . . 129
12.1.1
IP routes . . . . . . . . . . . . . . . . . . . . . . . . . . . . 129
12.1.2
Options . . . . . . . . . . . . . . . . . . . . . . . . . . . . . 134
12.2
NAT. . . . . . . . . . . . . . . . . . . . . . . . . . . . . . . 136
12.2.1
NAT Interfaces . . . . . . . . . . . . . . . . . . . . . . . . . . 136
12.2.2
Portforwarding . . . . . . . . . . . . . . . . . . . . . . . . . . 137
12.3
RIP . . . . . . . . . . . . . . . . . . . . . . . . . . . . . . . 141
12.3.1
RIP Interfaces . . . . . . . . . . . . . . . . . . . . . . . . . . 142
12.3.2
RIP Filter . . . . . . . . . . . . . . . . . . . . . . . . . . . . 144
12.3.3
RIP Options . . . . . . . . . . . . . . . . . . . . . . . . . . . 147
12.4
Load Balancing . . . . . . . . . . . . . . . . . . . . . . . . . . 149
12.4.1
Load Balancing Groups . . . . . . . . . . . . . . . . . . . . . . 150
12.5
Multicast. . . . . . . . . . . . . . . . . . . . . . . . . . . . . 152
12.5.1
Forwarding . . . . . . . . . . . . . . . . . . . . . . . . . . . 154
12.5.2
IGMP . . . . . . . . . . . . . . . . . . . . . . . . . . . . . . 155
12.5.3
Options . . . . . . . . . . . . . . . . . . . . . . . . . . . . . 159
Chapter 13
WAN. . . . . . . . . . . . . . . . . . . . . . . . . . . . .
13.1
Internet + Dialup . . . . . . . . . . . . . . . . . . . . . . . . . 161
13.1.1
PPPoE . . . . . . . . . . . . . . . . . . . . . . . . . . . . . 163
. . . . . . . . . . . . . . . . . . . . . . . 121
129
161
bintec R200-Serie
Table of Contents
Funkwerk Enterprise Communications GmbH
bintec R200-Serie
13.1.2
PPTP . . . . . . . . . . . . . . . . . . . . . . . . . . . . . . 168
13.1.3
PPPoA . . . . . . . . . . . . . . . . . . . . . . . . . . . . . 173
13.1.4
ISDN . . . . . . . . . . . . . . . . . . . . . . . . . . . . . . 177
13.1.5
IP Pools . . . . . . . . . . . . . . . . . . . . . . . . . . . . . 185
13.2
ATM . . . . . . . . . . . . . . . . . . . . . . . . . . . . . . 186
13.2.1
Profiles . . . . . . . . . . . . . . . . . . . . . . . . . . . . . 186
13.2.2
Service Categories . . . . . . . . . . . . . . . . . . . . . . . . 191
13.2.3
OAM Controlling . . . . . . . . . . . . . . . . . . . . . . . . . 194
13.3
Real Time Jitter Control . . . . . . . . . . . . . . . . . . . . . . 198
13.3.1
Controlled interfaces . . . . . . . . . . . . . . . . . . . . . . . 198
Chapter 14
VPN . . . . . . . . . . . . . . . . . . . . . . . . . . . . .
14.1
IPSec . . . . . . . . . . . . . . . . . . . . . . . . . . . . . . 200
14.1.1
IPSec Peers . . . . . . . . . . . . . . . . . . . . . . . . . . . 200
14.1.2
Phase-1 Profiles . . . . . . . . . . . . . . . . . . . . . . . . . 209
14.1.3
Phase-2 Profiles . . . . . . . . . . . . . . . . . . . . . . . . . 217
14.1.4
XAUTH Profiles . . . . . . . . . . . . . . . . . . . . . . . . . 222
14.1.5
IP Pools . . . . . . . . . . . . . . . . . . . . . . . . . . . . . 225
14.1.6
Options . . . . . . . . . . . . . . . . . . . . . . . . . . . . . 226
14.2
L2TP . . . . . . . . . . . . . . . . . . . . . . . . . . . . . . 229
14.2.1
Tunnel Profiles . . . . . . . . . . . . . . . . . . . . . . . . . . 230
14.2.2
User . . . . . . . . . . . . . . . . . . . . . . . . . . . . . . 233
14.2.3
Options . . . . . . . . . . . . . . . . . . . . . . . . . . . . . 239
14.3
PPTP . . . . . . . . . . . . . . . . . . . . . . . . . . . . . . 240
14.3.1
PPTP Tunnel
14.3.2
Options . . . . . . . . . . . . . . . . . . . . . . . . . . . . . 247
14.4
GRE . . . . . . . . . . . . . . . . . . . . . . . . . . . . . . 248
14.4.1
GRE Tunnels . . . . . . . . . . . . . . . . . . . . . . . . . . 248
14.5
Certificates . . . . . . . . . . . . . . . . . . . . . . . . . . . 250
14.5.1
Certificate list . . . . . . . . . . . . . . . . . . . . . . . . . . 250
200
. . . . . . . . . . . . . . . . . . . . . . . . . . 240
v
Table of Contents
vi
Funkwerk Enterprise Communications GmbH
14.5.2
CRLs . . . . . . . . . . . . . . . . . . . . . . . . . . . . . . 259
14.5.3
Certificate Servers . . . . . . . . . . . . . . . . . . . . . . . . 260
Chapter 15
Firewall . . . . . . . . . . . . . . . . . . . . . . . . . . .
15.1
Policies . . . . . . . . . . . . . . . . . . . . . . . . . . . . . 263
15.1.1
Filter rules . . . . . . . . . . . . . . . . . . . . . . . . . . . . 264
15.1.2
QoS . . . . . . . . . . . . . . . . . . . . . . . . . . . . . . 267
15.1.3
Options . . . . . . . . . . . . . . . . . . . . . . . . . . . . . 269
15.2
Interfaces . . . . . . . . . . . . . . . . . . . . . . . . . . . . 270
15.2.1
Groups . . . . . . . . . . . . . . . . . . . . . . . . . . . . . 271
15.3
Addresses . . . . . . . . . . . . . . . . . . . . . . . . . . . . 271
15.3.1
Address list . . . . . . . . . . . . . . . . . . . . . . . . . . . 272
15.3.2
Groups . . . . . . . . . . . . . . . . . . . . . . . . . . . . . 273
15.4
Services . . . . . . . . . . . . . . . . . . . . . . . . . . . . . 274
15.4.1
Service list . . . . . . . . . . . . . . . . . . . . . . . . . . . . 274
15.4.2
Groups . . . . . . . . . . . . . . . . . . . . . . . . . . . . . 276
Chapter 16
VoIP . . . . . . . . . . . . . . . . . . . . . . . . . . . . .
16.1
SIP . . . . . . . . . . . . . . . . . . . . . . . . . . . . . . . 278
16.1.1
Options . . . . . . . . . . . . . . . . . . . . . . . . . . . . . 278
16.2
RTSP . . . . . . . . . . . . . . . . . . . . . . . . . . . . . . 279
16.2.1
RTSP Proxy . . . . . . . . . . . . . . . . . . . . . . . . . . . 280
Chapter 17
Local services. . . . . . . . . . . . . . . . . . . . . . . .
17.1
DNS . . . . . . . . . . . . . . . . . . . . . . . . . . . . . . 281
17.1.1
Global Settings . . . . . . . . . . . . . . . . . . . . . . . . . . 283
17.1.2
Static Hosts . . . . . . . . . . . . . . . . . . . . . . . . . . . 286
17.1.3
Domain Forwarding . . . . . . . . . . . . . . . . . . . . . . . . 287
17.1.4
Cache . . . . . . . . . . . . . . . . . . . . . . . . . . . . . . 289
262
278
281
bintec R200-Serie
Table of Contents
Funkwerk Enterprise Communications GmbH
bintec R200-Serie
17.1.5
Statistics . . . . . . . . . . . . . . . . . . . . . . . . . . . . 291
17.2
DynDNS Client . . . . . . . . . . . . . . . . . . . . . . . . . . 292
17.2.1
DynDNS Update . . . . . . . . . . . . . . . . . . . . . . . . . 292
17.2.2
DynDNS Provider . . . . . . . . . . . . . . . . . . . . . . . . . 294
17.3
DHCP Server . . . . . . . . . . . . . . . . . . . . . . . . . . 296
17.3.1
DHCP Pool . . . . . . . . . . . . . . . . . . . . . . . . . . . 296
17.3.2
IP/MAC Binding . . . . . . . . . . . . . . . . . . . . . . . . . 299
17.3.3
DHCP Relay Setting . . . . . . . . . . . . . . . . . . . . . . . 301
17.4
Web Filter . . . . . . . . . . . . . . . . . . . . . . . . . . . . 302
17.4.1
Global Settings
17.4.2
Filter List . . . . . . . . . . . . . . . . . . . . . . . . . . . . 304
17.4.3
Black / White lists
17.4.4
History . . . . . . . . . . . . . . . . . . . . . . . . . . . . . 308
17.5
CAPI Server . . . . . . . . . . . . . . . . . . . . . . . . . . . 308
17.5.1
User . . . . . . . . . . . . . . . . . . . . . . . . . . . . . . 309
17.5.2
Options . . . . . . . . . . . . . . . . . . . . . . . . . . . . . 310
17.6
Scheduling. . . . . . . . . . . . . . . . . . . . . . . . . . . . 311
17.6.1
Schedule . . . . . . . . . . . . . . . . . . . . . . . . . . . . 311
17.6.2
Options . . . . . . . . . . . . . . . . . . . . . . . . . . . . . 315
17.7
Surveillance . . . . . . . . . . . . . . . . . . . . . . . . . . . 316
17.7.1
Hosts . . . . . . . . . . . . . . . . . . . . . . . . . . . . . . 316
17.7.2
Interfaces . . . . . . . . . . . . . . . . . . . . . . . . . . . . 319
17.7.3
Ping Generator . . . . . . . . . . . . . . . . . . . . . . . . . . 321
17.8
ISDN Theft Protection . . . . . . . . . . . . . . . . . . . . . . . 323
17.8.1
Options . . . . . . . . . . . . . . . . . . . . . . . . . . . . . 323
17.9
Funkwerk Discovery . . . . . . . . . . . . . . . . . . . . . . . 325
17.9.1
Device discovery . . . . . . . . . . . . . . . . . . . . . . . . . 325
17.9.2
Options . . . . . . . . . . . . . . . . . . . . . . . . . . . . . 329
17.10
UPnP . . . . . . . . . . . . . . . . . . . . . . . . . . . . . . 330
17.10.1
Interfaces . . . . . . . . . . . . . . . . . . . . . . . . . . . . 330
. . . . . . . . . . . . . . . . . . . . . . . . . 302
. . . . . . . . . . . . . . . . . . . . . . . . 306
vii
Table of Contents
viii
Funkwerk Enterprise Communications GmbH
17.10.2
Global Settings . . . . . . . . . . . . . . . . . . . . . . . . . . 332
Chapter 18
Maintenance . . . . . . . . . . . . . . . . . . . . . . . .
18.1
Diagnostics . . . . . . . . . . . . . . . . . . . . . . . . . . . 334
18.1.1
Ping Test . . . . . . . . . . . . . . . . . . . . . . . . . . . . 334
18.1.2
DNS Test . . . . . . . . . . . . . . . . . . . . . . . . . . . . 335
18.1.3
Traceroute Test . . . . . . . . . . . . . . . . . . . . . . . . . 336
18.2
Software & Configuration . . . . . . . . . . . . . . . . . . . . . 336
18.2.1
Options . . . . . . . . . . . . . . . . . . . . . . . . . . . . . 336
18.3
Reboot . . . . . . . . . . . . . . . . . . . . . . . . . . . . . 340
18.3.1
System Reboot . . . . . . . . . . . . . . . . . . . . . . . . . . 341
Chapter 19
External Reporting . . . . . . . . . . . . . . . . . . . . .
19.1
Syslog . . . . . . . . . . . . . . . . . . . . . . . . . . . . . 342
19.1.1
Syslog Servers . . . . . . . . . . . . . . . . . . . . . . . . . . 342
19.2
IP Accounting . . . . . . . . . . . . . . . . . . . . . . . . . . 345
19.2.1
Interfaces . . . . . . . . . . . . . . . . . . . . . . . . . . . . 345
19.2.2
Options . . . . . . . . . . . . . . . . . . . . . . . . . . . . . 346
19.3
E-mail alert . . . . . . . . . . . . . . . . . . . . . . . . . . . 347
19.3.1
E-mail Alert Server . . . . . . . . . . . . . . . . . . . . . . . . 347
19.3.2
E-mail Alert Receiver . . . . . . . . . . . . . . . . . . . . . . . 349
19.4
SNMP . . . . . . . . . . . . . . . . . . . . . . . . . . . . . . 351
19.4.1
SNMP Trap Options. . . . . . . . . . . . . . . . . . . . . . . . 351
19.4.2
SNMP Trap Hosts . . . . . . . . . . . . . . . . . . . . . . . . 352
19.5
Activity Monitor . . . . . . . . . . . . . . . . . . . . . . . . . . 353
19.5.1
Options . . . . . . . . . . . . . . . . . . . . . . . . . . . . . 354
Chapter 20
Monitoring . . . . . . . . . . . . . . . . . . . . . . . . . .
20.1
Internal Log . . . . . . . . . . . . . . . . . . . . . . . . . . . 356
334
342
356
bintec R200-Serie
Funkwerk Enterprise Communications GmbH
bintec R200-Serie
Table of Contents
20.1.1
System messages . . . . . . . . . . . . . . . . . . . . . . . . 356
20.2
IPSec . . . . . . . . . . . . . . . . . . . . . . . . . . . . . . 357
20.2.1
IPSec Tunnels . . . . . . . . . . . . . . . . . . . . . . . . . . 357
20.2.2
IPSec Statistics. . . . . . . . . . . . . . . . . . . . . . . . . . 359
20.3
ISDN/Modem . . . . . . . . . . . . . . . . . . . . . . . . . . 361
20.3.1
Current Calls . . . . . . . . . . . . . . . . . . . . . . . . . . . 361
20.3.2
Call History . . . . . . . . . . . . . . . . . . . . . . . . . . . 363
20.4
Interfaces . . . . . . . . . . . . . . . . . . . . . . . . . . . . 363
20.4.1
Statistics . . . . . . . . . . . . . . . . . . . . . . . . . . . . 364
20.5
WLAN . . . . . . . . . . . . . . . . . . . . . . . . . . . . . . 365
20.5.1
WLAN1 . . . . . . . . . . . . . . . . . . . . . . . . . . . . . 365
20.5.2
VSS . . . . . . . . . . . . . . . . . . . . . . . . . . . . . . 367
20.6
Bridges . . . . . . . . . . . . . . . . . . . . . . . . . . . . . 370
20.6.1
br<x> . . . . . . . . . . . . . . . . . . . . . . . . . . . . . . 370
Glossary. . . . . . . . . . . . . . . . . . . . . . . . . . .
371
Index . . . . . . . . . . . . . . . . . . . . . . . . . . . .
412
ix
Table of Contents
x
Funkwerk Enterprise Communications GmbH
bintec R200-Serie
Funkwerk Enterprise Communications GmbH
1 Introduction
Chapter 1 Introduction
The powerful gateways bintec R230a, bintec R230b, bintec R230aw, bintec R232a,
bintec R232b and bintec R232bw enable you to connect small networks and your individual workstation or small company to the Internet and other partner networks (e.g. to a
corporate network) at low cost.
Safety notices
The safety precautions, which are supplied with your device, tell you what you need to take
into consideration when using your bintec gateway.
Installation
How to connect your device is shown in Setting Up and Connecting on page 6. This
chapter also tells you what preliminary tasks are necessary for configuration.
Configuration
How to get your device running is explained in Basic configuration on page 9. There we
show you how to start up your device within a few minutes from a Windows PC with the
help of a Configuration Wizard and how to install other useful online assistants. At the end
of the chapter, you will be in a position to surf the Internet, send or receive e-mails and set
up a connection to a partner network to access data at your company head office, for example.
Password
If you are already familiar with configuring bintec devices and want to get started right
away, all you really need to know is the factory default user name and password.
User Name: Password: Caution
Remember to change the password immediately when you log in to the device for the
first time. All bintec devices are supplied with the same password, which means they
are not protected against unauthorised access until you change the password. How to
change the passwords is described in chapter Passwords on page 66.
Workshops
bintec R200-Serie
1
1 Introduction
Funkwerk Enterprise Communications GmbH
Step-by-step instructions for the most important configuration tasks can be found in the
separate FEC Application Workshop guide for each application, which can be downloaded from the www.funkwerk-ec.com website from the Product menu under Solutions.
Dime Manager
The devices are also designed for use with Dime Manager. The Dime Manager management tool can locate your Funkwerk devices within the network quickly and easily. The
.Net-based application, which is designed for up to 50 devices, offers easy to use functions
and a comprehensive overview of devices, their parameters and files.
By using SNMP multicast all of the devices in your local network can be located irrespective of their current IP address. A new IP address and password and other parameters can
also be assigned. A configuration can then be initiated over HTTP or TELNET. If using HTTP, the Dime Manager automatically logs into the devices on your behalf.
System software files and configuration files can be managed individually as required or in
logical groups for devices of the same type.
2
bintec R200-Serie
2 About this guide
Funkwerk Enterprise Communications GmbH
Chapter 2 About this guide
This document is valid for bintec devices with system software as of software version
7.8.7.
The guide, which you have in front of you, contains the following chapters:
User's Guide - Reference
Chapter
Description
Introduction
You see an overview of the the device:
About this guide
We explain the various components of this manual and how to
use it.
Installation
This contains instructions for how to set up and connect your
device.
Basic configuration
This chapter provides a step-by-step guide to the basic functions on your device.
Reset
This chapter explains how to reset your device to the ex works
state.
Technical data
This section contains a description of all the device's technical
properties.
Access and configuration
This includes explanations about the different access and configuration methods.
System Management
These chapters describe all configuration options of the Funkwerk Configuration Interface. The chapters are arranged in
the same sequence as the navigation menus in the Funkwerk
Configuration Interface.
Physical interfaces
LAN
Wireless LAN
The individual chapters also contain general explanations on
the subsystem in question.
Routing
WAN
VPN
Firewall
VoIP
bintec R200-Serie
3
2 About this guide
Funkwerk Enterprise Communications GmbH
Chapter
Description
Local services
Maintenance
External Reporting
Monitoring
Glossary
The glossary contains a reference to the most important technical terms used in network technology.
Index
The index lists all the key terms for operating the device and all
the configuration options and gives page numbers so they can
be found easily.
To help you locate information easily, this user's guide uses the following visual aids:
List of visual aids
Icon
Use
Indicates practical information.
Indicates general and important points.
Indicates a warning of risk level "Attention" (points out possible
dangers that may cause damage to property if not observed).
Indicates a warning of risk level "Warning" (points out possible
dangers that may cause physical injury or even death if not observed).
The following typographical elements are used to help you find and interpret the information in this user's guide:
Typographical elements
Typographical element Use
•
Menu->Submenu
Indicates lists.
Indicates menus and sub-menus.
File->Open
4
bintec R200-Serie
2 About this guide
Funkwerk Enterprise Communications GmbH
Typographical element Use
Indicates commands that you must enter as written.
bintec R200-Serie
bold, e.g. Windows
Start menu
Indicates keys, key combinations and Windows terms.
bold, e.g. biboAdmLoginTable
Indicates fields.
italic, e.g. Indicates values that you enter or that can be configured.
Online: blue and italic,
e.g.
www.funkwerk-ec.com
Indicates hyperlinks.
5
3 Installation
Funkwerk Enterprise Communications GmbH
Chapter 3 Installation
Caution
Please read the safety notices carefully before installing and starting up your device.
These are supplied with the device.
3.1 Setting Up and Connecting
Note
All you need for this are the cables and antennas supplied with the equipment.
Caution
The use of the wrong mains adapter may damage your device. Only use the mains adaptor supplied with the equipment. If you require foreign adapters/mains units, please
contact our funkwerk service.
Incorrect cabling of the ISDN and ETH interfaces may also damage your device. Connect only the ETH interface of the device to the LAN interface of the computer/hub or a
WAN interface if available and the ISDN interface of the device only to the ISDN connection.
6
bintec R200-Serie
Funkwerk Enterprise Communications GmbH
3 Installation
Fig. 2: Connection options using the example of bintec R232bw
When setting up and connecting, carry out the steps in the following sequence (refer to the
connection diagrams for the individual devices in chapter Technical data on page 21):
bintec R200-Serie
(1)
Antennas: Screw the two external standard antennas supplied to the RSMA connections provided for this purpose (only bintec R230aw and bintec R232bw).
(2)
Place your device on a solid, level base.
(3)
LAN: For the standard configuration of your device via Ethernet, connect the first
switch port (1) of your device to your LAN using the Ethernet cable supplied. The
device automatically detects whether it is connected to a switch or directly to a PC.
(4)
ADSL: Connect the ADSL interface (ADSL) of your device to the DSL output of the
7
3 Installation
Funkwerk Enterprise Communications GmbH
splitter using the DSL cable supplied.
(5)
Mains connection: Connect the device to a mains socket using the mains adaptor supplied.
Optional connections
• ISDN: Connect the ISDN interface (ISDN) of the device to your ISDN socket using the
ISDN cable provided (only bintec R232a, bintec R232b and bintec R232bw).
• DMZ: Connect the WAN interface ( ETH) of your device to the Ethernet connection of
your DMZ using another Ethernet cable (only bintec R232a, bintec R232b and bintec
R232bw).
• Other LANs/WANs: Connect any other terminals in your network to the remaining switch
ports (2, 3 or 4) of your device using other Ethernet cables.
• Setting up a serial connection: For alternative configuration possibilities, connect the serial interface of your PC (COM1 or COM2) to the serial interface of the gateway ( console).
Use only the serial cable supplied with the equipment. However, configuration via the
serial interface is not provided by default.
The device is now prepared for configuration using the Express Setup Wizard.
3.2 Cleaning
You can clean your device easily. Use a damp cloth or antistatic cloth. Do not use solvents.
Never use a dry cloth; the electrostatic charge could cause electronic faults. Make sure that
no moisture can enter the device and cause damage.
3.3 Support Information
If you have any questions on your new product or would like more information, you can
reach the Support Center of Funkwerk Enterprise Communications GmbH under the following call number or via the E-mail Hotline:
+49 911 9673 1550
[email protected]
For detailed information on our support services, contact www.funkwerk-ec.com .
8
bintec R200-Serie
Funkwerk Enterprise Communications GmbH
4 Basic configuration
Chapter 4 Basic configuration
Your bintec gateway contains extensive features for encrypted data transfer and Internet
access for both individual users and companies.
The basic configuration of your device is carried out using the Express Setup Wizard.
The way to obtain the basic configuration is explained below step-by-step. Detailed knowledge of networks is not necessary. A detailed online help system gives you extra support.
The Companion CD also supplied includes all the tools that you need for the configuration
and management of your device.
The BRICKware contains useful applications for managing your device.
4.1 Presettings
4.1.1 Preconfigured data
Your device is shipped with a pre-defined IP configuration:
• IP Address: • Netmask: Use the following access data to configure your device as delivered:
• User Name: • Password: Note
All bintec devices are delivered with the same username and password. As long as
the password remains unchanged, they are therefore not protected against unauthorized use. Make sure you change the passwords to prevent unauthorized access to
your device! (see Access and configuration on page 36).
4.1.2 Software update
Your device contains the version of the system software available at the time of production.
More recent versions may have since been released.
bintec R200-Serie
9
4 Basic configuration
Funkwerk Enterprise Communications GmbH
4.2 System requirements
For configuration, your PC must meet the following system requirements:
• Windows 95, Windows 98, Windows ME or Windows NT 4.0 or Windows 2000 or Windows XP.
(The instructions for testing/installing the TCP/IP protocol and setting up the PC apply to
Windows 2000 or Windows XP.)
• Installed network card (Ethernet)
• CD ROM drive
• Microsoft TCP/IP protocol installed (see Configuring a PC on page 14)
• High colour display (more than 256 colours) for correct representation of the graphics
4.3 Preparations
To prepare for configuration, you need to...
• have the data for the basic configuration and the Internet connection to hand and also
gather the data needed for connecting the required WLAN clients.
• check whether the PC from which you want to perform the configuration meets the necessary requirements.
You can also...
• install the BRICKware software, which provides more tools for working with your device.
This installation is optional and not essential for the configuration or operation of the
device.
4.3.1 Gathering data
You can gather the main data for basic configuration with the Express Setup Wizard
quickly, as you do not require any information that needs in-depth network knowledge. If
necessary, you can use the example values.
Before you start the configuration, you should gather the data for the following purposes:
• Basic configuration (obligatory if your device is in the ex works state)
• Internet access (optional)
• Wireless LAN (optional, only for bintec R230aw and bintec R232bw)
• Company network connection (optional).
10
bintec R200-Serie
4 Basic configuration
Funkwerk Enterprise Communications GmbH
The following tables show examples of possible values for the necessary data. You can
enter your personal data in the "Your values" column, so that you can refer to these values
later when needed.
If you configure a new network, you can use the given example values for IP addresses
and netmasks. In cases of doubt, ask your system administrator.
Basic configuration
For a basic configuration of your gateway, you need information that relates to your network environment:
Basic information
Access data
Example value
IP address of your gateway
Netmask of your gateway
Your values
Internet access
If you want to set up Internet access, you need an Internet Service Provider (ISP). You also
receive your personal access data from your ISP. The terms used for the required access
data may vary from provider to provider, However, the type of information you need for dialin in is basically the same.
The following table lists the access data that your device also needs for a DSL connection
to the Internet.
Data for Internet access
Access data
Example value
Provider name
Protocol
"
Encapsulation
#$!!%&
VPI (Virtual Path Identifier)
VCI (Virtual Circuit Identifier)
'
Your user name
()*
Password
+,-%
Your values
Some Internet Service Providers, such as T-Online, require additional information:
Additional information for T-Online
bintec R200-Serie
11
4 Basic configuration
Funkwerk Enterprise Communications GmbH
Access data
Example value
User account (12 digits)
'.
Your values
T-Online number (usually 12 digits) '.
Joint user account
Note
To configure T-Online Internet access, in the Username field, enter the following succession of numbers without intervening spaces: User account (12 digits) + T-Online
number (usually 12 digits) + co-user number (for the main user, always 0001). If your
T-Online number is less than 12 digits long, a "#" character is required between the TOnline number and the co-user number. If you use T-DSL, you must add the character
string "@t-online.de" at the end of this string of numbers. You username could, for example, look like this: 00012345678906112345678#[email protected]
Wireless LAN (only bintec R230aw and bintec R232bw)
You can operate your device as an access point and therefore connect individual work stations (e.g. laptops, PCs with wireless card or wireless adapter) by wireless connections to
your local network via WLAN (Wireless LAN) and let them communicate with each other.
The "Data for gateway configuration" table shows the details that are needed to do this.
As data can be transmitted over the air in the WLAN, this data can in theory be intercepted
and read by any attacker with the appropriate resources. Particular attention must therefore
be paid to protecting the wireless connection.
Note the following:
• Follow the safety precautions when configuring your WLAN.
• Please also read Sicherheit im Funk-LAN [Security in Wireless LAN] published by the
Federal Office for Information Security, see http://www.bsi.bund.de .
Data for the Wireless LAN configuration
Access data
Example value
Preshared key for WPA-PSK
without default
Installation location of your system
)
Channel to be used for WLAN
Network name (SSID) for your
WLAN
without default
Your values
Visibility of the SSID in the wireless &#/
12
bintec R200-Serie
4 Basic configuration
Funkwerk Enterprise Communications GmbH
Access data
Example value
Your values
network
Security setting
01!-2
Company network connection
To connect a remote network (e.g. head office), you need to know some data of the remote
terminal that will take your call. The remote terminal must also know your details. You have
to agree this data between you.
Your device and the device at your head office check before every connection to see if they
should take the call from the partner. To protect the network against unauthorised access,
the call is accepted only after correct authentication. This authentication is based on a common password and two codes that you and your partner use for the connection.
Data for connection to a company network
Access data
Example value
Partner name
3$3&&
Your values
(Key of company head office)
Dial-in number:
.'
(Call number of the company head
office's device)
Local name
4/
(Your own code. Your partner (the
head office) must enter this name
as the partner name on its device.)
Password
-%
(Common password for this connection, entered on both devices.)
bintec R200-Serie
Network address(es) of the company head office
Netmask(s) of the company head
office
13
4 Basic configuration
Funkwerk Enterprise Communications GmbH
4.3.2 Configuring a PC
In order to reach your device via the network and to be able to carry out configuration using
the Express Setup Wizard, the PC used for the configuration has to satisfy some prerequisites.
• Make sure that the TCP/IP protocol is installed on the PC.
• Assign fixed IP address to your PC.
Checking the TCP/IP protocol
Proceed as follows to check whether you have installed the protocol:
(1)
Click the Windows Start button and then Settings -> Network and Dial-up Connections (Windows 2000) or Settings -> Network Connections (Windows XP).
(2)
Click on LAN Connection.
(3)
Click on Properties in the status window.
(4)
Look for the Internet Protocol (TCP/IP) entry in the list of network components.
Installing the TCP/IP protocol
If you cannot find the Internet Protocol (TCP/IP) entry, install the TCP/IP protocol as follows:
(1)
First click Properties, then Install in the status window of the LAN Connection.
(2)
Select the Protocol entry.
(3)
Click Add.
(4)
Select Internet Protocol (TCP/IP) and click on OK.
(5)
Follow the on-screen instructions and restart your PC when you have finished.
Allocating PC IP address
Allocate an IP address to your PC as follows:
(1)
Select Internet Protocol (TCP/IP) and click on Properties.
(2)
Choose Use next IP address and enter a suitable IP address.
Your PC should now meet all the prerequisites for the configuration of your device.
Entering the gateway IP address in your PC
Then continue by entering the IP address of the gateway in the configuration of your PC as
follows:
14
bintec R200-Serie
4 Basic configuration
Funkwerk Enterprise Communications GmbH
(1)
In Internet Protocol (TCP/IP) -> Properties under Default gateway, enter the IP address of your gateway. If you do not use the pre-configured IP address of the gateway
or have not yet defined an IP address for it, carry out the initial gateway configuration
steps first (see Configuring the Gateway on page 17). You can determine a free IP address in your network automatically. Enter this IP address here.
(2)
Enter the IP address of your device under Use next DNS server address.
(3)
Click OK.
(4)
Close the status window with OK.
The computer now has an IP configuration and can access the Internet via the gateway.
4.3.3 Installing BRICKware
BRICKware contains a number of programs to help you when working with your device.
The installation is optional.
You only need the Companion CD supplied with your device for the installation. Your PC
should also meet the prerequisites stated in System requirements on page 10.
Elements of BRICKware
Tool
Description
Activity Monitor
The Activity Monitor ensures permanent monitoring of the data
transmitted on your device. It also allows the administrator of
the device to control, under password protection, individual interfaces and connections specifically using certain commands,
e.g. establishing and clearing connections or changing preconfigured Internet providers.
SNMP Manager
The SNMP Manager provides you with complete access to your
device's configuration. With this application, you can monitor important device events at the same time (SNMP traps).
Dime Tools
The Dime Tools application provides a number of services.
Tasks of the individual services:
• Updating of the system software: TFTP server
• Saving of the configuration on the PC: TFTP server
• Time synchronisation of the device with the server: Time server
• Saving of messages and data for accounting, sent from the
device: Syslog Daemon
• The processes can be logged if there are problems with the
data communications: ISDN Tracer
bintec R200-Serie
15
4 Basic configuration
Funkwerk Enterprise Communications GmbH
Tool
Description
• Assignment of IP addresses and loading of configurations:
BootP server
To install the software, proceed as follows:
(1)
Close all Windows programs on your PC.
(2)
Place your bintec Companion CD in the CD-ROM drive of your PC. The Start window will appear automatically after a short time. If the Start window does not open
automatically, click your CD-ROM drive in Windows Explorer and double-click
setup.exe. (For Unix computers: Open the index.htm file in your standard browser.)
(3)
In Add Ons, click BRICKware . A screen will then appear via which you can start the
installation or display the descriptions of the BRICKware components. Click the button to start the Setup program.
(4)
Specify the directory in which the BRICKware is to be installed.
(5)
Select your device.
(6)
Select the software components you wish to install.
The installed programs are available for use immediately after the installation of the
BRICKware ; it is not usually necessary to reboot the PC.
16
bintec R200-Serie
Funkwerk Enterprise Communications GmbH
4 Basic configuration
4.4 Configuring the Gateway
Your gateway can be configured quickly and easily with the Express Setup Wizard.
Fig. 3: Express Setup Wizard - Initial Screen
If you have already created a configuration using the Express Setup Wizard, the Express
Setup Wizard can use the preset values. You will be informed about this possibility during
configuration.
Start the configuration of your gateway as follows:
(1)
Enter ,56667 or ,&56667 in
your web browser's address line. Follow the instructions.
Optional:
(1)
On the bintec bintec Companion CD, choose Installation, and click the Configure
Device button.
(2)
Then follow the instructions to find a free IP address for the device. Click Allocate
Automatically... or enter the IP address and network mask you have defined.
(3)
Start the configuration withComplete.
You can carry out the configuration in 8
% or 1% mode. If you are not very familiar with networking technologies, choose 8
%. Your device is ready for operation when
you have completed the configuration.
You can select from the following configuration items:
bintec R200-Serie
17
4 Basic configuration
Funkwerk Enterprise Communications GmbH
• Basic configuration
• Internet connection
• WLAN settings
• Corporate network connection (LAN-LAN coupling).
The basic configuration is essential if your device is still in the ex works state, as it integrates the gateway into your local network.
(1)
Select the desired items and follow the instructions on the screen.
(2)
To be able to use your device in your local network, it may be necessary to make a
few more settings on the PCs connected in the network after completing the configuration. You can set up Internet access over your device for all PCs in the same network
as your device. To do this, you should set up these PCs as DHCP clients. Otherwise,
you have to allocate a fixed IP address to each PC and enter your device as a default
gateway and as a DNS server (see Configuring a PC on page 14).
The configuration of the gateway and its integration into your network are now completed.
4.5 Testing the Configuration
You have completed the configuration of your device and can now test the connection in
your LAN and to the Internet.
Carry out the following steps to test your device:
(1)
Remove the serial cable from your device if this was connected and you no longer
need the serial connection.
(2)
Test the connection to your device. Click Run in the Start menu and enter , followed by a space and the IP address of your device (e.g. ). A window appears with the response .
(3)
Test Internet access by entering www.funkwerk-ec.com in the Internet browser. Funkwerk Enterprise Communications GmbH's Internet site offers you the latest news, updates and documentation.
Note
Incorrect configuration of the devices in your LAN may result in unwanted connections
and increased charges! Monitor your device and make sure it only sets up connections
at the times you want it to. Watch the LEDs on your device (LED ISDN, ADSL and Ethernet interfaces to which you have connected one or more WANs; for an explanation
of the displays, see Technical data on page 21) or use the Activity Monitor (see
BRICKware for Windows).
18
bintec R200-Serie
Funkwerk Enterprise Communications GmbH
5 Reset
Chapter 5 Reset
If the configuration is incorrect or if your device cannot be accessed, you can reset the
device to the ex works standard settings using the Reset button on the back of the device.
Practically al existing configuration data will then be ignored, only the current user passwords are retained. Configurations stored in the device are not deleted and can, if required,
be reloaded when the device is rebooted.
Proceed as follows:
(1)
Switch off your device.
(2)
Press the Reset button on your device.
(3)
Keep the Reset button on your device pressed down and switch the device back on.
(4)
Look at the LEDs:
- The and -
& LEDs come on first.
- The Ethernet LEDs ( to ) for the ports connected to the Ethernet then flash.
- The device runs through the boot sequence.
- After the -
& LED has flashed five times, release the Reset button.
Proceed as follows if you also want to reset all the user passwords to the ex works state
and delete stored configurations when resetting the device:
• Set up a serial connection to your device. Reboot your device and monitor the boot sequence. Start the BOOTmonitor and choose (4) Delete Configuration and following the
instructions.
or
• First carry out the reset procedure with the Reset button described above. Then, set up a
serial or telnet connection (telnet: use the IP address in ex works state) to your device.
Enter & #%$ as Login at the login prompt in the command line. Leave the
password empty and press the Return key. The device runs through the boot sequence
again.
Note
If you delete the boot configuration using the Funkwerk Configuration Interface
(menu Maintenance->Software & Configuration ), all passwords will also be reset
and the current boot configuration deleted. The next time, the device will boot with the
standard ex works settings.
You can now configure your device again as described from Basic configuration on page 9
bintec R200-Serie
19
5 Reset
Funkwerk Enterprise Communications GmbH
.
20
bintec R200-Serie
6 Technical data
Funkwerk Enterprise Communications GmbH
Chapter 6 Technical data
This chapter summarises all the hardware characteristics of the bintec R230a, bintec
R230b, bintec R230aw, bintec R232a, bintec R232b and bintec R232bw devices.
6.1 Scope of supply
Your device is supplied with the following parts:
bintec
R230a
bintec
R230b
bintec
R230aw
Cable sets/mains unit/
other
Software
Documentation
Ethernet cable
bintec Companion CD
Quick Install Guide (printed)
DSL cable
User's Guide (on CD)
Serial connecting cable
Release Notes, if required
Mains unit
Safety notices
Ethernet cable
bintec Companion CD
Quick Install Guide (printed)
DSL cable
User's Guide (on CD)
Serial connecting cable
Release Notes, if required
Mains unit
Safety notices
Ethernet cable
bintec Companion CD
Quick Install Guide (printed)
DSL cable
User's Guide (on CD)
Serial connecting cable
Release Notes, if required
Mains unit
Safety notices
2 standard antennas
bintec
R232a
Ethernet cable
bintec Companion CD
Quick Install Guide (printed)
DSL cable
User's Guide (on CD)
ISDN cable
Release Notes, if required
Serial connecting cable
Safety notices
Mains unit
bintec
bintec R200-Serie
Ethernet cable
bintec Companion CD
Quick Install Guide (printed)
21
6 Technical data
Funkwerk Enterprise Communications GmbH
Cable sets/mains unit/
other
R232b
Software
Documentation
DSL cable
User's Guide (on CD)
ISDN cable
Release Notes, if required
Serial connecting cable
Safety notices
Mains unit
bintec
R232bw
Ethernet cable
bintec Companion CD
Quick Install Guide (printed)
DSL cable
User's Guide (on CD)
ISDN cable
Release Notes, if required
Serial connecting cable
Safety notices
Mains unit
2 standard antennas
6.2 General Product Features
The general product features cover performance features and the technical prerequisites
for installation and operation of your device.
The features are summarised in the following table:
General Product Features bintec R230a bintec R230b bintec R230aw
bintec R230b
bintec R230aw
Equipment dimensions 158 mm x 25.7 mm x
without cable (B x H x 123.1 mm
D):
158 mm x 25.7 mm x
123.1 mm
158 mm x 25.7 mm x
123.1 mm
Weight
approx. 550 g
approx. 550 g
approx. 550 g
Transport weight (incl. approx. 1.2 kg
documentation,
cables, packaging)
approx. 1.2 kg
approx. 1.2 kg
Memory
32 MB SDRAM,
32 MB SDRAM,
32 MB SDRAM,
8 MB flash ROM
8 MB flash ROM
8 MB flash ROM
Product name
bintec R230a
Dimensions and
weights:
LEDs
22
11 (1x Power, 4x2 Ether- 11 (1x Power, 4x2 Ether- 12 (1x Power, 4x2 Ether-
bintec R200-Serie
6 Technical data
Funkwerk Enterprise Communications GmbH
Product name
bintec R230a
bintec R230b
bintec R230aw
net, 1x Status, 1x ADSL) net, 1x Status, 1x ADSL) net, 1x WLAN, 1x
Status, 1x ADSL)
Power consumption of 4.7 Watt
the device
4.7 Watt
4.7 Watt
Voltage supply
12 V DC 500 mA EU
PSU
12 V DC 500 mA EU
PSU
12 V DC 800 mA EU
PSU
-20° to +70 ?
-20° to +70 ?
-20° to +70 ?
0° to 40 ?
0° to 40 ?
Environmental requirements:
Storage temperature
Operating temperature 0° to 40 ?
Relative atmospheric
humidity
10 % to 90 % non10 % to 90 % non10 % to 90 % noncondensing in operation, condensing in operation, condensing in operation,
5 % to 95 % non5 % to 95 % non5 % to 95 % noncondensing when stored condensing when stored condensing when stored
Room classification
Only use in dry rooms.
Only use in dry rooms.
Only use in dry rooms.
ADSL interface
Internal ADSL modem
for Annex A
Internal ADSL modem
for Annex B
Internal ADSL modem
for Annex A
Serial interface V.24
Permanently installed,
supports Baud rates:
1200, 2400, 4800, 9600,
19200, 38400, 57600,
115200 Baud
Permanently installed,
supports Baud rates:
1200, 2400, 4800, 9600,
19200, 38400, 57600,
115200 Baud
Permanently installed,
supports Baud rates:
1200, 2400, 4800, 9600,
19200, 38400, 57600,
115200 Baud
Ethernet IEEE 802.3
LAN (4-port switch)
Permanently installed
(twisted pair only),
10/100 mbps, autosensing, MDIX
Permanently installed
(twisted pair only),
10/100 mbps, autosensing, MDIX
Permanently installed
(twisted pair only),
10/100 mbps, autosensing, MDIX
WLAN interface
(antennas)
-
Available interfaces:
802.11b and 802.11g
with Antenna Diversity
Data rates 1, 2, 5.5, 6, 9,
11, 12, 18, 24, 36, 48,
54 mbps 1-, 2-, 5.5-, 6-,
9-, 11-, 12-, 18-, 24-,
bintec R200-Serie
23
6 Technical data
Funkwerk Enterprise Communications GmbH
Product name
bintec R230a
bintec R230b
bintec R230aw
36-, 48-, 54 mbps
Available sockets:
Serial interface V.24
5-pole mini USB socket
5-pole mini USB socket
5-pole mini USB socket
Ethernet interface
RJ45 socket
RJ45 socket
RJ45 socket
RJ11 socket
RJ11 socket
RJ11 socket
R&TTE Directive
1999/5/EC
R&TTE Directive
1999/5/EC
R&TTE Directive
1999/5/EC
CE symbol for all EU
states
CE symbol for all EU
states
CE symbol for all EU
states
SAFERNET TM Security Technology
Community passwords,
PAP, CHAP, MS-CHAP,
MS-CHAP v.2, PPTP,
PPPoE, PPPoA, Callback, Access Control
Lists, CLID, NAT, SIF,
MPPE Encryption, PPTP
Encryption, VPN with
PPTP or IPSec
Community passwords,
PAP, CHAP, MS-CHAP,
MS-CHAP v.2, PPTP,
PPPoE, PPPoA, Callback, Access Control
Lists, CLID, NAT, SIF,
MPPE Encryption, PPTP
Encryption, VPN with
PPTP or IPSec
Community passwords,
PAP, CHAP, MS-CHAP,
MS-CHAP v.2, PPTP,
PPPoE, PPPoA, Callback, Access Control
Lists, CLID, NAT, SIF,
MPPE Encryption, PPTP
Encryption, VPN with
PPTP or IPSec
Software supplied
BRICKware for Windows BRICKware for Windows BRICKware for Windows
ADSL interface
Standards &
Guidelines
BRICKtools for Unix
BRICKtools for Unix
BRICKtools for Unix
Printed documentation Quick Reference
supplied
Quick Reference
Quick Reference
Online documentation User's Guide
User's Guide
User's Guide
BRICKware for Windows BRICKware for Windows BRICKware for Windows
Software Reference
Software Reference
Software Reference
General Product Features bintec bintec R232a, bintec R232b, bintec R232bw
Product name
bintec R232a
bintec R232b
bintec R232bw
189.2 mm x 27 mm x
123.1 mm
189.2 mm x 27 mm x
123.1 mm
Dimensions and
weights:
Equipment dimensions 189.2 mm x 27 mm x
without cable (B x H x 123.1 mm
D):
24
bintec R200-Serie
6 Technical data
Funkwerk Enterprise Communications GmbH
Product name
bintec R232a
bintec R232b
bintec R232bw
Weight
approx. 550 g
approx. 550 g
approx. 550 g
Transport weight (incl. approx. 1.2 kg
documentation,
cables, packaging)
approx. 1.2 kg
approx. 1.2 kg
Memory
32 MB SDRAM,
32 MB SDRAM,
32 MB SDRAM,
8 MB flash ROM
8 MB flash ROM
8 MB flash ROM
LEDs
13 (1x Power, 4x2 Ether- 13 (1x Power, 4x2 Ether- 14 (1x Power, 4x2 Ethernet, 1x ETH, 1x Status, net, 1x ETH, 1x Status, net, 1x ETH, 1x WLAN,
1x ADSL, 1x ISDN)
1x ADSL, 1x ISDN)
1x Status, 1x ADSL, 1x
ISDN)
Power consumption of 4.7 Watt
the device
4.7 Watt
4.7 Watt
Voltage supply
12 V DC 800 mA EU
PSU
12 V DC 800 mA EU
PSU
12 V DC 800 mA EU
PSU
-20° to +70 ?
-20° to +70 ?
-20° to +70 ?
0° to 40 ?
0° to 40 ?
Environmental requirements:
Storage temperature
Operating temperature 0° to 40 ?
Relative atmospheric
humidity
10 % to 90 % non10 % to 90 % non10 % to 90 % noncondensing in operation, condensing in operation, condensing in operation,
5 % to 95 % non5 % to 95 % non5 % to 95 % noncondensing when stored condensing when stored condensing when stored
Room classification
Only use in dry rooms.
Only use in dry rooms.
Only use in dry rooms.
ADSL interface
Internal ADSL modem
for Annex A
Internal ADSL modem
for Annex B
Internal ADSL modem
for Annex B
Serial interface V.24
Permanently installed,
supports Baud rates:
1200, 2400, 4800, 9600,
19200, 38400, 57600,
115200 Baud
Permanently installed,
supports Baud rates:
1200, 2400, 4800, 9600,
19200, 38400, 57600,
115200 Baud
Permanently installed,
supports Baud rates:
1200, 2400, 4800, 9600,
19200, 38400, 57600,
115200 Baud
Available interfaces:
bintec R200-Serie
25
6 Technical data
Funkwerk Enterprise Communications GmbH
Product name
bintec R232a
bintec R232b
bintec R232bw
Ethernet IEEE 802.3
LAN (4-port switch)
Permanently installed
(twisted pair only),
10/100 mbps, autosensing, MDIX
Permanently installed
(twisted pair only),
10/100 mbps, autosensing, MDIX
Permanently installed
(twisted pair only),
10/100 mbps, autosensing, MDIX
ISDN-WAN S0
Permanently installed
Permanently installed
Permanently installed
ETH
Additional Ethernet
switch port
Additional Ethernet
switch port
Additional Ethernet
switch port
WLAN interface
(antennas)
802.11b and 802.11g
with Antenna Diversity
Data rates 1, 2, 5.5, 6, 9,
11, 12, 18, 24, 36, 48,
54 mbps 1-, 2-, 5.5-, 6-,
9-, 11-, 12-, 18-, 24-,
36-, 48-, 54 mbps
Available sockets:
Serial interface V.24
5-pole mini USB socket
5-pole mini USB socket
5-pole mini USB socket
Ethernet interface
RJ45 socket
RJ45 socket
RJ45 socket
ISDN interface
RJ45 socket
RJ45 socket
RJ45 socket
RJ11 socket
RJ11 socket
RJ11 socket
R&TTE Directive
1999/5/EC
R&TTE Directive
1999/5/EC
R&TTE Directive
1999/5/EC
CE symbol for all EU
states
CE symbol for all EU
states
CE symbol for all EU
states
SAFERNET TM Security Technology
Community passwords,
PAP, CHAP, MS-CHAP,
MS-CHAP v.2, PPTP,
PPPoE, PPPoA, Callback, Access Control
Lists, CLID, NAT, SIF,
MPPE Encryption, PPTP
Encryption, VPN with
PPTP or IPSec
Community passwords,
PAP, CHAP, MS-CHAP,
MS-CHAP v.2, PPTP,
PPPoE, PPPoA, Callback, Access Control
Lists, CLID, NAT, SIF,
MPPE Encryption, PPTP
Encryption, VPN with
PPTP or IPSec
Community passwords,
PAP, CHAP, MS-CHAP,
MS-CHAP v.2, PPTP,
PPPoE, PPPoA, Callback, Access Control
Lists, CLID, NAT, SIF,
MPPE Encryption, PPTP
Encryption, VPN with
PPTP or IPSec
Software supplied
BRICKware for Windows BRICKware for Windows BRICKware for Windows
ADSL interface
Standards &
Guidelines
BRICKtools for Unix
26
BRICKtools for Unix
BRICKtools for Unix
bintec R200-Serie
6 Technical data
Funkwerk Enterprise Communications GmbH
bintec R232b
bintec R232bw
Printed documentation Quick Reference
supplied
Quick Reference
Quick Reference
Online documentation User's Guide
User's Guide
User's Guide
Product name
bintec R232a
BRICKware for Windows BRICKware for Windows BRICKware for Windows
Software Reference
Software Reference
Software Reference
6.3 LEDs
The device LEDs provide information on certain activities and statuses of the device.
The LEDs on bintec R230a / bintec R230b are arranged as follows:
Fig. 4: LEDs of bintec R230a / bintec R230b
In operation mode, the LEDs on bintec R230a / bintec R230b display the following status
information for your device:
LED status display
LED
State
Information
Power
on
The power supply is connected.
State
on
The device has started.
flashing
The device is active.
on
The device is connected to the Ethernet (100 mbps or 10
mbps).
flashing
Data traffic via the Ethernet Interface (100 mbps or 10 mbps).
on
ADSL connection is active.
1 to 4
ADSL
bintec R200-Serie
27
6 Technical data
Funkwerk Enterprise Communications GmbH
The LEDs on bintec R230aw are arranged as follows:
Fig. 5: LEDs of bintec R230aw
In operation mode, the LEDs on bintec R230aw display the following status information for
your device:
LED status display
LED
State
Information
Power
on
The power supply is connected.
State
on
The device has started.
flashing
The device is active.
on
The device is connected to the Ethernet (100 mbps or 10
mbps).
flashing
Data traffic via the Ethernet Interface (100 mbps or 10 mbps).
on
The WLAN module is active.
flashing
Data traffic via the WLAN interface.
on
ADSL connection is active.
1 to 4
WLAN
ADSL
The LEDs on bintec R232a / bintec R232b are arranged as follows:
Fig. 6: LEDs of bintec R232a / bintec R232b
28
bintec R200-Serie
6 Technical data
Funkwerk Enterprise Communications GmbH
In operation mode, the LEDs on bintec R232a / bintec R232b display the following status
information for your device:
LED status display
LED
State
Information
Power
on
The power supply is connected.
State
on
The device has started.
flashing
The device is active.
on
The device is connected to the Ethernet (100 mbps or 10
mbps).
flashing
Data traffic via the Ethernet Interface (100 mbps or 10 mbps).
on
The device is connected to the Ethernet.
flashing
Data traffic via the Ethernet interface.
ADSL
on
ADSL connection is active.
ISDN
on
One B-channel is in use.
flashing
Both B-channels are in use.
1 to 4
ETH
The LEDs on bintec R232bw are arranged as follows:
Fig. 7: LEDs of bintec R232bw
In operation mode, the LEDs on bintec R232bw display the following status information for
your device:
LED status display
bintec R200-Serie
LED
State
Information
Power
on
The power supply is connected.
29
6 Technical data
Funkwerk Enterprise Communications GmbH
LED
State
Information
State
on
The device has started.
flashing
The device is active.
on
The device is connected to the Ethernet (100 mbps or 10
mbps).
flashing
Data traffic via the Ethernet Interface (100 mbps or 10 mbps).
on
The WLAN module is active.
flashing
Data traffic via the WLAN interface.
on
The device is connected to the Ethernet.
flashing
Data traffic via the Ethernet interface.
ADSL
on
ADSL connection is active.
ISDN
on
One B-channel is in use.
flashing
Both B-channels are in use.
1 to 4
WLAN
ETH
6.4 Connections
All the connections are located on the back of the device.
bintec R230a and bintec R230b have a 4 port Ethernet switch, an ADSL interface and
also a serial interface.
The connections are arranged as follows:
Fig. 8: bintec R230a / bintec R230b rear panel
30
bintec R200-Serie
6 Technical data
Funkwerk Enterprise Communications GmbH
bintec R230a / bintec R230b rear panel
1
Reset
Reset button
2
PWR
Socket for plug-in power pack
3
Console
Serial Interface
4
4/3/2/1
10/100 Base-T Ethernet interface
6
ADSL
ADSL interface
bintec R230aw has a 4 port Ethernet switch, an ADSL interface and also a serial interface.
The connections are arranged as follows:
Fig. 9: bintec R230aw rear panel
bintec R230aw rear panel
1
Reset
Reset button
2
PWR
Socket for plug-in power pack
3
Console
Serial Interface
4
4/3/2/1
10/100 Base-T Ethernet interface
6
ADSL
ADSL interface
8
Main/AUX
RSMA connection
bintec R232a and bintec R232b have a 4 port Ethernet switch, an ADSL interface and
also a serial interface.bintec R232a and bintec R232b also have a separate ETH/DMZ
port and an ISDN interface.
The connections are arranged as follows:
bintec R200-Serie
31
6 Technical data
Funkwerk Enterprise Communications GmbH
Fig. 10: bintec R232a / bintec R232b rear panel
bintec R232a / bintec R232b rear panel
1
Reset
Reset button
2
PWR
Socket for plug-in power pack
3
Console
Serial Interface
4
4/3/2/1
10/100 Base-T Ethernet interface
5
ETH
Ethernet interface
6
ADSL
ADSL interface
7
ISDN
ISDN interface
bintec R232bw has a 4 port Ethernet switch, an ADSL interface and also a serial interface.
bintec R232bw also has a separate ETH/DMZ port and an ISDN interface.
The connections are arranged as follows:
Fig. 11: bintec R232bw rear panel
bintec R232bw rear panel
32
1
Reset
Reset button
2
PWR
Socket for plug-in power pack
3
Console
Serial Interface
4
4/3/2/1
10/100 Base-T Ethernet interface
5
ETH
Ethernet interface
6
ADSL
ADSL interface
7
ISDN
ISDN interface
bintec R200-Serie
6 Technical data
Funkwerk Enterprise Communications GmbH
8
Main/AUX
RSMA connection
6.5 Pin Assignments
6.5.1 Serial Interface
Your device has a serial interface for connection to a console. This supports Baud rates
from 1200 to 115200 Bps.
The interface is designed as a 5-pole mini USB socket.
Fig. 12: 5-pole mini USB socket
The pin assignment is as follows:
Pin assignment of the mini USB socket
Pin
Function
1
Not used
2
TxD
3
RxD
4
Not used
5
GND
6.5.2 Ethernet interface
The devices have an Ethernet interface with integrated 4 port switch. This is used to connect individual PCs or other switches.
The connection is made via an RJ45 socket. bintec R232a, bintec R232b and bintec
R232bw also have a fifth Ethernet interface.
bintec R200-Serie
33
6 Technical data
Funkwerk Enterprise Communications GmbH
Fig. 13: Ethernet 10/100 Base-T interface (RJ45 socket)
The pin assignment for the Ethernet 10/100 Base-T interface (RJ45 socket) is as follows:
RJ45 socket for LAN connection
Pin
Function
1
TD +
2
TD -
3
RD +
4
Not used
5
Not used
6
RD -
7
Not used
8
Not used
The Ethernet 10/100 BASE-T interface does not have an Auto-MDI-X function.
6.5.3 ADSL interface
The ADSL interface is connected via an RJ11 plug. The cable supplied connects the RJ11
plug needed for the device to an RJ11 plug needed for most ADSL splitters.
Only the two inner pins are used for the ADSL connection:
Fig. 14: ADSL interface (RJ11)
The pin assignment for the ADSL interface (RJ11 socket) is as follows:
RJ11 socket for ADSL connection
34
bintec R200-Serie
6 Technical data
Funkwerk Enterprise Communications GmbH
Pin
Function
1
Not used
2
a
3
b
4
Not used
6.5.4 ISDN S0 port
bintec R232a, bintec R232b and bintec R232bw have an additional ISDN-S0 interface,
which can be used for backup functions, for example.
The connection is made via an RJ45 socket.
Fig. 15: ISDN S0 BRI interface (RJ45 socket)
The pin assignment for the ISDN S0 BRI interface (RJ45 socket) is as follows:
RJ45 socket for ISDN connection
bintec R200-Serie
Pin
Function
1
Not used
2
Not used
3
Transmit (+)
4
Receive (+)
5
Receive (-)
6
Transmit (-)
7
Not used
8
Not used
35
7 Access and configuration
Funkwerk Enterprise Communications GmbH
Chapter 7 Access and configuration
This chapter describes all the access and configuration options.
7.1 Access Options
The various access options are presented below. Select the procedure to suit your needs.
There are various ways you can access your device to configure it:
• Via your LAN
• Via the serial interface
• Via an ISDN connection (only bintec R232a, bintec R232b and bintec R232bw)
7.1.1 Access via LAN
Access via one of the Ethernet interfaces of your device allows you to to open the Express
Setup Wizard and Funkwerk Configuration Interface in a web browser for configuration
purposes and to access your device via Telnet or SSH.
7.1.1.1 HTTP/HTTPS
With a current web browser, you can use the HTML interfaces to configure your device.
Configuration with the Express Setup Wizard is particularly easy. An extended configuration can be set up using the Funkwerk Configuration Interface . For this, enter the following in your web browser's address field:
• Express Setup Wizard:
,56667
or
,&56667
• Funkwerk Configuration Interface :
,566
or
,&566
36
bintec R200-Serie
Funkwerk Enterprise Communications GmbH
7 Access and configuration
7.1.1.2 Telnet
Apart from configuration using a web browser, with a Telnet connection you can also access the SNMP shell and use other configuration options.
You do not need any additional software on your PC to set up a Telnet connection to your
device: Telnet is available on all operating systems.
Proceed as follows:
Windows
(1)
Click Run… in the Windows Start menu.
(2)
Enter !"# $$%% $&
'(.
(3)
Click OK.
A window with the login prompt appears. You are now in the SNMP shell of your
device.
(4)
Continue with Logging in for Configuration on page 42.
Unix
You can also set up a Telnet connection on UNIX and Linux without any problem:
(1)
Enter !"# $$%% $&
'( in a terminal.
A window with the login prompt appears. You are now in the SNMP shell of your
device.
(2)
Continue with Logging in for Configuration on page 42.
7.1.1.3 SSH
In addition to the unencrypted and potentially viewable Telnet session, you can also connect to your device via an SSH connection. This is encrypted, so all the remote maintenance options can be carried out securely.
The following preconditions must be met in order to connect to the device via SSH:
• The encryption keys needed for the process must be available on the device.
• An SSH client must be installed on your PC.
Encryption keys
First of all, make sure that the keys for encrypting the connection are available on your
device:
(1)
bintec R200-Serie
Log in to one of the types already available on your device (e.g. via Telnet - for login
37
7 Access and configuration
Funkwerk Enterprise Communications GmbH
see Logging in on page 41).
(2)
Enter $ for the input prompt. You are now in the Flash Management shell.
(3)
Call up a list of all the files saved on the device: % .
If you see a display like the one below, the keys needed are already there and you can
connect to the device via SSH:
)%*+* ( % )% ,%
-* . / ,01'2 34 3 445454 66 1047%'4
,8 44 94 4454543 466 %%*$7*%7%7:1
,8 44 4 4454543 466 %%*$7*%7%7:
,8 444 394 4454543 4663 %%*$7*%7$%7:1
,8 444 3 4454543 466 %%*$7*%7$%7:
)%*+* (
Note
The device generates a key pair for each of the algorithms (RSA and DSA), i.e. two
files must be stored in the flash for each algorithm (see example at above).
If no keys are available, you have to generate these first. Proceed as follows:
(1)
Leave the Flash Management shell with 0
.
(2)
Call up the Setup tool (%) and navigate to the Security -> SSH Daemon -> Certification Management menu.
(3)
To have the keys generated by the device, mark one of the two entries with the cursor
and confirm with Enter. The device then generates the key and stores it in the
FlashROM.
(4)
Make sure that both keys have been successfully generated. To do this, repeat the
procedure described above.
Login via SSH
Proceed as follows to log in on your device via SSH:
If you have made sure that all the keys needed are available on the device, you have to
check whether an SSH client is installed on your PC. Most UNIX and Linux distributions install a SSH client by default. Additional software, e.g. PuTTY, usually has to be installed on
38
bintec R200-Serie
Funkwerk Enterprise Communications GmbH
7 Access and configuration
a Windows PC.
Proceed as follows to log in on your device via SSH:
UNIX
(1)
Enter %%* !"# $$%% * $&
'( in a terminal.
The login prompt window appears. This is located in the SNMP shell of the device.
(2)
Continue with Logging in on page 41.
Windows
(1)
How an SSH connection is set up very much depends on the software used. Consult
the documentation for the program you are using.
As soon as you have connected to the device, the login prompt window will appear.
You are now in the SNMP shell of your gateway.
(2)
Continue with Logging in on page 41.
Note
PuTTY requires certain settings for a connection to a bintec device. The support
pages of http://www.funkwerk-ec.com include FAQs, which list the required settings.
7.1.2 Access via the Serial Interface
Each bintec gateway has a serial interface, with which a PC can be connected directly.
The following chapter describes what you have to remember when setting up a serial connection and what you can do to configure your device in this way.
Access via the serial interface is ideal if you are setting up an initial configuration of your
device and a LAN access is not possible via the pre-configured IP address
(192.168.0.254/255.255.255.0).
Windows
To connect your device to your PC via the serial interface, proceed as described in Installation on page 6. The Quick Install Guide is included with your device in printed form and is
also on the Companion CD.
If you are using a Windows PC, you need a terminal program for the serial connection, e.g.
HyperTerminal. Make sure that HyperTerminal was also installed on the PC with the Windows installation. However, you can also use any other terminal program that can be set to
the corresponding parameters (see below).
bintec R200-Serie
39
7 Access and configuration
Funkwerk Enterprise Communications GmbH
If you have installed the BRICKware as described in the Quick Install Guide, two links are
provided in the Windows Start menu. If you use these, you do not have to make any other
settings for the serial connection to your device.
Proceed as follows to access your device via the serial interface:
(1)
In the Windows Start menu, click on Programs -> BRICKware -> Device on COM1
(or Device on COM2 , if you use the COM2 port of your PC) to start HyperTerminal.
(2)
Press Return (at least once) after the HyperTerminal window opens.
A window with the login prompt appears. You are now in the SNMP shell of your device.
You can now log in on your device and start the configuration.
Check
If the login prompt does not appear after you press Return several times, the connection to
your device has not been set up successfully.
Therefore, check the COM1 or COM2 settings on your PC.
(1)
Click on File ->Properties.
(2)
Click Configure in the Connect to tab.
The following settings are necessary:
- Bits per second: - Data bits: - Parity: *
- Stopbits: - Flow control: *
(3)
Enter the values and click OK.
(4)
Make the following settings in the Settings tab:
- Emulation: 9+
(5)
Click OK.
The changes to the terminal program settings do not take effect until you disconnect the
connection to your device and then make the connection again.
If you use HyperTerminal, there may be problems with displaying umlauts and other special
characters. If necessary, therefore, set HyperTerminal to 1
% instead of 9+
.
Unix
You will require a terminal program such as ' (on System V), (on BSD) or '
(on Linux). The settings for these programs correspond to those listed above.
40
bintec R200-Serie
Funkwerk Enterprise Communications GmbH
7 Access and configuration
Example of a command line for using ': ' % 44 '5$&5+
Example of a command line for using : 44 5$&5+
7.1.3 Access over ISDN
All devices that have an ISDN interface can be accessed and configured from another
device via an ISDN call.
Access over ISDN with ISDN Login is especially recommended if your device is to be remotely configured or maintained. This is also possible even if your device is still in the ex
works state. Access is then obtained with the aid of a device that is already configured or a
PC with an ISDN card in the remote LAN. The device to be configured in your own LAN is
reached via a number of the ISDN connection (e.g. 1234). This enables the administrator in
the Remote LAN to configure your device remotely, for example.
Note
If you connect an unconfigured device to an ISDN connection in parallel to a PBX, the
PBX cannot take any calls until an ISDN number is configured on the device.
Access over ISDN costs money. If your device and your computer are in the LAN, it is
cheaper to access your device via the LAN or via the serial interface.
Your device in your LAN merely needs to be connected to the ISDN connection and
switched on.
To reach your device over ISDN Login, proceed as follows:
(1)
Connect your device to the ISDN.
(2)
Log in as administrator on your device in the remote LAN in the usual way.
(3)
In the SNMP shell, type in %$
! 1 * "+./ ''
$&
'(, e.g. %$
9.
(4)
The login prompt appears. You are now in the SNMP shell of your device.
Continue with Logging in for Configuration on page 42.
7.2 Logging in
With certain access data, you can log in on your device and carry out different actions. The
extent of the actions available depend on the authorisations of the user concerned.
bintec R200-Serie
41
7 Access and configuration
Funkwerk Enterprise Communications GmbH
A login prompt appears first, regardless of how you access your device. You cannot view
any information on the device or change the configuration without authentication.
7.2.1 User names and passwords in ex works state
In its ex works state, your device is provided with the following user names and passwords:
User names and passwords in ex works state
User name Password
Authorisations
$ :8: Read and change system variables, save configurations; use
Express Setup Wizard, Funkwerk Configuration Interface .
8
1
'
Read and write system variables (except passwords) (changes
are lost when you switch off your device).
$
1
'
Read system variables (except passwords).
It is only possible to change and save configurations if you log in with the user name $
. Access information (user names and passwords) can also only be changed if you log
in with the user name $ . For security reasons, passwords are normally shown on the
Setup Tool screen not in plain text, but only as asterisks. The user names, on the other
hand, are displayed as plain text.
The security concept of your device enables you to read all the other configuration settings
with the user name $, but not the access information. It is therefore impossible to log in
with $, read the password of the $ user and subsequently log in with $ and
make changes to the configuration.
Caution
All bintec devices are delivered with the same username and password. As long as
the password remains unchanged, they are therefore not protected against unauthorized use. How to change the passwords is described in on page .
Make sure you change the passwords to prevent unauthorized access to your device!
If you have forgotten your password, you must reset your device to the ex works state,
which means your configuration will be lost.
7.2.2 Logging in for Configuration
Set up a connection to the device. The access options are described in Access Options on
page 36.
42
bintec R200-Serie
7 Access and configuration
Funkwerk Enterprise Communications GmbH
Funkwerk Configuration Interface
Log in via the HTML surface as follows:
(1)
Enter your user name in the User field of the input window.
(2)
Enter your password in the Password field of the input window and confirm with Return or click the Login button.
The status page of the Funkwerk Configuration Interface opens in the browser.
SNMP shell
Log into the SNMP shell as follows:
(1)
Enter your user name e.g. $ , and confirm with Return.
(2)
Enter your user password e.g. :8:, and confirm with Return.
Your device logs in with the input prompt, e.g. 9186(. The login was successful. You
are now in the SNMP shell.
To leave the SNMP shell after completing the configuration, enter 0
and press Return.
7.3 Configuration options
This chapter first offers an overview of the various tools you can use for configuration of
your device.
You can configure your device in the following ways:
• Express Setup Wizard for beginners
• Funkwerk Configuration Interface for advanced users
• SNMP shell commands
The configuration options available to you depend on the type of connection to your device:
Types of connections and configurations
Type of connection
Possible types of configuration
LAN
Express Setup Wizard, Funkwerk Configuration Interface ,
shell commands
Serial connection
Shell command
Therefore, several types of configuration are available for each type of connection.
bintec R200-Serie
43
7 Access and configuration
Funkwerk Enterprise Communications GmbH
Note
To change the device configuration, you must log in with the user name $ . If you
do not know the password, you cannot make any configuration settings. This applies to
all types of configuration.
7.3.1 Express Setup Wizard for beginners
You have already learnt about configuration with the Express Setup Wizard in the Quick
Install Guide. It is used to perform the basic configuration of your device quickly and can
also be used if you can address the device with its preset IP configuration from your LAN.
This usually covers most standard configurations.
However, if you would like to make further settings, you can use the other configuration
methods mentioned above. You can first configure your device with the Express Setup
Wizard and subsequently extend or change this initial configuration with one of the other
tools. In many cases, configuration using the Express Setup Wizard alone will be sufficient.
The Express Setup Wizard guides you through the configuration. Once you have exited
the Express Setup Wizard, your device is ready for use. The information you need for
configuration with the Express Setup Wizard and the prerequisites for this can be found in
the Installation on page 6, which is also available to you in printed form.
The detailed help system of the Express Setup Wizard will help you to clarify any questions you may have. As a result, a detailed description of the Express Setup Wizard is not
provided here.
7.3.2 Funkwerk Configuration Interface for advanced users
The Funkwerk Configuration Interface is a web-based graphic user surface that you can
use from any PC with an up-to-date web browser via an HTTP or HTTPS connection.
You can use the Funkwerk Configuration Interface to carry out all configuration tasks
easily. It is integrated in your device and is available in English. If required, other languages
can be downloaded from the download area of www.funkwerk-ec.com and installed on
your device. To do this, proceed as described in Options on page 336.
The settings you make with the Funkwerk Configuration Interface are applied with the
OK or Apply button of the menu, and you do not have to restart the device.
If you finish the configuration and want to save your settings so that they are loaded as the
boot configuration when you reboot your device, save these by clicking the Save configur-
44
bintec R200-Serie
Funkwerk Enterprise Communications GmbH
7 Access and configuration
ation button.
You can also use the Funkwerk Configuration Interface to monitor the most important
function parameters of your device.
Fig. 16: Funkwerk Configuration Interface Initial Screen
7.3.2.1 Calling the Funkwerk Configuration Interface
bintec R200-Serie
(1)
Check whether the device is connected and switched on and that all the necessary
cables are correctly connected (see Setting Up and Connecting on page 6).
(2)
Check the settings of the PC from which you want to configure your device (see Configuring a PC on page 14).
(3)
Open a web browser.
(4)
Enter ,566 in the address field of the web browser.
(5)
Enter in the User field and in the Password field and click LOGIN.
45
7 Access and configuration
Funkwerk Enterprise Communications GmbH
You are not in the status menu of your device's Funkwerk Configuration Interface (see
State on page 61).
7.3.2.2 Operating elements
Funkwerk Configuration Interface window
The Funkwerk Configuration Interface window is divided into three areas:
• The header
• The navigation bar
• The main configuration window
Fig. 17: Areas of the Funkwerk Configuration Interface
Header
Fig. 18: Funkwerk Configuration Interface header
Funkwerk Configuration Interface header
Menu
Function
Language selection: From the dropdown menu, select the lan-
46
bintec R200-Serie
7 Access and configuration
Funkwerk Enterprise Communications GmbH
Menu
Function
guage in which the Funkwerk Configuration Interface is to be
displayed. Here, you can select the language in which you want
to carry out the configuration. German and English are available.
Online Help: Click this button if you want help with the menu
now active. The description of the sub-menu where you are now
is displayed.
Express Setup Wizard: Click this button if you want to activate
the configuration wizard. The configuration assistant is opened
in a new window and takes you step-by-step through the basic
configuration of your device and alternatively also through the
configuration of an Internet access, a wireless LAN connection
and a VPN connection.
Logout: If you want to end the configuration, click this button to
log out of your device. A window is opened offering you the following options:
• Continue with the configuration,
• Save the configuration and close the window,
• Exit the configuration without saving.
Navigation bar
Fig. 19: Save Configuration button
bintec R200-Serie
47
7 Access and configuration
Funkwerk Enterprise Communications GmbH
Fig. 20: Menus
The Save Configuration button is found in the navigation bar. Click the Save Configuration button to save all configuration changes, so that they are loaded as the boot configuration the next time you start the device.
The navigation bar also contains the main configuration menus and their sub-menus.
Click the main menu you require. The corresponding sub-menu then opens.
If you click the sub-menu you want, the entry selected will be displayed in red. All the other
sub-menus will be closed. You can see at a glance the sub-menu you are in.
Status page
If you call the Funkwerk Configuration Interface , after you log in the status page of your
device is displayed. The most important data of your device can be seen on this at a
glance.
Main configuration window
The sub-menus generally contain several pages. These are called using the buttons at the
top of the main window. If you click a button, the window is opened with the basic paramet-
48
bintec R200-Serie
7 Access and configuration
Funkwerk Enterprise Communications GmbH
ers. You can extend this by clicking the Advanced Settings tab, which displays the additional options.
Configuration elements
The various actions that you can perform when configuring your device in the Funkwerk
Configuration are triggered by means of the following buttons:
Funkwerk Configuration Interface buttons
Button
Function
Updates the view.
If you do not want to save a newly configured list entry, cancel
this and any settings made by pressing Cancel.
Confirms the settings of a new entry and the parameter
changes in a list.
Immediately starts the configured action.
Calls the the sub-menu to create a new entry.
Inserts an entry in an internal list.
Funkwerk Configuration Interface buttons for special functions
Button
Function
In the Access Point Search menu, you use this button to start
automatic detection of all the access points available and connected by Ethernet in the network.
In the VPN -> Certificates -> Certificates and the VPN -> Certificates -> CRLs menus, this button opens the sub-menus for
configuring the certificates or CRL imports.
In the VPN -> Certificates -> Certificates menu, this button
opens the sub-menu for the configuration of the certificate request.
In the Surveillance -> ISDN/Modem -> Current Calls menu,
clicking on this button ends the active calls selected in the
column
.
Various icons indicate the following possible actions or statuses:
Funkwerk Configuration Interface icons
bintec R200-Serie
49
7 Access and configuration
Funkwerk Enterprise Communications GmbH
Icon
Function
Deletes the list entry.
Displays the menu for changing the settings of an entry.
Displays the details for an entry.
Moves an entry. A combo box opens in which you can choose
the list entry that selected entry is to be be placed in front of/
after.
Creates another list entry first and opens the configuration
menu.
Sets the status of the entry to % .
Sets the status of the entry to 1%.
Indicates "Dormant" status for an interface or connection.
Indicates "Up" status for an interface or connection.
Indicates "Down" status for an interface or connection.
Indicates "Blocked" status for an interface or connection.
Indicates "Going up" status for an interface or connection.
Indicates that data traffic is encrypted.
Triggers a WLAN bandscan.
Displays the next page in a list.
Displays the previous page in a list.
You can select the following operating functions in the list view:
Funkwerk Configuration Interface list options
Menu
Function
Update Interval
Here you can set the interval in which the view is to be updated.
To do this, enter a period in seconds in the input field and confirm it with
.
Filter
50
You can have the list entries filtered and displayed according to
bintec R200-Serie
7 Access and configuration
Funkwerk Enterprise Communications GmbH
Menu
Function
certain criteria.
You can determine the number of entries displayed per page by
entering the required number in View x per Page.
Use the
and
buttons to scroll one page forward and one
page back.
You can filter according to certain keywords within the configuration parameters by selecting the filter rule you want under Filter in x <Option> y and entering the search word in the input
field.
starts the filter operation.
Configuration elements
Some lists contain configuration elements.
You can therefore change the configuration of the corresponding list entry directly in the list.
Fig. 21: Configuration of the update interval
Fig. 22: Filter list
Structure of the Funkwerk Configuration Interface configuration menus
The menus of the Funkwerk Configuration Interface contain the following basic structures:
Funkwerk Configuration Interface menu structure
Menu
Function
Basic configuration
menu/list
When you select a menu from the navigation bar, the menu of
basic parameters is displayed first. In a sub-menu containing
several pages, the menu containing the basic parameters is displayed on the first page.
The menu contains either a list of all the configured entries or
the basic settings for the function concerned.
Sub-menu
bintec R200-Serie
The New button is available in each menu in which a list of all
the configured entries is displayed. Click the button to display
the configuration menu for creating a new list entry.
51
7 Access and configuration
Funkwerk Enterprise Communications GmbH
Menu
Function
Sub-menu
Click this button to process the existing list entry. You go to the
configuration menu.
Menu
Click this tab to display extended configuration options.
The following options are available for the configuration:
Funkwerk Configuration Interface configuration elements
Menu
Function
Input fields
e.g. empty text field
Text field with hidden input
Enter the data.
Radio buttons
e.g.
Select the corresponding option.
Checkboxes
e.g. activation by selecting checkbox
Selection of several possible options
Dropdown menus
e.g.
Click the arrow to open the list. Select the required option using
the mouse.
Internal lists
e.g.
Click
. A new list entry is created. Enter the correspond-
ing data. If list input fields remain empty, these are not saved
52
bintec R200-Serie
7 Access and configuration
Funkwerk Enterprise Communications GmbH
Menu
Function
when you confirm with OK. Delete the entries by clicking the
icon.
Display of options that are not available
Options that are not available because they depend on the selection of other options are
generally hidden. If the display of these options could be helpful for a configuration decision, they are instead greyed out and cannot be selected.
Important
Please look at the messages displayed in the sub-menus. These provide information
on any incorrect configurations.
Warning symbols
Icon
Meaning
This symbol appears in messages referring you to settings
that were made with the Setup Tool.
This symbol appears in messages referring you to the fact
that values were entered or selected incorrectly.
Pay particular attention to the following message:
"Warning: changes not supported by the Setup Tool!". If you makes these changes
with the Funkwerk Configuration Interface , this can cause inconsistencies or malfunctions. Therefore, it is recommended that the configuration is continued with the
Setup Tool.
7.3.2.3 Funkwerk Configuration Interface menus
The configuration options of your device are contained in the sub-menus, which are displayed in the navigation bar in the left-hand part of the window.
Note
Please note that not all devices have the full range of functions. Check the software of
your device on the corresponding product page under www.funkwerk-ec.com .
The Funkwerk Configuration Interface contains the following menus:
bintec R200-Serie
53
7 Access and configuration
Funkwerk Enterprise Communications GmbH
System Management
Menu
Function
State
In this menu, general information on your device is displayed at
a glance.
This information includes serial number, software version, current memory and processor use, status of the physical interfaces and the last 10 system messages.
Global Settings
In this menu, you enter the basic system settings of your device,
such as, for example, system name, system date, system time
and passwords.
You can also manage licences that are necessary for the use of
certain functions.
Interface Mode / Bridge In this menu, you define the mode in which the interfaces of
Groups
your device are to run (routing or bridging) and if necessary can
define bridge groups.
Administrative Access In this menu, you configure the access options for the individual
interfaces.
Remote Authentication In this menu, you configure the authentication via a RADIUS
server or TACAS+ server.
Physical interfaces
Menu
Function
Ethernet Ports
In this menu, you configure the Ethernet interfaces of your
device. To do this, you select the speed and type of interface,
for example.
ISDN Ports
In this menu, you configure the ISDN interface of your device.
Here you enter data such as the type of ISDN connection to
which your device is connected.
ADSL Modem
In this menu, you make the basic settings for your ADSL connection.
LAN
54
bintec R200-Serie
7 Access and configuration
Funkwerk Enterprise Communications GmbH
Menu
Function
IP Configuration
In this menu, you carry out the IP configuration of the LAN interfaces for your device.
VLAN
In this menu, you configure the VLANs.
Wireless LAN
Menu
Function
WLAN1
In this menu, you configure your wireless modules as an access
point or bridge.
Administration
In this menu, you make the basic WLAN settings.
Routing
Menu
Function
Routes
In this menu, you enter additional routes.
NAT
In this menu, you configure the NAT firewall (NAT, Network Address Translation).
RIP
In this menu, you configure the dynamic updating of the routing
table via RIP.
Load Balancing
In this menu, you configure application-controlled bandwidth
management.
Multicast
In this menu, you configure the use of multimedia streaming
protocols for e.g. voice over IP or video and audio streaming
(e.g. IPTV or Webradio) or TriplePlay (voice, video, data).
WAN
bintec R200-Serie
Menu
Function
Internet + Dialup
In this menu, you define the Internet connections for the various
connection protocols or dialup connections.
ATM
In this menu, you carry out configuration of the ATM profiles that
are needed for all the ADSL connections and also connection
monitoring (OAM) and ATM QoS.
Real Time Jitter Con-
In this menu, you can optimise the low-bandwidth transmission
55
7 Access and configuration
Funkwerk Enterprise Communications GmbH
Menu
Function
trol
of voice data packets.
VPN
Menu
Function
IPSec
In this menu, you configure VPN connections over IPSec.
L2TP
In this menu you configure the use of L2TP (Layer 2 Tunnelling
Protocol).
PPTP
In this menu, you configure the an encrypted PPTP tunnel.
GRE
This menu shows a list of all configured GRE tunnels.
Certificates
In this menu you can generate and import keys and have them
certified.
Firewall
Menu
Function
Policies
In this menu you configure the filter rules for the firewall.
Interfaces
In this menu, you can group together the interfaces to be
filtered.
Addresses
In this menu, you can create the address aliases to be filtered.
Services
In this menu, you can create the service aliases to be filtered.
VoIP
Menu
Function
SIP
In this menu, you configure a network transition between various telecommunication networks.
RTSP
In this menu, you configure the use of the RealTime Streaming
protocol.
Local services
56
Menu
Function
DNS
In this menu, you configure the name resolution.
bintec R200-Serie
7 Access and configuration
Funkwerk Enterprise Communications GmbH
Menu
Function
DynDNS Client
In this menu, you configure the dynamic name resolution.
DHCP Server
In this menu, you configure your device as a DHCP server.
Web Filter
In this menu, you configure the use of the URL-based Proventia
Web Filter from ISS (www.iss.net).
CAPI Server
In this menu, you configure your device as a CAPI server.
Scheduling
In this menu, you configure time-dependent standard actions of
your devices.
Surveillance
In this menu, you configure the surveillance of interfaces or
hosts in the network.
ISDN Theft Protection
In this menu you can configure the ISDN theft protection function for each interface.
Funkwerk Discovery
In this menu, you can configure management functions for
bintec Access Point.
UPnP
In this menu, you configure the UPnP settings individually for
each interface of your gateway.
Maintenance
Menu
Function
Diagnostics
In this menu you can test the accessibility of hosts, DNS servers
or routing.
Software & Configuration
In this menu, you manage your device's software version, configuration files and interface language.
Reboot
In this menu, you can initiate the rebooting of the device.
External Reporting
bintec R200-Serie
Menu
Function
Syslog
In this menu, you configure the host to which the data logged internally on the device is forwarded for saving and further processing.
IP Accounting
In this menu, you decide for which interfaces accounting mes-
57
7 Access and configuration
Funkwerk Enterprise Communications GmbH
Menu
Function
sages are to be generated.
E-mail alert
Depending on the configuration, in this menu e-mails are sent to
the administrator as soon as relevant syslog messages occur.
SNMP
In this menu, you configure whether the device is to listen for
external SNMP accesses and send SNMP traps.
Activity Monitor
In this menu, you configure the surveillance of your device with
the Windows Tool Activity Monitor (component of BRICKware
for Windows).
Monitoring
Menu
Function
Internal Log
In this menu, the system messages are displayed.
IPSec
In this menu, the IPSec connections and connection statistics
that are currently active are displayed.
ISDN/Modem
In this menu, the ISDN connections are displayed.
Interfaces
In this menu, connection statistics and status of all interfaces
are displayed.
WLAN
This menu shows you the WLAN connections statistics.
Bridges
In this menu you can view the current values of the configured
bridges.
7.3.3 SNMP shell
SNMP (Simple Network Management Protocol) is a protocol that defines how you can access the configuration settings.
All configuration settings are stored in the MIB (Management Information Base) in the form
of MIB tables and MIB variables. You can access these directly from the SNMP shell via
SNMP commands. This type of configuration requires a detailed knowledge of our devices.
7.4 BOOTmonitor
The BOOTmonitor is only available over a serial connection to the device.
58
bintec R200-Serie
Funkwerk Enterprise Communications GmbH
7 Access and configuration
The BOOTmonitor provides the following functions, which you select by entering the corresponding number:
(1)
Boot System (reboot the system):
The device loads the compressed boot file from the flash memory to the working
memory. This happens automatically on starting.
(2)
Software Update via TFTP:
The devices performs a software update via a TFTP server.
(3)
Software Update via XMODEM:
The device performs a software update via a serial interface with XMODEM.
(4)
Delete configuration:
The device is reset to the ex works state. All configuration files are deleted and the
BOOTmonitor settings are set to the default values.
(5)
Default BOOTmonitor Parameters:
You can change the default settings of the BOOTmonitor of the device, e.g. the
baud rate for serial connections.
(6)
Show System Information:
Shows useful information about your device, e.g. serial number, MAC address and
software versions.
The BOOTmonitor is started as follows.
The devices passes through various functional states when starting:
• Start mode
• BOOTmonitor mode
• Normal mode
After some self-tests have been successfully carried out in the start mode, your device
reaches the BOOTmonitor mode. The BOOTmonitor prompt is displayed if you are serially
connected to your device.
bintec R200-Serie
59
7 Access and configuration
Funkwerk Enterprise Communications GmbH
After display of the BOOTmonitor prompt, press the space bar within four seconds to use
the functions of the BOOTmonitor. If you do not make an entry within four seconds, the
device changes back to normal operating mode.
Note
If you change the baud rate (the preset value is 9600 baud), make sure the terminal
program used also uses this baud rate. If this is not the case, you will not be able to
establish a serial connection to the device.
60
bintec R200-Serie
Funkwerk Enterprise Communications GmbH
8 System Management
Chapter 8 System Management
The System Management menu contains general system information and settings.
You see a system status overview. Global system parameters such as the system name,
date/time, passwords and licences are managed and the access and authentication methods are configured.
8.1 State
If you log into the Funkwerk Configuration Interface , your device's status page is displayed, which shows the most important system information.
You see an overview of the following data:
• System status
• Your device's activities: Resource utilisation, active sessions and tunnels
• Status and basic configuration of the LAN, WAN, ISDN, WLAN, and ADSL interfaces
• The last 10 system messages
You can customise the update interval of the status page by entering the desired period in
seconds as Automatic Update Interval and clicking on the Apply-button.
Caution
Under Automatic Refresh Interval do not enter a value of less than seconds, otherwise the refresh interval of the screen will be too short to make further changes!
bintec R200-Serie
61
8 System Management
Funkwerk Enterprise Communications GmbH
Fig. 24: System Management ->Status
The System Management -> Status menu consists of the following fields:
Fields in the Status System Information menu
Field
Value
Uptime
Displays the time past since the device was rebooted.
System Date
Displays the current system date and system time.
Serial number
Displays the device serial number.
BOSS Version
Displays the currently loaded version of the system software.
Fields in the Status Resource Information menu
62
Field
Value
CPU Usage
Displays the CPU usage as a percentage.
bintec R200-Serie
8 System Management
Funkwerk Enterprise Communications GmbH
Field
Value
Memory Usage
Displays the usage of the working memory in MByte in relation
to the available total working memory in MByte. The usage is
also displayed in brackets as a percentage.
ISDN Usage External
Displays the current number of ISDN B-channels used in relation to the total number of ISDN B-channels available.
Active Sessions (SIF,
RTP, etc... )
Displays the total of all SIF, TDRC, and IP load balancing sessions.
Active IPSec Tunnels
Displays the number of currently active IPSec tunnels in relation
to the number of configured IPSec tunnels.
Other fields in the Status menu
Field
Value
Physical Interface - Interface Specifics - Link
The physical interfaces are listed here and their most important
settings are shown. The system also displays whether the interface is connected or active.
Interface specifics for Ethernet interfaces:
• IP Address
• Netmask
Interface specifics for ISDN interfaces:
• Configured
• Not configured
Interface specifics for xDSL interfaces:
• Downstream/Upstream Line Speed
Interface Specifics for WLAN Interfaces:
Access Point Mode:
• Operation Mode: Access Point or Off
• The channel used on this wireless module
• Number of connected clients
• Number of WDS links
• Software version of the wireless card
Recent System Logs
bintec R200-Serie
Displays the last 10 system messages.
63
8 System Management
Funkwerk Enterprise Communications GmbH
8.2 Global Settings
The basic system parameters are managed in the Global Settings menu.
8.2.1 System
The System Management -> Global Settings -> System menu is used for entering the
basic system data of your device.
Fig. 25: System Management -> Global Settings -> System
The System Management -> Global Settings-> System menu consists of the following
fields:
Fields in the System Basic Parameters menu
Field
Value
System Name
Enter the system name of your device. This is also used as the
PPP host name.
A character string of up to 255 characters is possible.
The device type is entered as the default value.
Locality
64
Enter the location of your device.
bintec R200-Serie
8 System Management
Funkwerk Enterprise Communications GmbH
Field
Value
Contact
Enter the relevant contact person. Here you can enter the email address of the system administrator, for example.
A character string of up to 255 characters is possible.
The default value is 3*+:.
Maximum Number of
Syslog Entries
Enter the maximum number of syslog messages that are stored
internally in the device.
Possible values are to .
The default value is . You can view the stored messages in
Monitoring -> Internal Log.
Maximum Message
Level of Syslog Entries
Select the priority of system messages above which a log
should be created.
System messages are only recorded internally if they have a
higher or identical priority to that indicated, i.e. all messages
generated are recorded at syslog level #
$.
Possible values:
• $%): Only messages with emergency priority are recorded.
• 1/: Messages with emergency and alert priority are recorded.
• :%/: Messages with emergency, alert and critical priority are recorded.
• &: Messages with emergency, alert, critical and error
priority are recorded.
• 0$: Messages with emergency, alert, critical, error and
warning priority are recorded.
• *%: Messages with emergency, alert, critical, error,
warning and notice priority are recorded.
• (default value) Messages with emergency,
alert, critical, error, warning, notice and information priority are
recorded.
• ;#
$: All messages are recorded.
bintec R200-Serie
65
8 System Management
Funkwerk Enterprise Communications GmbH
Field
Value
Maximum Number of Ac- Enter the maximum number of accounting entries that are
counting Log Entries
stored internally in the device.
Possible values are to .
The default value is .
8.2.2 Passwords
Setting the passwords is another basic system setting.
Fig. 26: System Administration -> Global Settings -> Passwords
Note
All bintec devices are delivered with the same username and password. As long as
the password remains unchanged, they are not protected against unauthorised use.
Make sure you change the passwords to prevent unauthorised access to the device
If the password is not changed, under System Administration-> Status appears the
warning: "System password not changed!"
The System Management -> Global Settings-> Passwords menu consists of the follow-
66
bintec R200-Serie
8 System Management
Funkwerk Enterprise Communications GmbH
ing fields:
Fields in the Passwords System Password menu
Field
Value
System Admin Password
Enter the password for the user name $ .
This password is also used with SNMPv3 for authentication
(MD5) and encryption (DES).
Confirm system adminis- Confirm the password by entering it again.
trator password
Fields in the Passwords SNMP Communities menu
Field
Value
SNMP Read Community Enter the password for the user name $.
SNMP Write Community Enter the password for the user name 8
.
Fields in the Passwords Global Password Options menu
Field
Value
Show Passwords and
Keys in Clear Text
Define whether the passwords are to be displayed in clear text
(plain text).
The function is activated with ;&,/).
The function is disabled by default.
If you activate the function, all passwords and keys in all menus
are displayed and can be edited in plain text.
The WLAN and IPSec keys are one exception here. They can
only be entered in plain text. If you press OK or call the menu
again, they are displayed as asterisks.
8.2.3 Date and Time
You need the system time for tasks such as correct timestamps for system messages, accounting or IPSec certificates.
bintec R200-Serie
67
8 System Management
Funkwerk Enterprise Communications GmbH
Fig. 27: System Administration -> Global Settings -> Date and Time
You have the following options for determining the system time:
• Depending on the configuration the system time can be updated via ISDN, i.e. the date
and time are taken from the ISDN when the first outgoing call is made.
Switching from summer time to winter time (and back) is automatic if the time is derived
using this method. This is independent of the exchange time or the ntp server time. Summer time starts on the last Sunday in March by switching from 2 a.m. to 3 a.m. The calendar-related switches that are scheduled for the missing hour are then carried out. Winter
time starts on the last Sunday in October by switching from 3 a.m. to 2 a.m. The calendar-related switches that are scheduled for the extra hour are then carried out. Switches
already initiated are carried out again when the set time is reached. If an external call is
made during the switching time, the device compares the time transferred from the exchange with its own time. During the switching period, the device prevents switching
between the times. The time of the system telephones connected to the device is automatically changed by the device centrally.
• You can determine the system time automatically, e.g. using various time servers. To ensure that the device uses the desired current time, you should configure one or more time
servers. Switching from summer time to winter time (and back) must be carried out
manually if the time is derived using this method by changing the value in the Time Offset from GMT field.
68
bintec R200-Serie
8 System Management
Funkwerk Enterprise Communications GmbH
• You can set the system time manually on the device.
Note
If a method for automatically deriving the time is defined on the device, the values obtained in this way automatically have higher priority. A manually entered system time is
therefore overwritten.
The System Management-> Global Settings-> Date and Time menu consists of the following fields:
Field in the Date and Time System Time menu
Field
Description
Current System Time
The current date and current system time are shown here. The
entry cannot be changed.
Fields in the Date and Time Manual Time Settings menu
Field
Description
New Date
Enter a new date.
Format:
• Day: dd
• Month: mm
• Year: yyyy
New Time
Enter a new time.
Format:
• Hour: hh
• Minute: mm
Fields in the Date and Time Automatic Time Settings (network time protocol) menu
bintec R200-Serie
Field
Description
Update System Time
from ISDN
Define whether the time information received at an incoming
ISDN connection is used to update the system time. If a time
server is configured, the time is only determined over ISDN until
a successful update is received from this time server. Updating
over ISDN is deactivated for the period in which the time is determined by means of a time server.
69
8 System Management
Funkwerk Enterprise Communications GmbH
Field
Description
The function is activated with #/.
The function is disabled by default.
Primary Time Server
Enter the primary time server, using either a domain name or an
IP address.
In addition, select the protocol for the time server request.
Possible values:
• -*+ (default value): This server uses the simple network
time protocol with UDP port 123.
• + -% 6 <;: This server uses the Time service
with UDP port 37.
• + -% 6 +:: This server uses the Time service
with TCP port 37.
• *: This time server is not currently used for the time request.
Secondary Time Server
Enter the secondary time server, using either a domain name or
an IP address.
In addition, select the protocol for the time server request.
Possible values:
• -*+ (default value): This server uses the simple network
time protocol with UDP port 123.
• + -% 6 <;: This server uses the Time service
with UDP port 37.
• + -% 6 +:: This server uses the Time service
with TCP port 37.
• *: This time server is not currently used for the time request.
Tertiary Time Server
Enter the tertiary time server, using either a domain name or an
IP address.
In addition, select the protocol for the time server request.
Possible values:
70
bintec R200-Serie
8 System Management
Funkwerk Enterprise Communications GmbH
Field
Description
• -*+ (default value): This server uses the simple network
time protocol with UDP port 123.
• + -% 6 <;: This server uses the Time service
with UDP port 37.
• + -% 6 +:: This server uses the Time service
with TCP port 37.
• *: This time server is not currently used for the time request.
Time Offset from GMT
Select the offset in hours between the system time and the time
received from the time server (usually GMT).
Possible values are ! to '.
The default value is .
Time Update Interval
Enter the time interval in minutes at which the time is automatically updated.
The default value is .
Time Update Policy
Enter the time period after which the system attempts to contact
the time server again following a failed time update.
Possible values:
• */ (default value): The system attempts to contact the
time server after 1, 2, 4, 8, and 16 minutes.
• 1$$&&: For ten minutes, the system attempts to contact the time server after 1, 2, 4, 8 seconds and then every 10
seconds.
• /&&: For an unlimited period, the system attempts to
contact the time server after 1, 2, 4, 8 seconds and then every
10 seconds.
If certificates are used to encrypt data traffic in a VPN, it is extremely important that the correct time is set on the device. To
ensure this is the case, for Time Update Policy, select the
value /&&.
Internal Time Server
Select whether the internal time server is to be used.
The function is enabled by choosing #/. Time requests
bintec R200-Serie
71
8 System Management
Funkwerk Enterprise Communications GmbH
Field
Description
from a client will be answered with the current system time. This
is given as GMT, without offset.
The function is disabled by default. Time requests from a client
are not answered.
8.2.4 System Licences
This chapter describes how to activate the functions of the software licences you have purchased.
The following licence types exist:
• Licences already available in the device's ex works state
• Free extra licences
• Extra licences at additional cost
The data sheet for your device tells you which licences are available in the device's ex
works state and which can also be obtained free of charge or at additional cost. You can
access this data sheet at www.funkwerk-ec.com .
Entering licence data
You can obtain the licence data for extra licences via the online licensing pages in the support section at www.funkwerk-ec.com . Please follow the online licensing instructions.
(Please also note the information on the licence card for licences at additional cost.) You
will then receive an e-mail containing the following data:
• License Key and
• Licence Serial Number
You enter this data in the System Management -> Global Settings-> System Licenses > New menu.
In the System Management -> Global Settings ->System Licenses menu, a list of all registered licenses is shown (Description, License Type, License Serial Number, Status).
Possible values for Status:
72
Licence
Meaning
OK
Subsystem is activated.
Not OK
Subsystem is not activated.
Not Supported
You have entered a licence for a subsystem your device does
not support.
bintec R200-Serie
8 System Management
Funkwerk Enterprise Communications GmbH
In addition, above the list is shown the System License-ID required for on-line licensing.
8.2.4.1 Edit/New
Choose the
icon to edit existing entries. Choose the New button to add licences.
Fig. 28: System Management -> Global Settings -> System Licenses -> New
Activating extra licences
You activate extra licences by adding the received licence information in the System Management -> Global Settings -> System Licenses -> New menu.
The System Management -> Global Settings -> System Licences -> New menu consists of the following fields:
Fields in the System LicencesBasic Parameters menu
Field
Value
Licence Serial Number
Enter the licence serial number you received when you bought
the licence.
Licence Key
Enter the licence key you received by e-mail.
Note
If * =2 is displayed as the status:
bintec R200-Serie
73
8 System Management
Funkwerk Enterprise Communications GmbH
• Enter the licence data again.
• Check your hardware serial number.
If * -
,, is displayed as the status, you have entered a license for a subsystem that your device does not support. This means you cannot use the functions of
this licence.
Deactivating a licence
Proceed as follows to deactivate a licence:
(1)
Go to System Management -> Global Settings-> System Licenses.
(2)
Press the
(3)
Confirm with OK.
icon in the line containing the licence you want to delete.
The licence is deactivated. You can reactivate your additional licence at any time by entering the valid licence key and licence serial number.
8.3 Interface Mode / Bridge Groups
In this menu, you define the operation mode for your device's interfaces.
Routing versus bridging
Bridging connects networks of the same type. In contrast to routing, bridges operate at layer 2 of the OSI model (data link layer), are independent of higher-level protocols and transmit data packets using MAC addresses. Data transmission is transparent, which means the
information contained in the data packets is not interpreted.
With routing, different networks are connected at layer 3 (network layer) of the OSI model
and information is routed from one network to the other.
Conventions for port/interface names
The names of wireless ports in the user interface of your device are made up of the following parts:
(a) WLAN
(b) Number of the physical port (1 or 2)
Example: 041*
74
bintec R200-Serie
Funkwerk Enterprise Communications GmbH
8 System Management
The name of the Ethernet port is made up of the following parts:
(a) ETH, where en stands for Ethernet
(b) Number of the port
Example: +>
The names of the interfaces connected to an Ethernet port are made up of the following
parts:
(a) Abbreviation for interface type
(b) Number of the Ethernet port
(c) Number of the interface
Example: ! (first interface on the first Ethernet port)
The name of the bridge group is made up of the following parts:
(a) Abbreviation for interface type
(b) Number of the bridge group
Example: # (first bridge group)
The name of the wireless network is made up of the following parts:
(a) Abbreviation for interface type
(b) Number of the wireless module
(c) Number of the interface
Example: &&! (first wireless network on the first wireless module)
The names of the virtual interfaces connected to an Ethernet port are made up of the following parts:
(a) Abbreviation for interface type
(b) Number of the Ethernet port
(c) Number of the interface connected to the Ethernet port
(d) Number of the virtual interface
Example: !! (first virtual interface based on the first interface on the first Ethernet
port)
8.3.1 Interfaces
You define separately whether each interface is to operate in routing or bridging mode.
bintec R200-Serie
75
8 System Management
Funkwerk Enterprise Communications GmbH
If you want to set bridging mode, you can either use existing bridge groups or create a new
bridge group.
The default setting for all existing interfaces is routing mode. If the option * 3$
, is selected for Mode / Bridge Group, a bridge group, #, # etc, is automatically
set up.
Fig. 29: System Administration -> Interface Mode / Bridge Groups ->Interfaces
The System Management -> Interface Mode / Bridge Groups ->Interfaces menu consists of the following fields:
Fields in the Interfaces menu
Field
#
76
Description
Shows the serial number of the interface.
Interface Description
Displays the name of the interface.
Mode / Bridge Group
Select whether you want to run the interface in ?
$ (
or whether you want to assign the interface to an existing ( #,
# etc.) or new bridge group ( * 3$ ,). If you
select * 3$ ,, a new bridge group is created
automatically when you click OK.
Configuration interface
Select the interface via which the configuration is to be carried
out.
bintec R200-Serie
8 System Management
Funkwerk Enterprise Communications GmbH
Field
Description
Possible values:
• -/% (default value): Ex works setting The right configuration interface must be selected from the other options.
• $ : No interface is defined as configuration interface.
• @% A: Select the interface to be used for configuration. If this interface is in a bridge group, it is assigned
the group's IP address when it is taken out of the group.
8.4 Administrative Access
In this menu, you can configure the administrative access to the device.
8.4.1 Access
In the Administrative Access -> Access menu, a list of all physical interfaces is shown.
Fig. 30: System Management -> Administrative Access -> Access
For the Ethernet interface you can select the access parameters +/, -->, >++, >+!
+, $, -*(, and for the ISDN interfaces you can select -;* 4$.
bintec R200-Serie
77
8 System Management
Funkwerk Enterprise Communications GmbH
8.4.1.1 Add
Click the Add button to add more interfaces.
Fig. 31: System Management -> Administrative Access -> Access -> Add
The System Management -> Administrative Access -> Access -> Add menu consists of
the following fields:
Fields in the Access menu
Field
Description
Interface
Select the interface for which administrative access is to be configured.
8.4.2 SSH
Your devices offers encrypted access to the shell. You can enable ( #/, default
value) or disable this access in the System Administration -> Administrative Access ->
SSH menu and have access to the options for configuration of the SSH login.
78
bintec R200-Serie
8 System Management
Funkwerk Enterprise Communications GmbH
Fig. 32: System Management -> Administrative Access -> SSH
You need an SSH client application, e.g. PuTTY, to be able to reach the SSH Daemon.
If you wish to use SSH Login together with the PuTTY client, you may need to comply with
some special configuration requirements, for which we have prepared FAQs. You will find
these in the Service/Support section at www.funkwerk-ec.com .
To be able to reach the shell of your device via an SSH client, make sure the settings for
the SSH Daemon and SSH client are the same.
Note
If configuration of an SSH connection is not possible, restart the device to initialise the
SSH Daemon correctly.
The System Management -> Administrative Access-> SSH menu consists of the following fields:
Fields in the SSH SSH Parameters (secure shell) menu
Field
Value
SSH Service Active
Select whether the SSH Daemon is to be enabled for the interface.
The function is enabled by choosing #/.
bintec R200-Serie
79
8 System Management
Funkwerk Enterprise Communications GmbH
Field
Value
The function is enabled by default.
Compression
Select whether data compression should be used.
The function is enabled by choosing #/.
The function is disabled by default.
TCP Keepalives
Select whether the device is to send keepalive packets.
The function is enabled by choosing #/.
The function is enabled by default.
Logging Level
Select the syslog level for the syslog messages generated by
the SSH Daemon.
Possible settings:
• (default value) Fatal and simple errors of the
SSH Daemon and information messages are recorded.
• B/: Only fatal errors of the SSH Daemon are recorded.
• &: Fatal and simple errors of the SSH Daemon are recorded.
• ;#
$: All messages are recorded.
Fields in the SSH Authentication and Encryption Parameters menu
Field
Value
Encryption Algorithms
Select the algorithms that are to be used to encrypt the SSH
connection.
Possible options:
• ';• 3/&
• 1-!
• 1-!
';-, 3/& and 1-! and are enabled by default.
Hashing Algorithms
80
Select the algorithms that are to be available for message authentication of the SSH connection.
bintec R200-Serie
8 System Management
Funkwerk Enterprise Communications GmbH
Field
Value
Possible options:
• (;
• ->1!
• ?,(;
(;, ->1! and ?,(; are enabled by default.
Fields in the SSH Key Status menu
Field
Value
RSA Key Status
Shows the status of the RSA key.
If an RSA key has not been generated yet, * is
displayed in red and a link, , is provided. If you select
the link, the generation process is triggered and the view is updated. The status $ is displayed in green. When
generation has been completed successfully, the status
changes from $ to . If an error occurs
during generated, * and the link are
displayed again. You can then repeat generation.
If the status < is displayed, generation of a key is not
possible, for example because there is not enough space in the
FlashROM.
DSA Key Status
Shows the status of the DSA key.
If a DSA key has not been generated yet, * is
displayed in red and a link, , is provided. If you select
the link, the generation process is triggered and the view is updated. The status $ is displayed in green. When
generation has been completed successfully, the status
changes from $ to . If an error occurs
during generated, * and the link are
displayed again. You can then repeat generation.
If the status < is displayed, generation of a key is not
possible, for example because there is not enough space in the
FlashROM.
bintec R200-Serie
81
8 System Management
Funkwerk Enterprise Communications GmbH
8.4.3 SNMP
SNMP (Simple Network Management Protocol) is a network protocol used to monitor and
control network elements (e.g. routers, servers, switches, printers, computers etc.) from a
central station. SNMP controls communication between the monitored devices and monitoring station. The protocol describes the structure of the data packets that can be transmitted, as well as the communication process.
The data objects queried via SNMP are structured in tables and variables and defined in
the MIB (Management Information Base). This contains all the configuration and status
variables of the device.
SNMP can be used to perform the following network management tasks:
• Surveillance of network components
• Remote controlling and configuration of network components
• Error detection and notification
You use this menu to configure the use of SNMP.
Fig. 33: System Management -> Administrative Access -> SNMP
The System Management -> Administrative Access-> SNMP menu consists of the following fields:
Fields in the SNMP Base Parameters menu
82
bintec R200-Serie
8 System Management
Funkwerk Enterprise Communications GmbH
Field
Value
SNMP Version
Select the SNMP version your device is to use to listen for external SNMP accesses.
Possible values:
• : SNMP Version 1
• %: Community-Based SNMP Version 2
• ': SNMP Version 3
, % and ' are active by default.
If no option is selected, the function is deactivated.
SNMP Lists UDP Port
Shows the UDP port ( ) at which the device receives SNMP
requests.
The value cannot be changed.
Tip
If your SNMP Manager supports SNMPv3, you should, if possible, use this version as
older versions transfer all data unencrypted.
8.5 Remote Authentication
This menu contains the settings for user authentication.
8.5.1 RADIUS
RADIUS (Remote Authentication Dial In User Service) is a service that enables authentication and configuration information to be exchanged between your device and a RADIUS
server. The RADIUS server administrates a database with information about user authentication and configuration and for statistical recording of connection data.
RADIUS can be used for:
• Authentication
• Accounting
• Exchange of configuration data
For an incoming connection, your device sends a request with user name and password to
bintec R200-Serie
83
8 System Management
Funkwerk Enterprise Communications GmbH
the RADIUS server, which then searches its database. If the user is found and can be authenticated, the RADIUS server sends corresponding confirmation to your device. This confirmation also contains parameters (called RADIUS attributes), which your device uses as
WAN connection parameters.
If the RADIUS server is used for accounting, your device sends an accounting message at
the start of the connection and a message at the end of the connection. These start and
end messages also contain statistical information about the connection (IP address, user
name, throughput, costs).
RADIUS packets
The following types of packets are sent between the RADIUS server and your device
(client):
Packet types
Field
Value
ACCESS_REQUEST
Client –> Server
If an access request is received by your device, a request is
sent to the RADIUS server if no corresponding connection partner has been found on your device.
ACCESS_ACCEPT
Server –> Client
If the RADIUS server has authenticated the information contained in the ACCESS_REQUEST, it sends an ACCESS_ACCEPT to your device together with the parameters
used for setting up the connection.
ACCESS_REJECT
Server –> Client
If the information contained in the ACCESS_REQUEST does
not correspond to the information in the user database of the
RADIUS server, it sends an ACCESS_REJECT to reject the
connection.
ACCOUNTING_START
Client -> Server
If a RADIUS server is used for accounting, your device sends
an accounting message to the RADIUS server at the start of
each connection.
ACCOUNTING_STOP
84
Client -> Server
bintec R200-Serie
8 System Management
Funkwerk Enterprise Communications GmbH
Field
Value
If a RADIUS server is used for accounting, your device sends
an accounting message to the RADIUS server at the end of
each connection.
In the System Administration -> Remote Authentication -> RADIUS menu, a list of all
registered RADIUS servers is displayed.
8.5.1.1 Edit/New
Choose the
icon to edit existing entries. Choose the New button to add RADIUS serv-
ers.
Fig. 34: System Administration -> Remote Authentication -> RADIUS -> New
The System Management -> Remote Authentication-> RADIUS -> New menu consists
of the following fields:
Fields in the RADIUS Basic Parameters menu
bintec R200-Serie
85
8 System Management
Funkwerk Enterprise Communications GmbH
Field
Value
Authentication Type
Select what the RADIUS server is to be used for.
Possible values:
• 1
% (default value): The RADIUS server is
used for controlling access to a network.
• 1%%
$: The RADIUS server is used for recording
statistical call data.
• 4$ 1
%: The RADIUS server is used for
controlling access to the SNMP shell of your device.
• -% 1
%: The RADIUS server is used for
sending configuration data for IPSec peers to your device.
• 041* C": The RADIUS server is used for controlling
access to a wireless network.
• C1<+>: The RADIUS server is used for authenticating IPSec
peers via XAuth.
Server IP Address
Enter the IP address of the RADIUS server.
Radius Secret
Enter the shared password used for communication between
the RADIUS server and your device.
Priority
If a number of RADIUS server entries were created, the server
with the highest priority is used first. If this server does not answer, the server with the next-highest priority is used.
Possible values from (highest priority) to . (lowest priority).
The default value is .
See also Policy in the Advanced Settings.
Entry Active
Select whether the RADIUS server configured in this entry is to
be used.
The function is enabled by choosing #/.
The function is enabled by default.
Group Description
86
Define a new RADIUS group description or assign the new RADIUS entry to a predefined group. The configured RADIUS
servers for a group are queried according to priority and
bintec R200-Serie
8 System Management
Funkwerk Enterprise Communications GmbH
Field
Value
.
Possible values:
• * (default value): Enter a new group description in the text
field.
• <Group Name>: Select a predefined group from the list.
The Advanced Settingsmenu consists of the following fields:
Fields in the menu Advanced Settings
Field
Value
Policy
Select how your device is to react if a negative answer to a request is received.
Possible values:
• 1
(default value): A negative answer to a request is accepted.
• *!
: A negative answer to a request is not
accepted. A request is sent to the next RADIUS server until
your device receives an answer from a server configured as
authoritative.
UDP Port
Enter the UDP port to be used for RADIUS data.
RFC 2138 defines the default ports 1812 for authentication
(1645 in older RFCs) and 1813 for accounting (4,180.84 cm
older RFCs). You can obtain the port to be used from the documentation for your RADIUS server.
The default value is .
Server Timeout
Enter the maximum wait time between ACCESS_REQUEST
and response in milliseconds.
After timeout, the request is repeated according to Retries or
the next configured RADIUS server is requested.
Possible values are whole numbers between and .
The default value is (1 second).
Alive Check
bintec R200-Serie
Here you can activate a check of the reachability of a RADIUS
87
8 System Management
Funkwerk Enterprise Communications GmbH
Field
Value
server in Status ;.
An Alive Check is carried out regularly (every 20 seconds) by
sending an ACCESS_REQUEST to the IP address of the RADIUS server. If the server is reachable, Status is set to /
again. If the RADIUS server is only reachable over a switched
line (dialup connection), this can cause additional costs if the
server is for a long time.
The function is enabled by choosing #/.
The function is enabled by default.
Retries
Enter the number of retries for cases when there is no response
to a request. If an answer has still not been received after these
attempts, the Status is set to . If the Active Check = !
#/your device tries to reach the server every 20 seconds. If
the server answers, the Status is set back to /.
Possible values are whole numbers between and .
The default value is . To prevent Status being set to , set
this value to .
RADIUS Dialout
Only for Authentication Type = 1
% and -%
1
%.
Select whether your device receives requests from RADIUS
server dialout routes. This enables temporary interfaces to be
configured automatically and your device can initiate outgoing
connections that are not configured permanently.
The function is enabled by choosing #/.
The function is disabled by default.
If the function is active, you can enter the following options:
• ?/ / Enter the time period in seconds
between the update intervals.
The default entry here is i.e. an automatic reload is not carried out.
• ;
/ <& &&: This is the shared password
used for communication between the RADIUS server and
88
bintec R200-Serie
8 System Management
Funkwerk Enterprise Communications GmbH
Field
Value
your device.
8.5.2 TACACS+
TACACS+ permits access control for your device, network access servers (NAS) and other
network components via one or more central servers.
Like RADIUS, TACACS+ is an AAA protocol and offers authentication, authorisation and
accounting services (TACACS+ Accounting is currently not supported by bintec devices).
The following TACACS+ functions are available on your device:
• Authentication for login shell
• Command authorisation on the shell (e.g. telnet, setup. show)
TACACS+ uses TCP port 49 and establishes a secure and encrypted connection.
In the System Management -> Remote Authentication -> TACACS+ menu, a list of all
registered TACACS+ servers is displayed.
8.5.2.1 Edit/New
Choose the
icon to edit existing entries. Choose the New button to add TACACS+ serv-
ers.
bintec R200-Serie
89
8 System Management
Funkwerk Enterprise Communications GmbH
Fig. 35: System Management -> Remote Authentication -> TACACS+ -> New
The System Management -> Remote Authentication-> TACACS+ -> New menu consists of the following fields:
Fields in the TACACS+ Basic Parameters menu
Field
Description
Authentication Type
Displays which TACACS+ function is to be used. The value
cannot be changed.
Possible values:
• 4$ 1
%: Here, you can define whether the
current TACACS+ server is to be used for login authentication
to your device.
90
Server IP Address
Enter the IP address of the TACACS+ server that is to be requested for login authentication.
TACACS+ Secret
Enter the password to be used to authenticate and, if applicable, encrypt data exchange between the TACACS+ server and
the network access server (your device). The maximum length
of the entry is 32 characters.
Priority
Assign a priority to the current TACACS+ server. The server
with the lowest value is the one used first for TACACS+ login
bintec R200-Serie
8 System Management
Funkwerk Enterprise Communications GmbH
Field
Description
authentication. If this does not respond or access is denied
(only if Policy = *!
), the entry with the
next-highest priority is used.
The available values are to , the default value is .
Entry Active
Select whether this server is to be used for login authentication.
The function is enabled by choosing #/.
The function is enabled by default.
The Advanced Settingsmenu consists of the following fields:
Fields in the menu Advanced Settings
Field
Description
Policy
Select the interpretation of the TACACS+ response.
Possible values:
• *!
(default value): The TACACS+ servers are queried in order of their priority (see Priority) until a
positive response is received or a negative response is received from an authoritative server.
• 1
: A negative response to a request is accepted, i.e. a request is not sent to another TACACS+ server.
The device's internal user administration is is not turned off by
TACACS+. It is checked after all TACACS+ servers have been
queried.
TCP Port
Shows the default TCP port ( ) used for the TACACS+ protocol. The value cannot be changed.
Timeout
Enter time in seconds for which the NAS is to wait for a response from TACACS+.
If a response is not received during the wait time, the next configured TACACS+ server is queried (only if Policy = *!
) and the current server is set to status
3/%.
The possible values are to , the default value is '.
bintec R200-Serie
91
8 System Management
Funkwerk Enterprise Communications GmbH
Field
Description
Blocktime
Enter the time in seconds for which the current server is to remain in blocked status.
At the end of the block time, the server is set to the status specified in the Administrative Status field.
The possible values are to ', the default value is . The
value means that the server is never set to 3/% status
and thus no other servers are queried.
Encryption
Select whether data exchange between the TACACS+ server
and the NAS is to be encrypted with MD5.
The function is enabled by choosing #/.
The function is enabled by default.
If the function is not enabled, the packets and all related information are transferred unencrypted. Unencrypted transfer is not
recommended as a default setting and should only be used for
debugging.
8.5.3 Options
This setting possible here causes your device to carry out authentication negotiation for incoming calls, if it cannot identify the calling party number (e.g. because the remote terminal
does not signal the calling party number). If the data (password, partner PPP ID) obtained
by executing the authentication protocol is the same as the data of a listed remote terminal
or RADIUS user, your device accepts the incoming call.
92
bintec R200-Serie
8 System Management
Funkwerk Enterprise Communications GmbH
Fig. 36: System Administration -> Remote Authentication -> Options
The System Management->Remote Authentication-> Options menu consists of the following fields:
Fields in the Options Global RADIUS options menu
Field
Description
Authentication for PPP
Dialin
By default, the following authentication sequence is used for incoming calls with RADIUS: First CLID, then PPP and then PPP
with RADIUS.
Options:
• # : Only inband RADIUS requests (PAP,CHAP, MSCHAP V1 & V2) (i.e. PPP requests without CLID) are sent to
the RADIUS server defined in Server IP Address.
• =
# :4;" : Only outband RADIUS requests (i.e. requests for calling line identification, CLID) are sent to the RADIUS server.
# is activated by default.
bintec R200-Serie
93
9 Physical interfaces
Funkwerk Enterprise Communications GmbH
Chapter 9 Physical interfaces
9.1 Ethernet Ports
An Ethernet interface is a physical interface for connection to the local network or external
networks.
ETH1 - ETH4
If the switch ports (ETH1 - ETH4) are separated from each other, each separated port is
assigned the desired Ethernet interface in the Ethernet Interface Selection field of the
Port Configuration menu. For each assigned Ethernet interface, another interface is displayed in the list in the Port Configuration menu and a completely independent configuration of the interface is possible.
ETH5/DMZ
By default, the Ethernet interface ! is assigned to the ETH5/DMZ. The configuration
options are the same as those for the Ethernet switch ports.
Note
The Ethernet ports of the four-port switches are assigned to a single Ethernet interface
in ex works state. The Ethernet interface, en1-0, is pre-configured with the IP Address
and Netmask .
To ensure your device can be reached, when splitting ports make sure that Ethernet interface ! is assigned - with the preconfigured IP address and netmask - to a port that
can be reached via Ethernet. If in doubt, carry out the configuration using a serial connection via the console interface.
VLANs for Routing Interfaces
Configure VLANs to separate individual network segments from each other, for example
(e.g. individual departments of a company) or to reserve bandwidth for individual VLANs
when managed switches are used with the QoS function.
94
bintec R200-Serie
9 Physical interfaces
Funkwerk Enterprise Communications GmbH
9.1.1 Port Configuration
Port Separation
Your device makes it possible to run the four switch ports as one interface or to logically
separate these from each other and to configure them as independent Ethernet interfaces.
By default, the same configuration applies for all switch ports.
During configuration, please note the following: The splitting of the switch ports into several
Ethernet interfaces merely logically separates these from each other. The available total
bandwidth of 100 mbps full duplex for all resulting interfaces remains the same. For example, if you split all the switch ports from each other, each of the resulting interfaces only
uses a part of the total bandwidth. If you group together several switch ports into one interface, the full bandwidth of 100 mbps full duplex is available for all the ports together.
Fig. 37: Physical Interfaces -> Ethernet Ports -> Port Configuration
The Physical Interfaces -> Ethernet Ports-> Port Configuration menu consists of the
following fields:
Fields in the Port Configuration Switch Configuration menu
bintec R200-Serie
Field
Description
Switch Port
Shows the respective switch port. The numbering corresponds
to the numbering of the Ethernet ports on the back of the
device.
95
9 Physical interfaces
Funkwerk Enterprise Communications GmbH
Field
Description
Ethernet Interface Selec- Assign an Ethernet interface to the switch port.
tion
You can select from four interfaces, ! to !' . In the
basic setting, interface ! is assigned to all switch ports.
Configured Speed /
Mode
Select the mode in which the interface is to run.
Possible values:
• B
// 1
$ (default value)
• 1
#,& /)
• 1
#,& /)
• 1
#,& 6 B
// ;
,/D
• 1
#,& 6 >/ ;
,/D
• 1
#,& 6 B
// ;
,/D
• 1
#,& 6 >/ ;
,/D
• BD #,& 6 B
// ;
,/D
• BD #,& 6 >/ ;
,/D
• BD #,& 6 B
// ;
,/D
• BD #,& 6 >/ ;
,/D
• ;&#/ : The interface is created but remains inactive.
Current Speed / Mode
Shows the actual mode and actual speed of the interface.
Possible values:
• #,& 6 B
// ;
,/D
• #,& 6 >/ ;
,/D
• #,& 6 B
// ;
,/D
• #,& 6 >/ ;
,/D
• %
Fields in the Port Configuration Port Configuration menu
96
Field
Description
Interface
Shows the interface name of the separate Ethernet port ETH.
Configured Speed /
Mode
Select the mode in which the interface is to run.
bintec R200-Serie
9 Physical interfaces
Funkwerk Enterprise Communications GmbH
Field
Description
Possible values:
• B
// 1
$ (default value)
• 1
#,& /)
• 1
#,& /)
• 1
#,& /)
• 1
#,& 6 B
// ;
,/D
• 1
#,& 6 >/ ;
,/D
• 1
#,& 6 B
// ;
,/D
• 1
#,& 6 >/ ;
,/D
• BD #,& 6 B
// ;
,/D
• BD #,& 6 >/ ;
,/D
• BD #,& 6 B
// ;
,/D
• BD #,& 6 >/ ;
,/D
• ;&#/ : The interface is created but remains inactive.
Current Speed / Mode
Shows the actual mode and actual speed of the interface.
Possible values:
• #,& 6 B
// ;
,/D
• #,& 6 >/ ;
,/D
• #,& 6 B
// ;
,/D
• #,& 6 >/ ;
,/D
• %
9.2 ISDN Ports
You can use the ISDN BRI interface of your device for both dialup and leased lines over
ISDN. Proceed as follows to configure the ISDN BRI interface:
• Enter the settings for your ISDN connection: Here you set the most important parameters
of your ISDN connection.
• MSN Configuration: Here you tell your device how to react to incoming calls from the
WAN.
bintec R200-Serie
97
9 Physical interfaces
Funkwerk Enterprise Communications GmbH
9.2.1 ISDN Configuration
In this menu, you configure the ISDN interface of your device. Here you enter data such as
the type of ISDN connection to which your device is connected.
Note
If the ISDN protocol is not detected, it must be selected manually under Port Usage
and ISDN Configtype. The automatic D channel detection is then switched off. An incorrectly set ISDN protocol prevents ISDN connections being set up.
In the Physical Interfaces -> ISDN Ports -> ISDN Configuration menu, a list of all ISDN
ports and their configurations is shown.
9.2.1.1 Working with
Choose the
button to edit the configuration of the ISDN port.
Fig. 38: Physical Interfaces -> ISDN Ports-> ISDN Configuration ->
The Physical Interfaces -> ISDN Ports-> ISDN Configuration->
menu consists of the
following fields:
Fields in the ISDN Configuration Basic Parameters menu
98
bintec R200-Serie
9 Physical interfaces
Funkwerk Enterprise Communications GmbH
Field
Description
Port Name
Shows the name of the ISDN port.
Autoconfig on Bootup
Select whether the ISDN switch type (D channel detection for
switched line) is to be automatically identified.
The function is activated with #/.
The function is enabled by default.
Result of Autoconfigura- Shows the status of the ISDN Auto Config.
tion
Automatic D-channel detection runs until a setting is found or
until the ISDN protocol is selected manually under Port Usage.
This field cannot be edited.
Possible values:
• -;* , ,: See Port Usage and ISDN
Configtype
• -;* , /,: See Port Usage and
ISDN Configtype
• 1
:$ &#/ : Manual setting for Port Usage
and ISDN Configtype.
• ?
$: Detection is still running.
Port Usage
Only if Automatic Configuration on Startup is disabled.
Select the protocol that you want to use for the ISDN port.
Possible values:
• *: The ISDN connection is not used.
• ;/
,
-;*"
• 4& /
ISDN Configtype
Only if Autoconfig on Bootup is disabled and if Port Usage =
;/
, -;*".
Select the ISDN connection type.
Possible values:
• !!(
/, (default value): Point-to-multipoint
connection
bintec R200-Serie
99
9 Physical interfaces
Funkwerk Enterprise Communications GmbH
Field
Description
• !!,: Point-to-point ISDN access
The Advanced Settingsmenu consists of the following fields:
Fields in the menu Advanced Settings
Field
Description
X.31 (X.25 in D Channel)
Select whether you want to use X.31 (X.25 in the D channel)
e.g. for CAPI applications.
The function is activated with #/.
The function is disabled by default.
X.31 TEI Value
Only if X.31 (X.25 in D channel) is enabled
With the ISDN autoconfiguration, the X.31-TEI is detected automatically. If the autoconfiguration has not detected TEI, you can
manually enter the value assigned by the exchange.
Possible values are to '.
The default value is ! (for automatic detection).
X.31 TEI Service
Only if X.31 (X.25 in D channel) is enabled
Select the service for which you want to use X.31 TEI.
Possible values:
• :1
• :1 ;
/
• % -% (default value)
:1 and :1 ;
/ are for using X.31 TEI for CAPI applications. For :1, the TEI value set in the CAPI application is
used. For :1 ;
/, the value of the CAPI application is
ignored and the default value set here is always used.
Set % -% if you wish to use X.31 TEI for the X.25
device.
100
bintec R200-Serie
Funkwerk Enterprise Communications GmbH
9 Physical interfaces
9.2.2 MSN Configuration
In this menu, you can assign the available ISDN numbers to the required services (e.g.
PPP routing, ISDN login).
If you use the ISDN interface for outgoing and incoming dialup connections, your own numbers for this interface can be entered in this menu (these settings are not possible for
leased lines). Your device distributes the incoming calls to the internal services according
to the settings in this menu. Your own number is included as the calling party number for
outgoing calls.
The device supports the following services:
• PPP (routing): The PPP (routing) service is your device's general routing service. This
enables ISDN remote terminals to establish data connections with your LAN, among other things. This enables partners outside your own local network to access hosts within
your LAN. It is also possible to establish outgoing data connections to ISDN remote terminals.
• ISDN Login: The ISDN login service enables both incoming data connections with access
to the SNMP shell of your device, and outgoing data connections to other bintec devices.
As a result, your device can be remotely configured and administrated.
• IPSec: bintec devices support the DynDNS service to enable hosts without fixed IP addresses to obtain a secure connection over the Internet. With the IPSec Callback function
and using a direct ISDN call to an IPSec peer with a dynamic IP address you can signal
to this IPSec peer that you are online and waiting for the setup of an IPSec tunnel over
the Internet. If the called peer currently has no connection to the Internet, the ISDN call
causes a connection to be set up. The identification of the caller from his or her ISDN
number is enough information to initiate setting up a tunnel.
• X.25 PAD: X.25 PAD is used to provide a protocol converter, which converts nonpacket-oriented protocols to packet-oriented communication protocols and vice versa.
Data terminal equipment sending or receiving data on a non-data-packet-oriented basis
can this be adapted in line with Datex-P (public data packet network based on the principle of a packet switching exchange).
When a call comes in, your device first uses the entries in this menu to check the type of
call (data or voice call) and the called party number, whereby only part of the called party
number reaches the device, which is forwarded from the local exchange or, if available, the
PBX. The call is then assigned to the corresponding service.
bintec R200-Serie
101
9 Physical interfaces
Funkwerk Enterprise Communications GmbH
Note
If no entry is specified (ex works state), every incoming ISDN call is accepted by the
ISDN Login service. To avoid this, you should make the necessary entries here. As
soon as an entry exists, the incoming calls not assigned to any entry are forwarded to
the CAPI service.
In the Physical Interfaces -> ISDN Ports -> MSN Configuration menu a list of all MSNs
is shown.
9.2.2.1 New
Choose the New button to edit MSNs.
Fig. 39: Physical Interfaces -> ISDN Ports-> MSN Configuration -> New
The Physical Interfaces -> ISDN Ports-> MSN Configuration-> New menu consists of
the following fields:
Fields in the MSN Configuration Basic Parameters menu
Field
Description
ISDN Port
Select the ISDN port for which the MSN is to be configured.
Service
Select the service to which a call is to be assigned on the MSN
below.
Possible values:
102
bintec R200-Serie
9 Physical interfaces
Funkwerk Enterprise Communications GmbH
Field
Description
• -;* 4$ (default value): Enables logging in with -;*
4$.
• ?
$": Default setting for PPP routing. Contains
the automatic detection of the PPP connections stated below
except ;=93 .
• -%: Enables a number to be defined for IPSec callback.
• = ": Other services can be selected: (enables 64 kbps PPP data connections), (enables
56 kbps PPP data connections), 9 E
E E '" (enables PPP connections with
V.110 and bit rates of 9600 bps, 14400 bps, 19200 bps,
38400 bps), 9 (enables incoming PPP connections
with V.120).
MSN
Enter the number used to check the called party number. For
the call to be accepted, it is sufficient for the individual numbers
in the entry to agree, taking account of MSN Recognition.
MSN Recognition
Select the mode your device is to use for the number comparison of MSN with the called party number of the incoming call.
Possible values:
• ?$ 4 (default value)
• 4 ?$ ;;": Always select if your device is connected to a point-to-point connection.
Service attribute
Select the type of incoming call (service detection).
Possible values:
• ; F 9% (default value): Both data and voice calls
• ;: Data call
• 9%: Voice call (modem, voice, analogue fax)
9.3 ADSL Modem
bintec R200-Serie
103
9 Physical interfaces
Funkwerk Enterprise Communications GmbH
9.3.1 ADSL Configuration
In this menu, you make the basic settings for your ADSL connection.
Fig. 40: Physical Interfaces -> ADSL Modem-> ADSL Configuration
The Physical Interfaces -> ADSL Modem-> ADSL Configuration menu consists of the
following fields:
Fields in the ADSL Configuration ADSL Port Status menu
Field
Description
ADSL chipset
Shows the key of the installed chipset.
Physical connection
Shows the current ADSL operation mode. The value cannot be
changed.
Possible values:
• <: The ADSL link is not active.
• 1*- +': ANSI T1.413
• 1;-4: ADSL classic, G.DMT, ITU G.992.1
• 4: Splitterless ADSL, ITU G.992.2
• 1;-4: G.DMT.Bis, ITU G.992.3
• 1;-4 ;4+: ADSL2 Double Ended Line Test
• 1;-4 /
&: ADSL2 Plus, ITU G.992.5
104
bintec R200-Serie
9 Physical interfaces
Funkwerk Enterprise Communications GmbH
Field
Description
• 1;-4 /
& ;4+: ADSL2 Plus Double Ended Line Test
• ?1;-4: Reach Extended ADSL2
• ?1;-4 ;4+: Reach Extended ADSL2 Double Ended Line
Test
Fields in the ADSL Configuration Current Line Speed menu
Field
Description
Downstream
Displays the data rate in the receive direction (direction from
CO/DSLAM to CPE/router) in bits per second.
The value cannot be changed.
Upstream
Displays the data rate in the send direction (direction from CPE/
router to CO/DSLAM) in bits per second.
The value cannot be changed.
Fields in the ADSL Configuration ADSL Parameters menu
Field
Description
ADSL Mode
Select the ADSL mode.
Possible values:
• 1
% ( (default value): The ADSL mode is automatically adapted for the remote terminal.
• 1;-4: ADSL1 / G.DMT is used.
• 1;-4: ADSL2 / G.992.3 is used.
• 1;-4 /
&: ADSL2 Plus / G.992.5 is used.
• ; : The ADSL interface is not active.
Transmit Shaping
Select whether the data rate in the send direction is to be reduced. This is only needed in a few cases for special DSLAMs.
Possible values:
• ;
/ 4 -,": The data rate in the send direction is not reduced.
• E #,& to EE #,&: The data rate in the send
direction is reduced to a maximum of 128,000 bps to
2,048,000 bps in defined steps.
bintec R200-Serie
105
9 Physical interfaces
Funkwerk Enterprise Communications GmbH
Field
Description
• <& ;: The data rate is reduced to the value
entered in Maximum Upstream Bandwidth
The default value is ;
/
Maximum upstream
bandwidth
106
4 -,".
Only if Transmit Shaping = <& Enter the maximum data rate in the send direction in bits per
second.
bintec R200-Serie
Funkwerk Enterprise Communications GmbH
10 LAN
Chapter 10 LAN
In this menu, you configure the addresses in your LAN and can structure your local network
using VLANs.
10.1 IP Configuration
In this menu, you can edit the IP configuration of the LAN and Ethernet interfaces of your
device.
10.1.1 Interfaces
In the LAN -> IP Configuration -> Interfaces menu, the available IP interfaces are listed.
You can edit the IP configuration of the interfaces or create virtual interfaces for special applications. Interfaces are also listed here once you have created them in the subsystems
(wireless networks, bridge links), and then set them to routing mode in the System Management -> Interface Mode / Bridge Groups -> Interfaces menu.
Use the
to edit the settings of an existing interface (bridge groups, Ethernet interfaces in
routing mode).
You can use the New button to create virtual interfaces. However, this is only needed in
special applications (e.g. BRRP).
Depending on the option selected, different fields and options are available. All the configuration options are listed below.
The default setting for all existing interfaces of your device is routing mode. The interface,
en1-0, is pre-configured with IP address and netmask .
Example of subnets
If your device is connected to a LAN that consists of two subnets, you should enter a
second IP Address/Netmask.
The first subnet has two hosts with the IP addresses 192.168.42.1 and 192.168.42.2, for
example, and the second subnet has two hosts with the IP addresses 192.168.46.1 and
192.168.46.2. To be able to exchange data packets with the first subnet, your device uses
the IP address 192.168.42.3, for example, and 192.168.46.3 for the second subnet. The
netmasks for both subnets must also be indicated.
bintec R200-Serie
107
10 LAN
Funkwerk Enterprise Communications GmbH
10.1.1.1 Edit/New
Choose the
icon to edit existing entries. Choose the New button to create virtual inter-
faces.
Fig. 41: LAN -> IP Configuration -> Interfaces ->Edit/New
The LAN -> IP Configuration -> Interfaces ->Edit/New menu consists of the following
fields:
Fields in the Interfaces Basic Parameters menu
Field
Description
Based on Ethernet Inter- This field is only displayed if you are editing a virtual routing inface
terface.
Select the Ethernet interface for which the virtual interface is to
be configured.
Address mode
Select how an IP address is assigned to the interface.
Possible values:
• -% (default value): A static IP address is assigned to the
interface in IP Address/Netmask.
• ;>:: An IP address is assigned to the interface dynamically
via DHCP.
108
bintec R200-Serie
10 LAN
Funkwerk Enterprise Communications GmbH
Field
Description
IP / Netmask
Only if Address Mode = -%
With Add, add a new address entry and enter the IP Address
and corresponding Netmask
Interface Mode
Only for physical interfaces in routing mode.
Select the configuration mode of the interface.
Possible values:
• (
/ (default value): The interface is not assigned for a
specific purpose.
• 941*: This option only applies for routing interfaces.
You use this option to assign the interface to a VLAN. This is
done using the VLAN ID, which is displayed in this mode and
can be configured. In this mode, the definition of a MAC address in MAC Address is optional.
MAC address
Only for virtual interfaces and if Interface Mode = (
/
Enter the MAC address associated with the interface. For virtual
interfaces, you can use the MAC address of the physical interface under which the virtual interface was created, but this is not
necessary. You can also allocate a virtual MAC address. The
first 6 characters of the MAC are preset (but can be changed).
VLAN ID
Only if Interface Mode = 941*.
This option only applies for routing interfaces. Assign the interface to a VLAN by entering the VLAN ID of the relevant VLAN.
Possible values are (default value) to .
The Advanced Settingsmenu consists of the following fields:
Fields in the menu Advanced Settings
Field
Description
DHCP MAC Address
Only if Address Mode = ;>:
If <& 3
/! is activated (default setting), the hardware
MAC address of the Ethernet interface is used. In the case of
physical interfaces, the current MAC address is entered by de-
bintec R200-Serie
109
10 LAN
Funkwerk Enterprise Communications GmbH
Field
Description
fault.
If you disable <& 3
/!, you enter an MAC address for
the virtual interface, e.g. 5555#5' .
Some providers use hardware-independent MAC addresses to
allocate their clients IP addresses dynamically. If your provider
has assigned you an MAC address, enter this here.
DHCP Hostname
Only if Address Mode = ;>:
Enter the host name requested by the provider. The maximum
length of the entry is 45 characters.
Proxy ARP
Select whether your device is to respond to ARP requests from
its own LAN on behalf of defined remote terminals.
The function is enabled by choosing #/.
The function is disabled by default.
TCP-MSS Clamping
Select whether your device is to apply MSS Clamping. To prevent IP packets fragmenting, the MSS (Maximum Segment
Size) is automatically decreased by the device to the value set
here.
The function is enabled by choosing #/.
The function is disabled by default. Once enabled, the default
value ' is entered in the input field.
10.2 VLAN
By implementing VLAN segmentation in accordance with 802.1Q, you can configure
VLANs on your device. The wireless ports of an access point, in particular, are able to remove the VLAN tag of a frame sent to the clients and to tag received frames with a predefined VLAN ID. This functionality makes an access point nothing less than a VLANaware switch with the enhancement of grouping clients into VLAN groups. In general,
VLAN segmenting can be configured with all interfaces.
110
bintec R200-Serie
Funkwerk Enterprise Communications GmbH
10 LAN
Fig. 42: VLAN segmenting
VLAN for Bridging and VLAN for Routing
In the LAN -> VLAN menu, VLANs (virtual LANs) are configured with interfaces that operate in bridging mode. Using the VLAN menu, you can make all the settings needed for this
and query their status.
Caution
For interfaces that operate in Routing mode, you only assign a VLAN ID to the interface. You define this via the parameter Interface Mode = 941* and the VLAN ID field
in the LAN -> IP Configuration ->Interfaces->New menu.
bintec R200-Serie
111
10 LAN
Funkwerk Enterprise Communications GmbH
10.2.1 VLANs
In this menu, you can display all the VLANs already configured, edit your settings and create new VLANs. By default, the ($ VLAN is available, to which all interfaces are
assigned.
10.2.1.1 Edit/New
Choose the
icon to edit existing entries. Choose the New button to configure other
VLANs.
Fig. 43: LAN ->VLAN-> VLANs -> Edit/New
The LAN ->VLAN -> VLANs ->Edit/New menu consists of the following fields:
Fields in the VLANs Configure VLAN menu
Field
Description
VLAN Identifier
Enter the number that identifies the VLAN. In the Edit menu,
you can no longer change this value. Possible values are to
.
VLAN Name
Enter a unique name for the VLAN. A character string of up to
32 characters is possible.
VLAN Members
Select the ports that are to belong to this VLAN. You can use
the Add button to add members.
For each entry, also select whether the frames to be transmitted
112
bintec R200-Serie
10 LAN
Funkwerk Enterprise Communications GmbH
Field
Description
from this port are to be transmitted $$ (i.e. with VLAN information) or $$ (i.e. without VLAN information).
10.2.2 Port Configuration
In this menu, you can define and view the rules for receiving frames at the VLAN ports.
Fig. 44: LAN -> VLAN -> Port Configuration
The LAN ->VLAN-> Port Configuration menu consists of the following fields:
Fields in menu Port Configuration
Field
Description
Interface
Shows the port for which you define the PVID and processing
rules.
PVID
Assign the selected port the required PVID (Port VLAN Identifier).
If a packet without a VLAN tag reaches this port, it is assigned
this PVID.
Drop untagged frames
bintec R200-Serie
If this option is enabled, untagged frames are discarded. If the
option is disabled, untagged frames are tagged with the PVID
defined in this menu.
113
10 LAN
Funkwerk Enterprise Communications GmbH
Field
Description
Drop non-members
If this option is enabled, all tagged frames that are tagged with a
VLAN ID to which the selected port does not belong are discarded.
10.2.3 Administration
In this menu, you make general settings for a VLAN. The options must be configured separately for each bridge group.
Fig. 45: LAN -> VLAN -> Administration
The LAN -> VLAN -> Administration menu consists of the following fields:
Fields in the menu Bridge Group br<ID> VLAN Options
Field
Description
Enable VLAN
Enable or disable the specified bridge group for VLAN.
The function is activated with #/.
The function is not activated by default.
Management VID
114
Enter the VLAN ID of the VLAN in which your device is to operate.
bintec R200-Serie
Funkwerk Enterprise Communications GmbH
11 Wireless LAN
Chapter 11 Wireless LAN
In the case of wireless LAN (WLAN = Wireless Local Area Network), this relates to the creation of a network using wireless technology.
Network functions
Like a wired network, a WLAN offers all the main network functions. Access to servers,
files, printers, and the e-mail system is just as reliable as company-wide Internet access.
Because the devices do not require any cables, the great advantage of WLAN is that there
are no building-related restrictions (i.e. the device location does not depend on the position
and number of connections).
Currently applicable standard: IEEE 802.11
In the case of 802.11-WLANs, all the functions of a wired network are possible. WLAN
transmits inside and outside buildings with a maximum of 100 mW.
IEEE 802.11g is currently the most widespread standard for wireless LANs and offers a
maximum data transmission rate of 54 mbps. This procedure operates in the radio frequency range of 2.4 GHz, which ensures that parts of the building are penetrated as effectively as possible with a low transmission power that poses no health risks.
A 802.11g-compatible standard is 802.11b, which operates in the 2.4 GHz range (2400
MHz - 2485 MHz) and offers a maximum data transmission rate of 11 mbps. 802.11b and
802.11g WLAN systems involve no charge or login.
With 802.11a, bandwidths of up to 54 mbps can be used in the 5150 GHz to 5725 MHz
range. With the higher frequency range, 19 non-overlapping frequencies are available (in
Germany). This frequency range can also be used without a licence in Germany. In
Europe, transmission power of not just 30 mW but 1000 mW can be used with 802.11h, but
only if TPC (TX Power Control, method for controlling transmission power in wireless systems to reduce interferences) and DFS (Dynamic Frequency Selection) are used. The purpose of TPC and DFS is to ensure that satellite connections and radar devices are not interfered with.
11.1 WLANx
In the Wireless LAN -> WLANx menu, you can configure all the WLAN modules of your
device.
bintec R200-Serie
115
11 Wireless LAN
Funkwerk Enterprise Communications GmbH
Depending on the model, one or two WLAN modules, WLAN1 and, in certain models,
WLAN2, available.
11.1.1 Radio Settings
In the Wireless LAN -> WLANx -> Radio Settings menu, an overview of all the configuration options for the WLAN module is shown.
Fig. 46: Wireless LAN -> WLANx -> Radio Settings
11.1.1.1
Radio Settings -> Edit
In this menu, you change the settings for the wireless module.
Choose the
116
button to edit the configuration.
bintec R200-Serie
11 Wireless LAN
Funkwerk Enterprise Communications GmbH
Fig. 47: Wireless LAN -> WLANx -> Radio Settings ->
The Wireless LAN -> WLANx -> Radio Settings ->
menu consists of the following
fields:
Fields in the Radio Settings WLAN Settings menu
Field
Description
Wireless module
Select whether you want to enable the wireless module.
The function is enabled by choosing #/.
The function is disabled by default.
Operation Mode
Define whether your device is to be run as an 1%%&& .
Operation Band
Displays the operation band and usage area of the access
point.
Possible values:
bintec R200-Serie
117
11 Wireless LAN
Funkwerk Enterprise Communications GmbH
Field
Description
• >7 6=
(default value): The access point is
run within or outside buildings.
Channel
Enter the channel to be used.
The number of channels you can selected depends on the
country setting. Please consult the data sheet for your device.
Possible values are to ' and 1
.
The default value is 1
.
Configuring the network name (SSID) in Access Point mode
means that wireless networks can be logically separated from
each other, but they can still physically interfere with each other
if they are operating on the same or closely adjacent wireless
channels. So if you are operating two or more radio networks
close to each other, it is advisable to allocate the networks to
different channels. Each of these should be spaced at least four
channels apart, as a network also partially occupies the adjacent channels.
In the case of manual channel selection, please make sure first
that the clients actually support these channels.
Transmit Power
Select the maximum value for the radiated antenna power. The
actually radiated antenna power may be lower than the maximum value set, depending on the data rate transmitted. The maximum value for Transmit Power is country-dependent.
Possible values:
• ' 0 3 (default value)
• 0 3
• 0 3
• 0 3
• ' 0 3
Max. Clients
Enter the maximum number of clients that can be connected to
this wireless network (SSID)
The maximum number of clients that can register with a wireless module depends on the specifications of the respective
WLAN module. This number can be shared across all con-
118
bintec R200-Serie
11 Wireless LAN
Funkwerk Enterprise Communications GmbH
Field
Description
figured wireless networks. If the maximum number of clients is
reached, no more new wireless networks can be created and a
warning message will appear.
Fields in the Radio Settings Performance Settings menu
Field
Description
Wireless Mode
Select the wireless technology that the access point is to use.
Possible values:
• $: The device operates only in accordance with
802.11g. 802.11b clients have no access.
• #: Your device operates only in accordance with
802.11b and forces all clients to adapt to it.
• D #6$" (default value) / D!
& #6$": Your device adapts to the client technology.
The following applies for mixed-short: The data rates 5.5 and
11 mbps must be supported by all clients (basic rates).
• D!/$ #6$": Your device adapts to the client technology. Only a data rate of 1 and 2 mbps needs to be
supported by all clients (basic rates). This mode is also
needed for Centrino clients if connection problems occur.
Burst Mode
This performance feature increases the maximum burst time for
transmission to a connected client, and therefore increases the
data throughput in slower WLANs.
Several wireless data packets are transmitted directly one after
the other ("burst"). The CTS packet required for administration
is only sent once.
The function is enabled by choosing #/. The function is
enabled by default.
The burst functionality complies with the 802.11 standards,
which means burst mode can result in improvements with every
11g-enabled client.
If problems occur with older WLAN hardware, this field should
be set to disabled.
The Advanced Settingsmenu consists of the following fields:
bintec R200-Serie
119
11 Wireless LAN
Funkwerk Enterprise Communications GmbH
Fields in the menu Advanced Settings
Field
Description
Beacon Period
Enter the time in milliseconds between the sending of two
beacons.
This value is transmitted in Beacon and Probe Response
Frames.
Possible values are to '.
The default value is msec.
DTIM Period
Enter the interval for the Delivery Traffic Indication Message
(DTIM).
The DTIM field is a data field in transmitted beacons that informs clients about the window to the next broadcast or multicast transmission. If clients operate in power save mode, they
come alive at the right time and receive the data.
Possible values are to .
The default value is .
RTS Threshold
Select how the RTS/CTS mechanism is to be switched on/off.
If you choose <& ;, in the input field you can specify
the data packet length threshold in bytes (1..2346) as of which
the RTS/CTS mechanism is to be used. This makes sense if
several clients that are not in each other's wireless range are
run in one access point. The mechanism can also be switched
on/off independently of the data packet length by selecting the
value 1/)& or 1/)& (default value).
Short Retry Limit
Enter the maximum number of attempts to send a frame of
length less than or equal to the value defined in RTS
Threshold. After this many failed attempts, the packet is discarded.
Possible values are to .
The default value is ..
Long Retry Limit
120
Enter the maximum number of attempts to send a data packet
of length less than or equal to the value defined in RTS
bintec R200-Serie
11 Wireless LAN
Funkwerk Enterprise Communications GmbH
Field
Description
Threshold. After this many failed attempts, the packet is discarded.
Possible values are to .
The default value is .
Fragmentation
Threshold
Enter the maximum size as of which the data packets are to be
fragmented (i.e. split into smaller units). A low value is recommended for this field in areas with poor reception and in the
event of radio interference.
Possible values are to '.
The default value is ' bytes.
Max Receive Lifetime
Enter the time from receipt of the first fragment of a data packet
as of which no further attempts are made. The data packet is
discarded.
Possible values are to ..
The default value is msec.
Max Transmit MSDU
Lifetime
Enter the time from sending of the first fragment of a data packet as of which no further send attempts are made. The data
packet is discarded.
Possible values are to ..
The default value is msec.
11.1.2 Virtual Service Sets
If you operate your device in access point mode (Wireless LAN -> WLANx -> Wireless
Module Settings -> -> Operating Mode = 1%%&& ), you can set up and edit the
desired wireless networks in the Wireless LAN -> WLANx -> Wireless Networks (VSS) ->
->/New menu.
Setting network names
In contrast to a LAN set up over Ethernet, a wireless LAN does not have any cables for setting up a permanent connection between the server and clients. Access violations or faults
may therefore occur with directly adjacent radio networks. To prevent this, every radio net-
bintec R200-Serie
121
11 Wireless LAN
Funkwerk Enterprise Communications GmbH
work has a parameter that uniquely identifies the network and is comparable with a domain
name. Only clients with a network configuration that matches that of your device can communicate in this WLAN. The corresponding parameter is called the network name. In the
network environment, it is sometimes also referred to as the SSID.
Protection of wireless networks
As data can be transmitted over the air in the WLAN, this data can in theory be intercepted
and read by any attacker with the appropriate resources. Particular attention must therefore
be paid to protecting the wireless connection.
There are three security modes, WEP, WPA-PSK and WPA Enterprise. WPA Enterprise offers the highest level of security, but this security mode is only really suitable for companies, because it requires a central authentication server. Private users should choose WEP
or preferably WPA-PSK with higher security as their security mode.
WEP
802.11 defines the WEP security standard (Wired Equivalent Privacy = encryption of data
with 40 bits (Security Mode = 0 ) or 104 bits (Security Mode = 0 ). However,
this widely used WEP has proven susceptible to failure. However, a higher degree of security can only be achieved through hardware-based encryption which required additional
configuration (for example 3DES or AES). This permits even sensitive data from being
transferred via a radio path without fear of it being stolen.
IEEE 802.11i
Standard IEEE 802.11i for wireless systems contains basic security specifications for wireless networks, in particular with regard to encryption. It replaces the insecure WEP (Wired
Equivalent Privacy) with WPA (Wi-Fi Protected Access). It also includes the use of the advanced encryption standard (AES) to encrypt data.
WPA
WPA (Wi-Fi Protected Access) offers additional protection by means of dynamic keys
based on the Temporal Key Integrity Protocol (TKIP), and offers PSK (preshared keys) or
Extensible Authentication Protocol (EAP) via 802.1x (e.g. RADIUS) for user authentication.
Authentication using EAP is usually used in large wireless LAN installations, as an authentication instance in the form of a server (e.g. a RADIUS server) is used in these cases. PSK
(preshared keys) are usually used in smaller networks, such as those seen in SoHo (Small
office, Home office). Therefore, all the wireless LAN subscribers must know the PSK, because it is used to generate the session key.
122
bintec R200-Serie
Funkwerk Enterprise Communications GmbH
11 Wireless LAN
WPA2
WPA2 is the enhancement of WPA. In WPA2, the 802.11i standard is not only implemented for the first time in full, but another encryption algorithm AES (Advanced Encryption
Standard) is also used.
Access control
You can control which clients can access your wireless LAN via your device by creating an
Access control list (ACL Mode or MAC Filter). In the Access Control List, you enter the
MAC addresses of the clients that may access your wireless LAN. All other clients have no
access.
Security measures
To protect the data transferred on the WLAN, you may need to carry out the following configuration steps in the Wireless LAN -> WLANx -> Wireless Networks (VSS) ->New->/
menu:
• Change the access passwords for your device.
• Change the default SSID, Network Name (SSID) = B
!% , of your access
point. Set Visible = #/. This will exclude all WLAN clients that attempt to establish
a connection with the general value for Network Name (SSID) 1) and do not know the
SSID settings.
• Use the available encryption methods. To do this, select Security Mode = 0 , 0
, 01 -2 or 01 ,& or both, and enter the relevant key in the access
point under WEP Key1 - 4 or Preshared Key and in the WLAN clients.
• The WEP key should be changed regularly. To do this, change the Data Transfer Key .
Select the longer 104 Bit WEP key.
• For the transfer of highly security-critical information, Security Mode = 01!
,& should be configured with WPA Mode = 01 . This method contains
hardware-based encryption and RADIUS authentication of the client. In special cases,
combination with IPSec is possible.
• Restrict WLAN access to permitted clients. Enter the MAC addresses of the wireless network cards of these clients in the Permitted Addresses -list in the MAC Filter menu (see
Fields in the menu MAC Filter on page 127).
In the Wireless LAN -> WLANx -> Wireless Networks (VSS) menu, a list of all WLAN
networks shown.
bintec R200-Serie
123
11 Wireless LAN
Funkwerk Enterprise Communications GmbH
11.1.2.1 Virtual Service Sets -> Edit/New
Choose the
icon to edit existing entries. Choose the New button to configure other wire-
less networks.
Fig. 48: Wireless LAN -> WLANx -> Virtual Service Sets ->
The Wireless LAN -> WLANx -> Virtual Service Sets ->
->/New
->/New menu consists of the
following fields:
Fields in the Virtual Service Sets Service Set Parameters menu
Field
Description
Network Name (SSID)
Enter the name of the wireless network (SSID).
Enter an ASCII string with a maximum of 32 characters.
Also select whether the Network Name (SSID) is to be transmitted.
The network name is shown by choosing 9&#/.
It is visible by default.
Intra-cell Repeating
Select whether communication between the WLAN clients is to
be permitted within a radio cell.
The function is enabled by choosing #/.
The function is enabled by default.
124
bintec R200-Serie
11 Wireless LAN
Funkwerk Enterprise Communications GmbH
Field
Description
ARP Processing
Select whether the ARP processing function should be enabled.
The ARP data traffic is reduced in the network by the fact that
ARP broadcasts that have been converted to ARP unicasts are
forwarded to IP addresses that are known internally. Unicasts
are quicker and clients with an enabled power save function are
not addressed.
The function is enabled by choosing #/.
The function is disabled by default.
Make sure that ARP processing cannot be applied in conjunction with the MAC bridge function.
Fields in the Virtual Service Sets Security Settings menu
Field
Description
Security Mode
Select the security mode (encryption and authentication) for the
wireless network.
Possible values:
• % (default value): Neither encryption nor authentication
• 0 : WEP 40 Bit
• 0 : WEP 104 Bit
• 01!-2: WPA Preshared Key
• 01!,&: 802.11i/TKIP
Only if Security Mode = 0 E 0 Select one of the keys configured in WEP Key <1 - 4> as the
default key.
The default value is 2) .
Transmit Key
Only if Security Mode = 0 E 0 Select one of the keys configured in WEP Key <1 - 4> as the
default key.
The default value is 2) .
WEP Key 1-4
bintec R200-Serie
Only if Security Mode = 0 , 0 125
11 Wireless LAN
Funkwerk Enterprise Communications GmbH
Field
Description
Enter the WEP key.
Enter a character string with the right number of characters for
the selected WEP mode. For 0 you need a string of 5
characters, 0 13 characters. For example // for
0 , !, for 0 .
WPA Mode
Only if Security Mode = 01!-2 and 01!,&
Select whether you want to use WPA (with TKIP encryption) or
WPA 2 (with AES encryption), or both.
Possible values:
• 01 01 (default value): WPA and WPA 2 can be
used.
• 01 : Only WPA is used.
• 01 : Only WPA2 is used.
WPA Cipher
Only for Security Mode = 01!-2 and WPA Mode = 01
and 01 01
Select the type of encryption you want to apply to WPA.
Possible values:
• +2 (default value): TKIP is used.
• 1-: AES is used.
• 1;- +2 : AES or TKIP is used.
WPA2 Cipher
Only for Security Mode = 01!-2 and WPA Mode = 01
and 01 01
Select the type of encryption you want to apply to WPA2.
Possible values:
• 1- (default value): AES is used.
• +2 : TKIP is used.
• 1;- +2 : AES or TKIP is used.
Preshared Key
126
Only if Security Mode = 01!-2
bintec R200-Serie
11 Wireless LAN
Funkwerk Enterprise Communications GmbH
Field
Description
Enter the WPA password.
Enter an ASCII string with 8 - 63 characters.
Fields in the menu MAC Filter
Field
Description
ACL Mode
Select whether only certain clients are to be permitted for this
wireless network.
The function is enabled by choosing #/.
The function is disabled by default.
Allowed Addresses
Use Add to make entries and enter the MAC addresses (MAC
Address) of the clients to be permitted.
11.2 Administration
The Wireless LAN -> Administration menu contains basic settings for running your gateway as an access point (AP).
11.2.1 Basic settings
Fig. 49: Wireless LAN -> Administration -> Basic Settings
bintec R200-Serie
127
11 Wireless LAN
Funkwerk Enterprise Communications GmbH
The Wireless LAN -> Administration -> Basic Settings menu consists of the following
fields:
Field in the Basic Settings WLAN Administration menu
Field
Description
Region
Select the country in which the access point is to be run.
Possible values are all the countries configured on the gateway's wireless module.
The range of channels available for selection (Channel in the
Wireless LAN -> WLANx->Radio Settings menu) changes depending on the country setting.
The default value is )
128
bintec R200-Serie
Funkwerk Enterprise Communications GmbH
12 Routing
Chapter 12 Routing
12.1 Routes
12.1.1 IP routes
In the Routing -> Routes -> IP Routes menu a list of all configured routes is shown.
12.1.1.1 Edit/New
Choose the
icon to edit existing entries. Choose the New button to create routes.
Fig. 50: Routing -> Routes -> IP Routes -> New with Extended Route = * %
If the D ?
option is selected for Route Class, an extra configuration section
opens.
bintec R200-Serie
129
12 Routing
Funkwerk Enterprise Communications GmbH
Fig. 51: Routing -> Routes -> IP Routes -> New with Extended Route = 1%
The Routing -> Routes -> IP Routes-> New menu consists of the following fields:
Fields in the IP Routes Route Class menu
Field
Description
Extended Route
Select whether the route is to be defined with extended parameters. If the function is active, a route is created with extended
routing parameters such as source interface and source IP address, as well as protocol, source and destination port, type of
service (TOS) and the status of the device interface.
The function is enabled by choosing #/.
The function is disabled by default.
Fields in the IP Routes Route Parameters menu
130
Field
Description
Route Type
Select the type of route.
bintec R200-Serie
12 Routing
Funkwerk Enterprise Communications GmbH
Field
Description
Possible values:
• * ?
(default value): Route to a network.
• ;
/ ?
: Is used if no other suitable route is available.
• >& ?
: Route to a single host.
Destination IP Address / Only if Route Type >& ?
or * ?
Netmask
Enter the IP address of the destination host.
If Route Type = * ?
also enter the netmask in the
second field. If no entry is made, your device uses a default netmask.
Interface
If necessary, enter the interface to be used for this route.
Network Type
Not for Route Type = - ?
Also select the network type.
Possible values:
• ;% (default value):
• in the LAN: You define another IP address for the interface.
• in the WAN: You define a route without a transit network.
• %:
• in the LAN: You define a gateway route.
• in the WAN: You define a route with a transit network.
Local IP Address
Only for Network Type = ;%.
Enter the IP address of the gateway to which your device is to
forward the IP packets.
Gateway
Only for Network Type = %.
Enter the IP address of the host to which your device is to forward the IP packets.
Metric
bintec R200-Serie
Select the priority of the route.
131
12 Routing
Funkwerk Enterprise Communications GmbH
Field
Description
The lower the value, the higher the priority of the route.
Value range from to , The default value is .
Fields in the IP Routes Extended Route Parameters menu
Field
Description
Source Interface
Select the interface over which the data packets are to reach
the device.
The default value is * .
Source IP Address
Enter the IP address and netmask of the source host or source
network.
Layer 4 Protocol
Select a protocol.
Possible values: :( , +: , <; , ? , - , 1> , =-B ,
4+, 1*G .
The default value is 1*G .
Source Port
Only if Layer 4 Protocol = +: or <;.
Enter the source port.
First select the port number range.
Possible values:
• 1) (default value): The route is valid for all port numbers.
• -$/: Enables the entry of a port number.
• ?$: Enables the entry of a range of port numbers.
• /$: Entry of privileged port numbers: 0 ... 1023.
• -: Entry of server port numbers: 5000 ... 32767.
• :/& : Entry of client port numbers: 1024 ... 4999.
• :/& : Entry of client port numbers: 32768 ... 65535.
• * ,/$: Entry of unprivileged port numbers: 1024
... 65535.
Enter the appropriate values for the individual port or start port
of a range in Port and, for a range, the end port in to Port.
132
bintec R200-Serie
12 Routing
Funkwerk Enterprise Communications GmbH
Field
Description
Destination Port
Only if Layer 4 Protocol = +: or <;.
Enter the destination port.
First select the port number range.
Possible values:
• 1) (default value): The route is valid for all port numbers.
• -$/: Enables the entry of a port number.
• ?$: Enables the entry of a range of port numbers.
• /$: Entry of privileged port numbers: 0 ... 1023.
• -: Entry of server port numbers: 5000 ... 32767.
• :/& : Entry of client port numbers: 1024 ... 4999.
• :/& : Entry of client port numbers: 32768 ... 65535.
• * ,/$: Entry of unprivileged port numbers: 1024
... 65535.
Enter the appropriate values for the individual port or start port
of a range in Port and, for a range, the end port in to Port.
DSCP / TOS Value
Select the Type of Service (TOS).
Possible values:
• $ (default value): The type of service is ignored.
• ;-:: Relates to a Differentiated Services Code Point to RFC
3260.
• +=- 3) 9/
: The TOS value is specified in binary
format, e.g. 00111111.
• +=- ;%/ 9/
: The TOS value is specified in decimal
format, e.g. 63.
Enter the relevant value for ;-:, +=- 3) 9/
and
+=- ;%/ 9/
.
Mode
Select when the interface defined in Route Parameters -> Interface is to be used.
Possible values:
• ;/
, (default value): The route can be used if
bintec R200-Serie
133
12 Routing
Funkwerk Enterprise Communications GmbH
Field
Description
the interface is "up". If the interface is "dormant", then dial and
wait until the interface is "up".
• 1
: The route can always be used.
• ;/
, %
: The route can be used if the interface is "up". If the interface is "dormant", then select and use
the alternative route (rerouting) until the interface is "up".
• * /
,: The route can be used if the interface is
"up".
• 1/)& /
,: The route can be used if the interface is
"up". If the interface is "dormant", then dial and wait until the
interface is "up". In this case, an alternative interface with a
poorer metric is used for routing until the interface is "up".
12.1.2 Options
Back Route Verify
The term Back Route Verify describes a very simple but powerful function. If a check is activated for an interface, incoming data packets are only accepted over this interface if outgoing response packets are routed over the same interface. You can therefore prevent the
acceptance of packets with false IP addresses – even without using filters.
Fig. 52: Routing -> Routes -> Options
134
bintec R200-Serie
12 Routing
Funkwerk Enterprise Communications GmbH
The Routing -> Routes -> Options menu consists of the following fields:
Fields in the Options Return Route Checking menu
Field
Description
Mode
Select how the interfaces to be activated for Back Route Verify
are to be specified.
Possible values:
• #/ // %&: Back Route Verify is activated for all interfaces.
• #/ -,%% %& (default value): A
list of all interfaces is displayed in which Back Route Verify is
only enabled for specific interfaces.
• ;&#/ // %&: Back Route Verify is disabled for all interfaces.
#
Only for Mode = #/ &,%% %&
Displays the serial number of the list entry.
Interface
Only for Mode = #/ &,%% %&
Displays the name of the interface.
Back Route Verify
Only for Mode = #/ &,%% %&
Select whether ?
?
:%$ is to be enabled for
this interface.
The function is activated with #/.
By default, the function is deactivated for all interfaces.
Fields in the Options General menu
Field
Description
Allow deleting/editing all Define whether all the routes entered on your device can be edrouting entries
ited and deleted in the Routing -> Routes -> Routes menu.
The function is activated with #/.
By default, the function is deactivated for all interfaces.
bintec R200-Serie
135
12 Routing
Funkwerk Enterprise Communications GmbH
12.2 NAT
12.2.1 NAT Interfaces
Network Address Translation (NAT) is a function on your device for defined conversion of
source and destination addresses of IP packets. If NAT is activated, IP connections are still
only allowed by default in one direction, outgoing (forward) (= protective function). Exceptions to the rule can be configured (in Portforwarding on page 137).
In the Routing -> NAT -> NAT Interfaces menu, a list of all NAT interfaces is shown.
Fig. 53: Routing -> NAT ->NAT Interfaces
For each NAT interface, you can select the options *1+ 1%, -/ ;) and
+ &&
$.
In addition, $& displays how many portforwarding rules were configured
for this interface.
Options in the menu NAT Interfaces
Field
Description
NAT Active
Select whether NAT is to be activated for the interface.
The function is disabled by default.
136
bintec R200-Serie
12 Routing
Funkwerk Enterprise Communications GmbH
Field
Description
Silent Deny
Select whether IP packets are to be silently denied by NAT. If
this function is deactivated, the sender of the denied IP packet
is informed by means of an ICMP or TCP RST message.
The function is disabled by default.
PPTP Passthrough
Select whether the setup and operation of several simultaneous, outgoing PPTP connections from hosts in the network are
also to be permitted if NAT is activated.
The function is disabled by default.
If PPTP Passthrough is enabled, the device itself cannot be
configured as a tunnel endpoint.
Portforwardings
Shows the number of portforwarding rules configured in Routing -> NAT -> Portforwarding.
12.2.2 Portforwarding
In the Routing -> NAT -> Portforwarding menu, a list of all NAT interfaces is shown for
which portforwarding has been configured.
12.2.2.1 New
Choose the New button to set up portforwarding for other interfaces.
bintec R200-Serie
137
12 Routing
Funkwerk Enterprise Communications GmbH
Fig. 54: Routing -> NAT ->Portforwarding -> New
The Routing -> NAT -> Portforwarding-> New menu consists of the following fields:
Fields in the Portforwarding Basic Parameters menu
Field
Description
Interface
Select the interface for which portforwarding is to be configured.
Fields in the Portforwarding Select traffic
Field
Description
Service
Select the service for which address mapping is defined for incoming connections.
Possible values:
• <&! (default value)
• ;*-
<;"
• ;*-
+:"
• B+
• >++
• >++• (1
138
bintec R200-Serie
12 Routing
Funkwerk Enterprise Communications GmbH
Field
Description
• **+
• ='
• -(+
• -->
• +4*+
Protocol
Only if Services = <&!.
Select the protocol.
Possible values:
• 1*G
(default value)
• :(
• • • +:
• • • <
• :&
• <;
• >(
• C*-!;
• ?;
• • ?-9
• ?
• -
• 1>
• +4-
• -2
• 2),/
• -=!
bintec R200-Serie
139
12 Routing
Funkwerk Enterprise Communications GmbH
Field
Description
• ?
• =-B
• • C • 9??
• 4+
Corresponding NAT
entry for outgoing connection
Specify whether a NAT entry is to be created for outgoing connections for portforwarding.
The function is activated with #/.
The function is activated by default.
External IP address
Select the external host or network IP address of the selected
interface.
In default scenarios, only one external IP address is available.
In this case, select the 1
option.
The 1
option is disabled by default, so that you can enter
the IP address manually.
Port
Only if Service = <&!.
First select whether all connections are to be permitted, or
whether a certain port or port range is to be defined.
Possible values:
• 1// (default value): No port mapping is carried out. In this
case, the value ! is entered in the input fields.
• -,%) : Enables a port number to be entered.
• -,%) ?$ : Enables a port number range to be
entered.
Now enter the original destination port or destination port range
(...to...) of the incoming IP connection.
Remote network
140
Select whether IP packets are to be forwarded to a remote network.
bintec R200-Serie
12 Routing
Funkwerk Enterprise Communications GmbH
Field
Description
The function is disabled by default.
The function is activated with #/.
Remote IP Address /
Netmask
Only if Remote Network = #/.
Now enter the remote IP address and netmask for the remote
network.
Fields in the Portforwarding Forward to menu
Field
Description
Map to host
Enter the IP address of the internal host or network.
You can also select the 4%/ option, in which case the port is
mapped to your device.
Destination Port
Enter the new destination port of the incoming IP connection.
Select whether the source port is to be used by enabling the
=$/ option. In this case, enter the value ! in the port
number input field. Or disable the =$/ option and enter a
port number.
12.3 RIP
The entries in the routing table can be defined statically or the routing table can be updated
constantly by dynamic exchange of routing information between several devices. This exchange is controlled by a Routing Protocol, e.g. RIP (Routing Information Protocol). By default, about every 30 seconds (this value can be changed in Update Timer), a device
sends messages to remote networks using information from its own current routing table.
The complete routing table is always exchanged in this process. If triggered RIP is used, information is only exchanged if the routing information has changed. In this case, only the
changed information is sent.
Observing the information sent by other devices enables new routes and shorter paths for
existing routes to be saved in the routing table. As intermediate routes between networks
can become unreachable, RIP removes routes that are older than 5 minutes (i.e. routes not
verified in the last 300 seconds - Garbage Collection Timer + Route Timeout). Routes
learnt with triggered RIP are not deleted.
Your device supports both version 1 and version 2 of RIP, either individually or together.
bintec R200-Serie
141
12 Routing
Funkwerk Enterprise Communications GmbH
12.3.1 RIP Interfaces
In the Routing -> RIP -> RIP Interfaces menu, a list of all RIP interfaces is shown.
Fig. 55: Routing -> RIP ->RIP Interfaces
12.3.1.1 Edit
For each RIP interface, you can, in the
menu, select the options - 9&, ?!
% 9& and ?
1
%.
142
bintec R200-Serie
12 Routing
Funkwerk Enterprise Communications GmbH
Fig. 56: Routing -> RIP ->RIP Interfaces->
The Routing -> RIP -> RIP Interfaces->
menu consists of the following fields:
Fields in the RIP Parameters for <Interface> menu
Field
Description
Send Version
Decide whether routes are to be propagated via RIP and if so,
select the RIP version for sending RIP packets over the interface in send direction.
Possible values:
• * (default value): RIP is not enabled.
• ? 9: Enables sending and receiving of version 1 RIP
packets.
• ? 9: Enables sending and receiving of version 2 RIP
packets.
• ? 969: Enables sending and receiving of both version 1
and version 2 RIP packets.
• ? 9 (
/%&: For sending RIP V2 messages over
the multicast address 224.0.0.9.
• ? 9 +$$: RIP V1 messages are sent, received
and processed as per RFC 2091 (triggered RIP).
• ? 9 +$$: RIP V2 messages are sent, received
and processed as per RFC 2091 (triggered RIP).
bintec R200-Serie
143
12 Routing
Funkwerk Enterprise Communications GmbH
Field
Description
Receive Version
Decide whether routes are to be imported via RIP and if so, select the RIP version for receiving RIP packets over the interface
in receive direction.
Possible values:
• * (default value): RIP is not enabled.
• ? 9: Enables sending and receiving of version 1 RIP
packets.
• ? 9: Enables sending and receiving of version 2 RIP
packets.
• ? 969: Enables sending and receiving of both version 1
and version 2 RIP packets.
• ? 9 +$$: RIP V1 messages are sent, received
and processed as per RFC 2091 (triggered RIP).
• ? 9 +$$: RIP V2 messages are sent, received
and processed as per RFC 2091 (triggered RIP).
Route Announce
Select this option if you want to set the time at which any activated routing protocols (e.g. RIP) are to propagate the IP routes
defined for this interface.
Note: This setting does not affect the interface-specific RIP configuration mentioned above.
Possible values:
• <, =/) (default value): Routes are only propagated if the
interface status is up.
• 1/)&: Routes are always propagated independent of operational status.
12.3.2 RIP Filter
In this menu, you can specify exactly which routes are to be exported or imported.
You can use the following strategies for this:
• You explicitly deactivate the import or export of certain routes. The import or export of all
other routes that are not listed is still allowed.
• You explicitly activate the import or export of certain routes. In this case, you must also
144
bintec R200-Serie
12 Routing
Funkwerk Enterprise Communications GmbH
explicitly deactivate the import or export of all other routes. You can do this using a filter
for IP Address = no entry (this corresponds to the IP address 0.0.0.0) with Netmask =
no entry (this corresponds to the netmask 0.0.0.0). To make sure this filter is used last, it
must be placed at the lowest position.
You configure a filter for a default route with the following values:
• IP Address = no entry (this corresponds to the IP address 0.0.0.0) with Netmask =
255.255.255.255
In the Routing -> RIP -> RIP Filters menu, a list of all RIP filters is shown.
Fig. 57: Routing -> RIP ->RIP Filters
You can use the
button to insert another filter above the list entry. The configuration
menu for creating a new window opens.
You can use the
button to move the list entry. A dialog box opens, in which you can se-
lect the position to which the filter is to be moved.
12.3.2.1 New
Choose the New button to set up more RIP filters.
bintec R200-Serie
145
12 Routing
Funkwerk Enterprise Communications GmbH
Fig. 58: Routing -> RIP ->RIP Filters -> New
The Routing -> RIP -> RIP Filter-> New menu consists of the following fields:
Fields in the RIP Filter Basic Parameters menu
Field
Description
Interface
Select the interface to which the rule to be configured applies.
IP Address/Netmask
Enter the IP address and netmask to which the rule is to be applied. This address can be in the LAN or WAN.
The rules for incoming and outgoing RIP packets (import or export) for the same IP address must be separately configured.
You can enter individual host addresses or network addresses.
Direction
Select whether the filter applies to the export or import of routes.
Possible values:
• , (default value)
• D,
Metric Offset for Active
Interfaces
Select the value to be added to the route metric if the status of
the interface is "up". During export, the value is added to the exported metric if the interface status is "up".
Possible values are ! to .
146
bintec R200-Serie
12 Routing
Funkwerk Enterprise Communications GmbH
Field
Description
The default value is .
Metric Offset for Inactive Select the value to be added to the route metric if the status of
Interfaces
the interface is "dormant". During export, the value is added to
the exported metric if the interface status is "dormant".
Possible values are ! to .
The default value is .
12.3.3 RIP Options
Fig. 59: Routing -> RIP ->RIP Options
The Routing-> RIP ->RIP Options menu consists of the following fields:
Fields in the RIP Options Global RIP Parameters menu
bintec R200-Serie
Field
Description
RIP UDP Port
The setting option UDP port, which is used for sending and receiving RIP updates, is only for test purposes. If the setting is
changed, this can mean that your device sends and listens at a
port that no other devices use. The default value 520 should be
retained.
147
12 Routing
Funkwerk Enterprise Communications GmbH
Field
Description
Default Route Distribution
Select whether the default route of your device is to be propagated via RIP updates.
The function is activated with #/.
The function is enabled by default.
Poisoned Reverse
Select the procedure for preventing routing loops.
With standard RIP, the routes learnt are propagated over all interfaces with RIP SEND activated. With Poisoned Reverse ,
however, your device propagates over the interface over which
it learnt the routes, with the metric (Next Hop Count) 16
(=“Network is not reachable“).
The function is activated with #/.
The function is disabled by default.
RFC 2453 Variable
Timer
For the timers described in RFC 2453, select whether the same
values that you can configure in the Timer for RIP V2 (RFC
2453) menu.
The function is activated with #/.
The function is enabled by default.
If you deactivate the function, the times defined in RFC are retained for the timeouts.
RFC 2091 Variable
Timer
For the timers described in RFC 2091, select whether the same
values that you can configure in the Timer for Triggered RIP
(RFC 2091) menu.
The function is activated with #/.
The function is disabled by default.
If the function is not activated, the times defined in RFC are retained for the timeouts.
Fields in the RIP Options Timer for RIP V2 (RFC 2453) menu
148
Field
Description
Update Timer
Only for RFC 2453 Variable Timer = #/
bintec R200-Serie
12 Routing
Funkwerk Enterprise Communications GmbH
Field
Description
An RIP update is sent on expiry of this period of time.
The default value is ' (seconds).
Route Timeout
Only for RFC 2453 Variable Timer = #/
After the last update of a route, the route time is active.
After timeout, the route is deactivated and the Garbage Collection Timer is started.
The default value is (seconds).
Garbage Collection
Timer
Only for RFC 2453 Variable Timer = #/
The Garbage Collection Timer is started as soon as the route
timeout has expired.
After this timeout, the invalid route is deleted from the
IPROUTETABLE if no update is carried out for the route.
The default value is (seconds).
Fields in the RIP Options Timer for Triggered RIP (RFC 2091) menu
Field
Description
Hold Down Timer
Only for RFC 2091 Variable Timer = #/
The hold down timer is activated as soon as your device receives an unreachable route (metric 16). The route may deleted
once this period has elapsed.
The default value is 120 (seconds).
Retransmission Timer
Only for RFC 2091 Variable Timer = #/
After this timeout, update request or update response packets
are sent again until an update flush or update acknowledge
packet arrives.
The default value is 5 (seconds).
12.4 Load Balancing
bintec R200-Serie
149
12 Routing
Funkwerk Enterprise Communications GmbH
12.4.1 Load Balancing Groups
The increasing amount of data traffic over the Internet means it is necessary to send data
over different interfaces to increase the total bandwidth available. IP load balancing enables the controlled distribution of traffic within a particular group of interfaces according to
the following principles:
• In contrast to Multilink PPP-based solutions, load balancing also functions with accounts
with different providers.
• Session-based load balancing is achieved.
• Related (dependent) sessions are always routed over the same interface.
• A decision on distribution is only made for outgoing sessions.
In the Routing -> Load Balancing -> Load Balancing Groups menu a list of all configured load balancing groups is shown.
12.4.1.1 New
Choose the New button to set up new groups.
Fig. 60: Routing -> Load Sharing ->Load Sharing Groups -> New
The Routing -> Load Balancing ->Load Balancing Groups -> New menu consists of the
following fields:
Fields in the Load Balancing GroupsBasic Parameters menu
150
bintec R200-Serie
12 Routing
Funkwerk Enterprise Communications GmbH
Field
Description
Group Description
Enter the desired description of the interface group.
Distribution Policy
Select the way the data traffic is to be distributed to the interfaces configured for the group.
Possible values:
• -&&!?
!?# (default value): A newly added
session is assigned to one of the group interfaces according
to the percentage assignment of sessions to the interfaces.
The number of sessions is decisive.
• 4!, 3: A newly added session is
assigned to one of the group interfaces according to the share
of the total data rate handled by the interfaces. The current
data rate based on the data traffic is decisive in both the send
and receive direction.
Consider
Only for Load Balancing Policy = 3E /!
,
Choose the direction in which the current data rate is to be considered.
Options:
• ;/: Only the data rate in the receive direction is considered.
• <,/: Only the data rate in the send direction is considered.
The ;/ and <,/ are deactivated by default.
Distribution Mode
Select the state the interfaces in the group may have if they are
to be included in load balancing.
Possible values:
• 1/)&(default value): Also includes idle interfaces.
• =/) & % %&: Only interfaces in the up
state are included.
In the Interface Selection for Load Balancing area, you add and configure interfaces that
match the current group context. You can also delete interfaces.
bintec R200-Serie
151
12 Routing
Funkwerk Enterprise Communications GmbH
Use Add to create entries.
Fields in the Load Balancing Groups Interface Selection for Distribution menu
Field
Description
Interface
Select the interfaces that are to belong to the group from the
available interfaces.
Distribution Ratio
Enter the percentage of the data traffic to be assigned to an interface.
The meaning differs according to the Distribution Policy used:
• Based on the number of sessions to be distributed for -&!
&!?
!?#.
• For 3 4 ;, the data rate is the decisive factor.
12.5 Multicast
What is multicasting?
Many new communication technologies are based on communication from one sender to
several recipients. Therefore, modern telecommunication systems such as voice over IP or
video and audio streaming (e.g. IPTV or Webradio) focus on reducing data traffic, e.g. by
offering TriplePlay (voice, video, data). Multicast is a cost-effective solution for effective use
of bandwidth because the sender of the data packet, which can be received by several recipients, only needs to send the packet once. The packet is sent to a virtual address
defined as a multicast group. Interested recipients log in to these groups.
Other areas of use
One classic area in which multicast is used is for conferences (audio/video) with several recipients. The most well-known are probably the MBone Multimedia Audio Tool (VAT),
Video Conferencing Tool (VIC) and Whiteboard (WB). VAT can be used to hold audio conferences. All participants are displayed in a window and the speaker(s) are indicated by a
black box. Other areas of use are of particular interest to companies. Here, multicasting
makes it possible to synchronise the databases of several servers, which is valuable for
multinationals or even companies with just a few locations.
Address range for multicast
152
bintec R200-Serie
Funkwerk Enterprise Communications GmbH
12 Routing
For, IPv4 the IP addresses 224.0.0.0 to 239.255.255.255 (224.0.0.0/4) are reserved for
multicast in the class D network. An IP address from this range represents a multicast
group to which several recipients can log in. The multicast router then forwards the required packets to all subnets with logged in recipients.
Multicast basics
Multicast is connectionless, which means that any trouble-shooting or flow control needs to
be guaranteed at application level.
At transport level, UDP is used almost exclusively, as, in contrast to TCP, it is not based on
a point-to-point connection.
At IP level, the main difference is therefore that the destination address does not address a
dedicated host, but rather a group, i.e. during the routing of multicast packets, the decisive
factor is whether a recipient is in a logged-in subnet.
In the local network, all hosts are required to accept all multicast packets. For Ethernet or
FDD, this is based on MAC mapping, where the group address is encoded into the destination MAC address. For routing between several networks, the routers first need to make
themselves known to all potential recipients in the subnet. This is achieved by means of
Membership Management protocols such as IGMP for IPv4 and MLP for IPv6.
Membership Management protocol
In IPv4, IGMP (Internet Group Management Protocol) is a protocol that hosts can use to
provide the router with multicast membership information. IP addresses of the class D address range are used for addressing. An IP address in this class represents a group. A
sender (e.g. Internet radio) sends data to this group. The addresses (IP) of the various
senders within a group are called the source (addresses). Several senders (with different
IP addresses) can therefore transmit to the same multicast group, leading to a 1-to-n relationship between groups and source addresses. This information is forwarded to the router
by means of reports. In the case of incoming multicast data traffic, a router can use this information to decide whether a host in its subnet wants to receive it. Your device supports
the current version IGMP V3, which is upwardly compatible, which means that both V3 and
V1/V2 hosts can be managed.
Your device supports the following multicast mechanisms:
• Forwarding: This relates to static forwarding, i.e. incoming data traffic for a group is forwarded in all cases. This is a useful option if multicast data traffic is to be permanently
forwarded.
• IGMP: IGMP is used to gather information about the potential recipients in a subnet. In
the case of a hop, incoming multicast data traffic can thus be selected.
bintec R200-Serie
153
12 Routing
Funkwerk Enterprise Communications GmbH
Tip
With multicast, the focus is on excluding data traffic from unwanted multicast groups.
Note that if forwarding is combined with IGMP, the packets can be forwarded to the
groups specified in the forwarding request.
12.5.1 Forwarding
In this menu, you specify which multicast groups are always forwarded between the interfaces of your device.
12.5.1.1 New
Choose the New button to create forwarding rules for new multicast groups.
Fig. 61: Routing -> Multicast -> Forwarding ->
The Routing -> Multicast -> Forward ->
/New
/New menu consists of the following fields:
Fields in the Forward Basic Parameters menu
154
Field
Description
All Multicast Groups
Select whether all multicast groups, i.e. the complete multicast
address range 224.0.0.0/4, are to be forwarded from the defined
bintec R200-Serie
12 Routing
Funkwerk Enterprise Communications GmbH
Field
Description
Source Interface to the defined Destination Interface To do
this, check #/
Disable the option if you only want to forward one defined multicast group to a particular interface.
The option is deactivated by default.
Multicast Group Address Only for All Multicast-Groups = &#/
Enter here the address of the multicast group you want to forward from a defined Source Interface to a defined Destination
Interface
Source Interface
Select the interface on your device to which the selected multicast group is sent.
Destination Interface
Select the interface on your device to which the selected multicast group is to be forwarded.
12.5.2 IGMP
IGMP (Internet Group Management Protocol, see RFC 3376) is used to signal the information about group (membership) in a subnet. As a result, only the packets explicitly wanted
by a host enter the subnet.
Special mechanisms ensure that the requirements of the individual clients are taken into
consideration. At the moment there are three versions of IGMP (V1 – V3); most current
systems use V3, and less often V2.
Two packet types play a central role in IGMP: queries and reports.
Queries are only transmitted from a router. If several IGMP routers exist in a network, the
router with the lowest IP address is sent the "querier". We differentiate here between a
general query (sent to 224.0.0.1), a group-specific query (sent to a group address) and the
group-and-source-specific query (sent to a specific group address). Reports are only sent
by hosts to respond to queries.
In this menu, you configure the interfaces on which IGMP is to be enabled.
bintec R200-Serie
155
12 Routing
Funkwerk Enterprise Communications GmbH
12.5.2.1 New
Choose the New button to configure IGMP on other interfaces.
Fig. 62: Routing -> Multicast -> IGMP ->
The Routing -> Multicast -> IGMP ->
/New
/New menu consists of the following fields:
Fields in the IGMP IGMP Settings menu
Field
Description
Interface
Select the interface on which IGMP is to be enabled, i.e. queries
are sent and responses are accepted.
Query Interval
Enter the interval in seconds in which IGMP queries are to be
sent.
Possible values are to .
The default value is .
Maximum Response
Time
156
For the sending of queries, enter the time interval in seconds
within which hosts must respond. The hosts randomly select a
time delay from this interval before sending the response. This
spreads the load in networks with several hosts, improving performance.
bintec R200-Serie
12 Routing
Funkwerk Enterprise Communications GmbH
Field
Description
Possible values are to .
The default value is .
Robustness
Select the multiplier for controlling the timer values. A higher
value can e.g. compensate for packet loss in a network susceptible to loss. If the value is too high, however, the time between
logging off and stopping of the data traffic can be increased
(leave latency).
Possible values are to .
The default value is .
Response interval (last
member)
Define the time after a query for which the router waits for an
answer.
If you shorten the interval, it will be more quickly detected that
the last member has left a group so that no more packets for
this group should be forwarded to this interface.
Possible values are to .
The default value is .
Maximum number of IG- Limit the number of reports/queries per second for the selected
MP status messages
interface.
Mode
Specify whether the interface defined here only works in host
mode or in both host mode and routing mode.
Possible values:
• >& ?
$ (default value): The interface is operated in routing mode and in host mode.
• >& /): The interface is only operated in host mode.
IGMP Proxy
IGMP Proxy enables you to simulate several locally connected interfaces as a subnet to an
adjacent router. Queries coming in to the IGMP Proxy interface are forwarded to the local
subnets. Local reports are forwarded on the IPGM Proxy interface.
bintec R200-Serie
157
12 Routing
Funkwerk Enterprise Communications GmbH
Fig. 63: IGMP Proxy
The Advanced Settingsmenu consists of the following fields:
Fields in the menu Advanced Settings
Field
Description
IGMP Proxy
Select whether your device is to forward the hosts' IGMP messages in the subnet via its defined Proxy Interface.
Proxy Interface
Only for IGMP Proxy enabled
Select the interface on your device via which queries are to be
received and collected.
158
bintec R200-Serie
12 Routing
Funkwerk Enterprise Communications GmbH
12.5.3 Options
In this menu, you can enable and disable IGMP on your system. You can also define
whether IGMP is to be used in compatibility mode or only IGMP V3 hosts are to be accepted.
Fig. 64: Routing -> Multicast -> Options
The Routing -> Multicast -> Options menu consists of the following fields:
Fields in the Options Basic Settings menu
Field
Description
IGMP Status
Select the IGMP status.
Possible values:
• (default value) Multicast is activated automatically for
hosts if the hosts open applications that use multicast.
• 1%: Multicast is always on.
• ; : Multicast is always off.
Mode
Only for IGMP Status = 1% or 1
Select Multicast Mode.
Possible values:
bintec R200-Serie
159
12 Routing
Funkwerk Enterprise Communications GmbH
Field
Description
• :,#/) ( (default value): The router uses IGMP version 3. If it notices a lower version in the network, it
uses the lowest version it could detect.
• 9& ' /): Only IGMP version 3 is used.
Maximum groups
Enter the maximum number of groups to be permitted, both internally and in reports.
Maximum sources
Enter the maximum number of sources that are specified in version 3 reports and the maximum number of internally managed
sources per group.
Maximum number of IG- Enter the maximum permitted total number of incoming queries
MP status messages
and messages per second.
The default value is , i.e. the number of IGMP status messages is not limited.
160
bintec R200-Serie
13 WAN
Funkwerk Enterprise Communications GmbH
Chapter 13 WAN
13.1 Internet + Dialup
In this menu, you can set up Internet access or dialup connections.
To enable your device to set up connections to networks or hosts outside your LAN, you
must configure the partners you want to connect to on your device. This applies to outgoing
connections (your device dials its WAN partner) and incoming connections (a remote partner dials the number of your device).
If you want to set up Internet access, you must set up a connection to your Internet Service
Provider (ISP). For broadband Internet access, your device provides the PPPover-Ethernet (PPPoE), PPP-over-PPTP and PPP-over-ATM (PPPoA) protocols. You can
also configure Internet access over ISDN.
Note
Note your provider's instructions.
Dialin connections over ISDN are used to establish a connection to networks or hosts outside your LANs.
All the entered connections are displayed in the corresponding list, which contains the Description, the User Name, the Authentication and the current Status.
The Status field can take the following values:
Possible values for Status:
Field
Description
connected
not connected (dialup connection); connection setup possible
not connected (e.g. because of an error during setup of an outgoing connection, a renewed attempt is only possible after a
specified number of seconds)
administratively set to down (deactivated); connection setup not
possible for leased lines:
bintec R200-Serie
161
13 WAN
Funkwerk Enterprise Communications GmbH
Authentication
When a call is received, the calling party number is always sent over the ISDN D-channel.
This number enables your device to identify the caller (CLID), provided the caller is entered
on your device. After identification with CLID, your device can additionally carry out PPP
authentication with the connection partner before it accepts the call. Your device needs the
necessary data for this, which you should enter here. First establish the type of authentication process that should be performed, then enter a common password and two codes. You
get this information, for example, from your Internet Service Provider (ISP) or the system
administrator at your head office. If the data you entered on your device is the same as the
caller's data, the call is accepted. The call is rejected if the data is not the same.
Default Route
With a default route, all data is automatically forwarded to one connection if no other suitable route is available. If you set up access to the Internet, you must configure the route to
your Internet Service Provider (ISP) as a default route. If, for example, you configure a corporate network connection, only enter the route to the head office or branch office as a default route if you do not configure Internet access over your device. If, for example, you
configure both Internet access and a corporate network connection, enter a default route to
the ISP and a network route to the head office. You can enter several default routes on
your device, but only one default route can be active at any one time. If you enter several
default routes, you should make sure the values for Metric are different.
Activating NAT
With Network Address Translation (NAT), you conceal your whole network to the outside
world behind one IP address. You should certainly do this for your connection to the Internet Service Provider (ISP).
Only outgoing sessions are allowed initially if NAT is activated. To allow certain connections from outside to hosts within the LAN, these must be explicitly defined and admitted.
Callback
The callback mechanism can be used for every connection to obtain additional security regarding the connection partner or to clearly allocate the costs of connections. A connection
is not set up until the calling party has been clearly identified by calling back. Your device
can answer an incoming call with a callback or request a callback from a connection partner. Identification can be based on the calling party number or PAP/CHAP/MS-CHAP authentication. Identification is made in the former case without call acceptance, as the calling
party number is transferred over the ISDN D-channel, and in the latter case with call ac-
162
bintec R200-Serie
Funkwerk Enterprise Communications GmbH
13 WAN
ceptance.
Connection Idle Timeout
The connection idle timeout is determined in order to clear the connection automatically if it
is not being used, i.e. if data is no longer being sent, to help you save costs.
Block after Connection Failure
You use this function to set up a waiting time for outgoing connection attempts after which
your device's connection attempt is regarded as having failed.
Channel Bundling
Your device supports dynamic and static channel bundling for dialup connections. Only one
B-channel is initially opened when a connection is set up.
Dynamic
Dynamic channel bundling means that your device connects other ISDN B channels to increase the throughput for connections if this is required, e.g. for large data rates. If the
amount of data traffic drops, the additional B-channels are closed again.
Static
In static channel bundling, you specify right from the start how many B-channels your
device is to use for connections, regardless of the transferred data rate.
Channel bundling can only be used for ISDN connections for a bandwidth increase or as a
backup. If devices from other manufacturers are to be used at the far end, ensure that
these support dynamic channel bundling for a bandwidth increase or as a backup.
13.1.1 PPPoE
In the WAN -> Internet + Dialup -> PPPoE menu, a list of all PPPoE interfaces is shown.
PPP over Ethernet (PPPoE) is the use of the Point-to-Point Protocol (PPP) network protocol over an Ethernet connection. Today, PPPoE is used for ADSL connections in Germany. In Austria, the Point-to-Point Tunneling Protocol (PPTP) was originally used for ADSL access. However, PPPoE is now offered here too by some providers.
bintec R200-Serie
163
13 WAN
Funkwerk Enterprise Communications GmbH
13.1.1.1 New
Choose the New button to set up new PPPoE interfaces.
Fig. 65: WAN -> Internet + Dialup ->PPPoE -> New
The WAN -> Internet + Dialup -> PPPoE-> New menu consists of the following fields:
Fields in the PPPoE Basic Parameters menu
164
Field
Description
Description
Enter a name to uniquely identify the PPPoE partner. The first
character in this field must not be a number and no special
characters or umlauts must be used either.
PPPoE Mode
Select whether you want to use a standard Internet connection
over PPPoE ( -) or your Internet access is to be set
up over several interfaces ( (
//). If you choose (
/!
bintec R200-Serie
13 WAN
Funkwerk Enterprise Communications GmbH
Field
Description
/, you can connect several DSL connections from a provider over PPP as a static bundle in order to obtain more bandwidth. Each of these DSL connections should use a separate
Ethernet connection for this. At the moment, many providers are
still in the process of preparing the PPPoE Multilink function.
For PPPoE Multilink, we recommend using your device's Ethernet switch in Split-Port mode and to use a separate Ethernet interface e.g. !, ! for each PPPoE connection.
If you also want to use an external modem for PPPoE Multilink,
you must run your device's Ethernet switch in Split-Port mode.
PPPoE Ethernet Interface
Only if PPPoE Mode = -
Select the Ethernet interface specified for a standard PPPoE
connection.
If you want to use an external DSL modem, select the Ethernet
port to which the modem is connected.
When using the internal DSL modem, select here the EthoA interface configured in Physical Interfaces-> ATM-> Profiles->
New.
The default value is * &,%.
PPPoE Interfaces for
Multilink
Only if PPPoE Mode = (
//
User name
Enter the user name.
Password
Enter the password.
Always Active
Select whether the interface should always be activated.
Select the interfaces you want to use for your Internet connection. Click the Add button to create new entries.
The function is activated with #/.
The function is disabled by default.
Only activate this option if you have Internet access with a flatrate charge.
bintec R200-Serie
165
13 WAN
Funkwerk Enterprise Communications GmbH
Field
Description
Connection Idle Timeout Only if Always on is disabled.
Enter the idle time in seconds for static short hold. The static
short hold setting determines how many seconds should pass
between sending the last traffic data packet and clearing the
connection.
Possible values are to ' (seconds). deactivates the
short hold.
The default value is '.
Example: for FTP transmission, for LAN-to-LAN transmission, for Internet connections.
Fields in the PPPoEIP Mode and Routes menu
Field
Description
IP Address Mode
Select whether your device is to be assigned a static IP address
or whether it should be assigned this dynamically.
Possible values:
• 1&& (default value): Your device is dynamically assigned an IP address.
• -%: You enter a static IP address.
Standard Route
Select whether the route to this connection partner is to be
defined as the default route.
The function is activated with #/.
The function is enabled by default.
Create NAT Policy
Specify whether Network Address Translation (NAT) is to be activated.
The function is activated with #/.
The function is enabled by default.
Local IP Address
Only if IP Address Mode = -%
Enter the static IP address of the connection partner.
166
bintec R200-Serie
13 WAN
Funkwerk Enterprise Communications GmbH
Field
Description
Route Entries
Only if IP Address Mode = -%
Define other routing entries for this connection partner.
Add a new entry with Add.
• ? 1&&: IP address of the destination host or
network.
• *&: Netmask of Remote IP Address. If no entry is
made, your device uses a default netmask.
• (%: The lower the value, the higher the priority of the
route (possible values ... ). The default value is .
The Advanced Settingsmenu consists of the following fields:
Fields in the menu Advanced Settings
Field
Description
Block after Connection
Failure for
Enter the wait time in seconds before the device should try
again after an attempt to set up a connection has failed. The default value is .
Maximum Number of Di- Enter the number of unsuccessful attempts to setup a connecalup Retries
tion before the interface is blocked.
Possible values are to .
The default value is .
Authentication
Select the authentication protocol for this connection partner.
Select the authentication specified by your provider.
Possible values:
• 1 (default value) Only run 1 (PPP Password Authentication Protocol); the password is transferred unencrypted.
• :>1: Only run :>1 (PPP Challenge Handshake Authentication Protocol as per RFC 1994); the password is transferred
encrypted.
• 16:>1: Primarily run CHAP, otherwise PAP.
• (-!:>1: Only run MS-CHAP version 1 (PPP Microsoft
Challenge Handshake Authentication Protocol).
• 16:>16(-!:>1 : Primarily run CHAP, on denial then
bintec R200-Serie
167
13 WAN
Funkwerk Enterprise Communications GmbH
Field
Description
the authentication protocol required by the connection partner.
(MSCHAP version 1 or 2 possible.)
• (-!:>1: Run MS-CHAP version 2 only.
DNS Negotiation
Select whether your device receives IP addresses for primary
DNS server and secondary DNS server from the connection
partner or sends these to the connection partner.
The function is activated with #/.
The function is enabled by default.
Prioritize TCP ACK
Packets
Select whether the TCP download is to be optimised in the
event of intensive TCP upload. This function can be specially
applied for asymmetrical bandwidths (ADSL).
The function is activated with #/.
The function is disabled by default.
LCP Alive Check
Check whether the availability of the remote terminal is to be
checked by sending LCP echo requests or replies. This makes
it possible to switch to a backup connection more quickly in the
event of line faults.
The function is activated with #/.
The function is disabled by default.
13.1.2 PPTP
In the WAN -> Internet + Dialup -> PPTP menu, a list of all PPTP interfaces is shown.
In this menu, you configure an Internet connection that uses the Point Tunnelling Protocol
(PPTP) to set up a connection, e.g. required in Austria.
13.1.2.1 New
Choose the New button to set up new PPTP interfaces.
168
bintec R200-Serie
13 WAN
Funkwerk Enterprise Communications GmbH
Fig. 66: WAN -> Internet + Dialup ->PPTP -> New
The WAN -> Internet + Dialup -> PPTP-> New menu consists of the following fields:
Fields in the PPTP Basic Parameters menu
Field
Description
Description
Enter a name for uniquely identifying the internet connection.
The first character in this field must not be a number and no
special characters or umlauts must be used either.
PPTP Interface
Select the IP interface over which packets are to be transported
to the remote PPTP terminal.
If you want to use an external DSL modem, select the Ethernet
port to which the modem is connected.
bintec R200-Serie
169
13 WAN
Funkwerk Enterprise Communications GmbH
Field
Description
When using the internal DSL modem, select here the EthoA interface, e.g. !, configured for this connection in
Physical Interfaces-> ATM-> Profiles-> New.
The default value is * &,%.
User name
Enter the user name.
Password
Enter the password.
Always Active
Select whether the interface should always be activated.
The function is activated with #/.
The function is disabled by default.
Only activate this option if you have Internet access with a flatrate charge.
Connection Idle Timeout Only if Always on is disabled.
Enter the idle interval in seconds. This determines how many
seconds should pass between sending the last traffic data packet and clearing the connection.
Possible values are to ' (seconds). deactivates the
timeout.
The default value is '.
Example: for FTP transmission, for LAN-to-LAN transmission, for Internet connections.
Fields in the PPTP IP Mode and Routes menu
Field
Description
IP Address Mode
Select whether your device is to be assigned a static IP address
or whether it should be assigned this dynamically.
Possible values:
• 1&& (default value): Your device is automatically assigned a temporarily valid IP address from the provider.
• -%: You enter a static IP address.
170
bintec R200-Serie
13 WAN
Funkwerk Enterprise Communications GmbH
Field
Description
Standard Route
Select whether the route to this connection partner is to be
defined as the default route.
The function is activated with #/.
The function is enabled by default.
Create NAT Policy
Specify whether Network Address Translation (NAT) is to be activated.
The function is activated with #/.
The function is enabled by default.
Local IP Address
Only for IP Address Mode = -%
Assign an IP address from your LAN to the PPT interface, which
is to be used as your device's internal source address.
Route Entries
Only if IP Address Mode = -%
Define other routing entries for this PPTP partner.
Add a new entry with Add.
• ? 1&&: IP address of the destination host or
destination network.
• *&: Netmask of Remote IP Address. If no entry is
made, your device uses a default netmask.
• (%: The lower the value, the higher the priority of the
route (possible values ... ). The default value is .
The Advanced Settingsmenu consists of the following fields:
Fields in the menu Advanced Settings
Field
Description
Block after Connection
Failure for
Enter the wait time in seconds before the device should try
again after an attempt to set up a connection has failed. The default value is .
Maximum Number of Di- Enter the number of unsuccessful attempts to setup a connecalup Retries
tion before the interface is blocked.
bintec R200-Serie
171
13 WAN
Funkwerk Enterprise Communications GmbH
Field
Description
Possible values are to .
The default value is .
Authentication
Select the authentication protocol for this Internet connection.
Select the authentication specified by your provider.
Possible values:
• 1 (default value) Only run 1 (PPP Password Authentication Protocol); the password is transferred unencrypted.
• :>1: Only run :>1 (PPP Challenge Handshake Authentication Protocol as per RFC 1994); the password is transferred
encrypted.
• 16:>1: Primarily run CHAP, otherwise PAP.
• (-!:>1: Only run MS-CHAP version 1 (PPP Microsoft
Challenge Handshake Authentication Protocol).
• 16:>16(-!:>1 : Run primarily CHAP, if denied then
the authentication protocol required by the PPTP partner
(MSCHAP version 1 or 2 possible).
• (-!:>1: Run MS-CHAP version 2 only.
DNS Negotiation
Select whether your device receives IP addresses for primary
DNS server and secondary DNS server from the connection
partner or sends these to the connection partner.
The function is activated with #/.
The function is enabled by default.
Prioritize TCP ACK
Packets
Select whether the TCP download is to be optimised in the
event of intensive TCP upload. This function can be specially
applied for asymmetrical bandwidths (ADSL).
The function is activated with #/.
The function is disabled by default.
PPTP Address Mode
Displays the address mode. The value cannot be changed.
Possible values:
• -%: The IP address of the Ethernet port selected in
172
bintec R200-Serie
13 WAN
Funkwerk Enterprise Communications GmbH
Field
Description
PPTP Interface will be used.
Local PPTP IP Address
Assign the PPTP interface an IP address that is used as the
source address.
The default value is .
Remote PPTP IP Address
Enter the IP address of the PPTP partner.
LCP Alive Check
Check whether the availability of the remote terminal is to be
checked by sending LCP echo requests or replies. This makes
it possible to switch to a backup connection more quickly in the
event of line faults.
The default value is '.
The function is activated with #/.
The function is disabled by default.
13.1.3 PPPoA
In the WAN -> Internet + Dialup -> PPPoA menu, a list of all PPPoA interfaces is shown.
In this menu, you configure a xDSL connection used to set up PPPoA connections. With
PPPoA, the connection is configured so that the PPP data flow is transported directly over
an ATM network (RFC 2364). This is required by some providers. Note your provider's specifications.
When using the internal DSL modem, select here a PPPoA interface must be configured
for this connection in WAN -> ATM -> Profiles -> New with Client Type = = .
13.1.3.1 New
Choose the New button to set up new PPPoA interfaces.
bintec R200-Serie
173
13 WAN
Funkwerk Enterprise Communications GmbH
Fig. 67: WAN -> Internet + Dialup ->PPPoA -> New
The WAN -> Internet + Dialup -> PPPoA-> New menu consists of the following fields:
Fields in the PPPoA Basic Parameters menu
174
Field
Description
Description
Enter a name for uniquely identifying the connection partner.
The first character in this field must not be a number and no
special characters or umlauts must be used either.
ATM PVC
Select an ATM profile created in the ATM -> Profiles menu, indicated by the global identifiers VPI and VCI specified by the
provider.
User name
Enter the user name.
Password
Enter the password for the PPPoA connection.
Always Active
Select whether the interface should always be activated.
bintec R200-Serie
13 WAN
Funkwerk Enterprise Communications GmbH
Field
Description
The function is activated with #/.
The function is disabled by default.
Only activate this option if you have Internet access with a flatrate charge.
Connection Idle Timeout Only if Always on is disabled.
Enter the idle time in seconds for static short hold. The static
short hold setting determines how many seconds should pass
between sending the last traffic data packet and clearing the
connection.
Possible values are to ' (seconds). deactivates the
short hold.
The default value is '.
Example: for FTP transmission, for LAN-to-LAN transmission, for Internet connections.
Fields in the PPPoA IP Mode and Routes menu
Field
Description
IP Address Mode
Choose whether your device has a static IP address or is assigned one dynamically.
Possible values:
• 1&& (default value): Your device is dynamically assigned an IP address.
• -%: You enter a static IP address.
Standard Route
Select whether the route to this connection partner is to be
defined as the default route.
The function is activated with #/.
The function is enabled by default.
Create NAT Policy
Specify whether Network Address Translation (NAT) is to be activated.
The function is activated with #/.
bintec R200-Serie
175
13 WAN
Funkwerk Enterprise Communications GmbH
Field
Description
The function is enabled by default.
Local IP Address
Only if IP Address Mode = -%
Enter the static IP address you received from your provider.
Route Entries
Only if IP Address Mode = -%
Define other routing entries for this connection partner.
Add a new entry with Add.
• ? 1&&: IP address of the destination host or
LAN.
• *&: Netmask of Remote IP Address.
• (%: The lower the value, the higher the priority of the
route (possible values ). The default value is .
The Advanced Settingsmenu consists of the following fields:
Fields in the menu Advanced Settings
Field
Description
Block after Connection
Failure for
Enter the wait time in seconds before the device should try
again after an attempt to set up a connection has failed. The default value is .
Maximum Number of Di- Enter the number of unsuccessful attempts to setup a connecalup Retries
tion before the interface is blocked.
Possible values are to .
The default value is .
Authentication
Select the authentication protocol for this Internet connection.
Select the authentication specified by your provider.
Possible values:
• 1 (default value) Only run 1 (PPP Password Authentication Protocol); the password is transferred unencrypted.
• :>1: Only run :>1 (PPP Challenge Handshake Authentication Protocol as per RFC 1994); the password is transferred
encrypted.
176
bintec R200-Serie
13 WAN
Funkwerk Enterprise Communications GmbH
Field
Description
• 16:>1: Primarily run CHAP, otherwise PAP.
• (-!:>1: Only run MS-CHAP version 1 (PPP Microsoft
Challenge Handshake Authentication Protocol).
• 16:>16(-!:>1 : Primarily run CHAP, on denial, the authentication protocol required by the PPTP partner. (MSCHAP
version 1 or 2 possible.)
• (-!:>1: Run MS-CHAP version 2 only.
DNS Negotiation
Select whether your device receives IP addresses for primary
domain name server and secondary domain name server
from the connection partner or sends these to the connection
partner.
The function is activated with #/.
The function is enabled by default.
Prioritize TCP ACK
Packets
Select whether the TCP download is to be optimised in the
event of intensive TCP upload. This function can be specially
applied for asymmetrical bandwidths (ADSL).
The function is activated with #/.
The function is disabled by default.
LCP Alive Check
Check whether the availability of the remote terminal is to be
checked by sending LCP echo requests or replies. This is recommended for leased lines, PPTP and L2TP connections.
The function is activated with #/.
The function is disabled by default.
13.1.4 ISDN
In the WAN -> Internet + Dialup -> ISDN menu, a list of all ISDN interfaces is shown.
In this menu, you configure the following ISDN connections:
• Internet access over ISDN
• LAN-to-LAN connection over ISDN
• Remote (Mobile) Dialin
bintec R200-Serie
177
13 WAN
Funkwerk Enterprise Communications GmbH
• Use of the ISDN Callback function
13.1.4.1 New
Choose the New button to set up new ISDN interfaces.
Fig. 68: WAN -> Internet + Dialup ->ISDN -> New
178
bintec R200-Serie
13 WAN
Funkwerk Enterprise Communications GmbH
The WAN -> Internet + Dialup -> ISDN-> New menu consists of the following fields:
Fields in the ISDN Basic Parameters menu
Field
Description
Description
Enter a name for uniquely identifying the connection partner.
The first character in this field must not be a number and no
special characters or umlauts must be used either.
Connection Type
Select which layer 1 protocol your device should use.
This setting applies for outgoing connections to the connection
partner and only for incoming connections from the connection
partner if they could be identified on the basis of the calling
party number.
Possible values:
• -;* #,&: For 64-kbps ISDN data connections.
• -;* #,&: For 56-kbps ISDN data connections.
User name
Enter your device code (local PPP user name).
Remote User (for Dialin
only)
Enter the code of the remote terminal (remote PPP user name).
Password
Enter the password.
Always Active
Select whether the interface should always be activated.
The function is activated with #/.
The function is disabled by default.
Only activate this option if you have Internet access with a flatrate charge.
Connection Idle Timeout Enter the idle time in seconds for static short hold. The static
short hold setting determines how many seconds should pass
between sending the last traffic data packet and clearing the
connection.
Possible values are ! to ' (seconds). A value of ! means
that the connection is set up again immediately after disconnection and deactivates short hold. The default value is .
bintec R200-Serie
179
13 WAN
Funkwerk Enterprise Communications GmbH
Fields in the ISDN IP Mode and Routes menu
Field
Description
IP Address Mode
Select whether your device is to be assigned a static IP address
or whether it should be assigned this dynamically.
Possible values:
• -% (default value): You enter a static IP address.
• 1&&: Your device dynamically assigns an
IP address to the remote terminal.
• 1&&: Your device is dynamically assigned an
IP address.
Standard Route
Only if IP Address Mode = -%
and 1&&
Select whether the route to this connection partner is to be
defined as the default route.
The function is activated with #/.
The function is disabled by default.
Create NAT Policy
Only if IP Address Mode = -%
and 1&&
When you configure an ISDN connection, specify whether Network Address Translation (NAT) is to be enabled.
The function is activated with #/.
The function is disabled by default.
Local IP Address
Only if IP Address Mode = -%
Assign the IP address from your LAN to the ISDN interface
which is to be used as your device's internal source address.
Route Entries
Only if IP Address Mode = -%
Define routing entries for this connection partner.
• ? 1&&: IP address of the destination host or
LAN.
180
bintec R200-Serie
13 WAN
Funkwerk Enterprise Communications GmbH
Field
Description
• *&: Netmask of Remote IP Address.
• (%: The lower the value, the higher the priority of the
route (possible values ). The default value is .
IP Assignment Pool
Only if IP Address Mode = 1&&
Select an IP pool configured in the WAN->Internet +
Dialup->IP Pools menu. If an IP pool has not been configured
here yet, the message * ) appears in this field.
The Advanced Settingsmenu consists of the following fields:
Fields in the menu Advanced Settings
Field
Description
Block after Connection
Failure for
Enter the wait time in seconds before the device should try
again after an attempt to set up a connection has failed.
The default value is .
Maximum Number of Di- Enter the number of unsuccessful attempts to setup a connecalup Retries
tion before the interface is blocked.
Possible values are to .
The default value is .
Usage Type
If necessary, select a special interface use.
Possible values:
• - (default value): No special type is selected.
• ;/ /) : The interface is used for incoming dialup
connections and callbacks initiated externally.
• (
/!<& ;/ /)" : The interface is defined as
multi-user connection partner, i.e. several clients dial in with
the same user name and password.
Authentication
Select the authentication protocol for this PPTP partner.
Possible values:
• 16:>16(-!:>1 (default value): Primarily run CHAP, on
denial, the authentication protocol required by the PPTP part-
bintec R200-Serie
181
13 WAN
Funkwerk Enterprise Communications GmbH
Field
Description
ner. (MSCHAP version 1 or 2 possible.)
• 1: Only run 1 (PPP Password Authentication Protocol);
the password is transferred unencrypted.
• :>1: Only run :>1 (PPP Challenge Handshake Authentication Protocol as per RFC 1994); the password is transferred
encrypted.
• 16:>1: Primarily run CHAP, otherwise PAP.
• (-!:>1: Only run MS-CHAP version 1 (PPP Microsoft
Challenge Handshake Authentication Protocol).
• (-!:>1: Run MS-CHAP version 2 only.
Encryption
Only if Authentication = (-!:>1
If necessary, select the type of encryption that should be used
for data traffic to the connection partner. This is only possible if
STAC or MS-STAC compression is not activated for the connection. If Encryption is set, the remote terminal must also support it, otherwise a connection cannot be set up.
Possible values:
• * (default value): MPP encryption is not used.
• #/. MPP encryption V2 with 128 bit is used to RFC
3078.
• 0& %,#/: MPP encryption V2 with 128 bit is
used as compatible with Microsoft and Cisco.
Callback Mode
Select the Callback Mode function.
Possible values:
• * (default value): Your device does not call back.
• 1%: Select one of the following options:
• * *$: Your device calls the connection
partner to request a callback.
• 0& :/ (: Your device calls the connection
partner to request a callback via CBCP (Callback Control
Protocol). Needed for Windows clients.
• &&: Select one of the following options:
• #/. Your device calls back immediately when re-
182
bintec R200-Serie
13 WAN
Funkwerk Enterprise Communications GmbH
Field
Description
quested to do so by the connection partner.
• 0& - ( : Your device calls back after a
period of time proposed by the Microsoft client (NT: 10
seconds, new systems: 12 seconds. It uses the subscriber
number (Entries-> Number (MSN)) with the Mode =
$!
$ or 3 that has been entered for the other party. If no
number is entered, the required number can be reported by
the caller in a PPP negotiation. This setting should be
avoided where possible for security reasons. Currently cannot be avoided for the connection of mobile Microsoft clients
via DCN.
• ;/)E :4; /) : Your device calls back after approx. four seconds if your device is requested to do so by
the connection partner. Only makes sense for CLID.
• 0& - (E ://#% ,/ : Like
0& - ( but with the option of aborting.
This setting should be avoided for security reasons. The Microsoft client also has the option of aborting callback and
maintaining the initial connection to your device without callback. This only applies if no fixed, outgoing number has
been configured for the connection partner. This is done by
pressing CANCEL to close the dialog box that appears.
Field in the Advanced Settings Options for On-demand Bandwidth menu
Field
Description
Channel Bundling
Select whether channel bundling is to be used for ISDN connections with the connection partner, and if so, what type.
Your device supports dynamic and static channel bundling for
dialup connections. Only one B-channel is initially opened when
a connection is set up. Dynamic channel bundling means that
your device connects other ISDN B-channels to increase the
throughput for connections if this is required, e.g. for large data
rates. If the amount of data traffic drops, the additional Bchannels are closed again. In static channel bundling, you specify right from the start how many B-channels your device is to
use, regardless of the transferred data rate.
Possible values:
• * (default value): No channel bundling, only one B-
bintec R200-Serie
183
13 WAN
Funkwerk Enterprise Communications GmbH
Field
Description
channel is ever available for connections.
• -%: Static channel bundling.
• ;)% : Dynamic channel bundling.
Fields in the Advanced Settings Dial Numbers menu
Field
Description
Entries
Enter the connection partner's numbers.
• Mode: Select whether Subscriber Number is to be used for
incoming or outgoing calls or for both. Possible values:
• 3 (default value): For incoming and outgoing calls.
• %$ : For incoming calls, where your connection
partner dials in to your device.
• =
$$ : For outgoing calls, where you dial your connection partner.
The calling party number of the incoming call is compared
with the number entered under Subscriber Number.
• Subscriber Number:
Enter the connection partner's number.
Fields in the Advanced Settings IP Options menu
Field
Description
OSPF Mode
Select whether and how routes are propagated via the interface
and/or OSPF protocol packets are sent.
Possible values:
• && (default value) OSPF is not activated for this interface, i.e. no routes are propagated or OSPF protocol packets
sent over this interface. Networks reachable over this interface are, however, included when calculating the routing information and propagated over active interfaces.
• 1%: OSPF is activated for this interface, i.e. routes are
propagated or OSPF protocol packets sent over this interface.
• ; : OSPF is disabled for this interface.
Proxy ARP
184
Select whether and how ARP requests from your own LAN are
bintec R200-Serie
13 WAN
Funkwerk Enterprise Communications GmbH
Field
Description
to be responded to for the specified connection partner.
Possible values:
• % (default value): Deactivates Proxy ARP for this
connection partner.
• <, ;: Your device only responds to an ARP request if the status of the connection to the connection partner
is <, or ;. In the case of ;, your device only
responds to the ARP request; the connection is not set up until someone actually wants to use the route.
• 1% =/): Your device responds to an ARP request only
if the status of the connection to the connection partner is <,
(active), i.e. a connection already exists to the connection
partner.
DNS Negotiation
Select whether your device receives IP addresses for primary
DNS server, secondary DNS server, primary WINS and secondary WINS from the connection partner or sends these to the
connection partner.
The function is activated with #/.
The function is enabled by default.
13.1.5 IP Pools
In the IP Pools menu a list of all IP pools is displayed.
Your device can operate as a dynamic IP address server for PPP connections. You can
use this function by providing one or more pools of IP addresses. These IP addresses can
be assigned to dialling-in connection partners for the duration of the connection.
Any host routes entered always have priority over IP addresses from the address pools.
This means if an incoming call has been authenticated, your device first checks whether a
host route is entered in the routing table for this caller. If not, your device can allocate an IP
address from an address pool (if available). If address pools have more than one IP address, you cannot specify which connection partner receives which address. The addresses are initially assigned in order. If a new dial-in takes place within an interval of one
hour, an attempt is made to allocate the same IP address assigned to this partner the last
time.
Use the Add button to set up new IP pools.
bintec R200-Serie
185
13 WAN
Funkwerk Enterprise Communications GmbH
Fig. 69: WAN -> Internet + Dialup ->IP Pools -> Add
The WAN -> Internet + Dialup -> IP Pools-> Add menu consists of the following fields:
Fields in the IP Pools menu
Field
Description
IP pool name
Enter the name of the IP pool.
IP pool range
In the first field, enter the first IP address of the range.
In the second field, enter the last IP address of the range.
13.2 ATM
13.2.1 Profiles
In the WAN -> ATM -> Profiles menu, a list of all ATM profiles is shown.
If the connection for your Internet access is set up using the internal modem, the ATM connection parameters must be set for this.
By default an ATM profile with the description 1<+=!:?1+; is preconfigured. Its values
(VPI 1 and VCI 32) are suitable for a Telekom ATM connection, for example.
186
bintec R200-Serie
13 WAN
Funkwerk Enterprise Communications GmbH
Note
The ATM encapsulations are described in RFCs 1483 and 2684. You will find the
RFCs on the relevant pages of the IETF (www.ietf.org/rfc.html ).
13.2.1.1 New
Choose the New button to set up new ATM profiles.
Fig. 70: WAN -> ATM -> Profiles -> New
The WAN -> ATM -> Profile-> New menu consists of the following fields:
Fields in the Profile ATM Profiles Parameter menu
Field
Description
Provider
Select one of the preconfigured ATM profiles for your provider
from the list or manually define the profile using ! <&!
-,% !.
Description
Only for Provider = ! <&! !
Enter the desired description for the connection.
bintec R200-Serie
187
13 WAN
Funkwerk Enterprise Communications GmbH
Field
Description
Type
Only for Provider = ! <&! !
Select the protocol for the ATM connection.
Possible values:
• 1+( (default value): Ethernet over ATM
(EthoA) is used for the ATM connection (Permanent Virtual
Circuit, PVC).
• ?
%/& 1+(: Routed Protocols over
ATM (RPoA) is used for the ATM connection (Permanent Virtual Circuit, PVC).
• 1+(: PPP over ATM (PPPoA) is used for the ATM
connection (Permanent Virtual Circuit, PVC).
Virtual Path Identifier
(VPI)
Only for Provider = ! <&! !
Enter the VPI value of the ATM connection. The VPI is the identification number of the virtual path to be used. Note your provider's instructions.
Possible values are to .
The default value is .
Virtual Channel Identifier Only for Provider = ! <&! !
(VCI)
Enter the VCI value of the ATM connection. The VCI is the identification number of the virtual channel. A virtual channel is the
logical connection for the transport of ATM cells between two or
more points. Note your provider's instructions.
Possible values are ' to '.
The default value is 32.
Encapsulation
Only for Provider = ! <&! !
Select the encapsulation to be used. Note your provider's instructions.
Possible values (in accordance with RFC 2684):
• 44: 3$ B:- (default value for Ethernet over
ATM): Only shown for Type = 1+(.
188
bintec R200-Serie
13 WAN
Funkwerk Enterprise Communications GmbH
Field
Description
Bridged Ethernet with LLC/SNAP encapsulation without
Frame Check Sequence (checksums).
• 44: 3$ B:- : Only shown for Type = 1+(.
Bridged Ethernet with LLC/SNAP encapsulation with Frame
Check Sequence (checksums).
• -= (default value for Routed Protocols over ATM):
Only shown for Type = ?
%/& 1+(.
Encapsulation with LLC/SNAP header, suitable for IP routing.
• 44:: Only shown for Type = 1+(.
Encapsulation with LLC header.
• 9: (
/,/D$ (default value for PPP over ATM):
Bridged Ethernet without additional encapsulation (Null Encapsulation) with Frame Check Sequence (checksums).
Fields in the Settings for Ethernet over ATM menu (only shown for Type = Ethernet
over ATM)
Field
Description
Default Ethernet for
PPPoE Interfaces
Only for Type = 1+(
Select whether this Ethernet-over-ATM interface is to be used
for all PPPoE connections
The function is activated with #/.
The function is disabled by default.
Address mode
Only for Type = 1+(
Select how an IP address is to be assigned to the interface.
Possible values:
• -% (default value): A static IP address is assigned to the
interface in IP Address/Netmask.
• ;>:: An IP address is assigned to the interface dynamically
via DHCP.
IP Address/Netmask
bintec R200-Serie
Only if Address Mode = -%
189
13 WAN
Funkwerk Enterprise Communications GmbH
Field
Description
Enter the IP addresses (IP Address) and the corresponding
netmasks (Netmask) of the ATM interfaces. Add new entries
with Add.
MAC address
Enter a MAC address for the internal router interface of ATM
connection, e.g. 5555#5'. An entry is only required in special cases.
For Internet connections, it is sufficient to select the <& !
%$
option (default setting), in which case the MAC
address of ! is used.
DHCP MAC Address
Only if Address Mode = ;>:
Enter the MAC address of the internal router interface of ATM
connection, e.g. 5555#5'.
If your provider has assigned you an MAC address for DHCP,
enter this here.
You can select the <& !%$
option (default setting), in which case the MAC address of ! is used.
DHCP Hostname
Only if Address Mode = ;>:
If necessary, enter the host name registered with the provider to
be used by your device for DHCP requests.
The maximum length of the entry is 45 characters.
Fields in the Settings for Routed Protocols over ATM menu (only shown for Type =
Routed Protocols over ATM)
Field
Description
IP Address/Netmask
Enter the IP addresses (IP Address) and the corresponding
netmasks (Netmask) of the ATM interface. Add new entries
with Add.
Prioritize TCP ACK
Packets
Select whether the TCP download is to be optimised in the
event of intensive TCP upload. This function can be specially
applied for asymmetrical bandwidths (ADSL).
The function is activated with #/.
190
bintec R200-Serie
13 WAN
Funkwerk Enterprise Communications GmbH
Field
Description
The function is disabled by default.
Fields in the Settings for PPP over ATM menu (only shown for Type = PPP over ATM)
Field
Description
Client Type
Select whether the PPPoA connection is to be set up permanently or on demand.
Possible values:
• = (default value): The PPPoA is only set up on demand, e.g. for Internet access.
13.2.2 Service Categories
In the WAN -> ATM -> Service Categories menu, a list of ATM connections (PVC, Permanent Virtual Circuit) already configured with specific assigned data traffic parameters is
shown.
Your device supports QoS (Quality of Service) for ATM interfaces.
Caution
ATM QoS should only be used if your provider specifies a list of data traffic parameters
(traffic contract).
The configuration of ATM QoS requires extensive knowledge of ATM technology and
the way the bintec devices function. An incorrect configuration can cause considerable disruption during operation. If applicable, save the original configuration on your
PC.
13.2.2.1 New
Choose the New button to set up new categories.
bintec R200-Serie
191
13 WAN
Funkwerk Enterprise Communications GmbH
Fig. 71: WAN -> ATM -> Service Categories-> New
The WAN -> ATM -> Service Categories-> New menu consists of the following fields:
Fields in the Service Categories Basic Parameters menu
Field
Description
Virtual Channel Connec- Select the already configured ATM connection (displayed by the
tion (VCC)
combination of VPI and VCI) for which the service category is to
be defined.
ATM Service Category
Select how the data traffic of the ATM connection is to be controlled.
When you select the ATM service category a priority is implicitly
assigned: from CBR
(highest priority) through VBR.1 /VBR.3 to VBR (lowest priority).
Possible settings:
• <&,% 3 ? <3?" (default value):
(Unspecified Bit Rate) A particular data rate is not guaranteed
for the connection. The Peak Cell Rate (PCR) defines the limit above which data is discarded. This category is suitable for
non-critical applications.
• :& 3 ? :3?" : (Constant Bit Rate) The connection is assigned a guaranteed data rate determined by the
Peak Cell Rate (PCR) . This category is suitable for critical
(real-time) applications that require a guaranteed data rate.
192
bintec R200-Serie
13 WAN
Funkwerk Enterprise Communications GmbH
Field
Description
• 9#/ 3 ? 9 93?" : (Variable Bit Rate)
The connection is assigned a guaranteed data rate (Sustained Cell Rate (SCR)). This may be exceeded by the
volume configured in Maximum Burst Size. Any additional
ATM traffic is discarded. The Peak Cell Rate (PCR) represents the maximum possible data rate. This category is suitable for non-critical applications with burst data traffic.
• 9#/ 3 ? 9' 93?'" : (Variable Bit Rate)
The connection is assigned a guaranteed data rate (Sustained Cell Rate (SCR)). This may be exceeded by the
volume configured in Maximum Burst Size (MBS). Additional
ATM traffic is marked and handled with low priority based on
the utilisation of the destination network, i.e. is discarded if necessary. The Peak Cell Rate (PCR) represents the maximum
possible data rate. This category is suitable for critical applications with burst data traffic.
Peak Cell Rate (PCR)
Enter a value for the maximum data rate in bits per second.
Possible values: to .
The default value is .
Sustained Cell Rate
(SCR)
Only for ATM Service Category = 9#/ 3 ? 9
93?" or 9#/ 3 ? 9' 93?'"
Enter a value for the minimum available, guaranteed data rate
in bits per second.
Possible values: to .
The default value is .
Maximum burst size
(MBS)
Only for ATM Service Category = 9#/ 3 ? 9
93?" or 9#/ 3 ? 9' 93?'"
Enter a value for the maximum number of bits per second by
which the PCR can be exceeded briefly.
Possible values: to .
The default value is .
bintec R200-Serie
193
13 WAN
Funkwerk Enterprise Communications GmbH
13.2.3 OAM Controlling
OAM is a service for monitoring ATM connections. A total of five hierarchies (flow level F1
to F5) are defined for OAM information flow. The most important information flows for an
ATM connection are F4 and F5. The F4 information flow concerns the virtual path (VP) and
the F5 information flow the virtual channel (VC). The VP is defined by the VPI value, the
VC by VPI and VCI.
Note
Generally, monitoring is not carried out by the terminal but is initiated by the ISP. Your
device then only needs to react correctly to the signals received. This is ensured
without a specific OAM configuration for both flow level 4 and flow level 5.
Two mechanisms are available for monitoring the ATM connection: Loopback Tests and
OAM Continuity Check (OAM CC). These can be configured independently of each other.
Caution
The configuration of OAM requires extensive knowledge of ATM technology and the
way the bintec devices functions. An incorrect configuration can cause considerable
disruption during operation. If applicable, save the original configuration on your PC.
In the WAN -> ATM -> OAM Control menu, a list of all monitored OAM flow levels is
shown.
13.2.3.1 New
Choose the New button to set up monitoring for other flow levels.
194
bintec R200-Serie
13 WAN
Funkwerk Enterprise Communications GmbH
Fig. 72: WAN -> ATM -> OAM Control -> New
The WAN -> ATM -> OAM Control-> New menu consists of the following fields:
Fields in the OAM Control OAM Flow Configuration
Field
Description
OAM Flow Level
Select the OAM flow level to be monitored.
Possible values:
• : (virtual channel level) The OAM settings are used for the
virtual channel (default value).
• : (virtual path level) The OAM settings are used for the virtual path.
Virtual Channel Connec- Only for OAM Flow Level = tion (VCC)
Select the already configured ATM connection to be monitored
(displayed by the combination of VPI and VCI).
Virtual Path Connection
(VPC)
Only for OAM Flow Level = Select the already configured virtual path connection to be monitored (displayed by the VPI).
Fields in the OAM Control Loopback
bintec R200-Serie
195
13 WAN
Funkwerk Enterprise Communications GmbH
Field
Description
Loopback End-to-End
Select whether you activate the loopback test for the connection
between the endpoints of the VCC or VPC.
The function is activated with #/.
The function is disabled by default.
End-to-End Send Interval
Only if Loopback End-to-End is enabled.
Enter the time in seconds after which a loopback cell is to be
sent.
Possible values are to .
The default value is 5.
End-to-End Pending Re- Only if Loopback End-to-End is enabled.
quests
Enter the number of directly consecutive loopback cells that
may fail to materialise before the connection is regarded as interrupted ("down"). Possible values are to .
The default value is .
Loopback Segment
Select whether you want to activate the loopback test for the
segment connection (segment = connection of the local endpoint to the next connection point) of the VCC or VPC.
The function is activated with #/.
The function is disabled by default.
Segment Send Interval
Only if Loopback Segment is enabled.
Enter the time in seconds after which a loopback cell is sent.
Possible values are to .
The default value is .
Segment Pending Requests
196
Only if Loopback Segment is enabled.
Enter the number of directly consecutive loopback cells that
may fail to materialise before the connection is regarded as interrupted ("down").
bintec R200-Serie
13 WAN
Funkwerk Enterprise Communications GmbH
Field
Description
Possible values are to .
The default value is .
Fields in the OAM Control CC Activation
Field
Description
Continuity Check (CC)
End-to-End
Select whether you activate the OAM-CC test for the connection
between the endpoints of the VCC or VPC.
Possible values:
• && (default value) OAM CC requests are responded to
after CC negotiation (CC activation negotiation).
• 1%: OAM CC requests are sent after CC negotiation (CC
activation negotiation).
• 3 : OAM CC requests are sent and answered after CC negotiation (CC activation negotiation).
• * $: Depending on the setting in the Direction
field, OAM CC requests are either sent and/or responded to.
There is no CC negotiation.
• *: The function is disabled.
Also select whether the test cells of the OAM CC are to be sent
or received.
Possible values:
• 3 (default value): CC data is both received and generated.
• ;&: CC data is received.
• -
%: CC data is generated.
Continuity Check (CC)
Segment
Select whether you want to activate the OAM-CC test for the
segment connection (segment = connection of the local endpoint to the next connection point) of the VCC or VPC.
Possible values:
• && (default value) OAM CC requests are responded to
after CC negotiation (CC activation negotiation).
• 1%: OAM CC requests are sent after CC negotiation (CC
activation negotiation).
bintec R200-Serie
197
13 WAN
Funkwerk Enterprise Communications GmbH
Field
Description
• 3 : OAM CC requests are sent and answered after CC negotiation (CC activation negotiation).
• * $: Depending on the setting in the Direction
field, OAM CC requests are either sent and/or responded to.
There is no CC negotiation.
• *: The function is disabled.
Also select whether the test cells of the OAM CC are to be sent
or received.
Possible settings:
• 3 (default value): CC data is both received and generated.
• ;&: CC data is received.
• -
%: CC data is generated.
13.3 Real Time Jitter Control
When telephoning over the Internet, voice data packets normally have the highest priority.
Nevertheless, if the upstream bandwidth is low, noticeable delays in voice transmission can
occur when other packets are routed at the same time.
The real time jitter control function solves this problem. So that the "line" is not blocked for
too long for the voice data packets, the size of the other packets can be reduced, if required, during a telephone call.
13.3.1 Controlled interfaces
In the WAN -> Real Time Jitter Control ->Regulated Interfaces menu, a list of all interfaces is shown for which the real time jitter control has been configured.
13.3.1.1 New
Click o the New button to set up portforwarding for other interfaces.
198
bintec R200-Serie
13 WAN
Funkwerk Enterprise Communications GmbH
Fig. 73: WAN -> Real Time Jitter Control -> Regulated Interfaces -> New
The WAN -> Real Time Jitter Control -> Regulated Interfaces -> New menu consists of
the following fields:
Fields in the Regulated InterfacesBasic Settings menu
Field
Description
Interface
Define for which interfaces voice transmission is to be optimised.
Control Mode
Select the mode for the optimisation.
Possible values:
• =/) :// ?+ -&(default value): By
means of the data routed via the media gateway, the system
detects voice data traffic and optimises the voice transmission.
• 1// ?+ -&: All RTP streams are optimised.
• ; : Voice data transmission is not optimised.
• 1/)&: Voice data transmission is always optimised.
Maximum Upstream
Speed
bintec R200-Serie
Enter the maximum available upstream bandwidth in kbps for
the selected interface.
199
14 VPN
Funkwerk Enterprise Communications GmbH
Chapter 14 VPN
14.1 IPSec
IPSec enables secure connections to be set up between two locations (VPN). This enables
sensitive business data to be transferred via an unsecure medium such as the Internet.
The devices use function here as the endpoints of the VPN tunnel. IPSec involves a number of Internet Internet Engineering Task Force (IETF) standards, which specify mechanisms for the protection and authentication of IP packets. IPSec offers mechanisms for encrypting and decrypting the data transferred in the IP packets. The IPSec implementation
can also be smoothly integrated in a Public Key Infrastructure (PKI). The bintec IPSec implementation achieves this firstly by using the Authentication Header (AH) protocol and Encapsulated Security Payload (ESP) protocol, and secondly through the use of cryptographic key key administration mechanisms like the Internet Key Exchange (IKE) protocol.
14.1.1 IPSec Peers
An endpoint of a communication is defined as peer in a computer network. Each peer offers its services and uses the services of other peers.
In the VPN -> IPSec -> IPSec Peers menu a list of all configured IPSec peers is shown.
Fig. 74: VPN -> IPSec ->IPSec Peers
200
bintec R200-Serie
14 VPN
Funkwerk Enterprise Communications GmbH
Peer Monitoring
The menu for monitoring a peer is called by selecting the
button for the peer in the peer
list. See Values in the list IPSec Tunnels on page 358.
14.1.1.1 New
Choose the New button to set up more IPSec peers.
Fig. 75: VPN -> IPSec ->IPSec Peers -> New
The VPN -> IPSec -> IPSec Peers-> New menu consists of the following fields:
bintec R200-Serie
201
14 VPN
Funkwerk Enterprise Communications GmbH
Fields in the IPSec Peers Peer Parameters menu
Field
Description
Administrative Status
Select the status to which you wish to set the peer after saving
the peer configuration.
Possible values:
• <, (default value): The peer is available for setting up a tunnel
immediately after saving the configuration.
• ; : The peer is initially not available after the configuration
has been saved.
Description
Enter a description of the peer that identifies it.
The maximum length of the entry is 255 characters.
Peer Address
Enter the official IP address of the peer or its resolvable host
name.
The entry can be omitted in certain configurations, whereby
your device then cannot initiate an IPSec connection.
Peer ID
Select the ID type and enter the peer ID.
This entry is not necessary in certain configurations.
The maximum length of the entry is 255 characters.
Possible ID types:
• B
//) 8
/ ; *
B8;*"
• !/ &&
• 9 1&&
• 1-* ;*
;&$
& *"
On the peer device, this ID corresponds to the parameter Local
ID Value.
Preshared Key
Enter the password agreed with the peer.
The maximum length of the entry is 50 characters. All characters are possible except for D at the start of the entry.
Fields in the IPSec Peers Interface Routes menu
202
bintec R200-Serie
14 VPN
Funkwerk Enterprise Communications GmbH
Field
IP Address Assignment
Description
Select the configuration mode of the interface.
Possible values:
• -% (default value): You enter a static IP address.
• 2 :$ (: Choose an IP address from the configured IP pool.
IP Assignment Pool
Only if IP Address Assignment = 2 :$ (
Select an IP pool configured in the VPN -> IP Pools menu. If an
IP pool has not been configured here yet, the message *
) appears in this field.
Standard Route
Only for IP Address Assignment = -%
Select whether the route to this IPSec peer is to be defined as
the default route.
The function is activated with #/.
The function is disabled by default.
Local IP Address
Only if Standard Route is #/.
Enter the WAN IP address of your IPSec tunnel. This can be the
same IP address as the address configured on your router as
the LAN IP address.
Route Entries
Define routing entries for this connection partner.
• ? 1&&: IP address of the destination host or
LAN.
• *&: Netmask for Destination IP Address.
• (%: The lower the value, the higher the priority of the
route (possible values ). The default value is .
The Advanced Settingsmenu consists of the following fields:
Fields in the Advanced Settings Advanced IPSec Options menu
bintec R200-Serie
Field
Description
Phase-1 Profile
For phase 1, select a profile already configured in the Phase-1
Profiles menu. You can also select the profile marked as the
203
14 VPN
Funkwerk Enterprise Communications GmbH
Field
Description
default in Phase-1 Profiles: ;
/ /.
Phase-2 Profile
For phase 2, select a profile already configured in the Phase-2
Profiles menu. You can also select the profile marked as the
default in Phase-2 Profiles: ;
/ /.
XAUTH Profile
Select a profile created in VPN -> IPSec -> XAUTH Profiles if
you wish to use this IPSec peer XAuth for authentication.
If XAuth is used together with IKE Config Mode, the transactions for XAuth are carried out before the transactions for IKE
Config Mode.
Usage Type
Select how to use this peer entry.
Possible values:
• - (default value): Only one peer can connect with
the data defined in this peer profile.
• (
/!<& ;/ =/)": Several peers can connect
with the data defined in this peer profile. For each connection
request with the data of this profile, the peer entry is duplicated.
Start mode
Select how the peer is to be switched to the active state.
Possible values:
• = (default value): The peer is switched to the active
state by a trigger.
• 1/)& : The peer is always active.
Fields in the Advanced Settings Advanced IP Options menu
Field
Description
Back Route Verify
Select whether a check on the back route should be activated
for the interface to the connection partner.
The function is activated with #/.
The function is disabled by default.
Proxy ARP
204
Select whether your device is to respond to ARP requests from
its own LAN on behalf of the specific connection partner.
bintec R200-Serie
14 VPN
Funkwerk Enterprise Communications GmbH
Field
Description
Possible values:
• = (default value) Deactivates Proxy ARP for this IPSec
peer.
• <, ;: Your device only responds to an ARP request if the status of the connection to the IPSec peer is <,
(active) or ;. In the case of ;, your device
only responds to the ARP request; the connection is not set
up until someone actually wants to use the route.
• 1% =/): Your device responds to an ARP request only
if the status of the connection to the IPSec peer is <, (active),
i.e. a connection already exists to the IPSec peer.
IPSec Callback
bintec devices support the DynDNS service to enable hosts without fixed IP addresses to
obtain a secure connection over the Internet. This service enables a peer to be identified
using a host name that can be resolved by DNS. You do not need to configure the IP address of the peer.
The DynDNS service does not signal whether a peer is actually online and cannot cause a
peer to set up an Internet connection to enable an IPSec tunnel over the Internet. This possibility is created with IPSec callback: Using a direct ISDN call to a peer, you can signal
that you are online and waiting for the peer to set up an IPSec tunnel over the Internet. If
the called peer currently has no connection to the Internet, the ISDN call causes a connection to be set up. This ISDN call costs nothing (depending on country), as it does not have
to be accepted by your device. The identification of the caller from his or her ISDN number
is enough information to initiate setting up a tunnel.
Before you can configure this service, you must first configure a number for IPSec callback
on the passive page in the Physical Interfaces -> ISDN Ports -> MSN Configuration ->
New menu. The value -% is available for this purpose in the Service field. This entry
ensures that incoming calls for this number are routed to the IPSec service.
If callback is active, the peer is caused to initiate setting up an IPSec tunnel by an ISDN
call as soon as this tunnel is required. With passive callback, the set-up of a tunnel to the
peer is always initiated if an ISDN call to the corresponding number ( MSN in the Physical
Interfaces -> ISDN Ports -> MSN Configuration -> New for Service -% menu) is received. This ensures that both peers are reachable and that the connection can be set up
over the Internet. The only case in which callback is not executed is if SAs (Security Associations) already exist, i.e. the tunnel to the peer already exists.
bintec R200-Serie
205
14 VPN
Funkwerk Enterprise Communications GmbH
Note
If a tunnel is to be set up to a peer, the interface over which the tunnel is to be implemented is activated first by the IPSec Daemon. If IPSec with DynDNS is configured on
the local device, the own IP address is propagated first and then the ISDN call is sent
to the remote device. This ensures that the remote device can actually reach the local
device if it initiates the tunnel setup.
Transfer of IP Address over ISDN
Transferring the IP address of a device over ISDN (in the D channel and/or B channel)
opens up new possibilities for the configuration of IPSec VPNs. This enables restrictions
that occur in IPSec configuration with dynamic IP addresses to be avoided.
Note
To use the IP address transfer over ISDN function, you must obtain a free-of-charge
extra licence.
You can obtain the licence data for extra licences via the online licensing pages in the
support section at www.funkwerk-ec.com . Please follow the online licensing instructions.
Before System Software Release 7.1.4, IPSec ISDN callback only supported tunnel setup if
the current IP address of the initiator could be determined by indirect means (e.g. via
DynDNS). However, DynDNS has serious disadvantages, such as the latency until the IP
address is actually updated in the database. This can mean that the IP address propagated
via DynDNS is not correct. This problem is avoided by transferring the IP address over
ISDN. This type of transfer of dynamic IP addresses also enables the more secure ID Protect mode (main mode) to be used for tunnel setup.
Method of operation: Various modes are available for transferring your own IP address to
the peer: The address can be transferred free in the D channel or in the B channel, but
here the call must be accepted by the remote station and therefore incurs costs. If a peer
whose IP address has been assigned dynamically wants to arrange for another peer to set
up an IPSec tunnel, it can transfer its own IP address as per the settings described in
Fields in the Advanced Settings IPSec Callback menu on page 207. Not all transfer modes
are supported by all telephone companies. If you are not sure, automatic selection by the
device can be used to ensure that all the available possibilities can be used.
206
bintec R200-Serie
14 VPN
Funkwerk Enterprise Communications GmbH
Note
The callback configuration on the two devices should be the same so your device of
the called peer can identify the IP address information.
The following roles are possible:
• One side takes on the active role, the other the passive role.
• Both sides can take on both roles (both).
The IP address transfer and the start of IKE phase 1 negotiation take place in the following
steps:
(1)
Peer A (the callback initiator) sets up a connection to the Internet in order to be assigned a dynamic IP address and be reachable for peer B over the Internet.
(2)
Your device creates a token with a limited validity and saves it together with the current IP address in the MIB entry belonging to peer B.
(3)
Your device sends the initial ISDN call to peer B, which transfers the IP address of
peer A and the token as per the callback configuration.
(4)
Peer B extracts the IP address of peer A and the token from the ISDN call and assigns them to peer A based on the calling party number configured (the ISDN number
used by peer A to send the initial call to peer B).
(5)
The IPSec Daemon at peer B's device can use the transferred IP address to initiate
phase 1 negotiation with peer A. Here the token is returned to peer A in part of the
payload in IKE negotiation.
(6)
Peer A is now able to compare the token returned by peer B with the entries in the
MIB and so identify the peer without knowing its IP address.
As peer A and peer B can now mutually identify each other, negotiations can also be conducted in the ID Protect mode using preshared keys.
Note
In some countries (e.g. Switzerland), the call in the D channel can also incur costs. An
incorrect configuration at the called side can mean that the called side opens the B
channel the calling side incurs costs.
Fields in the Advanced Settings IPSec Callback menu
bintec R200-Serie
Field
Description
Mode
Select the Callback Mode.
207
14 VPN
Funkwerk Enterprise Communications GmbH
Field
Description
Possible values:
• % (default value): IPSec callback is deactivated. The
local device neither reacts to incoming ISDN calls nor initiates
ISDN calls to the remote device.
• &&: The local device only reacts to incoming ISDN calls
and, if necessary, initiates setting up an IPSec tunnel to the
peer. No ISDN calls are sent to the remote device to cause
this to set up an IPSec tunnel.
• 1%: The local device sends an ISDN call to the remote
device to cause this to set up an IPSec tunnel. The device
does not react to incoming ISDN calls.
• 3 : Your device can react to incoming ISDN calls and
send ISDN calls to the remote device. The setting up of an
IPSec tunnel is executed (after an incoming ISDN call) and
initiated (by an outgoing ISDN call).
Incoming ISDN Number
Only for Mode = && or 3.
Enter the ISDN number from which the remote device calls the
local device (calling party number). Wildcards may also be
used.
Outgoing ISDN Number
Only for Mode = 1% or 3.
Enter the ISDN number with which the local device calls the remote device calls (called party number). Wildcards may also be
used.
Transfer Own IP Address over ISDN
Select whether the IP address of your own device is to be transferred over ISDN for IPSec callback.
The function is activated with #/.
The function is disabled by default.
Transfer Mode
Only if Transfer Own IP Address over ISDN = activated
Select the mode in which your device is to attempt to transfer its
IP address to the peer.
Possible values:
• 1
% 3& ( : Your device automatically de-
208
bintec R200-Serie
14 VPN
Funkwerk Enterprise Communications GmbH
Field
Description
termines the most favourable mode. It first tries all D channel
modes before switching to the B channel. (Costs are incurred
for using the B channel.)
• 1
% /) ; :/ (& : Your device automatically determines the most favourable D channel mode.
The use of the B channel is excluded.
• <& &,%% ; :/ ( : Your device tries to
transfer the IP address in the mode set in the D Channel
Mode field.
• +) &,%% ; :/ (E // #% 3
:/ : Your device tries to transfer the IP address in the
mode set in the D Channel Mode field. If this does not succeed, the IP address is transferred in the B channel. (This incurs costs.)
• <& /) 3 :/ ( : Your device transfers the IP
address in the B channel. This incurs costs.
D Channel Mode
Only if Transfer Mode = <& &,%% ; :/ (
or +) &,%% ; :/ (E B//#% 3
:/
Select the D channel mode in which your device tries to transfer
the IP address.
Possible values:
• 44: (default value): The IP address is transferred in the "LLC
information elements" of the D channel.
• -<31;;? : The IP address is transferred in the subaddress "information elements" of the D channel.
• 44: -<31;;? : The IP address is transferred in both
the "LLC" and "subaddress information elements".
14.1.2 Phase-1 Profiles
In the VPN -> IPSec -> Phase-1 Profiles menu a list of all configured IPSec phase-1 profiles is shown.
bintec R200-Serie
209
14 VPN
Funkwerk Enterprise Communications GmbH
Fig. 76: VPN -> IPSec -> Phase-1 Profiles
In the Standard column, you can mark the profile to be used as the default profile.
14.1.2.1 New
Choose the New button to set up new profiles.
210
bintec R200-Serie
14 VPN
Funkwerk Enterprise Communications GmbH
Fig. 77: VPN -> IPSec ->Phase-1 Profiles -> New
The VPN -> IPSec -> Phase-1 Profile-> New menu consists of the following fields:
Fields in the Phase-1 (IKE) Parameters menu
Field
Description
Description
Enter a description that uniquely defines the type of rule.
Proposals
In this field, you can select any combination of encryption and
message hash algorithms for IKE phase 1 on your device. The
combination of six encryption algorithms and four message
hash algorithms gives 24 possible values in this field. At least
one proposal must exist. Therefore the first line of the table cannot be deactivated.
Encryption algorithms (Encryption):
• ';- (default value): 3DES is an extension of the DES algorithm with an effective key length of 112 bits, which is rated
as secure. It is the slowest algorithm currently supported.
• +&: Twofish was a final candidate for the AES
bintec R200-Serie
211
14 VPN
Funkwerk Enterprise Communications GmbH
Field
Description
(Advanced Encryption Standard). It is rated as just as secure
as Rijndael (AES), but is slower.
• 3/&: Blowfish is a very secure and fast algorithm.
Twofish can be regarded as the successor to Blowfish.
• :1-+: CAST is also a very secure algorithm, marginally
slower than Blowfish, but faster than 3DES.
• ;-: DES is an older encryption algorithm, which is rated as
weak due to its small effective length of 56 bits.
• 1-: Rijndael has been nominated as AES due to its fast key
setup, low memory requirements, high level of security
against attacks and general speed.
• 1-!: Rijndael has been nominated as AES due to its
fast key setup, low memory requirements, high level of security against attacks and general speed. Here, it is used with a
key length of 128 bits.
• 1-!: Rijndael has been nominated as AES due to its
fast key setup, low memory requirements, high level of security against attacks and general speed. Here, it is used with a
key length of 192 bits.
• 1-!: Rijndael has been nominated as AES due to its
fast key setup, low memory requirements, high level of security against attacks and general speed. Here, it is used with a
key length of 256 bits.
Hash algorithms (Authentication):
• (; (default value): MD 5 (Message Digest #5) is an older
hash algorithm. It is used with a 96 bit digest length for IPSec.
• ->1 : SHA1 (Secure Hash Algorithm #1) is a hash algorithm
developed by the NSA (United States National Security Association). It is rated as secure, but is slower than MD5. It is
used with a 96 bit digest length for IPSec.
• ?,(; : RipeMD 160 is a 160 bit hash algorithm. It is
used as a secure replacement for MD5 and RipeMD.
• +$: Tiger 192 is a relatively new and very fast algorithm.
Please note that the description of the encryption and authentication or the hash algorithms is based on the author’s knowledge
and opinion at the time of creating this User Guide. In particular,
212
bintec R200-Serie
14 VPN
Funkwerk Enterprise Communications GmbH
Field
Description
the quality of the algorithms is subject to relative aspects and
may change due to mathematical or cryptographic developments.
DH Group
The Diffie-Hellman group defines the parameter set used as the
basis for the key calculation during phase 1. "MODP" as supported by bintec devices stands for "modular exponentiation".
Possible values:
• .!#": During the Diffie-Hellman key calculation,
modular exponentiation at 768 bits is used to create the encryption material.
• !#": During the Diffie-Hellman key calculation,
modular exponentiation at 1024 bits is used to create the encryption material.
• '!#": During the Diffie-Hellman key calculation,
modular exponentiation at 1536 bits is used to create the encryption material.
Lifetime
Create a lifetime for phase 1 keys.
As for RFC 2407, the default value is eight hours, which means
the key must be renewed once eight hours have elapsed.
The following options are available for defining the lifetime:
Entry in Seconds: Enter the lifetime for phase 1 key in seconds.
The value can be a whole number from 0 to 2147483647. The
default value is .
Entry in kBytes: Enter the lifetime for phase 1 keys as amount
of data processed in kBytes. The value can be a whole number
from 0 to 2147483647. The default value is .
The standard value as per RFC is used seconds and Kbytes are entered.
Authentication Method
Select the authentication method.
Possible values:
• & 2)& (default value): If you do not use certificates for the authentication, you can select Preshared Keys.
bintec R200-Serie
213
14 VPN
Funkwerk Enterprise Communications GmbH
Field
Description
These are configured during peer configuration in the IPSec
Peers menu. The preshared key is the shared password.
• ;-1 -$
: Phase 1 key calculations are authenticated
using the DSA algorithm.
• ?-1 -$
: Phase 1 key calculations are authenticated
using the RSA algorithm.
• ?-1 %),: In RSA encryption the ID payload is also
encrypted for additional security.
Local Certificate
Only if Authentication Method = ;-1 -$
, ?-1 -$!
or ?-1 %),
This field enables you to select one of your own certificates for
authentication. It shows the index number of this certificate and
the name under which it is saved. This field is only shown for
authentication settings based on certificates and indicates that a
certificate is essential.
Mode
Select the phase 1 mode.
Possible values:
• 1$$&& (default value): The Aggressive Mode is necessary if one of the peers does not have a static IP address and
preshared keys are used for authentication; it requires only
three messages for configuring a secure channel.
• ( ( ; %" : This mode (also designated
Main Mode) requires six messages for a Diffie-Hellman key
calculation and thus for configuring a secure channel, over
which the IPSec SAs can be negotiated. A condition is that
both peers have static IP addresses if preshared keys are
used for authentication.
Also define whether the selected mode is used exclusively
(Strict), or the peer can also propose another mode.
Local ID Type
Select the local ID type.
Possible values:
• B
//) 8
/ ; *
B8;*"
• !/ &&
214
bintec R200-Serie
14 VPN
Funkwerk Enterprise Communications GmbH
Field
Description
• 9 1&&
• 1-* ;*
Local ID Value
;&$
& *"
Enter the ID of your device.
For Authentication Method = ;-1 -$
, ?-1 -$!
, ?-1 %),, the <& -
#H% * :% option is shown.
If you enable the <& -
#H% * %%
option, the first alternative subject name indicated in the certificate is used, or, if none is specified, the subject name of the certificate is used.
Note: If you use certificates for authentication and your certificate contains alternative subject names (see Certificates on
page 250), you must make sure your device selects the first alternative subject name by default. Make sure you and your peer
both use the same name, i.e. that your local ID and the peer ID
your partner configures for you are identical.
Alive Check
During communication between two IPSec peers, one of the peers may become unavailable, e.g. due to routing problems or a reboot. However, this can only be detected when
the end of the lifetime of the security connection is reached. Up until this point the data
packets are lost. These are various methods of performing an alive check to prevent this
happening. In the Alive Check field you can specify whether a method should be used to
check the availability of a peer.
Two methods are available: Heartbeats and Dead Peer Detection.
The Advanced Settingsmenu consists of the following fields:
Fields in the menu Advanced Settings
Field
Description
Alive Check
Select the method to be used to check the functionality of the
IPSec connection.
In addition to the default method Dead Peer Detection (DPD),
the (proprietary) Heartbeat method is implemented. This sends
and receives signals every 5 seconds, depending on the configuration. If these signals are not received after 20 seconds, the
bintec R200-Serie
215
14 VPN
Funkwerk Enterprise Communications GmbH
Field
Description
SA is discarded as invalid.
Possible values:
• 1
% (default value): Your device detects and uses
the mode supported by the remote terminal.
• ; : Your device sends and expects no heartbeat. Set this
option if you use devices from other manufacturers.
• >#& D,% /)": Your device expects a
heartbeat from the peer but does not send one itself.
• >#& - /)": Your device expects no heartbeat from the peer, but sends one itself.
• >#& & I D,%": Your device expects a
heartbeat from the peer and sends one itself.
• ; ;%: Use DPD (dead peer detection) in
accordance with RFC 3706. DPD uses a request-reply protocol to check the availability of the remote terminal and can
be configured independently on both sides. This option only
checks the availability of the peer if data is to be sent to it.
• ; ;% /": Use DPD (dead peer detection) in accordance with RFC 3706. DPD uses a requestreply protocol to check the availability of the remote terminal
and can be configured independently on both sides. This option is used to carry out a check at certain intervals depending
on forthcoming data transfers.
Blocktime
Define how long a peer is blocked for tunnel setups after a
phase 1 tunnel setup has failed. This only affects locally initiated
setup attempts.
Possible values are ! to (seconds); ! means the
value in the default profile is used and means that the peer is
never blocked.
The default value is '.
NAT Traversal
NAT Traversal (NAT-T) also enables IPSec tunnels to be
opened via one or more devices on which network address
translation (NAT) is activated.
Without NAT-T, incompatibilities may arise between IPSec and
NAT (see RFC 3715, section 2). These primarily prevent the
216
bintec R200-Serie
14 VPN
Funkwerk Enterprise Communications GmbH
Field
Description
setup of an IPSec tunnel from a host within a LANs and behind
a NAT device to another host or device. NAT-T enables these
kinds of tunnels without conflicts with NAT device, activated
NAT is automatically detected by the IPSec Daemon and NAT-T
is used.
The function is activated with #/.
The function is enabled by default.
CA Certificates
Only if Authentication Method = ;-1 -$
, ?-1 -$!
or ?-1 %),
If you enable the +
& //$ :1 %%& option, you can select up to three additional CA certificates that
are accepted for this profile.
This option can only be configured if certificates are loaded.
14.1.3 Phase-2 Profiles
You can define profiles for phase 2 of the tunnel setup just as for phase 1.
In the VPN -> IPSec -> Phase-2 Profiles menu a list of all configured IPSec phase-2 profiles is shown.
bintec R200-Serie
217
14 VPN
Funkwerk Enterprise Communications GmbH
Fig. 78: VPN -> IPSec -> Phase-2 Profiles
In the Standard column, you can mark the profile to be used as the default profile.
14.1.3.1 New
Choose the New button to set up new profiles.
218
bintec R200-Serie
14 VPN
Funkwerk Enterprise Communications GmbH
Fig. 79: VPN -> IPSec ->Phase-2 Profiles -> New
The VPN -> IPSec -> Phase-2 Profile-> New menu consists of the following fields:
Fields in the Phase-2 Profile Phase-2 (IPSEC) Parameters menu
Field
Description
Description
Enter a description that uniquely identifies the profile.
The maximum length of the entry is 255 characters.
Proposal
In this field, you can select any combination of encryption and
message hash algorithms for IKE phase 2 on your default. The
combination of six encryption algorithms and two message hash
algorithms gives 12 possible values in this field.
Encryption algorithms (Encryption):
• ';- (default value): 3DES is an extension of the DES algorithm with an effective key length of 112 bits, which is rated
as secure. It is the slowest algorithm currently supported.
• !144!: All options can be used.
• 1-!: Rijndael has been nominated as AES due to its
fast key setup, low memory requirements, high level of security against attacks and general speed. Here, it is used with a
bintec R200-Serie
219
14 VPN
Funkwerk Enterprise Communications GmbH
Field
Description
key length of 128 bits.
• 1-!: Rijndael has been nominated as AES due to its
fast key setup, low memory requirements, high level of security against attacks and general speed. Here, it is used with a
key length of 192 bits.
• 1-!: Rijndael has been nominated as AES due to its
fast key setup, low memory requirements, high level of security against attacks and general speed. Here, it is used with a
key length of 256 bits.
• +&: Twofish was a final candidate for the AES
(Advanced Encryption Standard). It is rated as just as secure
as Rijndael (AES), but is slower.
• 3/&: Blowfish is a very secure and fast algorithm.
Twofish can be regarded as the successor to Blowfish.
• :1-+: CAST is also a very secure algorithm, marginally
slower than Blowfish, but faster than 3DES.
• ;-: DES is an older encryption algorithm, which is rated as
weak due to its small effective length of 56 bits.
Hash algorithms (Authentication):
• (; (default value): MD 5 (Message Digest #5) is an older
hash algorithm. It is used with a 96 bit digest length for IPSec.
• !144!: All options can be used.
• ->1 : SHA1 (Secure Hash Algorithm #1) is a hash algorithm developed by the NSA (United States National Security Association). It is rated as secure, but is slower than MD5.
It is used with a 96 bit digest length for IPSec.
Note that RipeMD 160 and Tiger 192 are not available for message hashing in phase 2.
Use PFS Group
As PFS (Perfect Forward Secrecy) requires another DiffieHellman key calculation to create new encryption material, you
must select the exponentiation features. If you enable PFS (
#/), the options are the same as for the configuration in
Phase 1: Group. PFS is used to protect the keys of a renewed
phase 2 SA, even if the keys of the phase 1 SA have become
known.
The field has the following options:
220
bintec R200-Serie
14 VPN
Funkwerk Enterprise Communications GmbH
Field
Description
• .!#": During the Diffie-Hellman key calculation,
modular exponentiation at 768 bits is used to create the encryption material.
• 3" (default value): During the Diffie-Hellman key
calculation, modular exponentiation at 1024 bits is used to
create the encryption material.
• '!#": During the Diffie-Hellman key calculation,
modular exponentiation at 1536 bits is used to create the encryption material.
Lifetime
Define how the lifetime is defined that will expire before phase 2
SAs need to be renewed.
The new SAs are negotiated shortly before expiry of the current
SAs. As for RFC 2407, the default value is eight hours, which
means the key must be renewed once eight hours have
elapsed.
The following options are available for defining the lifetime:
Entry in -%&: Enter the lifetime for phase 2 key in seconds.
The value can be a whole number from to .'. . The
default value is ..
Entry in 3)&: Enter the lifetime for phase 2 keys as amount
of data processed in Kbytes. The value can be a whole number
from to .'. . The default value is .
The Advanced Settingsmenu consists of the following fields:
Fields in the menu Advanced Settings
Field
Description
IP Compression
Select whether compression is to be activated before data encryption. If data is compressed effectively, this can result in
higher performance and a lower volume of data to be transferred. In the case of fast lines or data that cannot be compressed, you are advised against using this option as the performance can be significantly affected by the increased effort
during compression.
The function is activated with #/.
The function is disabled by default.
bintec R200-Serie
221
14 VPN
Funkwerk Enterprise Communications GmbH
Field
Description
Alive Check
Select whether and how IPSec heartbeats are used.
A bintec IPSec heartbeat is implemented to determine whether
or not a Security Association (SA) is still valid. This function
sends and receives signals every 5 seconds, depending on the
configuration. If these signals are not received after 20 seconds,
the SA is discarded as invalid.
Possible values:
• ; : Your device sends and expects no heartbeat. Set this
option if you use devices from other manufacturers.
• >#& D,% /)": Your device expects a
heartbeat from the peer but does not send one itself.
• >#& - /)": Your device expects no heartbeat from the peer, but sends one itself.
• >#& & I D,%": Your device expects a
heartbeat from the peer and sends one itself.
• 1
%: Automatic detection of whether the remote terminal is a bintec device. If it is, Heartbeat Both (for a remote
terminal with bintec) or None (for a remote terminal without
bintec) is set.
Propagate PMTU
Select whether the PMTU (Path Maximum Transfer Unit) is to
be propagated during phase 2.
The function is activated with #/.
The function is enabled by default.
14.1.4 XAUTH Profiles
In the XAUTH Profiles menu a list of all XAUTH profiles is displayed.
Extended Authentication for IPSec (XAuth) is an additional authentication method for IPSec
tunnel users.
The gateway can take on two different roles when using XAuth as it can act as a server or
as a client:
• As a server the gateway requires a proof of authorisation.
• As a client the gateway provides proof of authorisation.
222
bintec R200-Serie
14 VPN
Funkwerk Enterprise Communications GmbH
In server mode multiple users can obtain authentication via XAuth, e.g. users of Apple
iPhones. Authorisation is verified either on the basis of a list or via a Radius Server. If using
a one time password (OTP), the password check can be carried out by a token server (e.g.
SecOVID from Kobil), which is installed behind the Radius Server. If a company's
headquarters is connected to several branches via IPSec, several peers can be configured.
A specific user can then use the IPSec tunnel over various peers depending on the assignment of various profiles. This is useful, for example, if an employee works alternately in different branches, if each peer represents a branch and if the employee wishes to have onsite access to the tunnel.
XAuth is carried out once IPSec IKE (Phase 1) has been completed successfully and before IKE (Phase 2) begins.
If XAuth is used together with IKE Config Mode, the transactions for XAuth are carried out
before the transactions for IKE Config Mode.
14.1.4.1 New
Choose the New button to set up new profiles.
Fig. 80: VPN -> IPSec -> XAUTH Profiles -> New
The VPN->IPSec-> XAUTH Profiles -> New menu consists of the following fields:
Fields in the XAUTH Profiles Basic Parameters menu
bintec R200-Serie
Field
Description
Description
Enter a description for this XAuth profile.
223
14 VPN
Funkwerk Enterprise Communications GmbH
Field
Description
Role
Select the role of the gateway for XAuth authentication.
Possible values:
• - (default value): The gateway requires a proof of authorisation.
• :/: The gateway provides proof of authorisation.
Mode
Only if Role = -
Select how authentication is carried out.
Possible values:
• ?1;<- (default value): Authentication is carried out via a Radius server. This is configured in the System Management ->
Remote Authentication -> RADIUS menu and selected in
the RADIUS Server Group ID field.
• 4%/: Authentication is carried out via a local list.
Name
Only if Role = :/
Enter the authentication name of the client.
Password
Only if Role = :/
Enter the authentication password.
RADIUS Server Group
ID
Only if Role = -
Users
Only for Role = - and Mode = 4%/
Select the desired RADIUS group configured in System Management ->Remote Authentication -> RADIUS.
If your gateway is configured as an XAuth server, the clients
can be authenticated via a locally configured user list. Define
the members of the user group for this XAUTH profile by entering the authentication name of the client (Name) and the authentication password (Password). Add new members with
Add.
224
bintec R200-Serie
14 VPN
Funkwerk Enterprise Communications GmbH
14.1.5 IP Pools
In the IP Pools menu a list of all IP pools is displayed.
Your device can operate as a dynamic IP address server for PPP connections. You can
use this function by providing one or more pools of IP addresses. These IP addresses can
be assigned to dialling-in connection partners for the duration of the connection.
Any host routes entered always have priority over IP addresses from the address pools.
This means if an incoming call has been authenticated, your device first checks whether a
host route is entered in the routing table for this caller. If not, your device can allocate an IP
address from an address pool (if available). If address pools have more than one IP address, you cannot specify which connection partner receives which address. The addresses are initially assigned in order. If a new dial-in takes place within an interval of one
hour, an attempt is made to allocate the same IP address assigned to this partner the last
time.
Use the Add button to set up new IP pools.
Fig. 81: VPN -> IPSec -> IP Pools -> Add
The VPN -> IPSec -> IP Pools -> Add menu consists of the following fields:
Fields in the Options IP Pools menu
bintec R200-Serie
Field
Description
IP pool name
Enter the name of the IP pool.
225
14 VPN
Funkwerk Enterprise Communications GmbH
Field
Description
IP pool range
In the first field, enter the first IP address of the range.
In the second field, enter the last IP address of the range.
14.1.6 Options
Fig. 82: VPN -> IPSec ->Options
The VPN -> IPSec ->Options menu consists of the following fields:
Fields in the Options Global Options menu
Field
Description
Enable IPSec
Select whether you want to activate IPSec.
The function is activated with #/.
The function is active as soon as an IPSec Peer is configured.
Delete complete IPsec
configuration
226
If you click the
icon, delete the complete IPSec configuration
of your device.
bintec R200-Serie
14 VPN
Funkwerk Enterprise Communications GmbH
Field
Description
This cancels all settings made during the IPSec configuration.
Once the configuration is deleted, you can start with a completely new IPSec configuration.
You can only delete the configuration if Enable IPSec = *
%.
IPSec Debug Level
Select the priority of the syslog messages of the IPSec subsystem to be recorded internally.
Possible values:
• $%) (highest priority)
• 1/
• :%/
• • 0$
• 1/
• • ;#
$ (default value, lowest priority)
Syslog messages are only recorded internally if they have a
higher or identical priority to that indicated, i.e. all messages
generated are recorded at syslog level debug.
The Advanced Settings menu is for adapting certain functions and features to the special
requirements of your environment, i.e. mostly interoperability flags are set. The default values are globally valid and enable your system to work correctly to other bintec devices, so
that you only need to change these values if the remote terminal is a third-party product or
you know special settings are necessary. These may be needed, for example, if the remote
end operates with older IPSec implementations.
The Advanced Settingsmenu consists of the following fields:
Fields in the Options Advanced Settings menu
Field
Description
Send Initial Contact
Message
Select whether IKE Initial Contact messages are to be sent during IKE (phase 1) if no SAs with a peer exist.
The function is activated with #/.
bintec R200-Serie
227
14 VPN
Funkwerk Enterprise Communications GmbH
Field
Description
The function is enabled by default.
Sync SAs with ISP Inter- Select whether all SAs are to be deleted whose data traffic was
face Status
routed via an interface on which the status has changed from
<,to ;, ; or 3/%.
The function is activated with #/.
The function is disabled by default.
Use Zero Cookies
Select whether zeroed ISAKMP Cookies are to be sent.
These are equivalent to the SPI (Security Parameter Index) in
IKE proposals; as they are redundant, they are normally set to
the value of the negotiation currently in progress. Alternatively,
your device can use zeroes for all values of the cookie. In this
case choose #/.
Zero Cookie Size
Only if Use Zero Cookies = activated.
Enter the length in bytes of the zeroed SPI used in IKE proposals.
The default value is '.
Dynamic RADIUS Authentication
Select whether RADIUS authentication is to be activated via
IPSec.
The function is activated with #/.
The function is disabled by default.
Fields in the Advanced Settings PKI Editing Options menu
Field
Description
Ignore Certificate Request Payloads
Select whether certificate requests received from the remote
end during IKE (phase 1) are to be ignored.
The function is activated with #/.
The function is disabled by default.
Send Certificate Request Payloads
228
Select whether certificate requests are to be sent during IKE
(phase 1).
bintec R200-Serie
14 VPN
Funkwerk Enterprise Communications GmbH
Field
Description
The function is activated with #/.
The function is enabled by default.
Send Certificate Chains
Select whether complete certificate chains are to be sent during
IKE (phase 1).
The function is activated with #/.
The function is enabled by default.
Deactivate this function if you do not wish to send the peer the
certificates of all levels (from your level to the CA level).
Send CRLs
Select whether CRLs are to be sent during IKE (phase 1).
The function is activated with #/.
The function is disabled by default.
Send Key Hash Payloads
Select whether key hash payloads are to be sent during IKE
(phase 1).
In the default setting, the public key hash of the remote end is
sent together with the other authentication data. Only applies for
RSA encryption; activate this function with #/ to suppress this behaviour.
14.2 L2TP
The layer 2 tunnel protocol (L2TP) enables PPP connections to be tunnelled via a UDP
connection.
Your bintec device supports the following two modes:
• L2TP LNS Mode (L2TP Network Server): for incoming connections only
• L2TP LAC Mode (L2TP Access Concentrator): for outgoing connections only
Note the following when configuring the server and client: An L2TP tunnel profile must be
created on each of the two sides (LAC and LNS). The corresponding L2TP tunnel profile is
used on the initiator side (LAC) to set up the connection. The L2TP tunnel profile is needed
on the responder side (LNS) to accept the connection.
bintec R200-Serie
229
14 VPN
Funkwerk Enterprise Communications GmbH
14.2.1 Tunnel Profiles
In the VPN -> L2TP -> Tunnel Profiles menu a list of all configured tunnel profiles is
shown.
14.2.1.1 New
Choose the New button to set up new tunnel profiles.
Fig. 83: VPN -> L2TP -> Tunnel Profiles -> New
The VPN -> L2TP -> Tunnel Profiles -> New menu consists of the following fields:
Fields in the Tunnel Profiles Basic Parameters menu
Field
Description
Description
Enter a description for the current profile.
The device automatically names the profiles 4+
and numbers them, but the value can be changed.
230
bintec R200-Serie
14 VPN
Funkwerk Enterprise Communications GmbH
Field
Local Hostname
Description
Enter the host name for LNS or LAC.
• LAC: The Local Hostname is used in outgoing tunnel setup
messages to identify this device and is associated with the
Remote Hostname of a tunnel profile configured on the LNS.
These tunnel setup messages are SCCRQs (Start Control
Connection Request) sent from the LAC and SCCRPs (Start
Control Connection Reply) sent from the LNS.
• LNS: Is the same as the value for Remote Hostname of the
incoming tunnel setup message from the LAC.
Remote Hostname
Enter the host name of the LNS or LAC.
• LAC: Defines the value for Local Hostname of the LNS
(contained in the SCCRQs received from the LNS and the
SCCRPs received from the LAC). The Local Hostname configured in the LAC must match the Remote Hostname configured for the intended profile in the LNS and vice versa.
• LNS: Defines the Local Hostname of the LAC. If the Remote
Hostname field remains empty on the LNS, the related profile
qualifies as the standard entry and is used for all incoming
calls for which a profile with a matching Remote Hostname
can be found.
Password
Enter the password to be used for tunnel authentication. Authentication between LAC and LNS takes place in both directions, i.e. the LNS checks the Local Hostname and the Password contained in the SCCRQ of the LAC and compares them
with those specified in the relevant profile. The LAC does the
same with the fields of the SCCRP of the LNS.
If this field remains empty, authentication data in the tunnel
setup messages are not sent and are ignored.
Fields in the Tunnel Profiles LAC Mode Parameters menu
Field
Description
Remote IP Address
Enter the fixed IP address of the LNS used as the destination
address for connections based on this profile.
The destination must be a device that can behave like an LNS.
UDP Source Port
bintec R200-Serie
Enter how the port number to be used as the source port for all
outgoing L2TP connections based on this profile is to be be de-
231
14 VPN
Funkwerk Enterprise Communications GmbH
Field
Description
termined.
By default, the BD option is disabled, which means that
ports are dynamically assigned to the connections that use this
profile.
If you want to enter a fixed port, enable the BD option. Select this option if you encounter problems with the firewall or
NAT.
The available values are to '.
UDP Destination Port
Enter the destination port number to be used for all calls based
on this profile. The remote LNS that receives the call must monitor this port on L2TP connections.
Possible values are ... '.
The default value is . (RFC 2661).
The Advanced Settingsmenu consists of the following fields:
Fields in the menu Advanced Settings
Field
Description
Local IP Address
Enter the IP address to be used as the source address for all
L2TP connections based on this profile.
If this field is left empty, your device uses the IP address of the
interface used to reach Remote IP Address by the L2TP tunnel.
Hello Interval
Enter the interval (in seconds) between the sending of two L2TP
HELLO messages. These messages are used to keep the tunnel open.
The available values are to , the default value is '. The
value means that no L2TP HELLO messages are sent.
Minimum Time between Enter the minimum time (in seconds) that your device waits beRetries
fore resending a L2TP control packet for which it received no response.
The wait time is dynamically extended until it reaches the Max-
232
bintec R200-Serie
14 VPN
Funkwerk Enterprise Communications GmbH
Field
Description
imum Time between Retries. The available values are to
, the default value is .
Maximum Time between Enter the maximum time (in seconds) that your device waits beRetries
fore resending a L2TP control packet for which it received no response.
The available values are to , the default value is .
Maximum Retries
Enter the maximum number of times your device is to try to resend the L2TP control packet for which is received no response.
The available values are to , the default value is .
Data Packets Sequence Select whether your device is to use sequence numbers for
Numbers
data packets sent through a tunnel on the basis of this profile.
The function is not currently used.
The function is activated with #/.
The function is disabled by default.
14.2.2 User
In the VPN -> L2TP -> Users menu a list of all configured L2TP partners is shown.
14.2.2.1 New
Choose the New button to set up new L2TP partners.
bintec R200-Serie
233
14 VPN
Funkwerk Enterprise Communications GmbH
Fig. 84: VPN -> L2TP -> Users-> New
The VPN -> L2TP -> Users-> New menu consists of the following fields:
Fields in the Users Basic Parameters menu
Field
Description
Description
Enter a name for uniquely identifying the L2TP partner.
The first character in this field must not be a number and no
special characters or umlauts must be used either. The maximum length of the entry is 25 characters.
Connection Type
234
Select whether the L2TP partner is to take on the role of the
bintec R200-Serie
14 VPN
Funkwerk Enterprise Communications GmbH
Field
Description
L2TP network server (LNS) or the functions of a L2TP access
concentrator client (LAC client).
Possible values:
• 4*- (default value): If you select this option, the L2TP partner
is configured so that it accepts L2TP tunnels and restores the
encapsulated PPP traffic flow.
• 41: : If you select this option, the L2TP partner is configured
so that it encapsulates a PPP traffic flow in L2TP and sets up
a L2TP tunnel to a remote LNS.
Tunnel Profile
Only for Connection Type = 41:
Select a profile created in the Tunnel Profiles menu for the
connection to this L2TP partner.
User name
Enter the code of your device.
Password
Enter the password.
Always Active
Select whether the interface should always be activated.
The function is activated with #/.
The function is disabled by default.
Connection Idle Timeout Only if Always on is disabled.
Enter the idle time in seconds for static short hold. The static
short hold setting determines how many seconds should pass
between sending the last traffic data packet and clearing the
connection.
Possible values are to ' (seconds). deactivates the
short hold. The default value is '.
Fields in the Users IP Mode and Routes menu
Field
Description
IP Address Mode
Select whether your device is to be assigned a static IP address
or whether it should be assigned this dynamically.
Possible values:
bintec R200-Serie
235
14 VPN
Funkwerk Enterprise Communications GmbH
Field
Description
• -% (default value): You enter a static IP address.
• 1&&: Only for Connection Type = 4*Your device dynamically assigns an IP address to the remote
terminal.
• 1&&: Only for Connection Type = 41: Your
device is dynamically assigned an IP address.
Standard Route
Only if IP Address Mode = 1&&
and -%
Select whether the route to this connection partner is to be
defined as the default route.
The function is activated with #/.
The function is disabled by default.
Create NAT Policy
Only if IP Address Mode = 1&&
and -%
Specify whether Network Address Translation (NAT) is to be activated for this connection.
The function is activated with #/.
The function is disabled by default.
IP Assignment Pool
(IPCP)
Only if IP Address Mode = 1&&
Local IP Address
Only for IP Address Mode = -%
Select an IP pool configured in the WAN->Internet +
Dialup->IP Pools menu.
Enter the WAN IP address of your device.
Route Entries
Only for IP Address Mode = -%
Enter the Remote IP Address and Netmask of the L2TP partner LAN and the corresponding Metric. Add new entries with
Add.
The Advanced Settingsmenu consists of the following fields:
236
bintec R200-Serie
14 VPN
Funkwerk Enterprise Communications GmbH
Fields in the menu Advanced Settings
Field
Description
Block after Connection
Failure for
Enter the wait time in seconds before the device should try
again after an attempt to set up a connection has failed. The default value is '.
Authentication
Select the authentication protocol for this L2TP partner.
Possible values:
• 16:>16(-!:>1 (default value): Primarily run CHAP, on
denial, the authentication protocol required by the PPTP partner. (MSCHAP version 1 or 2 possible.)
• 1: Only run 1 (PPP Password Authentication Protocol);
the password is transferred unencrypted.
• :>1: Only run :>1 (PPP Challenge Handshake Authentication Protocol as per RFC 1994); the password is transferred
encrypted.
• 16:>1: Primarily run CHAP, otherwise PAP.
• (-!:>1: Only run MS-CHAP version 1 (PPP Microsoft
Challenge Handshake Authentication Protocol).
• (-!:>1: Run MS-CHAP version 2 only.
Encryption
Only for PPP Authentication = (-!:>1
If necessary, select the type of encryption that should be used
for data traffic to the L2TP partner. This is only possible if STAC
or MS-STAC compression is not activated for the connection. If
Encryption is set, the remote terminal must also support it, otherwise a connection cannot be set up.
Possible values:
• * (default value): MPP encryption is not used.
• #/. MPP encryption V2 with 128 bit is used to RFC
3078.
• 0& %,#/: MPP encryption V2 with 128 bit is
used as compatible with Microsoft and Cisco.
LCP Alive Check
bintec R200-Serie
Check whether the availability of the remote terminal is to be
checked by sending LCP echo requests or replies. This is recommended for leased lines, PPTP and L2TP connections.
237
14 VPN
Funkwerk Enterprise Communications GmbH
Field
Description
The function is activated with #/.
The function is disabled by default.
Prioritize TCP ACK
Packets
Select whether the TCP download is to be optimised in the
event of intensive TCP upload. This function can be specially
applied for asymmetrical bandwidths (ADSL).
The function is activated with #/.
The function is disabled by default.
Fields in the Advanced Settings IP Options menu
Field
Description
OSPF Mode
Select whether and how routes are propagated via the interface
and/or OSPF protocol packets are to be sent.
Possible values:
• && (default value) OSPF is not activated for this interface, i.e. no routes are propagated or OSPF protocol packets
sent over this interface. Networks reachable over this interface are, however, included when calculating the routing information and propagated over active interfaces.
• 1%: OSPF is activated for this interface, i.e. routes are
propagated or OSPF protocol packets sent over this interface.
• ; : OSPF is disabled for this interface.
Proxy ARP Mode
Select whether your device is to respond to ARP requests from
its own LAN on behalf of the specific L2TP partner.
Possible values:
• % (default value): Deactivates Proxy ARP for this
L2TP partner.
• <, ;: Your device only responds to an ARP request if the status of the connection to the L2TP partner is <,
(active) or ;. In the case of ;, your device
only responds to the ARP request; the connection is not set
up until someone actually wants to use the route.
• 1% =/): Your device responds to an ARP request only
if the status of the connection to the L2TP partner is <,
238
bintec R200-Serie
14 VPN
Funkwerk Enterprise Communications GmbH
Field
Description
(active), i.e. a connection already exists to the L2TP partner.
DNS Negotiation
Select whether your device receives IP addresses for primary
DNS server, secondary DNS server, primary WINS and secondary WINS from the L2TP partner or sends these to the
L2TP partner.
The function is activated with #/.
The function is enabled by default.
14.2.3 Options
Fig. 85: VPN -> L2TP ->Options
The VPN -> L2TP -> Options menu consists of the following fields:
Fields in the Options Global Options menu
Field
Description
UDP Destination Port
Enter the port to be monitored by the LNS on incoming L2TP
tunnel connections.
Available values are all whole numbers from to ', the
default value is .E as specified in RFC 2661.
bintec R200-Serie
239
14 VPN
Funkwerk Enterprise Communications GmbH
Field
Description
UDP Source Port Selec- Select whether the LNS should only use the monitored port
tion
(UDP destination port) as the local source port for the L2TP
connection.
The function is activated with BD.
The function is disabled by default.
14.3 PPTP
The Point-to-Point Tunnelling Protocol (=PPTP) can be used to set up an encrypted PPTP
tunnel to provide security for data traffic over an existing IP connection.
First a connection to an ISP (=Internet Service Provider) is set up at both sites. Once these
connections are available, a tunnel is set up to the PPTP partner over the Internet using
PPTP.
The PPTP subsystem sets up a control connection between the endpoints of the tunnel.
This is used to send control data to set up, keep alive and terminate the connection
between the two PPTP tunnel end-points. As soon as this control connection is set up, the
PPTP transfers the traffic data packed in GRE packets (GRE = Generic Routing Encapsulation).
14.3.1 PPTP Tunnel
In the PPTP Tunnel menu, a list of all PPTP tunnels is shown.
240
bintec R200-Serie
14 VPN
Funkwerk Enterprise Communications GmbH
14.3.1.1 New
Click on New to set up further PPTP partners.
Fig. 86: VPN -> PPTP -> PPTP Tunnel -> New
The VPN -> PPTP -> PPTP tunnel -> New menu consists of the following fields:
Fields in the menu, PPTP Tunnel PPTP Partner Parameter
bintec R200-Serie
Field
Description
Description
Enter a unique name for the tunnel.
241
14 VPN
Funkwerk Enterprise Communications GmbH
Field
Description
The first character in this field must not be a number and no
special characters or umlauts must be used either.
PPTP Mode
Enter the role to be assigned to the PPTP interface.
Possible values:
• *- (default value): this assigns the PPTP interface the role
of PPTP server.
• 0& :/ (: this assigns the PPTP interface the
role of PPTP client.
User name
Enter the user name.
Password
Enter the password.
Always Active
Select whether the interface should always be activated.
The function is activated with #/.
The function is disabled by default.
Connection Idle Timeout
Only if Always Active (Flatrate mode) is disabled.
Enter the idle interval in seconds. This determines how many
seconds should pass between sending the last traffic data packet and clearing the connection.
Possible values are to ' (seconds). deactivates the
timeout.
The default value is '.
Example: for FTP transmission, for LAN-to-LAN transmission, for Internet connections.
Remote PPTP IP Address
Enter the IP address of the PPTP partner.
Fields in the menu, PPTP Tunnel IP Mode and Routes
Field
Description
IP Address Mode
Select whether your device is to be assigned a static IP address
or whether it should be assigned this dynamically.
Possible values:
242
bintec R200-Serie
14 VPN
Funkwerk Enterprise Communications GmbH
Field
Description
• -% (default value): You enter a static IP address.
• 1&&: Only if PPTP Mode = *-Your
device dynamically assigns an IP address to the remote terminal.
• 1&&: Only if PPTP Mode = 0& :/
(Your device is dynamically assigned an IP address.
Standard Route
Only if IP Address Mode = -%
Select whether the route to this connection partner is to be
defined as the default route.
The function is activated with #/.
The function is disabled by default.
Create NAT Policy
Only if IP Address Mode = -%
The function is activated with #/.
The function is disabled by default.
Local IP Address
Only for IP Address Mode = -%
Assign the IP address from your LAN that is to be used as internal source address to the PPTP interface.
Route Entries
Only if IP Address Mode = -%
Define routing entries for this connection partner.
• ? 1&&: IP address of the destination host or
LAN.
• *&: Netmask of Remote IP Address.
• (%: The lower the value, the higher the priority of the
route (possible values ). The default value is .
IP Assignment Pool
(IPCP)
Only if IP Address Mode = 1&&
Select an IP pool configured in the WAN->Internet +
Dialup->IP Pools menu. If an IP pool has not been configured
here yet, the message * ) appears in this field.
The Advanced Settingsmenu consists of the following fields:
bintec R200-Serie
243
14 VPN
Funkwerk Enterprise Communications GmbH
Fields in the menu Advanced Settings
Field
Block after Connection
Failure for
Description
Enter the wait time in seconds before the device should try
again after an attempt to set up a connection has failed.
The default value is '.
Authentication
Select the authentication protocol for this PPTP partner.
Possible values:
• 16:>16(-!:>1 (default value): Give priority to CHAP, if
refused use the authentication protocol requested by the
PPTP partner. (MSCHAP version 1 or 2 possible.)
• 1: Only run 1 (PPP Password Authentication Protocol);
the password is transferred unencrypted.
• :>1: Only run :>1 (PPP Challenge Handshake Authentication Protocol as per RFC 1994); the password is transferred
encrypted.
• 16:>1: Primarily run CHAP, otherwise PAP.
• (-!:>1: Only run MS-CHAP version 1 (PPP Microsoft
Challenge Handshake Authentication Protocol).
• (-!:>1: Run MS-CHAP version 2 only.
Encryption
If necessary, select the type of encryption that should be used
for data traffic to the connection partner. This is only possible if
STAC or MS-STAC compression is not activated for the connection. If Encryption is set, the remote terminal must also support it, otherwise a connection cannot be set up.
Possible values:
• *: MPP encryption is not used.
• #/ (default value): MPP encryption V2 with 128 bit is
used to RFC 3078.
• 0& %,#/: MPP encryption V2 with 128 bit is
used as compatible with Microsoft and Cisco. This setting is,
as a rule, only needed for older Windows versions than Windows XP.
LCP Alive Check
244
Check whether the availability of the remote terminal is to be
checked by sending LCP echo requests or replies. This is re-
bintec R200-Serie
14 VPN
Funkwerk Enterprise Communications GmbH
Field
Description
commended for leased lines, PPTP and L2TP connections.
The function is activated with #/.
The function is enabled by default.
Fields in the Advanced Settings IP Options menu
Field
Description
OSPF Mode
Select whether and how routes are propagated via the interface
and/or OSPF protocol packets are to be sent.
Possible values:
• && (default value) OSPF is not activated for this interface, i.e. no routes are propagated or OSPF protocol packets
sent over this interface. Networks reachable over this interface are, however, included when calculating the routing information and propagated over active interfaces.
• 1%: OSPF is activated for this interface, i.e. routes are
propagated or OSPF protocol packets sent over this interface.
• ; : OSPF is disabled for this interface.
Proxy ARP Mode
Select whether your device is to answer APR requests from
your LAN on behalf of the specific PPTP partner.
Possible values:
• % (default value): Disables Proxy-ARP (Address
Resolution Protocol) for this PPTP partner.
• <, ;: Your device answers an APR request only
if the status of the connection to the PPTP partner is 1%
or /. In the case of ;, your device only responds
to the ARP request; the connection is not set up until
someone actually wants to use the route.
• 1% =/): Your device answers an APR request only if
the status of the connection to the PPTP partner is 1%,
i.e. if a connection to the PPTP partner has already been established.
DNS Negotiation
bintec R200-Serie
Select whether your device should obtain IP addresses for
Primary DNS client, Secondary DNS client from the PPTP
partner or should send these to the PPTP partner.
245
14 VPN
Funkwerk Enterprise Communications GmbH
Field
Description
The function is activated with #/.
The function is enabled by default.
Fields in the Advanced Settings PPTP Callback menu
Field
Callback
Description
Enables a PPTP tunnel through the Internet to be set up with a
PPTP partner, even if the partner is currently inaccessible. As a
rule, the PPTP partner will be requested by means of an ISDN
call to go online and set up a PPTP connection.
The function is activated with #/.
The function is disabled by default.
Note that you must activate the relevant option on the gateways
of both partners. An ISDN connection is usually required for this
function. Without ISDN, callback is only to be activated in special applications.
Incoming ISDN Number
Only if Callback is enabled.
Enter the ISDN number from which the remote device calls the
local device (calling party number).
Outgoing ISDN Number
Only if Callback is enabled.
Enter the ISDN number with which the local device calls the remote device calls (called party number).
246
bintec R200-Serie
14 VPN
Funkwerk Enterprise Communications GmbH
14.3.2 Options
In this menu, you can make general settings of the global PPTP profile.
Fig. 87: VPN -> PPTP -> Options
The menu, VPN -> PPTP -> Options consists of the following fields:
Fields in the Options Global Options menu
Field
GRE Window Adaption
Description
Select whether the GRE Window Adaptation is to be enabled.
This adaptation only becomes necessary if you have downloaded service pack 1 from the Microsoft Windows XP page and
installed it. Since, in SP 1, Microsoft has changed the confirmation algorithm in the GRE protocol, the automatic window adaptation for GRE must be turned off on the bintec side.
The function is activated with #/.
The function is enabled by default.
GRE Window Size
Enter the maximum number of GRE packets that can be sent
without confirmation.
Windows XP uses a higher initial reception window in the GRE,
which is why the maximum send window size on the bintec side
bintec R200-Serie
247
14 VPN
Funkwerk Enterprise Communications GmbH
Field
Description
must be adjusted here via the value, GRE Window Size. Possible values are 0 to 256.
14.4 GRE
Generic Routing Encapsulation (GRE) is a network protocol that encapsulates other protocols and transports them in the form of IP tunnels to the specified recipients.
The specification of the GRE protocol is available in two versions:
• GRE V.1 for use in PPTP connections (RFC 2637, configuration in the PPTP menu)
• GRE V.0 (RFC 2784) for general encapsulation using GRE
In this menu you can configure a virtual interface for using GRE V.0. The data traffic routed
over this interface is then encapsulated using GRE and sent to the specified recipient.
14.4.1 GRE Tunnels
In the VPN -> GRE -> GRE Tunnels menu, a list of all configured GRE tunnels is shown.
14.4.1.1 New
Choose the New button to set up new GRE tunnels.
Fig. 88: VPN -> GRE -> GRE Tunnels
248
bintec R200-Serie
14 VPN
Funkwerk Enterprise Communications GmbH
The VPN -> GRE -> GRE Tunnels menu consists of the following fields:
Fields in the GRE Tunnels Basic Parameters menu
Field
Description
Description
Enter a description for the GRE tunnel.
Local GRE IP Address
Enter the source IP address of the GRE packets to the GRE
partner.
If no IP address is given (this corresponds to IP address
0.0.0.0), the source IP address of the GRE packets is selected
automatically from one of the addresses of the interface via
which the GRE partner is reached.
Remote GRE IP Address
Standard Route
Specify the destination IP address of the host or network to
which the packets are to be sent through the GRE tunnel.
If you enable the Default Route, all data is automatically routed
to one connection.
The function is disabled by default.
Local IP Address
Route Entries
Enter the IP address to be used as the source address for this
GRE connection.
Define other routing entries for this connection partner.
Add a new entry with Add.
• ? 1&&: IP address of the destination host or
network.
• *&: Netmask of Remote IP Address. If no entry is
made, your device uses a default netmask.
• (%: The lower the value, the higher the priority of the
route (possible values ... ). The default value is .
MTU
Enter the maximum packet size (Maximum Transfer Unit, MTU)
in bytes that is allowed for the GRE connection between the
partners.
Possible values are to .
The default value is .
Use Key
bintec R200-Serie
Enable the key input for the GRE connection, which makes it
249
14 VPN
Funkwerk Enterprise Communications GmbH
Field
Description
possible to distinguish between several parallel GRE connections between two GRE partners (see RFC 1701).
The key is activated with #/.
The function is disabled by default.
Key Value
Only if Use Key is enabled.
Enter the GRE connection key.
Possible values are to .'..
The default value is .
14.5 Certificates
14.5.1 Certificate list
In the VPN -> Certificates -> Certificate List menu a list of all available certificates is
shown.
14.5.1.1 Edit
Click the
250
icon to display the content of the selected object (key, certificate, or request).
bintec R200-Serie
14 VPN
Funkwerk Enterprise Communications GmbH
Fig. 89: VPN -> Certificates -> Certificate List->
The certificates and keys themselves cannot be changed, but a few external attributes can
be changed, depending on the type of the selected entry.
The VPN -> Certificates -> Certificate List ->
menu consists of the following fields:
Fields in the menu
Field
Description
Description
Name of the certificate, key, or request.
Certificate is CA Certific- Mark the certificate as a certificate from a trustworthy certificaate
tion authority (CA).
Certificates issued by this CA are accepted during authentication (unless specified otherwise under "Phase-1 Profiles").
The function is activated with +
.
The function is disabled by default.
Certificate Revocation
List (CRL) Checking
bintec R200-Serie
Only for Certificate is a CA certificate = +
.
Define the extent to which certificate revocation lists (CRLs) are
251
14 VPN
Funkwerk Enterprise Communications GmbH
Field
Description
to be included in the validation of certificates issued by the owner of this certificate.
Possible settings:
• ;&#/ : No checking of CRLs.
• 1/)&: CRLs are always checked.
• =/) :?4 ;&#
& ,&
(default value): A check is only carried out if a CRL Distribution Point entry is included in the certificate. This can be determined under "View Details" in the certificate content.
• <& -$& &
, %%: The settings of the higher level certificate are used, if one exists. It is
does not, the same procedure is used as that described under
"Only if a CRL Distribution Point is present".
Force Certificate to be
trusted
Define that this certificate is to be accepted as the user certificate without further checks during authentication.
The function is activated with +
.
The function is disabled by default.
Caution
It is extremely important for VPN security that the integrity of all certificates manually
marked as trustworthy (certification authority and user certificates) is ensured. The displayed "fingerprints" can be used to check this integrity: Compare the displayed values
with the fingerprints specified by the issuer of the certificate (e.g. on the Internet). It is
sufficient to check one of the two values.
14.5.1.2 Request
Registration authority certificates in SCEP
If SCEP is used, your device also supports separate registration authority certificates.
Registration authority certificates are used by some Certificate Authorities (CAs) to handle
certain tasks (signature and encryption) during SCEP communication with separate keys,
and to delegate the operation to separate registration authorities, if applicable.
252
bintec R200-Serie
14 VPN
Funkwerk Enterprise Communications GmbH
When a certificate is downloaded automatically, i.e. if CA Certificates = !;/! is
selected, all the certificates needed for the operation are loaded automatically.
If all the necessary certificates are already available in the system, these can also be selected manually.
Select the Request button to request or import more certificates.
Fig. 90: VPN ->Certificates ->Certificate List -> Request
The VPN ->Certificates -> Certificate List ->Request menu consists of the following
fields:
Fields in the Certificate List Certificate Request menu
bintec R200-Serie
Field
Description
Certificate Request Description
Enter a unique description for the certificate.
253
14 VPN
Funkwerk Enterprise Communications GmbH
Field
Description
Mode
Select the way in which you want to request the certificate.
Possible settings:
• (
/ (default value): Your device generates a PKCS#10
for the key. This file can then be uploaded directly in the
browser or copied in the Edit menu using the View Details
field. This file must be provided to the CA and the received
certificate must then be imported manually to your device.
• -: : The key is requested from a CA using the Simple Certificate Enrolment Protocol.
Generate Private Key
Only if Mode = (
/.
Select an algorithm for key creation.
?-1 (default value) and ;-1 are available.
Also select the length of the key to be created.
Possible values: , ., , ', , .
Please note that a key with a length of 512 bits could be rated
as unsecure, whereas a key of 4096 bits not only needs a lot of
time to create, but also occupies a major share of the resources
during IPSec processing. A value of 768 or more is, however,
recommended and the default value is 1024 bits.
SCEP URL
Only if Mode = -:.
Enter the URL of the SCEP server, e.g. http://scep.funkwerk.de:8080/scep/scep.dll
Your CA administrator can provide you with the necessary data.
CA Certificate
Only if Mode = -:.
• !;/!: In CA Name, enter the name of the CA certificate of the certification authority (CA) from which you wish to
request your certificate, e.g. %&. Your CA administrator can provide you with the necessary data.
If no CA certificates are available, the device will first download the CA certificate of the relevant CA. It then continues
with the enrolment process, provided no more important para-
254
bintec R200-Serie
14 VPN
Funkwerk Enterprise Communications GmbH
Field
Description
meters are missing. In this case, it returns to the Generate
Certificate Request menu.
If the CA certificate does not contain a CRL distribution point
(Certificate Revocation List, CRL), and a certificate server is
not configured on the device, the validity of certificates from
this CA is not checked.
• <name of an existing certificate>: If all the necessary certificates are already available in the system, you select these
manually.
RA Sign Certificate
Only if Mode = -:.
Only if CA Certificates is not = !;/!.
Select a certificate for signing SCEP communication.
The default value is !<& :1 :%!, i.e. the CA certificate is used.
RA Encrypt Certificate
Only if Mode = -:.
Only if RA Sign Certificate is not = !<& :1 :%!.
If you use one of your own certificates to sign communication
with the RA, you can select another one here to encrypt communication.
The default value is !<& ?1 -$ :%!, i.e. the
same certificate is used as for signing.
Password
Only if Mode = -:.
You may need a password from the certification authority to obtain certificates for your keys. Enter the password you received
from the certification authority here.
Fields in the Certificate List Subject Name menu
bintec R200-Serie
Field
Description
User-defined
Select whether you want to enter the name components of the
subject name individually as specified by the CA or want to
enter a special subject name.
255
14 VPN
Funkwerk Enterprise Communications GmbH
Field
Description
If #/ is selected, a subject name can be given in Condensed with attributes that are not offered in the list. Example:
"CN=VPNServer, DC=mydomain, DC=com, c=DE".
If the field is not marked, enter the name components in General name, e-mail, Organisational Unit, Organisation, Locality,
State/Province and Country.
The function is disabled by default.
Summary
Only for User Defined = enabled.
Enter a subject name with attributes not offered in the list.
Example: "CN=VPNServer, DC=mydomain, DC=com, c=DE".
Common Name
Only for User Defined = disabled.
Enter the name according to CA.
Email
Only for User Defined = disabled.
Enter the e-mail address according to CA.
Organisational Unit
Only for User Defined = disabled.
Enter the organisational unit according to CA.
Organisation
Only for User Defined = disabled.
Enter the organisation according to CA.
Locality
Only for User Defined = disabled.
Enter the location according to CA.
State/Province
Only for User Defined = disabled.
Enter the state/province according to CA.
Country
Only for User Defined = disabled.
Enter the country according to CA.
The Advanced Settingsmenu consists of the following fields:
256
bintec R200-Serie
14 VPN
Funkwerk Enterprise Communications GmbH
Fields in the Advanced Settings Alternative Subject Name menu
Field
Description
#1, #2, #3
For each entry, define the type of name and enter additional
subject names.
Possible values:
• * (default value): No additional name is entered.
• : An IP address is entered.
• ;*-: A DNS name is entered.
• /: An e-mail address is entered.
• <?: A uniform resource identifier is entered.
• ;*: A distinguished name (DN) name is entered.
• ?;: A registered identity (RID) is entered.
Field in the Advanced Settings Options menu
Field
Description
Autosave Mode
Select whether your device automatically stores the various
steps of the enrolment internally. This is an advantage if enrolment cannot be concluded immediately. If the status has not
been saved, the incomplete registration cannot be completed.
As soon as the enrolment is completed and the certificate has
been downloaded from the CA server, it is automatically saved
in the device configuration.
The function is activated with #/.
The function is enabled by default.
14.5.1.3 Import
Choose the Import button to import other certificates.
bintec R200-Serie
257
14 VPN
Funkwerk Enterprise Communications GmbH
Fig. 91: VPN ->Certificates ->Certificate List -> Import
The VPN ->Certificates -> Certificate List ->Import menu consists of the following fields:
Fields in the Certificate List Import menu
Field
Description
External Filename
Enter the file path and name of the certificate to be imported, or
use Browse... to select it from the file browser.
Local Certificate Description
Enter a unique description for the certificate.
File Encoding
Select the type of coding so that your device can decode the
certificate.
Possible values:
• (default value) Activates automatic code recognition. If
downloading the certificate in auto mode fails, try with a certain type of encoding.
• 3&
• 3)
Password
You may need a password to obtain certificates for your keys.
Enter the password here.
258
bintec R200-Serie
14 VPN
Funkwerk Enterprise Communications GmbH
14.5.2 CRLs
In the VPN -> Certificates -> CRLs menu a list of all CRLs is shown.
14.5.2.1 Import
Choose the Import button to import other CRLs.
Fig. 92: VPN -> Certificates -> CRLs-> Import
The VPN ->Certificates -> CRLs ->Import menu consists of the following fields:
Fields in the CRLs CRL Import menu
Field
Description
External Filename
Enter the file path and name of the CRL to be imported, or use
Browse... to select it from the file browser.
Local Certificate Description
File Encoding
Enter a unique description for the CRL.
Select the type of encoding, so that your device can decode the
CRL.
Possible values:
• (default value) Activates automatic code recognition. If
bintec R200-Serie
259
14 VPN
Funkwerk Enterprise Communications GmbH
Field
Description
downloading the CRL in auto mode fails, try with a certain
type of encoding.
• 3&
• 3)
Password
Enter the password to be used for the import.
14.5.3 Certificate Servers
In the VPN -> Certificates -> Certificate Servers menu a list of all certificate servers is
shown.
14.5.3.1 New
Choose the New button to set up new certificate servers.
Fig. 93: VPN -> Certificates ->Certificate Servers -> New
The VPN -> Certificates -> Certificate Servers-> New menu consists of the following
fields:
Fields in the Certificate Servers Basic Parameters menu
260
bintec R200-Serie
14 VPN
Funkwerk Enterprise Communications GmbH
bintec R200-Serie
Field
Description
Description
Enter a unique description for the certificate server.
LDAP URL Path
Enter the LDAP URL of the server.
261
15 Firewall
Funkwerk Enterprise Communications GmbH
Chapter 15 Firewall
The Stateful Inspection Firewall (SIF) provided for bintec gateways is a powerful security
feature.
The SIF with dynamic packet filtering has a decisive advantage over static packet filtering:
The decision whether or not to send a packet cannot be made solely on the basis of source
and destination addresses or ports but also using dynamic packet filtering based on the
state of the connection to a partner.
This means packets that belong to an already active connection can also be forwarded.
The SIF also accepts packets that belong to an "affiliated connection". The negotiation of
an FTP connection takes place over port 21, for example, but the actual data exchange can
take place over a completely different port.
SIF and other security features
bintec’s Stateful Inspection Firewall fits into the existing security architecture of bintec
device very well due to its simple configuration. The configuration work for the SIF is comparatively straightforward with systems like Network Address Translation (NAT) and IP Access Lists (IPAL).
As SIF, NAT and IPAL are active in the system simultaneously, attention must be given to
possible interaction: If any packet is rejected by one of the security instances, this is done
immediately. This is irrelevant whether another instance would accept it or not. Your need
for security features should therefore be accurately analysed.
The essential difference between SIF and NAT/IPAL is that the rules for the SIF are generally applied globally, i.e. not restricted to one interface.
In principle, the same filter criteria are applied to the data traffic as those used in NAT and
IPAL:
• Source and destination address of the packet (with an associated netmask)
• Service (preconfigured, e.g. Echo, FTP, HTTP)
• Protocol
• Port number(s)
To illustrate the differences in packet filtering, a list of the individual security instances and
their method of operation is given below:
262
bintec R200-Serie
Funkwerk Enterprise Communications GmbH
15 Firewall
NAT
One of the basic functions of NAT is the translation of the local IP addresses of your LAN
into the global IP addresses you are assigned by your ISP and vice versa. All connections
initiated externally are first blocked, i.e. every packet your device cannot assign to an existing connection is rejected. This means that a connection can only be set up from inside to
outside. Without explicit permission, NAT rejects every access from the WAN to the LAN.
IP Access Lists
Here packets are permitted or rejected exclusively on the basis of the criteria listed above,
i.e. the state of the connection is not considered (except where Services = %,).
SIF
The SIF sorts out all packets that are not explicitly or implicitly allowed. The result can be a
"deny", in which case no error message is sent to the sender of the rejected packet, or a
"reject", where the sender is informed of the packet rejection.
The incoming packets are processed as follows:
• The SIF first checks if an incoming packet can be assigned to an existing connection. If
so, it is forwarded. If the packet cannot be assigned to an existing connection, a check is
made to see if a suitable connection is expected (e.g. as affiliated connection of an existing connection). If so, the packet is also accepted.
• If the packet cannot be assigned to any existing or expected connection, the SIF filter
rules are applied: If a deny rule matches the packet, the packet is discarded without
sending an error message to the sender of the packet; if a reject rule matches, the packet
is discarded and an ICMP Host Unreachable message sent to the sender of the packet.
The packet is only forwarded if an accept rule matches.
• All packets without matching rules are rejected without sending an error message to the
sender when all the existing rules have been checked (=default behaviour).
15.1 Policies
bintec R200-Serie
263
15 Firewall
Funkwerk Enterprise Communications GmbH
15.1.1 Filter rules
The default behavior with Action = 1%%&& consists of two implicit filter rules: If an incoming packet can be assigned to an existing connection and if a suitable connection is expected (e.g. such as an affiliated connection of an existing connection), the packet is allowed.
The sequence of filter rules in the list is relevant: The filter rules are applied to each packet
in succession until a rule matches. If overlapping occurs, i.e. more than one filter rule
matches a packet, only the first rule is executed. This means that if the first rule denies a
packet, whereas a later rule allows it, the packet is rejected. A deny rule also has no effect
if a relevant packet has previously been allowed by another filter rule.
In the Firewall -> Policies -> Filter Rules menu, a list of all configured filter rules is
shown. Select the show administrative access rules option to display existing filter rules for
administrative access to your device (see System Management -> Administrative Access -> Access). These rules can also be edited here.
Fig. 94: Firewall -> Policies ->Filter Rules
You can use the
button to insert another policy above the list entry. The configuration
menu for creating a new policy opens.
You can use the
button to move the list entry. A dialog box opens, in which you can se-
lect the position to which the policy is to be moved.
Moreover, the overview provides the option to show the firewall rules of the underlying settings made in the System Management->Administrative Access->Access menu. To do
264
bintec R200-Serie
15 Firewall
Funkwerk Enterprise Communications GmbH
this, enable the Show administrative access rules option.
15.1.1.1 New
Choose the New button to set up new parameters.
Fig. 95: Firewall -> Policies ->Filter Rules -> New
The Firewall -> Policies -> Filter Rules-> New menu consists of the following fields:
Fields in the Policies Basic Parameters menu
Field
Description
Source
Select one of the preconfigured aliases for the source of the
packet.
The list includes all WAN-/LAN interfaces, interface groups (see
Firewall -> Interfaces -> Groups), addresses (see Firewall ->
Addresses -> Address List) and address groups (see Firewall
-> Addresses -> Groups) for selection.
The value 1) means that neither the source interface nor the
source address is checked.
Destination
bintec R200-Serie
Select one of the preconfigured aliases for the destination of the
packet.
The list includes all WAN-/LAN interfaces, interface groups (see
Firewall -> Interfaces -> Groups), addresses (see Firewall ->
Addresses -> Address List) and address groups (see Firewall
265
15 Firewall
Funkwerk Enterprise Communications GmbH
Field
Description
-> Addresses -> Groups) for selection.
The value 1) means that neither the destination interface nor
the destination address is checked.
Service
Select one of the preconfigured services to which the packet to
be filtered must be assigned.
The extensive range of services configured ex works includes
the following:
• B+
• +4*+
• -(+
• ;*• >++
• **+
• • *$
Other services are set up in Firewall -> Services -> Service
List.
In addition, the service groups configured in Firewall -> Services -> Groups can be selected.
Action
Select the action to be applied to a filtered packet.
Possible values:
• 1%%&& (default value): The packets are forwarded on the
basis of the entries.
• ;) : The packets are rejected.
• ?H% : The packets are rejected. An error message is issued to the sender of the packet.
Apply QoS
Only for Action = 1%%&&
Select whether you want to enable QoS for this policy with the
priority selected in Data Traffic Priority
The function is activated with #/.
266
bintec R200-Serie
15 Firewall
Funkwerk Enterprise Communications GmbH
Field
Description
The option is deactivated by default.
If QoS is not activated for this policy, bear in mind that the data
cannot be prioritised on the sender side either.
A policy for which QoS has been enabled is also set for the firewall. Make sure therefore that data traffic that has not been expressly authorised if blocked by the firewall!
Data Traffic Priority
Only for Apply QoS = #/
Select the priority with which the data specified by the policy is
handled on the send side.
Possible values:
• * (default value): No priority.
• 4 4%): Low Latency Transmission (LTT), i.e. handling of data with the lowest possible latency, e.g. suitable for
VoIP data.
• >$
• (
• 4
15.1.2 QoS
More and more applications need increasingly larger bandwidths, which are not always
available. Quality of Service (QoS) makes it possible to distribute the available bandwidths
effectively and intelligently. Certain applications can be given preference and bandwidth reserved for them.
In the Firewall -> Policies -> QoS menu, a list of all QoS rules is shown.
15.1.2.1 New
Choose the New button to set up new QoS rules.
bintec R200-Serie
267
15 Firewall
Funkwerk Enterprise Communications GmbH
Fig. 96: Firewall -> Policies -> QoS -> New
The Firewall -> Policies -> QoS -> New menu consists of the following fields:
Fields in the QoS Configure QoS Interface menu
Field
Description
Interface
Select the interface on which bandwidth management is to be
carried out.
Traffic Shaping
Select whether you want to activate bandwidth management for
the selected interface.
The function is activated with #/.
The function is disabled by default.
Specify Bandwidth
Only for Traffic Shaping = #/.
Enter the maximum available bandwidth in kbps for the selected
interface.
Filter rules
This field contains a list of all configured firewall policies for
which QoS was enabled (Apply QoS = #/). The following options are available for each list entry:
• Use: Select whether this entry should be assigned to the QoS
interface. The option is deactivated by default.
• Bandwidth: Enter the maximum available bandwidth in Bps
268
bintec R200-Serie
15 Firewall
Funkwerk Enterprise Communications GmbH
Field
Description
for the service specified under Services. is entered by default.
• Fixed: Select whether the bandwidth defined in Bandwidth
can be exceeded in the longer term. By activating this field,
you specify that it cannot be exceeded. If the option is deactivated, the bandwidth can be exceeded and the excess data
rate is handled in accordance with the priority defined in the
firewall policy. The option is deactivated by default.
15.1.3 Options
Fig. 97: Firewall -> Policies ->Options
The Firewall -> Policies ->Options menu consists of the following fields:
Fields in the Options Global Firewall Options menu
Field
Description
Firewall Status
Here you can activate and deactivate the firewall function.
The function is activated with #/.
The function is enabled by default.
Logged Actions
bintec R200-Serie
Select the firewall syslog level.
269
15 Firewall
Funkwerk Enterprise Communications GmbH
Field
Description
The messages are output together with messages from other
subsystems.
Possible values:
• 1// (default value): All firewall activities are displayed.
• ;) : Only reject and deny events are shown, see "Action".
• 1%%, : Only accept events are shown.
• *: Syslog messages are not generated.
Fields in the Options Session Timer menu
Field
Description
UDP Inactivity
Enter the inactivity time after which a UDP session is to be regarded as expired (in seconds).
Possible values are ' to .
The default value is .
TCP Inactivity
Enter the inactivity time after which a TCP session is to be regarded as expired (in seconds).
Possible values are ' to .
The default value is '.
PPTP Inactivity
Enter the inactivity time after which a PPTP session is to be regarded as expired (in seconds).
Possible values are ' to .
The default value is .
Other Inactivity
Enter the inactivity time after which a session of another type is
to be regarded as expired (in seconds).
Possible values are ' to .
The default value is '.
15.2 Interfaces
270
bintec R200-Serie
15 Firewall
Funkwerk Enterprise Communications GmbH
15.2.1 Groups
In the Firewall -> Interfaces -> Groups menu, a list of all configured interface groups is
shown.
You can group together the interfaces of your device. This makes it easier to configure firewall rules.
15.2.1.1 New
Choose the New button to set up new interface groups.
Fig. 98: Firewall -> Interfaces ->Groups-> New
The Firewall -> Interfaces -> Groups-> New menu consists of the following fields:
Fields in the Groups Basic Parameters menu
Field
Description
Description
Enter the desired description of the interface group.
Members
Select the members of the group from the available interfaces.
To do this, enable the field in the Members column.
15.3 Addresses
bintec R200-Serie
271
15 Firewall
Funkwerk Enterprise Communications GmbH
15.3.1 Address list
In the Firewall -> Addresses -> Address List menu, a list of all configured addresses is
shown.
15.3.1.1 New
Choose the New button to set up new addresses.
Fig. 99: Firewall -> Addresses -> Address List -> New
The Firewall -> Addresses -> Address List-> New menu consists of the following fields:
Fields in the Address List Basic Parameters menu
Field
Description
Description
Enter the desired description of the address.
Address Type
Select the type of address you want to specify.
Possible values:
• 1&& 6 -
# (default value): Enter an IP address
with subnet mask.
• 1&& ?$: Enter an IP address range with a start and
end address.
272
bintec R200-Serie
15 Firewall
Funkwerk Enterprise Communications GmbH
Field
Description
Address / Subnet
Only if Address Type = 1&&
Enter the IP address of the host or a network address and the
related netmask.
The default value is .
Address Range
Only if Address Type = ?$
Enter the start and end IP address of the range.
15.3.2 Groups
In the Firewall -> Addresses -> Groups menu, a list of all configured address groups is
shown.
You can group together addresses. This makes it easier to configure firewall rules.
15.3.2.1 New
Choose the New button to set up new address groups.
Fig. 100: Firewall -> Addresses ->Groups -> New
The Firewall -> Addresses -> Groups-> New menu consists of the following fields:
Fields in the Groups Basic Parameters menu
bintec R200-Serie
273
15 Firewall
Funkwerk Enterprise Communications GmbH
Field
Description
Description
Enter the desired description of the address group.
Selection
Select the members of the group from the available Addresses.
To do this, enable the field in the Selection column.
15.4 Services
15.4.1 Service list
In the Firewall -> Services -> Service List menu, a list of all available services is shown.
15.4.1.1 New
Choose the New button to set up new services.
Fig. 101: Firewall -> Services -> Service List-> New
The Firewall -> Services -> Service List-> New menu consists of the following fields:
Fields in the Service List Basic Parameters menu
274
Field
Description
Description
Enter an alias for the service you want to configure.
bintec R200-Serie
15 Firewall
Funkwerk Enterprise Communications GmbH
Field
Description
Protocol
Select the protocol on which the service is to be based. The
most important protocols are available for selection.
Destination Port Range
Only if Protocol = +: , <;6+: or <;
In the first field, enter the destination port via which the service
is to run.
If a port number range is specified, in the second field enter the
last port of the port range. By default the field does not contain
an entry. If a value is displayed, this means that the previously
specified port number is verified. If a port range is to be
checked, enter the upper limit here.
Possible values are to '.
Source Port Range
Only if Protocol = +: , <;6+: or <;
In the first field, enter the source port to be checked, if applicable.
If a port number range is specified, in the second field enter the
last port of the port range. By default the field does not contain
an entry. If a value is displayed, this means that the previously
specified port number is verified. If a port range is to be
checked, enter the upper limit here.
Possible values are to '.
Type
Only if Protocol = :(
The Type field shows the class of ICMP messages, the Code
field specifies the type of message in greater detail.
Possible values:
• 1) (default value)
• % ?,/)
• ;& <%#/
• -
% 8
%
• ?%
• %
• + D%
bintec R200-Serie
275
15 Firewall
Funkwerk Enterprise Communications GmbH
Field
Description
• #/
• +&,
• +&, ?,/)
• ?J
&
• ?,/)
• 1&& (& ?J
&
• 1&& (& ?,/)
Code
ICMP code options can only be selected if Type = ;&!
<%#/.
Possible values:
• 1) (default value)
• * <%#/
• >& <%#/
• %/ <%#/
• <%#/
• B$ *
• :
% ;& * & 1!
&/) #
• :
% ;& >& & 1!
&/) #
15.4.2 Groups
In the Firewall -> Services -> Groups menu, a list of all configured service groups is
shown.
You can group together services. This makes it easier to configure firewall rules.
15.4.2.1 New
Choose the New button to set up new service groups.
276
bintec R200-Serie
15 Firewall
Funkwerk Enterprise Communications GmbH
Fig. 102: Firewall -> Services ->Groups-> New
The Firewall -> Services-> Groups-> New menu consists of the following fields:
Fields in the Groups Basic Parameters menu
bintec R200-Serie
Field
Description
Description
Enter the desired description of the service group.
Members
Select the members of the group from the available service aliases. To do this, enable the field in the Members column.
277
16 VoIP
Funkwerk Enterprise Communications GmbH
Chapter 16 VoIP
Voice over IP (VoIP) uses the IP protocol for voice and video transmission.
The main difference compared with conventional telephony is that the voice information is
not transmitted over a switched connection in a telephone network, but divided into data
packets by the Internet protocol and these packets are then passed to the destination over
undefined paths in a network. This technology uses the existing network infrastructure for
voice transmission and shares this with other communication services.
16.1 SIP
SIP serves as a translation instance between different telecommunications networks, e.g
between the plain old phone network and the next generation networks (IP networks).
16.1.1 Options
In the VoIP ->SIP-> Options menu, you can make global settings for the SIP.
Fig. 103: VoIP ->SIP-> Options
The VoIP ->SIP-> Options menu consists of the following fields:
Fields in the Options Basic Parameters menu
Field
SIP Proxy
278
Description
Select whether you want to activate the SIP proxy.
bintec R200-Serie
16 VoIP
Funkwerk Enterprise Communications GmbH
Field
Description
The function is activated with #/.
The function is disabled by default.
SIP Port
Enter the port to be supervised by the proxy.
or each destination port to which VoIP clients from the LAN can
connect, you must configure a proxy.
The ports can be provider-specific.
The default value is .
Prioritize SIP Calls
Select whether you want to activate Prioritize SIP Calls.
The function is activated with #/.
The function is disabled by default.
16.2 RTSP
In this menu, you configure the use of the RealTime Streaming protocol (RTSP).
RTSP is a network protocol for controlling multimedia traffic flows in IP-based networks.
Payload data is not transferred using RTSP. Rather, it is used to control a multimedia session between sender and recipient.
If you want to use RTSP, the firewall and NAT must be configured accordingly. In the VoIP
-> RTSP, you can enable the RTSP proxy to enable requested RTSP sessions over the
defined port if required.
bintec R200-Serie
279
16 VoIP
Funkwerk Enterprise Communications GmbH
16.2.1 RTSP Proxy
In the VoIP -> RTSP -> RTSP Proxy menu, you configure the use of the RealTime Streaming protocol (RTSP).
Fig. 104: VoIP -> RTSP -> RTSP Proxy
The VoIP -> RTSP -> RTSP Proxy menu consists of the following fields:
Fields in the RTSP ProxyBasic Parameters menu
Field
Description
RTSP Proxy
Select whether you want to permit RTSP sessions.
The function is enabled by choosing #/.
The function is disabled by default.
RTSP Port
Select the port over which the RTSP messages are to come in
and go out.
Possible values are to '.
The default value is .
280
bintec R200-Serie
Funkwerk Enterprise Communications GmbH
17 Local services
Chapter 17 Local services
17.1 DNS
Each device in a TCP/IP network is usually located by its IP address. Because host names
are often used in networks to reach different devices, it is necessary for the associated IP
address to be known. This task can be performed by a DNS server, which resolves the
host names into IP addresses. Alternatively, name resolution can also take place over the
HOSTS file, which is available on all PCs.
Your device offers the following options for name resolution:
• DNS Proxy, for forwarding DNS requests sent to your device to a suitable DNS server.
This also includes specific forwarding of defined domains (Forwarded Domains).
• DNS cache, for saving the positive and negative results of DNS requests.
• Static entries (Static Hosts), for manually defining or preventing assignments of IP addresses to names.
• DNS monitoring, for providing an overview of DNS requests on your device.
Global Name Server
The IP addresses of global name servers that are queried if your device is unable to answer requests itself or by forwarding entries are entered in Local Services -> DNS ->
Global Settings -> Basic Parameters.
For local applications, the IP address of your device or the general loopback address
(127.0.0.1) can be entered as the global name server.
Your device can also receive the global name servers dynamically and transfer them dynamically if necessary.
Strategy for name resolution on your device
A DNS request is handled by your device as follows:
bintec R200-Serie
(1)
If possible, the request is answered directly from the static or dynamic cache with IP
address or negative response.
(2)
Otherwise, if a suitable forwarding entry exists, the relevant DNS server is asked, depending on the configuration of the Internet or dialin connections, if necessary by setting up a WAN connection at extra cost. If the DNS server can resolve the name, the
281
17 Local services
Funkwerk Enterprise Communications GmbH
information is forwarded and a dynamic entry created in the cache.
(3)
Otherwise, if global name servers are entered, the primary DNS server then the secondary DNS server are asked. If the IP address of your device or the loopback address is entered for local applications, these are ignored here. If one of the DNS servers can resolve the name, the information is forwarded and a dynamic entry created in
the cache.
(4)
Otherwise, if a suitable Internet or dialin connection is selected as the standard interface, the relevant DNS server is asked, depending on the configuration of the Internet
or dialin connections, if necessary by setting up a WAN connection at extra cost. If
one of the DNS servers can resolve the name, the information is forwarded and a dynamic entry created in the cache.
(5)
Otherwise, if overwriting the addresses of the global name servers is allowed ( DNS
Server Configuration = ;)%), a connection is set up – in some cases at extra
cost – that is configured to enable DNS server addresses to be requested from DNS
servers (DNS Negotiation = #/), if this has not been attempted previously. If
name server negotiation is successful, these are entered as global name servers and
are therefore available for further requests.
(6)
Otherwise the initial request is answered with a server error.
If one of the DNS servers answers with 0
% $ , the initial request is immediately answered accordingly and a corresponding negative entry is made in the DNS
cache of your device.
282
bintec R200-Serie
17 Local services
Funkwerk Enterprise Communications GmbH
17.1.1 Global Settings
Fig. 105: Local Services -> DNS -> Global Settings
The Local Services ->UPnP-> Global Settings menu consists of the following fields:
Fields in the Global Settings Basic Parameters menu
Field
Description
Domain Name
Enter the standard domain name of your device.
DNS Server Configuration
Select whether the addresses of the global name server on your
device can be overwritten by transferred name server addresses.
Possible values:
• ;)% (default value) The name server addresses can be
automatically overwritten.
• -%: The name server addresses are not overwritten.
bintec R200-Serie
283
17 Local services
Funkwerk Enterprise Communications GmbH
Field
Description
DNS Server
Only for DNS Server Configuration = -%
Primary
Enter the IP address of the first and, if necessary, second global
DNS server.
Secondary
WINS Server
Primary
Enter the IP address of the first and, if necessary, alternative
global Windows Internet Name Server (=WINS) or NetBIOS
Name Server (=NBNS).
Secondary
The Advanced Settingsmenu consists of the following fields:
Fields in the menu Advanced Settings
Field
Description
Positive Cache
Select whether the positive dynamic cache is to be activated,
i.e. successfully resolved names and IP addresses are to be
stored in the cache.
The function is enabled by choosing #/.
The function is enabled by default.
Negative Cache
Select whether the negative dynamic cache is to be activated,
i.e. whether queried names for which a DNS server has sent a
negative response are stored as negative entries in the cache.
The function is enabled by choosing #/.
The function is enabled by default.
Cache Size
Enter the maximum total number of static and dynamic entries.
Once this value is reached, the dynamic entry not requested for
the longest period of time is deleted when a new entry is added.
If the Cache Size is reduced by the user, dynamic entries are
deleted if necessary. Static entries are not deleted. Cache Size
cannot be set to smaller than the current number of static
entries.
Possible values: .. .
The default value is .
284
bintec R200-Serie
17 Local services
Funkwerk Enterprise Communications GmbH
Field
Description
Maximum TTL for Positive Cache Entries
Enter the value to which the TTL is to be set for a positive dynamic DNS entry in the cache if its TTL is or its TTL exceeds
the value for Maximum TTL for Positive Cache Entries .
The default value is .
Maximum TTL for Negative Cache Entries
Enter the value set to which the TTL is to be set in the case of a
negative dynamic entry in the cache.
The default value is .
Alternative interface to
get DNS servers
Only if DNS Server Configuration = ;)%
Select the interface to which a connection is set up for name
server negotiation if other name resolution attempts were not
successful.
The default value is 1
% i.e. a one-time connection is
set up to the first suitable connection partner configured in the
system.
IP Address to use for
DNS/WINS Server Assignment
As DHCP Server
Select which name server addresses are sent to the DHCP client if your device is used as DHCP server.
Possible values:
• *: No name server address is sent.
• = 1&& (default value): The address of your
device is transferred as the name server address.
• /#/ ;*- -$: The addresses of the global name
servers entered on your device are sent.
As IPCP Server
Select which name server addresses are to be transmitted by
your device in the event of dynamic server name negotiation if
your device is used as the IPCP server for PPP connections.
Possible values:
• *: No name server address is sent.
• = &&: The address of your device is transferred
bintec R200-Serie
285
17 Local services
Funkwerk Enterprise Communications GmbH
Field
Description
as the name server address.
• /#/ ;*- -$ (default value): The addresses of the
global name servers entered on your device are sent.
17.1.2 Static Hosts
In the Local Services -> DNS -> Static Hosts menu, a list of all configured static hosts is
shown.
17.1.2.1 New
Choose the New button to set up new static hosts.
Fig. 106: Local Services -> DNS ->Static Hosts -> New
The Local Services -> DNS -> Static Hosts-> New menu consists of the following fields:
Fields in the Static Hosts Basic Parameters menu
286
Field
Description
Description
Enter the host name to which the IP Address defined in this
menu is to be assigned if a positive response is received to a
bintec R200-Serie
17 Local services
Funkwerk Enterprise Communications GmbH
Field
Description
DNS request. If a negative response is received to a DNS request, no address is specified.
The entry can also start with the wildcard *, e.g. *.funkwerk.de.
If a name is entered without a dot, this is completed with
<Name>. after confirming with OK " is added.
Response
In this entry, select the type of response to DNS requests.
Possible values:
• *$ : A DNS request for Name is answered with a
negative response.
• & (default value): A DNS request for Name is
answered with the associated IP address.
• *: A DNS request is ignored; no answer is given.
IP Address
Only if Response = &.
Enter the IP address assigned to Name.
TTL
Enter the the time for which the assignment of Name to IP Address is to be valid in seconds (only relevant if Response =
& ) that is transferred to requesting hosts.
The default value is (= 24 h).
17.1.3 Domain Forwarding
In the Local Services -> DNS -> Domain Forwarding menu, a list of all configured forwarding for defined domains is shown.
17.1.3.1 New
Choose the New button to set up new forwardings.
bintec R200-Serie
287
17 Local services
Funkwerk Enterprise Communications GmbH
Fig. 107: Local Services -> DNS ->Domain Forwarding -> New
The Local Services -> DNS ->Domain Forwarding -> New menu consists of the following
fields:
Fields in the Domain Forwarding Forwarding Parameters menu
Field
Description
Forwarding
Select whether a host or domain is to be forwarded.
Possible values:
• >& (default value)
• ;
Host
Only for Forward = >&
Enter the name of the host to be forwarded.
The entry can also start with the wildcard *, e.g. *.funkwerk.com.
If a name is entered without a full stop, once you confirm with
OK " <Default Domain>. " is added.
Domain
288
Only for Forward = ;
bintec R200-Serie
17 Local services
Funkwerk Enterprise Communications GmbH
Field
Description
Enter the name of the domain to be forwarded.
The entry can also start with the wildcard *, e.g. *.funkwerk.com.
If a name is entered without a full stop, once you confirm with
OK " <Default Domain>. " is added.
Forward to
Select the forwarding destination requests to the name defined
in Host or Domain.
Possible values:
• % (default setting) The request is forwarded to the
defined Interface.
• ;*- -: The request is forwarded to the defined DNS
server.
Interface
Only for Forward to = %
Select the interface via which the requests for the defined Domain are to be received and forwarded to the DNS server.
DNS Server
Only for Forward to = ;*- &
Enter the IP address of the primary and secondary DNS server.
17.1.4 Cache
In the Local Services -> DNS -> Cache menu, a list of all available cache entries is
shown.
bintec R200-Serie
289
17 Local services
Funkwerk Enterprise Communications GmbH
Fig. 108: Local Services -> DNS ->Cache
You can select individual entries using the checkbox in the corresponding line, or select
them all using the Select All button.
A dynamic entry can be converted to a static entry by marking the entry and confirming with
Set to Static. This entry then disappears from the list and is included in the list in the Static Hosts menu. The TTL is transferred in this operation.
290
bintec R200-Serie
17 Local services
Funkwerk Enterprise Communications GmbH
17.1.5 Statistics
Fig. 109: Local Services -> DNS ->Statistics
In the Local Services -> DNS ->Statistics menu, the following statistical values are
shown:
Fields in the Statistics DNS Statistics menu
bintec R200-Serie
Field
Description
Received DNS Packets
Shows the number of received DNS packets addressed direct to
your device, including the response packets for forwarded requests.
Invalid DNS Packets
Shows the number of invalid DNS packets received and addressed direct to your device.
DNS Requests
Shows the number of valid DNS requests received and addressed direct to your device.
Cache Hits
Shows the number of requests that were answered with static or
dynamic entries from the cache.
Forwarded Requests
Shows the number of requests forwarded to other name servers.
Cache Hitrate (%)
Displays the number of Cache Hits per DNS Request in %.
291
17 Local services
Funkwerk Enterprise Communications GmbH
Field
Description
Successfully Answered
Queries
Shows the number of successfully answered requests (positive
and negative).
Server Failures
Shows the number of requests that were not answered by any
name server (either positively or negatively).
17.2 DynDNS Client
The use of dynamic IP addresses has the disadvantage that a host in the network can no
longer be found once its IP address has changed. DynDNS ensures that your device can
still be reached after a change to the IP address.
The following configuration steps are necessary:
• Registration of a host name at a DynDNS provider
• Configuration of your device
Enrolment
The registration of a host name means that you define an individual user name for the
DynDNS service, e.g. )K%/. The service providers offer various domain names for
this, so that a unique host name results for your device , e.g.
)K%/,%. The DynDNS provider relieves you of the task of answering all DNS requests concerning the host )K%/,% with the dynamic
IP address of your device.
To ensure that the provider always knows the current IP address of your device, your
device contacts the provider when setting up a new connection and propagates its present
IP address.
17.2.1 DynDNS Update
In the Local Services -> DynDNS Client -> DynDNS Update menu, a list of all configured
DynDNS registrations is shown that are to be updated.
17.2.1.1 New
Choose the New button to set up further DynDNS registrations to be updated.
292
bintec R200-Serie
17 Local services
Funkwerk Enterprise Communications GmbH
Fig. 110: Local Services -> DynDNS Client -> DynDNS Update -> New
The Local Services -> DynDNS Client -> DynDNS Update -> New menu consists of the
following fields:
Fields in the DynDNS Update Basic Parameters menu
Field
Description
Host Name
Enter the complete host name as registered with the DynDNS
provider.
Interface
Select the WAN interface whose IP address is to be propagated
over the DynDNS service (e.g. the interface of the Internet Service Provider).
User name
Enter the user name as registered with the DynDNS provider.
Password
Enter the password as registered with the DynDNS provider.
Provider
Select the DynDNS provider with which the above data is registered.
A choice of DynDNS providers is already available in the unconfigured state and their protocols are supported.
bintec R200-Serie
293
17 Local services
Funkwerk Enterprise Communications GmbH
Field
Description
Other DynDNS providers can be configured in the Local Services -> DynDNS Client-> DynDNS Providers menu.
The default value is ;);*- .
Enable Update
Select whether the DynDNS entry configured here is to be activated.
The function is enabled by choosing #/.
The function is disabled by default.
The Advanced Settingsmenu consists of the following fields:
Fields in the menu Advanced Settings
Field
Description
Mail Exchanger (MX)
Enter the full host name of a mail server to which e-mails are to
be forwarded if the host currently configured is not to receive
mail.
Ask your provider about this forwarding service and make sure
e-mails can be received from the host entered as MX.
Wildcard
Select whether the forwarding of all subdomains of the Host
Name are to be enabled for the current IP address of the Interface (advanced name resolution).
The function is enabled by choosing #/.
The function is disabled by default.
17.2.2 DynDNS Provider
In the Local Services -> DynDNS Client -> DynDNS Providers menu, a list of all configured DynDNS providers is shown.
17.2.2.1 New
Choose the New button to set up new DynDNS providers.
294
bintec R200-Serie
17 Local services
Funkwerk Enterprise Communications GmbH
Fig. 111: Local Services -> DynDNS Client -> DynDNS Providers -> New
The Local Services -> DynDNS Client -> DynDNS Provider -> New menu consists of the
following fields:
Fields in the DynDNS Provider Basic Parameters menu
Field
Description
Provider Name
Enter a name for this entry.
Server
Enter the host name or IP address of the server on which the
provider’s DynDNS service runs.
Update Path
Enter enter the path on the provider’s server that contains the
script for managing the IP address of your device.
Ask your provider for the path to be used.
Port
Enter the port at which your device is to reach your provider’s
server.
Ask your provider for the relevant port.
The default value is .
bintec R200-Serie
295
17 Local services
Funkwerk Enterprise Communications GmbH
Field
Description
Protocol
Select one of the protocols implemented.
Possible values:
• ;);*- (default value)
• -% ;);*• =;• >*
• ;G*• ,!>+(4
• ,!+:
• :
& ;);*-
Update Interval
Enter the minimum time (in seconds) that your device must wait
before it is allowed to propagate its current IP address to the
DynDNS provider again.
The default value is ' seconds.
17.3 DHCP Server
You can configure your device as a DHCP (Dynamic Host Configuration Protocol) server.
Your device and each PC in your LAN requires its own IP address. One option for allocating IP addresses in your LAN is the Dynamic Host Configuration Protocol (DHCP). If you
configure your device as a DHCP server, the device automatically assigns IP addresses to
requesting PCs in the LAN from a predefined IP address pool. A PC sends out an ARP request and in turn receives its IP address assigned by your device. You therefore do not
need to allocate fixed IP addresses to PCs, which reduces the amount of configuration
work in your network. To do this, you set up a pool of IP addresses, from which your device
assigns IP addresses to hosts in the LAN for a defined period of time. A DHCP server also
transfers the addresses of the domain name server entered statically or by PPP negotiation
(DNS), NetBIOS name server (WINS) and default gateway.
17.3.1 DHCP Pool
To activate your device as a DHCP server, you must first define IP address pools from
which the IP addresses are distributed to the requesting clients.
In the Local Services->DHCP Server->DHCP Pool menu, a list of all configured IP ad-
296
bintec R200-Serie
17 Local services
Funkwerk Enterprise Communications GmbH
dress pools is shown.
In the list, for each entry, you have the possibility under Pool of enabling or disabling the
configured DHCP pools.
17.3.1.1 New
Choose the New button to set up new IP address pools. Choose the
icon to edit exist-
ing entries.
Fig. 112: Local Services -> DHCP Server-> DHCP Pool -> New
The Local Services -> DHCP Server ->DHCP Pool -> New menu consists of the following
fields:
Fields in the DHCP PoolBasic Parameters menu
Field
Description
Interface
Select the interface over which the addresses defined in IP
Range are to be assigned to DHCP clients.
When a DHCP request is received over this Interface, one of
the addresses from the address pool is assigned.
IP Address Range
bintec R200-Serie
Enter the first (first field) and last (second field) IP address of
297
17 Local services
Funkwerk Enterprise Communications GmbH
Field
Description
the IP address pool.
Pool Usage
Specify whether the IP pool is used for DHCP requests in the
same subnet or for DHCP requests that have been forwarded to
your device from another subnet. In this case it is possible to
define IP addresses from another network.
Possible values:
• 4%/ (default value): The DHCP pool is only used for DHCP
requests in the same subnet.
• 4%/6?/): The DHCP pool is used for DHCP requests in
the same subnet and from other subnets.
• ?/): The DHCP pool is only used for DHCP requests forwarded from other subnets.
The Advanced Settingsmenu consists of the following fields:
Fields in the menu Advanced Settings
Field
Description
Gateway
Select which IP address is to be transferred to the DHCP client
as gateway.
Possible values:
• * $) (default value): No IP address is sent.
• <& & $): The IP address defined for the
Interface is transferred.
• -,%): Enter the corresponding IP address.
Lease Time
Enter the length of time (in minutes) for which an address from
the pool is to be assigned to a host.
After the Lease Time (Minutes) expires, the address can be reassigned by the server.
The default value is .
DHCP Options
Specify which additional data is forwarded to the DHCP client.
Possible values for Option:
• + - (default value): Enter the IP address of the
298
bintec R200-Serie
17 Local services
Funkwerk Enterprise Communications GmbH
Field
Description
time server to be sent to the client.
• ;*- -: Enter the IP address of the DNS server to be
sent to the client.
• ;*- ; *: Enter the DNS domain to be sent to the
client.
• 0*-6*3*- -: Enter the IP address of the WINS/
NBNS server to be sent to the client.
• 0*-6*3+ * +),: Enter the type of the WINS/NBT
node to be sent to the client.
• +B+ -: Enter the IP address of the TFTP server to be
sent to the client.
Several entries are possible. Add new entries with the Add button.
17.3.2 IP/MAC Binding
In the Local Services -> DHCP Server -> IP/MAC Binding menu a list is shown of all clients that have received an IP address from your device via DHCP.
You can now allocate an IP address from a defined IP address pool to specific MAC addresses. You can do this by selecting the Static Binding option in the list to convert a list
entry as a fixed binding, or you manually create a fixed IP/MAC binding by configuring this
in the New sub-menu.
Note
You can only create new static IP/MAC bindings if IP address ranges have been configured in Local Services -> DHCP Server -> DHCP Pool.
17.3.2.1 New
Choose the New button to set up new IP/MAC bindings.
bintec R200-Serie
299
17 Local services
Funkwerk Enterprise Communications GmbH
Fig. 113: Local Services -> DHCP Server -> IP/MAC Binding -> New
The Local Services -> DHCP Server ->DHCP Binding -> New menu consists of the following fields:
Fields in the IP/MAC Binding Basic Parameters menu
Field
Description
Description
Enter the name of the host to the MAC Address of which the IP
Address is to be bound.
A character string of up to 256 characters is possible.
300
IP Address
Enter the IP address to be assigned to the MAC address specified in MAC Address.
MAC address
Enter the MAC address to which the IP address specified in IP
Address is to be assigned.
bintec R200-Serie
17 Local services
Funkwerk Enterprise Communications GmbH
17.3.3 DHCP Relay Setting
If your device for the local network does not distribute any IP addresses to the clients by
DHCP, it can still forward the DHCP requests on behalf of the local network to a remote
DHCP server. The DHCP server then assigns the your device an IP address from its pool,
which in turn sends this to the client in the local network.
Fig. 114: Local Services -> DHCP Server ->DHCP Relay Settings
The Local Services -> DHCP Server -> DHCP Relay Settings menu consists of the following fields:
Fields in the DHCP Relay SettingsBasic Parameters menu
bintec R200-Serie
Field
Description
Primary DHCP Server
Enter the IP address of a server to which BootP or DHCP requests are to be forwarded.
Secondary DHCP Server
Enter the IP address of an alternative BootP or DHCP server.
301
17 Local services
Funkwerk Enterprise Communications GmbH
17.4 Web Filter
In the Local Services -> Web Filters menu, you can configure a URL-based Web filter
service, which accesses the Proventia Web Filter from the company Internet Security Systems (www.iss.net) and checks how a requested Internet page is categorised by the
Proventia Web Filter. The action resulting from the classification is configured on your
device.
17.4.1 Global Settings
This menu contains the configuration of basic parameters for using the Proventia Web Filter.
Fig. 115: Local Services -> Web Filters -> Global Settings
The menu Local Services -> Web Filters -> Global Settings consists of the following
fields:
Fields in the Global Settings Web Filter Options menu
302
bintec R200-Serie
17 Local services
Funkwerk Enterprise Communications GmbH
Field
Description
Enable Web Filter
Here you can activate the filter.
The function is enabled by choosing #/.
The function is disabled by default.
Filtered input interface(s) Select for which of the existing Ethernet interfaces web filtering
is to be activated.
Press the Add button to add more interfaces. The requests from
http Internet pages that reach your device via these interfaces
are then monitored by web filtering.
Maximum number of his- Define the number of entries to be saved in the web filtering history entries
tory (History menu).
Possible values are to .
The default value is .
URL path length
Select the path length to which a URL is to be checked by the
Cobion Orange Filter.
Action if Content Server
not reachable
Select which is to be done with URL requests if the web filtering
server cannot be reached.
Possible values:
• 1// // (default value): The download is permitted.
• 3/% //: The download of the requested page is blocked.
• 4$ //: The download is permitted, but logged.
Action if license not registered
Select what is to be done with URL requests if the licence key
status is * 9/.
Possible values:
• 1// // (default value): The download is permitted.
• 3/% //: The download of the requested page is blocked.
• 4$ //: The download is permitted, but logged.
The License Information menu consists of the following fields:
Fields in the Global SettingsLicense Information menu
bintec R200-Serie
303
17 Local services
Funkwerk Enterprise Communications GmbH
Field
Description
Licence Key
Enter the number of your Proventia Web Filter licence. The preset code assigned by ISS designates the device type.
In the ex works state, you can activate a 30-day demo version
of the Proventia Web Filter. Click here on the link [Activate
30-day demo license]
Licence Status
Shows the result of the last validity check of the licence. The
validity of the licence is checked every 23 hours.
License valid until
This shows the expiry date of the licence (relative to the time set
on your device) and cannot be edited.
17.4.2 Filter List
In the Local Services -> Web Filters -> Filter List menu, configure which categories of Internet pages are to be handled and how.
You configure the relevant filters for this purpose. A list of filters already configured is displayed.
There are basically different approaches for configuring the filters:
• First a filter list can be created that only contains entries for those addresses that are to
be blocked. In this case it is necessary to make an entry at the end of the filter list that allows all accesses that do not match a filter. (Setting for this: Category = ;
/ 3!
, Action = or 4$)
• If you only create entries for those addresses that are to be allowed or logged, it is not
necessary to change the default behaviour (= all other calls are blocked).
304
bintec R200-Serie
17 Local services
Funkwerk Enterprise Communications GmbH
17.4.2.1 New
Choose the New button to set up new filters.
Fig. 116: Local Services -> Web Filters -> Filter List ->New
The Local Services -> Web Filter -> Filter List-> New menu consists of the following
fields:
Fields in the Filter List Filter Parameters menu
Field
Description
Category
Select which category of addresses/URLs the filter is to be used
on.
The options are first the standard categories of the Proventia
Web Filter (default value: $,)6*
)). Actions can
also be defined for the following special cases, e.g.:
• ;
/ #
: This category applies to all Internet
addresses.
• = :$): Some addresses are already known to
the Proventia Web Filter, but not yet classified. The action associated with this category is used for such addresses.
bintec R200-Serie
305
17 Local services
Funkwerk Enterprise Communications GmbH
Field
Description
• < <?4: If an address is not known to the Proventia
Web Filter, the action associated with this category is used.
Day
Select the days on which the filter is to be active.
Possible settings:
• ;/) (default value): The filter is used every day of the
week.
• @0)A: The filter is used on a certain day of the week.
Only one day can be selected per filter; several filters must be
configured if several individual days are to be covered.
• ()!B): The filter is used from Monday to Friday.
The default value is ;/).
Schedule (start/stop
time)
In from, enter from which time the the filter is to be activated.
The time is entered in the form hh:mm. The default value is
00:00. In to, enter the time at which the filter is to be deactivated. The time is entered in the form hh:mm. The default value
is 00:00.
Action
Select the action to be executed if the filter matches a call.
Possible values:
• 3/% 4$ (default value): The call of the requested
page is prevented and logged.
• 1// 4$: The download is permitted, but logged.
The events log can be viewed in the Local Services -> Web
Filters -> Filter List menu.
• 1//: The call is allowed and not logged.
17.4.3 Black / White lists
The Local Services -> Web Filters -> Black / White Lists menu contains a list of URLs
and IP addresses that can be downloaded even if they were blocked as a result of the filter
configuration and classification in the Proventia Web Filter (no entries are contained in the
default configuration).
306
bintec R200-Serie
17 Local services
Funkwerk Enterprise Communications GmbH
17.4.3.1 Add
Use the Add button to add further URLs or IP addresses to the list.
Fig. 117: Local Services -> Web Filter -> Black / White List -> Add
The Local Services -> Web Filter -> Black / White List->Add menu consists of the following fields:
Fields in the Black / White List menu
Field
Description
URL/IP-Address
You enter a URL or IP address. The length of the entry is limited
to 60 characters.
Blacklisted
You can select whether a URL or IP address can always ( 0 4&) or never ( 3/% 4&) be
downloaded.
Whitelisted
By default, 0 4& is enabled.
Addresses listed in the White List are allowed automatically. It is
not necessary to configure a suitable filter.
bintec R200-Serie
307
17 Local services
Funkwerk Enterprise Communications GmbH
17.4.4 History
In the Local Services -> Web Filter -> History menu, you can view the recorded history of
the web filter. The history logs all requests that are marked for logging by a relevant filter
(Action = 4$), likewise all rejected requests.
Fig. 118: Local Services -> Web Filters -> History
17.5 CAPI Server
You can use the CAPI Server function to assign user names and passwords to users of the
CAPI applications on your device. This makes sure that only authorised users can receive
incoming calls and make outgoing calls via CAPI.
The CAPI service allows connection of incoming and outgoing data and voice calls to communications applications on hosts in the LAN that access the Remote CAPI interface of
your device. This enables, for example, hosts connected to your device to receive and
send faxes.
308
bintec R200-Serie
Funkwerk Enterprise Communications GmbH
17 Local services
Note
Ex works, a user with the user name / and no password is always entered for
the CAPI subsystem. All calls to the CAPI are offered to all CAPI applications in the
LAN.
Use the Settings menu to distribute incoming calls for the CAPI subsystem to defined
users with password. You should then delete the user / without password.
17.5.1 User
In the Local Services -> CAPI Server -> Users menu, a list of all configured CAPI users is
shown.
17.5.1.1 New
Choose the New button to set up new CAPI users.
Fig. 119: Local Services -> CAPI Server -> Users -> New
The Local Services -> CAPI Server ->Users -> New menu consists of the following fields:
Fields in the Users Basic Parameters menu
bintec R200-Serie
309
17 Local services
Funkwerk Enterprise Communications GmbH
Field
Description
User name
Enter the user name for which access to the CAPI service is to
be allowed or denied.
Password
Enter the password with which the user User Name has to use
for identification purposes to gain access to the CAPI service.
Access
Select whether access to the CAPI service is to be permitted or
denied for the user.
The function is enabled by choosing #/.
The function is enabled by default.
17.5.2 Options
Fig. 120: Local Services -> CAPI Server ->Options
The Local Services -> CAPI Server ->Options menu consists of the following fields:
Fields in the Options Basic Parameters menu
310
bintec R200-Serie
17 Local services
Funkwerk Enterprise Communications GmbH
Field
Description
Enable Server
Select whether your device is to be enabled as a CAPI server.
The function is enabled by choosing #/.
The function is enabled by default.
CAPI Server TCP Port
The field can only be edited if Enable Server is enabled.
Enter the TCP port number for remote CAPI connections.
The default value is .
17.6 Scheduling
Your device has a event scheduler, which enables certain standard actions (activation or
deactivation of interfaces) to be carried out on a time-dependent basis.
Note
To run the event scheduler, the date configured on your device must be 1.1.2000 or
later.
17.6.1 Schedule
In the Local Services -> Scheduling -> Schedule menu, a list of all scheduled tasks is
shown.
17.6.1.1 New
Choose the New button to set up new tasks.
bintec R200-Serie
311
17 Local services
Funkwerk Enterprise Communications GmbH
Fig. 121: Local Services -> Scheduling -> Time Schedule -> New
The Local Services -> Scheduling -> Schedule-> New menu consists of the following
fields:
Fields in the Time Schedule Basic Parameters menu
Field
Description
Description
Enter the desired name for the scheduled task.
Fields in the Time Schedule Action menu
Field
Description
Select Action
Select the desired action.
Possible values:
• ?# ;% (default value): Your device is rebooted.
• 1% % : The interface defined in the Select
Interface field is activated.
• ;% % : The interface defined in the Select Interface field is deactivated.
• 1% 041*: The WLAN interface defined in the Select
Interface field is activated.
312
bintec R200-Serie
17 Local services
Funkwerk Enterprise Communications GmbH
Field
Description
• ;% 041*: The WLAN interface defined in the Select Interface field is deactivated.
• +$$ & ,: A software update is initiated.
• +$$ %$
#%
,: The backup of the
device configuration to a TFTP server is initiated.
Select Interface
Only if Select Action = 1% % or ;%!
%
or if
Select Action = 1% 041* or ;% 041*
Select which interface is to be activated or deactivated.
Source
Only if Select Action = +$$ & ,
Select the desired source.
Possible values:
• :
& B
&: The latest
software will be downloaded from the Funkwerk server.
• >++ &: The latest software will be downloaded from
an HTTP server that you define in <, <?4.
Update URL
Only if Select Action = +$$ & , and
Source = >++ &
Enter the name of the HTTP server from which you wish to
download a configuration file.
TFTP server
Only if Select Action = +$$ :$
3%
,
Enter the IP address of the TFTP server to which you wish to
transfer a configuration file.
TFTP File Name
Only if Select Action = +$$ :$
3%
,
Enter the name with which configuration file is to be transferred
to the TFTP server.
Fields in the Time Schedule Select time interval menu
bintec R200-Serie
313
17 Local services
Funkwerk Enterprise Communications GmbH
Field
Description
Time Condition
First select the type of time entry in Condition Type.
Possible values:
• 0): In Condition Settings , select a weekday.
• & (default setting): In Condition Settings , select a
particular period.
• ;) (: In Condition Settings , select a particular
day of the month.
Possible values for Condition Settings with Condition Type =
0):
() (default value) ... -
).
Possible values for Condition Settings with Condition Type =
&:
• ;/): The initiator becomes active daily (default value).
• ()!B): The initiator becomes active daily from
Monday to Friday.
• ()!-
) : The initiator becomes active daily from
Monday to Saturday.
• -
) ! -
) : The initiator becomes active on Saturdays and Sundays.
Possible values for Condition Settings with Condition Type =
;) :
... '.
Start Time
Enter the time from which the initiator is to be activated. Activation is carried on the next scheduling interval. the default value
of this interval is 55 seconds.
Stop Time
Not if Select Action = ?# ;%
Enter the time from which the initiator is to be deactivated. Deactivation is carried on the next scheduling interval. If you do not
enter a Stop Time or set Stop Time = Start Time, the initiator
is activated and deactivated after 10 seconds.
314
bintec R200-Serie
17 Local services
Funkwerk Enterprise Communications GmbH
17.6.2 Options
In the Local Services -> Scheduling -> Options menu, you configure the schedule interval.
So long as, under Local Services -> Scheduling -> Schedule, no tasks are configured,
= is shown in this field.
Fig. 122: Local Services -> Scheduling-> Options
The Local Services -> Scheduling -> Options menu consists of the following fields:
Fields in the Options Scheduling Options menu
Field
Description
Schedule Interval
Enter the interval in seconds during which the system checks
whether there are planned tasks.
Possible values are to '.
The value ' is recommended (5 minute accuracy). Values
lower than 60 are generally pointless and are an unnecessary
use of system resources.
bintec R200-Serie
315
17 Local services
Funkwerk Enterprise Communications GmbH
Field
Description
If = is displayed in this field, the scheduler is deactivated.
17.7 Surveillance
In this menu, you can configure an automatic availability check for hosts or interfaces and
automatic ping tests.
Note
This function cannot be configured on your device for connections that are authenticated via a RADIUS server.
17.7.1 Hosts
In the Local Services -> Monitoring -> Hosts menu, a list of all monitored hosts is shown.
Fig. 123: Local Services -> Surveillance -> Hosts
Values in the list Hosts
316
bintec R200-Serie
17 Local services
Funkwerk Enterprise Communications GmbH
Field
Description
Group ID
Shows the chosen group ID.
Monitored IP Address
Shows the IP address to be monitored.
State
Displays the operating state of the monitored IP address.
Interface Action
Shows the chosen interface action.
Interface
Shows the interface to which the chosen interface action should
be applied.
17.7.1.1 Edit/New
Choose the
icon to edit existing entries. Choose the New button to set up new surveil-
lance tasks servers.
Fig. 124: Local Services -> Monitoring -> Hosts -> New
The Local Services -> Monitoring -> Hosts-> New menu consists of the following fields:
Fields in the Hosts Host Parameters menu
bintec R200-Serie
Field
Description
Group ID
Select an ID for the group of hosts whose availability is to be
monitored by your device.
317
17 Local services
Funkwerk Enterprise Communications GmbH
Field
Description
The group IDs are automatically created from to . If an
entry has not yet been created, a new group is created using
the * ; option. If entries have been created, you can select
one from the list of created groups.
Each host to be monitored must be assigned to a group.
The action configured in Interface Action is only executed if no
other group member can be reached.
Fields in the Hosts Trigger menu
Field
Description
Monitored IP Address
Enter the IP address of the host to be monitored.
Source IP Address
Select how the IP address is to be determined that your device
uses as the source address of the packet sent to the host to be
monitored.
Possible values:
• 1
% (default value): The IP address is determined
automatically.
• -,%%: Enter the IP address in the adjacent input field.
Interval
Enter the time interval (in seconds) to be used for checking the
availability of hosts.
Possible values are to '.
The default value is .
The smallest Interval of the group members is used within a
group.
Trials
Enter the number of pings that must remain unanswered for the
host to be regarded as unavailable.
Possible values are to '.
The default value is '.
Controlled interfaces
318
Select the interface(s) for which the action defined in Interface
Action is to be performed.
bintec R200-Serie
17 Local services
Funkwerk Enterprise Communications GmbH
Field
Description
All the physical and virtual interfaces and the options 1// %& and 1// -% %& can be selected.
Each interface, select whether each interface is to be activated (
#/) or deactivated ( ;&#/, default value).
17.7.2 Interfaces
In the Local Services -> Monitoring -> Interfaces menu, a list of all monitored Interfaces
is shown.
Fig. 125: Local Services -> Surveillance -> Interfaces
Values in the list Interfaces
bintec R200-Serie
Field
Description
Monitored Interface
Shows the interface to be monitored.
State
Shows the operating status of the selected interface.
Trigger
Displays the chosen state transition.
Interface Action
Shows the interface action.
Interface
Shows the interface to which the chosen interface action should
be applied.
319
17 Local services
Funkwerk Enterprise Communications GmbH
17.7.2.1 Edit/New
Choose the
icon to edit existing entries. Choose the New button to set up monitoring for
other interfaces.
Fig. 126: Local Services -> Monitoring -> Interfaces -> New
The Local Services -> Monitoring ->Interfaces -> New menu consists of the following
fields:
Fields in the Interfaces Basic Parameters menu
Field
Description
Monitored Interface
Select the interface on your device that is to be monitored.
Trigger
Select the state or state transition of Monitored Interfaces that
is to trigger a particular Interface Action.
Possible values:
• % $& , (default setting)
• % $& Interface Action
320
Select the action that is to follow the state or state transition
bintec R200-Serie
17 Local services
Funkwerk Enterprise Communications GmbH
Field
Description
defined in Trigger.
The action is applied to the Interface(s) selected in Interface.
Possible values:
• #/ (default value): Activation of interface(s)
• ;&#/: Deactivation of interface(s)
Interface
Select the interface(s) for which the action defined in Interface
Action is to be performed.
All the physical and virtual interfaces and the options 1// %& and 1// -% %& can be selected.
17.7.3 Ping Generator
In the Local Services -> Monitoring -> Ping Generator menu, a list is shown of all pings
configured for automatic generation.
Fig. 127: Local Services -> Surveillance -> Ping Generator
Values in the Ping Generator list
bintec R200-Serie
321
17 Local services
Funkwerk Enterprise Communications GmbH
Field
Description
Destination IP Address
Source IP Address
Interval
Shows the IP address to which the ping is automatically sent.
Shows the source IP address of the outgoing ICMP echo request packets.
Shows the interval in seconds during which the ping is sent to
the specified address.
State
Displays the operating state of the destination IP address.
17.7.3.1 Edit/New
Choose the
icon to edit existing entries. Choose the New button to set up further pings.
Fig. 128: Local Services -> Monitoring -> Ping Generator -> New
The Local Services -> Monitoring ->Ping Generator -> New menu consists of the following fields:
Fields in the Ping Generator Basic Parameters menu
322
Field
Description
Destination IP Address
Enter the IP address to which the ping is automatically sent.
bintec R200-Serie
17 Local services
Funkwerk Enterprise Communications GmbH
Field
Description
Source IP Address
Enter the source IP address of the outgoing ICMP echo request
packets.
Possible values:
• 1
% (default value): The IP address is determined
automatically.
• -,%%: Enter the IP address in the adjacent input field
e.g. to test a particular extended route.
Interval
Enter the interval is seconds during which the ping is to be sent
to the target IP address specified in Target IP Address .
Possible values are to '.
The default value is .
17.8 ISDN Theft Protection
With the ISDN theft protection function, you can prevent a thief who has stolen a gateway
from gaining access to the gateway owner's LAN. (Without theft protection, he could dial into the LAN by ISDN if, under WAN-> Internet + Dialup->New, the field Always On is enabled.)
17.8.1 Options
All interfaces for which the theft protection is enabled are administratively set to "down"
when the gateway boots.
The gateway then calls itself by ISDN and checks its location. If the configured ISDN call
numbers differ from the numbers dialled, the interfaces remain disabled.
If the numbers agree, the device assumes that it is at the original location and the interfaces are administratively set to "up".
To reduce cost, the function uses the ISDN D channel.
Note
Note that the ISDN theft protection function is not available for Ethernet interfaces.
bintec R200-Serie
323
17 Local services
Funkwerk Enterprise Communications GmbH
Fig. 129: Local Services ->ISDN Theft Protection -> Options
The Local Services ->ISDN Theft Protection -> Options menu consists of the following
fields:
Fields in the Options Basic Parameters menu
Field
Description
ISDN Theft Protection
Service
Here you can enable or disable the ISDN theft protection function.
The function is activated with #/.
The function is disabled by default.
Dialling Number
Only if ISDN theft protection service is enabled.
Enter the subscriber number that the gateway dials to call itself.
Incoming Number
Only if ISDN theft protection service is enabled.
Enter the subscriber number to be compared with the current
calling party number.
Number Called
324
Only if ISDN theft protection service is enabled.
bintec R200-Serie
17 Local services
Funkwerk Enterprise Communications GmbH
Field
Description
Enter the subscriber number to be set as calling party number.
Monitored interfaces
Only if ISDN theft protection service is enabled.
Use Add to add a new interface to the list.
Select from the available interfaces those to which the ISDN
theft protection function is to be applied.
Fields in the Options Advanced Settings menu
Field
Description
Number of dial attempts
Enter the number of dial attempts that the gateway is to make to
call itself by ISDN after a reboot.
Possible values are to .
The default value is '.
Timeout
Enter the time in seconds that the gateway is to wait before trying again after an unsuccessful attempt to call itself.
Possible values are to .
The default value is .
17.9 Funkwerk Discovery
17.9.1 Device discovery
The funkwerk Discovery protocol is used to identify and configure bintec access points that
are in the same wired network as your device. Once an access point has been discovered,
certain basic parameters (node name, IP address, netmask, and device address) can be
configured on the access point (provided you know the administrator password).
Note
Any bintec access points that exist are determined by means of a multicast. The IP
address of the access point is therefore irrelevant.
Please note that the discovered bintec access points are not stored in the flash, which
bintec R200-Serie
325
17 Local services
Funkwerk Enterprise Communications GmbH
means discovery must be repeated after you reboot your device.
In the Local Services -> Funkwerk Discovery -> Device Discovery menu, under Results a list is shown of all access points found on the network. In the Interface field, select
the interface of your device via which access point discovery is to be carried out. You use
the !1//! option to query all interfaces.
The current discovery status is displayed for each individual Ethernet interface under Discovery Status. * means that discovery is not active. ;&%) is displayed when discovery is currently being carried out.
This discovery function also enables your device to be discovered and configured by other
access points with a discovery function. You configure this in the Options sub-menu.
17.9.1.1 Discover
Click the Discover button to start access point discovery.
Fig. 130: Local Services -> Funkwerk Discovery -> Device Discovery
If access points were discovered in the network, they are displayed in the list. You use the
button to go to the configuration menu for the access point.
326
bintec R200-Serie
17 Local services
Funkwerk Enterprise Communications GmbH
Fig. 131: Local Services -> Funkwerk Discovery -> Device Discovery ->
The Local Services -> Funkwerk Discovery -> Device Discovery->
menu consists of
the following fields:
Fields in the Funkwerk Discovery Basic Parameters menu
Field
Description
Interface
The value of this field can only be read.
This field specifies the interface of your device on which discovery is carried out.
MAC address
The value of this field can only be read.
This field specifies the MAC address of the discovered access
point.
bintec R200-Serie
Node Name
You can change the name of the discovered access point here.
IP Address
You can change the IP address of the discovered access point
here.
Netmask
You can change the related netmask here.
327
17 Local services
Funkwerk Enterprise Communications GmbH
Field
Description
Gateway
You can change the gateway address of the discovered access
point here.
Authentication Password You must enter the administrator password for the access point
here, otherwise you cannot carry out the configuration operation.
Last Write Result
The value of this field can only be read.
This field displays the result of the last configuration operation.
Possible values:
• * : The access point reported a successful operation
or a configuration change has not yet been made with OK.
• * ?&,&: The access point has not responded.
• 1%%&& ;: The access point reported an authorisation
error. Check the authentication password.
• / &: There is a problem with the intended IP parameters (IP address, netmask, or gateway address).
• ;& <%#/: The access point cannot be
reached for internal reasons (e.g. the interface to which the
access point is connected is down). A configuration request
cannot be sent to the access point.
• = 1 : The access point responds to the configuration request with an unexpected or non-specific error.
• / : An internal device problem prevented the
configuration option from being carried out.
328
bintec R200-Serie
17 Local services
Funkwerk Enterprise Communications GmbH
17.9.2 Options
In this menu, you can grant permission for your device to be discovered by other bintec
devices using the funkwerk Discovery protocol and to be configured by means of this.
Fig. 132: Local Services -> Funkwerk Discovery -> Options
The Local Services -> Funkwerk Discovery -> Options menu consists of the following
fields:
Fields in the Options Discovery Server Options menu
Field
Description
Enable Discovery Server Select whether your device is to be discovered and configured
by other bintec devices in the network.
The function is activated with #/.
The function is disabled by default.
bintec R200-Serie
329
17 Local services
Funkwerk Enterprise Communications GmbH
17.10 UPnP
Universal Plug and Play (UPnP) makes it possible to use current messenger services (e.g.
real time video/audio conferencing) as peer-to-peer communication where one of the peers
lies behind a NAT-enabled gateway.
UPnP enables (mostly) Windows-based operating systems to take control of other devices
with UPnP functionality on the local network. These include gateways, access points and
print servers. No special device drivers are needed as known common protocols are used,
such as TCP/IP, HTTP and XML.
Your gateway makes it possible to use the subsystem of the Internet Gateway Device
(IGD) from the UPnP function range.
In a network behind a NAT-enabled gateway, the UPnP-configured computers act as LAN
UPnP clients. To do this, the UPnP function on the PC must be enabled.
The pre-configured port used for UPnP communication between LAN UPnP clients and the
gateway is .. The LAN UPnP client acts as a so-called service control point, i.e. it recognizes and controls the UPnP devices on the network.
The ports assigned dynamically by, for example, MSN Messenger, lie in the range from
to '. The ports are released internally to the gateway on demand, i.e. when an
audio/video transfer is started in Messenger. When the application is closed, the ports are
immediately closed again.
The peer-to-peer-communication is initiated via public SIP servers with only the information
from the two clients being forwarded. The clients then communicate directly with one another.
For further information about UPnP, see www.upnp.org .
17.10.1 Interfaces
In this menu, you configure the UPnP settings individually for each interface of your gateway.
You can determine whether UPnP requests from clients are accepted by each interface (for
requests from the local network) and/or whether the interface can be controlled via UPnP
requests.
330
bintec R200-Serie
17 Local services
Funkwerk Enterprise Communications GmbH
Fig. 133: Local Services -> UPnP ->Interfaces
The Local Services -> UPnP->Interfaces menu consists of the following fields:
Fields in the UPnP Interfaces menu
Field
Description
Interface
Shows the name of the interface for which the UPnP settings
are to be made. The entry cannot be changed.
Answer to client request Determine whether UPnP requests from clients are to be
answered via the particular interface (from the local network).
The function is activated with #/.
The function is disabled by default.
Interface is UPnP controlled
Determine whether the NAT configuration of this interface is
controlled by UPnP.
The function is activated with #/.
The function is enabled by default.
bintec R200-Serie
331
17 Local services
Funkwerk Enterprise Communications GmbH
17.10.2 Global Settings
In this menu, you make the basic UPnP settings.
Fig. 134: Local Services -> UPnP -> Global Settings
The Local Services -> UPnP-> Global Settings menu consists of the following fields:
Fields in the Global Settings Basic Parameters menu
Field
Description
UPnP Status
Decide how the gateway processes UPnP requests from the
LAN.
The function is activated with #/. The gateway proceeds
with UPnP releases in accordance with the parameters contained in the request from the LAN UPnP client, independently
of the IP address of the requesting LAN UPnP client.
The function is disabled by default. The gateway rejects UPnP
requests, NAT releases are not made.
UPnP TCP Port
332
Enter the number of the port on which the gateway listens for
UPnP requests.
bintec R200-Serie
17 Local services
Funkwerk Enterprise Communications GmbH
Field
Description
The possible values are to ', the default value is ..
bintec R200-Serie
333
18 Maintenance
Funkwerk Enterprise Communications GmbH
Chapter 18 Maintenance
This menu provides you with numerous functions for maintaining your device. It firstly
provides a menu for testing availability within the network. You can manage your system
configuration files. If more recent system software is available, you can use this menu to install it. If you need other languages for the configuration interface, you can import these.
You can also trigger a system reboot in this menu.
18.1 Diagnostics
In the Maintenance -> Diagnosis menu, you can test the accessibility of individual hosts,
the resolution of domain names and certain routes.
18.1.1 Ping Test
Fig. 135: Maintenance -> Diagnosis ->Ping Test
You can use the ping test to check whether a certain host in the LAN or an internet address
can be reached. The Output field shows the ping test messages. The ping test is started
by entering the IP address to be tested in Send Ping Request to Address and clicking on
the Go button.
334
bintec R200-Serie
Funkwerk Enterprise Communications GmbH
18 Maintenance
18.1.2 DNS Test
Fig. 136: Maintenance -> Diagnosis ->DNS Test
The DNS test is used to check whether the domain name of a particular host is correctly resolved. The Output Results field shows the DNS test messages. The DNS test is started
by entering the domain name to be tested in DNS Address and clicking on the Go button.
bintec R200-Serie
335
18 Maintenance
Funkwerk Enterprise Communications GmbH
18.1.3 Traceroute Test
Fig. 137: Maintenance -> Diagnosis ->Traceroute Test
You use the traceroute test to display the route to a particular address (IP address or domain name), if this can be reached. The Output field shows the traceroute test messages.
The traceroute test is started by entering the address to be tested in Traceroute Address
and clicking on the Go button.
18.2 Software & Configuration
18.2.1 Options
You can use this menu to manage the software version of your device, your configuration
files and the language of the Funkwerk Configuration Interface .
Your device contains the version of the system software available at the time of production.
More recent versions may have since been released. You may therefore need to carry out
a software update.
Every new system software includes new features, better performance and any necessary
bugfixes from the previous version. You can find the current system software at
www.funkwerk-ec.com . The current documentation is also available here.
336
bintec R200-Serie
Funkwerk Enterprise Communications GmbH
18 Maintenance
Important
If you want to update your software, make sure you consider the corresponding release notes. These describe the changes implemented in the new system software.
The result of an interrupted update (e.g. power failure during the update) could be that
your gateway no longer boots. Do not turn your device off during the update.
An update of BOOTmonitor and/or Logic is recommended in a few cases. In this case,
the release notes refer expressly to this fact. Only update BOOTmonitor or Logic if
Funkwerk Enterprise Communications GmbH explicitly recommends this.
Flash
Your device saves its configuration in configuration files in the flash EEPROM (Electrically
Erasable Programmable Read Only Memory). The data even remains stored in the flash
when your device is switched off.
RAM
The current configuration and all changes you set on your device during operation are
stored in the working memory (RAM). The contents of the RAM are lost if the device is
switched off. So if you modify your configuration and want to keep these changes for the
next time you start your device, you must save the modified configuration in the flash
memory before switching off: Save Configuration button in the Funkwerk Configuration
Interface navigation area. This configuration is then saved in the flash in a file with the
name #. When you start your device, the # configuration file is used by default.
Operations
The files in the flash memory can be copied, moved, erased and newly created. It is also
possible to transfer configuration files between your device and a host via HTTP.
bintec R200-Serie
337
18 Maintenance
Funkwerk Enterprise Communications GmbH
Fig. 138: Maintenance -> Software & Configuration -> Options
The Maintenance -> Software & Configuration ->Options menu consists of the following
fields:
Fields in the Options Currently Installed Software menu
Field
Description
BOSS
Shows the current software version loaded on your device.
System Logic
ADSL Logic
Shows the current system logic loaded on your device.
Shows the current version of the ADSL logic loaded on your
device.
Fields in the Options Software and Configuration Options menu
Field
Action
Description
Select the action you wish to execute.
Possible values:
• * % (default value):
• , %$
: Under Filename select a configuration file you want to import. Note: Click Go to load the file
under the name # in the flash memory for the device.
You must restart the device to enable it.
• , /$
$: You can import other language versions
338
bintec R200-Serie
18 Maintenance
Funkwerk Enterprise Communications GmbH
Field
Description
of the Funkwerk Configuration Interface into your device.
You can download the files to your PC from the download
area at www.funkwerk-ec.com and from there import them to
your device.
• <, &)& &: you can start an update of the
system software, the ADSL logic and the BOOTmonitor.
• D, %$
: The configuration file Current filename in flash memory is transferred to your local host. If
you click on the Go button, a dialog box is shown, in which
you can select the storage location on your PC and enter the
desired file name.
• D, -
& : The active configuration
from the RAM is transferred to your local host. If you click on
the Go button, a dialog box is shown, in which you can select
the storage location on your PC and enter the desired file
name.
• :,): The configuration file in the Source File Name field is
saved as Destination file name.
• ?: The configuration file in the Select File field is renamed as New Filename.
• ;/ :$
: The configuration file in the Select File field is deleted.
• ;/ B/: The file in the Select File field is deleted.
Encryption of the ConfigOnly for Action = , %$
, D, %!
uration
$
, D, %$
&
& !
. Define whether the data of the selected Action
are to be encrypted..
The function is enabled by choosing #/.
The function is disabled by default.
If the function is active, you can enter the Password in the text
field.
Filename
Source
bintec R200-Serie
Only for Action = , %$
, , /!
$
$, <, &)& &. Enter the path and name
of the file or select the file with Browse... via the explorer/finder.
Only for Action = <, &)& &
339
18 Maintenance
Funkwerk Enterprise Communications GmbH
Field
Description
Select the source for the update.
Possible values:
• 4%/ B/ (default value): The system software file is
stored locally on your PC.
• >++ &: The file is stored on a remote server specified
in the URL.
• :
& B
&: The file is
on the official Funkwerk update server.
URL
Only for Source = >++ &
Enter the URL of the update server from which the system software file is loaded.
Current File Name in
Flash
Include Certificates and
Keys
For Action = D, %$
: The configuration file
Current filename in flash memory is exported.
For Action = D, %$
, D, %$
!
&
& . Define whether the selected Action should also be applied for certificates and keys.
The function is enabled by choosing #/.
The function is enabled by default.
Source Filename
Destination Filename
Select File
New Filename
Only for Action = :,) Select the source file to be copied.
Only for Action = :,) Enter the name of the copy.
Only if Action = ?, ;/ %$
or ;!
/ /: Select the file or configuration to be renamed or
deleted.
Only for Action = ?: Enter the new name of the configuration file.
18.3 Reboot
340
bintec R200-Serie
Funkwerk Enterprise Communications GmbH
18 Maintenance
18.3.1 System Reboot
In this menu, you can trigger an immediate reboot of your device. Once your system has
restarted, you must call the Funkwerk Configuration Interface again and log in.
Pay attention to the LEDs on your device. For information on the meaning of the LEDs, see
the Technical Data chapter of the manual.
Note
Before a reboot, make sure you confirm your configuration changes by clicking the
Save Configuration button, so that these are not lost when you reboot.
Fig. 139: Maintenance -> Reboot ->System Reboot
If you wish to reboot your device, click on OK in response to the question Are you sure
you want to reboot the system now?
bintec R200-Serie
341
19 External Reporting
Funkwerk Enterprise Communications GmbH
Chapter 19 External Reporting
19.1 Syslog
Events in various subsystems of your device e.g. PPP) are logged in the form of syslog
messages (system logging messages). The number of messages visible depends on the
level set (eight levels from $%) and to ;#
$).
In addition to the data logged internally on your device, all information can and should also
be passed to one or more external PCs for storage and processing, e.g. to the system administrator’s PC. The syslog messages saved internally on your device are lost when you
reboot.
Warning
Make sure you only pass syslog messages to a safe computer. Check the data regularly and ensure that there is always enough spare capacity available on the hard disk
of your PC.
Syslog Daemon
All Unix operating systems support the recording of syslog messages. For Windows PCs,
the Syslog Demon included in the DIME Tools can record the data and distribute to various
files depending on the contents (see BRICKware for Windows ).
19.1.1 Syslog Servers
Configure your device as a syslog server so that defined system messages can be sent to
suitable hosts in the LAN.
In this menu, you define which messages are sent to which hosts and with which conditions.
In the External Reporting -> System Log -> Syslog Servers menu, a list of all configured
system log servers is shown.
19.1.1.1 New
Choose the New button to set up new syslog servers.
342
bintec R200-Serie
19 External Reporting
Funkwerk Enterprise Communications GmbH
Fig. 140: External Reporting -> Syslog -> Syslog Servers -> New
The External Reporting -> Syslog-> Syslog Servers -> New menu consists of the following fields:
Fields in the Syslog Servers Basic Parameters menu
Field
Description
IP Address
Enter the IP address of the host to which syslog messages are
passed.
Level
Select the priority of the syslog messages that are to be sent to
the host.
Possible values:
• $%) (highest priority)
• 1/
• :%/
• • 0$
• 1/
• (default value)
• ;#
$ (lowest priority)
bintec R200-Serie
343
19 External Reporting
Funkwerk Enterprise Communications GmbH
Field
Description
Syslog messages are only sent to the host if they have a higher
or identical priority to that indicated, i.e. all messages generated
are recorded at syslog level ;#
$.
Facility
Enter the syslog facility on the host.
This is only required if the Log Host is a Unix computer.
Possible values: /%/ ! .
.
The default value is /%/.
Time Stamp
Select the format of the time stamp in the syslog.
Possible values:
• * (default value): No system time indicated.
• + : System time without date.
• ; I + : System time with date.
Protocol
Select the protocol for the transfer of syslog messages. Note
that the syslog server must support the protocol.
Possible values:
• <; (default value)
• +:
Type of Messages
Select the message type.
Possible values:
• -)& I 1%%
$ (default value)
• -)&
• 1%%
$
344
bintec R200-Serie
Funkwerk Enterprise Communications GmbH
19 External Reporting
19.2 IP Accounting
In modern networks, information about the type and number of data packets sent and received over the network connections is often collected for commercial reasons. This information is extremely important for Internet Service Providers that bill their customers by data
volume.
However, there are also non-commercial reasons for detailed network accounting. If, for
example, you manage a server that provides different kinds of network services, it is useful
for you to know how much data is generated by the individual services.
Your device contains the IP Accounting function, which enables you to collect a lot of useful
information about the IP network traffic (each individual IP session).
19.2.1 Interfaces
In this menu, you can configure the IP Accounting function individually for each interface.
Fig. 141: External Reporting -> IP Accounting-> Interfaces
In the External Reporting -> IP Accounting-> Interfaces menu, a list of all interfaces
configured on your device is shown. For each entry, you can activate IP Accounting by setting the checkmark. In the IP Accounting column, you do not need to click each entry individually. Using the options Select All and Disable All, you can enable or disable the IP accounting function for all interfaces simultaneously.
bintec R200-Serie
345
19 External Reporting
Funkwerk Enterprise Communications GmbH
19.2.2 Options
In this menu, you configure general settings for IP Accounting.
Fig. 142: External Reporting -> IP Accounting-> Options
In the External Reporting -> IP Accounting -> Options menu you can set the Log
Format of the IP accounting messages. The messages can contain character strings in
any order, sequences separated by a slash, e.g. L or L or defined tags.
Possible format tags:
Format tags for IP accounting messages
346
Field
Description
%d
Date of the session start in the format DD.MM.YY
%t
Time of the session start in the format HH:MM:SS
%a
Duration of the session in seconds
%c
Protocol
%i
Source IP Address
%r
Source Port
%f
Source interface index
%I
Destination IP Address
%R
Destination Port
bintec R200-Serie
19 External Reporting
Funkwerk Enterprise Communications GmbH
Field
Description
%F
Destination interface index
%p
Packets sent
%o
Octets sent
%P
Packets received
%O
Octets received
%s
Sequential number for accounting message
%%
%
By default, the following format instructions are entered in the Log Format field. *+5
MMMM%M5M6M !A M5M?6MBM,MMM=NM&O
19.3 E-mail alert
It was previously possible to send syslog messages from the router to any syslog host. Depending on the configuration, E-mails are sent to the administrator as soon as relevant syslog messages occur.
19.3.1 E-mail Alert Server
The E-mail Alert Server menu consists of the following fields:
Fig. 143: External Reporting -> E-mail Alert-> E-mail Alert Server
bintec R200-Serie
347
19 External Reporting
Funkwerk Enterprise Communications GmbH
The External Reporting -> E-mail Alert-> E-mail Alert Server menu consists of the following fields:
Fields in the E-mail Alert Server Basic Parameters menu
Field
Description
Alert service
Enable or disable the function.
Sender's E-mail Address Enter the mail address to be entered in the sender field of the Email.
Maximum number of
messages per minute
Limit the number of outgoing mails per minute. Possible values
are to , the default value is .
Fields in the E-mail Alert ServerSNMP Settings menu
Field
SMTP Server
Description
Enter the address (IP address or valid DNS name) of the mail
server to be used for sending the mails.
The entry is limited to 40 characters.
SMTP Authentication
Forward the incoming E-mails.
Possible values:
• * (default value): The E-mails are not forwarded.
• -(+: The E-mails are forwarded to the destination over
SMTP.
• -(+ =: The E-mails are collected by the provider
with POP and are forwarded to the destination over SMTP.
User name
Only if SMTP Authentication = -(+ or -(+ =.
Enter the user name of the user.
Password
Only if SMTP Authentication = -(+ or -(+ =.
Enter the password of the user.
POP3 Server
Only if SMTP Authentication = -(+ =.
Enter the address of the server from which the mails are to be
retrieved.
Appropriate POP3 server software must be installed so that the
348
bintec R200-Serie
19 External Reporting
Funkwerk Enterprise Communications GmbH
Field
Description
mailserver can answer the requests via POP3.
POP3 Timeout
Only if SMTP Authentication = -(+ =.
Enter how long the router must wait after a relevant event before it is forced to send the alert mail.
The default value is seconds.
19.3.2 E-mail Alert Receiver
In the E-mail Alert Receiver menu, a list of syslog messages is displayed.
19.3.2.1 New
Choose the New button to create new e-mail alert receivers.
Fig. 144: External Reporting -> E-mail Alert-> E-mail Alert Receiver
The External Reporting -> E-mail Alert-> E-mail Alert Receiver menu consists of the following fields:
Fields in the E-mail Alert Receiver Add / Edit E-mail Alert Receiver menu
bintec R200-Serie
Field
Description
Recipient
Enter the recipient's e-mail address. The entry is limited to 40
characters.
349
19 External Reporting
Funkwerk Enterprise Communications GmbH
Field
Matching String
Description
You must enter a "Matching String". This must occur in a syslog
message as a necessary condition for triggering an alert.
The entry is limited to 55 characters. Bear in mind that without
the use of wildcards (e.g. "*"), only those strings that correspond
exactly to the entry fulfil the condition. The "Matching String"
entered therefore usually contains wildcards. To be informed of
all syslog messages of the selected level, just enter "*".
Severity
Select the syslog level at which the string configured in the
Matching String field must occur to trigger an e-mail alert.
Possible values:
$%) (default value), 1/, :%/, , 0!
$, *%, , ;#
$
Message Timeout
Enter how long the router must wait after a relevant event before it is forced to send the e-mail alert.
Possible values are to . The value 0 disables the
timeout.
Number of Messages
Enter the number of syslog messages that must be reached before an e-mail alert can be sent for this case. If timeout is configured, the mail is sent when this expires, even if the number of
messages has not been reached.
Possible values are to ; the default value is .
Message Compression
Select whether the e-mail alert text is to be shortened. The email then contains the syslog message only once plus the number of relevant events.
Enable or disable the field.
The function is enabled by default.
Fields in the E-mail Alert Receiver Monitored Subsystems menu
Field
Subsystem
Description
Select the subsystems to be monitored.
Add a new system with Add.
350
bintec R200-Serie
Funkwerk Enterprise Communications GmbH
19 External Reporting
19.4 SNMP
SNMP (Simple Network Management Protocol) is a protocol from the IP protocol family for
transporting management information about network components.
Every SNMP management system contains an MIB. SNMP can be used to configure, control and administrate various network components from one system. Such an SNMP tool is
included on your device: the Configuration Manager. As SNMP is a standard protocol, you
can use any other SNMP managers, e.g. HPOpenView.
For more information on the SNMP versions, see the relevant RFCs and drafts:
• SNMP V. 1: RFC 1157
• SNMP V. 2c: RFC 1901 – 1908
• SNMP V. 3: RFC 3410 – 3418
19.4.1 SNMP Trap Options
In the event of errors, a message - known as a trap packet - is sent unrequested to monitor
the system.
In the External Reporting -> SNMP -> SNMP Trap Options menu, you can configure the
sending of traps.
Fig. 145: External Reporting -> SNMP-> SNMP Trap Options
bintec R200-Serie
351
19 External Reporting
Funkwerk Enterprise Communications GmbH
The External Reporting -> SNMP -> SNMP Trap Options menu consists of the following
fields:
Fields in the SNMP Trap Options Basic Parameters menu
Field
Description
SNMP Trap Broadcasting
Select whether the transfer of SNMP traps is to be activated.
Your device then sends SNMP traps to the LAN's broadcast address.
The function is enabled by choosing #/.
The function is disabled by default.
SNMP Trap UDP Port
Only if SNMP Trap Broadcasting is enabled.
Enter the number of the UDP port to which your device is to
send SNMP traps.
Any whole number is possible.
The default value is .
SNMP Trap Community
Only if SNMP Trap Broadcasting is enabled.
Enter a new SNMP code. This must be sent by the SNMP Manager with every SNMP request so that this is accepted by your
device.
A character string of between and characters is possible
here.
The default value is -*( +,.
19.4.2 SNMP Trap Hosts
In this menu, you specify the IP addresses to which your device is to send the SNMP traps.
In the External Reporting -> SNMP -> SNMP Trap Hosts menu, a list of all configured
SNMP trap hosts is shown.
19.4.2.1 New
Choose the New button to set up new SNMP trap hosts.
352
bintec R200-Serie
19 External Reporting
Funkwerk Enterprise Communications GmbH
Fig. 146: External Reporting -> SNMP-> SNMP Trap Hosts -> New
The External Reporting -> SNMP -> SNMP Trap Hosts-> New menu consists of the following fields:
Fields in the SNMP Trap Hosts Basic Parameters menu
Field
Description
IP Address
Enter the IP address of the SNMP trap host.
19.5 Activity Monitor
This menu contains the settings needed to monitor your device with the Windows tool
Activity Monitor (part of BRICKware for Windows ).
Purpose
The Activity Monitor enables Windows users to monitor the activities of your device. Important information about the status of physical interfaces (e.g. ISDN line) and virtual interfaces is easily obtained with one tool. A permanent overview of the utilisation of your
device is possible.
Method of operation
bintec R200-Serie
353
19 External Reporting
Funkwerk Enterprise Communications GmbH
A Status Daemon collects information about your device and transfers it as UDP packets to
the broadcast address of the first LAN interface (default setting) or to an explicitly entered
IP address. One packet is sent per time interval, which can be adjusted individually to values from 1 - 60 seconds. Up to 100 physical and virtual interfaces can be monitored,
provided the packet size of 4096 bytes is not exceeded. The Activity Monitor on your PC
receives the packets and can display the information contained in them in various ways according to the configuration.
Activate the Activity Monitor as follows:
• configure the relevant device(s) to be monitored.
• Start and configure the Windows application on your PC (see BRICKware for
Windows).
19.5.1 Options
Fig. 147: External Reporting -> Activity Monitor -> Options
The External Reporting -> Activity Monitor-> Options menu consists of the following
fields:
Fields in the Options Basic Parameters menu
354
Field
Description
Monitored interfaces
Select the type of information to be sent in the UDP packets to
the Windows application.
bintec R200-Serie
19 External Reporting
Funkwerk Enterprise Communications GmbH
Field
Description
Possible values:
• * (default value): Deactivates the sending of information
to the Activity Monitor.
• )&%/: Only information about the physical interfaces is
sent.
• )&%/601*69*: Information about physical and virtual
interfaces is sent
Send Information to
Select where your device sends the UDP packets.
Possible values:
• 1// 1&&& #%&" (default value): The default value means that the broadcast address of the first LAN interface is used.
• -$/ >&: The UDP packets are sent to the IP address
entered in the adjacent input field.
Update Interval
Enter the update interval (in seconds).
Possible values are to .
The default value is .
UDP Destination Port
Enter the port number for the Windows application Activity
Monitor.
The default value is . (registered by IANA - Internet Assigned Numbers Authority).
Password
bintec R200-Serie
Enter the password for the Activity Monitor.
355
20 Monitoring
Funkwerk Enterprise Communications GmbH
Chapter 20 Monitoring
This menu includes information that enable you to locate problems in your network and
monitor activities, e.g. at your device's WAN interface.
20.1 Internal Log
20.1.1 System messages
In the Monitoring -> Internal Log -> System Messages menu, a list of all internally stored
system messages is shown. Above the table you will find the configured Maximum Number of Syslog Entries and the configured Maximum Message Level of Syslog Entries .
These values can be changed in the System Management -> Global Settings -> System
menu.
Fig. 148: Monitoring -> Internal Log ->System Messages
Values in the list System Messages
356
bintec R200-Serie
20 Monitoring
Funkwerk Enterprise Communications GmbH
Field
Description
#
Displays the serial number of the system message.
Date
Displays the date of the record.
Time
Displays the time of the record.
Level
Displays the hierarchy level of the message.
Subsystem
Displays which subsystem of the device generated the message.
Message
Displays the message text.
20.2 IPSec
20.2.1 IPSec Tunnels
In the Monitoring -> IPSec -> IPSec Tunnel menu, a list of all configured IPSec peers is
shown.
Fig. 149: Monitoring -> IPSec ->IPSec Tunnel
Values in the list IPSec Tunnels
bintec R200-Serie
Field
Description
#
Displays the serial number of the IPSec connection.
Description
Displays the name of the IPSec connection.
357
20 Monitoring
Funkwerk Enterprise Communications GmbH
Field
Description
Remote IP Address
Displays the IP address of the remote IPSec peer.
Remote Networks
Displays the currently negotiated subnets of the remote terminal.
Security Algorithm
Displays the encryption algorithm of the IPSec connection.
State
Displays the operating state of the IPSec connection.
Action
Enables you to change the status of the IPSec tunnel by pressing the
button or the
button.
Details
Opens a detailed statistics window.
You change the status of the IPSec tunnel by pressing the
button or
button in the
Action column.
By pressing the
button, you display detailed statistics on the IPSec connection.
Fig. 150: Monitoring -> IPSec ->IPSec Tunnel ->
Values in the list IPSec Tunnels
358
Field
Description
Description
Shows the description of the peer.
Local IP Address
Shows the WAN IP address of your device.
Destination IP Address
Shows the WAN IP address of the connection partner.
Local ID
Shows the ID of your device for this IPSec tunnel.
bintec R200-Serie
20 Monitoring
Funkwerk Enterprise Communications GmbH
Field
Description
Remote ID
Shows the ID of the peer.
Exchange Type
Shows the exchange type.
Authentication Method
Shows the authentication method.
MTU
Shows the current MTU (Maximum Transfer Unit).
Alive Check
Shows the method for checking that the peer is reachable.
NAT Detection
Displays the NAT detection method.
Local Port
Shows the local port.
Remote Port
Shows the remote port.
packets
Shows the total number of incoming and outgoing packets.
Bytes
Shows the total number of incoming and outgoing bytes.
Error
Shows the total number of errors.
IKE (Phase 1) SAs (x)
The parameters of the IKE (Phase 1) SAs are displayed here.
Role / Algorithm / Lifetime remaining / State
IPSec (Phase 2) SAs (x) Shows the parameters of the IPSec (Phase 2) SAs.
Role / Algorithm / Local /
Remote / Lifetime remaining / State
Messages
The system messages for this IPSec tunnel are displayed here.
20.2.2 IPSec Statistics
In the Monitoring -> IPSec -> IPSec Statistics menu, statistical values for all IPSec connections are shown.
bintec R200-Serie
359
20 Monitoring
Funkwerk Enterprise Communications GmbH
Fig. 151: Monitoring -> IPSec ->IPSec Statistics
The Monitoring -> IPSec ->IPSec Statistics menu consists of the following fields:
Field in the IPSec Statistics Licenses menu
Field
Description
IPSec Tunnels
Shows the IPSec licenses currently in use (In use) and the
maximum number of licenses usable (Maximum).
Field in the IPSec Statistics Peers menu
Field
Description
State
Displays the number of IPSec connections by their current
status.
• Active: Currently active IPSec connections.
• Enable: IPSec connections currently in the tunnel setup
phase.
• Blocked: IPSec connections that are blocked.
• Dormant: Currently inactive IPSec connections.
• Configured: Configured IPSec connections.
Field in the IPSec Statistics SAs menu
360
Field
Description
IKE (Phase1)
Shows the number of active phase 1 SAs (Established) from
the total number of phase 1 SAs (Total).
bintec R200-Serie
20 Monitoring
Funkwerk Enterprise Communications GmbH
Field
Description
IPSec (Phase2)
Shows the number of active phase 2 SAs (Established) from
the total number of phase 2 SAs (Total).
Field in the IPSec Statistics Packet Statistics menu
Field
Description
Total
Shows the number of all processed incoming (Incoming) or
outgoing (Outgoing) packets.
Passed
Shows the number of incoming (Incoming) or outgoing (Outgoing) packets forwarded in plain text.
Dropped
Shows the number of rejected incoming (Incoming) or outgoing
(Outgoing) packets.
Encrypted
Shows the number of IPSec protected incoming (Incoming) or
outgoing (Outgoing) packets.
Error
Shows the number of incoming (Incoming) or outgoing (Outgoing) packets for which the processing led to errors.
20.3 ISDN/Modem
20.3.1 Current Calls
In the Monitoring -> ISDN/Modem -> Current Calls menu, a list of the existing ISDN connections (incoming and outgoing) is shown.
bintec R200-Serie
361
20 Monitoring
Funkwerk Enterprise Communications GmbH
Fig. 152: Monitoring -> ISDN/Modem ->Current Calls
Values in the list Current Calls
362
Field
Description
#
Displays the serial number of the ISDN connection entry.
Service
Displays the service to or from which the call is connected: ,
-:, C, =+-.
Remote Number
Displays the number that was dialled (in the case of outgoing
calls) or from which the call was made (in the case of incoming
calls).
Interface
Displays additional information for PPP connections.
Direction
Displays the send direction: %$, =
$$.
Charge
Displays the costs of the current connection.
Duration
Displays the duration of the current connection.
Stack
Displays the related ISDN port (STACK).
Channel
Displays the number of the ISDN B channel.
State
Displays the state of the connection: //, %!,
/!&, %!,%, %!/, %!,&, %!%,
%!,%, ,, &%!J, &%!, &
&,!J, !
&
!J, /!%.
bintec R200-Serie
20 Monitoring
Funkwerk Enterprise Communications GmbH
20.3.2 Call History
In the Monitoring -> ISDN/Modem -> Call History menu, a list of the last 20 ISDN connections (incoming and outgoing) made since the last system boot is shown.
Fig. 153: Monitoring -> ISDN/Modem ->Call History
Values in the list Call History
Field
Description
#
Displays the serial number of the ISDN connection.
Service
Displays the service to or from which the call was connected:
, -:, C, =+-.
Remote Number
Displays the number that was dialled (in the case of outgoing
calls) or from which the call was made (in the case of incoming
calls).
Interface
Displays additional information for PPP connections.
Direction
Displays the send direction: %$, =
$$.
Charge
Displays the costs of the connection.
Start Time
Displays the time at which the call was made or received.
Duration
Displays the duration of the connection.
20.4 Interfaces
bintec R200-Serie
363
20 Monitoring
Funkwerk Enterprise Communications GmbH
20.4.1 Statistics
In the Monitoring -> Interfaces -> Statistics menu, the current values and activities of all
device interfaces are shown.
Fig. 154: Monitoring -> Interfaces -> Statistics
You change the state of the interface by pressing the
column. Press the
button or
button in the Action
button to display the statistical data for the individual interfaces in de-
tail.
Values in the list Statistics
364
Field
Description
#
Shows the serial number of the interface.
Description
Displays the name of the interface.
Type
Displays the interface text.
Tx Packets
Shows the total number of packets sent.
Tx Bytes
Displays the total number of octets sent.
Tx Errors
Shows the total number of errors sent.
Rx Packets
Shows the total number of packets received.
Rx Bytes
Displays the total number of bytes received.
Rx Errors
Shows the total number of errors received.
bintec R200-Serie
20 Monitoring
Funkwerk Enterprise Communications GmbH
Field
Description
State
Shows the operating status of the selected interface.
Unchanged for
Shows the length of time for which the operating state of the interface has not changed.
Action
Enables you to change the status of the interface as displayed.
20.5 WLAN
20.5.1 WLAN1
In the Monitoring -> WLAN -> WLAN1 menu, the current values and activities of the first
interface are shown.
Fig. 155: Monitoring -> WLAN -> WLAN1
Values in the list WLAN1
bintec R200-Serie
Field
Description
Mbps
Displays the possible data rates on this wireless module.
Tx Packets
Shows the total number of packets sent for the data rate shown
in Mbps.
Rx Packets
Shows the total number of packets received for the data rate
shown in Mbps.
365
20 Monitoring
Funkwerk Enterprise Communications GmbH
You can choose the Advanced button to go to an overview of more details.
Fig. 156: Monitoring -> WLAN -> WLAN1 -> Advanced
Values in the list Advanced
Field
Description
#
Displays the serial number of the list entry.
Description
Displays the description of the displayed value.
Value
Displays the statistical value.
Meaning of the list entries
366
Description
Meaning
Unicast MSDUs transmitted successfully
Displays the number of MSDUs successfully sent to unicast addresses since the last reset. An acknowledgement was received
for each of these packets.
Multicast MSDUs transmitted successfully
Displays the number of MSDUs successfully sent to multicast
addresses (including the broadcast MAC address).
Transmitted MPDUs
Displays the number of MPDUs received successfully.
Multicast MSDUs received successfully
Displays the number of successfully received MSDUs that were
sent with a multicast address.
Unicast MPDUs received successfully
Displays the number of successfully received MSDUs that were
sent with a unicast address.
MSDUs that could not
be transmitted
Displays the number of MSDUs that could not be sent.
bintec R200-Serie
20 Monitoring
Funkwerk Enterprise Communications GmbH
Description
Meaning
Frame transmissions
without ACK received
Displays the number of sent frames which which an acknowledgement frame was not received.
Duplicate received MSDUs
Displays the number of MSDUs received in duplicate.
CTS frames received in
response to an RTS
Displays the number of received CTS (clear to send) frames
that were received as a response to RTS (request to send).
Received MPDU that
couldn't be decrypted
Displays the number of received MSDUs that could not be encrypted. One reason for this could be that a suitable key was
not entered.
RTS frames with no CTS Displays the number of RTS frames for which no CTS was rereceived
ceived.
Invalid packets received
Displays the number of frames received incompletely or with errors.
20.5.2 VSS
In the Monitoring -> WLAN -> VSS menu, the current values and activities of the configured wireless networks are shown.
Fig. 157: Monitoring -> WLAN -> VSS
Values in the list VSS
bintec R200-Serie
367
20 Monitoring
Funkwerk Enterprise Communications GmbH
Field
Description
MAC address
Shows the MAC address of the associated client.
IP Address
Shows the IP address of the client.
Uptime
Shows the time in hours, minutes and seconds for which the client is logged in.
Tx Packets
Shows the total number of packets sent.
Rx Packets
Shows the total number of packets received.
Signal dBm
Shows the received signal strength in dBm.
Noise dBm
Shows the received noise strength in dBm.
Data Rate Mbps
Shows the current transmission rate of data received by this client in Mbps.
The following transmission rates are possible: IEEE 802.11b:
11, 5.5, 2 and 1 mbps; IEEE 802.11g/a: 54, 48, 36, 24, 18, 12,
9, 6 mbps.
If the 5 GHz frequency band is used, the indication of 11, 5.5, 2
and 1 Mbps is suppressed for IEEE 802.11b.
VSS - Details for Connected Clients
In the Monitoring -> WLAN -> VSS-><Connected client>->
menu, the current values
and activities of a connected client are shown.
368
bintec R200-Serie
20 Monitoring
Funkwerk Enterprise Communications GmbH
Fig. 158: Monitoring -> WLAN -> VSS-><Connected client> ->
Values in the list VSS <Connected client>
Field
Description
Client MAC Address
Shows the MAC address of the associated client.
IP Address
Shows the IP address of the client.
Uptime
Shows the time in hours, minutes and seconds for which the client is logged in.
Signal dBm
Shows the received signal strength in dBm.
Noise dBm
Shows the received noise strength in dBm.
SNR dB
Signal-to-Noise Ratio in dB is an indicator of the quality of the
wireless connection.
Values:
• > 25 dB excellent
• 15 – 25 dB good
• 2 – 15 dB borderline
• 0 – 2 dB bad.
Data Rate Mbps
bintec R200-Serie
Shows the current transmission rate of data received by this client in Mbps. The following transmission rates are possible:
IEEE 802.11b: 11, 5.5, 2 and 1 mbps; IEEE 802.11g/a: 54, 48,
369
20 Monitoring
Funkwerk Enterprise Communications GmbH
Field
Description
36, 24, 18, 12, 9.6 Mbps. If the 5-GHz frequency band is used,
the indication of 11, 5.5, 2 and 1 Mbps is suppressed for IEEE
802.11b.
Rate
Displays the possible data rates on this wireless module.
Tx Packets
Shows the number of sent packets for the data rate.
Rx Packets
Shows the number of received packets for the data rate.
20.6 Bridges
20.6.1 br<x>
In the Monitoring->Bridges->br<x> menu, the current values of the configured bridges
are shown.
Fig. 159: Monitoring ->Bridge
Values in the br<x> list
370
Field
Description
MAC address
Shows the MAC addresses of the associated bridge.
Port
Shows the port on which the bridge is active.
bintec R200-Serie
Glossary
Funkwerk Enterprise Communications GmbH
Glossary
Announcement
If you want to call your employees or family members to a meeting
or the dinner table, you could call each one of them individually or
simply use the announcement function. With just one call, you reach
all the announcement-enabled telephones without the subscribers
having to pick up the receiver.
Announcement func- Performance feature of a PBX. On suitable telephones (e.g. system
tion
telephones), announcements can be made as on an intercom.
bintec R200-Serie
Bit
Binary digit. Smallest unit of information in computer technology.
Signals are represented in the logical states "0" and "1".
Bundle
The external connections of larger PBXs can be grouped into
bundles. When an external call is initiated by the exchange code or
in the event of automatic external line access a bundle released for
this subscriber is used to establish the connection. If a subscriber
has authorisation for several bundles, the connection is established
using the first released bundle. If one bundle is occupied, the next
released bundle is used. If all the released bundles are occupied,
the subscriber hears the engaged tone.
Busy On Busy
Call to engaged team subscriber. If one subscriber in a team has
taken the receiver off the hook or is on the telephone, you can decide whether other calls are to be signalled for this team. The setting
for reaching a subscriber can be toggled between "Standard" and
"Busy On Busy". In the basic configuration, it is set to Standard. If
Busy on Busy is set for a team, other callers hear the engaged tone.
DECT
Digital European Cordless Telecommunication. European standard
for wireless telephones and wireless PBXs. Internal calls can be
made free of charge between several handheld units. Another advantage is the higher degree of interception protection (GAP).
Digital exchange
Allows computer-controlled crossbar switches to set up a connection
quickly, and special features such as inquiries, call waiting, threeparty conference and call forwarding to be activated. All T-Com exchanges have been digital since January 1998.
Digital voice transmission
As a result of the internationally standardised Pulse Code Modulation (PCM), analogue voice signals are converted to a digital pulse
flow of 64 kbps. Advantages: Better voice quality and less susceptibility to faults during analogue voice transmission.
371
Glossary
Funkwerk Enterprise Communications GmbH
Direct Call
You are not at home. However, there is someone at home who
needs to be able to reach you quickly and easily by telephone if necessary (e.g. children or grandparents). As you can set up the Direct
Call function for one or more telephones, the receiver of the telephone simply needs to be lifted. After five seconds, the PBX automatically calls the defined direct call number, if you do not start dialling another number first. You can enter up to 12 destination numbers when you configure Direct Call. A direct call number can only
be used by one subscriber. If you want to change an entered direct
call number, you can simply enter the new direct call number without
having to delete the old direct call number. The old number is automatically overwritten when the new configuration is transferred to
the PBX.
DISA
Direct Inward System Access
Download
Data transfer during online connections, where files are "loaded"
from a PC or data network server to the user's own PC, PBX or terminal, so that they can be used there.
DSL and ISDN con- Data is transferred between the Internet and your PBX over ISDN or
nections
T-DSL. The PBX determines the remote terminal to which a data
packet is to be sent. For a connection to be selected and set up,
parameters must be defined for all the required connections. These
parameters are stored in lists which together permit the right connection to be set up. The PBX uses the PPP (Point-to-Point Protocol) for ISDN access, and PPPoE (Point-to-Point Protocol over
Ethernet) for access over T-DSL. The traffic on these two Internet
connections is monitored separately by the PBX.
372
DSL modem
Special modem for data transmission using DSL access technology.
DSL splitter
A DSL splitter is a device that splits the data or frequencies of various applications that run via a subscriber line or distribution point,
and provides this via separate connections.
Services
Euro ISDN contains service indicates with defined names. Some of
these have only historical meaning. In general, you should choose
the "Telephony" service for "real" telephone calls. If this selection
does not work (depends on network operator), you can try "speech",
"audio 3k1Hz" or "telephony 3k1Hz". The same applies for faxing.
Here, too, there is the collective term "Fax" plus a couple of more
specific cases. From a purely technical point of view, the services
are bits in a data word evaluated by means of a mask. If you include
several bits in the mask, all these services are approved for activation, while in the case of just one bit, it is just the one selected ser-
bintec R200-Serie
Glossary
Funkwerk Enterprise Communications GmbH
vice.
Three-party confer- A three-way telephone call. Performance feature in T-Net, T-ISDN
ence
and your PBX.
bintec R200-Serie
10 Base 2
Thin Ethernet connection. Network connection for 10-mbps networks with BNC connector. T-connectors are used for the connection of equipment with BNC sockets.
100Base-T
Twisted pair connection, Fast Ethernet. Network connection for
100-mbps networks.
10Base-T
Twisted pair connection. Network connection for 10-mbps networks
with RJ45 connector.
1TR6
D channel protocol used in the German ISDN. Today the more common protocol is DSS1.
3DES (Triple DES)
See DES.
802.11a/g
Specified data rates of 54, 48, 36, 24, 18, 12, 9 and 6 mbps and a
working frequency in the range of 5 GHz (for IEEE802.11a) or 2.4
GHz (for IEEE802.11g). IEEE802.11 g can be configured to run in
compliance with 11b or 11b and 11 as well.
802.11b/g
One of the IEEE standards for wireless network hardware. Products
that meet the same IEEE standard can communicate with each other, even if they come from different hardware manufacturers. The
IEEE802.11b standard specifies the data rates of 1, 2, 5.5 and 11
mbps, a working frequency in the range of 2.4 to 2.4835 GHz and
WEP encryption. IEEE802.11 wireless networks are also known as
Wi-Fi networks.
A-subscriber
The A-subscriber is the caller.
a/b interface
For connection of an analogue terminal. In the case of an ISDN terminal (terminal adapter) with a/b interface, the connected analogue
terminal is able to use the supported T-ISDN performance features.
AAA
Authentication, Authorisation, Accounting
Access code
PIN or password
Access list
A rule that defines a set of packets that should or should not be
transmitted by the device.
Access point
An active component of a network consisting of wireless parts and
373
Glossary
Funkwerk Enterprise Communications GmbH
optionally also of wired parts. Several WLAN clients (terminals) can
log in to an access point (AP) and communicate via the AP data. If
the optional wired Ethernet is connected, the signals between the
two physical media, the wireless interface and wired interface, are
bridged (bridging).
Access protection
Filters can be used to prevent external persons from accessing the
data on the computers in your LAN. These filters are a basic function of a firewall.
Accounting
Recording of connection data, e.g. date, time, connection duration,
charging information and number of data packets transferred.
Active probing
Active probing takes advantage of the fact that as standard, access
points are to respond to client requests. Clients therefore send
"probe requests" on all channels and wait for responses from an access point in the vicinity. The response packet then contains the
SSID of the wireless LAN and information on whether WEP encryption is used.
Ad hoc network
An ad hoc network refers to a number of computers that form an independent 802.11 WLAN each with a wireless adapter. Ad hoc networks work independently without an access point on a peer-to-peer
basis. Ad hoc mode is also known as IBSS mode (Independent Basic Service Set) and makes sense for the smallest networks, e.g. if
two notebooks are to be linked to each other without an access
point.
ADSL
Asymmetric digital subscriber line
AH
Authentication header
Alphanumeric display
Display unit e.g. for T-Concept PX722 system telephone, able to
display letters and other characters as well as digits.
Analogue connections
For the connection of analogue terminals such as telephone, fax
and answering machine.
Analogue terminals Terminals that transmit voice and other information analogously,
e.g. telephone, fax machine, answering machine and modem.
Analogue voice
transmission
To transmit voice via the telephone, acoustic oscillations are converted to continuous electrical signals, which are transmitted via a network of lines (digital voice transmission).
Answering machine You configure an analogue answering machine under "Terminal
Type".
374
bintec R200-Serie
Glossary
Funkwerk Enterprise Communications GmbH
bintec R200-Serie
AOC-D
Display during and at end of connection.
AOC-D/E
Advice of charge-during/end.
AOC-E
Display only at end of connection.
ARP
Address Resolution Protocol
Assignment
An external call can be signalled to internal subscribers. The entries
in the "Day" option and "Night" option can be different.
Asynchronous
A method of data transmission in which the time intervals between
transmitted characters can vary in length. This allows computers
and peripheral devices to intercommunicate without being synchronised by clock signals. The beginning and end of the transmitted
characters must be marked by start and stop bits – in contrast to
synchronous transmission.
ATM
Asynchronous transfer mode
Attention tone
Superimposing of an acoustic signal during a telephone call e.g. for
call waiting.
Authentication
Check on the user's identify.
Authorisation
Based on the identity (authentication), the user can access certain
services and resources.
Automatic callback
Special feature on telephones: By pressing a key or code, the caller
requests a call back from the engaged terminal. If the subscriber
you want is not at their desk or cannot take the call, they are automatically connected with the caller as soon as they have used the
telephone again and replaced the receiver.
Automatic callback
on busy
This function can only be used on telephones that permit suffix dialling. An automatic callback from an inquiry connection is not possible.
Automatic callback
on busy (CCBS)
You urgently need to contact a business partner or internal subscriber. However, when you call, you always hear the engaged tone.
If you were to receive notification that the subscriber had ended the
call, your chance of reaching them would be very good. With "Callback on Busy" you can reach the engaged subscriber once they
have replaced the receiver at the end of the call. Your telephone
rings. When you lift the receiver, a connection to the required subscriber is set up automatically. An internal "Callback on Busy" is deleted automatically after 30 minutes. The external "Callback on
375
Glossary
Funkwerk Enterprise Communications GmbH
Busy" is deleted after a period specified by the exchange (approx.
45 minutes). Manual deletion before this period has elapsed is also
possible.
Automatic callback You urgently need to contact a business partner or internal subon no reply (CCBS) scriber. When you call them, you always hear the ringing tone, but
your business partner is not close to the telephone and does not
pick up. With "Callback on no reply", you can reach the subscriber
as soon as they have completed a call or lifted and replaced the receiver of their telephone. Your telephone rings. When you lift the receiver, a connection to the required subscriber is established automatically.
Automatic clearing
of Internet connection (ShortHold)
You can activate ShortHold. When you do so, you define the time
after which an existing connection is cleared if data transfer is no
longer taking place. If you enter a time of 0, ShortHold is deactivated.
Automatic outside
line
After the receiver of a telephone is lifted, the telephone number of
the external subscriber can be dialled immediately.
Automatic redialling Performance feature of a terminal. If the line is busy, several redial
attempts are made.
B channel
Corresponds to a telephone line in T-Net. In T-ISDN, the basic connection contains two B channels, each with a data transmission rate
of 64 kbps.
B channel
Bearer channel of an ISDN Basic Rate Interface or a Primary Rate
Interface for the transmission of traffic (voice, data). An ISDN Basic
Rate Interface consists of two B channels and one D channel. A B
channel has a data transmission rate of 64 kbps. The data transmission rate of an ISDN Basic Rate Interface with your gateway can be
increased to up to 128 kbps using channel bundling.
BACP/BAP
Bandwidth Allocation Control Protocols (BACP/BAP in accordance
with RFC 2125)
Base station
Central unit of wireless telephone devices. There are two different
types: The simple base station is used to charge the handheld unit.
For special-feature telephones, the base station can also be used as
a telephone, the handheld unit is charged using separate charging
stations.
Basic Rate Interface ISDN connection that includes two basic channels (B channels)
each with 64 kbps and one control and signalling channel (D chan-
376
bintec R200-Serie
Glossary
Funkwerk Enterprise Communications GmbH
nel) with 16 kbps. The two basic channels can be used independently of each other for each service offered in the T-ISDN. You can
therefore telephone and fax at the same time. T-Com offers the Basic Rate Interface as a point-to-multipoint or point-to-point connection.
Blacklist (dialling
ranges)
You can define a restriction on external dialling for individual subscribers. The telephone numbers entered in the blacklist table cannot be called by the terminals subject to dialling control, e.g. entry
0190 would block all connections to expensive service providers.
Block Cipher Modes Block-based encryption algorithm
bintec R200-Serie
Blowfish
An algorithm developed by Bruce Schneier. It relates to a block
cipher with a block size of 64 bit and a key of variable length (up to
448 bits).
Bluetooth
Bluetooth is a wireless transfer technology that can connect up different devices. Bluetooth replaces cables to connect various devices
e.g. Notebook, PC, PDA, etc. Thanks to Bluetooth, these devices
can exchange data with each other without a fixed connection. For
example, PCs, notebooks or a PDA can access the Internet or a local network. The appointments on a PDA can be synchronised with
the appointments on the PC without the need for a cable connection. Because of the many different application areas for the
Bluetooth technology, the different types of connections between the
devices are divided into profiles. A profile determines the service
(function) that the individual Bluetooth clients can use among each
other.
BOD
Bandwidth on Demand
BootP
Bootstrap protocol
Bps
Bits per second. A unit of measure for the transmission rate.
Break-in
In a PBX, the option of breaking in to an existing call. This is signalled acoustically by an attention tone.
BRI
Basic Rate Interface
Bridge
Network component for connecting homogeneous networks. As opposed to a gateway, bridges operate at layer 2 of the OSI model,
are independent of higher-level protocols and transmit data packets
using MAC addresses. Data transmission is transparent, which
means the information contained in the data packets is not inter-
377
Glossary
Funkwerk Enterprise Communications GmbH
preted.
378
Broadcast
Broadcasts (data packages) are sent to all devices in a network in
order to exchange information. Generally, there is a certain address
(broadcast address) in the network that allows all devices to interpret a message as a broadcast.
Brokering
Brokering makes it possible to switch between two external or internal subscribers without the waiting subscriber being able to hear
the other conversation.
Browser
Program for displaying content on the Internet or World Wide Web.
Bus
A data transmission medium for use by all the devices connected to
a network. Data is forwarded over the entire bus and received by all
devices on the bus.
CA
Certificate Authority
Calendar
By allocating a calendar, you switch between Day and Night call assignment. For each day of the week, you can select any day/night
switching time. A calendar has four switch times, which can be specifically assigned to each individual day of the week.
Call allocation
In a PBX, calls can be assigned to certain terminals.
Call costs account
You can set up a "call costs account" for a subscriber here. The
maximum available number of units, in the form of a limit, can be assigned to each subscriber on their personal "call costs account". The
"cost limit" is to be activated so that units can be booked. Once the
units have been used up, no further external calls are possible. Internal calls can still be made at any time. The units are booked to
the account each time a call is ended.
Call diversion
Also known as call forwarding. An incoming call is diverted to a specified telephone, Internet or wireless connection.
Call filter
Performance feature e.g. of the T-Concept PX722 system telephone, special-feature telephones or answering machines. The call
is only signalled in the case of certain previously defined telephone
numbers.
Call forwarding in
the exchange
You can only use the options of call forwarding in the exchange via
the keypad if certain services are activated for your connection. You
can receive more information on this from your T-Com advisor. The
exchange connects the calling subscriber with an external subscriber you have specified.
bintec R200-Serie
Glossary
Funkwerk Enterprise Communications GmbH
Call forwarding in
the PBX
The call forwarding (CF) performance feature of the PBX enables
you to be reached even if you are not in the vicinity of your telephone. You achieve this by automatically forwarding your calls to
the required internal or external telephone number. You can use the
configuration program to define whether call forwarding should be
carried out in the PBX or the exchange. You should use call forwarding in the exchange if certain services are activated for your
connection. You can receive more information on this from your TCom advisor.
Call option day/night Option of changing the call allocation on a PBX using a calendar.
Calls received after office hours are forwarded to a telephone still
manned, or to the answering machine or fax.
Call pickup
Performance feature of a PBX. Calls can be received on an internal
terminal that is not part of active call allocation.
Call pickup
An external call is only signalled for your colleague. As you belong
to several different teams, this is not surprising. You can now form
various groups of subscribers in which call pickup is possible. A call
can only be picked up by subscribers/terminals in the same pickup
group. The assignment of subscribers in pickup groups is not dependent on the settings in the Day and Night team call assignment.
Call Relay on Busy
Reject
Call Through
Call Through is a dial-in via an external connection to the PBX with
the call put through from the PBX via another external connection.
Call to engaged sub- Busy on busy
scriber
Call waiting
The "Call Waiting" performance feature means that other people can
contact you during a telephone call. If another subscriber calls while
you are on the telephone, you hear your telephone's call waiting
tone. You can then decide whether to continue with your first call or
speak to the person whose call is waiting.
Call waiting protec- If you do not want to use the call waiting feature, you switch on call
tion
waiting protection. If you are taking a call, a second caller hears the
engaged tone.
Callback on Busy
bintec R200-Serie
Performance feature in T-ISDN, PBXs and T-Net. A connection is
set up automatically as soon as the Busy status on the destination
connection ends. When the connection is free, this is signalled to
the caller. As soon as the caller lifts the receiver, the connection is
379
Glossary
Funkwerk Enterprise Communications GmbH
set up automatically. However, Callback must first be activated by
the caller on his or her terminal.
Callback on no reply You call a subscriber, who does not pick up. With "Callback on no
reply", this is not a problem for you, because with this special feature, you can set up the connection without having to redial. If you
are not on the telephone yourself, a new connection with the subscriber is set up - for a maximum of 180 minutes.
Called party number Number of the terminal called.
Caller list
Special-feature telephones such as the T-Concept PX722 system
telephone enable call requests to be stored during absence.
Calling party numberNumber of the calling terminal.
CAPI
Common ISDN Application Programming Interface
CAST
A 128-bit encryption algorithm with similar functionality to DES. See
Block Cipher Modes.
CBC
Cipher Block Chaining
CCITT
Consultative Committee for International Telegraphy and Telephony
CD (Call Deflection) The forwarding of calls. This performance feature enables you to
forward a call without having to take it yourself. If you forward a call
to an external subscriber, you bear any connection costs from your
connection to the destination of the forwarded call. This feature can
therefore be used by system telephones and ISDN telephones that
support this function (see user's guide for terminals). For more information on using this performance feature with the telephone,
please see the user's guide.
380
Central speeddial
memory
Performance feature of a PBX. Telephone numbers are stored in a
PBX and can be called from every connected telephone using a key
combination.
Certificate
Certificate
Channel Bundling
Channel bundling
CHAP
Challenge Handshake Authentication Protocol
Checksum field
Frame Check Sequence (FCS)
CLID
Calling Line Identification
bintec R200-Serie
Glossary
Funkwerk Enterprise Communications GmbH
Client
A client uses the services provided by a server. Clients are usually
workstations.
CLIP
Abbreviation for Calling Line Identification Presentation. Telephone
number display of calling party.
CLIR
Abbreviation for Calling Line Identification Restriction. Temporary
suppression of the transmission of the calling party's telephone
number.
COLR
Connected Line Identification Restriction (suppress B telephone
number). This performance feature permits or suppresses the display of the called subscriber's telephone number. If display of the B
telephone number is suppressed, your telephone number is not
transmitted to the caller when you take a call. Example: You have
set up call diversion to another terminal. If this terminal has activated suppression of the B telephone number, the calling party does
not see a telephone number on the terminal display.
Combination device If an analogue terminal connection of the PBX is set up as a "multifunctional port" for combination devices, all calls are received, regardless of the service. In the case of trunk prefixes using codes,
the service ID "Analogue Telephony" or "Telefax Group 3" can also
be transmitted, regardless of the configuration of the analogue connection. If 0 is dialled, the service ID "Analogue Telephony" is also
transmitted.
Conference call
Performance feature of a PBX: Several internal subscribers can
telephone simultaneously. Three-party conferences are also possible with external subscribers.
Configuration Man- Windows application (similar to the Windows Explorer), which uses
ager
SNMP commands to request and carry out the settings of your gateway. The application was called the DIME Browser before BRICKware version 5.1.3.
Configuration of the One important prerequisite for the transfer of your configuration to
PBX with the PC
the PBX is that you have set up a connection between the PC and
PBX. You can do this using the LAN Ethernet connection.
Configuration of the With some restrictions, you can also program your PBX using the
PBX with the teletelephone. For information on programming your PBX using the telephone
phone, please see the accompanying user's guide.
Connection of analogue terminals
bintec R200-Serie
The performance features for analogue terminals can only be used
with terminals that use the MFC dialling method and that have an R
381
Glossary
Funkwerk Enterprise Communications GmbH
or flash key.
Connection of ISDN The internal telephone number of the connection, and not the exterminals
ternal number (multiple subscriber number) must be entered as the
MSN in the ISDN terminal connected to the internal ISDN bus. See
the user's guide for the ISDN terminals: Enter MSN. Please note
that not all the ISDN terminals available on the market can use the
performance features provided by the PBX via their key interface.
382
CRC
Cyclic Redundancy Check
CTI
Computer Telephony Integration. Term for connection between a
PBX and server. CTI enables PBX functions to be controlled and
evaluated by a PC.
D channel
Control and signalling channel of an ISDN Basic Rate Interface or
Primary Rate Interface. The D channel has a data transmission rate
of 16 kbps. In addition to the D channel, each ISDN BRI has two B
channels.
Data compression
A process for reducing the amount of data transmitted. This enables
higher throughput to be achieved in the same transmission time. Examples of this technique include STAC, VJHC and MPPC.
Data Link Layer
(DLL)
Data packet
A data packet is used for information transfer. Each data packet
contains a prescribed number of characters (information and control
characters).
Data transmission
rate
The data transmission rate specifies the number of information units
for each time interval transferred between sender and recipient.
Datagram
A self-contained data packet that is forwarded in the network with
minimum protocol overhead and without an acknowledgement
mechanism.
Datex-J
Abbreviation for Data Exchange Jedermann, the T-Online access
platform. Local dial-in node in every local network. Some German
cities offer additional high-speed access over T-Net/T-Net-ISDN.
Day/Night option
If you want to transfer important calls made after office hours to your
home office to an answering machine, so that you are not disturbed,
you can use call assignment. You can allocate each subscriber two
different call allocations (call assignment Day and call assignment
Night). With call assignments, it is also possible to forward the call to
an external subscriber, so that you can be contacted at all times.
bintec R200-Serie
Glossary
Funkwerk Enterprise Communications GmbH
With call assignment Day/Night, therefore, you define which internal
terminals are to ring in the event of an external call. Call assignment
Day/Night is achieved using a table in which all the incoming calls
are assigned to internal subscribers.
Day/Night/Calendar You define switching of call variant Day/Night.
DCE
Data Circuit-Terminating Equipment
DCN
Data communications network
Default gateway
Describes the address of the gateway to which all traffic not
destined for its own network is sent.
Denial-Of-Service At- A Denial-of-Service (DoS) attack is an attempt to flood a gateway or
tack
host in a LAN with fake requests so that it is completely overloaded.
This means the system or a certain service can no longer be run.
DES
Data Encryption Standard
Destination number Speeddial memory
memory
DHCP
Dynamic Host Configuration Protocol
Dial preparation
On some telephones with a display, you can first enter a telephone,
check it first, and then dial it.
Dial-in parameters
Define the dial-in parameters i.e. you enter the provider's dial-in
number and specify:
Dialling control
In the configuration for certain terminals, you can define restrictions
for external dialling.
Dialup connection
A connection is set up when required by dialling an extension number, in contrast to a leased line.
DIME
Desktop Internetworking Management Environment
DIME Browser
Old name for Configuration Manager.
Direct dial-in
Performance feature of larger PBXs at the point-to-point connection:
The extensions can be called directly from outside.
Direct dialling range See Extension numbers range
Display and output
of connection data
bintec R200-Serie
In the configuration, it is possible to define storage of data records
for specific terminals or all terminals. In the ex works setting, all in-
383
Glossary
Funkwerk Enterprise Communications GmbH
coming external connections and all external calls you make are
stored.
Display of caller's
number
A suitable telephone is a prerequisite for this feature. Transmission
of the telephone number must be permitted by the caller.
DLCI
In a Frame Relay network, a DLCI uniquely describes a virtual connection. Note that a DLCI is only relevant for the local end of the
point-to-point connection.
DMZ
Demilitarised Zone
DNS
Domain Name System
Do not disturb
Station guarding
DOI
Domain of Interpretation
Domain
A domain refers to a logical group of devices in a network. On the
Internet, this is part of a naming hierarchy (e.g. bintec.de).
Door intercom
Door intercom device. It can be connected to various PBXs. A telephone can be used to take an intercom call and open the door.
Door intercom on
An analogue connection can be set up for connected of function
analogue connection module M06 to connect a DoorLine intercom system.
384
Door terminal adapter
The function module can be installed on an analogue connection of
your PBX. If a door intercom (DoorLine) is connected to your PBX
via a function module, you can speak with a visitor at the door via
every authorised telephone. You can assign particular telephones to
each ring button. These phones then ring if the ring button is
pressed. On analogue telephones, the signal on the telephone
matches the intercom call. In place of the internal telephones, an external telephone can also be configured as the call destination for
the ring button. Your door intercom can have up to 4 ring buttons.
The door opener can be pressed during an intercom call. It is not
possible activate the door opener if an intercom call is not taking
place.
Dotted Decimal
Notation
The syntactic representation of a 32-bit whole number, written in
four 8-bit numbers in decimal form and subdivided by a point. It is
used to represent IP addresses on the Internet, e.g. 192.67.67.20
Downstream
Data transmission rate from the ISP to the customer.
DSA (DSS)
Digital Signature Algorithm (Digital Signature Standard).
bintec R200-Serie
Glossary
Funkwerk Enterprise Communications GmbH
DSL/xDSL
Digital Subscriber Line
DSS1
Digital Subscriber Signalling System
DSSS
Direct Sequence Spread Spectrum is a wireless technology that was
originally developed for the military and offers a high level of protection against faults because the wanted signal is spread over a wide
area. The signal is spread by means of a spread sequence or chipping code consisting of 11 chips across 22 MHz. Even if there is a
fault on one or more of the chips during transfer, the information can
still be obtained reliably from the remaining chips.
DTE
Data Terminal Equipment
DTMF
Dual Tone Multi Frequency (tone dialling system)
Dynamic IP address In contrast to a static IP address, a dynamic IP address is assigned
temporarily by DHCP. Network components such as the web server
or printer usually have static IP address, while clients such as notebooks or workstations usually have dynamic IP addresses.
E1/T1
E1: European variant of the 2.048 mbps ISDN Primary Rate Interface, which is also called the E1 system.
ECB
Electronic Code Book mode
ECT
Explicit Call Transfer. This performance feature allows two external
connections to be transferred without blocking the two B channels of
the exchange connection.
Email
Electronic mail
Emergency numbers You urgently need to contact the policy, fire brigade or another telephone number. To make things worse, all the connections are busy.
However, you have informed your PBX of the telephone numbers
that need to be contactable in an emergency. If you now dial one of
these numbers, it is recognised by the PBX and a B channel of the
T-ISDN is automatically freed up for your emergency call. Emergency calls are not subject to configuration restrictions. If "Calling
with prefix plus code number" is set for a a connection, the internal
connection is busy. To make an external call, first dial 0 and then
the required emergency number.
Encapsulation
bintec R200-Serie
Encapsulation of data packets in a certain protocol for transmitting
the packets over a network that the original protocol does not directly support (e.g. NetBIOS over TCP/IP).
385
Glossary
Funkwerk Enterprise Communications GmbH
Encryption
Refers to the encryption of data, e.g. MPPE.
Entry of external
connection data
In the ex works setting, all external connections made and received
via your PBX are recorded and stored in the form of connection data
records.
ESP
Encapsulating Security Payload
ESS
The Extended Service Set describes several BSS (several access
points) that form a single, logical wireless network.
Ethernet
A local network that connects all devices in the network (PC, printers, etc.) via a twisted pair or coaxial cable.
Ethernet connections
The 4 connections are led equally through an internal switch. Network clients can be directly connected to the connection sockets.
The ports are designed as 100/BaseT full-duplex, autosensing, auto
MDIX upwardly compatible to 10/Base T. Up to 4 SIP telephones or
IP softclients with SIP standard can be directly connected to PCs
with a network card.
Eumex Recovery
If the power supply to the PBX cuts out while new firmware is being
loaded, the PBX functions are deleted.
Euro ISDN
Harmonised ISDN standardised within Europe, based on signalling
protocol DSS1, the introduction of which network operators in over
20 European countries have committed to. Euro-ISDN has been introduced in Germany, replacing the previous national system 1 TR6.
Eurofile transfer
Communication protocol for the exchange of files between two PCs
over ISDN using an ISDN card (file transfer) or telephones or PBXs
configured for this.
Exchange
Node in the public telecommunication network. We differentiate
between local exchanges and remote exchanges.
Exchange access
right
PBXs differentiate between the following "exchange access rights".
These can be set up differently for each subscriber in the configuration.
Extended redialling A selected telephone number is "parked" in the telephone's memory.
It can be redialled later, even if you have called other numbers in the
meantime.
Extension
386
For PBXs, describes the terminal (e.g. telephone) connected to the
exchange. Each extension can access PBX services and communicate with other extensions.
bintec R200-Serie
Glossary
Funkwerk Enterprise Communications GmbH
Extension number
An extension is an internal number for a terminal or subsystem. In
point-to-point ISDN accesses, the extension is usually a number
from the extension numbers range assigned by the telephone provider. In point-to-multipoint connections, it can be the MSN or a part
of the MSN.
Extension numbers (direct dialling range)
range
Fall Back: Priority of The priority of the Internet provider entries is defined by the sethe Internet provider quence in which they are entered in the list. The first entry of a DSL
entries
connection is the standard access. If a connection cannot be set up
via the standard access after a predefined number of attempts,
setup is attempted using the second entry then subsequent entries.
If the final entry in the list does not enable a connection to be set up
successfully, the operation is terminated until a new request is
made. When fall back occurs and all other ISPs can only be reached
by dialup connections, both B channels may be occupied. If channel
bundling is used, you cannot be reached for the duration of this connection.
bintec R200-Serie
Fax
Abbreviation of telefax.
FHSS, Frequency
Hopping Spread
Spectrum
In a FHSS system, the frequency spread is achieved through constantly changing frequencies based on certain hopping patterns. In
contrast to DSSS systems, hopping patterns are configured, not the
frequency. The frequency changes very frequently in one second.
File transfer
Data transmission from one computer to another, e.g. based on the
Eurofile transfer standard.
Filter
A filter comprises a number of criteria (e.g. protocol, port number,
source and destination address). These criteria can be used to select a packet from the traffic flow. Such a packet can then be
handled in a specific way. For this purpose, a certain action is associated with the filter, which creates a filter rule.
Firewall
Describes the whole range of mechanisms to protect the local network against external access. Your gateway provides protection
mechanisms such as NAT, CLID, PAP/CHAP, access lists, etc.
Firmware
Software code containing all a device's functions. This code is written to a PROM (programmable read only memory) and is retained
there, even after the device is switched off. Firmware can be updated by the user when a new software version is available
(firmware upgrade).
387
Glossary
388
Funkwerk Enterprise Communications GmbH
First-level domain
Describes the last part of a name on the Internet. For
www.t-com.de, the first-level domain is de and in this case stands
for Germany.
Flash key
The flash key on a telephone is the R button. R stands for
Rückfrage (inquiry). The key interrupts the line briefly to start certain
functions such as inquiries via the PBX.
Follow-me
Performance feature of a PBX for diverting calls on the destination
telephone.
Fragmentation
Process by which an IP datagram is divided into small parts in order
to meet the requirements of a physical network. The reverse process is known as reassembly.
Frame
Unit of information sent via a data connection.
Frame relay
A packet switching method that contains smaller packets and fewer
error checks than traditional packet switching methods such as
X.25. Because of its properties, frame relay is used for fast WAN
connections with a high density of traffic.
Freecall
Telephone number. Previous service 0130. These telephone numbers have been switched to freecall 0800 since January 1, 1998.
FTP
File Transfer Protocol
Full duplex
Operating mode in which both communication partners can communicate bidirectionally at the same time.
Function keys
Keys on the telephone that can be assigned telephone numbers or
network functions.
G.991.1
Data transmission recommendation for HDSL
G.991.2
Data transmission recommendation for SHDSL
G.992.1
Data transmission recommendation for ADSL. See also G.992.1 Annex A and G.992.1 Annex B.
G.992.1 Annex A
Data transmission recommendation for ADSL: ITU-T G.992.1 Annex
A
G.992.1 Annex B
Data transmission recommendation for ADSL: ITU-T G.992.1 Annex
B
G.SHDSL
See G.991.2.
bintec R200-Serie
Glossary
Funkwerk Enterprise Communications GmbH
bintec R200-Serie
Gateway
Entrance and exit, transition point
Half duplex
Bidirectional communication method in which it is only possible to
either send or receive at a particular point in time. Also known as
Simplex.
Handheld unit
Mobile component of wireless telephone units. In the event of digital
transmission, it is also possible to make telephone calls between the
handheld units (DECT).
Hands free
If the telephone has a microphone and speaker installed, you can
conduct a call without using your hands. As a result, other people in
the room can also participate in the call.
Hashing
The process of deriving a number (hash) from a character string. A
hash is generally far shorter than the text flow it was derived from.
The hashing algorithm is designed so that there is a relatively low
probability of generating a hash that is the same as another hash
generated from a text sequence with a different meaning. Encryption
methods use hashing to make sure that intruders cannot change
transmitted messages.
HDLC
High Level Data Link Control
HDSL
High Bit Rate DSL
HDSL2
High Bit Rate DSL, version 2
Headset
Combination of headphones and microphone as a useful aid for
anyone who makes a lot of telephone calls and wants to keep hands
free for making notes.
HMAC
Hashed Message Authentication Code
HMAC-MD5
Hashed Message Authentication Code - uses Message Digest Algorithm Version 5.
HMAC-SHA1
Hashed Message Authentication Code - uses Secure Hash Algorithm Version 1.
Holding a call
A telephone call is put on hold without breaking the connection
(inquiry/brokering).
Holding in the PBX
Both B channels of the ISDN connection are needed for the performance features "Call another person during a call" and "Speak alternately with two people" (brokering). As a result, you cannot be
reached from outside or make external calls via your PBX's second
389
Glossary
Funkwerk Enterprise Communications GmbH
B channel. With this setting, an external caller put on hold hears the
PBX's on-hold music.
Hook flash
The use of the inquiry, brokerage and three-party conference special features in T-Net and certain performance features of some
PBXs is only possible with the hook flash function (long flash) of the
signal key on the telephone. On modern telephones, this key is indicated with an "R".
Host name
A name used in IP networks instead of the corresponding address.
A host name consists of an ASCII string that uniquely identifies the
host computer.
HTTP
HyperText Transfer Protocol
Hub
Network component used to connect several network components
together to form a local network (star-shaped).
IAE
ISDN connection unit, ISDN connection socket.
ICMP
Internet Control Message Protocol
ICV
Integrity Check Value
Identify malicious
callers (intercept)
You have to request this performance feature from T-Com. The
company will provide you with further information on the procedure.
If you enter code 77 during a call or after the caller has ended a call
(you hear the engaged tone from the exchange), the caller's telephone number is stored in the exchange. ISDN telephones can also
use separate functions for this performance feature. For more information on this function, please see your user's guide.
IEEE
The Institute of Electrical and Electronics Engineers (IEEE). A large,
global association of engineers, which continuously works on standards in order to ensure different devices can work together.
IETF
Internet Engineering Task Force
Index
The index from 0...9 is fixed. Every external multiple subscriber
number entered is assigned to an index. You need this index when
configuring performance features using the telephone's codes, e.g.
configuring "Call forwarding in the exchange" or "Define telephone
number for the next external call".
Infrastructure mode A network in infrastructure mode is a network that contains at least
one access point as the central point of communication and control.
In a network in infrastructure mode, all clients communicate with
390
bintec R200-Serie
Glossary
Funkwerk Enterprise Communications GmbH
each other via access points only. There is no direct communication
between the individual clients. A network of this kind is also known
as a BSS (basic service set), and a network that consists of several
BSS is known as an ESS (extended service set). Most wireless networks operate in infrastructure mode to establish a connection with
the wired network.
Inquiry
Makes it possible to put the first call on hold in the event of a call
waiting and take a new call.
Internal call tone
Special signal on a PBX to differentiate between internal and external calls.
Internal calls
Free-of-charge connection between terminals in a PBX.
Internal telephone
numbers
Your PBX has a fixed internal telephone number plan.
Internet
The Internet consists of a number of regional, local and university
networks. The IP protocol is used for data transmission on the Internet.
Internet time sharing Allows several users to surf the Internet simultaneously over an
ISDN connection. The information is requested by the individual
computers with a time delay.
bintec R200-Serie
Intranet
Local computer network within a company based on Internet technology providing the same Internet services, e.g. homepages and
sending email.
IP
Internet Protocol
IP Address
The first part of the address by which a device is identified in an IP
network, e.g. 192.168.1.254. See also netmask.
IPComP
IP payload compression
IPCONFIG
A tool used on Windows computers to check or change its own IP
settings.
IPoA
IP over ATM
ISDN
Integrated Services Digital Network
ISDN address
The address of an ISDN device that consists of an ISDN number followed by further numbers that relate to a specific terminal, e.g.
47117.
391
Glossary
Funkwerk Enterprise Communications GmbH
ISDN Basic Rate In- ISDN subscriber connection. The Basic Rate Interface consists of
terface
two B channels and one D channel. In addition to the Basic Rate Interface, there is the Primary Rate Interface. The interface to the subscriber is provided by an So bus.
392
ISDN card
Adapter for connecting a PC to the ISDN Basic Rate Interface. From
a technical perspective, we differentiate between active and passive
cards. Active ISDN cards have their own processor, which handles
communication operations independently of the PC processor and
therefore does not require any resources. A passive ISDN card, on
the other hand, uses the PC's resources.
ISDN Login
Function of your gateway. Your gateway can be configured and administrated remotely using ISDN Login. ISDN Login operates on
gateways in the ex works state as soon they are connected to an
ISDN connection and therefore reachable via an extension number.
ISDN number
The network address of the ISDN interface, e.g. 4711.
ISDN router
A router that does not have network connections but provides the
same functions between PC, ISDN and the Internet.
ISDN-BRI
ISDN Basic Rate Interface
ISDN-Dynamic
This performance feature requires the installation of the T-ISDN
Speedmanager. If you are surfing the Internet and use two B channels for downloading, you cannot be reached by telephone from outside. As a further call is signalled over the D channel, your PBX can,
depending on the setting, specifically shut down a B channel so that
you can take the call.
ISDN-Internal/External
Alternative name for the So bus.
ISDN-PRI
ISDN Primary Rate Interface
ISO
International Standardization Organization
ISP
Internet Service Provider
ITU
International Telecommunication Union
Key Escrow
Stored keys can be viewed by the government. The US government,
in particular, requires key storages to prevent crimes being covered
up through data encryption.
LAN
Local Area Network
bintec R200-Serie
Glossary
Funkwerk Enterprise Communications GmbH
bintec R200-Serie
LAPB
Link Access Procedure Balanced
Last access
The last access by T-Service is stored and displayed in the configuration.
Layer 1
Layer 1 of the ISO OSI Model, the bit transfer layer.
LCD
Liquid Crystal Display, a screen in which special liquid crystal is
used to display information.
LCP
Link Control Protocol
LDAP
Lightweight Directory Access Protocol
Lease Time
The "Lease Time" is the time a computer keeps the IP address assigned to it without having to "talk" to the DHCP server.
Leased Line
Leased line
LLC
Link Layer Control
Local exchange
Switching node of a public local telephone network that supports the
connection of end systems.
Loudspeaker
Function on telephones with an integrated loudspeaker: You can
press a button so that the people present in the room can also hear
the telephone call.
MAC Address
Every device in the network is defined by a fixed hardware address
(MAC address). The network card of a device defines this internationally unique address.
Man-in-the-Middle
Attack
Encryption using public keys requires the public keys to be exchanged first. During this exchange, the unprotected keys can be intercepted easily, making a "man-in-the-middle" attack possible. The
attacker can set a key at an early stage so that a key known to the
"man-in-the-middle" is used instead of the intended key from the
real communication partner.
MD5
See HMAC-MD5
MFC
Multifrequency code dialling method
MIB
Management Information Base
Microphone mute
Switch for turning off the microphone. The subscriber on the telephone cannot hear the discussions in the room.
393
Glossary
Funkwerk Enterprise Communications GmbH
Mixed mode
The access point accepts WPA and WPA2.
MLPPP
Multilink PPP
Modem
Modulator/Demodulator
MPDU
MAC Protocol Data Unit - every information packet exchanged on
the wireless medium includes management frames and fragmented
MSDUs.
MPPC
Microsoft Point-to-Point Compression
MPPE
Microsoft Point-to-Point Encryption
MSDU
MAC Service Data Unit - a data packet that ignores fragmentation in
the WLAN.
MSN
Multiple subscriber number
MSSID
See SSID
MTU
Maximum Transmission Unit
Multicast
A specific form of broadcast in which a message is simultaneously
transmitted to a defined user group.
Multiple subscriber Multiple subscriber number
number
Multiprotocol gateway
A gateway that can route several protocols, e.g. IP, X.25, etc.
Music on hold (MoH) Your PBX has two internal music-on-hold melodies. On delivery, internal melody 1 is active. You can choose between melody 1 or 2, or
deactivate the music on hold.
Music on hold (MoH) Performance feature of a PBX. During an inquiry or call forwarding,
a melody is played that the waiting subscriber hears. On your PBX,
you can choose between two internal melodies.
394
MWI
Transmission of a voice message from a mailbox e.g. T-NetBox or
MailBox to a terminal. The receipt of the message on the terminal is
signalled e.g. by a LED.
NAT
Network Address Translation
NDIS WAN
NDIS WAN is a Microsoft enhancement of this standards in relation
to wide area networking (WAN). The NDIS WAN CAPI driver per-
bintec R200-Serie
Glossary
Funkwerk Enterprise Communications GmbH
mits the use of the ISDN controller as a WAN card. The NDIS WAN
driver enables the use of a DCN network on Windows. NDIS is the
abbreviation for Network Device Interface Specification and is a
standard for the connection of network cards (hardware) to network
protocols (software).
Net surfing
A "journey of discovery" for interesting information in wide-ranging
data networks such as T-Online. Known mainly from the Internet.
NetBIOS
Network Basic Input Output System
Netmask
The second part of an address in an IP network, used for identification of a device, e.g. 255.255.255.0. See also IP address.
Network
Your PBX has a DSL router so that one or more PCs can surf the Internet and download information.
Network address
A network address designates the address of a complete local network.
Network termination In telecommunications, the network termination is the point at which
(NTBA)
access to a communication network is provided to the terminal.
Netz-Direkt (keypad You can use the "Netz-Direkt" (keypad) function (automatic external
functions)
line access) to enter a key sequence from your ISDN or analogue
telephone to use current T-ISDN functions. For more information on
this, consult your T-Com client advisor and request the necessary
codes (e.g. call forwarding in the exchange).
bintec R200-Serie
NMS
Network Management Station
Notebook function
During a telephone call, a telephone number can be entered in the
telephone's buffer so that it can be dialled at a later point in time.
NT
Network Termination
NTBA
Network Termination for Basic Access
NTP
Network Time Protocol
OAM
Operation and Maintenance
Offline
Without connection. Connectionless operating state e.g. of the PCs.
Online
With connection. For example the state of a connection between a
PC and data network or for data exchange between two PCs.
Online banking
Term for electronic banking e.g. using T-Online.
395
Glossary
Funkwerk Enterprise Communications GmbH
Online Pass
Part of the T-Com certification services for the Internet. Digital pass
for the Internet. With the Online Pass, an Internet user can be authenticated as a customer in a company.
Online services
Services available around the clock via communication services
such as T-Online and the Internet.
OSI model
OSI = Open Systems Interconnection
OSPF
Open Shortest Path First
Outgoing extension The "outgoing extension number signal" is intended for internal connumber signal
nections on the point-to-point to which an explicit extension number
was not assigned. When an external call is made, the extension
number entered under Outgoing Extension Number Signal is also
transmitted.
Outgoing telephone If you have not suppressed transmission of your telephone number,
number
and the telephone of the person you are calling supports the CLIP
function, the person you are calling can see the telephone number
of the connection you are calling from on their telephone display.
This telephone number transmitted during an external call is called
the outgoing telephone number.
396
Packet switching
Packet switching
PAP
Password Authentication Protocol
Parking
The call is held temporarily in the exchange. The main difference to
on hold: The call is interrupted, the receiver can be replaced. Can
be used for brokering. Possible in T-Net, T-ISDN and PBXs. The terminal must have MFC and the R key.
PBX
Private Branch Exchange
PBX
The features offered by a PBX are manufacturer-specific and enable
operation of exchanges, free internal calls, callback on busy, and
conference calls, among other things. PBXs are used e.g. for office
communication (voice, text and data transfer).
PBX
Private Branch Exchange (PBX)
PBX
Private Automatic Branch Exchange
PBX number
A point-to-point ISDN access includes a PBX number and an extension numbers range. The PBX number is used to reach the PBX. A
certain terminal of the PBX is then dialled via one of the extension
bintec R200-Serie
Glossary
Funkwerk Enterprise Communications GmbH
numbers of the extension numbers range.
bintec R200-Serie
PCMCIA
The PCMCIA (Personal Computer Memory Card International Association) is an industry association founded in 1989 that represents
credit card-sized I/O cards such as WLAN cards.
PDM
Abbreviation for pulse dialling method. Conventional dialling procedure in the telephone network. Dialled numbers are represented by a
defined number of dc impulses. The pulse dialling method is being
replaced by the multifrequency code method (MFC) .
PGP
Pretty Good Privacy
PH
Packet handler
Phone book
The PBX has an internal phone book. You can store up to 300 telephone numbers and the associated names. You can access the
PBX's phone book with the funkwerk devices (for example CS 410).
You add entries to the phone book using the configuration interface.
PIN
Personal identification number
Ping
Packet Internet Groper
PKCS
Public Key Cryptography Standards
Point-to-multipoint
Point-to-multipoint connection
Point-to-multipoint
Basic connection in T-ISDN with three telephone numbers and two
lines as standard. The ISDN terminals are connected directly on the
network termination (NTBA) or ISDN internet connection of a PBX.
Point-to-multipoint
Point-to-multipoint
Point-to-multipoint
connection for the
PBX
You enter the multiple subscriber numbers received from T-Com
with the order confirmation in the table fields defined for them in the
configuration. As a rule, you receive three multiple subscriber numbers, but can apply for up to 10 telephone numbers for each connection. When you enter the telephone numbers, they are assigned
to an "index" and also to a team. Note that initially, all telephone
numbers are assigned to team 00. The internal telephone numbers
10, 11 and 20 are entered in team 00 ex works. External calls are
therefore signalled with the internal telephone numbers 10, 11 and
20 for the connections entered in team 00.
Point-to-point
Point-to-point
397
Glossary
Funkwerk Enterprise Communications GmbH
Point-to-point ISDN Point-to-point
access
Polling
Fax machine function that "fetches" documents provided by other
fax machines or fax databases.
Port
Input/output
POTS
Plain Old Telephone System
PPP
Point-to-Point Protocol
PPP authentication Security mechanism. A method of authentication using passwords in
PPP.
398
PPPoA
Point to Point Protocol over ATM
PPPoE
Point to Point Protocol over Ethernet
PRI
Primary Rate Interface
Primary Rate Interface (PRI)
ISDN subscriber connection. The PRI consists of one D channel and
30 B channels (in Europe). (In America: 23 B channels and one D
channel.) There is also the ISDN Basic Rate Interface.
Protocol
Protocols are used to define the manner and means of information
exchange between two systems. Protocols control and rule the
course of data communication at various levels (decoding, addressing, network routing, control procedures, etc.).
Proxy ARP
ARP = Address Resolution Protocol
PSN
Packet Switched Network
PSTN
Public Switched Telephone Network
PVID
Port VLAN ID
R key
Telephones that have a R key (inquiry key) can also be connected
to a PBX. In modern telephones, the R key triggers the hook flash
function. This is required for use of performance features in T-Net
such as inquiry/brokering and three-party conference.
RADIUS
Remote Authentication Dial In User Service
RADSL
Rate-Adaptive Digital Subscriber Line
RAS
Remote access service
bintec R200-Serie
Glossary
Funkwerk Enterprise Communications GmbH
Real Time Clock
(RTC)
Hardware clock with buffer battery
Receiver volume
Function for controlling the volume in the telephone receiver.
Reconnection on the For a point-to-multipoint connection, enables the terminal connecbus (parking)
tion to be reconnected to another ISDN socket during the telephone
call.
Recording telephone Performance feature of an answering machine. Enables a conversacalls
tion to be recorded during the telephone call.
Remote
Remote, as opposed to local.
Remote access
Opposite to local access, see Remote.
Remote CAPI
bintec's own interface for CAPI.
Remote diagnosis/re-Some terminals and PBXs are supported and maintained by Tmote maintenance Service support offices over the telephone line, which often means a
service engineer does not have to visit the site.
bintec R200-Serie
Remote query
Answering machine function. Involves listening to messages remotely, usually in connection with other options such as deleting
messages or changing recorded messages.
Repeater
A device that transmits electrical signals from one cable connection
to another without making routing decisions or carrying out packet
filtering. See Bridge and Router.
Reset
Resetting the PBX enables you to return your system to a predefined initial state. This may be necessary if you have made incorrect configuration settings or the PBX is to be reprogrammed.
RFC
Specifications, proposals, ideas and guidelines relating to the Internet are published in the form of RFCs (request for comments).
Rijndael (AES)
Rijndael (AES) was selected as AES due to its fast key generation,
low memory requirements and high level of security against attacks.
For more information on AES, see http://csrc.nist.gov/encryption/aes.
RIP
Routing Information Protocol
RipeMD 160
RipeMD 160 is a cryptographic hash function with 160 bits. It is regarded as a secure replacement for MD5 and RipeMD.
399
Glossary
400
Funkwerk Enterprise Communications GmbH
RJ45
Plug or socket for maximum eight wires. Connection for digital terminals.
Roaming
In a multicell WLAN, clients can move freely and log off from one access point and log on to another when moving through cells, without
the user noticing this. This is known as roaming.
Room monitoring
(acoustic)
To use the "Room Monitoring" performance feature, the telephone
must be activated in the room to be monitored by means of a code,
and the receiver must be lifted or "Hands-free" switched on. If you
replace the telephone receiver or turn off "Hands-free", room monitored ends and the performance feature is switched off.
Room monitoring
from external telephones
This function can be used to monitor rooms from an external telephone.
Room monitoring
from internal telephones
You can acoustically monitor a room from an internal telephone in
your PBX. This is set up using the telephone procedures described
in the user's guide. Please read the information on the described
functions in the user's guide.
Router
A device that connects different networks at layer 3 of the OSI model and routes information from one network to the other.
RSA
The RSA algorithm (named after its inventors Rivest, Shamir, Adleman) is based on the problem of factoring large integers. It therefore
takes a large amount of data processing capacity and time to derive
a RSA key.
RTSP
Real-Time Streaming Protocol
S2M interface
See Primary Rate Interface.
SAD
The SAD (=Security Association Database) contains information on
security agreements such as AH or ESP algorithms and keys, sequence numbers, protocol modes and SA life. For outgoing IPSec
connections, an SPD entry refers to an entry in the SAD i.e. the
SPD defines which SA is to be applied. For incoming IPSec connections, the SAD is queried to determine how the packet is to be processed.
SDSL
Symmetric Digital Subscriber Line
Server
A server offers services used by clients. Often refers to a certain
computer in the LAN, e.g. DHCP server.
bintec R200-Serie
Glossary
Funkwerk Enterprise Communications GmbH
ServerPass
Part of the T-Com certification services for the Internet. Digital pass
for a company. With the ServerPass, T-Com confirms that a server
on the Internet belongs to a particular company and that this was
verified through the presentation of an excerpt from the business register.
Service 0190
Additional voice service from T-Com for the commercial distribution
of private information services. The T-Com services are limited to
providing the technical infrastructure and collection processing for
the information providers. The provided information is accessed using the telephone number 0190 which is uniform across Germany
plus a 6-digit telephone number. Information offering: Entertainment,
weather, finance, sport, health, support and service hotlines.
Service 0700
Additional voice service from T-Com. Allows calls to be received via
a location-independent telephone number uniform across Germany,
starting with the numbers 0700. Free-of-charge routing to national
fixed network. Enhancement with Vanity possible.
Service 0900
Additional voice service from T-Com. Replaces Service 0190.
Service number 0180 Additional voice service 0180call from T-Com to receive calls from a
location-dependent telephone number uniform across Germany,
starting with the numbers 0180.
bintec R200-Serie
Setup Tool
Menu-driven tool for the configuration of your gateway. The Setup
Tool can be used as soon as the gateway has been accessed
(serial, ISDN Login, LAN).
SHA1
See HMAC-SHA.
SHDSL
Single-Pair High-Speed
Short hold
Is the defined amount of time after which a connection is cleared if
no more data is transmitted. Short hold can be set to static (fixed
amount of time) or dynamic (according to charging information).
Signalling
Simultaneous signalling: All assigned terminals are called simultaneously. If a telephone is busy, call waiting can be used.
Simplex operation
(ISDN subscribers
only)
This connection can only be used for an ISDN telephone (only TConcept PX722 system telephones) with a simplex function. If you
call an ISDN telephone with a simplex function, this automatically
activates the Loudspeaker function so that a conversation can take
place immediately. Please see the information on the telephone
user's guide on the simplex operation function.
401
Glossary
402
Funkwerk Enterprise Communications GmbH
SIP
Session Initiation Protocol
SMS
Short Message Service
SMS receipt
If you have connected an SMS-enabled terminal, you can decide
whether SMS receipt is to be permitted for the connection. The ex
works setting is no SMS receipt. To receive an SMS with your SMSenabled terminal, you must register once with the T-Com SMS Service. One-time registration is free. You simply send an SMS containing ANMELD to the destination call number 8888. You then receive
a free-of-charge confirmation of registration from the T-Com SMS
Service. You can deregister your device or telephone number by
sending an SMS containing ABMELD to the destination number
8888. Incoming SMS are then read out. Information on which telephones are SMS-enabled can be obtained from T-Punkt, our customer hotline 0800 330 1000 or on the Internet at http://www.t-com.de.
SMS server telephone numbers
You can connect SMS-enabled telephones to your PBX and thus
use the SMS performance feature in the T-Com fixed network.
SMSs are forwarded to the recipient via the T-Com SMS server. To
send an SMS with an SMS-enabled terminal, the telephone number
0193010 of the SMS server must be prefixed to the recipient number. This telephone number is already stored in your PBX, so manual input of the server telephone is not necessary and does not need
to be sent from the telephone. To receive an SMS with your SMSenabled fixed-network telephone, you must register once with the
Deutsche Telekom SMS Service. Charges are made for sending
SMSs. There are no costs for receiving SMSs.
SNMP
Simple Network Management Protocol
SNMP shell
Input level for SNMP commands.
So bus
All ISDN sockets and the NTBA of an ISDN point-to-multipoint connection. All So buses consist of a four-wire cable. The lines transmit
digital ISDN signals. The So bus is terminated with a terminating
resistor after the last ISDN socket. The So bus starts at the NTBA
and can be up to 150 m long. Any ISDN devices can be operated on
this bus. However, only two devices can use the So bus at any one
time, as only two B channels are available.
So connection
See ISDN Basic Rate Interface
So interface
Internationally standardised interface for ISDN systems. This interface is provided on the network side by the NTBA . On the user
bintec R200-Serie
Glossary
Funkwerk Enterprise Communications GmbH
side, the interface is intended for connecting a PBX (point-to-point
connection) and for connecting up to eight ISDN terminals
(point-to-multipoint connection).
bintec R200-Serie
SOHO
Small Offices and Home Offices
SPD
The SPD (=Security Policy Database) defines the security services
available for IP traffic. These security services are dependent on
parameters such as the source and destination of the packet etc.
Special features
Performance features of the T-Net and T-ISDN networks such as
display of the caller's number, callback on busy, call forwarding,
changeable connection lock, changeable telephone number lock,
connection without dialling and transmission of charge information.
Availability depends on the standard of the connected terminals.
Special-features
connection
T-ISDN Basic Rate Interface with an extensive range of services:
call waiting, call forwarding, third-party conference, display of call
costs at the end of a connection, inquiry/brokering, telephone number transmission. In the special-features connection, three multiple
subscriber numbers are included as standard.
Specify own telephone number for
next call
If you want to make a business call late in the evening from your
private sphere - say the living room - for example, you can define
your business telephone number as the outgoing multiple subscriber
number (MSN) for this call. The advantages of this are that the costs
for the connection are recorded for the selected MSN and the person you are calling can identify you by the transferred MSN. Before
you call an external number, you can define which of your telephone
numbers is to be sent to the exchange and called party. You make
the selection using the telephone number index.
Speeddial number
A speeddial index (000...299) can be assigned to each of the 300
telephone numbers in the telephone book. You then dial this speeddial index instead of the long telephone number. Note that telephone
numbers dialled using the speeddial function must also comply with
the dialrule.
SPID
Service Profile Identifier
Splitter
The splitter separates data and voice signals on the DSL connection.
Spoofing
Technique for reducing data traffic (and thus saving costs), especially in WANs.
403
Glossary
Funkwerk Enterprise Communications GmbH
SSID
The Service Set Identifier (SSID) or Network Name refers to the
wireless network code based on IEEE 802.11.
SSL
Secure Sockets Layer A technology, now standard, developed by
Netscape, which is generally used to secure HTTP traffic between a
web browser and a web server.
STAC
Data compression procedure.
Standard connection T-ISDN Basic Rate Interface with the performance features Inquiry/
Brokering and Telephone Number Transmission. The standard connection contains three multiple subscriber numbers.
404
Static IP address
A fixed IP address, in contrast to a dynamic IP address.
Station guarding
Deactivation of acoustic call signalling: do not disturb.
Subaddressing
In addition to the transmission of ISDN telephone numbers, additional information in the form of a subaddress can be transmitted from
the caller to the called party over the D channel when the connection is set up. Addressing that goes beyond the pure MSN, which
can be used e.g. specifically to locate several ISDN terminals that
can be reached on one telephone number for a particular service. In
the called terminal - e.g. a PC - various applications can also be addressed and in some cases executed. Costs are charged for the
performance feature, and it must be requested separately from the
network operator.
Subnet
A network scheme that divides individual logical networks into smaller physical units to simplify routing.
Subnet mask
A method of splitting several IP networks into a series of subgroups
or subnetworks. The mask is a binary pattern that must match the IP
addresses in the network. 255.255.255.0 is the default subnet mask.
In this case, 254 different IP addresses can occur in a subnet, from
x.x.x.1 to x.x.x.254.
Subscriber Name
To distinguish between connections more easily, you can assign a
subscriber name for each internal subscriber.
Suppress Atelephone number
(CLIR)
CLIP/CLIR: Calling line identification presentation/calling line identification restriction
Suppress B telephone number
(COLR)
COLP/COLR: Connected line identification presentation/connected
line identification restriction = Activate/suppress transmission of
called party's telephone number to caller. This performance feature
bintec R200-Serie
Glossary
Funkwerk Enterprise Communications GmbH
suppresses the display of the called subscriber's telephone number.
If display of the B telephone number is suppressed, your telephone
number is not transmitted to the caller when you take a call.
Suppress own tele- Temporary deactivation of the transmission of your own telephone
phone number
number.
bintec R200-Serie
Suppression of the
telephone number
Performance feature of a PBX. The display of the telephone number
can be deactivated on an individual basis.
Switch
LAN switches are network components with a similar function to
bridges or even gateways. They switch data packets between the input and output port. In contrast to bridges, switches have several input and output ports. This increases the bandwidth in the network.
Switches can also be used for conversion between networks with
different speeds (e.g. 100-mbps and 10-mbps networks).
Switchable dialling
method
Option of switching between the pulse dialling method and MFC
method by means of a switch or key input on the terminal, such as
the telephone or fax machine.
Synchronous
Transmission process in which the sender and receiver operate with
exactly the same clock signals – in contrast to asynchronous transmission. Spaces are bridged by a stop code.
Syslog
Syslog is used as the de facto standard for transmitting log messages in an IP network. Syslog messages are sent as unencrypted
text messages over the UDP port 514 and collected centrally. They
are usually used to monitor computer systems.
System telephones
Telephone that belongs to a modern PBX, which - depending on the
PBX - has a number of special features and keys, e.g. the TConcept PX722.
T-DSL
Product name used by Deutsche Telekom AG for its DSL services
and products.
T-Fax
Product name for T-Com fax machines.
T-ISDN
Telephony, faxing, data transfer and online services from one network and a single connection: T-ISDN offers exciting services with
numerous benefits, for example a point-to-multipoint connection the ideal solution for families or small businesses. This connection
option, which can be used with the existing telephone cable, costs
less than two telephone connections but offers far greater quality
and ease of use: Two independent lines, so that you can still make a
405
Glossary
Funkwerk Enterprise Communications GmbH
phone call, receive a fax, or surf the Internet when another family
member is making a long call on the other line. Three or more telephone numbers, which you can assign individually to your devices
and distribute differently if needed through simple programming
steps. Most ISDN telephones can "manage" several telephone numbers, so you can set up a "central" telephone in your household, for
example, to allow you to react to calls to all ISDN telephone numbers with this telephone. The fax and telephone in your home office
can also each be assigned a number, as can your son or daughter's
phone. As a result, each family member can be contacted with a
separate number, helping to eliminate "day-to-day friction"! And as
far as the costs are concerned, on request you can have your bill
broken down to show which units have been charged for the individual ISDN telephone numbers.
T-Net
The digital telephone network of T-Com for connecting analogue terminals.
T-NetBox
The answering machine in T-Net and T-ISDN. The T-NetBox can
store up to 30 messages.
T-NetBox telephone Enter the current T-NetBox telephone number here if it differs from
number
the 08003302424 entered ex works. As soon as your T-NetBox receives a voice or fax message, notification is sent to your PBX.
406
T-Online
Umbrella term the T-Com online platform. Offers services such as email and Internet access.
T-Online software
T-Com software decoder for all conventional computer systems that
enables access to T-Online. Supports all functions such as KIT, email and the Internet with a browser. T-Online users receive this
software free of charge.
T-Service
T-Service carries out all installation work and configurations for the
PBX at the customer's request. The service ensures optimum voice
and data transmission at all times thanks to maintenance work.
T-Service access
T-Service access enables you to have your PBX configured by TService. Give T-Service a call! Get advice and provide information
on your configuration requirements. T-Service will then configure
your PBX remotely without you having to do anything.
TA
Terminal Adapter
TAPI
Telephony Application Program Interface
bintec R200-Serie
Glossary
Funkwerk Enterprise Communications GmbH
bintec R200-Serie
TAPI configuration
You can use the TAPI configuration to modify the TAPI driver in line
with the program that uses this driver. You can check which MSN is
to be assigned to a terminal, define a line name, and configure the
dialling parameters. First configure your PBX. You must then configure the TAPI interface. Use the "TAPI Configuration" program.
TCP
Transmission Control Protocol
TCP/IP
Transmission Control Protocol/Internet Protocol
TCU
Telecommunication connection unit
TE
Terminal equipment
TEI
Terminal Endpoint Identifier
Telefax
Term that describes the remote copying for transmitting texts,
graphics and documents true to the original over the telephone network.
Telematics
Telematics is a combination of telecommunication and computer
technology and describes data communication between systems
and devices.
Telnet
Protocol from the TCP/IP protocol family. Telnet enables communication with a remote device in the network.
Terminal adapter
Device for interface adaptation. It enables different equipment to be
connected to T-ISDN. The terminal adapter a/b is used to connect
analogue terminals to the So interface of the ISDN Basic Rate Interface. Existing analogue terminals can still be operated with tone dialling.
TFTP
Trivial File Transfer Protocol
Tiger 192
Tiger 192 is a relatively new and very fast hash algorithm.
TLS
Transport Layer Security
Tone dialling
Multifrequency code method (MFC)
Transfer internal
code
If you receive an internal call, e.g. from the subscriber with internal
telephone number 22, while you are away, this subscriber's internal
telephone number is stored in your telephone's caller list. However,
because your connection is automatically set to Automatic Outside
Line as a result of the ex works settings, you would first have to dial
** for a callback in order to obtain the internal dialling tone, and then
407
Glossary
Funkwerk Enterprise Communications GmbH
22. If "Transfer Internal Code" is active, ** is placed before the 22
and the callback can be made directly from the caller list.
Transmission speed The number of bits per second transmitted in T-Net or T-ISDN from
the PC or fax machine. Fax machines achieve up to 14.4 kbps, modems 56 kbps. In the ISDN, data and fax exchange with 64 kbps is
possible. With T-DSL, up to 8 mbps can be received and up to 768
kbps sent.
TSD
Terminal Selection Digit
TTL
TTL stands for Time to Live and describes the time during which a
data packet is sent between the individual servers before it is discarded.
Twofish
Twofish was a possible candidate for the AES (Advanced Encryption Standard). It is regarded as just as secure as Rijndael (AES),
but is slower.
U-ADSL
Universal Asymmetric Digital Subscriber Line
UDP
User Datagram Protocol
Update
Update to a software program (PBX firmware). An update is the updated version of an existing software product, and is indicated by a
new version number.
Upload
Data transfer during online connections, where files are transferred
from the user's PC to another PC or to a data network server.
UPnP
Universal Plug and Play
Upstream
Data transmission rate from the client to the ISP.
URL
Universal/Uniform Resource Locator
USB
Universal Serial Bus
User guidance
Electronic user guidance that takes the user through the required
functions of a terminal such as a telephone, answering machine or
fax machine step by step (menu-guided operation).
UUS1 (User to User This function is only possible for system telephones and ISDN teleSignalling 1)
phones.
V.11
408
ITU-T recommendation for balanced dual-current interface lines (up
to 10 mbps).
bintec R200-Serie
Glossary
Funkwerk Enterprise Communications GmbH
bintec R200-Serie
V.24
CCITT and ITU-T recommendation that defines the interface
between a PC or terminal as Data Terminal Equipment (DTE) and a
modem as Data Circuit-terminating Equipment (DCE).
V.28
ITU-T recommendation for unbalanced dual-current interface line.
V.35
ITU-T recommendation for data transmission at 48kbps in the range
from 60 to 108kHz.
V.36
Modem for V.35.
V.42bis
Data compression procedure.
V.90
ITU standard for 56 kbps analogue modems. In contrast to older
V.34 modems, data is sent in digital form to the client when the V.90
standard is used and does not need to be first converted from digital
to analogue on one side of the modem (provider), as was the case
with V.34 and earlier modems. This makes higher transmission
rates possible. A maximum speed of 56 kbps can be achieved only
under optimum conditions.
Vanity
Letter dialling
VDSL
Very high bit rate digital subscriber line (also called VADSL or BDSL).
VID
VLAN ID
VJHC
Van Jacobson Header Compression
VLAN
Virtual LAN
VoIP
Voice over IP
VPN
Virtual Private Network
VSS
Virtual Service Set
WAN
Wide Area Network
WAN interface
WAN interface
WAN partner
Remote station that is reached over a WAN, e.g. ISDN.
Web server
Server that provides documents in HTML format for access over the
Internet (WWW).
Webmail
T-Online service with which e-mails can be sent and received world-
409
Glossary
Funkwerk Enterprise Communications GmbH
wide on the Internet by means of a browser.
410
WEP
Wired Equivalent Privacy
Western plug
(also known as RJ-45 plug) Plug used for ISDN terminals with eight
contacts. Developed by the US telephone company Western Bell.
Western plugs for analogue telephones have four or six contacts.
WINIPCFG
A graphical tool on Windows 95, 98 and Millennium that uses Win32
API to view and configure the IP address configuration of computers.
WLAN
A group of computers wirelessly connected to each other (wireless
LAN).
WMM
Wireless multimedia
WPA
Wi-Fi-protected access
WPA Enterprise
Concentrates primarily on the needs of companies and offers secure
encryption and authentication. Uses 802.1x and the Extensible Authentication Protocol (EAP) and thus offers an effective means of
user authentication.
WPA-PSK
Intended for private users or small businesses that do not run a
central authentication server. PSK stands for Pre-Shared Key and
means that AP and client use a fixed character string (8 to 63 characters) known to all subscribers as the basis for key calculation for
wireless traffic.
WWW
World Wide Web
X.21
The X.21 recommendation defines the physical interface between
two network components in packet-switched data networks (e.g. Datex-P).
X.21bis
The X.21bis recommendation defines the DTE/DCE interface to Vseries synchronous modems.
X.25
An internationally agreed standard protocol that defines the interface
between network components and a packet-switched data network.
X.31
ITU-T recommendation on the integration of X.25-compatible DTEs
in ISDN (D channel).
X.500
ITU-T standards that cover user directory services, see LDAP. Example: The phone book is the directory in which you find people on
bintec R200-Serie
Glossary
Funkwerk Enterprise Communications GmbH
the basis of their name (agreement with the telephone directory).
The Internet supports several databases with information on users,
such as e-mail addresses, telephone numbers and postal addresses. You can search these databases to obtain information
about individuals.
X.509
bintec R200-Serie
ITU-T standards that define the format of the certificates and certificate queries and their use.
411
Index
Funkwerk Enterprise Communications GmbH
Index
288 , 343
Mail Exchanger (MX)
294
#
# 76 , 135 , 356 , 357 , 364 , 366
#1, #2, #3 257
A
Access 309
ACCESS_ACCEPT 84
ACCESS_REJECT 84
ACCESS_REQUEST 84
ACCOUNTING_START 84
ACCOUNTING_STOP 84
ACL Mode 127
Action 265 , 305 , 338 , 357 , 364
Action if Content Server not
reachable 302
Action if license not registered 302
Active IPSec Tunnels 62
Active Sessions (SIF, RTP, etc... ) 62
Address 272
Address mode 108 , 189
Address Range 272
Address Type 272
Administrative Status 202
ADSL chipset 104
ADSL Logic 338
ADSL Mode 105
Alert service 348
Alive Check 87 , 215 , 221 , 358
All Multicast Groups 154
Allow deleting/editing all routing
entries 135
Allowed Addresses 127
Alternative interface to get DNS
servers 284
Always Active 174 , 179 , 234 , 241
412
Always Active 164 , 169
Answer to client request 331
Apply QoS 265
ARP Processing 124
ATM PVC 174
ATM Service Category 192
Authentication 167 , 171 , 176 , 181 ,
237 , 244
Authentication for PPP Dialin 93
Authentication Method 211 , 358
Authentication Password 327
Authentication Type 85 , 90
Autoconfig on Bootup 98
Autosave Mode 257
B
Back Route Verify 135 , 204
Based on Ethernet Interface 108
Beacon Period 120
Block after Connection Failure for 167
, 171 , 176 , 181 , 237 , 244
Blocked 161
Blocktime 91 , 215
BOSS 338
BOSS Version 62
Burst Mode 119
Bytes 358
C
CA Certificate 253
CA Certificates 215
Cache Hitrate (%) 291
Cache Hits 291
Cache Size 284
Callback 246
Callback Mode 181
CAPI Server TCP Port 310
Category 305
Certificate is CA Certificate 251
Certificate Request Description 253
Certificate Revocation List (CRL)
Checking 251
Channel 117 , 362
bintec R200-Serie
Index
Funkwerk Enterprise Communications GmbH
Channel Bundling 183
Charge 362 , 363
Client MAC Address 369
Client Type 191
Code 274
Common Name 255
Compression 79
Configuration interface 76
Configured Speed / Mode 95 , 96
Confirm system administrator
password 67
Connection Idle Timeout 164 , 169 ,
174 , 179 , 234 , 241
Connection Type 179 , 234
Consider 150
Contact 64
Continuity Check (CC) End-to-End
197
Continuity Check (CC) Segment 197
Control Mode 199
Controlled interfaces 318
Corresponding NAT entry for outgoing
connection 138
Country 255
CPU Usage 62
Create NAT Policy 166 , 170 , 175 ,
180 , 235 , 242
CTS frames received in response to an
RTS 366
Current File Name in Flash 338
Current Speed / Mode 95 , 96
Current System Time 69
D
D Channel Mode 207
Data Packets Sequence Numbers
232
Data Rate Mbps 367 , 369
Data Traffic Priority 265
Date 356
Day 305
Default Ethernet for PPPoE Interfaces
189
Default Route Distribution 147
bintec R200-Serie
Delete complete IPsec configuration
226
Description 164 , 169 , 174 , 179 ,
187 , 202 , 211 , 219 , 223 , 230 ,
234 , 241 , 249 , 251 , 260 , 271 ,
272 , 273 , 274 , 277 , 286 , 300 ,
312 , 357 , 358 , 364 , 366
Destination 265
Destination Filename 338
Destination Interface 154
Destination IP Address 130 , 321 ,
322 , 358
Destination Port 132 , 141
Destination Port Range 274
Details 357
DH Group 211
DHCP Hostname 109 , 189
DHCP MAC Address 109 , 189
DHCP Options 298
Dialling Number 324
Direction 146 , 362 , 363
Distribution Mode 150
Distribution Policy 150
Distribution Ratio 152
DNS Negotiation 167 , 171 , 176 ,
184 , 238 , 245
DNS Requests 291
DNS Server 288
DNS Server Configuration 283
DNS Test 335
Domain 288
Domain Name 283
Dormant 161
Down 161
Downstream 105
Drop non-members 113
Drop untagged frames 113
Dropped 361
DSA Key Status 81
DSCP / TOS Value 132
DTIM Period 120
Duplicate received MSDUs 366
Duration 362 , 363
Dynamic RADIUS Authentication 227
413
Index
Funkwerk Enterprise Communications GmbH
E
Email 255
Enable Discovery Server 329
Enable IPSec 226
Enable Server 310
Enable Update 293
Enable VLAN 114
Enable Web Filter 302
Encapsulation 187
Encrypted 361
Encryption 91 , 181 , 237 , 244
Encryption Algorithms 80
Encryption of the Configuration 338
End-to-End Pending Requests 195
End-to-End Send Interval 195
Entries 184
Entry Active 85 , 90
Error 358 , 361
Ethernet Interface Selection 95
Exchange Type 358
Extended Route 130
External Filename 258 , 259
External IP address 138
F
Facility 343
File Encoding 258 , 259
Filename 338
Filter rules 268
Filtered input interface(s) 302
Firewall Status 269
Force Certificate to be trusted 251
Forward to 288
Forwarded Requests 291
Forwarding 288
Fragmentation Threshold 120
Frame transmissions without ACK received 366
G
Garbage Collection Timer 148
Gateway 130 , 298 , 327
414
Generate Private Key 253
GRE Window Adaption 247
GRE Window Size 247
Group Description 150
Group ID 316 , 317
H
Hashing Algorithms 80
Hello Interval 232
Hold Down Timer 149
Host 288
Host Name 293
HTTP 77
HTTPS 77
I
IGMP Proxy 158
IGMP Status 159
Ignore Certificate Request Payloads
228
IKE (Phase 1) SAs 358
IKE (Phase1) 360
Include Certificates and Keys 338
Incoming ISDN Number 207 , 246
Incoming Number 324
Interface 78 , 96 , 113 , 130 , 135 ,
138 , 146 , 152 , 156 , 199 , 268 ,
288 , 293 , 297 , 316 , 319 , 320 ,
327 , 331 , 362 , 363
Interface Action 316 , 319 , 320
Interface Description 76
Interface is UPnP controlled 331
Interface Mode 108
Internal Time Server 69
Interval 318 , 321 , 322
Intra-cell Repeating 124
Invalid DNS Packets 291
Invalid packets received 366
IP / Netmask 108
IP Accounting 345
IP accounting message format 346
IP Address 146 , 189 , 190 , 286 , 300
, 327 , 343 , 353 , 367 , 369
bintec R200-Serie
Index
Funkwerk Enterprise Communications GmbH
IP Address Assignment 202
IP Address Mode 166 , 170 , 175 ,
180 , 235 , 242
IP Address Range 297
IP Address to use for DNS/WINS Server
Assignment 284
IP Assignment Pool 180 , 202
IP Assignment Pool (IPCP) 235 , 242
IP Compression 221
IP pool name 186 , 225
IP pool range 186 , 225
IPSec (Phase 2) SAs 358
IPSec (Phase2) 360
IPSec Debug Level 226
IPSec Tunnels 360
ISDN Configtype 98
ISDN external use 62
ISDN Login 77
ISDN Port 102
ISDN Theft Protection Service 324
K
Key Value
249
L
Last Write Result 327
Layer 4 Protocol 132
LCP Alive Check 167 , 171 , 176 ,
237 , 244
LDAP URL Path 260
Lease Time 298
Level 343 , 356
Licence Key 73 , 303
Licence Serial Number 73
License Status 303
License valid until 303
Lifetime 211 , 219
Local Certificate 211
Local Certificate Description 258 ,
259
Local GRE IP Address 249
Local Hostname 230
Local ID 358
bintec R200-Serie
Local ID Type 211
Local ID Value 211
Local IP 130
Local IP Address 166 , 170 , 175 ,
180 , 202 , 232 , 235 , 242 , 249 ,
358
Local Port 358
Local PPTP IP Address 171
Locality 64 , 255
Logged Actions 269
Logging Level 79
Long Retry Limit 120
Loopback End-to-End 195
Loopback Segment 195
M
MAC address 108 , 189 , 300 , 327 ,
367 , 370
Management VID 114
Map to host 141
Matching String 349
Max Receive Lifetime 120
Max Transmit MSDU Lifetime 120
Max. Clients 117
Maximum burst size (MBS) 192
Maximum groups 159
Maximum Message Level of Syslog
Entries 64
Maximum Number of Accounting Log
Entries 64
Maximum Number of Dialup Retries
167 , 171 , 176 , 181
Maximum number of history entries
302
Maximum number of IGMP status messages 156 , 159
Maximum number of messages per
minute 348
Maximum Number of Syslog Entries
64
Maximum Response Time 156
Maximum Retries 232
Maximum sources 159
Maximum Time between Retries 232
415
Index
Funkwerk Enterprise Communications GmbH
Maximum TTL for Negative Cache
Entries 284
Maximum TTL for Positive Cache
Entries 284
Maximum upstream bandwidth 105
Maximum Upstream Speed 199
Mbps 365
Members 271 , 277
Memory Usage 62
Message 356
Message Compression 349
Message Timeout 349
Messages 358
Metric 130
Metric Offset for Active Interfaces 146
Metric Offset for Inactive Interfaces
146
Minimum Time between Retries 232
Mode 132 , 135 , 156 , 159 , 207 ,
211 , 223 , 253
Mode / Bridge Group 76
Monitored Interface 319 , 320
Monitored interfaces 324 , 354
Monitored IP Address 316 , 318
MSDUs that could not be transmitted
366
MSN 102
MSN Recognition 102
MTU 249 , 358
Multicast Group Address 154
Multicast MSDUs received
successfully 366
Multicast MSDUs transmitted successfully 366
N
Name 223
NAT Active 136
NAT Detection 358
NAT Traversal 215
Negative Cache 284
Netmask 130 , 146 , 189 , 190 , 235 ,
327
Network Name (SSID) 124
416
Network Type 130
New Date 69
New Filename 338
New Time 69
Node Name 327
Noise dBm 367 , 369
Number Called 324
Number of dial attempts 325
Number of Messages 349
O
OAM Flow Level 195
Operation Band 117
Operation Mode 117
Organisation 255
Organisational Unit 255
OSPF Mode 184 , 238 , 245
Other Inactivity 270
Outgoing ISDN Number 207 , 246
P
packets 358
Passed 361
Password 164 , 169 , 174 , 179 , 223
, 230 , 234 , 241 , 253 , 258 , 259 ,
293 , 309 , 338 , 348 , 354
Peak Cell Rate (PCR) 192
Peer Address 202
Peer ID 202
Phase-1 Profile 203
Phase-2 Profile 203
Physical connection 104
Physical Interface - Interface Specifics Link 63
Ping 77
Ping Test 334
Poisoned Reverse 147
Policy 87 , 91
Pool Usage 297
POP3 Server 348
POP3 Timeout 348
Port 138 , 295 , 370
Port Name 98
bintec R200-Serie
Index
Funkwerk Enterprise Communications GmbH
Port Usage 98
Port VLAN Identifier (PVID) 113
Portforwardings 136
Positive Cache 284
PPPoE Ethernet Interface 164
PPPoE Interfaces for Multilink 164
PPPoE Mode 164
PPTP Address Mode 171
PPTP Inactivity 270
PPTP Interface 169
PPTP Mode 241
PPTP Passthrough 136
Preshared Key 125 , 202
Primary 283 , 283
Primary DHCP Server 301
Primary Time Server 69
Prioritize SIP Calls 278
Prioritize TCP ACK Packets 167 , 171
, 176 , 190 , 237
Priority 85 , 90
Propagate PMTU 221
Proposal 219
Proposals 211
Protocol 138 , 274 , 295 , 343
Provider 187 , 293
Provider Name 295
Proxy ARP 109 , 184 , 204
Proxy ARP Mode 238 , 245
Proxy Interface 158
Q
Query Interval
156
R
RA Encrypt Certificate 253
RA Sign Certificate 253
RADIUS Dialout 87
Radius Secret 85
RADIUS Server Group ID 223
Receive Version 143
Received DNS Packets 291
Received MPDU that couldn't be decrypted 366
bintec R200-Serie
Recent System Logs 63
Recipient 349
Region 128
Remote GRE IP Address 249
Remote Hostname 230
Remote ID 358
Remote IP Address 231 , 357
Remote IP Address / Netmask 138
Remote network 138
Remote Networks 357
Remote Number 362 , 363
Remote Port 358
Remote PPTP IP Address 171 , 241
Remote User (for Dialin only) 179
Response 286
Response interval (last member) 156
Result of Autoconfiguration 98
Retransmission Timer 149
Retries 87
RFC 2091 Variable Timer 147
RFC 2453 Variable Timer 147
RIP UDP Port 147
Robustness 156
Role 223
Route Announce 143
Route Entries 166 , 170 , 175 , 180 ,
202 , 235 , 242 , 249
Route Timeout 148
Route Type 130
RSA Key Status 81
RTS frames with no CTS received
366
RTS Threshold 120
RTSP Port 280
RTSP Proxy 280
Rx Bytes 364
Rx Errors 364
Rx Packets 364 , 365 , 367 , 369
S
SCEP URL 253
Schedule (start/stop time)
Schedule Interval 315
Secondary 283 , 283
305
417
Index
Funkwerk Enterprise Communications GmbH
Secondary DHCP Server 301
Secondary Time Server 69
Security Algorithm 357
Security Mode 125
Segment Pending Requests 195
Segment Send Interval 195
Select Action 312
Select File 338
Select Interface 312
Selection 273
Send Certificate Chains 228
Send Certificate Request Payloads
228
Send CRLs 228
Send Information to 354
Send Initial Contact Message 227
Send Key Hash Payloads 228
Send Version 143
Sender's E-mail Address 348
Serial number 62
Server 295
Server Failures 291
Server IP Address 85 , 90
Server Timeout 87
Service 102 , 138 , 265 , 362 , 363
Service attribute 102
Severity 349
Short Retry Limit 120
Show Passwords and Keys in Clear
Text 67
Signal dBm 367 , 369
Silent Deny 136
SIP Port 278
SIP Proxy 278
SMTP Authentication 348
SMTP Server 348
SNMP 77
SNMP Lists UDP Port 82
SNMP Read Community 67
SNMP Trap Broadcasting 352
SNMP Trap Community 352
SNMP Trap UDP Port 352
SNMP Version 82
SNMP Write Community 67
418
SNR dB 369
Source 265 , 312 , 338
Source Filename 338
Source Interface 132 , 154
Source IP Address 132 , 318 , 321 ,
322
Source Port 132
Source Port Range 274
Specify Bandwidth 268
SSH 77
SSH Service Active 79
Stack 362
Standard Route 166 , 170 , 175 , 180
, 202 , 235 , 242 , 249
Start mode 203
Start Time 313 , 363
State 316 , 319 , 321 , 357 , 360 , 362
, 364
State/Province 255
Stop Time 313
Subnet 272
Subsystem 350 , 356
Successfully Answered Queries 291
Summary 255
Sustained Cell Rate (SCR) 192
Switch Port 95
Sync SAs with ISP Interface Status
227
System Admin Password 67
System Date 62
System Logic 338
System Name 64
T
TACACS+ Secret 90
TCP Inactivity 270
TCP Keepalives 79
TCP Port 91
TCP-MSS Clamping 109
Telnet 77
Tertiary Time Server 69
TFTP File Name 312
TFTP server 312
Time 356
bintec R200-Serie
Index
Funkwerk Enterprise Communications GmbH
Time Condition 313
Time Offset from GMT 69
Time Stamp 343
Time Update Interval 69
Time Update Policy 69
Timeout 91 , 325
Total 361
Traceroute Test 336
Traffic Shaping 268
Transfer Mode 207
Transfer Own IP Address over ISDN
207
Transmit Key 125
Transmit Power 117
Transmit Shaping 105
Transmitted MPDUs 366
Trials 318
Trigger 319 , 320
TTL 286
Tunnel Profile 234
Tx Bytes 364
Tx Errors 364
Tx Packets 364 , 365 , 367 , 369
Type 187 , 274 , 364
Type of Messages 343
U
UDP Destination Port 231 , 239 , 354
UDP Inactivity 270
UDP Port 87
UDP Source Port 231
UDP Source Port Selection 239
Unchanged for 364
Unicast MPDUs received successfully
366
Unicast MSDUs transmitted
successfully 366
Up 161
Update Interval 295 , 354
Update Path 295
Update System Time from ISDN 69
Update Timer 148
Update URL 312
UPnP Status 332
bintec R200-Serie
UPnP TCP Port 332
Upstream 105
Uptime 62 , 367 , 369
URL 338
URL path length 302
URL/IP-Address 307
Usage Type 181 , 203
Use Key 249
Use PFS Group 219
Use Zero Cookies 227
User name 164 , 169 , 174 , 179 , 234
, 241 , 293 , 309 , 348
User-defined 255
Users 223
V
Value 366
Virtual Channel Connection (VCC)
192 , 195
Virtual Channel Identifier (VCI) 187
Virtual Path Connection (VPC) 195
Virtual Path Identifier (VPI) 187
VLAN ID 108
VLAN Identifier 112
VLAN Members 112
VLAN Name 112
W
WEP Key 1-4 125
Wildcard 294
Wireless Mode 119
Wireless module 117
WPA Cipher 125
WPA Mode 125
WPA2 Cipher 125
X
X.31 (X.25 in D Channel)
X.31 TEI Service 100
X.31 TEI Value 100
XAUTH Profile 203
100
Z
419
Index
Funkwerk Enterprise Communications GmbH
Zero Cookie Size
420
227
bintec R200-Serie