1
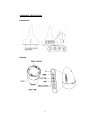
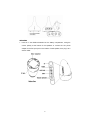
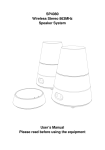
5RBWS2
Wireless Stereo 900MHz
Speaker System
User’s Manual
Please read before using the equipment
P.
INTRODUCTION
This stereo wireless speaker system applies the latest 900MHz wireless
technology that enables you to enjoy music and TV sound anywhere inside or
outside your home. You can simply connect the transmitter with any audio source
such as Ipod, TV, DVD, Hi-Fi and CD/MP3 player.
FEATURES
1.
900 MHz RF technology
2.
Auto Tuning System on speakers
3.
Phase Lock Loop (PLL) transmission system on transmitter
4.
Waterproof speakers
5.
Stereo effect on Speakers
6.
Operating distance up to 50 metres
7.
No line of sight limitation
8.
Auto On/Off control on Transmitter
9.
Auto Shut-Off on Speakers
10.
Mood light feature
11.
Remote control unit
P.
COMPONENT IDENTIFICATION
TRANSMITTER
SPEAKER
P.
REMOTE CONTROL UNIT
INSTALLATION
TRANSMITTER
1. Connect the supplied AC power adaptor to an electrical wall outlet.
2. Plug the AC power adaptor in the DC jack located on the rear of the
transmitter.
3. The rear of the transmitter has one audio cord that can be connected to the
audio output jack of a TV, Ipod, DVD, and CD/MP3 players or to
headphone/earphone jack with the connector provided.
When the power adapter connection is finished, the LED on the transmitter will light
up in Green. When the audio cable connection is finished and the audio source is
turned on, the LED will turn from Green to Blue.
P.
SPEAKERS
1. Insert 8 ‘C’ size Alkaline batteries into the battery compartment, noting the
correct polarity at the bottom of the speakers or connect the 12V power
adaptor to the DC input jack on the bottom of each speaker, then plug it to a
wall AC outlet.
P.
`
2. Press Power button and turn the speakers on. The Power/Standby LED will
light up in Blue.
REMOTE CONTROL UNIT
1. Remove the battery cover at the rear of the remote control unit and insert 2
“AAA” size batteries (included) into the battery compartment, noting the correct
polarity.
2. Place the cover back and close the battery compartment.
OPERATION
1. Connect the power adapter between your AC wall socket and the transmitter.
The LED will turn to Green.
2. Turn on the audio source (TV or audio component) to which the transmitter is
connected. The LED will turn from Green to Blue.
3. Select the channel 1, 2 or 3 of the transmitter depending on noise or
interference from nearby 900MHz wireless devices.
4. Turn on the Power button on the speaker and adjust the volume by pressing
“+” or “-“ for your desired listening level. Volume can also be adjusted by
pressing “+” or “-” button located on the remote control unit.
5. Push the “Auto Tune” button to get the best tuning reception in the speakers.
When the button is pressed, frequency tuning starts automatically and it stops
when a signal is detected.
6. You should now be able to place the speakers freely from room to room without
disruption.
P.
SWITCHING OFF
1.
If there is no audio input signal to the transmitter for 4 minutes, the transmitter
will go to standby mode and LED will change from Blue to Green.
2.
If the power adapter is unplugged, the LED on the transmitter will turn off.
3.
Speakers will turn to standby mode if there is no input signal to transmitter
and LED becomes Green. Speakers will automatically shut off when standby
mode continues for 5 minutes.
4.
Speakers will also turn to standby mode if you press the POWER button on
the remote control to Green LED. Speakers will automatically shut off after 5
minutes.
5.
At standby mode, speaker will turn to On automatically after getting a signal
from the transmitter.
OTHER CONTROLS
1. Select volume up and down on Speakers or Remote Control Unit.
2. Select Mood Light On/OFF by pressing the “Light” button on Speakers or
Remote Control Unit
3. If you hear interference from other components, re-adjust the tuning control by
moving channel switch to 1, 2 or 3 of the transmitter, then pressing the “AUTO
TUNE” button on speakers or remote unit for best reception.
TROUBLESHOOTING
NO SOUND
-
Ensure the AC adaptor is fully inserted into the AC outlet and the power
connection input on the transmitter.
-
Ensure the speakers are switched ON.
-
Speaker’s battery capacity is too low, replace with new batteries or
connect the AC adaptors to the speakers.
-
Ensure the TV or audio component is ON.
-
The connected audio / video equipment is not playing. Start playing the
equipment.
-
The volume of speaker is too low; adjust the volume to an appropriate
level.
P.
DISTORTED
-
Press the “AUTO TUNE” button on the speakers until it matches the
frequency of the transmitter.
-
Change the position of the channel selector on the transmitter. You must
then press the “AUTO TUNE” button on the speakers.
-
Battery capacity is too low. Replace with new batteries.
-
Ensure the volume level of speakers is adjusted properly.
-
The speaker is too far from transmitter, move closer.
-
The input level of the audio signal is too low. Turn up the volume of the
audio source equipment.
TECHNICAL SPECIFICATIONS
Transmission Mode
Carrier Frequency
Operation Voltage
:
:
:
Frequency Response
Distortion
S/N Ratio
Channel Separation
Operating Distance
Output Power
:
:
:
:
:
:
UHF stereo
900 MHz
Transmitter, DC 6V 300mA
Speaker, 8 X “C” size Alkaline batteries
(included) or DC 12V 750mA adaptor
Remote Control Unit, 2 X ‘AAA’ size batteries
(included)
40Hz – 12KHz
1.5%
65dB (typical)
35dB (typical)
Up to 50 metres (150 feet)
2 x 5W (Max)
WARNING:
This device complies with AS/NZS CISPR 13:2004 and AS/AZS
22:2006 Australian Standards Tests.
This is a Class A Product
This device may cause radio interference in some situations in
which case the user is required to take adequate measures when
operating this device
P.
DIGITAL AUDIO
guarantees this product for a period of 12 months from
the original date of purchase. This guarantee covers repair or replacement of
equipment if it proves to be faulty as a result of manufacturing faults or
workmanship. No liability can be accepted for faults arising from accident
or misuse.
In the event of a replacement being required and if there is a shortage of
stock the supplier has the right to replace the faulty item with a similar
product of equivalent value.
Please retain all original packaging materials for possible future use in case
the product needs to be returned for repair or replacement. We suggest that
you fill in the enclosed Warranty Card and send it in as soon as possible.
CONDITIONS
-
-
-
This Warranty will be granted only when the original invoice or
photo-copy of the sales docket (with proof of date and place of
purchase)is presented with the defective product
This guarantee does not cover transportation costs, home service
costs
Damage from misuse or unauthorized modifications etc.
Repairs done by unauthorized persons
Accidents due to accidental dropping, improper ventilation,
exposure to excessive heat or incorrect installation
P.
P.