1
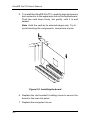
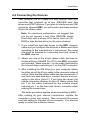
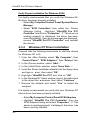
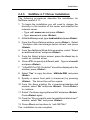
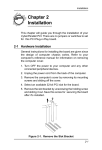
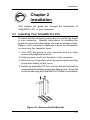
Installation
Chapter 2
Installation
This chapter will guide you through the installation of
UltraIDE Pro PC in your computer.
2-1 Installing Your UltraIDE Pro PCI
Proceed with the following instructions to install the board
in your computer. General instructions for installing the
board are given since the design of computer chassis varies.
Refer to your computer’s reference manual for information
on removing the computer cover.
1. Turn OFF the power to your computer and any other
connected peripheral devices.
2. Unplug power cord from the back of the computer.
3. Remove your computer’s cover by removing its mounting
screw and sliding off the cover.
4. Select an available PCI slot, remove the slot bracket by
unscrewing the holding screw and sliding it out. Save this
screw for securing the UltraIDE Pro PCI after it is installed.
Figure 2-1: Remove the Slot Bracket
2-1
UltraIDE Pro PCI User's Manual
5. To install theUltraIDE Pro PCI, carefully align the board’s
bus connector to the expansion slot on the motherboard.
Push the card down firmly, but gently, until it is well
seated.
Note Hold the card by its external edges only. Try to
avoid touching the components, connectors or pins.
Figure 2-2: Installing the board
6. Replace the slot bracket's holding screw to secure the
board to the rear slot panel.
7. Replace the computer's cover.
2-2
Installation
2-2 Connecting the Devices
Your UltraIDE Pro PCI board is a dual channel Ultra ATA
controller that supports up to four IDE/EIDE hard disk
drives and ATAPI devices. If you plan to use the second IDE
connector channel IDE2, you will need to purchase another
40-pin flat ribbon cable.
Note For maximum performance, we suggest that
you do not connect a fast Ultra IDE/EIDE device
(hard disk) with a slower ATA device (such as CDROM or tape backup drive) on the same channel.
1. If you install two hard disk drives on the IDE1 channel,
make sure you configure the drives as a Master and Slave
according to the manufacturer’s instructions. The same
rule must be followed for connecting hard disk drives to
the IDE2 channel.
2. Attach one end of the 40-pin ribbon cable that was included with the UltraIDE Pro PCI to the IDE1 connector
on the board. Make sure pin 1 on the cable (indicated by
the colored stripe) matches pin 1 on the IDE1 connector.
3. After installing the IDE drive(s) in your computer, attach
the other end of the 40-pin cable to the connector edge of
a drive. Note that the ribbon cable has two connectors. If
you have one hard disk drive, connect the last end connector to the drive (drive C). If you have two drives, the
middle connector attaches to drive D. Make certain that
pin 1 on the cable (indicated by the colored stripe)
matches pin 1 on the hard disk drive’s connector when
making the connections.
The same procedure applies when connecting to IDE2.
After making all your internal connections, replace the
computer’s cover and screws. Then reconnect the power
cord and cables to the back of the computer. You are now
ready to install the software drivers.
2-3
UltraIDE Pro PCI User's Manual
2-3 Installing the Software Drivers
The following sections provides information on how to
install the UltraIDE Pro PCI's driver and utilities for the
following operating system:
MS-DOS/Windows 3.1x
Windows 95/98
Windows NT 4.0
Netware 4.11
For OS/2 Warp 4.0 drivers, please refer to the README.TXT
located in the A:\os2warp.
2-3.1 DOS/Windows 3.1x Driver Installation
Proceed with the following steps to install the driver for MSDOS/Windows 3.1x operating system:
1. Turn on your computer to boot to the DOS prompt.
2. Insert the Driver Installation diskette into the floppy drive.
3. At the a:> prompt, type: CD DOS and press <Enter>.
4. At the a:\DOS>, type: Setup and press <Enter>.
5. Remove the diskette and follow the screen instructions to
reboot the system.
The driver installation is complete.
2-4
Installation
2-3.2
Windows 98 Driver Installation
Windows 98 drivers are inluded in the Windows 95 folder.
Follow the procedures listed below to install the drivers:
1. When the system restart, the Add New Hardware Wizard
dialog box will apears. Click "Next".
2. Select "Search for the best driver for your device." And
then click " Next".
3. Check "Specify a location" and type in A:\95 and click
"Next".
4. Click "Next" and then "Finish", respectively.
5. Select "Yes" to restart the system.
2-3.3
Windows 95 Driver Installation
To ensure proper installation in your system, verify the
version (4.00.950 or 4.00.950B) of Windows 95 before
proceeding with the driver installtion. Go to:
• My Computer / Control Panel / System / General
Follow the procedures listed below to install the drivers for
Windows 95:
1. When the system restarts, the New Hardare Found dialog
box will appears. Insert the Driver Installation diskette
into the floppy drive.
2. Select “Driver from disk provided by hardware
manufacturer”, select “OK”.
(For version 4.00.950B, click “Next” for Update Device
Driver Wizard)
3. In the Install from Disk window, type: a:\95, select “OK”
(For version 4.00.950B, click on “Other Locations” and
type: a:\95. Click “OK”, “Finish”).
4. Type: a:\95 and select "OK" for three more times again.
5. Remove the diskette from the system and select “Yes” to
restart your computer.
2-5
UltraIDE Pro PCI User's Manual
Verify Proper Installation For Windows 95/98
It is highly recommended that you verify the Windows 95/
98 driver has been properly installed.
• Select My Computer/Control Panel/System/Device
Manager.
• Select “SCSI Controllers” from within the Device
Manager listing. Highlight “UltraIDE Pro PCI
Controller”and click on “Properties”. If “This device is
working properly” is displayed, the driver has been
correctly installed. If any error messages are displayed,
remove "UltraIDE Pro PCI Controller" and reinstall
the drivers.
2-3.4
Windows NT Driver Installation
Proceed with the following instructions to intall the drivers
for Windows NT v4.0:
1. From the Main Desktop select “My Computer”, then
“Control Panel”, “SCSI Adapters”, then “Drivers” tab.
2. In the Drivers window, select “Add…”
3. In the Install Driver window, select “Have Disk...”.
4. Insert the Driver Installation diskette into the floppy drive
and type in: a:\nt , then select “OK”.
5. High-light "UltraIDE Pro PCI" and click on "OK".
6. In the Windows NT Setup window, type in the path name
to the driver files: a:\nt again, then select “Continue”.
7. Remove the diskette and select "Yes" to restart the
computer.
It is highly recommended you verify that your Windows NT
device driver has been properly installed.
• Select My Computer/Control Panel/SCSI Adapters
• Highlight “UltraIDE Pro PCI Controller” from the
SCSI Adapters listing and select “Properties”. If “This
device is working properly” is displayed, the driver has
been correctly installed.
2-6
Installation
2-3.5
NetWare 4.11 Driver Installation
The following procedures describe the installation for
NetWare version 4.11:
1. To begin the installation you will need to change the
directory to the location of the server and initialize the
network server.
• Type: cd \ nwserver and press <Enter>
• Type: server and press <Enter>.
2. At the NetWare prompt, type: load install and press <Enter>.
3. From the Driver Options window, press <Enter>. Select
“Configure disk and storage device drivers” and press
<Enter>.
4. From the Additional Drive Actions window, select “Select
an additional driver” and press <Enter>.
5. From the Select a driver screen, press the <Ins> key to
install an unlisted driver.
6. Press <F3> to specify a different path. Type in a:\novell
and press <Enter>.
7. “UltraIDE Pro PCI Controller” should be displayed in the
window, press <Enter>.
8. Select “Yes” to copy the driver h345n4x.DSK and press
<Enter>.
9. Specify a server boot path (c:\cwserver) by pressing
<Enter>. The driver files will be copied.
10. Form the Save existing file c:\newserver\aspitran.dsk
window, select “No” and press <Enter>. Press <Enter>
to continue.
11. Select “Continue copying the next file” and press <Enter>.
Press <Enter> again.
12. From the “Do you want to select an additional disk driver?”
window, select “No” and press <Enter>.
13. Press <Esc> and continue to “exit INSTALL”.
The installation is now complete.
2-7
UltraIDE Pro PCI User's Manual
2-4 CD Xpress
CD Xpress is a program that buffer the data from the
CD-ROM to area on the hard drive. When the CD-ROM first
inserted, CD Xpress automatically starts to buffer the data.
When accessing data on the CD-ROM, the information is
actually accessing data from the hard drive. This will boost
the performance and access time of the CD-ROM. CD Xpress
is only active when the system is at idle. Thus, the process is
transparent to the users and it will not take up CPU processing
time.
Perform the following steps to install the CD Xpress driver
for Windows 95/98:
1. Insert the CD Xpress diskette into the floppy driver.
2. Go to Start and Run. Type: a:\setup and hit <Enter>.
3. Follow on-screen instructions to install the driver and
restart the system.
4. When the system restarts, the "CD Xpress Warning" screen
will appear, click on "OK".
5. Click on Start / Program / SIIG CD Xpress / CD Buffer
Control.
6. Follow the on-screen instructions to configure the buffer
size for maximum performance in your system.
Note When CD Buffer Control first activated, it will
inform you of the available hard disk space. DO NOT
allocate all the available disk space to the buffer size.
Reserve 50 to 100 MB disk space for usage by the operating
system and application software. For maximum
performance of the CD Xpress, allocate up to 650 MB hard
disk space as the buffer size (if possible).
2-8