1
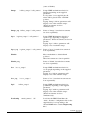
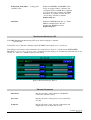
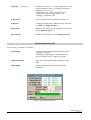
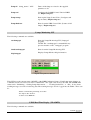
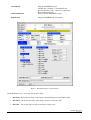
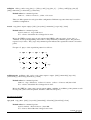
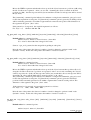
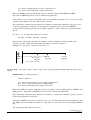
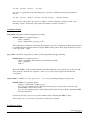
LIRIS
DISEÑO, FABRICACIÓN, INTEGRACIÓN, VERIFICACIÓN Y PRUEBAS
NOTAS DE INGENIERÍA
Código Archivo
Código Proyecto
Fecha
Autor/es
DS/TN-LIR/558v.3
L00C0EN4
09/10/06
Heidy Moreno Arce
Sistema
GENERAL
Unidad
SOFTWARE
Título:
LIRIS COMMANDS - USER GUIDE
NOTA: 17/09/04 Added new command for polarimetry
15/12/04 Added new command llamp
24/02/05 Changed limage syntax
07/05/05 Adapt to new observation scripts syntaxes
09/10/06 Eliminate Overplot Slit option from udasrtd
Mechanism Commands
lsethome
<mech_name> | "all"
Sets HOME some or all mechanisms
When ALL is selected the camera wheel is
not moved!
lslit
<name> | <wheel_pos> | sethome
Moves the SLIT WHEEL to the supplied
name/position parameter.
lfwheel1
<name> | <wheel_pos> | sethome
Moves the FILTER WHEEL 1 to the
supplied name/position parameter.
lfwheel2
<name> | <wheel_pos> | sethome
Moves the FILTER WHEEL 2 to the
supplied name/position parameter.
lpupil
<name> | <wheel_pos> | sethome
Moves the PUPIL WHEEL to the supplied
name/position parameter.
lgrism
<name> | <wheel_pos> | sethome
Moves the GRISM WHEEL to the
supplied name/position parameter.
lcamera
<name> | <wheel_pos> | sethome
Moves the CAMERA WHEEL to the
supplied name/position parameter.
lmchstat
Reports the status of the EPICS Controller
and LIRIS Mechanisms.
lwheelconfig
Reports the names and positions of each of
the elements loaded in the LIRIS wheels.
lmchstop
Moves mechanisms to shutdown locations,
DSTNLIR_558v2.DOC
Pg. 1 de 17
(same as lblanks)
limage
| <filter_setup> | | <slit_name> |
Setups LIRIS mechanisms wheels for
imaging depending on the supplied
parameter.
If “slit_name” is not supplied, the slit
wheel will be placed in the “CLEAR”
position.
Typing ´limage´ with no parameters will
display a list of the available setups.
(Wheel movements are done
simultaneously)
limage_seq | <filter_setup> | | <slit_name> |
Same as ´limage´, but wheel movements
are done sequentially.
lspec
Setups LIRIS Mechanisms wheels for
spectroscopy depending on supplied
parameters. Wheel movements are done in
parallel.
Typing ´lspec´ with no parameters will
display a list of available setups.
| <grism_setup> | | <slit_name> |
lspec_seq | <grism_setup> | | <slit_name> | Same as ´lspec´, but wheel movement is
done sequentially.
lblanks
Move mechanisms to default blank
positions.
Wheel movements are done in parallel!
lblanks_seq
Same as ´lblank´, but wheel movements
are done sequentially.
lcor | <coor_setup> |
Setups LIRIS mechanisms wheels for
coronography depending on the supplied
parameter.
Typing ´lcor´ with no parameters will
display a list of the available setups.
lcor_seq
Same as ´lcor´, but wheel movements are
done sequentially.
lipol
| <coor_setup> |
| <filter_setup> |
lloadconfig
<mech_name> | ´all´
Setups LIRIS mechanisms wheels for
polarimetry depending on the supplied
parameter.
Typing ´lipol´ with no parameters will
display a list of the available setups.
(Wheel movements are done
simultaneously)
Loads into the EPICS Data Base the
“name - distance” configuration file for the
supplied wheel corresponding to the
current HOME micro-switch. Engineering
use !.
DSTNLIR_558v2.DOC
Pg. 2 de 17
lbuild_mch_hometables
<distance_file>
lmchstart
<config_file>
Builds new HOME1 and HOME2 tables
based on supplied wheel `s distance and
configuration files. NOTE: This command
does not perform any load into the EPICS
Data Base. To actually load the files use
“lloadconfig” after this command.
Engineering use !.
Initializes LIRIS Mechanisms. (i.e. Starts
EPICS communications and sets
mechanisms HOME if needed)
Engineering use !.
Mechanisms Monitoring GUI
The LIRIS Mechanisms Monitoring GUI can be started using the command:
“start-liris-inf”
It should be noted , that this command expects the EPICS environment to be correctly set .
This GUI provides wheels status information. For each wheel, it shows it’s current status (INITIALIZED,
MOVING or current_wheel_position_name). Each wheel status changes as mechanisms commands actions are
carried out. There is a “STOP” button for each wheel.
Figure4: Mechanisms Monitor Window
Thermal Commands
lthermstat
Reports the status of the Lakeshore 340, Pfeiffer
Controllers and their sensors.
lpressstat
Reports the status of the pressure sensors inside the
cryostat.
ltempstat
Reports the status of the ´setpoint´ temperature and
temperature sensors inside the cryostat.
DSTNLIR_558v2.DOC
Pg. 3 de 17
ltempsetp | <setpoint> |
Establishes the detector ´s setpoint temperature to the
supplied parameter value by starting the automatic
temperature control loop.
Typing ´ltempsetp´ with no parameters, will
establish the ´setpoint´ temperature to the
coldfinger_temperature + 0.1
ltempcntroff
Turns off the automatic temperature control loop.
ltempconf
Configures the Lakeshore 340 temperature controller
for LIRIS use. Engineering use !.
ltmpstartup
Initializes the Lakeshore 340. (Configures and reports
status). Engineering use !.
lpressstartup
Initializes the Pfeiffer Controller. Engineering use !.
Thermal Monitoring GUI
The following commands are available:
starttempgui
Starts the Temperature/Pressure Monitoring GUI
(“tempgui” program).
NOTE: The “starttempgui” command kills any
previous instance of the “tempgui” program.
shutdowntempgui
Shuts down the temperature/Pressure Monitoring
GUI.
Helptempgui
Displays Temperature/Pressure Monitor help
information.
Figure5: Thermal Monitor Window
DSTNLIR_558v2.DOC
Pg. 4 de 17
This GUI shows the current thermal status of LIRIS (temperature and pressure). Data is automatically refreshed
every 10 minutes. The “Refresh” button can be used at any time to obtain new data readings.
From top to bottom:
•
Cold Finger (k) : Shows the Kelvin temperature reading from the sensor located at the Cold Finger and
its status.
•
Fanout Box (k) : Shows the Kelvin temperature reading from the sensor located at the Fanout and its
status.
•
CC StageI (k): Shows the Kelvin temperature reading from the sensor located at the Closed Cycle
Stage I and its status.
•
CC StageI (k): Shows the Kelvin temperature reading from the sensor located at the Closed Cycle
Stage II and its status.
•
SetPoint Temp.: Shows the value of the setpoint temperature to be used when the control loop is
activated.
•
Control Loop: Shows whether the temperature control loop is ON/OFF. The Control Loop may be
activated via the command-line interface.
•
Press. I (mbar): Shows the milliBar pressure reading of the sensor located in the vacuum tank and its
status.
•
Status: Shows the status of thermal GUI. It can be “Reading Temperatures…”, “Reading Pressures”,
“Creating header File “ or “Idle”. It also shows warning messages as result of readings. The warning
messages are also logged into the Talker. These can be:
“Temperature Sensor in Error”
“Heater range in Error”
“ColdFinger Temperature above limit”
“Pressure Sensor in Error”
“High Vacuum Level OUT of LIMITS”
“Low Vacuum Level OUT of LIMITS”
“DANGER – Pressure out of limits”
•
Refresh: Click on this button to obtain new data readings.
•
Quick: Click on this button to close the GUI.
Lamps Commands
llampstat
Reports the status of the LIRIS Calibration
LAMPS.
llamp ´Ar | Xe ´ ´ON | OFF´
Turns ON or OFF the requested Argon or Xenon
lamp.
llampon <lamp_num>
Turns on the lamp associated to the supplied
parameter. Same as “llamp”, but by numbers (Ar
=1, Xe = 2)
DSTNLIR_558v2.DOC
Pg. 5 de 17
llampoff
<lamp_num> | ´ALL´
Turns off the lamp associated to the supplied
parameter or all.
llampconf
Configures the LAMPS Control Unit for LIRIS
use. Engineering use!.
llampstartup
Starts up the Lamp Control Unit (Configures and
reports status). Engineering use!.
llampshutdown
Shuts down the LIRS Control Unit. (It turns off all
lamps). Engineering use!.
Lamps Monitoring GUI
The following commands are available:
startlampsgui
Starts the Lamps Monitoring GUI (“lampsgui”
program).
NOTE: The “startlampsgui” command kills any
previous instance of the “lampsgui” program.
shutdownlampsgui
Shuts down the Lamps Monitoring GUI.
helplampsgui
Displays Lamps Monitor help information.
Figure6: Lamps Monitor Window
This GUI shows the current status (ON/OFF) of the LIRIS Calibration Lamps. Each Lamp status changes as
commands actions are carried out on the command line. The “Quit” button closes the GUI. The LAMPS GUI
status can be “Initializing”, “Getting Lamps Information…”, “Creating header File” or “Idle”. It also shows
warning messages as result of retrieving data. The warning messages are also logged into the Talker. These can
be:
“Failed communicating with Lamp Controller”
“Incomplete data obtained”
“Couldn’t create HDR file”
LIRIS Real Time Display (UDASRTD)
The following commands are available:
DSTNLIR_558v2.DOC
Pg. 6 de 17
startudasrtd
shutdownudasrtd
Start the UDASRTD system
NOTE: The “startudas” command kills any
previous instance of the “udasrtd” program and
Ximtool/Ds9 programs.
Shuts down the UDASRTD system
helpudasrtd
Display UDASRTD help information.
Figure 7: Real Time Display Control Window
On the RTD from top to bottom and from left to right:
•
Obs. Data: Shows the file name of the image currently displayed on the Ximtool/ds9.
•
Ref. Data: Shows the file name of the image loaded as a reference data.
•
Data Dir.: Shows the directory where the data is being stored.
DSTNLIR_558v2.DOC
Pg. 7 de 17
•
•
•
StoreMode: Shows the store mode on which the current displayed data was saved (DIFF, DIFF_PRE,
PRE_POST, SLOPE, SLOPE_READS)
Status: Status of the UDASRTD. Among others:
Waiting for FITS to arrive
If the automatic “File Detection” is selected to
be ON
AUTO FILE DETECTION IS OFF
If the automatic “File Detection” is selected to
be OFF
AUTO scaling ON
If “Scale Auto” is selected to be ON
Overplot slit
If interactive “Over Plot” option is selected
Interactive STAR PROFILE
If interactive Star Profile option is selected
Interactive LOCAL STATISTIC
If interactive “Local Statistic” option is
selected
Image Statistics: This section offers basic statistic values of the currently displayed image. These are:
Median, Non Linear percentage, Minimum, Maximum, Sigma-left and Sigma-right
•
Local Statistics: This section offers basic statistic values (median, sigma, minimum, maximum,
sigma-left, and sigma-right) of a particular section of the image, which has been previously selected by
clicking on the “LOCAL STATISTIC” diamond under the Interactive section (see below).
•
Star Parameters: This section offers a star profile (Xc, Yc, Gaussian amplitude, Gaussian ALPHA,
sky around the star, Gaussian eccentricity, FWHM in pixels and FWHM in arc-seconds) of a particular
section of the image, which has been previously selected by clicking on the “STAR PROFILE”
diamond under the “Interactive” section (see below).
•
File Detection: If the “ON” diamond is selected, new acquired images are automatically displayed into
the Ximtool/ds9.
•
Display State: This section offers several options to display the data, which are activated by clicking
the diamonds on the left.
o
OBS-REF Displays the post-read minus pre-read of the “observation data” minus the post-read minus
pre-read of the “reference data”
o
OBS pre Displays the pre-read of the “observation data”.
o
OBS post Displays the post-read of the “observation data”.
o
OBS diff Displays the post-read minus pre-read of the “observation data”.
o
OBS slope Displays the slope of the “observation data”. This option is only valid when data has been
saved using SLOPE or SLOPE_READS store mode.
o
OBS firstRAMP Displays the first RAMP of the “observation data”. This option is only valid when
data has been saved using SLOPE_READS store mode.
o
OBS lastRAMP Displays the last RAMP of the “observation data”. This option is only valid when data
has been saved using SLOPE_READS store mode.
o
REF pre Displays the pre-read of the “reference data”.
o
REF post Displays the post-read of the “reference data”.
o
REF diff Displays the post-read minus pre-read of the “reference data”.
DSTNLIR_558v2.DOC
Pg. 8 de 17
o
REF slope Displays the slope of the “reference data”. This option is only valid when data has been
saved using SLOPE or SLOPE_READS store mode.
o
REF firstRAMP Displays the first RAMP of the “reference data”. This option is only valid when data
has been saved using SLOPE_READS store mode.
o
REF lastRAMP Displays the last RAMP of the “reference data”. This option is only valid when data
has been saved using SLOPE_READS store mode.
•
Scale Auto: If the “ON” diamond is selected, automatic image scaling is performed and the ZScale
min and Zscale max values determined by the IRAF (CDL) autoscale algorithm are showed next to the
ZScale min, ZScale max buttons located on the right side of the panel. If the “OFF” diamond is
selected, the user may type their on values to scale the current image.
•
Xbox/Ybox: Click on these buttons to load a new box dimension for the interactive “Star Profile” and
“Local Statistic” options. (see below). The default box size is 30, 30 pixels.
•
Interactive: This section offers two interactive options which are activated by clicking the diamonds
on the left. Should be noted that in order to use these options, the automatically “File Detection” must
be “OFF”.
o
Star Profile Click on this button to obtain Gaussian Parameters of an user selected area of the
current image. The area is delimited by a green box which appears at the center of the current
displayed image. To select a new area, move the cursor to the desired position, press “b” to redrawn the box, press “f” to fit and stay in the interactive process, press “e” to fit and quit and
press “q” to just quit. The calculated star parameters will be displayed on the “Start
Parameters” section. (see above).
o
Local Statistic: Click on this button to obtain statistics of an user selected area of the current
image. The area is delimited by a green box which appears at the center of the current
displayed image. To select a new area, move the cursor to the desired position, press “b” to redrawn the box press “f” to fit and stay in the interactive process, press “e” to fit and quit and
press “q” to just quit.. The calculated statistic values will show up on the “Local Statistics”
section. (see above).
o
OFF: Click on this button to close the interactive section.
•
Load OBS File: This button can be used to load any FITS file on the “Data Directory” as the
“observation data”. Type the file name of the image and click the button.
•
Load REF File: This button can be used to load any FITS file on the “Data Directory” as the
“reference data”. Type the file name of the image and click the button.
•
ObsToRef: Click on this button to load the current observation data as the reference data.
•
New Target Dir: This button can be used to change the data directory from which to load files. This
can be used when automatic file detection is OFF.
•
Refresh Click on this button to refresh the display on the Ximtool/ ds9.
•
Quit Click on this button to quit the UDASRTD.
DSTNLIR_558v2.DOC
Pg. 9 de 17
Observation Scripts Commands
IMIGING SCRIPTS
[ag_]mdither <ndither> <exp_time> [title] [-ncyc=int] [-nruns=int] [-xoffset=int] [-yoffset=int] [jitter=float] [-clean]
Default values for command-options:
ncyc=1, nruns=1, xoffset=12 arcsec, yoffset = 12 arcsec, jitter= 0.0,
Use –clean to discard the first 3 images before runs.
Repeats a dither pattern “ncyc” times using a jitter box to randomly generate new TCS offsets. Scripts
prefixed 'ag_' perform telescope guiding at each dither point. The <ndither> cmd-argument indicates
the number of data acquisitions that occur during telescope movement.
The [-nruns=int] command-option indicates if a multrun or a single run command is going to be used
for the data acquisition at each dither point. If the [-jitter=float] command-option is given, the
different ditter points will be randomly generated to lie in a box of “jitter” size.
The basic telescope move patterns are 2, 3, 4, 5, 8 and 9 point patterns. Scripts always start and end
with the telescope at the same point in space, at the centre of the pattern.
For <ndither> = 3, 5 and 9 the data acquisition positions are as follows:
3
POINTS
3
5
POINTS
9
POINTS
3
4
3
2
1
4
1
2
2
5
5
1
9
6
7
8
For <ndither> = 2, 4, and 8 the acquisition at the central position is dropped. Thus:
2
POINTS
2
4
POINTS
8
POINTS
2
3
2
1
o
1
3
o
1
4
4
o
8
5
6
7
[ag_]mdither_ext <ndither> <exp_time> <sky_offset> <pa_offset> [title] [-ncyc=int] [-nruns=int] [xoffset=int] [-yoffset=int] [-jitter=float] [-clean]
Default values for command-options:
ncyc=1, nruns=1, xoffset=12 arcsec, yoffset = 12 arcsec, jitter= 0.0,
Use –clean to discard the first 3 images before runs.
Alternatively switches between the object and the sky positions taking at both points a “mdither” or
“ag_mdither” pattern. The starting sky position is given by the “pa_offset” angle and the “sky_offset”
distance parameters.
DSTNLIR_558v2.DOC
Pg. 10 de 17
mfiltphot <filter_conf1> <exp_time_1> [ filter_conf1] [exp_time_2] …. [ filter_confN] [exp_time_N]
[title] [-nruns=int] [-xoffset=int] [-yoffset=int]
Default values for command-options:
nruns = 1, xoffset = 12 arcsec, yoffset = 12 arcsec
Takes a 4 dither pattern for each given filter configuration. Different exposure times may be used for
each filter configuration.
mosaic <exp_time> <nptx> <npty> [title] [-ncyc=int] [-nruns=int] [-step= int] [-clean]
Default values for command-options:
ncyc=1, nruns = 1, step = 180 arcsec
Use –clean to discard the first 3 images before runs.
Moves the WHT in a (nptx, npty) mosaic pattern using LIRIS to take exposures of type “run” or
“multrun” at each point depending on the value of the [-nruns=int] command-option. The pattern is
repeated “ncyc” times. The [-step= int] command-option indicates the separation between consecutive
points.
For nptx = 5, npty = 4, the acquisition pattern is as follows:
20
19
18
17
16
11
12
13
14
15
10
9
8
7
6
step
1
2
3
4
5
step
mdithermosaic <ndither> <dit_cycle> <exp_time> <nptx> <npty> [title] [-nruns=int] [-step= int]
[xoffset=int] [-yoffset=int] [-jitter=float] [-clean]
Default values for command-options:
nruns = 1, step = 180 arcsec, xoffset = 12 arcsec, yoffset = 12 arcsec and jitter = 0.0
Use –clean to discard the first 3 images before runs.
Moves the WHT in a (nptx, npty) mosaic pattern taking a mdither of <ndither> points pattern at each
mosaic point, (same as mosaic pattern, but takes a dither at each point ).
Spectroscopy Scripts
spec_nod <exp_time> [title] [-ncyc=int] [-nruns=int] [-offset=int] [-jitter=float] [-clean]
Default values for command-options:
ncyc=1, nruns=1, offset=12 arcsec, jitter= 0.0,
Use –clean to discard the first 3 images before runs.
DSTNLIR_558v2.DOC
Pg. 11 de 17
Moves the WHT in a pattern such that the telescope nods the object between two positions (A,B) along
the slit. Positions are separated “offset” arc seconds. Assuming the object is centred on the first
position A = (0,0) , the first exposure will be just around there and the second exposure will be around
B= (0, offset).
The [-nruns=int] command-option indicates if a multrun or a single run command is going to be used
for the data acquisition at each point. If [-jitter=float] command–option is given, the A and B positions
will be randomly generated to lie within a segment that is centred at each position. The dimension of
the segment is the given “jitter” value.
If the pattern is to be repeated, the acquisition pattern is as follows:
For “ncyc” = 5, AB BA AB BA AB.
ag_spec_nod <exp_time> [title] [-mndr=int] [-ncyc=int] [-nruns=int] [-offset=int] [jitter=float] [-clean]
Default values for command-options:
mndr=4, ncyc=1, nruns=1, offset=12 arcsec, jitter= 0.0,
Use –clean to discard the first 3 images before runs.
Same as “spec_nod” pattern, but the autoguider is guiding at each point.
Prior the start of the pattern, the detector´s number of reads is changed to perform “mndr” reads
(default = 4 reads). At the end of the pattern, the number of reads is reseted to 1.
ag_spec_nod3 <exp_time> [title] [-mndr=int] [-ncyc=int] [-nruns=int] [-offset=int] [-jitter=float] [-clean]
Default values for command-options:
mndr=4, ncyc=1, nruns=1, offset=12 arcsec, jitter= 0.0,
Use –clean to discard the first 3 images before runs.
Moves the WHT in a pattern such that the telescope nods the object between three positions (B, A, C)
along the slit. The A, B and A, C positions are separated “offset” arc seconds. Assuming the object is
centred on position A = (0, 0), the first exposure will be just around there, the second exposure will be
around B = (0, offset) and the third will be around position C = (0, -offset).
The [-nruns=int] command-option indicates if a multrun or a single run command is going to be used
for the data acquisition at each point. If [-jitter=float] command–option is given, the A,B and C
positions will be randomly generated to lie within a segment that is centred at each position. The
dimension of the segment is the given “jitter” value.
If the pattern is to be repeated, the acquisition pattern is as follows:
For “ncyc” = 4, ABC, ABC, ABC, ABC
Prior the start of the pattern, the detector´s number of reads is changed to perform “mndr” reads
(default = 4 reads). At the end of the pattern, the number of reads is reseted to 1.
ag_spec_ext <exp_time> <sky_offset> [title] [-mndr=int] [-ncyc=int] [-nruns=int] [-jitter=float] [-invert]
[-clean]
Default values for command-options:
mndr=4, ncyc=1, nruns =1, jitter= 0.0
DSTNLIR_558v2.DOC
Pg. 12 de 17
Use –invert command-option to reverse offset direction
Use –clean to discard the first 3 images before runs.
Moves the WHT in a pattern such that the telescope switches between the OBJECT and SKY.
Exposures at OBJECT positions are done with the autoguider ON.
If the pattern is to be repeated, the SKY positions are randomly generated to lie on a 15 arc seconds
segment perpendicular to the slit centred at (sky_offset, 0).
The [-nruns=int] command-option indicates if a multrun or a single run command is going to be used
for the data acquisition at each point. If [-jitter=float] command–option is given, the OBJECT
positions will be randomly generated to lie within a segment of “jitter” value size along the direction of
the slit.
For “ncyc” = 4, the acquisition pattern is as follows:
Obj Sky1
Obj Sky2 Obj Sky3
Obj Sky4
Prior the start of the pattern, the detector´s number of reads is changed to perform “mndr” reads
(default = 4 reads). At the end of the pattern, the number of reads is reseted to 1.
Example: For “sky_offset” = 30 arcsec and “ncyc” = 3
(0,0)
Object
(24.7, 0)
sky_off2
(30 ,0)
sky_off1
(34.2,0)
sky_off3
sky_offset = 30 arcsec
ag_spec_map <exp_time> <npts> <step> <sky_offset> [title] [-mndr=int] [-nruns=int] [-invert] [-cycle] [clean]
Default values for command-options:
mndr =4, nruns =1
Use –invert command-option to reverse sky offset direction
Use –cycle to repeat each sequence of OBJn, SKYn
Use –clean to discard the first 3 images before runs.
Moves the WHT in a pattern such that the telescope makes a map switching between OBJECT and
SKY positions. Exposures at OBJECT positions are done with the autoguider ON.
The [-nruns=int] command-option indicates if a multrun or a single run command is going to be used
for the data acquisition at each point.
Successive OBJECT positions are separated “step” arcs seconds in the direction perpendicular to the
slit. SKY positions are taken at a distance of “sky_offset” arc seconds from its corresponding OBJECT
pair.
The acquisition pattern will be as follows:
DSTNLIR_558v2.DOC
Pg. 13 de 17
obj1 sky1 obj2 sky2 obj3 sky3 …..objn skyn
If “-cycles” is given then each objN, skyN pair is repeated, resulting in an acquisition pattern as
follows:
obj1 sky1 obj1 sky1 obj2 sky2 obj2 sky2 obj3 sky3 obj3 sky3 …. objn skyn objn skyn
Prior the start of the pattern, the detector´s number of reads is changed to perform “mndr” reads
(default = 4 reads). At the end of the pattern, the number of reads is reseted to 1.
Acquisition Scripts
lacq_mask <slit_name> [-dbdir=string][-fcent = string]
Default Values for command-options:
dbdir = /wht/var/
fcent = /wht/var/liris_rotcent_pos.dat
This script places a calibration star in the first reference position of a multiobject mask. It is performed
by defining the TCS aperture 0 and moving the WHT to that position. This script should be used prior
to the “lpos_mult” script.
lpos_mult <slit name> <exp_time(s)> <title> [-offset=int][-dbdir=string] [-nrun=int]
Default values for command-options:
offset = 5 (nodding offset must be less than half slit width)
dbdir = /wht/var/
nrun = 1
Moves the WHT to each slit in the multiobject mask nodding the object between two positions (A,B)
along each slit. Positions are separated “offset” arc seconds. This script should run after the
“lacq_mask”.
lobject_inslit <slit ID> <x1> <y1> [<x2> <y2>… <xn> <yn>] [-fslitmap=string] [-ncor] [-noyoff]
Default Values for command-options:
fslitmap = /wht/var/liris_slitdb_pos.dat
Use –nocor command-option to NOT perform telescope corrections due to flexures. (By
default WHT corrections are done!).
Use –noyoff command-option to NOT adjust TCS Yoffset (Yoffset is 0). By default the WHT
Yoffset is adjusted!).
Centres an object in a given <x,y> position within a slit by adjusting the WHT position.
If more than one x ,y positions are given then a multi slit is assumed.
Polarimetry Scripts
DSTNLIR_558v2.DOC
Pg. 14 de 17
nod5_pol <exp_time> [title] [-ncyc=int][-nruns=int] [-offset=int] [-jitter=float] [-clean]
Default values for command-options:
ncyc=1, nruns=1, offset=12 arcsec, jitter= 0.0,
Use –clean to discard the first 3 images before runs.
Moves the WHT in a pattern such that the telescope nods the object in 5 positions (Pos3, Pos4, Pos0,
Pos1, Pos2). Positions are separated “offset” arc seconds. Assuming the object is centred at position
Pos0 = (0, 0), the first exposure will be just around there, the second exposure will be around Pos1 =
(offset,0), the third at Pos2 = (offset * 2,0), the fourth at Pos3 = (offset * -2, 0) and the fifth at Pos4 =
(-offset, 0)
The [-nruns=int] command-option indicates if a multrun or a single run command is going to be used
for the data acquisition at each point. If [-jitter=float] command–option is given, the positions will be
randomly generated to lie within a segment that is centred at each position. The dimension of the
segment is the given “jitter” value.
If the pattern is to be repeated, the acquisition pattern is as follows:
For “ncyc” = 2, Pos3, Pos4, Pos0, Pos1, Pos2 Pos3, Pos4, Pos0, Pos1, Pos2
Other Scripts
lsleep
Place LIRIS in sleep mode. Wheels are moved to their “blank” locations. Temperature control loop is
turned OFF and all calibration lamps are turned off.
UltraDAS Commands
This section lists the most important UltraDAS commands used by LIRIS. For a complete UltraDAS commands
see the UltraDAS User Manual.
udas_rdmode liris <read_mode> <Nr> <Nc>
Sets the detector read mode (MNDR /
RAMP), the number of reads (Nr) and the
number of coadditions (Nc) for future
exposures.
udas_storemode liris <save_mode>
Sets the MNDR file save mode (normal
/diff /diff_pre) for future exposures.
udas_coave liris <Nc>
Sets the detector number of coadditions
for future exposures.
arc liris <int_time> [“title”]
Takes a run and sets OBSTYPE header
parameter to ARC
multarc liris <N> <int_time> [“title”]
Repeats an arc N times
dark liris
Takes a run and sets OBSTYPE header
parameter to DARK
<int_time> [“title”]
multdarc liris <N> <int_time> [“title”]
Repeats a DARK N times
DSTNLIR_558v2.DOC
Pg. 15 de 17
flat
liris <int_time> [“title”]
Takes a run and sets OBSTYPE header
parameter to FLAT
multflat
liris <N> <int_time> [“title”]
Repeats flat N times
glance
liris
Takes a glance and saves it in: s1.fit. The
file is overwritten every time a new glance
is taken.
multglance
run
<int_time>
liris <N> <int_time>
liris <int_time> [“title”]
Same as ´glance´, but produces a series of
N exposures. Can be interrupted with
Cntrl-C
Takes a run and saves in: r<xxxxxx>.fit
multrun liris <N> <int_time> [“title”]
Repeats a run N times.
scratch
Takes a run and saves in: s<n>.fit
liris <N> <int_time> [title]
multscratch liris <N> <int_time> [“title”]
Repeats a scratch N times
dasreset
It resets the LIRIS controller, sets up the
read speed of the controller to SLOW and
sets the store mode to DIFF. Engineering
use !.
liris
Telescope Remote Control Commands
This section lists the most important TCS commands used by LIRIS. For a complete TCS commands see the
TCS User Manual.
add
Add current entry to TCS catalogue
aperture <aperture number>
Offset the telescope so the image moves by
a vector fixed in the focal plane.
autoguide ON | OFF
Lock or unlock the autoguider loop.
gocat
Go to specified object in catalogue
<src_name>
next
Go to next object
object
<name> <ra> <dec> <equinox>
Define new object
offset
<offs_sys> <delta-ra> <delta-dec>
Offset the telescope from the reference
position so that the image moves to a given
position on the detector.
<offs_sys> = ARC Tangent plane offset
<offs_sys> = TIME RA, DEC offset
<delta-ra> <delta-dec> in radians.
DSTNLIR_558v2.DOC
Pg. 16 de 17
park
Moves the telescope to the zenith park
position and stops
rotate
<mode> <position angle>
Move telescope rotator
user
<string>
Send arbitrary USER command to TCS.
Note: The command string should be
entered in quotes, unless it consists of only
one word.
Under the “user” command LIRIS scripts use the following TCS commands.
user “SLOWOFF <ra_off> <dec_off> <slew_rate>”
Same as “offset”, but telescope is
moved slowly so that autoguider
can track the guide star.
<ra_off> <dec_off> in degrees
user “ENTER ARC 0 <xi_skyoffset> <eta_skyoff>”
user “POSITION 0”
user “AUTO ON <X> <Y>”
Tells the TCS to start guiding on
the specified point.
user “AUTO OFF”
Tells the TCS to stoop guiding
user “TWEEK” <xoffset> <yoffset> <paoffset>
Diagnostic Commands
lmchstat
Reports the status of the EPICS Controller
and LIRIS Mechanisms.
llampstat
Reports the status of the LIRIS Calibration
LAMPS.
lpressstat
Reports the status of the pressure sensors
inside the cryostat.
ltempstat
Reports the status of the ´setpoint´
temperature and temperature sensors inside
the cryostat.
DSTNLIR_558v2.DOC
Pg. 17 de 17