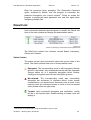
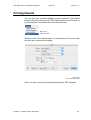
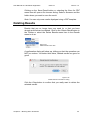
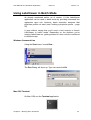
1
Projet LaboViewer Healthnet Laboratory Result Viewer Centre de Recherche Public Henri Tudor Centre de Ressources des Technologies pour la Santé 29, Avenue John F. Kennedy tél. 42 59 91-1 fax 42 59 91-777 L - 1855 Luxembourg–Kirchberg www.tudor.lu User Manual for LaboViewer Application 03/07/12 Version 1.4 ENTWICKLUNGSSTUFEN DES DOKUMENTS Version Initiative 1.2 SANTEC 1.3 SANTEC 1.4 SANTEC 1.4 SANTEC Objekt First Draft Included version 1.3 Features Updated to new reqirements Add migration note for Windows XP, Vista users Date Autor 18.02.05 NMA 16.12.05 NMA 18.11.11 NMA 28.06.12 NMA 2 User Manual for LaboViewer Application 03/07/12 Version 1.4 LaboViewer User Manual Before using the LaboViewer application, please read this manual thoroughly and retain it for future reference © 2005-2012 CRP Henri Tudor | Santec 3 User Manual for LaboViewer Application 03/07/12 Version 1.4 Table of Content LaboViewer ............................................................................................................ 3 User Manual ........................................................................................................... 3 Table of Content.................................................................................................... 4 Introduction ........................................................................................................... 6 About this manual ................................................................................................. 6 Purpose of this Manual ...................................................................................................................... 7 Organization of this Manual ............................................................................................................... 7 Chapter 1 Project Overview ..................................................................................................................... 7 Chapter 2 Features of the LaboViewer Application ................................................................................. 7 Chapter 3 Getting started ......................................................................................................................... 7 Chapter 1 ............................................................................................................... 8 Project Overview ................................................................................................... 8 Project Overview ................................................................................................... 9 Current Status ................................................................................................................................. 11 Chapter 2 ............................................................................................................. 12 Features of the LaboViewer application........................................................... 12 Features of the LaboViewer Application .......................................................... 13 Download of Results........................................................................................................................ 13 Integrated Keychain ........................................................................................................................ 13 Automatic Laboratory Update .......................................................................................................... 13 Template Chooser ........................................................................................................................... 14 Physician Manager .......................................................................................................................... 14 Multi-platform ................................................................................................................................... 14 Batch Mode ..................................................................................................................................... 14 Chapter 3 ............................................................................................................. 15 Getting started .................................................................................................... 15 Getting Started ................................................................................................................................ 16 Downloading LaboViewer ................................................................................................................ 16 Windows Installer ....................................................................................................................................... 16 MacOSX Installer........................................................................................................................................ 16 Linux Installer ............................................................................................................................................. 17 Prerequisites ................................................................................................................................... 17 Java Runtime Environment ......................................................................................................................... 17 Unlimited Strength Jurisdiction Policy Files .............................................................................................. 17 Working Environment ...................................................................................................................... 18 Single computer installation ....................................................................................................................... 18 Multiple computer installation .................................................................................................................... 18 Security Considerations .............................................................................................................................. 19 Chapter 4 ............................................................................................................. 20 Working with LaboViewer .................................................................................. 20 4 User Manual for LaboViewer Application 03/07/12 Version 1.4 Working with LaboViewer .................................................................................. 21 Launching the LaboViewer Application ........................................................................................... 21 The Main Window ............................................................................................................................ 22 The Toolbar ................................................................................................................................................. 22 Result Details .............................................................................................................................................. 24 Result View.................................................................................................................................................. 25 Page Browser .............................................................................................................................................. 25 Creating a Physician Profile ............................................................................................................ 25 Managing Physicians ...................................................................................................................... 32 New Physician Profile................................................................................................................................. 32 Edit Physician ............................................................................................................................................. 32 Switch Physicians........................................................................................................................................ 33 Delete Physician ......................................................................................................................................... 33 Downloading Results ....................................................................................................................... 34 Result List ........................................................................................................................................ 35 Status Column ............................................................................................................................................. 35 Laboratory Column ..................................................................................................................................... 36 Patient Column ........................................................................................................................................... 36 Created Column .......................................................................................................................................... 36 Summary ..................................................................................................................................................... 36 Displaying Results ........................................................................................................................... 38 Printing Results ............................................................................................................................... 40 Saving Results as PDF.................................................................................................................... 41 Deleting Results .............................................................................................................................. 42 Changing the Master Password ...................................................................................................... 43 Using LaboViewer in Batch Mode ................................................................................................... 44 Windows Command Line ............................................................................................................................ 44 Mac OSX Terminal ..................................................................................................................................... 44 5 User Manual for LaboViewer Application 03/07/12 Version 1.4 Introduction About this manual This manual is a guidebook for users of the LaboViewer. The introduction discusses the purpose and organization of the manual. Reading it first will help you decide which of the other chapters you should read most carefully, depending on your degree of experience with the application. Introduction – About this Manual 6 User Manual for LaboViewer Application 03/07/12 Version 1.4 Purpose of this Manual This manual is a user manual for the LaboViewer application. This manual is intended as well for new as for advanced users. Depending on your degree of experience, you may skip certain chapters. Organization of this Manual The following is a brief summary of the chapters and appendices in this manual. Please note that the opening page of each chapter also gives a summary of the contents of that chapter. Chapter 1 Project Overview Gives a general overview of the Labo project as such. Page 8 Chapter 2 Features of the LaboViewer Application Describes the principal features and functions of the application. Page 12 Chapter 3 Getting started Explains how to get and install the LaboViewer application. Page 15 Chapter 4 Working with LaboViewer Gives you step-by-step instructions on how to configure and use the LaboViewer application. Page 20 Introduction – About this Manual 7 User Manual for LaboViewer Application 03/07/12 Version 1.4 Chapter 1 Project Overview Gives a general overview of the Labo project. This chapter is intended for people who are not yet familiar with the Labo project. Chapter 1 – Project Overview 8 User Manual for LaboViewer Application 03/07/12 Version 1.4 Project Overview The aim of the Labo project consists in the creation of a communication platform within the Healthnet project for the exchange of laboratory data. The platform addresses the data exchange needs of the participating partners, i.e. physicians and laboratories, the integration of heterogeneous IT solutions and the hosting of a central archiving system, meeting the requirements of the different structures and the set criteria in terms of adaptability, scalability and economy. 2 R es Labo Server ult 1 Re s 3 Phys ici a n Prescription Prescripti on u lt 4 Figure 1.1 Labo Project Data Exchange The basic idea consists in getting away from the currently employed paper based model and moving towards a fully digital one. The physician posts an analysis prescription for a specific laboratory. Upon arrival of the patient, the specified laboratory retrieves the prescription from the Labo server and performs the prescribed exams. Results from the analysis are then stored on the Labo server for later retrieval by the prescribing physician. It goes without saying, that the above mentioned exchange scheme requires a sound security infrastructure. First of all it must be guaranteed that only the addressee can read the transmitted information. Secondly, the receiver must be sure that the received information really originated from the sender. This can be achieved by setting up a Public Key Infrastructure (PKI). In general this means that the sender digitally signs the information, to make sure it is genuine, and encrypts it so that only the receiver can read it. Chapter 1 – Project Overview 9 User Manual for LaboViewer Application 03/07/12 Version 1.4 Digital signature and encryption is done using pairs of digital keys. A pair of keys consists of exactly one public key and one private key. A digital key is a special file issued by a Certification Authority (CA). In a nutshell, signing or encrypting data with a private, respectively a public key can only be reversed with the matching public, respectively private key. The public key, as the name already suggests, is intended to be available publicly. In the scope of the Labo project, all the public keys of both Physicians and Laboratories are stored on the Labo server. The private key however is kept by the owner and MUST be kept in a safe place. 1 Signing Phys ici a 2 Encryption 3 Verification Decryption n 4 Result Result Figure 1.2 Labo PKI Infrastructure Figure 1.2 illustrates the typical exchange of laboratory results. Upon completion of the analysis, the laboratory signs result data with its private key. This way, the laboratory makes sure that the physician is able to verify that the result is genuine and trustworthy. Next, the laboratory encrypts the signed result with the public key of the prescribing physician. By doing so, the laboratory ensures that only the prescribing physician is able to decrypt it. The encrypted data is then transferred to the Labo server. The prescribing physician retrieves the encrypted result from server and decrypts it with his private key. Next step for physician consists in verifying the result signature using laboratoryʼs public key. If the signature matches, then authenticity of the result is guaranteed. Chapter 1 – Project Overview 10 the the the the User Manual for LaboViewer Application 03/07/12 Version 1.4 Current Status At the time this document was written, only the transmission of results had been implemented, i.e. prescriptions were still paper based. This two-phase process was required by the fact that it was not yet possible to standardize the prescription format. Chapter 1 – Project Overview 11 User Manual for LaboViewer Application 03/07/12 Version 1.4 Chapter 2 Features of the LaboViewer application This chapter describes the principal features and functions of the LaboViewer application. Chapter 2 – Features of the LaboViewer 12 User Manual for LaboViewer Application 03/07/12 Version 1.4 Features of the LaboViewer Application The LaboViewer application is a free multi-platform viewer for laboratory results transmitted in the scope of the Labo project. The viewer was developed by Santec, a department of the CRP Henri Tudor dedicated to health care technologies. The following gives you an overview of the features of the application. Download of Results The LaboViewer application has an integrated FTP1 client, allowing an automatic connection to the Labo result server and downloading all available results. The username and password of the physicians account on the server needs to be configured only once. Login information will be stored in a physician profile. Integrated Keychain Key pairs have a limited period of validity, usually two years. Once an old key pair expires, a new pair will be issued by the CA2 and send to the physician. During a short overlap period, a physician may receive results still encrypted with his old public key and some already encrypted with his new key. To make this transitional phase transparent for the physician, a key chain has been integrated into the LaboViewer application. Upon reception of the new key pair, all the physician has to do is to add his new private key to the key chain of his profile. When decrypting a result, the application detects which key has been used to encrypt the result file and automatically retrieves the matching private key from the key chain. Automatic Laboratory Update Public keys of laboratories also do expire after a period of two years. Furthermore, especially during the startup phase of the Labo project, new laboratories may decide to join the project. As all the public keys of laboratories are available on the Labo server, the application automatically synchronizes its local public key repository with the one on the server. This synchronization occurs every time a physician connects to the server to download results. 1 2 File Transfer Protocol Certification Authority Chapter 2 – Features of the LaboViewer 13 User Manual for LaboViewer Application 03/07/12 Version 1.4 Template Chooser The LaboViewer application comes with a set of predefined templates, presenting laboratory data in different formats. A template chooser allows the physician to easily toggle between predefined templates. Physician Manager Every piece of information relative to a physician, such as location of private keys, where to store downloaded results, username and password of Labo server account, and so on, is stored in a physician profile. The LaboViewer application comes with an integrated physician manager, allowing to switch between multiple physician profiles. This feature is of interest for medical offices with more than one physician and where the secretaries have to get access to laboratory data. Multi-platform The LaboViewer application was written using the Java programming language. By doing so, it was guaranteed that the application could be used on a variety of platforms. Pre-packaged installers are available for Windows, MacOSX and Linux. Batch Mode As of Version 1.3, the LaboViewer application can be used in batch mode, i.e. certain operations can be initiated by providing command line arguments. Chapter 2 – Features of the LaboViewer 14 User Manual for LaboViewer Application 03/07/12 Version 1.4 Chapter 3 Getting started This chapter covers how to get and install the LaboViewer application. Chapter 3 – Getting started 15 User Manual for LaboViewer Application 03/07/12 Version 1.4 Getting Started The LaboViewer application is a free multi-platform viewer, developed using the Java programming language. Installers are currently available for Windows, MacOSX and Linux. Installation on other platforms is also possible but may not be as straight forward as using the provided installers. Downloading LaboViewer The LaboViewer application can be downloaded for free from the following address: http://www.sante.public.lu/fr/travailler-santesocial/healthnet/applications-healthnet/labo/index.html The page gives you some information about the latest release of the LaboViewer application as well as some instructions on how to install the application. Scroll down to the bottom of the page and click on the installer package for your platform. Doing so will start the download process. Depending on the installer package that you downloaded, install the application as follows: Windows Installer After downloading, double-click LaboViewer-setup-1.4.0.exe. This will start the installation wizard, guiding you through the required installation steps. Note for Windows XP and Vista Users: If you have already been using older versions (pre 1.4) of the Laboviewer Application on your computer and you would like to preserve your physician profiles, please make sure to: a.) create a LaboViewer directory in your user directory. b.) copy the Physicians.prf file from the Laboviewer Applicationʼs Installation directory (C:\Program Files\Laboviewer 1.x) into the newly created LaboViewer directory. MacOSX Installer After downloading, double-click LaboViewer-setup-1.4.0.jar. This will start the installation wizard, guiding you through the required installation steps. Chapter 3 – Getting started 16 User Manual for LaboViewer Application 03/07/12 Version 1.4 Linux Installer After downloading, execute the LaboViewer-setup-1.4.0.bin file. This will start the installation wizard, guiding you through the required installation steps. You may skip the Prerequisites section and continue with the Working Environment section if youʼre planning to install the LaboViewer application on a Windows computer. Prerequisites Java Runtime Environment The LaboViewer application requires a Java Runtime Environment (JRE) not older than version 1.6 to work properly. In the case of the Windows installation, a pre-configured JRE is already included in the installer package, so you donʼt have to worry about it. For every other Platform, including MacOSX and Linux, It is assumed that your computer already has a JRE installed. Unlimited Strength Jurisdiction Policy Files Except for the Windows installer, shipping with a pre-configured JRE, every other installation requires the installation of an additional package, the Unlimited Strength Jurisdiction Policy Files. Due to import control restrictions, standard JRE distributions allow only strong but limited cryptography to be used. The new set of policy files provide unlimited strength cryptography, a feature required by the LaboViewer application. The Unlimited Strength Policy Files are included in the download. Installing the Policy Files The Unlimited Strength Jurisdiction Folder contains four files: README.txt COPYRIGHT.html local_policy.jar US_export_policy.jar To use the encryption/decryption functionality without any limitation, you will have to replace the original policy files with the ones provided in the Unlimited Strength Jurisdiction Folder. Itʼs a good a idea to make a copy of the original files first, in case you decide to switch back to the original configuration. Chapter 3 – Getting started 17 User Manual for LaboViewer Application 03/07/12 Version 1.4 The original policy files can be found in: <java-home>/lib/security. <java-home> stands for the directory where the JRE was installed. The location of that directory depends on the installation platform. On a MacOSX computer, the <java-home> folder is located at: /System/Library/Frameworks/JavaVM.framework/Home On a typical linux system Copy the US_export_policy.jar and local_policy.jar file from the Unlimited Strength Jurisdiction Folder into the <javahome>/lib/security folder. Working Environment By working environment, we mean a location on your hard disk that will be used to store downloaded results and where your keys are kept. Depending on whether you install the LaboViewer application on a single computer, often the case if youʼre the only practitioner in your medical office, or on multiple computers, we generally recommend the following scheme: Single computer installation As already mention earlier, a single computer installation is typical for a small medical office where you are the only practitioner and youʼre downloading and viewing results on only one computer. For a single computer installation, we recommend you to create a folder named labo inside your home directory. Go into the newly created labo folder, and create two additional folders, named results, respectively keys. The last step consists in copying your keys (.crt and .key files) from your keys CD into the newly created keys folder. Multiple computer installation A multiple computer installation is typical for larger medical offices, shared by two or more practitioners. In that configuration, fellow Chapter 3 – Getting started 18 User Manual for LaboViewer Application 03/07/12 Version 1.4 practitioners or secretaries may need to have access to your laboratory data. For a multiple computer installation, we recommend keeping laboratory related data on a central server. Doing so ensures that the totality of downloaded results will be readily available no matter which computer was used to download them. Setting up the working environment for this kind of installation boils down to repeating the steps of a single computer installation on the server for every physician in the medical office. Security Considerations Independently from the kind of installation you choose, make sure that your laboratory data is kept in a safe place. Give your results, and especially your keys, the same security considerations you would give your credit card number. Security begins with controlled physical access to the computer. Make sure to secure your computer from access by nonauthorized persons! Never share your private key! Your private key is comparable to your signature. You donʼt want anybody else to use it! Chapter 3 – Getting started 19 User Manual for LaboViewer Application 03/07/12 Version 1.4 Chapter 4 Working with LaboViewer This chapter gives you step-by-step instructions on how to configure and use the LaboViewer application. Chapter 4 – Working with LaboViewer 20 User Manual for LaboViewer Application 03/07/12 Version 1.4 Working with LaboViewer This chapter gives you step-by-step instructions on how to configure and use the LaboViewer application. Launching the LaboViewer Application Depending on the platform youʼve installed the LaboViewer on, starting the LaboViewer application is done by selecting LaboViewer in the Start menu (Windows only) or by double-clicking the LaboViewer icon. When starting the LaboViewer for the first time, you will be prompted to provide a new Master Password. This password will be used to encrypt the settings of the LaboViewer application. Encryption is necessary because, as weʼre going to see later on, application settings will contain server and private key passwords. Figure 4.1 New Master Password Dialog Provide a password that is at least eight characters long. Repeat the password to make sure the provided password does not contain any typos. When youʼre done, click the Apply button. Note: You will be asked to enter the password every time you launch the application, so please remember it well. Chapter 4 – Working with LaboViewer 21 User Manual for LaboViewer Application 03/07/12 Version 1.4 The Main Window Figure 4.2 Zones of Main Window The main window of the LaboViewer application is divided into five different zones. These zones are: 1. 2. 3. 4. 5. Toolbar Result Details Result List Result View Page Browser The Toolbar The toolbar is located at the top of the main window. The toolbar groups commonly used functions and make them instantly available. The same functions are also available via the menu bar. At this point of the manual, weʼre only going to have a look at the different functions without too much detail. The different functions will be described in more detail later on. Chapter 4 – Working with LaboViewer 22 User Manual for LaboViewer Application 03/07/12 Version 1.4 Figure 4.3 Toolbar New Physician The LaboViewer application incorporates a Physician Manager, storing the profiles of different physicians. A physician profile consists of all the settings regarding that particular physician, i.e. location of keys, download directories, server accounts, etc. The New Physician function allows the creation of a new physician profile. Physician Manager The Physician Manager function gives the user the possibility to manage already created physician profiles. Managing profiles consists in editing, switching and deleting profiles. Display Scale The Display Scale function lets the user choose the magnification or zoom factor of the currently displayed result. Scale is expressed in percent. Template Chooser Results can be viewed in different formats. The Template Chooser gives the physician the possibility to choose the display format that suits him best. Fetch Results The Fetch Results function establishes a server connection using the current physicians username and password and initiates the download of new results available on the server. Refresh Results The Refresh Results function refreshes the content of the Result List. Use this function if you want to make sure the Result List displays the results effectively in your download Chapter 4 – Working with LaboViewer 23 User Manual for LaboViewer Application 03/07/12 Version 1.4 folder. Delete Results Results currently selected in the Result list can be deleted with the Delete Results function. Save Result Saves the currently displayed result as a PDF file. A file chooser dialog allows the user to specify where to store the file. Please note that the Save Result function only works for PDF templates. Print Result Prints the currently displayed result. Please note that the Print Result function only works for PDF templates. Result Details The Result Details zone displays a summary of important information about the currently selected result. This gives the physician quick access to important result information without having to display the result first. F i g u r e 4 4.4 Result Details Zone Result List All downloaded results will appear in the Result List zone. Results are displayed simply by double-clicking them. Chapter 4 – Working with LaboViewer 24 User Manual for LaboViewer Application 03/07/12 Version 1.4 Result View All Results are displayed in the Result View zone. The Scale Display function controls the magnification ratio of the view. Page Browser The Result View always displays a single page of a result. In case a result is more than one page long, the page browser allows thumbing through the individual pages. Figure 4.5 Page Browser Creating a Physician Profile The first thing to do after an installation from scratch is to create your physician profile. As already mentioned earlier, all your personal configurations such as language preferences, location of keys and passwords are stored in your profile. Please make sure you have your Labo Welcome letter at hand when creating your profile. The letter contains all the personal account details and passwords required to create your profile! To create a new physician profile, you have to use the New Physician function. You may either use the New Physician button from the Toolbar or the New Physician menu item from the Physicians menu: Figure 4.6 Physician Menu Click on the New Physician button or select the New Physician menu item from the Physicians menu to open the Physician Dialog. Chapter 4 – Working with LaboViewer 25 User Manual for LaboViewer Application 03/07/12 Version 1.4 Figure 4.7 Physician Dialog Enter your name and your physician code (UCM3 code). Next, click on the Settings button. The Settings dialog will show up. Figure 4.8 Settings Dialog The Settings dialog is divided into three sections, each one accessible via a dedicated tab. The first section allows the specification of your language preferences. User Language defines the language to be used for the menus, labels and messages of the LaboViewer application whereas Result Language defines the language to be used for displaying results. 3 Union des caisses de maladie Chapter 4 – Working with LaboViewer 26 User Manual for LaboViewer Application 03/07/12 Version 1.4 Click on the Cryptography tab to access your cryptography settings. Figure 4.9 Cryptography Settings The cryptography section defines all the settings regarding your keys and passwords. The Certificate Folder field specifies the location of your public certificate (.crt) file. Use the Browse button on the right to locate file on your computer. Assuming youʼve created your working environment as explained in Chapter 3 - page 18, your public certificate should be located in your home directory, containing a labo folder with a keys folder inside. The keys folder should contain a file, whose name matches your physician code with a .crt extension. In the case of our example physician Dr Mustermann, the certificate file would be: 141067-55A.crt Note: The letter A behind your physician code is used to differentiate multiple certificates. Every certificate has a limited time of validity, usually two years. Your A certificate will expire in two years time. Before the certificate expires, you will receive a new certificate with the letter B. During a short period of time, the time needed for all the laboratories to switch to your new certificate, youʼll receive result encrypted using either the old A certificate or the new B certificate. During this transition period, both certificates must be Chapter 4 – Working with LaboViewer 27 User Manual for LaboViewer Application 03/07/12 Version 1.4 active simultaneously, thus the extra letter to distinguish them. The same naming schema also applies for private keys. Select the keys folder. The Key Folder field specifies the location of your private key (.key) file. Assuming youʼve created your working environment as explained in Chapter 3 - page 18, your private key is located in the same folder as your certificate file. In the case of our example physician Dr Mustermann, the key file would be: 141067-55A.key Select the keys folder. After doing so, the Private Key Chain at the bottom of the dialog will display the private keys available in the selected folder. Figure 4.10 Cryptography Settings with set Key Folder The Automatic Decryption checkbox enables the function carrying the same name. If automatic decryption is enabled, the program automatically decrypts every downloaded result. Ticking the Automatic Decryption checkbox will allow you to edit the password column of your private key chain. Double click the password column behind the key to edit the password of the respective key. Make sure to hit the enter key when youʼre done editing the password! Note: By specifying the password in the key chain, the application will automatically use the specified password whenever required. If Chapter 4 – Working with LaboViewer 28 User Manual for LaboViewer Application 03/07/12 Version 1.4 you donʼt want this behavior, just leave the field blank. By doing so, the program will prompt you to enter the password when needed. Figure 4.11 Specifying private key password for automatic decryption Chapter 4 – Working with LaboViewer 29 User Manual for LaboViewer Application 03/07/12 Version 1.4 Next, click on the File Transfer tab. The File Transfer settings will appear. Figure 4.12 File Transfer settings The FTP Server Name field specifies the name of the Labo Result server to get your results from. Unless stated otherwise on the Labo Welcome letter, the name of the server normally is labo.admin.healthnet.lu. Enter the user name and password specified in your Labo Welcome letter in the User Name field, respectively the User Password field. The Local Download Folder field specifies the location to download results to. Assuming youʼve created your working environment as explained in Chapter 3 - page 18, your download folder should be located in your home directory, containing a labo folder with a results folder inside. Selected the results folder as your local download folder. Clicking the Apply button will bring you back to the physician dialog. Click the Apply button again to save your changes. If youʼre having a look at the Toolbar, youʼll notice that your name appeared in the previously empty select box at the left. This select box is called the Physician Chooser. With the physician chooser, Chapter 4 – Working with LaboViewer 30 User Manual for LaboViewer Application 03/07/12 Version 1.4 you can easily switch between multiple physician profiles, provided you defined more than one profile. This feature is of interest for medical offices with more than one physician where a secretary needs access to the results of practicing physicians. The physician selected in the Physician Chooser is the physician whose profile is currently active. Figure 4.13 Physician Chooser Chapter 4 – Working with LaboViewer 31 User Manual for LaboViewer Application 03/07/12 Version 1.4 Managing Physicians When you have created more than one physician profile, you may manage them via the Physician Manager. The Physician Manager can be accessed either by clicking on the Physician Manager button or by selecting the Manage Physicians menu item in the Physicians menu. Figure 4.14 Manage Physicians menu item The Physician Manager dialog will show up. Figure 4.15 Physician Manager Dialog The Physician Manager dialog displays a list containing all the physician profiles that you have created. The physician highlighted in green is the one whose profile is currently active. The physician manager offers all the functions required to manage physician profiles. These functions are. New Physician Profile Creates a new physician profile Edit Physician Modify an already existing physician profile. Select the physician to edit first, then click on the Edit Physician button. The Physician Dialog will show up. Alternatively, you can Chapter 4 – Working with LaboViewer 32 User Manual for LaboViewer Application 03/07/12 Version 1.4 access the Edit Physician function by double-clicking the physician to edit. Switch Physicians As already mentioned earlier, the physician highlighted in green is the physician whose profile is currently active. The Switch Physicians functions activates another physicians profile. To do so, select the physician whose profile you would like to activate, then click the Switch Physician button. The newly selected physician now becomes the active physician, signalized by the green highlight. Note: Switching physicians can also be achieved by selecting a different physician in the Physician Chooser located in the Toolbar of the main window. Delete Physician A physician profile you no longer need can be discarded using the Delete Physician function. Select the physician to delete and click the Delete Physician button. A confirmation dialog will show up. Figure 4.16 Physician Manager Dialog Click the Okay button if youʼre absolutely sure you really want to delete the selected profile. This operation can NOT be undone! Note: Deleting a physician can also be achieved by selecting the physician to delete and hitting the Backspace key on your keyboard! Chapter 4 – Working with LaboViewer 33 User Manual for LaboViewer Application 03/07/12 Version 1.4 Downloading Results Result download is initiated with the Fetch Results function, either by clicking on the Fetch Results button in the Toolbar or by selecting the Fetch Results menu item in the Results menu. Figure 4.17 Fetch Results Menu Item A progress dialog, monitoring connection and download progress, will show up. Figure 4.18 Download Progress Dialog Depending on the speed of your Internet connection and the number of results available for download, the download operation may take a minute or two. Depending on whether you checked the Automatic Decrypt option in your cryptography settings, the program will start decrypting the downloaded results once the download is done. In case you preferred not to store your private key password in your key chain, the program will prompt you to enter the private key password. Figure 4.19 Private Key Password Dialog Chapter 4 – Working with LaboViewer 34 User Manual for LaboViewer Application 03/07/12 Version 1.4 Enter the password when prompted. The Remember Password option, checked by default, tells the program to remember the password throughout your current session4. Doing so avoids the program to prompt the same password over and over again when decrypting multiple files. Result List Upon successful download and decryption of results, the Result List zone of the main window will display the downloaded results. Figure 4.20 Result List displaying downloaded and decrypted results The Result list contains four columns, named Status, Laboratory, Patient and Created. Status Column The status column gives information about the current state of the result. The Status column holds one of three possible icons: Encrypted: The corresponding result is still encrypted. Results will be in that state if you downloaded results with the Automatic Decrypt option off, or if automatic decryption failed. Doubleclicking an encrypted result will start decryption process. Non-trusted: The corresponding result was successfully decrypted but verification of signature failed. Under normal circumstances, you should never encounter such a result. In the unlikely event you should encounter a result in the non-trusted state, please inform us right away. Trusted: Upon successful decryption and verification, results will be in the trusted state. Double-clicking a trusted result will display it. 4 The session is the time spent using the application until you quit. Chapter 4 – Working with LaboViewer 35 User Manual for LaboViewer Application 03/07/12 Version 1.4 Laboratory Column Depending on the state the result is in, i.e. encrypted or trusted, the laboratory column will either display the laboratories UCM code, respectively the name of the laboratory. Patient Column Depending on the state the result is in, i.e. encrypted or trusted, the patient column will either display the results running number, respectively the name of the patient. Created Column Depending on the state the result is in, i.e. encrypted or trusted, the created column will either display the creation date of the result file, respectively the examination date. Summary The following table gives a summary of the columns content in function of the result status. Status Laboratory Patient Created UCM code of Laboratory Result Number Creation date of result file UCM code of Laboratory Result Number Creation date of result file Name of Laboratory Name of Patient Date of Examination Tip: Moving the mouse pointer over the status icon will display a tooltip describing the meaning of the icon. Moving the mouse pointer over every other column of a result will display the result filename. Figure 4.21 Tooltip showing result filename Chapter 4 – Working with LaboViewer 36 User Manual for LaboViewer Application 03/07/12 Version 1.4 Selecting a result in the result list updates the Result Details zone of the main window. Result selection is achieved by clicking on the result. Figure 4.22 Result Selection Once a result is selected, you may select the next or previous result using the cursor up, respectively the cursor down key on your keyboard. Chapter 4 – Working with LaboViewer 37 User Manual for LaboViewer Application 03/07/12 Version 1.4 Displaying Results To display a result, double-click the result in the result list. In case the result is still encrypted, it will be decrypted first. Figure 4.23 Displaying a Result Results will be displayed in Result View zone of the main window. The format used to display the result is preset using the Template Chooser in the Toolbar. Available templates are: • • • • Detailed / HTML Detailed / PDF Compact / HTML Compact / PDF Detailed templates display all the information contained in the result. Detailed views are the most complete form of result display. Compact templates however, display most essential information for quick lookup of relevant data. These are the two major display formats, affecting the way results are presented. Chapter 4 – Working with LaboViewer 38 User Manual for LaboViewer Application 03/07/12 Version 1.4 The difference between HTML5 and PDF6 templates resides in the technology used to render the results. HTML templates display results as web pages. Results displayed using HTML templates enable the physician to copy-paste portions of the displayed data. Unfortunately, results displayed using HTML templates canʼt be scaled using the Display Scale chooser, neither can they be saved or printed. PDF templates offer better control of how results are rendered. The Display Scale Chooser allows changing magnification of displayed results. Furthermore, results displayed using PDF type templates can be printed and saved as files that can be opened using Acrobat Reader. Unfortunately, copy-paste does not work for PDF templates. Note: Use HTML templates whenever you wish to copy-paste portions of displayed date. Use PDF templates in any other case! Note: Display will not be refreshed automatically when switching templates. After you have chosen the template format of your liking, please display the result again by double-clicking it. If the displayed result has more than one page, you may use the Page Browser underneath the Result View to thumb through the different pages. Tip: You can resize the area occupied by the Result List and the Result View simply by dragging the separator between both zones. The two little arrows in the separator allow displaying either side full size. 5 6 HyperText Markup Language Portable Document Format, a.k.a Acrobat Reader format Chapter 4 – Working with LaboViewer 39 User Manual for LaboViewer Application 03/07/12 Version 1.4 Printing Results You can print the currently displayed result using the Print Result function either by clicking on the Print Result button in the Toolbar or by selecting the Print menu item in the Results menu. Figure 4.24 Print menu item Clicking on the Print Result button or selecting the Print menu item will open your systems print dialog. Figure 4.25 Mac OSX Print Dialog Note: You can only print results displayed using a PDF template. Chapter 4 – Working with LaboViewer 40 User Manual for LaboViewer Application 03/07/12 Version 1.4 Saving Results as PDF You can save the currently displayed result using the Save Result function, either by clicking on the Save Result button in the Toolbar or by selecting the Save As PDF menu item in the Results menu. Figure 4.26 Save As PDF menu item Chapter 4 – Working with LaboViewer 41 User Manual for LaboViewer Application 03/07/12 Version 1.4 Clicking on the Save Result button or selecting the Save As PDF menu item will open a file chooser dialog. Select a filename and the folder where you want to save the result. Note: You can only save results displayed using a PDF template. Deleting Results Results that you no longer have any need for or that you have already archived can be deleted. Click on the Delete Result button in the Toolbar or select the Delete Results menu item in the Results menu to do so. Figure 4.27 Delete Results menu item A confirmation dialog will show up, telling you that the operation can NOT be undone. You better think twice, deleted results are gone for good! Figure 4.28 Delete Results Confirmation Dialog Click the Okay button to confirm that you really want to delete the selected results. Chapter 4 – Working with LaboViewer 42 User Manual for LaboViewer Application 03/07/12 Version 1.4 Changing the Master Password You can change the Master Password required to unlock application settings. To change the master password, selected the Change Password menu item in the Physicians menu. Figure 4.29 Change Password menu item. The Master Password dialog will show up, prompting you to enter the new password. Figure 4.30 Master Password Dialog Chapter 4 – Working with LaboViewer 43 User Manual for LaboViewer Application 03/07/12 Version 1.4 Using LaboViewer in Batch Mode As already mentioned earlier, as of version 1.3 the LaboViewer application can be used in batch mode by providing command line arguments upon call. However, batch execution assumes that physician profiles do exist (see Creating a physician profile – page 25) It goes without saying that youʼll need a text console to launch LaboViewer in batch mode. Depending on the platform youʼre running LaboViewer on, getting access to a text console is achieved in different ways: Windows Command Line Using the Start menu, launch Run… The Run Dialog will show up. Type cmd and click Ok. Mac OSX Terminal On Mac OSX use the Terminal application. Chapter 4 – Working with LaboViewer 44 User Manual for LaboViewer Application 03/07/12 Version 1.4 The Terminal application should normally be in your dock. If not, you can find it in the Applications/Utilities folder. After opening your text console, youʼll have to navigate into the folder where the LaboViewer application has been installed. Under Windows it will probably be C:\Program Files\LaboViewer, on Mac OSX it will normally be /Applications/LaboViewer. Please note: It is important to launch the LaboViewer application from its installation folder. The command line to use LaboViewer in batch mode is as follows: java –jar LaboViewer.jar –download – password=”Master Password” [-verbose] [physician=”Name of Physician”] Please note: Windows users should use the Java Virtual Machine that came with the LaboViewer application. Please substitute java with jre6_win32_jce\bin\java in command line. Arguments in brackets are optional. Available arguments are: -download -password -verbose -physician -help : initiate result download : specifies the master password required to unlock physician profiles : tells the application to output additional information during program execution. This is particularly useful while setting up or debugging installations. : specifies one particular physician to download results for. If omitted, results for all physicians will be downloaded. : display usage message Please note: If you want the downloaded results to be decrypted and verified automatically, please make sure to check the Automatic Decryption checkbox in the physician profiles (see Figure 4.11 – page 29) and that the physicianʼs private key passwords are set in their respective keychains (see Figure 4.11 – page 29). Chapter 4 – Working with LaboViewer 45