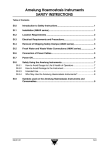
1
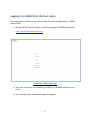
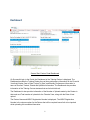
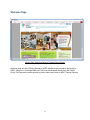
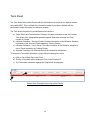
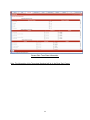
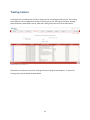
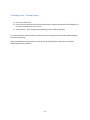
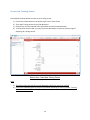
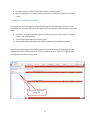
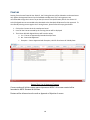
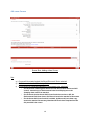
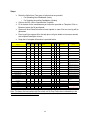
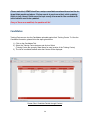
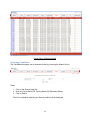
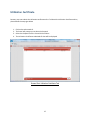
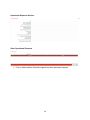
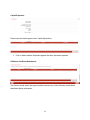
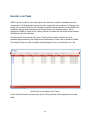
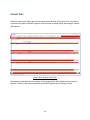
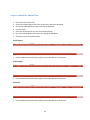
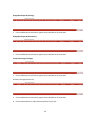
SDMS TRAINING MANUAL FOR NSDC PARTNERS Document History Document Name Date of Release SDMS Training Manual for NSDC Training Partners 1 10.05.2014 Version V 1.0 Preface We are glad to introduce a new enhanced and improved version of SDMS Training Partner Portal. Please find below the list of enhancements and features introduced in this version of SDMS Portal. Welcome Screen Partner Profile Information Term Sheet Data – Contract Information Training Centre Master list of all S&QA Approved Courses New Course Creation and Approval Process Flow Online Submission of Training Calendar Online Submission of Annual Plan Online Submission of Utilization Certificate Improved Dashboard (Tabular/Graphical) to view achievement on Monthly and Yearly Candidate Information New Candidate Upload Interface Candidate Recruitment and Placement Updation Module 2 Table of Contents Table of Contents Document History ......................................................................................................................................... 1 Preface .......................................................................................................................................................... 2 Logging in to SDMS Portal (Partner Login) .................................................................................................... 4 Dashboard ..................................................................................................................................................... 5 Description of Dashboard ......................................................................................................................... 6 Welcome Page .............................................................................................................................................. 8 Partner Profile Tab: ....................................................................................................................................... 9 Term Sheet .................................................................................................................................................. 10 Training Centres .......................................................................................................................................... 12 Training Centre – Search Option ............................................................................................................. 13 Create new Training Centre .................................................................................................................... 14 Training Centre Information: .............................................................................................................. 15 Training Centre Point of Contact: ....................................................................................................... 15 Training Calender ................................................................................................................................ 16 Annual Plan – Training Centre Update................................................................................................ 17 Courses........................................................................................................................................................ 18 Add a new Course ................................................................................................................................... 19 Candidate Upload ....................................................................................................................................... 20 Updating Existing Candidates (Update Option) ...................................................................................... 23 Candidates .................................................................................................................................................. 24 Searching Candidates .............................................................................................................................. 25 Export to Excel: ....................................................................................................................................... 26 Utilization Certificate .................................................................................................................................. 27 To Submit the New Utilization Certificate .............................................................................................. 29 Monster.com Tasks ..................................................................................................................................... 32 Annual Plan ................................................................................................................................................. 34 Steps to submit the Annual Plan:............................................................................................................ 35 3 Logging in to SDMS Portal (Partner Login) The Login details to all Partners are shared. Please find below the steps to login to SDMS Partner Portal. 1) Browse the URL mentioned below to open the login page on SDMS Partner portal. http://c20cp7.saas.talismaonline.com/ Screen Shot: SDMS Login Page 2) Enter your “Username” and “Password” provided to you by NSDC and click “Login” button. 3) On successfully login, the Dashboard page is displayed 4 Dashboard Screen Shot: Partner Portal Dashboard On Successful login to the Portal, the Dashboard of the Training Partner is displayed. The Dashboard provides the Training Partner the real time performance information for the Financial Year that includes Year to Date, Project To Date* and Monthly Performance information in terms of Enrolled, Trained, Placed and UpSkilled Information. The Dashboard also provides information of the Training Centres statuses that are Active/InActive # The Dashboard is also provides information of the Number of Uploads made by the Partner in that week and Total number of uploads for the Financial Year, along with the Date of Last upload. The Partner Name and NSDC Registration Number is displayed. The NSDC Registration Number is the unique number for the Partner that will be required hence forth to be inputted while uploading the candidate information. 5 The above dashboard will be against the Proposal submitted by the Partner. The Partner having multiple proposals will display Multiple Proposal number in the list with the Option buttons. The Dashboard performance number changes according to the Proposal option selected. Description of Dashboard 1. Partner Name: Displays the Organization name as stored in SDMS 2. NSDC Registration Number: This number is unique number assigned to respective NSDC Partner. While uploading Candidate data this number will be required to map Candidates with the Partner’s organization 3. Date of Last Upload: Display’s information of the date of last successful upload 4. Number of Uploads (Week): Provides count of Number of Successful uploads made in that week. 5. Number of Uploads in FY: Provides count of number of successful uploads in FY 6. Proposal Name: Proposal name as per NSDC records 7. Proposal No.: Number assigned against the Proposal by NSDC. This number will be required to map Candidates with the Proposal 8. Date of Sanction: Date on which Proposal was Approved 9. Year to Date: Provides Information of Partner Performance against the Proposal for the Financial Year 10. Project to Date#: Provides Information of Partner Performance against the Proposal against the sanction Project, till date 11. Month wise Performance: Provides information of Partner Performance month wise against the Proposal for the Financial Year Below are the parameters and the conditions used to arrive at the Performance Numbers: o o o o o Enrolled: Count of Successful Candidates uploaded in SDMS mapped against the Batch Start Date* Trained: Count of Successful Candidates uploaded in SDMS with Training Status = Completed mapped against the Passing out Date* Placed: Count of Successful candidates uploaded in SDMS with Training Status = Completed AND Placement Status=Yes and mapped against the Date of Joining field* Up-skilled: Count of Successful candidates uploaded in SDMS with Training Status = Completed AND Placement Status = Yes AND Employment Type= ’Up-skilled’ mapped against Passing out Date* New Centres Created: Number Centres Created with the time frame* Note: * The Count of Year to Date, Project to Date and Month Wise performance is mapped against the date fields defined above 6 12. Centre Status: o Active: Number of Training Centres that are in Active Status as on Date o In-active: Number of Training Centres that are in InActive status as on Date 13. Annual Report: The Annual Report will provide you with Month wise Analysis on Enrolled, Trained, Placed and Up-Skilled candidates against the Proposal selected by the Training Partner 7 Welcome Page Screen Shot: Welcome Page of Training Partner Portal Welcome page will direct Training Partner to NSDC website where information pertaining to NSDC, Objectives, Knowledge Bank and FAQ’s can be accessed directly from the Partner Portal. The Page also provides access to various other useful links to NSDC Training Partners. 8 Partner Profile Tab: Screen Shot: Profile Page of Training Partner Portal The Profile tab introduces Partner with the Partner Organisation Details as per the data available in SDMS. The Profile page also provides the contact information of the person logged into the Portal. The Contact information is editable and recommended Partner to update the contact information to provide accurate information in SDMS. The Organisation detail is Read Only information and cannot be modified. Note: Please make a note of NSDC Registration Number for reference and to be used while uploading the candidate. 9 Term Sheet The Term sheet Tab provides Partner with the information that are as per the agreed contract terms with NSDC. This is a Read Only information meant to provide the Partner with the performance target information for reference purpose. The Term sheet information is provided across four sections: a) Target States and Total Number of Centres: Provides information as per the Contract Term sheet of the Geographical spread of agreed State wise coverage and Total number of Centres b) Utilization Schedule – Source of Funds: Provides information of the Utilization Schedule information of the Source of Funds agreed by Training Partner. c) Utilization Schedule – Use of Funds : Provides information of the Utilization schedule of Use of Funds agreed by the Training Partner d) Sectorial Coverage: List of Sectors that will be covered by the Partners To access the Term sheet information, please follow the steps given below: a) Click on Term Sheet Tab in the Portal. b) The list of Proposals will be displayed. Click on the Proposal ID c) The Term sheet information against the Proposal will be displayed. Screen Shot: Proposal/Contract List of the Partner 10 Screen Shot: Term Sheet Information. Note: The Information of the Term sheet displayed will be in the Read Only Format 11 Training Centres Training Partner can view the list of all the Training centres created against the Account. The Training centre table to view is configured to display the Training Centre ID, Training Centre Name, Building Name & Number, Street Name, District, State and Training Centre Point of Contact Information. The Partner may choose to search the Training Centre by clicking on Search Option. To Search for Training Centre, please follow the Steps below. 12 Training Centre – Search Option a) Click on the Search link b) Enter the Information OR select from the drop down list against the Search Field configured. For Ex: Select the State name from the List c) Click on Search. The Training Centres matching to the list will be displayed. Ex: If the State Name Andhra Pradesh is selected, all the Training Centre crated under Andhra Pradesh state will be displayed. Note: If multiple Search parameters are entered, the result displayed is combination of condition satisfying the Search conditions. 13 Create new Training Centre Please follow the Steps below to create a new Training Centre: a) b) c) d) Click on the Create button on the bottom right corner of the Screen The Create Training Centre form will be displayed Please fill up all of the required field’s information and click on Submit button. To discard the entries made, you may click on the Back button to move to previous page of displaying all Training centres. Screen Shot: Create New Training Center Note: a) The fields marked with red dots are the Mandatory fields that need to be entered. b) Click on the individual forms to fill up the information pertaining to Point of Contact, Training Calendar and Annual Plan. 14 Training Centre Information: This form contains the important mandatory set of fields required to create the Training centre. All the fields defined here are self – explanatory. To access more information, please click on the help icon against the field to display the tool tip against the field. Training Centre Point of Contact: Training Partner need to update the Training centre point of contact information of this Centre. All the fields marked with red dot are mandatory fields like First Name, Last Name, Email, Designation and Mobile Number Click on this page to enter point of contact details 15 Training Calender The Training Partner may choose to update the Training Calender information against the Centre. The details such as Sector, Course Name, Course Fees, Job Role, Minimum Education required, Couse Duration, Batch Start Date and Batch End Date field need to provided. The information provided in this calender will be used to consolidate and provide search option for the candidates to search for the Trainng courses conducted by the Training Partner. This will also help to mobilize candidates enquiring about the courses by State, District, Training Partner and Sector wise. Click on add button to insert more rows Click on this page to enter training calendar Click on submit to save details Please follow the steps to update the Calender Entry. 1. 2. 3. 4. Click on the Training Centre ID to open the Training Centre Item view Click on Training Calender Page Click on Add to add entries against Sector Name, Course Name and other fields. For the Entries already exists, you may change the entries to edit the Traning scheudle or change the Calender 16 5. To delete an Enrtry, select the check box and click on Delete button 6. Once completed, click on Submit button to submit the calender entry against the Training Centre. Annual Plan – Training Centre Update Training partners are encouraged to submit the Annual plan at the beginning of the Year. For the Training Partners to update the Annual plan against the Training Centre, please follow the steps given below: 1. Click on the Training Centre ID to open the Training Centre Item view or click on Create to Create a new Training Centre 2. Click on Annual Plan Page in the Training Centre 3. Click on Add to add entries against Annual Plan Centrewise Training and Placement. Note: The Annual plan against the Training centres can be submitted only at the Beginning of the calendar Year for the next Financial Year. The Form will be enabled to make entries against every Training Centre and New Training Centre. Click on this page to view annual plan 17 Courses Starting from the new Financial Year 2014-15, the Training Partners will be allowed to make enrolments only against the Approved Courses by the Standards and QA team. The Training partners are recommended to align their courses as per the QP norms of the Qualification pack for the Sector. All such QP aligned courses are needed to be submitted to the Standards & QA team for their approval. To view already existing courses against the Training Partner, please follow the steps given below: 1. Click on the Courses tab in the new Partner Portal. 2. List of all the Courses created by the Training Partner will be displayed 3. The Column QP-NOS Aligned Course will have the values: a. Yes - Course are approved by Standard and QA Team b. No - Course Not Approved c. Exception – Course Approved with Exception, valid for Enrolments till Validity Date Screen Shot: List of Approved Courses Course creation will initiate course approval process at NSDC. All courses created will be forwarded to NSDC Standard & QA team. Partners will be informed over the mail on Approval or Rejection of course 18 Add a new Course Screen Shot: Adding a New Course Note: a) Course will be created against the Broad Economic Sector selected b) All fields marked as * are Mandatory fields c) Course Approval Parameters(Mandatory Documents to be attached): o o o For the Course created against the Sector that does not have the Sector Skill council, scanned copy of Endorsement letter from 3 Employers on the Company letter need to be attached For the Sector that has Sector Skill Council and does not have a QP, the Endorsement Email from Sector Skill Council need to be attached as document For the Sector Skill Council and QP available, Syllabus and Curriculum copy need to be attached. Partner may download the Curriculum Template from the link provided in the screen 19 Candidate Upload Training Partners can upload candidate information in to the SDMS by clicking on the Candidate upload tab in the Portal. The tab will be displayed as below. In this SDMS enhancement, two different upload options are provided- o One for uploading new candidates (Insert Option) o One for updating already uploaded candidates (Update Option) Partner can choose the type of Upload by selecting the provided button. Please click on the link in the URL to download the template. The Upload template is attached below: CandidateRegistratio nandEnrolment.xls Below are the list of fields and the validations against each field: 20 Steps: Select the Option from Two types of options that are provided o For Uploading New Candidates (Insert) o For Updating the existing Candidates (Update) Click on the URL Link to Download the Template Fill in the data for the candidates as per instruction provided on Template. Click on Browse to select the file and Upload. System will show Pass/Fail status of excel upload. In case of fail, an error log will be generated. Error log will give support # for the help plus it will give details of erroneous records with complete description of error Snap shot of complete information is provided below CHECK CRITERIA FieldName NSDCRegistrationNumber DATE (DDInsert Fields Update Fields MM-YYYY) NUMERIC Field Length ALPHA SPECIAL NUMERI CHAR CHARACT C ACTER ER Restricted Values P M P M P P M P M P P M P M P M P M ProposalNumber CentreID Enrollmentnumber P P P Salutation Refer DropDownValues Sheet P FirstNameCandidate LastNameCandidate P M P M P P P M P M P P GuardianType Refer DropDownValues Sheet P DateofBirth PlaceofBirth FirstNameofFatherGuardian LastNameofFatherGuardian Mother’s Maiden Name AadharEnrolmentNo Aadharno RationCardNumber P M P M P P M P M P P P M P M P P P P P P P P P P P P 12 Gender P M Religion TraineeAddress P P P M M M TcState P M P P M CasteCategory TcDistrict PINCode Refer DropDownValues Sheet Refer DropDownValues Sheet Refer DropDownValues Sheet Refer DropDownValues Sheet P 6 Comments Unique Registration Number of the Partner Account Unique Proposal Number - Against which the Enrolment entry will be recorded Training Centre ID from the list Training centre in Portal Should be Unique for every Training Centre Should match against the Gender Field. As per the Drop down List provided Text with No Special Characters and Numbers Text with No Special Characters and Numbers Should match against the Gender Field. As per the Drop down List provided Date of Birth Not Great than Year 2000 Text with No Special Characters and Numbers Text with No Special Characters and Numbers Text with No Special Characters and Numbers Text with No Special Characters and Numbers Aadhaar Enrolment Number Format 12 Digit Valid Aadhaar Number As per Ration Card Number Format Should match the Salutation and Guardian Type. As per the Drop down List provided As per the Drop down List provided Ensure The State & District Combination Selected is correct in the Candidate Upload File or else Data import validation will fail. 6 Digit Number Note: The Items that are marked with Red check are De-Dup Fields that are Mandatory to be entered in both Insert and Update Mode 21 CHECK CRITERIA FieldName ContactnoofTrainee E-mailIDofTrainee PreTrainingStatus P P M P M P P P P P Noofmonthsofpreviousexperience P M P M P M Should be Numeric with range 0 to 42 CourseID P P M M SkillInstructorOrTrainerName FeePaidBy BatchStartDate P Should be Numeric with in the range Refer DropDownValues Sheet Refer DropDownValues Sheet P P M P M P P M P P M P M P P M M BatchEndDate TrainingStatus DatasubmitforMonth DataSubmitforYear Attendance(in%) PassingoutDate Grade Certified CertificationDate CertificatenameOrAward Certificateno Assessment Date Agency Assessor Certifying Agency PlacementStatus EmploymentType Apprenticeship Undertakingforselfemployedcollectedfromthetr ainee Proofofupskillingprovided Typeofproof DateofJoining EmployerNameOrSelfEmployed EmployerContactPersonName EmployerContactPersonDesignation EmployercontactNo LocationofemployerState LocationofemployerDistrict Feedbackcollectedfromemployer frequencyoffeedback StateofplacementORwork DistrictofplacementORwork MonthlyEarningOrCTCbeforeTraining MonthlyCurrentCTCOrearning P M P P P P P M 4 P P P P P P P P P P P P P P Refer DropDownValues Sheet Refer DropDownValues Sheet Refer DropDownValues Sheet Refer DropDownValues Sheet Refer DropDownValues Sheet Refer DropDownValues Sheet P P P P P P P P Refer DropDownValues Sheet Refer DropDownValues Sheet P P P P Refer DropDownValues Sheet Refer DropDownValues Sheet P P P P Refer DropDownValues Sheet Refer DropDownValues Sheet P P P P P P P P P Refer DropDownValues Sheet Refer DropDownValues Sheet Refer DropDownValues Sheet P P P P 22 As per the Drop down List provided This field can have only the specified values As per the Drop down List provided. Only the Valid Approved Sectors against the Proposal to be entered Course ID of the Apprvoed Course by the Standards and QA Team Text with No Special Characters and Numbers P Refer DropDownValues Sheet P As per the Drop down List provided Should be Numeric with in the range SectorCovered CourseFee Comments 10 Digit Valid Mobile Number Valid Email address format Should be Numeric with range 0 to 11 P TechnicalEducation 10 Refer DropDownValues Sheet Noofyearsofpreviousexperience EducationLevel ALPHA SPECIAL NUMERI CHAR CHARACT C ACTER ER Restricted Values DATE (DDInsert Fields Update Fields MM-YYYY) NUMERIC Field Length As per the Drop down List provided Valid Date field. Should not be < 5 Days from Current Date Valid Date field. The differnce between Batch Start Date and Batch End Date cannot be < 30 As per the Drop down list provided. For Insert 'Only On-Going' is enabled As per the drop down list provided As per the drop down list provided Numeric and cannot be > 100 Date field. Should be > Batch End Date As per the drop down list provided As per the drop down list provided Date field. Should be > Passing out Date Mandatory if Certified = Yes Mandatory if Certified = Yes Valid Assesment Date. Should be > Batch End Date Vaild Agency Name Valid Assessor Name Valid Certifying Agency Name As per the drop down list provided Mandatory if PlacementStatus=Y As per the drop down list provided As per the drop down list provided As per the drop down list provided As per the drop down list provided Mandatory if PlacementStatus=Y Mandatory if PlacementStatus=Y Mandatory if PlacementStatus=Y Mandatory if PlacementStatus=Y Mandatory if PlacementStatus=Y Mandatory if PlacementStatus=Y Mandatory if PlacementStatus=Y Mandatory if PlacementStatus=Y Mandatory if PlacementStatus=Y Mandatory if PlacementStatus=Y Mandatory if PlacementStatus=Y Mandatory if PlacementStatus=Y Mandatory if PlacementStatus=Y Note: Important changes in the Candidate Upload a) NSDCRegistrationNumber field need to entered instead of Partner Name b) Proposal Number should be entered. Partner can view the Proposal Number in their Dashboard c) Candidate Name – Partner need to updated both First Name and Last Name of the Candidate d) Date of Birth is the mandatory field e) FatherorGuardianName – First Name and Last Name of the Father/Guardian Name need to be entered Updating Existing Candidates (Update Option) 1. In case where training partner needs to update some fields of candidate information, they can do so by using bulk update feature. 2. Partner can select “Update” option. 3. Partner needs to follow the given steps to update the candidate information4. Use the same excel template which was used for uploading the candidates. 5. Keep de-dupe fields exactly the same as in the sheet used for uploading candidate information. 6. The de-dupe fields used are NSDC Registration Number Candidate First Name Candidate Last Name Date of Birth First Name of Father/HusbandOrCareTaker Last name of Father/HusbandOrCareTaker Course ID Enrolment Number Training Centre ID 7. Fill in the other columns which need to be updated. 8. Upload the sheet on portal. 23 Please note that, SDMS identifies a unique candidate enrolment based on the dedupe fields mentioned above. Partner needs to make sure that, while updating fields in bulk, these 9 fields must be kept exactly the same for the candidate for which details need to be updated. If any of these are modified, the update will fail. Candidates Training Partners can view the Candidates uploaded against their Training Centre. To View the Candidate information, please follow the steps given below: 1) Click on the Candidates Tab 2) Select the Training Centre instance and click on Select (Training Centre are group by State Name for easy location of the Training Centre) 3) The List of candidates trained under that Centre will be displayed. Screen Shot: Candidate Details through Centres 24 Screen Shot: Candidate Details Searching Candidates The Candidates displayed can be searched further by choosing the Search Option. Steps: 1. Click on the Search Hyper link. 2. Enter the Centre Name OR Training Status OR Placement Status 3. Click on Search The list of candidates satisfying the Search condition will be displayed. 25 Export to Excel: The output displayed can be exported to Excel file. Steps: 1. Click on the Bottom Right Hand Corner Icon Export to Excel. 2. The Option to save the file will be displayed. 3. Click on Save As, to give a File Name and Save the file on your local machine. . 26 Utilization Certificate Partners may now submit the Utilization certificate online. To Submit the Utilization Certificate online, please follow the steps give below 1. 2. 3. 4. Click on the tab named UC The Portal will prompt you to select the Proposal Select the Proposal from the list and click on Select The Utilization Certificates submitted till date will be displayed. Screen Shot: Utilization Certificate Tab 27 Utilization certificate is mapped against the proposal submitted to NSDC. This will again be segregated into years and quarters. Select the proposal and click on “Select” button to open screen for add UC, year and quarter wise 28 To Submit the New Utilization Certificate Steps: 1. Click on the Create button to open up the new Utilization Certificate Form 2. Please select the Mandatory Financial Year, Quarter and enter the Opening Balance Amount for the UC 3. Update other fields against the following sections. Utilization Certificate Details Section: Receipts Section: Other Receipts: Click on Add to add the Particulars against the other receipts 29 Operational Expenses Section: Other Operational Expenses Click on Add to add the Particulars against the other operational expense 30 Capital Expenses: Please input the details against other Capital Expenditure Click on Add to add the Particulars against the other operational expense Utilization Certificate Attachment: The Partner should submit the signed audited scanned copy of the Utilization certificate as attachment before submission. 31 Monster.com Tasks NSDC has tied up with the recruitment agency like Monster to enable; Candidates who have completed the Training should be placed for last 3 months after the completion of Training to be placed in the Industry. Based on the Integration workflow between Monster.com and SDMS, the candidates who are been selected as part of the Monster.com integration search, will be displayed in SDMS as Tasks for the Training Partner to facilitate the Interview process between the Employer and the Candidate. The MIS and the Lead contact of the every Training Partner will be notified of any such candidate being selected by the Employer and automatically a Task in will be created in SDMS. The Identified Task list of the Candidate will be displayed by click on the Monster.com Tab. Screen Shot: List of Monster.com Tasks All the Tasks that need to be acted upon by the Training Partner will be displayed as ‘Pending State’. 32 Steps to View the Task and Update the Task: 1. Click on the Task Number (Interaction Number) displayed in the Task List 2. The Task Details with the details of the Job Description/Information will be displayed. 3. After reviewing the details, click on Add Message to update the Task Details of the Interview Process 4. Post updating the fields click on Submit. The Task will be updated and Closed automatically 33 Annual Plan Partner is expected to submit annual action plan before the start of Financial Year. An interface is provided to partner to add AAP against a financial year for social target, staff strength, centres and financial. Screen Shot: Annual Action Plan Parameters are pre-defined in the system. On final submission AAP will become read only for partners. Partner is also recommended to update AAP against all the Training Centres. 34 Steps to submit the Annual Plan: 1. 2. 3. 4. 5. 6. 7. Click on the Annual Plan Tab Select the Proposal against which the Annual Plan need to be submitted Annual Plan submitted for previous years will be displayed Click on Create Select the Annual Plan for the Year from the drop Down Key in the Entries against each section by clicking on Add Button The Section to be entered are below: Social Targets: Click on Add button to add entries against the pre-defined set of Parameters Staff Strength: Click on Add button to add entries against the pre-defined set of Parameters Financials: Click on Add button to add entries against the pre-defined set of Parameters 35 Geographical Spread (Training): Click on Add button to add entries against the pre-defined set of Parameters Geographical Spread (Placements): Click on Add button to add entries against the pre-defined set of Parameters Sectoral Coverage (Trainings): Click on Add button to add entries against the pre-defined set of Parameters Sectoral Coverage (Placements) Click on Add button to add entries against the pre-defined set of Parameters 8. Click on Submit Button to submit the Annual Plan for the Year. 36