1
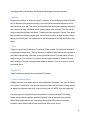
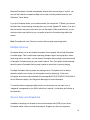
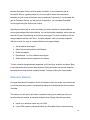
Ian Shepherd's Perception User Manual 1 Contents 3 Welcome to Perception 3 System Requirements 3 Compatibility 3 Installation and Authorization 5 Getting Started 7 Perception User Interface 10 Syncing 10 Monitoring Levels 11 Loudness and Dynamics 11 Source and Controller Placement 12 Multiple Sources 12 Source Gain and Snapshots 13 Reference Material 14 Loudness Recommendations (Optional) 15 Diagnostic Messages 2 Welcome to Perception Ian Shepherd's Perception, by MeterPlugs lets you bypass complex FX chains and make levelmatched comparisons—quickly and easily. You can use it to compare the real impact of effects including EQ, compression, limiting and more, without being deceived by differences in volume. Plus, it shows you the effect that your plugins have on your music's loudness and dynamics and even allows you to compare different levels of compression. In other words, Perception helps you make accurate, informed decisions about your music. It takes the “loudness deception” out of the equation so that you can focus on the sound of your music, rather than volume. Welcome to the future of mastering! System Requirements ● Mac OS X 10.5.7 or greater ● Windows XP, Vista, 7 or 8 ● AAX, Audio Unit, or VST 2.4 compatible DAW Compatibility ● Mac: AAX (Pro Tools 10.3.7+), Audio Unit and VST 2.4 (all 32 & 64bit) ● Win: AAX (Pro Tools 10.3.7+) and VST 2.4 (all 32 & 64bit) Installation and Authorization To install Perception on Mac OS X, run the installer and follow the onscreen instructions. Perception will be installed into the following folders: Mac ● AAX: /Library/Application Support/Avid/Audio/PlugIns/ ● AU: /Library/Audio/PlugIns/Components/ ● VST: /Library/Audio/PlugIns/VST/ 3 Windows ● AAX: C:\Program Files\Common Files\Avid\Audio\PlugIns\ ● VST: C:\Program Files\Steinberg\VSTPlugins\ Most DAWs will scan these folders for plugins. If yours doesn’t, you may need to configure it to scan these folders. See your DAW’s manual for more information. Online Authorization (requires Internet connection) When you first install and run Perception, an authorization dialog will prompt you for your email address and serial number. Enter the email address that you used when you purchased Perception. Note that both fields are casesensitive. Figure 1: Perception Authorization Offline Authorization If you prefer, it is possible to authorize Perception without an Internet connection by performing the following steps: ● Create a text file named perceptionlicense.txt containing the email address that you used when you purchased Perception, your serial number and the license signature, each on a separate line. See the sample license file below. ● Copy perceptionlicense.txt to the same directory that Perception is installed in. For 4 example, /Library/Audio/PlugIns/Components/ on Mac OS X or C:\Program Files\Steinberg\VSTPlugins on Windows. Once Perception has been successfully authorized, the authorization dialog will no longer appear when Perception is run. If you have difficulty authorizing Perception, try the following: ● If you use the authorization dialog (Figure 1), ensure that you are connected to the Internet and that your email address and serial number exactly match your license (they are case sensitive). ● If you create the license file manually, make sure it is a plain text file. Use Notepad on Windows or TextEdit on Mac OS X (choose Format > Make Plain Text). Sample License File [email protected] PCN10C8H2ZY24QBQ8XNT2H4EN MC4CFQCXPK4UfE3vWzW07lUxB6F8o0yhpgIVAMPXs1lsfl3ZguJvm+3LhVWtjBSv Getting Started The main purpose of Perception is to quickly and easily make levelmatched comparisons of complex plugin chains including EQ, compression, limiting and more. Perception is actually two plugins in one: Perception Source and Perception Controller. Perception allows you to bypass an entire FX chain between Perception Source and Perception Controller, with a single click. When you do this, you hear the audio exactly as it sounds at the Source, without undergoing any of the processing in between. Throughout the rest of this manual we will refer to the audio as it sounds at Perception Source as the preFX stream and the regular audio as the postFX stream. For example, “Perception helps you make levelmatched comparisons of your pre and postFX streams.” Bypassing FX chains is useful, but where Perception really shines is by giving you the ability to perform levelmatched comparisons. When you click Balance, Perception will equalize the volume of the pre and postFX streams. Then you can toggle between the two 5 streams to compare them at the same volume level. This lets you focus on the difference in the sound rather than the difference in the loudness, a fundamental challenge that mastering engineers deal with. (This version of Perception was specifically developed with mastering in mind, however it can also be useful in mixing situations, too.) To get started, imagine that you want to test settings on a compressor. First, insert Perception Source before the compressor. Second, insert Perception Controller after the compressor and open the editor. You can now bypass the compressor entirely by clicking Perception's Bypass FX button. Of course, this isn't too exciting... Most DAWs will allow you to bypass an individual plugin. But, Perception lets you bypass multiple plugins at once. Now, suppose that the compressor boosts the volume of your music in addition to influencing its dynamic range. This could make it difficult to distinguish the change in gain from the change in dynamics. Perception can help. Click Perception's Balance button. Now the pre and postcompression streams will play back at the same volume level, meaning you’ll only hear the changes in dynamics! Imagine being able to do this for complex FX chains consisting of EQ, compression, limiting, etc., with a single click. Note: Perception is only meant to be used for previewing your audio using loudnessmatching, not for processing your final audio. Once you’ve used Perception to optimize your processing choices, you should disable it for the final export. 6 Perception User Interface This section describes the Perception user interface components, which are identified by numbered circles, 1 through 10, in Figure 2. Figure 2: Perception User Interface 1. LU Difference / Error Displays the loudness difference (in LU) between the pre and postFX streams, which is updated when you click Balance, and the error: how much the difference has changed since you last balanced. When the error gets high, it turns red, letting you know that you should probably rebalance. Note: you may also see diagnostic messages in this display that warn you when 7 something needs your attention. See Diagnostic Messages for more information. 2. Balance Equalize the loudness of the pre and postFX streams. When the Balance button is clicked, the LU difference will update accordingly. You should press this button whenever the LU difference error turns red. This button will be disabled until an accurate loudness reading of each stream has been calculated, which typically takes a few seconds. Click the circular arrow to reset the loudness calculation. To balance the pre and postFX levels, Perception has to change the reference replay level, so you’ll hear a volume change and may need to adjust your monitor gain. This reference level can be changed in the Options windowsee below. 3. Sync Toggle syncing of the pre and postFX streams. When enabled, Perception will attempt to compensate for plugin delay. The first time sync is enabled it may take several seconds to calculate the plugin delay. After that, syncing should be quicker. In some cases you may need to resync. For example, if you add or remove plugins between Perception Source and Perception Controller, the plugin delay might be affected. You can resync by clicking the circular arrow. 4. Bypass FX Toggle between monitoring the pre and postFX streams. 5. Peak to Loudness Ratios Displays the peak to loudness ratios of the pre and postFX streams. This value is related to the music’s “crest factor” and gives an indication of how hard the music is being pushed up against its maximum peak levelwhich is likely close to 0 dBFS, if you are mastering. Use these ratios to compare the dynamic behaviour of the pre and postFX streams. Higher values indicate a greater amount of transient contrast and shortterm dynamic range. Many people believe that consistently pushing the PSR (peak to shortterm loudness) values below 8 dB will have an adverse affect on the sound. 8 6. Source Gain Set the gain of the Perception Source plugin. This is useful for testing a compressor with different input levels. Use snapshots to store and compare different source gains. See Source Gain and Snapshots for more information. 7. Snapshots Load and store gain settings including the current balance levels and the source gain. Each Perception Source plugin has its own set of snapshots. Snapshots are useful for comparing different source gain settings. See Source Gain and Snapshots for more information. 8. Options Open the Options pane. 9.Reference Level Set the reference level (in LUFS) that Perception uses for balancing. Depending on whether you are mixing or mastering, you may want to adjust this value to more closely match the levels you typically work with. The default value of 16 LUFS is a conservative mastering level for most pop music, and roughly matches the normalization levels used by iTunes Radio and Spotify. If you are mixing or working with high dynamic range music, you may want to use a reference level of 23 LUFS, which is the international standard for loudness normalization in broadcast. Or, you can set it to your own preference. Once you have a reference level you’re comfortable with, chances are you won’t need to change this setting often, and you can mark the “Perception Level” on your monitor gain control for future reference. Note: If the reference level is set too high, you are likely to see clipping after the Perception Controller. In this case you should reduce it to prevent clipping. 9 10. Sync Time Set the maximum time (in seconds) taken to do an initial sync. Depending on how much plugin delay there is between Perception Source and Perception Controller, you may need to increase this value in order for sync to work. The sync time must be at least as high as the plugin delay, or syncing will fail. On the other hand, if you have a low plugin delay, you may want to decrease this value to speed up syncing. Syncing When toggling between the pre and postFX streams, you may encounter situations where they are out of sync. This is caused by plugin delay. Basically, certain plugins delay the audio stream in order to look ahead at future samples. This makes comparing the pre and postFX streams difficult. The good news is that Perception can detect and correct sync issues so that you can compare pre and postFX streams insync. Sync may also help compensate for D/A and A/D conversion delays if you are using external hardware. When Sync is first enabled, Perception detects the plugin delay between Perception Source and Perception Controller. This may take several seconds. You can set the maximum amount of time taken to sync. This value needs to be at least as high as the plugin delay, or syncing will fail. After the plugin delay has been computed, future syncing will be much quicker. If the plugin delay changes, you will need to resync. The plugin delay may change if you add or remove plugins between Perception Source and Perception Controller. When this happens, resync by pressing the circular arrow on the Sync button. Monitoring Levels To make a loudnessmatched comparison, Perception changes the level of the pre and postFX streams. For this reason, you will almost always hear the replay loudness change when you enable Perception and click Balance. This is normal, and means that while you have Perception enabled, you need to temporarily change the gain to your studio monitors, and then revert the gain when you aren’t using it. The easiest way to do this is to adjust the 10 volume knob for your monitors. So, if you have a normal reference level when you are working, you will need to choose a second “Perception level” when you are using the plugin. The good news is that the output loudness will always be the same (16 LUFS, by default) so once you know what works, you can just mark the "Perception level" on your monitor volume control and always use the same setting. You can adjust this reference level in the Options panesee above. Loudness and Dynamics ”Loudness” and dynamics are an important consideration when mastering. If the music is too dynamic your music will be hot, blasting your ears one minute and you’ll be straining to hear it the next. Reduce the dynamics too much and your music will sound flat, lifeless and fatiguing. Perception lets you hear how your plugins affect your music's dynamics. It also shows you the peak to loudness ratio of the pre and postFX streams. A peak to loudness ratio is similar to a crest factor, or DR value if you are familiar with the TT Meter. It measures the difference between a signal's peak and average levels, with higher values indicating more shortterm dynamic range. As a guide, we recommend you avoid regularly reducing this value below 8 to avoid squashing your music too muchbut this will depend on your goals in mastering and personal taste. There are more optional guidelines in the section Loudness Recommendations, below. Source and Controller Placement You can put the Perception plugins anywhere you like in your signal path, but we recommend you start as follows: ● Put Perception Source before any other plugins, either on the source mixer channel or directly on the source clip, if your DAW supports this ● Put Perception Controller on your master output channel, after the final limiter This setup allows you to objectively compare your entire FX chain, including final limiting. 11 Because Perception Controller automatically detects which source plugin is “active”, you can use this method to compare multiple source clips, including reference trackssee Reference Tracks below. If you put Perception before your loudness meters (for example the TT Meter) you can see the effect that your processing is having when you use the “Bypass FX” button. If you put it after the meters, they won’t react when you use Perception. Either method is fine, so use whichever feels most intuitive to youwe prefer to have the Controller plugin before the meters. Note: Perception will mute if there is no active Source plugin processing audio. Multiple Sources Perception allows you to use multiple Perception Source plugins with a single Perception Controller plugin. This is useful when mastering multiple songs in a single project, where each song has its own track. You can insert a Perception Source plugin on each track and a Perception Controller plugin on your master channel. Then, Perception will automatically detect the active Perception Source plugin, based on which one is currently playing. If multiple Perception Source plugins are playing at once, Perception won’t be able to determine which source to play (or which gains to use for balancing). In this case, Perception will mute its output and flash the message MULTIPLE SOURCES PLAYING in the LU Difference display. See Diagnostic Messages for more information. To avoid this when comparing multiple tracks, we recommend you lay them out in a “staggered” arrangement in your DAW, rather than “stacked”, so that they don’t all play at the same time. Source Gain and Snapshots In addition to showing you the peak to shortterm loudness ratio (PSR) of your music, Perception makes it easy to tweak the dynamics. Suppose you have a compressor 12 between Perception Source and Perception Controller. If you increase the gain at Perception Source, a greater portion of your music will be above the compression threshold, so your music will become more compressed. Conversely, if you decrease the gain at Perception Source, you will get less compression. You can adjust Perception Source's gain using the Source Gain control. Adjusting the source gain is useful, but ideally you want to be able to compare different source gain settings while levelmatching. You can do this with snapshots, which store pre and postFX gains for balancing as well as the source gain. To store a snapshot, click an empty snapshot and then click Store. To load a snapshot, click a nonempty snapshot. With this in mind, it is easy to compare different source gain settings: 1. Set the desired source gain 2. Wait a few seconds and then click Balance 3. Create a snapshot 4. Repeat steps 1 to 3 for a different source gain 5. Switch between the two snapshots to compare To hear a smooth change between snapshots you’ll need Sync enabledsee above. Bear in mind that there will be a short delay between clicking the button and the new snapshot becoming active while the new snapshot “settles”, because of the sync compensation. Reference Material One great thing about Perception is that it will loudnessmatch any audioeven when there is no extra processing, and no corresponding change in level between the Source and the Controller. This means you can quickly and easily compare the song you’re working on with your favorite reference material, at matched loudness levels. Simply follow this procedure: ● Import your reference tracks into your DAW ● If your DAW supports clipbased effects, put Perception Source onto each song 13 ● If not, place each reference song on its own audio track, and Perception Source on each corresponding mixer channel. Make sure the songs aren’t playing at the same timePerception will warn you if this happens. Instead, lay your songs out in a “staggered” arrangement in your DAW ● Play each song in turn and when you have a stable Loudness Difference estimate, click Balance Now when you play each reference song, its loudness will set to Perception’s reference level, and you can objectively compare them to your own material. Note: The current version of Perception is intended as a mastering utility. However, using this technique you can also use it in mixing. Simply route your current mix to its own stereo bus, add Perception Source to that bus, play the mix and click Balance. Now you can compare your mix with the reference songs as above. Loudness Recommendations (Optional) Perception is not a loudness meter, and doesn’t try to tell you how loud to master your music. Instead, it gives you an objective way of finding the “loudness sweet spot” that suits your taste, and stands up well against your reference material. However, if you would like some guidance, you may find the following suggestions useful. Note that you’ll need a loudness meter (ITU BS.1770 or EBU R128) to follow some of these guidelines. Many DAWs now include this, or you can use a loudness meter like MeterPlugs LCAST. With that said, we recommend that you: ● Avoid mastering with an integrated loudness level greater than 11 LUFS ● Avoid mastering with a truepeak level greater than 1 dBTP ● Avoid pushing the shortterm peak to loudness ratio (PSR) below 8 ● Pay particular attention to Perception's PSR when comparing your music to reference material. If the reference tracks regularly read less than PSR 6, we suggest you try to achieve a similar sound but with higher PSR levels (>8). Typically, pushing PSR below 8 has little realworld benefit and can have an 14 adverse effect on your music. iTunes Sound Check and iTunes Radio use a reference level of approximately 16 LUFS, meaning if you master following the above guidelines, there may be up to 5dB of peak headroom unused. International broadcast guidelines use a reference level of 23 LUFS, leaving up to 12 dB of unused peak headroom following the guidelines above. Diagnostic Messages Perception flashes diagnostic messages in the LU Difference display when it detects a problem. These are useful for troubleshooting problems that you may be experiencing. Here is a description of each message, including actions you can take: MULTIPLE SOURCES PLAYING This happens when multiple sources are sending nonsilent audio to Perception Controller at the same time. In these cases, Perception can become confused as to which source it should play (and how to balance output levels), so it simply mutes. MULTIPLE CONTROLLERS This happens when more than one instance of Perception Controller is running. Currently, only a single instance of Perception Controller can be running (inserted) on your system at once. Any additional instances will display this message and will not function. Typically, you only need a single instance of Perception Controller on your master output channel, so this is not a problem; however, you may run into this warning if you have multiple projects open, each with its own instance of Perception Controller. In these cases, you will need to close the other projects. NO SOURCE This happens when no Perception Source instances are connected to Perception Controller. This will often be displayed if you insert Perception Controller before inserting Perception Source. Once you insert Perception Source, this warning should go away. 15 When this warning is displayed, Perception Controller will mute its output. 16