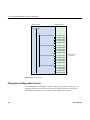
1
SGI InfiniteStorage Appliance Manager
User’s Guide
®
007–4699–010
COPYRIGHT
© 2004, 2006–2009 SGI. All rights reserved; provided portions may be copyright in third parties, as indicated elsewhere herein. No
permission is granted to copy, distribute, or create derivative works from the contents of this electronic documentation in any manner,
in whole or in part, without the prior written permission of SGI.
LIMITED RIGHTS LEGEND
The software described in this document is “commercial computer software” provided with restricted rights (except as to included
open/free source) as specified in the FAR 52.227-19 and/or the DFAR 227.7202, or successive sections. Use beyond license provisions is
a violation of worldwide intellectual property laws, treaties and conventions. This document is provided with limited rights as defined
in 52.227-14.
TRADEMARKS AND ATTRIBUTIONS
SGI, the SGI cube, the SGI logo, Altix, and XFS are registered trademarks and CXFS, OpenVault, and Performance Co-Pilot are
trademarks of Silicon Graphics, Inc., in the United States and/or other countries worldwide.
Active Directory, Internet Explorer, Microsoft, and Windows are registered trademarks of Microsoft Corporation. AIX, IBM, and Tivoli
are registered trademarks of IBM Corporation. Apache is a trademark of the Apache Software Foundation. Apple and Mac OS are
registered trademarks of Apple Computer, Inc. The BakBone Software company name and the NetVault:Replicator are trademarks of
BakBone Software, Inc. Fedora, Red Hat and all Red Hat-based trademarks are trademarks or registered trademarks of Red Hat, Inc.
in the United States and other countries. InfiniBand is a registered trademark and service mark of the InfiniBand Trade Association.
Firefox and Mozilla are registered trademarks of the Mozilla Foundation. Kerberos is a trademark of the Massachusetts Institute of
Technology. Kerberos is a trademark of the Massachusetts Institute of Technology. Linux is a registered trademark of Linus Torvalds in
several countries. Novell is a registered trademark, and SUSE is a trademark of Novell, Inc. in the United States and other countries.
OpenLDAP is a registered trademark of the OpenLDAP Foundation. Solaris and Sun are trademarks or registered trademarks of Sun
Microsystems, Inc. All other trademarks mentioned herein are the property of their respective owners.
Microsoft product screen shots reprinted with permission from Microsoft Corporation.
New Features in This Guide
This revision contains the new appendix Appendix D, "SGI NEXIS System Reset
DVD" on page 119.
007–4699–010
iii
Record of Revision
007–4699–010
Version
Description
001
September 2004
Original publication
002
December 2004
Documents SGI InfiniteStorage NAS Manager version 2
003
October 2006
Documents SGI InfiniteStorage NAS Manager version 3.2
004
January 2007
Documents SGI InfiniteStorage Appliance Manager version 4.0
005
September 2007
Documents SGI InfiniteStorage Appliance Manager version 4.1
006
March 2008
Documents SGI InfiniteStorage Appliance Manager version 4.2
007
June 2008
Documents SGI InfiniteStorage Appliance Manager version 4.3
008
September 2008
Documents SGI InfiniteStorage Appliance Manager version 4.4
009
December 2008
Documents SGI InfiniteStorage Appliance Manager version 4.5
010
March 2009
Documents SGI InfiniteStorage Appliance Manager version 4.6 and
ISSP 1.6
v
Contents
About This Guide
. . . .
. . . .
. . .
. . . .
. . . .
. . xvii
Related Publications
.
.
.
.
.
.
.
.
.
.
.
.
.
.
.
.
.
.
.
.
.
. xviii
Obtaining Publications
.
.
.
.
.
.
.
.
.
.
.
.
.
.
.
.
.
.
.
.
.
. xviii
Conventions
.
.
.
.
.
.
.
.
.
.
.
.
.
.
.
.
.
.
.
.
.
.
.
xix
.
.
.
.
.
.
.
.
.
.
.
.
.
.
.
.
.
.
.
.
.
.
.
xix
.
.
.
.
.
.
.
.
.
.
.
.
.
.
.
.
.
.
.
xx
. . . .
. .
1
.
.
Reader Comments
Appliance Manager Comments
1. Overview
. .
. . . .
. . . .
. . .
. . . .
System Management and Monitoring with Appliance Manager
.
.
.
.
.
.
.
.
.
1
Appliance Manager Interface
.
.
.
.
.
.
.
.
.
.
.
.
.
.
.
.
.
.
.
.
2
XVM Snapshots
.
.
.
.
.
.
.
.
.
.
.
.
.
.
.
.
.
.
.
.
6
.
.
.
.
.
.
.
.
.
.
.
.
.
.
.
.
.
.
.
7
.
.
.
.
.
.
.
.
.
.
.
.
.
.
.
.
.
.
.
8
. . . .
. .
9
.
.
.
.
DMF and Appliance Manager
Licensing Requirements
.
.
2. Initial System Setup
. .
Accessing the Setup Wizard
.
.
. . . .
.
.
.
.
. . .
.
Using the Setup Wizard to Configure the System
Passwords
.
.
.
.
.
.
Time and Date
.
System Restart
.
.
.
.
.
.
.
.
.
.
.
.
9
.
.
.
.
.
.
.
.
.
.
.
.
.
11
.
.
.
.
.
.
.
.
.
.
.
.
.
.
.
.
.
.
.
.
12
.
.
.
.
.
.
.
.
.
.
.
.
.
.
.
.
.
.
.
.
.
.
12
.
.
.
.
.
.
.
.
.
.
.
.
.
.
.
.
.
.
.
.
.
.
.
14
.
.
.
.
.
.
.
.
.
.
.
.
.
.
.
.
.
.
.
.
.
.
.
15
.
.
.
.
.
.
.
.
.
.
.
.
.
.
.
.
.
.
.
.
.
15
.
.
.
.
.
.
.
.
.
.
.
.
.
.
.
.
.
.
.
.
.
.
.
16
.
.
.
.
.
.
.
.
.
.
.
.
.
.
.
.
.
.
.
.
.
.
.
16
.
.
.
.
.
.
.
.
.
.
.
.
.
.
.
.
.
.
.
17
Customizing Your Installation
007–4699–010
.
.
Verify Configuration
Finished
.
.
Network Interface
DNS
. . . .
vii
Contents
3. Server Configuration and Management
Network Interface Configuration
Management Interface
.
.
Ethernet Network Interfaces
Storage Configuration
. . . .
. . . .
. .
19
.
.
.
.
.
.
.
.
.
.
.
.
.
.
.
.
.
.
.
21
.
.
.
.
.
.
.
.
.
.
.
.
.
.
.
.
.
.
.
22
.
.
.
.
.
.
.
.
.
.
.
.
.
.
.
.
.
.
.
22
.
.
.
.
.
.
.
.
.
.
.
.
.
.
.
.
.
.
24
.
.
.
.
.
.
.
.
.
.
.
.
.
.
.
.
.
.
.
25
InfiniBand Network Interfaces
Bonded Network Interfaces
. .
.
.
.
.
.
.
.
.
.
.
.
.
.
.
.
.
.
.
.
.
.
.
28
.
.
.
.
.
.
.
.
.
.
.
.
.
.
.
.
.
.
.
.
.
.
29
Listing Filesystems
.
.
.
.
.
.
.
.
.
.
.
.
.
.
.
.
.
.
.
.
.
29
Creating Filesystems
.
.
.
.
.
.
.
.
.
.
.
.
.
.
.
.
.
.
.
.
.
30
Growing Filesystems
.
.
.
.
.
.
.
.
.
.
.
.
.
.
.
.
.
.
.
.
.
34
Destroying Filesystems
.
.
.
.
.
.
.
.
.
.
.
.
.
.
.
.
.
.
.
.
35
Discovering Filesystems
.
.
.
.
.
.
.
.
.
.
.
.
.
.
.
.
.
.
.
.
35
.
.
.
.
.
.
.
.
.
.
.
.
.
.
.
.
.
.
.
.
36
.
.
.
.
.
.
.
.
.
.
.
.
.
.
.
.
.
38
.
.
.
.
.
.
.
.
.
.
.
.
.
.
.
.
.
.
41
Miscellaneous iSCSI Management
.
.
.
.
.
.
.
.
.
.
.
.
.
.
.
.
.
42
Filesystems
iSCSI
.
.
.
.
.
.
.
.
Creating iSCSI Pool and Targets
The iSCSI Initiator
Snapshots
.
.
.
.
.
.
.
.
.
.
.
.
.
.
.
.
.
.
.
.
.
.
.
.
.
.
.
43
.
.
.
.
.
.
.
.
.
.
.
.
.
.
.
.
.
.
.
.
.
43
.
.
.
.
.
.
.
.
.
.
.
.
.
.
.
.
.
.
.
.
.
.
45
Schedule Snapshots
Take a Snapshot
.
List Snapshots
.
.
.
.
.
.
.
.
.
.
.
.
.
.
.
.
.
.
.
.
.
.
.
45
DMF Configuration
.
.
.
.
.
.
.
.
.
.
.
.
.
.
.
.
.
.
.
.
.
.
.
46
.
.
.
.
.
.
.
.
.
.
.
.
.
.
.
.
.
.
46
.
.
.
.
.
.
.
.
.
.
.
.
.
.
47
Tape Volume and Drive Screens
Emptying a Lost or Damaged Tape Volume
DMF Configuration Screens
.
.
.
.
.
.
.
.
.
.
.
.
.
.
.
.
.
.
.
47
User and Group Configuration
.
.
.
.
.
.
.
.
.
.
.
.
.
.
.
.
.
.
.
49
.
.
.
.
.
.
.
.
.
.
.
.
.
.
.
.
.
.
.
49
Local Users and Groups
viii
.
007–4699–010
®
SGI InfiniteStorage Appliance Manager User’s Guide
Quotas
.
.
.
.
.
.
.
.
.
.
.
.
.
.
.
.
.
.
.
.
.
.
.
.
.
.
50
User Quotas
.
.
.
.
.
.
.
.
.
.
.
.
.
.
.
.
.
.
.
.
.
.
.
50
Group Quotas
.
.
.
.
.
.
.
.
.
.
.
.
.
.
.
.
.
.
.
.
.
.
.
51
Applying Quotas to Filesystems Created with Earlier Versions of Appliance Manager
.
52
NFS Configuration
.
.
.
.
.
.
.
.
.
.
.
.
.
.
.
.
.
.
.
.
.
.
.
52
Global Options
.
.
.
.
.
.
.
.
.
.
.
.
.
.
.
.
.
.
.
.
.
.
.
53
Export Options
.
.
.
.
.
.
.
.
.
.
.
.
.
.
.
.
.
.
.
.
.
.
.
54
.
.
.
.
.
.
.
.
.
.
.
.
.
.
.
.
.
.
.
.
.
54
.
.
.
.
.
.
.
.
.
.
.
.
.
.
.
.
.
.
.
56
Use Export Options
Use a Custom Definition
CIFS Configuration
.
.
.
.
.
.
.
.
.
.
.
.
.
.
.
.
.
.
.
.
.
.
57
CXFS Configuration
.
.
.
.
.
.
.
.
.
.
.
.
.
.
.
.
.
.
.
.
.
.
59
NDMP Configuration
.
.
.
.
.
.
.
.
.
.
.
.
.
.
.
.
.
.
.
.
.
.
61
SNMP Configuration
.
.
.
.
.
.
.
.
.
.
.
.
.
.
.
.
.
.
.
.
.
.
62
Global Configuration
.
.
.
.
.
.
.
.
.
.
.
.
.
.
.
.
.
.
.
.
.
.
64
.
.
.
.
.
.
.
.
.
.
.
.
.
.
.
.
.
.
.
.
.
.
64
.
.
.
.
.
.
.
.
.
.
.
.
.
.
.
.
.
.
.
.
.
65
System Name
.
.
.
Name Service Client
Local Files Only
.
.
.
.
.
.
.
.
.
.
.
.
.
.
.
.
.
.
.
.
.
.
65
Active Directory
.
.
.
.
.
.
.
.
.
.
.
.
.
.
.
.
.
.
.
.
.
.
65
LDAP
NIS
.
.
.
.
.
.
.
.
.
.
.
.
.
.
.
.
.
.
.
.
.
.
.
.
.
.
68
.
.
.
.
.
.
.
.
.
.
.
.
.
.
.
.
.
.
.
.
.
.
.
.
.
69
.
.
.
.
.
.
.
.
.
.
.
.
.
.
.
.
.
.
.
.
.
69
DNS and Hostnames
Time and Date
Licenses
.
.
.
.
.
.
.
.
.
.
.
.
.
.
.
.
.
.
.
.
.
.
.
.
.
71
.
.
.
.
.
.
.
.
.
.
.
.
.
.
.
.
.
.
.
.
.
.
.
72
.
.
.
.
.
.
.
.
.
.
.
.
.
.
.
.
.
.
.
.
72
.
.
.
.
.
.
.
.
.
.
.
.
.
.
.
.
.
.
.
.
72
.
.
.
.
.
.
.
.
.
.
.
.
.
.
.
.
.
.
.
72
Administrator Password
Operations
.
.
.
.
.
Save/Restore Configuration
Support Data
.
Performance Data
007–4699–010
.
.
.
.
.
.
.
.
.
.
.
.
.
.
.
.
.
.
.
.
.
.
.
73
.
.
.
.
.
.
.
.
.
.
.
.
.
.
.
.
.
.
.
.
.
.
73
ix
Contents
Shutdown
.
.
.
.
.
.
.
4. Performance Monitoring
.
.
.
.
.
.
. . . .
.
.
.
. . .
.
.
.
.
. . . .
.
.
.
.
.
.
73
. . . .
. .
75
Metrics Collected
.
.
.
.
.
.
.
.
.
.
.
.
.
.
.
.
.
.
.
.
.
.
.
76
System Summary
.
.
.
.
.
.
.
.
.
.
.
.
.
.
.
.
.
.
.
.
.
.
.
78
.
.
.
.
.
.
.
.
.
.
.
.
.
.
.
.
.
.
.
.
.
.
.
.
81
.
.
.
.
.
.
.
.
.
.
.
.
.
.
.
.
.
.
.
.
.
.
.
.
81
.
.
.
.
.
.
.
.
.
.
.
.
.
.
.
.
.
.
.
.
.
.
.
.
82
.
.
.
.
.
.
.
.
.
.
.
.
.
.
.
82
System Alerts
Resources
.
.
Disk Space
Disk User Quota and Disk Group Quota
Disk Throughput and Disk IOPS
DMF Resources
.
.
.
.
OpenVault Tape Libraries
.
.
.
.
.
.
.
.
.
.
.
.
.
.
.
.
.
.
83
.
.
.
.
.
.
.
.
.
.
.
.
.
.
.
.
.
.
.
84
.
.
.
.
.
.
.
.
.
.
.
.
.
.
.
.
.
.
.
84
Tape Drives
.
.
.
.
.
.
.
.
.
.
.
.
.
.
.
.
.
.
.
.
.
.
.
85
Tape Volumes
.
.
.
.
.
.
.
.
.
.
.
.
.
.
.
.
.
.
.
.
.
.
.
86
DMF-Managed Filesystems
.
.
.
.
.
.
.
.
.
.
.
.
.
.
.
.
.
.
.
86
Disk Caches
.
.
.
.
.
.
.
.
.
.
.
.
.
.
.
.
.
.
.
.
87
.
.
.
.
.
.
.
.
.
.
.
.
.
.
.
.
.
.
.
.
87
.
.
.
.
.
.
.
.
.
.
.
.
87
.
.
.
DMF Error Messages
DMF Statistics are Unavailable or DMF is Idle
OpenVault Library Is Missing
CPU Utilization
.
.
.
.
.
.
.
.
.
.
.
.
.
.
.
88
.
.
.
.
.
.
.
.
.
.
.
.
.
.
.
.
.
.
.
.
89
Network Throughput
.
.
.
.
.
.
.
.
.
.
.
.
.
.
.
.
.
.
.
.
.
90
Hardware Inventory
.
.
.
.
.
.
.
.
.
.
.
.
.
.
.
.
.
.
.
.
.
90
.
.
.
.
.
.
.
.
.
.
.
.
.
.
.
.
.
.
.
.
.
.
.
.
.
.
90
.
.
.
.
.
.
.
.
.
.
.
.
.
.
.
.
.
.
.
.
.
.
.
.
.
.
91
CIFS
.
.
.
.
.
.
.
.
.
.
.
.
.
.
.
.
.
.
.
.
.
.
.
.
.
.
93
CXFS
.
.
.
.
.
.
.
.
.
.
.
.
.
.
.
.
.
.
.
.
.
.
.
.
.
.
95
DMF Activity
.
.
.
.
.
.
.
.
.
.
.
.
.
.
.
.
.
.
.
.
.
.
.
.
98
NDMP
.
.
.
.
.
.
.
.
.
.
.
.
.
.
.
.
.
.
.
.
.
.
.
.
99
NFS
x
.
.
.
Services
.
.
.
.
.
007–4699–010
®
SGI InfiniteStorage Appliance Manager User’s Guide
Versions
Clients
.
.
.
.
.
.
.
.
.
.
.
.
.
.
.
.
.
.
.
.
.
.
.
.
.
.
.
100
.
.
.
.
.
.
.
.
.
.
.
.
.
.
.
.
.
.
.
.
.
.
.
.
.
100
. . . .
. .
101
5. Troubleshooting
. . . .
. . . .
Forgotten Password or Corrupt Password File
The archives Directory is Too Large
.
.
Unconfigured Storage Arrays are Discovered
. . .
. . . .
.
.
.
.
.
.
.
.
.
.
.
.
.
.
101
.
.
.
.
.
.
.
.
.
.
.
.
.
.
.
102
.
.
.
.
.
.
.
.
.
.
.
.
.
.
.
102
Filesystem Creation Warning Messages
.
.
.
.
.
.
.
.
.
.
.
.
.
.
.
.
.
103
Power Outage and iSCSI
.
.
.
.
.
.
.
.
.
.
.
.
.
.
.
.
.
.
.
.
.
103
.
.
.
.
.
.
.
.
.
.
.
.
.
.
.
.
.
.
.
103
.
.
.
.
.
.
.
.
.
.
.
.
.
.
.
.
.
.
.
104
.
.
.
.
.
.
.
.
.
.
.
.
.
.
.
.
104
Appliance Manager is Inaccessible when the System Must Be Rebooted
.
.
.
.
.
.
.
105
.
.
.
.
.
.
105
.
.
.
.
.
.
106
. . .
. .
107
Users and Groups Not Visible
CXFS Status is Incorrect
.
.
CXFS Client Stuck on Filesystems Mount
Appliance Manager is Inaccessible due to Network Configuration Issues
Reporting Problems to SGI
.
.
.
.
.
.
.
.
.
.
.
.
.
.
Appendix A. How Appliance Manager Configures Filesystems
Filesystem Creation Goals
.
.
.
.
.
.
.
.
.
.
.
.
.
.
.
.
.
.
.
.
.
107
Disk Striping
.
.
.
.
.
.
.
.
.
.
.
.
.
.
.
.
.
.
.
.
.
108
.
.
.
.
.
.
.
.
.
.
.
.
.
.
.
.
.
.
110
.
.
.
.
Filesystem Configuration Factors
Disk Allocation
.
.
.
Multi-Array Filesystems
Hot Spare Assignment
.
.
.
.
.
.
.
.
.
.
.
.
.
.
.
.
.
.
.
.
.
.
111
.
.
.
.
.
.
.
.
.
.
.
.
.
.
.
.
.
.
.
.
.
111
.
.
.
.
.
.
.
.
.
.
.
.
.
.
.
.
.
.
.
.
.
112
.
.
.
.
.
.
.
.
.
.
.
.
.
.
.
112
Changing from SGIRDAC to SGIAVT Mode
TPSSM
.
.
.
.
.
.
.
.
.
.
.
.
.
.
.
.
.
.
.
.
.
.
.
.
.
113
ISSM EE
.
.
.
.
.
.
.
.
.
.
.
.
.
.
.
.
.
.
.
.
.
.
.
.
.
113
ISSM WE
.
.
.
.
.
.
.
.
.
.
.
.
.
.
.
.
.
.
.
.
.
.
.
.
.
114
.
.
.
.
.
.
.
.
.
.
.
.
.
.
.
.
.
.
.
.
.
.
.
.
.
114
SMI
.
.
.
007–4699–010
xi
Contents
Appendix B. How Appliance Manager Configures the CXFS Cluster
.
. .
115
Changing the Network Configuration
.
.
.
.
.
.
.
.
.
.
.
.
.
.
.
.
.
115
.
.
.
.
.
.
.
.
.
.
.
.
.
.
.
.
.
116
Appendix C. Reinstalling Appliance Manager After the Network is
Configured . . . . . . . . . . . . . . . . . . . . . .
. .
117
Appendix D. SGI NEXIS System Reset DVD
. . . .
. .
119
Cluster Connection Issues
.
.
.
.
When to Use the SGI NEXIS System Reset DVD
.
.
.
.
Resetting to the Factory Default Image after Severe Failure
Glossary
Index
xii
.
. . . .
.
.
.
.
.
.
.
.
.
.
.
119
.
.
.
.
.
.
.
.
.
.
120
. . .
. . . .
. . . .
. . .
. . . .
. . . .
. .
127
. . . .
. . . .
. . . .
. . .
. . . .
. . . .
. .
135
007–4699–010
Figures
Figure 1-1
Appliance Manager Interface
Figure 2-1
Setup Wizard
Figure 3-1
Management Screen
Figure 3-2
Bonded Network Interfaces
Figure 3-3
iSCSI Storage
.
.
.
Figure 4-1
Monitoring Screen
.
.
Figure 4-2
Color-Coding the Direction of Data Flow
Figure 4-3
Summary Screen
Figure 4-4
CXFS Monitoring Example
Figure A-1
Filesystem Structure
Figure A-2
Four-Way Stripe
Figure D-1
EFI Shell
Figure D-2
Fully Automated Base Installation
Figure D-3
Post-Installation Configuration
007–4699–010
.
.
.
.
.
.
.
.
.
.
.
.
.
.
.
.
.
.
.
.
.
3
.
.
.
.
.
.
.
.
.
.
.
.
.
.
.
.
.
.
11
.
.
.
.
.
.
.
.
.
.
.
.
.
.
.
.
.
.
20
.
.
.
.
.
.
.
.
.
.
.
.
.
.
.
.
26
.
.
.
.
.
.
.
.
.
.
.
.
.
.
.
.
.
37
.
.
.
.
.
.
.
.
.
.
.
.
.
.
.
.
.
76
.
.
.
.
.
.
.
.
.
.
.
.
78
.
.
.
.
.
.
.
.
.
.
.
.
.
.
.
.
.
.
80
.
.
.
.
.
.
.
.
.
.
.
.
.
.
.
.
97
.
.
.
.
.
.
.
.
.
.
.
.
.
.
.
.
.
.
109
.
.
.
.
.
.
.
.
.
.
.
.
.
.
.
.
.
.
.
110
.
.
.
.
.
.
.
.
.
.
.
.
.
.
.
.
.
.
.
121
.
.
.
.
.
.
.
.
.
.
.
.
.
.
123
.
.
.
.
.
.
.
.
.
.
.
.
.
.
124
.
xiii
Tables
Table 4-1
CPU Metrics Reported by Appliance Manager
.
.
.
.
.
.
.
.
.
.
.
89
Table 4-2
Statistics Reported by NFS and CIFS Screens
.
.
.
.
.
.
.
.
.
.
.
91
Table 4-3
Additional Information Reported by the NFS Screen
.
.
.
.
.
.
.
.
.
92
Table 4-4
NFS Operation Classes
.
.
.
.
.
.
.
.
.
.
.
.
.
.
.
.
.
.
92
Table 4-5
CIFS Operation Classes
.
.
.
.
.
.
.
.
.
.
.
.
.
.
.
.
.
.
93
Table 4-6
Additional Information Reported by the CIFS Screen
.
.
.
.
.
.
.
.
94
007–4699–010
xv
About This Guide
This manual describes the operation of SGI InfiniteStorage Appliance Manager. It
discusses the following:
• Chapter 1, "Overview" on page 1, describes the tasks you can accomplish with
Appliance Manager and introduces the interface
• Chapter 2, "Initial System Setup" on page 9, describes how to use the Setup
Wizard to perform your initial system configuration
• Chapter 3, "Server Configuration and Management" on page 19, describes how to
use Appliance Manager to configure the various components of your system and
perform general system administration
• Chapter 4, "Performance Monitoring" on page 75, describes the current and
historical views of the state and the performance of a storage server
• Chapter 5, "Troubleshooting" on page 101, discusses problems that you might
encounter and how to resolve them
• Appendix A, "How Appliance Manager Configures Filesystems" on page 107,
describes how Appliance Manager constructs a filesystem and provides an
overview of the underlying volume and RAID device configuration that the
system uses to lay out the filesystem
• Appendix B, "How Appliance Manager Configures the CXFS Cluster" on page 115,
describes how Appliance Manager constructs a CXFS cluster
• Appendix C, "Reinstalling Appliance Manager After the Network is Configured"
on page 117, describes the procedure to reinstall Appliance Manager after the
network is configured
• Appendix D, "SGI NEXIS System Reset DVD" on page 119, which describes the
bootable DVD that you can use to reset your NAS settings to the factory defaults
!
Caution: The NEXIS reset process is destructive and is only appropriate in cases
of severe failure.
In addition, this document includes a glossary of terms.
007–4699–010
xvii
About This Guide
Related Publications
For information about this release, see the SGI InfiniteStorage Software Platform
(ISSP) release notes (README.txt).
For more information, see the following SGI publications:
• DMF 4 Administrator’s Guide for SGI InfiniteStorage
• DMF Filesystem Audit Guide for SGI InfiniteStorage
• CXFS 5 Administration Guide for SGI InfiniteStorage
• CXFS 5 Client-Only Guide for SGI InfiniteStorage
• OpenVault Operator’s and Administrator’s Guide
• SGI InfiniteStorage Software Platform Release Note
• TMF Release and Installation Guide
• TMF User’s Guide
• TMF Administrator’s Guide
• XVM Volume Manager Administrator’s Guide
Note: The external websites referred to in this guide were correct at the time of
publication, but are subject to change.
Obtaining Publications
You can obtain SGI documentation in the following ways:
• See the SGI Technical Publications Library at http://docs.sgi.com. Various formats
are available. This library contains the most recent and most comprehensive set of
online books, man pages, and other information.
• You can also view man pages by typing man <title> on a command line.
• The /docs directory on the ISSP DVD or in the Supportfolio download directory
contains the following:
– The ISSP release note: /docs/README.txt
xviii
007–4699–010
®
SGI InfiniteStorage Appliance Manager User’s Guide
– Other release notes: /docs/README_NAME.txt
– The manuals provided with ISSP
– A complete list of the packages and their location on the media:
/docs/RPMS.txt
– The packages and their respective licenses: /docs/PACKAGE_LICENSES.txt
• The ISSP release notes and manuals are installed on the system as part of the
sgi-isspdocs RPM into the following location:
/usr/share/doc/packages/sgi-issp-ISSPVERSION-TITLE
Conventions
The following conventions are used throughout this publication:
Convention
Meaning
command
This fixed-space font denotes literal items such as commands, files,
routines, path names, signals, messages, and programming
language structures.
variable
Italic typeface denotes variable entries and words or concepts
being defined.
user input
Bold, fixed-space font denotes literal items that the user enters in
interactive sessions. (Output is shown in nonbold, fixed-space
font.)
Menu item
Bold font indicates a menu item or button in the graphical user
interface (GUI).
...
Ellipses indicate that a preceding element can be repeated.
manpage(x)
Man page section identifiers appear in parentheses after man page
names.
Reader Comments
If you have comments about the technical accuracy, content, or organization of this
publication, contact SGI. Be sure to include the title and document number of the
007–4699–010
xix
About This Guide
publication with your comments. (Online, the document number is located in the
front matter of the publication. In printed publications, the document number is
located at the bottom of each page.)
You can contact SGI in any of the following ways:
• Send e-mail to the following address:
[email protected]
• Contact your customer service representative and ask that an incident be filed in
the SGI incident tracking system.
• Send mail to the following address:
SGI
Technical Publications
1140 East Arques Avenue
Sunnyvale, CA 94085–4602
SGI values your comments and will respond to them promptly.
Appliance Manager Comments
If you have comments about using the Appliance Manager software, please send
email to SGI engineering at [email protected]. You can also access this
email address from the following menu selection:
Help
> About
xx
007–4699–010
Chapter 1
Overview
This chapter discusses the following:
• "System Management and Monitoring with Appliance Manager" on page 1
• "Appliance Manager Interface" on page 2
• "XVM Snapshots" on page 6
• "DMF and Appliance Manager" on page 7
• "Licensing Requirements" on page 8
System Management and Monitoring with Appliance Manager
Appliance Manager is a web-based interface that lets you configure, manage, and
monitor a storage server solution. You can use Appliance Manager to do the
following:
• Perform initial system configuration using the Setup Wizard
• Manage and install SGI software licenses
• Configure the system components
• Perform general system administration tasks
• Monitor the state and performance of the storage server, including the following:
– CPU utilization
– Disk utilization
– Network throughput
– Services
• Review historical data describing the state and performance of the storage server
• View connected clients and determine how each of these contribute to the current
workload
• Detect and investigate problems
007–4699–010
1
1: Overview
• Create CXFS filesystems, add and delete CXFS client-only nodes, monitor CXFS
filesystems and nodes, and download CXFS client software to client-only nodes
• Monitor the Data Migration Facility (DMF), perform certain DMF configuration
tasks, and download DMF client software to DMF client nodes
Note: DMF is a hierarchical storage management system for SGI environments.
Consult the release notes for the procedure to activate the DMF monitoring screens.
• Create, delete, and manage NFS and CIFS exported filesystems
Note: Reverse lookup for NFS clients must be properly configured in the DNS
server because the NFS server will always try to do a reverse lookup on client IP
addresses. Improper configuration will cause delays.
• Create, delete, and manage iSCSI block-level devices
Appliance Manager Interface
To access the Appliance Manager features, click one of the menu options displayed
across the top of the Appliance Manager screen. As you page through Appliance
Manager, your location is shown below the menu options. You can also click an item
in this path to directly access that location. For example, Figure 1-1 shows the screen
you would see if you selected the CPU Utilization item from the Resources category
on the Monitoring menu page. The menu path is shown in this guide in the
following format:
Monitoring
> Resources
> CPU Utilization
2
007–4699–010
®
SGI InfiniteStorage Appliance Manager User’s Guide
Figure 1-1 Appliance Manager Interface
007–4699–010
3
1: Overview
The menu options are as follows:
Summary
Displays a graphic summary of system utilization,
including CXFS filesystem and node status (if CXFS is
licensed and installed), number of alerts, CPU usage,
disk space, disk throughput, network throughput,
current clients, and uptime. See "System Summary" on
page 78.
Monitoring
Lets you monitor features in the following categories:
• Alerts displays messages from the system logs. See
"System Alerts" on page 81.
• Resources groups a list of system resources that
Appliance Manager monitors. Select a resource
(such as Disk Space) to display its status. See
"Resources" on page 81.
• Services groups a list of services provided by the
storage server. Select a service (such as NFS) to
display its status. You can also display the current
versions of installed software. See "Services" on
page 90.
• Clients displays various I/O criteria by which to
display information about the storage server’s
clients. See "Clients" on page 100.
Management
Lets you perform tasks in the following categories:
• Resources groups a list of system resources that you
can configure using Appliance Manager. Select a
resource (such as Network Interfaces). See:
4
–
"Network Interface Configuration" on page 21
–
"Storage Configuration" on page 28
–
"DMF Configuration" on page 46
–
"User and Group Configuration" on page 49
007–4699–010
®
SGI InfiniteStorage Appliance Manager User’s Guide
• Services groups a list of services that you can
configure using Appliance Manager. See:
–
"NFS Configuration" on page 52
–
"CIFS Configuration" on page 57
–
"CXFS Configuration" on page 59
–
"NDMP Configuration" on page 61
–
"SNMP Configuration" on page 62
• Global Configuration groups a list of options for
various general system administration tasks. See
"Global Configuration" on page 64.
• Operations lets you save and restore the system
configuration files that you create with Appliance
Manager, gather support and performance data, and
shut down or reboot the system. See "Operations"
on page 72.
Site Map
Displays an index of direct links to each screen that
Appliance Manager displays.
Help
Displays this guide, the release notes, and legal
information about Appliance Manager.
Log In
Displays the management log-in screen, in which you
enter the administration password that enables you to
make changes with Appliance Manager and use the
Management screens. (No password is required to use
the Monitoring screens.) You must also enable cookies.
Log Out
Allows you to exit from the management function but
still access monitoring functions. (After you have
logged in, the menu selection changes to Log Out.)
Note: Features documented in this guide are only available if the required software is
installed for DMF and CXFS.
007–4699–010
5
1: Overview
XVM Snapshots
Note: The snapshot feature is not available with CXFS or DMF filesystems, or for
iSCSI exported block devices.
The XVM snapshot feature provides the ability to create virtual point-in-time images
of an XFS filesystem without causing a service interruption.
The snapshot feature requires a minimal amount of storage because it uses a
copy-on-write mechanism that copies only the data areas that change after the
snapshot is created.
Snapshot copies of a filesystem are virtual copies, not actual media backup for a
filesystem. You can, however, use a snapshot copy of a filesystem to create a backup
dump of a filesystem, allowing you to continue to use and modify the filesystem
while the backup runs.
You can also use a snapshot copy of a filesystem to provide a recovery mechanism in
the event of data loss due to user errors such as accidental deletion. A full filesystem
backup, however, is necessary in order to protect against data loss due to media
failure.
Creating filesystem snapshots requires that you first create a snapshot repository in
which original copies of regions of data that have changed on the filesystem are
stored. If you plan to use the snapshot feature, you must allow room for the snapshot
repository on the RAID when you create the filesystems.
Snapshots are read-only. The oldest snapshot will be deleted automatically after all
space in the snapshot repository has been used. You cannot delete intermediate
snapshots.
6
007–4699–010
®
SGI InfiniteStorage Appliance Manager User’s Guide
DMF and Appliance Manager
Appliance Manager includes pages designed to aid the administration and
maintenance of a DMF configuration. By default, it presents the most commonly
altered parameters for inspection and alteration. However, the expert mode presents a
far larger number of parameters. You should use expert mode with care. Both normal
mode and expert mode exclude those parameters that are deprecated or are specific to
resource scheduler or resource watcher stanzas.
The DMF pages allow you to edit the contents of existing stanzas; creating new
stanzas and deleting old ones is not supported. Also, some parameters can be
dangerous to change; these are displayed but may not be altered. This includes those
that control the search order of volume groups or media-specific processes (MSPs)
when recalling files.
To allow you to work around these restrictions, there is a page that allows the DMF
configuration file to be edited directly. You may find the dmf.conf(5) man page and
the DMF 4 Administrator’s Guide for SGI InfiniteStorage useful.
There is also a page that invokes the dmcheck command, which performs a syntax
and sanity check on a DMF configuration. You should run this after making any
changes.
Most common DMF configurations are supported; however, there are some
limitations. Specifically, the following are assumed to be true:
• The OpenVault mounting service is preferred. Ejection and injection of tape
volumes from and into a tape library is disabled if the Tape Management Facility
(TMF) is in use, but the other functions are supported for both OpenVault and
TMF.
• All tapes that are ejected and injected using the Appliance Manager interface are
for use by a DMF volume group or allocation group. Other tapes may reside in
the library, but they cannot be managed by the Appliance Manager pages.
• Each DMF library server only manages a single tape library. Appliance Manager
will refer to the library by using the name of the library server. Use of more than
one tape library per library server is not supported by the tape injection and
ejection pages.
• Each DMF drive group is associated with an OpenVault drive group or a TMF
device group of the same name.
007–4699–010
7
1: Overview
Licensing Requirements
Appliance Manager requires a license.
Additionally, the following software requires licenses if used:
• CXFS
• DMF
• Enhanced NFS
• XVM snapshot
8
007–4699–010
Chapter 2
Initial System Setup
This chapter describes how to use the Setup Wizard to perform the initial system
configuration:
• "Accessing the Setup Wizard" on page 9 discusses the Ethernet connections that
must be in place in order to run the Setup Wizard.
Note: Before running the Setup Wizard, ensure that the hardware setup
instructions have been completed and verified and that the machine has been
powered up. For information on system hardware setup, see your system’s Quick
Start Guide.
• "Using the Setup Wizard to Configure the System" on page 11 steps you through
the screens of the Setup Wizard.
• "Customizing Your Installation" on page 17 provides an overview of the
configuration tasks to customize the system for your specific needs after you have
finished using the Setup Wizard.
If you must reinstall Appliance Manger, see Appendix C, "Reinstalling Appliance
Manager After the Network is Configured" on page 117.
Accessing the Setup Wizard
To access the wizard, do the following:
1. Connect a cross-over Ethernet cable from a laptop or PC to the primary Ethernet
port on the storage server as described in the Quick Start Guide.
2. Launch a web browser to the following URL:
https://192.168.9.9:1178
007–4699–010
9
2: Initial System Setup
Note: You must temporarily reset the IP address of the laptop or PC to
192.168.9.1 for this to work correctly.
If you have just powered the system on, you may need to allow five minutes for
the system to boot up before the Setup Wizard will be accessible.
Appliance Manager requires the following:
• JavaScript
• One of the following browsers:
–
Internet Explorer 6.0 or later
–
Firefox 2.0 or later
3. Accept the security certificate:
• For Internet Explorer, click Yes to accept the security certificate
• For Firefox, click the radio button to accept the certificate permanently and
then click OK
Note: Appliance Manager generates its own SSL certificates, rather than having the
SSL certificates signed by a commercial certificate authority. Therefore, this warning is
safe to ignore.
The first time you boot the system, the web browser presents the Setup Wizard. After
you have completed initial system configuration with the Setup Wizard and restarted
the system, the web browser presents the Appliance Manager summary screen, from
which you can access all of the product features.
Note: Until you have run through the Setup Wizard, you will not be able to access
the rest of Appliance Manager.
When using the Setup Wizard, you may see warning or error messages when you
click Next after filling in the fields for a particular page. This happens when the
system detects a problem in what you have configured. When a warning message
appears, the system will still proceed to the next screen. When an error message
appears, the system remains on the current screen.
10
007–4699–010
®
SGI InfiniteStorage Appliance Manager User’s Guide
All of the initial system configuration you perform through the Setup Wizard can be
later modified using Appliance Manager, as described in Chapter 3, "Server
Configuration and Management", in the section "Global Configuration" on page 64 in
particular.
Using the Setup Wizard to Configure the System
The initial Setup Wizard screen is the Introduction screen, as shown in Figure 2-1.
The box at the left of the screen shows the steps that will be covered in order by the
Setup Wizard and your location within the steps.
Figure 2-1 Setup Wizard
007–4699–010
11
2: Initial System Setup
Systems come with one or more factory-preconfigured filesystems that take up the
entire space of the RAID device. On completion of the Setup Wizard, the
factory-preconfigured filesystems will automatically be configured to be exported and
shared via NFS and CIFS. Additionally, on SAN systems, the filesystems will be made
available via CXFS. The CXFS cluster is automatically created for you during the
setup process. Appliance Manager supports a CXFS cluster with a single metadata
server only. To configure the client-only nodes, see "CXFS Configuration" on page 59.
Note: There are situations that will require a different filesystem configuration than
the one that is preinstalled, which takes up the entire space of the RAID device. If
you plan to use the XVM snapshot feature or iSCSI targets, for example, you must
reserve space on the RAID device. For further information on creating filesystems, see
"Filesystems" on page 29.
Click Next to display the Passwords screen.
Passwords
On initial setup, the Passwords screen displays two sets of text boxes, allowing you to
enter and confirm the following:
• Appliance Manager administration password. This is the password you must
enter in order to perform web-based server configuration and management. The
password is not required to view the system monitoring screens.
• Command-line configuration password. This is the root password for the system
Note: You must enter password into the text boxes to continue with the setup
process.
Click Next to display the Network Interface screen.
Network Interface
The Network Interface screen lets you configure the network management interface
(eth0) for the system. For information, see "Network Interface Configuration" on
page 21.
12
007–4699–010
®
SGI InfiniteStorage Appliance Manager User’s Guide
!
Caution: If you configure an incorrect IP address for the management interface, you
can render the system inaccessible from the network.
The system is shipped with eth0 preconfigured as the management interface and a
static IP address of 192.168.9.9. This lets you plug a laptop into the storage server.
For information on other system settings (such as the default gateway), see "Global
Configuration" on page 64.
To configure network interfaces in addition to the management interface and to
configure bonded interfaces, you must complete the initial system setup and
customize your installation, as described in "Customizing Your Installation" on page
17.
Configure the following fields:
System name
Specifies the fully qualified domain name (FQDN) for
this storage server. The default hostname is
sgiserver.
Note: On SAN systems, you cannot change the
hostname via Appliance Manager after the Setup
Wizard completes because changing the hostname in a
CXFS cluster is disruptive. To change the hostname
later, you must use various CXFS and Linux
command-line tools.
007–4699–010
Workgroup
Specifies the NetBIOS workgroup to which the machine
should belong. The default is WORKGROUP. If you are
not using CIFS, you can ignore this setting.
Use DHCP
Specifies when checked that dynamic host configuration
protocol (DHCP) will be used to configure the Ethernet
interface. (Another system must be the DHCP server.)
For information on DHCP, see "Ethernet Network
Interfaces" on page 22. If you require a particular IP
address for the system, leave this box unchecked to use
static IP addressing.
IP address
Specifies the IP address for the system if you are not
using DHCP.
13
2: Initial System Setup
Subnet mask
Specifies the subnet mask to use for the system if you
are not using DHCP.
Default gateway
Specifies the default network gateway, which is the IP
address of the router that this system should use to
communicate with machines that are outside of its
subnet. See "System Name" on page 64.
This field can be left blank if either of the following is
true:
• The default gateway is supplied by a DHCP server
• All the machines that need to access the system are
in the same subnet
Click Next to display the DNS screen.
DNS
If you do not have a domain name system (DNS) server and use only an
/etc/hosts file, you can leave the fields on this screen blank and use Appliance
Manager to modify or import a host file. You can do this after you have completed
the initial system setup and restarted the system, as described in "Customizing Your
Installation" on page 17. For information on /etc/hosts files, see "DNS and
Hostnames" on page 69.
Configure the following fields:
Domain search
Specifies the domain name or names that the DNS
servers will use to resolve partial name queries. If you
have multiple domains, list them in the order you want
to use for lookup. This is important in cases where
there are two machines with the same name, each on a
different domain.
Nameserver #
Specifies up to three IP addresses for the DNS name
servers to use. If an address you specify is down, the
system will use the next one.
Click Next to display the Time and Date screen.
14
007–4699–010
®
SGI InfiniteStorage Appliance Manager User’s Guide
Note: If you specify one or more DNS servers, all name resolution will be provided
by the specified DNS servers (plus the contents of /etc/hosts) — Appliance
Manager adds mdns off to the /etc/host.conf file in order to force resolution
of .local names to go to the DNS server rather than using multicast DNS.
If you do not specify DNS servers during initial setup, the value of mdns in
/etc/host.conf will be untouched. If you specify DNS servers and then later
remove the DNS servers, mdns off will still be specified in /etc/host.conf. Only
.local names will be resolvable via multicast DNS (plus the contents of
/etc/hosts). You cannot use both DNS to resolve names and multicast DNS to
resolve .local domain names.
If you manually edit /etc/host.conf to force mdns on, Appliance Manager will
not change this setting provided that you do not specify any DNS servers via
Appliance Manger.
Time and Date
Use the Time and Date screen to set the following:
Time zone
Specifies the local time zone for Appliance Manager.
NTP enable
Enables automatic time synchronization with Network
Time Protocol (NTP). If the server has Internet access,
see the following website for information about using
the public NTP timeserver:
http://www.pool.ntp.org/
NTP servers
Specifies the NTP servers.
Click Next to display the Verify Configuration screen.
Verify Configuration
The Verify Configuration screen provides a summary of the configuration
information you have entered on the previous screens. For the SAN server, it also
shows the CXFS private network that is configured by default.
007–4699–010
15
2: Initial System Setup
Note: At this point in the process, the passwords you provided on the Passwords
screen have been implemented. If you click Previous to page back through the
screens in order to edit any of the information, the text boxes on the Passwords
screen will no longer be visible.
Click Next to apply this configuration. It takes several seconds for the configuration
to be applied; after the configuration changes are is complete, the Finished screen will
appear.
Finished
The Finished screen indicates that the configuration information you entered in the
Startup Wizard has been applied. After the software setup phase has completed,
Appliance Manager will require a restart.
If you need to modify the custom installation (for example, to add name services or
reconfigure the preinstalled filesystem), you will be able to do so after restarting the
system.
Click Next to restart the system and display the System Restart screen.
System Restart
The System Restart screen displays as the system is restarting and indicates the
Appliance Manager license entitlements and the browser address from which to
access Appliance Manager. Point your browser to the following address:
https://YOUR_SERVER:1178/
As the system is restarting, you should remove the cross-over cable and connect the
management interface into the local network.
Note: After you complete the initial hardware setup and reboot the system, you can
customize the installation as described in "Customizing Your Installation" on page 17.
16
007–4699–010
®
SGI InfiniteStorage Appliance Manager User’s Guide
Customizing Your Installation
After completing your system setup and restarting your system, you may need to
modify or complete your system installation through configuration procedures that
you perform directly with Appliance Manager.
The following aspects of system configuration require that you use Appliance
Manager to customize your system:
• Creating a different filesystem configuration than the one that is preinstalled. This
will be necessary if you plan to use the following features:
– XVM snapshots
– iSCSI targets
– CXFS
– DMF
To configure the system to use these filesystems and files, you must destroy the
preconfigured filesystems and create new filesystems. For information on
destroying and creating filesystems, see "Filesystems" on page 29.
• Configuring network interfaces in addition to the management interface. For
information on configuring network interfaces, see "Network Interface
Configuration" on page 21.
• Configuring bonded interfaces, which are virtual network interface that consists of
real interfaces working in tandem. A virtual interface can provide the aggregated
bandwidth of all of the interfaces that you used to create it. For information, see
"Bonded Network Interfaces" on page 25.
• Configuring local users and groups, as described in "User and Group
Configuration" on page 49.
• Modifying the /etc/hosts file. For information on /etc/hosts files, see "DNS
and Hostnames" on page 69.
• Configuring authentication services. For information on configuring Active
Directory, LDAP, or NIS for the system, see "Name Service Client" on page 65.
• Setting the time directly, as described in "Time and Date" on page 71.
007–4699–010
17
Chapter 3
Server Configuration and Management
This chapter describes how to use SGI InfiniteStorage Appliance Manager to configure
the various components of your system and perform general system administration:
• "Network Interface Configuration" on page 21 describes how to configure and
modify the network interfaces for the system
• "Storage Configuration" on page 28 describes how to configure filesystems,
filesystem snapshots, and iSCSI targets
• "DMF Configuration" on page 46 describes the Data Migration Facility (DMF)
tasks that you can perform
• "User and Group Configuration" on page 49 describes how to configure a name
service client, local users, local groups, and user and group quotas
• "NFS Configuration" on page 52 describes how to configure NFS to share
filesystems
• "CIFS Configuration" on page 57 describes how to configure CIFS to share
filesystems
• "CXFS Configuration" on page 59 describes how to configure CXFS client-only
nodes and manage the CXFS cluster
• "NDMP Configuration" on page 61 describes how to configure Network Data
Management Protocol (NDMP) for backups
• "SNMP Configuration" on page 62 describes how to configure basic Simple
Network Management Protocol (SNMP)
• "Global Configuration" on page 64 describes how to perform various general
administration functions
• "Operations" on page 72 describes how to save changes to the configuration files
and restore them, how to gather support and performance data, and shut down
the system
Figure 3-1 shows the top level Management screen.
007–4699–010
19
3: Server Configuration and Management
20
Figure 3-1 Management Screen
007–4699–010
®
SGI InfiniteStorage Appliance Manager User’s Guide
Network Interface Configuration
You can use Appliance Manager to configure and modify the network interfaces for
the system. When configuring the system, you must consider the difference between
the management interface and the remainder of the interfaces in the system.
The management interface is the first interface in the machine (eth0), which is
dedicated for use by Appliance Manager. On a NAS system, the remainder of the
interfaces in the system are used for fileserving. On a SAN system, the remainder of
the interfaces are preconfigured for the CXFS private network and connection to the
Fibre Channel switch.
!
Caution: Changing the network interface configuration for a SAN system can leave
the CXFS cluster inoperative. If you are required to change the configuration, you
must do so carefully by using the cxfs_admin command or the CXFS GUI. For more
information, see Appendix B, "How Appliance Manager Configures the CXFS Cluster"
on page 115 and CXFS 5 Administration Guide for SGI InfiniteStorage.
You can configure these ports as individual standalone ports or you can group these
ports together into a bonded network interface.
Bonding interfaces together gives you the aggregated bandwidth for multiple clients
of all of the interfaces that constitute the bonded interface. For most systems, this can
significantly increase performance over a system in which all of the interfaces are
configured as individual network ports.
For further information, see:
• "Management Interface" on page 22
• "Ethernet Network Interfaces" on page 22
• "InfiniBand Network Interfaces" on page 24
• "Bonded Network Interfaces" on page 25
!
007–4699–010
Caution: Ensure that the hardware settings are correct before you configure the
network interfaces. For information on hardware setting, see the Quick Start Guide for
your system.
21
3: Server Configuration and Management
Management Interface
When the system is shipped from the factory, the management interface has a
preconfigured IP address. When using the Setup Wizard, you connect a laptop to that
interface in order to perform the initial setup tasks. For information on the Setup
Wizard, see Chapter 2, "Initial System Setup" on page 9.
The management interface is always configured as an individual network interface
and cannot be part of a bonded interface.
You can modify the management interface by selecting eth0 from the following
screen:
Management
> Resources
> Network Interfaces
> Modify
For information on the network configuration parameters you can modify, see
"Ethernet Network Interfaces" on page 22.
!
Caution: If you configure an incorrect IP address for the management interface, you
can make Appliance Manager inaccessible.
Ethernet Network Interfaces
To see the available Ethernet network interfaces and change their parameters, select
the following:
Management
> Resources
> Network Interfaces
> Modify
To modify an interface, select it. You can change the following fields:
22
Enabled?
Enables the interface. You cannot disable the
management interface.
Speed
Displays the port speed of the Ethernet card, which is
usually Autonegotiate.
007–4699–010
®
SGI InfiniteStorage Appliance Manager User’s Guide
Duplex
Displays the duplex of the Ethernet connection, which
is usually Autonegotiate.
Automatic discovery
by DHCP
Specifies that dynamic host configuration protocol
(DHCP) will be used to configure the Ethernet interface.
(Another system must be the DHCP server.)
Static
Specifies that a particular IP address is required for the
network interface. If you select this, you must provide
the IP address and subnet mask.
Dedicated
Specifies the local and remote IP address for a
dedicated network connection between the storage
server and another host, for example a dedicated
VLAN network or single point-to-point network cable.
A dedicated network interface is an interface, such as
eth2, that has been configured to use a point-to-point
connection with a single remote host. All network
traffic to and from that server will go via the local
dedicated network interface and no other traffic will
appear on that interface.
Dedicated network interfaces can be useful when there
may be a large amount of network traffic to a specific
host and you wish to prevent interference with other
network traffic to other hosts.
Note: Dedicated interfaces are an advanced option that
may require configuration changes to the network
infrastructure and on the remote host. You should only
use dedicated interfaces if they are specifically required.
007–4699–010
23
3: Server Configuration and Management
InfiniBand Network Interfaces
To see the available InfiniBand network interfaces and change their parameters, select
the following:
Management
> Resources
> Network Interfaces
> Modify
To modify an interface, select it. You can change the following fields:
Enabled
Enables the interface.
Automatic discovery
by DHCP
Specifies that dynamic host configuration protocol
(DHCP) will be used to configure the Ethernet interface.
(Another system must be the DHCP server.)
Static
Specifies that a particular IP address is required for the
network interface. If you select this, you must provide
the IP address and subnet mask.
Dedicated
Specifies the local and remote IP address for a
dedicated network connection between the storage
server and another host, for example a dedicated
VLAN network or single point-to-point network cable.
A dedicated network interface is an interface that has been
configured to use a point-to-point connection with a
single remote host. All network traffic to and from that
server will go via the local dedicated network interface
and no other traffic will appear on that interface.
Dedicated network interfaces can be useful when there
may be a large amount of network traffic to a specific
host and you wish to prevent interference with other
network traffic to other hosts.
24
007–4699–010
®
SGI InfiniteStorage Appliance Manager User’s Guide
Note: Dedicated interfaces are an advanced option that
may require configuration changes to the network
infrastructure and on the remote host. You should only
use dedicated interfaces if they are specifically required.
Bonded Network Interfaces
A bonded interface is a virtual network interface that consists of real interfaces
working in tandem. You use bonded interfaces on NAS systems to increase
bandwidth to NFS and CIFS clients. (It does not apply to CXFS clients because they
are connected via Fibre Channel.)
A virtual interface can provide the aggregated bandwidth of all of the interfaces that
you used to create it.
Note: Any single client can achieve the bandwidth of only a single interface at a time.
A bonded interface increases the aggregate bandwidth for multiple clients.
For example, if you have three interfaces each with a bandwidth of 10, the aggregate
bandwidth is 30. For an individual client, however, the maximum bandwidth remains
10. When additional clients access the bonded interface, the clients are assigned to the
subinterfaces, and up to three clients can use a bandwidth of 10 at the same time.
Thus multiple clients accessing the system increase the aggregate bandwidth,
improving the performance to a maximum bandwidth of 30.
For example, Figure 3-2 shows a configuration in which all clients connect to a single
IP address (192.168.0.3). The switch is responsible for sharing the load across 4
bonded interfaces (eth1--eth4). Therefore, 4 times as many clients can
communicate with the same server without a loss in overall performance.
007–4699–010
25
3: Server Configuration and Management
Interfaces
NAS
server
Clients
Switch
192.168.0.3
Management interface
eth0 192.168.1.2
192.168.0.10
eth1
eth2
192.168.0.3
192.168.0.11
eth3
eth4
bond0
192.168.0.3
192.168.0.3
192.168.0.12
Figure 3-2 Bonded Network Interfaces
Output load balancing controls how the server chooses which subinterface to send
replies. Input load balancing controls how clients are assigned to subinterfaces, and
how and when clients are moved from one subinterface to another. Load balancing
happens on a per-packet basis. When a client sends a packet, it traverses a switch,
which determines at which subinterface the packet arrives. Input load balancing
ensures that each client arrives at a different subinterface. The clients see only one
interface because the balancing is done by the system.
In addition to configuring a bonded interface in Appliance Manager, you must
configure the ports on the switch so that they use either static trunking or 802.3ad
dynamic trunking. For more information, refer to the user manual for your switch.
To create a bonded interface, select the following:
Management
> Resources
> Network Interfaces
> Create a bonded interface
The available interfaces are displayed for selection.
26
007–4699–010
®
SGI InfiniteStorage Appliance Manager User’s Guide
When you configure a bonded interface, you specify the following:
Available interfaces
Specifies the interfaces to be used.
Bonding mode
Selects a bonding mode that governs the relation of the
subinterfaces to a switch and defines the protocol that
is used for assigning network switch ports to a bonded
interface:
• Dynamic 802.3ad uses the 802.3ad protocol to
communicate with the switch and automatically
bond the appropriate switch ports together. You
may need to configure your switch to enable the
802.3ad protocol on a range of switch ports or for
the switch as a whole.
• Static requires that the switch be manually
configured to bond specific switch ports together.
Your choice depends upon what your switch supports:
• If your switch supports the 802.3ad protocol, choose
dynamic bonding.
• If your switch only supports manually grouping
ports together in a bond, choose static bonding.
• If your switch does not support any bonding, you
must configure all your network interfaces as
separate individual interfaces.
007–4699–010
27
3: Server Configuration and Management
Output Load Balancing
Specifies how the server chooses which subinterface to
send replies:
• Layer 3 (IP header) specifies that the server and
client are on different subnets.
• Layer 2 (MAC address) specifies that all packets
sent to the clients use separate MAC addresses. This
option is more efficient than Layer 3 (IP header).
Use this option only if the clients are in the same
broadcast domain as the server.
Note: Do not select this option if the switch
immediately upstream of the server is acting as a
router rather than a switch (that is, making packet
routing decisions at Layer 3 rather than Layer 2) or
if the clients are in a different subnet and you have
another router between the server and clients.
IP address
Specifies the IP address of the new bonded interface.
The IP address for a bonded interface must be
configured statically. Appliance Manager does not
support DHCP and dedicated IP addresses for bonded
interfaces.
Subnet mask
Specifies the subnet mask of the new bonded interface.
All configured network interfaces should be on
different subnets.
Click Apply Changes to create the bond.
Storage Configuration
You can use Appliance Manager to configure the following:
• XFS filesystems (CIFS/NFS)
• CXFS clustered filesystems (license required)
• iSCSI targets
• XVM filesystem snapshots (license required)
28
007–4699–010
®
SGI InfiniteStorage Appliance Manager User’s Guide
These features are available under the following menu selection:
Management
> Resources
> Storage
The following sections describe these features:
• "Filesystems" on page 29
• "iSCSI" on page 36
• "Snapshots" on page 43
Filesystems
This section describes the following:
• "Listing Filesystems" on page 29
• "Creating Filesystems" on page 30
• "Growing Filesystems" on page 34
• "Destroying Filesystems" on page 35
• "Discovering Filesystems" on page 35
For background information about how Appliance Manager works, see Appendix A,
"How Appliance Manager Configures Filesystems" on page 107.
Listing Filesystems
To display a brief description of the RAID to which Appliance Manager is connected,
use the List option:
Management
> Resources
> Storage
> Filesystems
> List
This includes the worldwide name (WWN) of the RAID device and an indication of
the RAID status, which will be ONLINE unless a hardware or software failure mode
007–4699–010
29
3: Server Configuration and Management
has prevented communication between Appliance Manager and the array firmware
(such as if the array is powered down or a cable has been pulled out).
Appliance Manager will list filesystems under the following categories, depending on
their current state:
Configured Filesystems
Filesystems created by Appliance Manager and
filesystems that are able to be managed by Appliance
Manager
Unconfigured
Filesystems
Filesystems that are able to be managed by Appliance
Manager but are not currently fully configured
Unmanaged
Filesystems
Filesystems that are not manageable by Appliance
Manager, such as manually created filesystems
The Type field on this screen indicates whether the listing is a filesystem, a snapshot
repository, iSCSI storage, or available space.
Note: Unconfigured filesystems and unmanaged filesystems will show an
approximate capacity (indicated by the ~ character) if they are not currently mounted.
If you have created a snapshot repository but have not scheduled any snapshots to be
taken and stored on that repository, its size will appear as 0 on this display.
To discover unconfigured filesystems, click the Reconfigure Unconfigured
Filesystems link on this page. See "Discovering Filesystems" on page 35.
Creating Filesystems
Note: To create a filesystem, all the storage arrays chosen to contain the filesystem
must be supported by Appliance Manager. For best results, SGI recommends that the
arrays are symmetrical with respect to the number of drives and trays installed as
well as the type of drives installed — such as Serial Attached SCSI (SAS), Serial ATA
(SATA) or Fibre Channel (FC) — and the speed/size of the drive.
The Create option steps you through a filesystem creation wizard. The steps that the
wizard will take are listed in a box to the left of the screen, with the current step
highlighted.
The filesystem creation procedure is mostly automatic. You provide the name, size,
and general characteristics of the filesystem to create and Appliance Manager
30
007–4699–010
®
SGI InfiniteStorage Appliance Manager User’s Guide
determines the underlying layout of the filesystem on the disk devices. For
information on how Appliance Manager calculates the allocation of disk resources,
see Appendix A, "How Appliance Manager Configures Filesystems" on page 107.
There is a limit to the number of filesystems on a particular array. This limit is fewer
than 30 filesystems for a 4-tray array, but it can be smaller on large arrays (because
each filesystem will use 2 or 3 of the total 254 LUN numbers per tray of disks in the
array). The number of filesystems and repositories that you can create depends on the
make and model of the storage arrays that are connected. Some arrays are capable of
supporting up to 254 LUN numbers, but others support only 31 or fewer. The
number of LUN numbers consumed by a filesystem/repository depends upon the
number of disks and the size of the disks and trays that are connected to the storage
array. SGI recommends that you create as few filesystems as possible in order to save
LUN numbers (which can later be utilized to grow the filesystem) and because the
storage subsystem performs better with fewer filesystems configured.
Note: When you create the filesystem, the system detects whether the disk
configuration is supported and issues a warning if it is not. You can continue to
create the filesystem under these circumstances, but the filesystem will not be an
efficient one.
You can grow an XFS filesystem after you have created it, by whatever size you
choose. It is most efficient, however, if you create a filesystem that fills the disk array
and add additional disks if you need to grow the filesystem, filling those disks when
you do.
Perform the following steps to create a filesystem:
1. Select the Create option:
Management
> Resources
> Storage
> Filesystems
> Create
2. Appliance Manager searches for the RAID arrays on the system and displays
them on the Arrays screen. If you have more than one storage array, a list of
arrays will be presented and you can chose on which arrays the filesystem should
be created. Selecting more than one array will result in a filesystem that spans the
selected arrays. Spanning filesystems across multiple arrays is possible only for
external storage arrays (the SGI InfiniteStorage series). Click Next.
007–4699–010
31
3: Server Configuration and Management
3. The Options screen displays the filesystem configuration options. These are based
on the devices that are available to the system and include the following
categories:
Drive type
Specifies the drive type: Serial Attached SCSI
(SAS), Serial ATA (SATA) or Fibre Channel (FC).
You cannot create a filesystem that spans multiple
types of disks.
Goal
Specifies the goal of the filesystem optimization.
You can select a filesystem optimized for
performance or capacity (if appropriate for your
system). If you select for capacity, Appliance
Manager will use all the available disk space to
create the filesystem, although this will usually
come at the cost of slower performance.
Workload
Selects the workload type. You can select a
filesystem optimized for bandwidth or for I/O per
second (IOPS). Select Bandwidth when you will
have a small set of files and you must perform
streaming reads and streaming writes as fast as
possible. Select IOPS when you will be performing
random reads and writes to different sets of files.
Normally, IOPS will be the better choice.
If you are optimizing for IOPS, it is best to build
one large filesystem. In general, there is a cost to
having multiple filesystems.
Available Space
Displays the available space in gigabytes (GiB, 1024
megabytes).
Click Next.
4. On the Purpose screen, select whether the filesystem will be a clustered CXFS
filesystem or an XFS filesystem. The Purpose screen will appear if Appliance
Manager is managing a SAN (CXFS) system or if DMF is installed. Depending on
the existence of CXFS and DMF, you will be asked if you want to create a clustered
CXFS filesystem or a local XFS filesystem, and with or without DMF support. The
DMF filesystem option will create the filesystem with 512–byte inodes, and the
dmapi and mtpt mount options as required for DMF support. (It will not add
the filesystem to the DMF configuration file; you must do this later manually.)
For more information about DMF, see "DMF Configuration" on page 46.
32
007–4699–010
®
SGI InfiniteStorage Appliance Manager User’s Guide
5. On the Name & Size screen, enter the following:
• Filesystem mount point (must be begin with /mnt/ as shown).
• Filesystem size in gigabytes.1 The default filesystem size is the size of a
filesystem that will completely fill the disk devices. If you choose less than
this maximum size, the filesystem will be divided up among the disks. For
example, if you create a filesystem that is 20% of the maximum size, it will be
spread out among the first 20% of each disk. If you create a second filesystem
that is also 20% of that maximum size, it will be spread out among the second
20% of each disk.
Note: If you plan to use the XVM snapshot feature, you should ensure that
the filesystem capacity entered will leave enough remaining free capacity to
create a snapshot repository. For further information, see "XVM Snapshots" on
page 6.
XVM snapshots are not available on DMF or CXFS filesystems.
• Optional snapshot repository size. The size of the repository that you will
need depends on several factors:
–
The size of the filesystem for which you are creating a snapshot. A
repository that is approximately 10% of this size is a reasonable starting
estimate.
–
The volatility of the data in the volume. The more of the data that changes,
the more room you will need in the repository volume.
–
The snapshot frequency. (More frequent snapshots results in smaller
individual snapshots.)
Click Next.
6. The Confirmation screen summarizes the filesystem options you have selected.
Click Next to confirm your choices and create the filesystem.
7. The Create filesystem screen displays a "please wait" message and transitional
status during the filesystem creation process. Click Next after the operation is
finished and the completion message displays.
1
GiB, 1024 megabytes
007–4699–010
33
3: Server Configuration and Management
8. The Create repository screen (if you have chosen to create a snapshot repository)
displays a "please wait" message and transitional status during the filesystem
creation process. Click Next after the operation is finished and the completion
message displays.
9. The NFS and CIFS screen lets you configure the filesystem so that it can be
exported with NFS or CIFS network protocols. (If you NFS export and/or CIFS
share a CXFS filesystem, it will only be exported/shared from the CXFS metadata
server, not from CXFS clients.) 2 For information, see "NFS Configuration" on
page 52 and "CIFS Configuration" on page 57. Click Next.
10. The Finished screen indicates that the filesystem has been created. Click Done.
Growing Filesystems
Note: You cannot use Appliance Manager to grow a CXFS filesystem.
You can use a filesystem normally as you grow it. (You do not need to disable access
or unmount it, or take any other special actions before growing the filesystem.)
To increase the size of an existing XFS filesystem, do the following:
1. Select the Grow option:
Management
> Resources
> Storage
> Filesystems
> Grow
2. The Filesystem screen lists the current filesystems along with their usage and
size. Select the filesystem you want to grow and click Next.
3. The Size screen lets you enter the size in gigabytes3
should be grown. Click Next.
by which the filesystem
4. The Confirmation screen displays the current size of the filesystem and the
amount to grow the filesystem. Click Next.
2
3
34
Metadata is information that describes a file, such as the file’s name, size, location, and permissions.The metadata server is
the node that coordinates the updating of metadata on behalf of all nodes in a cluster.
GiB, 1024 megabytes
007–4699–010
®
SGI InfiniteStorage Appliance Manager User’s Guide
5. The Growing screen displays a "please wait" message during the growing process.
Click Next after the operation is finished and the completion message displays.
6. The Finished screen indicates that the larger filesystem is available. Select Done.
Destroying Filesystems
To delete a filesystem, do the following:
1. Select Destroy:
Management
> Resources
> Storage
> Filesystems
> Destroy
This screen displays a list of the existing filesystems.
2. Select a filesystem from the list. A message indicates that all data on the specified
filesystem will be destroyed.
3. Confirm that you want to destroy the filesystem and select Yes, destroy the
filesystem.
On completion, a SUCCEEDED message appears.
Discovering Filesystems
To discover lost or unconfigured filesystems, select Discover:
Management
> Resources
> Storage
> Filesystems
> Discover
The disk names of configured filesystems are shown in italics.
To reconfigure an unconfigured filesystem, select its check box from the list of
detected volumes and click Configure Selected.
007–4699–010
35
3: Server Configuration and Management
After the discovery process has completed, configuration results are displayed for
each filesystem configured. Newly discovered filesystems that were successfully
configured are now available for use.
iSCSI
Internet Small Computer Systems Interface (iSCSI) is a protocol that is used to transport
SCSI commands across a TCP/IP network. This allows a system to access storage
across a network just as if the system were accessing a local physical disk. To a client
accessing the iSCSI storage, the storage appears as a disk drive would appear if the
storage were local.
In an iSCSI network, the client accessing the storage is called the initiator and runs
iSCSI Initiator software. The remote storage that the client accesses is called the target,
which is what appears to the initiator as a disk drive.
A common application of an iSCSI network is to configure an Exchange Server as an
iSCSI initiator that uses an iSCSI target as its mail store.
Figure 3-3 illustrates iSCSI storage. Each client (initiator) is configured to connect to a
specific iSCSI target (an area allocated in the RAID iSCSI storage pool), and views this
target as if it were a local disk. The lines in Figure 3-3 indicate data flow.
36
007–4699–010
®
SGI InfiniteStorage Appliance Manager User’s Guide
RAID
iSCSI storage
target
target
NAS
server
Switch
Clients (initiators)
Data flow
Workstation
Data flow
Workstation
Data flow
Workstation
target
target
Data flow
Exchange
server
Figure 3-3 iSCSI Storage
You can use Appliance Manager to create iSCSI targets on the RAID storage. An
iSCSI initiator will be able to connect to the system and access those targets, format
them, and use the targets as it would use a disk drive.
You cannot configure Appliance Manager itself as an initiator, and you cannot
re-export iSCSI targets with NFS, CIFS, or CXFS. In addition, you cannot export
existing filesystems that you have created with Appliance Manager as iSCSI targets;
you can create filesystems and configure them to be exported by NFS, CIFS, or CXFS,
but you must configure iSCSI targets separately on the RAID device.
Note: Due to the nature of iSCSI as a block-level protocol (as distinct from file-level
protocols such as NFS and CIFS), particular care must be taken in the event of a
system crash, power failure, or extended network outage. See "Power Outage and
iSCSI" on page 103.
007–4699–010
37
3: Server Configuration and Management
This section discusses the following:
• "Creating iSCSI Pool and Targets" on page 38
• "The iSCSI Initiator" on page 41
• "Miscellaneous iSCSI Management" on page 42
Creating iSCSI Pool and Targets
You create iSCSI targets with a creation wizard, just as you create filesystems.
Perform the following steps to create an iSCSI target:
1. Select the Create Target option:
Management
> Resources
> Storage
> iSCSI
> Create Target
2. If this is the first target, the system will display a message indicating that you
must create the iSCSI storage pool before you can create a target.
Note: Although you can grow this storage pool at a later time when you create
additional targets, SGI recommends that you create a storage pool that is large
enough to contain all of the targets that you will need. Creating the iSCSI storage
pool can be a slow process, but once you have created the pool, creating the
targets themselves is a fast process.
If you have previously created iSCSI storage, you can grow the storage at this
time; in this case, the screen displays how much storage you have available.
To create or grow iSCSI storage, click Next and proceed to step 3. If you do not
need to create or grow iSCSI storage, select Skip this step and proceed to step 8.
3. Appliance Manager searches for the RAID arrays on the system and displays
them on the Arrays screen. Click Next.
4. The Options screen displays the iSCSI storage configuration options. For
information, see "Creating Filesystems" on page 30.
38
007–4699–010
®
SGI InfiniteStorage Appliance Manager User’s Guide
5. In the Size screen, enter the size in gigabytes4
Next.
for the iSCSI storage pool. Click
6. The Confirmation screen summarizes the options you have selected. Click Next
to confirm your choices and create the pool.
7. The Creating screen displays a "please wait" message during the target creation
process. Click Next after the operation is finished and the completion message
displays.
8. The Target Name screen lets you specify the target information. Enter the domain
and optional identifier for the iSCSI name and the size of the target in the
following fields:
Domain
Specifies an iSCSI qualified name (which is a unique
name that starts with iqn), then a year and month,
then an internet domain name in reverse order. A
default name appears based on the current system
configuration. If in doubt, leave this field as is.
Identifier
Specifies a string that will be used to uniquely
identify the target. If you create only one target,
this is optional. If you create more than one target,
each must have a unique identifier. By default, a
unique target identifier is provided for you.
Target Size (GiB)
Specifies the size, in gigabytes, of the target.
Click Next.
9. The Target Options screen defines access to the target. You must specify at least
one authentication option:
Note: If more than one initiator were to write to the same target at the same time,
there is a high risk of data loss. By using one or more authentication options, you
ensure that only one client (initiator) can access an individual target at a time.
4
GiB, 1024 megabytes
007–4699–010
39
3: Server Configuration and Management
• Authentication:
Initiator IP Address
Specifies the IP addresses of the initiators that
will be allowed access to this target
• Challenge Handshake Authentication Protocol (CHAP) authentication, in
which the initiator will supply the following information to the target:
Target Username
Specifies the username that the initiator must
supply to connect to the target using CHAP
authentication. (This is not the username with
which you logged in to Appliance Manager; it is
specific to the iSCSI target that you are defining.)
Target CHAP Secret
Specifies the password that the initiator must
supply to connect to the target using CHAP
authentication. It must be in the range from 12
through 16 characters. (This is not the password
with which you logged in to Appliance
Manager; it is specific to the iSCSI target you are
defining.)
Re-enter Target CHAP
Secret
Verifies the CHAP secret.
• Mutual CHAP authentication, in which the target will supply the following
information to the initiator:
Mutual Username
Specifies the target username for mutual CHAP
authentication. With mutual CHAP
authentication, after the initiator supplies a
username, the target must supply a username
and password back to the initiator. If you leave
the Mutual Username field blank, it defaults to
the target username.
The mutual name is usually ignored by
initiators, which only care about the mutual
secret. When the client connects to a target, the
iSCSI initiator software verifies that the mutual
secret specified in Appliance Manager matches
the secret specified in the initiator.
Mutual CHAP Secret
40
Specifies the mutual CHAP secret.
007–4699–010
®
SGI InfiniteStorage Appliance Manager User’s Guide
Note: This secret should be different from the
target CHAP secret.
Re-enter Mutual
CHAP Secret
Verifies the mutual CHAP secret.
You must enter the CHAP username and secret specified on this screen in the
iSCSI initiator software on the client in order for the initiator to be able to
authenticate with and connect to the target. For a Windows client, this is the
username and secret you enter in Microsoft’s iSCSI Initiator program.
10. The Confirm screen summarizes the target options you have selected. Click Next
to confirm your choices and create the iSCSI target.
11. The Finished screen indicates that the iSCSI target has been created. Select Done.
After you have created iSCSI targets, select the following to see what initiators are
connected to what targets:
Monitoring
> Clients
> iSCSI
The iSCSI Initiator
Appliance Manager lets you configure iSCSI targets for use by an iSCSI initiator, such
as the Microsoft iSCSI Software Initiator or the iSCSI initiator included with various
Linux and UNIX distributions.
After you have created an iSCSI target, you must configure the initiator on the client
system that will connect to the target. You must specify the following:
• Hostname of the storage server
• Target identifier
• Any CHAP authentication details you configured when creating the target (for
specific instructions, see the documentation supplied with your iSCSI initiator)
After the iSCSI initiator has connected to the target, the target will appear as a disk
drive on the client system and can then be formatted using the tools supplied with
the client operating system.
007–4699–010
41
3: Server Configuration and Management
The following is an example of configuring a Windows client (it assumes that you
have already created a target or targets):
1. Download the iSCSI Initiator from Microsoft’s web site
(http://www.microsoft.com/) and install it on the Windows client.
2. Open the iSCSI Initiator Control Panel applet.
3. Add the storage server to the list of Target Portals.
4. Select the iSCSI target to connect to from the Targets list and click Log On.
5. Specify CHAP authentication details in the Advanced settings.
6. Use the following tool to partition and format the target and assign a drive letter:
Start Menu
> Administrative Tools
> Computer Management
> Disk Management
Miscellaneous iSCSI Management
The iSCSI menu also provides the following management options:
42
List Targets
Lists the existing iSCSI targets.
Modify Target
Modifies the authentication settings you defined on the
Target Options screen when you created an iSCSI
target.
Destroy Target
Destroys an existing iSCSI target.
Destroy Storage Pool
Destroys the iSCSI storage pool on the RAID device
and all existing targets.
Stop/Start
Stops or starts the iSCSI service. If you are backing up
the system, taking iSCSI services offline ensures that the
data is in a consistent state.
007–4699–010
®
SGI InfiniteStorage Appliance Manager User’s Guide
Snapshots
This section discusses the following:
• "Schedule Snapshots" on page 43
• "Take a Snapshot" on page 45
• "List Snapshots" on page 45
Schedule Snapshots
To schedule how often the system will create a snapshot of a filesystem, do the
following:
1. Select the Schedule Snapshots menu:
Management
> Resources
> Storage
> Snapshots
> Schedule Snapshots
2. Select the filesystem for which you want to schedule snapshots.
3. Specify the following options:
Scheduled?
Specifies that a snapshot will take place for the filesystem.
Scheduled Snapshot Times
Specifies the hours at which a snapshot should take place. You
can select multiple boxes.
Custom Time Specification
Specifies the times and frequency that a snapshot should take
place (the minimum interval is 30 minutes). You can specify this
value using one of the following forms:
• Spelled out using the following syntax:
every XX minute/s|hour/s|day/s [from XX:XX to XX:XX]
007–4699–010
43
3: Server Configuration and Management
The specific times listed within brackets are optional. For
example:
every 1 hour
every 20 minutes from 8:00 to 22:00
every 4 days
• Exact times. For example:
12:45 23:00 9:30
• The word never, which disables snapshots.
Maximum number of snapshots
Specifies the maximum number of snapshots that will be retained
in the repository before the oldest snapshot is deleted when a
new snapshot is taken. By default, the system will retain 32
snapshots. The maximum number is 256. SGI recommends that
you use the default.
!
Caution: If you set the maximum number of snapshots to a
number lower than the current number of existing snapshots, old
snapshots will be deleted automatically.
Click Schedule snapshots to apply your settings.
4. Verify that you want to update the snapshot schedule by clicking Yes. (To return
to the previous screen, click No.)
Note: The system will delete the oldest snapshot if it determines that repository space
is running low.
Snapshots are made available in the /SNAPSHOTS directory of the base filesystem.
They are named according to the date and time at which they are taken. For example,
a snapshot might be named as follows:
/mnt/data/SNAPSHOTS/2006_07_30_113557_Sun
Windows clients can access snapshots using the Windows Shadow Copy Client. This
feature allows a Windows client to right-click a file or directory, select Properties, and
access previous snapshot version of the file. Windows 2000 and Windows XP users
44
007–4699–010
®
SGI InfiniteStorage Appliance Manager User’s Guide
should download and install the ShadowCopyClient.msi installer, which is
discussed at:
http://support.microsoft.com/kb/832217
Users with Windows 2003, Windows Vista, or later will already have this software
installed on their systems.
Take a Snapshot
To take a snapshot, do the following:
1. Select the Take Snapshot menu:
Management
> Resources
> Storage
> Snapshots
> Take Snapshot
2. Click on the filesystem name.
3. Confirm that you want to take the snapshot.
List Snapshots
To display whether or not snapshots have been enabled for a given filesystem and the
number currently available, select the List Snapshots menu:
Management
> Resources
> Storage
> Snapshots
> List Snapshots
To list all of the snapshots for a given filesystem, click on the filesystem name.
007–4699–010
45
3: Server Configuration and Management
DMF Configuration
The DMF Resources screens let you do the following:
• Stop/start DMF and tape daemons
• Enable/disable tape drives
• Import/export volumes from an OpenVault library (but not the Tape Migration
Facility, TMF)
• Empty a lost or damaged DMF tape
• Alter DMF configuration parameters
• Audit the databases
This section discusses the following:
• "Tape Volume and Drive Screens" on page 46
• "Emptying a Lost or Damaged Tape Volume" on page 47
• "DMF Configuration Screens" on page 47
Tape Volume and Drive Screens
Appliance Manager supports most common DMF configurations. There are some
limitations to this support, however. Specifically, the following are assumed to be true:
• The OpenVault mounting service is preferred. Ejection and injection of tape
volumes from and into a tape library is disabled if TMF is in use, but the other
functions are supported for both OpenVault and TMF.
• All tapes that are ejected and injected using Appliance Manager are for use by a
DMF volume group or allocation group. Other tapes may reside in the library, but
they cannot be managed by Appliance Manager.
• Each DMF library server manages only a single tape library. Appliance Manager
refers to the library by using the name of the library server. Use of more than one
tape library is not supported.
• Each DMF drive group is associated with an OpenVault drive group or a TMF
device group of the same name.
46
007–4699–010
®
SGI InfiniteStorage Appliance Manager User’s Guide
Emptying a Lost or Damaged Tape Volume
The Empty Tape Volume screen uses the herr, hvfy, and hlock DMF database flags
to record the progress of the emptying procedure. If you use the dmvoladm(8)
command to inspect the database entry for a tape while it is being emptied, you may
see unexpected settings of these flags. Appliance Manager’s use of these flags does
not interfere with DMF’s.
Appliance Manager does not make any use of the VOL database flags reserved for
site use, although the Import and Export screens do allow you to manipulate them.
The Empty Tape Volume screen’s Empty Volume, Remove Volume, and Reuse
Volume options cannot remove soft-deleted files from a tape volume, unlike the
Merge Volume button. You must wait until they have been hard-deleted by the
scheduled run_hard_deletes.sh task or by the dmhdelete(8) command.
Also, these three buttons may need access to the output file from the previous run of
the scheduled run_filesystem_scan.sh task or the dmscanfs(8) command. If it
cannot be found or is older than the files remaining on the tape, some files may be
misreported in the Alerts screen as soft-deleted and remain on the tape as described
above. Trying again after the next run of run_filesystem_scan.sh is likely to
succeed in this case.
For more information, see the dmemptytape(8) man page for more information.5
DMF Configuration Screens
You can use the DMF Configuration screens to inspect and modify various DMF
parameters.
For initial configuration of DMF, use the Edit link:
Management
> Resources
> DMF
> Configuration
> Edit
This link allows you to directly modify the configuration file or import another
configuration file.
5
You can access man pages and books from the SGI Technical Publications Library at http://docs.sgi.com.
007–4699–010
47
3: Server Configuration and Management
!
Caution: You must ensure that the changes you make are safe. For more information,
see the dmf.conf(5) man page and the DMF 4 Administrator’s Guide for SGI
InfiniteStorage.)
The Check link allows you to perform syntax and sanity checks on the current
configuration of DMF:
Management
> Resources
> DMF
> Configuration
> Check
SGI recommends that you use the Check link after making any modification to ensure
that the changes are safe.
The Global link displays parameters for all of DMF:
Management
> Resources
> DMF
> Configuration
> Global
If you click Switch to Expert Mode on the Global page, Appliance Manager presents
more parameters. You should use expert mode with care. To return to normal mode,
click Switch to Normal Mode. Excluded from both modes are parameters that are:
• Deprecated
• Specific to the Resource Scheduler or Resource Watcher stanzas
To work around these restrictions, the Edit link allows you to edit the DMF
configuration file directly.
The other links provide quick access to commonly altered parameters of
already-configured features. You should make changes with care. Parameters that can
be dangerous to change are displayed but may not be altered; this includes those
parameters that control the search order of volume groups and media-specific
processes (MSPs) when recalling files.
48
007–4699–010
®
SGI InfiniteStorage Appliance Manager User’s Guide
Note: On the DMF Configuration screens, disk sizes use multipliers that are powers
of 1000, such as kB, MB, and GB. This is for consistency with the DMF documentation
and log files. However, the rest of Appliance Manager, including the DMF Monitoring
screens, use multipliers that are powers of 1024, such as kiB, MiB, and GiB.
User and Group Configuration
Appliance Manager lets you configure local users, local groups, and user and group
quotas:
• "Local Users and Groups" on page 49
• "Quotas" on page 50
Local Users and Groups
Appliance Manager can create and add local user and group accounts to access the
storage server locally. This is a local database only; these users and groups do not
interact with the users and groups provided by the name server. If you search the site
directory and do not find the user or group data you are looking for, the system
searches this local database. The local user accounts will be used for authentication
for CIFS shares if you are not using LDAP or Active Directory authentication.
!
Caution: If you create a local user and subsequently add that user in the sitewide
directory, access problems may result. For example, if you create local user Fred with
a UID of 26, Fred will be able to create local files. But if you subsequently add a
user Fred on a sitewide name services directory with a different UID, user Fred will
be unable to access those local files because the system will use the sitewide name
and UID first.
If you are using LDAP or Active Directory as a name service client, a user must be
present in LDAP or Active Directory and you will not be able to authenticate local
users and groups. In this case, adding local users and groups may be useful for ID
mapping, but authentication does not use the local password files.
When you select the Import option for either Local Users or Local Groups, you can
choose among the following actions:
007–4699–010
49
3: Server Configuration and Management
• Add the new users and groups. If there is an existing user or group with one of
the names you are adding, keep the existing user or group.
• Add the new users. If there is an existing user or group with one of the names
you are adding, replace the existing user or group with the new user or group.
• Replace all current unrestricted users or groups with the new users or groups.
Accounts with a UID or GID of less than 1000 are considered restricted and are not
imported or replaced.
If you use a shadow file, which is a file that is protected from all access by non-root
users and stores the encrypted passwords, then you can use the Import Users screen
to import this file as well as the password file itself.
Quotas
Appliance Manager will create new filesystems with both user and group quotas
enabled by default.
This section discusses the following:
• "User Quotas" on page 50
• "Group Quotas" on page 51
• "Applying Quotas to Filesystems Created with Earlier Versions of Appliance
Manager" on page 52
User Quotas
You can use the following screen to specify the user for whom you want to modify
quotas:
Management
> Resources
> Users & Groups
> User Quotas
Enter the name of the user and click Submit. (To modify the default for user quotas,
leave the field blank.) The following screen displays the current amount of disk space
that can be used (disk limits, in KiB) and the number of files that can be owned (file
limits):
50
007–4699–010
®
SGI InfiniteStorage Appliance Manager User’s Guide
• The soft limit is the number of 1–KiB blocks or the number of files that the user is
expected to remain below. If a user hits the soft limit, a grace period of 7 days will
begin. If the user still exceeds the soft limit after the grace period expires, the user
will not be able to write to that filesystem until he or she removes files in order to
reduce usage.
• The hard limit is the number of 1–KiB blocks or the number of files that the user
cannot exceed. If a user’s usage reaches the hard limit, he or she will be
immediately unable to write any more data.
Note: The administrator can set quotas for the root user. However, instead of
enforcing these quotas against the root user specifically, they will apply to all users
that do not have their own quotas set. In other words, setting quotas for the root
user will set the default quotas for all normal users and groups. (The actual root
user is exempt from quota limits.)
Group Quotas
You can use the following screen to specify the group for which you want to modify
quotas:
Management
> Resources
> Users & Groups
> Group Quotas
Enter the name of the group and click Submit. (To modify the default for group
quotas, leave the field blank.) The following screen displays the current amount of
disk space that can be used (disk limits, in KiB) and the number of files that can be
owned (file limits):
• The soft limit is the number of 1–KiB blocks or the number of files that the group
is expected to remain below. If any user in that group hits the soft limit, a grace
period of 7 days will begin. If the user still exceeds the soft limit after the grace
period expires, the user will not be able to write to that filesystem until he or she
removes files in order to reduce usage.
• The hard limit is the number of 1–KiB blocks or the number of files that the group
cannot exceed. If the usage for a user in that group reaches the hard limit, he or
she will be immediately unable to write any more data.
007–4699–010
51
3: Server Configuration and Management
Note: The administrator can set quotas for the root group. However, instead of
enforcing these quotas against the root group specifically, they will apply to all
groups that do not have their own quotas set. In other words, setting quotas for the
root group will set the default quotas for all normal groups. (The actual root user
is exempt from quota limits.)
Applying Quotas to Filesystems Created with Earlier Versions of Appliance Manager
If you want to apply quotas to filesystems created with earlier versions of Appliance
Manger, do the following:
1. Use the ssh command to log in to the system.
2. Edit the /etc/fstab file.
For example, suppose you originally have the following:
/dev/lxvm/data /mnt/data xfs rw,logbufs=8,logbsize=64K 0 0
You would change it to the following:
/dev/lxvm/data /mnt/data xfs rw,uquota,gquota,logbufs=8,logbsize=64K 0 0
3. Reboot the system to apply your changes.
NFS Configuration
To configure filesystems so that they are available for network clients by means of the
NFS network protocol, select the following:
Management
> Services
> NFS
This screen displays a link for Global Options and all of the filesystems that have
been created with Appliance Manager, whether or not they have been enabled for
export.
52
007–4699–010
®
SGI InfiniteStorage Appliance Manager User’s Guide
To specify NFSv4 options, select Global Options. To change the export options, select
an individual filesystem name or All Filesystems. See:
• "Global Options" on page 53
• "Export Options" on page 54
Note: Reverse lookup for NFS clients must be properly configured in the DNS server.
Global Options
The Global Options screen lets you specify the following:
Enable NFSv4
Specifies whether NFSv4 is enabled (checked) or not. If
enabled, an NFS exported filesystem will be accessible
via both NFSv3 and NFSv4. The following fields are
only relevant if you have enabled NFSv4.
NFS serving domain
Specifies the serving domain. If NFSv4 is enabled, the
mapping of user/group IDs between the client and
server requires both to belong to the same NFS serving
domain.
Enable Kerberos
Specifies whether Kerberos is enabled (checked) or not.
Enabling Kerberos forces encrypted authentication
between the NFS client and server. Furthermore, the
NFS exported filesystems will only be accessible to a
Kerberos enabled client via NFSv4. The following fields
are only relevant if you have enabled Kerberos.
Note: Appliance Manager supports Kerberos 5. You
must use a mechanism to synchronize the time between
all systems.
007–4699–010
Realm
Specifies the Kerberos realm in which the NFSv4 server
operates.
Domain
Specifies the DNS domain name that corresponds to the
realm.
KDC
Specifies the key distribution center (KDC). In most
cases, the KDC will be the same system as the Kerberos
53
3: Server Configuration and Management
admin server. However, if the admin server in your
Kerberos environment is not used for granting tickets,
then set the KDC to the system that grants tickets.
Admin Server
Specifies the server containing the master copy of the
realm database.
Keep Existing Keytab
Select this radio button to keep the existing keytab
without changes.
Update Keytab
Select this radio button to change the principal user and
password for the existing keytab.
Principal
Specifies a user that belongs to the Kerberos server with
sufficient privileges to generate a keytab for the NFS
server.
Password
Specifies the principal’s password.
Upload Keytab
Copies the selected file to /etc/krb5.keytab on the
NFS server. Click Browse to see a list of available files.
Verify Keytab
Specifies that the keytab should be verified. This is not
supported by Active Directory.
Export Options
You can choose to export or not export a filesystem by clicking the check box. When
you enable a filesystem for export, you can do one of the following:
• "Use Export Options" on page 54
• "Use a Custom Definition" on page 56
After specifying the configuration parameters, click Apply changes.
Use Export Options
If you select Use export options, you must specify the following:
54
Read-only
Specifies that the client has access to the filesystem but
cannot modify files or create new files.
Asynchronous writes
Specifies whether or not to use asynchronous writes.
Data that is written by the client can be buffered on the
server before it is written to disk. This allows the client
to continue to do other work as the server continues to
write the data to the disk.
007–4699–010
By default, writes are performed synchronously, which
ensures that activity on the client is suspended when a
write occurs until all outstanding data has been safely
stored onto stable storage.
®
SGI InfiniteStorage Appliance Manager User’s Guide
Allow access from
unprivileged ports
Allows access for Mac OS X clients or other NFS clients
that initiate mounts from port numbers greater than
1024. If there are no such clients on your network,
leave this option unchecked.
All hosts
Allows connections from anywhere on a network.
Local subnet
Allows connections from the indicated subnet. You can
select any subnet from those that have been defined for
the network interfaces.
Kerberos aware clients
(krb5)
Allows connections only from those systems that are
Kerberos aware (if Kerberos is enabled in "Global
Options" on page 53) over NFSv4.
Kerberos with
Integrity support
aware clients (krb5i).
Allows connections only from those systems that are
Kerberos with Integrity support aware (if Kerberos is
enabled in "Global Options" on page 53) over NFSv4
Restrict to hosts
Specifies the set of hosts that are permitted to access the
NFS filesystem. You can specify the hosts by hostname
or IP address; separate values with a space or tab. For
example, you could restrict access to only the hosts on a
Class C subnet by specifying something like the
following:
150.203.5
To allow hosts of IP address 150.203.5.* and
myhost.mynet.edu.au, specify the following:
150.203.5. myhost.mynet.edu.au
You can also specify hosts by network/subnet mask
pairs and by netgroup names if the system supports
netgroups.
To allow hosts that match the network/subnet mask of
150.203.15.0/255.255.255.0, you would specify
the following:
50.203.15.0/255.255.255.0
007–4699–010
55
3: Server Configuration and Management
To allow two hosts, hostA and hostB, specify the
following:
hostA hostB
Note: Access still requires suitable user-level
passwords. The localhost address 127.0.0.1 will
always be allowed.
Use a Custom Definition
If you select Use custom definition, you can enter any NFS export options that are
supported in the Linux /etc/exports file.
For example, the following entry gives 192.168.10.1 read-write access, but
read-only access to all other IP addresses:
192.168.10.1(rw) *(ro)
Note: There cannot be a space between the IP address and the export option.
For information on the /etc/exports file, see the exports(5) man page. 6
6
56
You can access man pages from the SGI Technical Publications Library at http://docs.sgi.com.
007–4699–010
®
SGI InfiniteStorage Appliance Manager User’s Guide
CIFS Configuration
To configure filesystems so that they are available for network clients by means of the
CIFS network protocol, select the following:
Management
> Services
> CIFS
All of the filesystems created with Appliance Manager are displayed on this screen,
whether or not they have been enabled for sharing. To share a file, select it and click
the Shared? box.
Specify the following Share Options:
Share name
Specifies the name under which the filesystem will
appear to a Windows client, as displayed in its
Network Neighborhood.
Comment
Specifies an arbitrary string to describe the share.
Read-only
Specifies that the client has access to the filesystem but
cannot modify files or create new files.
Allow guest users
Specifies that users can gain access to the CIFS
filesystem without authenticating. Uncheck this option
to allow connections only to valid users.
By default, the CIFS protocol requires a password for
authentication. If you are configured as an Active
Directory client, then the authentication is distributed.
See "Active Directory" on page 65.
007–4699–010
Always synchronize
writes
Ensures that write activity on the client is suspended
when a write occurs until all outstanding data has been
safely stored onto stable storage. If you do not check
this box, data that is written by the client can be
buffered on the server before it is written to disk. This
allows the client to continue to do other writing as the
server continues to write the data to the disk. This is
the faster write option and is recommended.
Allow symbolic
linking outside of the
share
Specifies that symbolic links made by NFS users that
point outside of the Samba share will be followed.
57
3: Server Configuration and Management
!
Caution: This feature is a performance/security tradeoff
that is only interesting for sites running both CIFS and
NFS from the same filesystem. Allowing linking could
be a security risk if, for example, an NFS user created a
symbolic link to /etc/passwd. However, unchecking
the box will cause a decrease in performance.
All hosts
Allows connections from anywhere on a network.
Local subnets
Allows connections from the indicated subnet. You can
select one subnet in this field and you must choose it
from the available interfaces as set in the Network
Interfaces screen.
Restrict to hosts
Specifies the set of hosts that are permitted to access the
CIFS filesystem. You can specify the hosts by name or
IP number; separate values by a space or tab. For
example, you could restrict access to only the hosts on a
Class C subnet by specifying something like the
following:
150.203.5
To allow hosts of IP address 150.203.5.* and
myhost.mynet.edu.au, specify the following:
150.203.5. myhost.mynet.edu.au
You can also specify hosts by network/subnet mask
pairs and by netgroup names if the system supports
netgroups. You can use the EXCEPT keyword to limit a
wildcard list.
For example, to allow all IP address in 150.203.*.*
except one address (150.203.6.66), you would
specify the following:
150.203. EXCEPT 150.203.6.66
58
007–4699–010
®
SGI InfiniteStorage Appliance Manager User’s Guide
To allow hosts that match the network/subnet mask of
150.203.15.0/255.255.255.0, you would specify
the following:
50.203.15.0/255.255.255.0
To allow two hosts, hostA and hostB, specify the
following:
hostA, hostB
Note: Access still requires suitable user-level
passwords. The localhost address 127.0.0.1 will
always be allowed.
After specifying the configuration parameters, select Apply changes.
CXFS Configuration
To manage a CXFS cluster, select the following:
Management
> Services
> CXFS
This lets you choose the following options:
Cluster Nodes
Adds, enables, disables, and deletes client-only nodes
and displays node status. To add a client-only node,
you must specify the node’s hostname, CXFS private
network IP address, and operating system:
AIX
IRIX
Linux7
Mac OS X
Solaris
Windows
7
Red Hat Enterprise Linux (RHEL) or SUSE Linux Enterprise Server (SLES).
007–4699–010
59
3: Server Configuration and Management
For the specific operating system release levels
supported, see the CXFS release notes.
When you add a new node, it is automatically enabled
and able to mount all CXFS filesystems. However, if
you had to install software on the client, you must first
reboot it. For example, for a Linux client:
linux# /sbin/reboot
Note: Appliance Manager on a SAN Solution server
does not support the existence of other CXFS clusters
on the same public network as the SAN Solution
server’s CXFS cluster. If there are other CXFS clusters at
your site, they must use a different public network as a
failover network.
Switches
Displays Fibre Channel switches. To fence/unfence
ports on a switch, select the switch’s IP address then
select the ports to fence/unfence.
Stop/Start
Displays the status of CXFS cluster daemon and lets
you start, restart, or stop all of the CXFS daemons.
Client Packages
Provides access to CXFS client packages for each client
platform, which may be downloaded to the clients via
Appliance Manager.
To create a CXFS filesystem, see "Creating Filesystems" on page 30.
60
007–4699–010
®
SGI InfiniteStorage Appliance Manager User’s Guide
NDMP Configuration
The storage server administered by Appliance Manager acts as a network data
management protocol (NDMP) server; that is, it processes requests sent to it from a
data migration application (DMA) in order to transfer data to/from a remote NDMP
tape/data server.
In order to perform backups of user data on the storage server using NDMP, you will
need a DMA (such as Legato Networker) and a separate NDMP tape server.
The NDMP configuration screen in Appliance Manager allows you to configure your
system such that it will communicate with your DMA and your NDMP tape server.
For information on initiating backup/restore operations, refer to the documentation
that came with your DMA software.
To administer NDMP for backups, select the following:
Management
> Services
> NDMP
The NDMP screen lets you configure the following parameters:
007–4699–010
Protocol
Specifies the NDMP version. (Protocol version 4 is the
default. Protocol version 3 is provided for backward
compatibility. If in doubt, use version 4.)
New Sessions
Specifies whether new NDMP sessions are allowed or
disallowed, which lets you stop backup clients from
connecting to the NDMP server or allow the
connection. With Allowed, authorized backup clients
may connect and initiate backup sessions. With
Disallowed, no new client sessions may be established
(existing sessions will not be affected).
Interfaces
Specifies the individual interfaces where the ndmp
server will listen for connections. To use all interfaces,
leave all interfaces unselected.
Authorized Clients
Specifies the IP address of those clients that are
authorized to access NDMP. If you want all clients to
have access, leave this field blank.
Username
Specifies the username that NDMP clients will use to
establish sessions with the NDMP server.
61
3: Server Configuration and Management
New Password
Sets the password for the username.
Confirm New
Password
Confirms the password for the username.
Note: When performing a full filesystem backup (as opposed to an incremental
backup), the quota and mkfs information will be backed up into a tar file in the root
directory of the backup. The file will be named:
.volume_info_date
For example, the following file was backed up on August 6th 2007 at 2:45 PM:
.volume_info_200708061445
This file will be placed in the root directory of the filesystem if it is restored.
However, the quotas and mkfs options will not be applied on restoration; the
administrator may choose to apply them if desired.
SNMP Configuration
Appliance Manager lets you configure basic SNMP monitoring support on your
storage server. In order to query the SNMP service and receive SNMP traps, you will
require an external management station with appropriately configured monitoring
software.
To configure the SNMP service, select the following:
Management
> Services
> SNMP
The SNMP screen lets you configure the following parameters:
62
Enable SNMP
Enables or disables the SNMP service.
Allow SNMP access
from
Specifies the IP address of the Network Monitoring
Station (NMS) or the network segment that is allowed
to access the SNMP service.
Trap destination
Specifies the IP address of your NMS for receiving
default SNMP traps and RAID hardware traps for
supported storage subsystems.
007–4699–010
®
SGI InfiniteStorage Appliance Manager User’s Guide
Community string
Specifies the SNMP community string to use when
sending SNMP traps and when querying the SNMP
service. The default is public.
System name
Specifies the system name. This field is automatically
set by Appliance Manager to the hostname of the
server. However, you may change this to something
more appropriate to your environment.
System location
Specifies the physical location of the storage server
(optional).
System contact
Specifies the contact details (such as the name and
email address) of one or more persons responsible for
administration of the server (optional).
System description
Provides addition descriptive information for
identifying the server (optional).
The following option will enable the RAID management software to emit SNMP traps
for RAID hardware events:
Enable hardware-level
SNMP traps
Enables SNMP traps for hardware monitoring events.
For Altix XE systems, the following options allow configuration of the network
interface on the IPMI device:
IP address
Specifies the IPMI network interface IP address.
Subnet mask
Specifies the IPMI network interface subnet mask.
Gateway address
Specifies the IPMI network interface gateway address.
After applying your configuration changes to the SNMP service, you should receive
start/stop SNMP v2 traps notifying you that the SNMP service has been restarted.
007–4699–010
63
3: Server Configuration and Management
Global Configuration
The following sections describe the following aspects of system administration that
you can perform with Appliance Manager:
• "System Name" on page 64
• "Name Service Client" on page 65
• "DNS and Hostnames" on page 69
• "Time and Date" on page 71
• "Licenses" on page 72
• "Administrator Password" on page 72
System Name
Use the System Name screen to set the following system components:
System name
Specifies the fully qualified domain name (FQDN) for
this storage server. The default hostname is
sgiserver. (You cannot change the default hostname
for a SAN Server.)
Note: After changing the hostname of the NAS Server,
the various Appliance Manager screens will still display
the old hostname. SGI recommends that you reboot the
system to complete the hostname change.
64
Workgroup
Specifies the NetBIOS workgroup to which the machine
should belong. The default is WORKGROUP. If you are
not using CIFS, you can ignore this setting.
Default network
gateway
Specifies the IP address of the router that this system
should use to communicate with machines that are
outside of its subnet.
Management IP
address
Specifies the IP address of the management interface
Subnet mask
Specifies the subnet mask of the management interface.
007–4699–010
®
SGI InfiniteStorage Appliance Manager User’s Guide
Use DHCP
Specifies whether or not to use dynamic host
configuration protocol (DHCP).
You can also use the Network Interfaces screen for eth0 to configure or modify the
management interface. For information on these options, see "Ethernet Network
Interfaces" on page 22.
Name Service Client
The Name Service Client screen lets you specify a name service (or directory service) for
the system. A name service is the application that manages the information
associated with the network users. For example, it maps user names with user IDs
and group names with group IDs. It allows for centralized administration of these
management tasks.
You can specify whether you are using local files (if you have no sitewide protocol
and names and IDs are kept locally on server), Active Directory services, lightweight
directory access protocol (LDAP), or the sitewide network information service (NIS).
Note: When specifying servers on the Name Service Client screen, you must use IP
addresses rather than hostnames, because the system may require a name service
client to determine the IP address from the hostname.
Local Files Only
The Local Files Only selection specifies that an external name server will not be used.
All user and group name to ID mapping will be done using local users and groups.
See "Local Users and Groups" on page 49.
Active Directory
Active Directory is a directory service that implements LDAP in a Windows
environment. It provides a hierarchical structure for organizing access to data. CIFS
authentication will automatically use the Active Directory service.
Note: The Active Directory section is disabled if there are no Active Directory DNS
servers specified. See "DNS and Hostnames" on page 69.
007–4699–010
65
3: Server Configuration and Management
The following Active Directory components appear on the Name Service Client
screen:
Active Directory
domain
Specifies the full domain name of the Active Directory.
Note: If you later change the server hostname on which
Appliance Manager runs, you must rejoin the Active
Directory domain because the Active Directory Security
Identifier (SID) will be changed.
Domain Controller
Specifies a domain controller.
Administrative user
Specifies the user with administrator privileges.
Allow this user to
remotely manage CIFS
share permissions
Specifies whether or not the Administrative user
specified will be able to use the Windows MMC
Computer Management GUI to manipulate CIFS share
permissions remotely when you join the Active
Directory domain.
Password
Specifies the password for the administrator user. For
security reasons, the Active Directory password cannot
contain the following characters:
;*&|‘<>?[]
Re-enter password
Verifies the password for the administrator user.
UID/GID Mapping
Lets you manage UNIX user ID (UID) and group ID
(GID) mapping on the Active Directory server, using
one of the following:
• RFC 2307 (Microsoft Windows Server 2003 R2). In
order for this to function correctly:
66
–
The Active Directory domain controller must be
running Microsoft Windows Server 2003 R2.
–
The Identity Management for UNIX service must
be installed on the domain controller.
–
You must use the UNIX Attributes tab in Active
Directory user management to set up UIDs and
GIDs for all users requiring access to this system.
007–4699–010
®
SGI InfiniteStorage Appliance Manager User’s Guide
• Microsoft Windows Services For UNIX. In order for
this to function correctly:
–
Microsoft Windows Services for UNIX must be
installed on the Active Directory domain
controller.
–
You must use the UNIX Attributes tab in Active
Directory user management to set up UIDs and
GIDs for all users requiring access to this system.
• Automatic assignment based on Windows SID. In
this mode, UIDs and GIDs are automatically based
on the Windows SID and are set to be in the range
16777216 through 33554431.
Note: This method can only be used within a single
Active Directory domain and is incompatible with
trusted domains.
• Automatic assignment in range 10000-20000. In this
mode, UIDs and GIDs in the range 10000 through
20000 will be automatically assigned to Active
Directory users on a first-come, first-served basis.
Note: The default is Automatic assignment based on
Windows SID. For best interoperability, SGI
recommends that you choose either RFC 2307
(Microsoft Windows Server 2003 R2) or Microsoft
Windows Services For UNIX when applicable, as
appropriate for your environment.
!
007–4699–010
Caution: Depending on your environment, making changes to the UID/GID
mapping may result in ownership changes of user files.
67
3: Server Configuration and Management
LDAP
Lightweight directory access protocol (LDAP) is a networking protocol that organizes
access to data in a directory tree structure. Each entry in the tree has a unique
identifier called the distinguished name.
The default LDAP server IP address is the local host. You will probably need to
specify a different IP address.
Fields:
LDAP server
Specifies the IP address of the LDAP server.
Base
Specifies the distinguished name of the base of the
subtree you will be searching.
Root binddn
Specifies the distinguished name of the user to whom
you are assigning root privileges for administration.
This is expressed as a node in the directory tree that
refers to a user account.
Password
Specifies the password that will be required to
authenticate against the LDAP server. For security
reasons, the LDAP password cannot contain the
following characters:
;*&|‘<>?[]
Re-enter password
Verifies the password that will be required to
authenticate against the LDAP server.
To use LDAP for CIFS authentication, you must configure the LDAP server to use the
RFC2307bis or NIS schema to supply POSIX account information. In addition, you
must add a Samba schema to the LDAP database. These schemas specify how the
user and group data is organized in the database. The database must be organized
using these particular schemas so that the CIFS authentication mechanism is able to
extract the data it needs.
For a description of how to add the Samba schema to a Fedora Directory Server, see:
http://directory.fedora.redhat.com/wiki/Howto:Samba
For a description of how to add the samba schema to an OpenLDAP Server, see:
http://www.samba.org/samba/docs/man/Samba-HOWTO-Collection/passdb.html#id327194
68
007–4699–010
®
SGI InfiniteStorage Appliance Manager User’s Guide
The following website provides another description of an OpenLDAP configuration:
http://www.unav.es/cti/ldap-smb/ldap-smb-3-howto.html
For other LDAP servers (such as the Sun Directory Server, Novell’s eDirectory, and
IBM’s Tivoli Directory Server) the above information may be useful; however, please
refer to the relevant documentation for your server product for more information.
NIS
Network information service (NIS) is a network lookup service that provides a
centralized database of information about the network to systems participating in the
service. The NIS database is fully replicated on selected systems and can be queried
by participating systems on an as-needed basis. Maintenance of the database is
performed on a central system.
Note: NIS cannot be used for CIFS authentication.
Specify the following:
Domain name
Specifies the NIS domain name for this system.
NIS server IP address
Specifies the IP address of the NIS server. If the NIS
server is on the same subnet as Appliance Manager,
Appliance Manager finds the NIS server IP address and
provides it as a default. If you are not on the same
subnet, you must enter the address in this field.
Click Apply changes.You will then be presented with a confirmation screen that
allows you to verify whether or not you want to commit the changes.
DNS and Hostnames
You can use the DNS and Hostnames screen to specify how to map hostnames to IP
addresses for the system. Click Edit local hosts table to access the Hosts screen,
where you can edit the /etc/hosts file that contains local mappings or import the
contents of a file you specify. For information on the /etc/hosts file, see the
hosts(5) man page. 8
007–4699–010
69
3: Server Configuration and Management
You can also specify the DNS servers to map hostnames to IP addresses and to
resolve hostnames that are incomplete.
Domain Search
Specifies the domain name or names of the DNS servers
that the system uses to provide hostname-to-IP-address
translation.
If you have multiple domains, list them in the order
you want to use for lookup. This is important in cases
where you have two machines with the same name,
each on a different domain, to establish the lookup
priority.
Nameserver #
You can specify up to three IP addresses for the DNS
name servers to use. If an address you specify is down,
the system will use the next one.
Note: If you specify one or more servers for DNS, all name resolution will be
provided by the specified DNS servers (plus the contents of /etc/hosts). If you do
not specify a server, only .local names will be resolvable via multicast DNS (plus
the contents of /etc/hosts). You cannot use both DNS to resolve names and
multicast DNS to resolve .local domain names.
If you specify one or more DNS servers, SGI InfiniteStorage Appliance Manager adds
mdns off to the /etc/host.conf file in order to force resolution of .local
names to go to the DNS server rather than using multicast DNS.
If you later remove the DNS servers, the value of mdns off in /etc/host.conf
remains the same.
If you manually edit /etc/host.conf to force mdns on, Appliance Manager will
not change this setting provided that you do not specify DNS servers via "DNS and
Hostnames" on page 69.
8
70
You can access man pages from the SGI Technical Publications Library at http://docs.sgi.com.
007–4699–010
®
SGI InfiniteStorage Appliance Manager User’s Guide
Time and Date
Use the Time and Date screen to set the following:
Time zone
Sets the local time zone for Appliance Manager. You
can choose a time zone from a drop-down list of
options, or you can set a custom time zone. For
example, the following specifies what the name of the
time zone is for both standard and daylight savings
periods, and when the change-over is from daylight to
standard and back again (going from standard to
daylight on the 10th month and the 5th Sunday, and
back again on the 4th month and the first Sunday):
AEST-10AEDT,M10.5.0,M4.1.0
For more information about custom time-zone format,
see the tzfile man page.9
NTP Time
Synchronisation
Enables automatic time synchronization with Network
Time Protocol (NTP). The NTP protocol is used to
synchronize clocks on computer systems over a
network. Select Apply NTP changes keep the system’s
time in synchronization with an NTP server or Set time
from NTP server to go off and synchronize it now once
only.
If the server has Internet access, see the following
website for information about using the public NTP
timeserver:
http://www.pool.ntp.org/
Set Current Time and
Date
9
Sets the system date (in the format year/month/day) and
time directly instead of using NTP time
synchronization.
You can access man pages from the SGI Technical Publications Library at http://docs.sgi.com.
007–4699–010
71
3: Server Configuration and Management
Licenses
Appliance Manager is shipped with temporary licenses. The Licenses screen provides
information required to request licenses and a text box in which you can type in or
paste permanent licenses obtained from SGI. Some licenses, such as the license for
XVM snapshot, will not take affect until you reboot the system.
Administrator Password
The Administrator Password screen changes the Appliance Manager administration
password, which is the password required to perform server configuration and
management. This password is not required to view the Appliance Manager
monitoring screens.
Operations
The following sections describe other operations you can perform with Appliance
Manager:
• "Save/Restore Configuration" on page 72
• "Support Data" on page 73
• "Performance Data" on page 73
• "Shutdown" on page 73
Save/Restore Configuration
The Save/Restore Configuration screen screen lets you save the current Appliance
Manager configuration or restore a previously saved version. The configuration
information saved includes how the interfaces are configured and what filesystems
should be mounted. You may find this useful if you have made an error in the
present configuration and you wish to return to a previously configured state.
!
72
Caution: This procedure does not provide a system backup and specifically does not
save or restore user data; it provides a snapshot record of the configuration.
007–4699–010
®
SGI InfiniteStorage Appliance Manager User’s Guide
This screen lists previously saved configurations, labeled by date. After restoring a
configuration, you should restart the system.
Support Data
If there is a problem with the system, SGI Call Center Support may request support
data in order to find and resolve the problem. The Gather Support Data screen lets
you generate an archive containing copies of the storage server’s software and
hardware configuration and log files.
To collect the data, select Yes, gather information. This process can take more than 30
seconds on large RAID configurations and requires at least 200 MB of free space in
/tmp.
Performance Data
This screen lets you capture and download archives of performance data from the
server on which Appliance Manager is running. SGI may request such an archive for
performance-analysis purposes, but please be aware that it may contain potentially
sensitive information such as network traces.
Note: The Performance Data screen in Appliance Manager is only available if you
have installed the oprofile and ethereal packages.
Shutdown
From the Shutdown screen, you can specify to reboot or shut down the system in a
specified number of seconds.
007–4699–010
73
Chapter 4
Performance Monitoring
Appliance Manager provides current and historical views of the state and the
performance of a storage server. This includes CPU usage, disk and network
throughput, and many other metrics. It also allows you to view connected clients and
determine how each of these contribute to the current workload.
This chapter does not describe all of the details of each Appliance Manager monitoring
screen, because most screens are quite straightforward. Instead, it attempts to explain
why the displayed information matters and how it can be sensibly interpreted.
This chapter discusses the following:
• "Metrics Collected" on page 76
• "System Summary" on page 78
• "System Alerts" on page 81
• "Resources" on page 81
• "Services" on page 90
• "Clients" on page 100
Figure 4-1 shows the top-level Monitoring screen.
007–4699–010
75
4: Performance Monitoring
Figure 4-1 Monitoring Screen
Metrics Collected
The information provided by Appliance Manager can be roughly broken down into
“who” and “how much.” Appliance Manager continuously gathers performance
metrics and stores them in archives in /var/lib/appman/archives. Each month,
76
007–4699–010
®
SGI InfiniteStorage Appliance Manager User’s Guide
a data reduction process is performed on the metric gathered for the month. This
reduces the size of the archives while retaining a consistent amount of information.
Although the size of metric archives has a bounded maximum, this can still be quite
large depending on the configuration of the server and how many clients access it.
For example, a server with a large number of filesystems could generate up to
100 Mbytes of archives per day. You should initially allow around 2 Gbytes of space
for archive storage and monitor the actual usage for the first few weeks of operation.
Note: Appliance Manager uses the International Electrotechnical Commission’s
International Standard names and symbols for binary multiples of units. In particular,
this means that 1 MiB/s is 220 = 1048576 Bytes per second. For more information on
this standard, see the National Institute of Standards & Technology information about
prefixes for binary multiples at:
http://physics.nist.gov/cuu/Units/binary.html
Appliance Manager distinguishes between current and historic time. Current metrics
are either drawn live from the server or are taken from the last few minutes of the
metric archives. Historic metrics are taken exclusively from the metric archives.
Appliance Manager is able to display this historical information for three time periods:
• Last hour
• Last day (the previous 24 hours)
• Last month (the previous 30 days)
Within bar graphs, Appliance Manager uses color-coding to display the direction of
data flow:
• Red represents write and receive data flow
• Blue represents read and send data flow
Figure 4-2 describes how Appliance Manager color-codes the direction of data flow
graphs. For an example of the result in a graph, see Figure 4-3 on page 80.
007–4699–010
77
4: Performance Monitoring
Write
Write
Read
Read
Color coding of filesystem directions
Receive
Send
Color coding of network directions
Figure 4-2 Color-Coding the Direction of Data Flow
System Summary
Appliance Manager provides a Summary menu selection at the top of the screen.
This screen displays the following on a per-node basis:
• CXFS filesystem and node status (For details, see "CXFS" on page 95):
– If all CXFS filesystems are stable (or if no filesystems exist), the Filesystems
indicator will be green, and it will say Stable
78
007–4699–010
®
SGI InfiniteStorage Appliance Manager User’s Guide
– If all cluster nodes are stable, the Nodes indicator will be green it will say
Stable
– If any of the filesystems or nodes are inactive or in a transient state (such as
mounting filesystems), the indicators will be red and appropriate status text
will be displayed
• CPU utilization
• Disk space
• Disk throughput
• Network throughput
• InfiniBand throughput (if installed)
• The number of NFS, CIFS, and iSCSI clients (if iSCSI targets have been created)
• System uptime
• Number of users
• Load average
The screen displays ticks along the status bars that represent the average value over
the past day or hour, rather than the immediate value that is shown by the graph.
You can drill down to more detailed status by clicking the headings to the left of the
graphs.
Click History to view the historical status of a parameter.
Figure 4-3 shows an example Summary screen.
007–4699–010
79
4: Performance Monitoring
Figure 4-3 Summary Screen
In Figure 4-3, the bar graph for Disk Throughput shows 3.41 MiB/s of data
read/sent (the blue part of the graph) and 0.841 MiB/s of data written/received (the
red part of the graph). If you were sending and receiving data at the same rate, there
80
007–4699–010
®
SGI InfiniteStorage Appliance Manager User’s Guide
would be equal amounts of red and blue in the graph. For more information, see
Figure 4-2 on page 78.
System Alerts
The Alerts screen displays messages from the system logs. These provide informative
messages, notifications of unusual events, and error conditions.
Only unacknowledged alerts are displayed unless you click Show Acknowledged.
You must log in in order to acknowledge alerts.
After a period of time, alerts are archived and will not be redisplayed. Acknowledged
alerts are archived after 2 days and unacknowledged alerts are archived after 7 days.
The /var/lib/appman/alerts/archive file contains all the archived alert
messages.
Resources
Appliance Manager contains a separate screen to display the utilization of each
resource.
The following sections provide details about the resources:
• "Disk Space" on page 82
• "Disk User Quota and Disk Group Quota" on page 82
• "Disk Throughput and Disk IOPS" on page 83
• "DMF Resources" on page 84
• "CPU Utilization" on page 89
• "Network Throughput" on page 90
• "Hardware Inventory" on page 90
Where multiple physical resources are bonded into a single logical resource (for
example, load-balanced NICs and RAID volumes in a filesystem), Appliance Manager
shows the structure of the aggregated resource, and (where possible) shows metrics
for both the aggregate and the component resources.
007–4699–010
81
4: Performance Monitoring
Disk Space
The Disk Space screen shows the GiB used on each filesystem. If the amount of disk
space appears low on a filesystem on which disk quotas are enabled, you can use the
Disk User Quota screen to find out who is using the most disk space.
Disk User Quota and Disk Group Quota
Disk user/group quotas provide limits on the number of files and the amount of disk
space a user/group is allowed to consume on each filesystem. A side effect of this is
that they make it possible to see how much each user/group is currently consuming.
Because quotas are applied on a per-filesystem basis, the limits reported in the All
Filesystems screen are not additive. This means that if a user/group has a 500-MiB
disk space limit on filesystem A and a 500-MiB limit on filesystem B, the user/group
cannot store a 1-GiB file because there is no single filesystem with a large-enough
space allowance.
However the current usage shown in the used column on the All Filesystems screen
is additive, so you can use this screen to determine the user/groups who are
currently consuming the most disk space. The All Filesystems screen highlights
user/groups who have exceeded the quota on any filesystem on which they have
been allocated a quota.
Note: Users/groups that do not have quotas explicitly assigned to them are not listed
in the monitoring pages.
82
007–4699–010
®
SGI InfiniteStorage Appliance Manager User’s Guide
Disk Throughput and Disk IOPS
Disk operations occur when the result of a file operation is committed to disk. The
most common types of disk operation are data reads and writes, but in some types of
workload, metadata operations can be significant. Metadata operations include the
following:
• Truncating and removing files
• Looking up filenames
• Determining the size and types of files
Disk operations are measured in I/O per second (IOPS).
Disk throughput is the amount of data that is transferred to and from the disks. This is
predominantly the result of reading and writing data.
The Disk Throughput and Disk IOPS screens display a bar graph for each active
filesystem. For RAID filesystems, a separate graph is displayed for each volume
element.
Note: Users of versions of Appliance Manager prior to 4.1 should note that the IOPS
shown for the same workload may be lower now. This indicates a more accurate
count, not a decrease in performance. There may be issues if upgrading from 4.0;
users may lose all of their history because the graph metrics are now different.
If the cache hit rate is low and the network throughput is high, the disk throughput
should be high. Usually, the disk throughput would be steady somewhere a little
under the maximum bandwidth of the disk subsystem. If the disk throughput is
consistently too high relative to the network throughput, this might indicate that the
server has too little memory for the workload.
Under heavy loads, a storage server must be able to sustain a high rate of disk
operations. You can use the disk operations metrics in conjunction with other metrics
to determine the characteristics of a workload so that you can tune the server can be
tuned. For example, a high utilization of NICs but few IOPS could indicate that a
workload is coming straight from the cache. A large number of IOPS but low
throughput (either disk or network) indicates a metadata-dominated load. You can
determine the contributing operations or clients from the NFS screen, CIFS screen,
and the various screens under the Clients category.
007–4699–010
83
4: Performance Monitoring
DMF Resources
The DMF Resources screens show how DMF is using its hardware, as described in
the following sections:
• "OpenVault Tape Libraries" on page 84
• "Tape Drives" on page 85
• "Tape Volumes" on page 86
• "DMF-Managed Filesystems" on page 86
• "Disk Caches" on page 87
• "DMF Error Messages" on page 87
For information about troubleshooting, see "DMF Error Messages" on page 87. For
information on how Appliance Manager displays user-generated DMF activity, see
"DMF Activity" on page 98.
Note: The DMF Filesystems and Caches pages are updated at infrequent intervals by
those DMF programs that scan the filesystem inodes:
dmaudit
dmdaux
dmdskfree
dmfsfree
dmhdelete
dmscanfs
dmselect
OpenVault Tape Libraries
The following displays the tape library slot usage, which is the number of slots used by
DMF, other applications, or vacant):
Monitoring
> Resources
> DMF
> Tape Libraries
84
007–4699–010
®
SGI InfiniteStorage Appliance Manager User’s Guide
The Tape Libraries screen is available only if the OpenVault tape subsystem is in use.
This screen is unavailable if you are using Tape Management Facility (TMF). (You
must choose a single method for handling tapes, either OpenVault or TMF.)
Tape Drives
The following shows information about tape drives:
Monitoring
> Resources
> DMF
> Tape Drives
The Tape Drives screen provides information for each tape drive concerning its
current state:
• Idle
• Busy
• Unavailable
When the drive is in use, it also shows the following:
• Activity (such as waiting)
• Purpose (such as recall)
• Details of the tape volume (such as volume name)
Note: This information is available only for DMF’s tapes. Any other use, such as
filesystem backups or direct tape use by users, is not shown; any such drives appear
to be idle on this screen.
This screen also includes a link to the Reservation Delay History screen, which
indicates when demand for tape drives exceeds the number available. This is purely a
relative indication, to be compared visually with the equivalent indicator at other
times; it has no useful numerical value.
007–4699–010
85
4: Performance Monitoring
Tape Volumes
The following shows the number of tape volumes in various states according to
volume group (VG):
Monitoring
> Resources
> DMF
> Tape Volumes
Those volume groups that share an allocation group are shown together inside a box
that indicates the grouping.
Because of their normally large number, full volumes are only shown numerically.
Those in other states (such as empty) are shown graphically. History links show
trends over time.
DMF-Managed Filesystems
The following shows the proportions of files on DMF-managed filesystems that are
migrated and not migrated:
Monitoring
> Resources
> DMF
> Filesystems
The screen also displays the amount of offline data related to the filesystems and the
over-subscription ratios (which are typically in the range of 10:1 to 1000:1, although
they vary considerably from site to site). As this is being viewed from the filesystem
perspective, the fact that migrated files may have more than one copy on the back-end
media is not considered. That is, this is a measure of data that could be on disk but is
not at the time, rather than a measure of the amount of back-end media being used.
The data presented in the graph is gathered periodically by DMF. The time at which
this information was gathered is displayed at the top of the page. The default
configuration is to update this information once daily (at 12:10am). To change this
default, use the following menu selection:
86
007–4699–010
®
SGI InfiniteStorage Appliance Manager User’s Guide
Management
> Resources
> DMF
> Configuration
> Maintenance Tasks
> daemon_tasks
Disk Caches
The following shows Disk Cache Manager (DCM) disk caches:
Monitoring
> Resources
> DMF
> Caches
DCM disk caches have similar issues to filesystems with regard to the frequency of
updates as described in "DMF-Managed Filesystems" on page 86.
Dual-resident refers to cache files that have already been copied to back-end tape and
can therefore be quickly removed from the cache if it starts filling. Non-dual-resident
files would have tape copies made before they could be removed, which is much
slower.
DMF Error Messages
This section describes problems you may encounter when monitoring DMF with
Appliance Manager.
DMF Statistics are Unavailable or DMF is Idle
This screen requires statistics from DMF that are unavailable;
check that DMF is running, including the "pmdadmf2"process.
Make sure the DMF "EXPORT_METRICS" configuration parameter is enabled.
This message indicates that DMF is idle. When this occurs, perform the following
procedure:
1. Check the version of DMF by running the dmversion command. It should
report version 3.4.0.0 or later.
2. Check that the EXPORT_METRICS on line has been added to
/etc/dmf/dmf.conf after the TYPE base line.
007–4699–010
87
4: Performance Monitoring
Run dmcheck to search the DMF configuration file for syntactic errors.
3. Check that DMF has been restarted after the change to /etc/dmf/dmf.conf
was made in step 2.
4. Check that the data is being exported by DMF by running the following
command:
# dmarenadump -v
If it is not, run the following commands as root to restart DMF, PCP, and
Appliance Manager:
#
#
#
#
#
#
cd /dmf/spool # or equivalent at your site
rm base/arena
/etc/init.d/dmf restart
/etc/init.d/pcp stop
/etc/init.d/pcp start
/etc/init.d/appman restart
# if necessary
5. Check that the data is passing through PCP by running the following command:
# pminfo -f dmf2
If it is not, run the following commands as root to remove and reinstall the PCP
performance metrics domain agents and restart Appliance Manager:
#
#
#
#
cd /var/lib/pcp/pmdas/dmf2
./Remove
./Install
/etc/init.d/appman restart
OpenVault Library Is Missing
No OpenVault-controlled library found.
This indicates that OpenVault is not running. Run the following command to verify
that the ov_stat command is available:
# ls -lL /usr/bin/ov_stat
-rws--x--x 1 root sys 322304 Jul 22 2005 /usr/bin/ov_stat
88
007–4699–010
®
SGI InfiniteStorage Appliance Manager User’s Guide
If the file permissions are not -rws--x--x as shown above, run the following
command to change the permissions:
# chmod 4711 /usr/bin/ov_stat
CPU Utilization
Serving files places demands on the storage server CPU as well as the I/O subsystem.
The CPU helps with copying data to and from disks, calculating checksums, and
other tasks. Table 4-1 shows the CPU metrics that Appliance Manager reports.
Table 4-1 CPU Metrics Reported by Appliance Manager
CPU Metric
Description
Wait time
Time when a CPU was forced to do nothing while waiting for
an event to occur. Typical causes of wait time are filesystem
I/O and memory swapping.
Interrupt time
Time the CPU spent processing requests from I/O devices. In
a storage server context, these are almost exclusively
generated by disk operations or network packets and by
switching between processes.
System time
Time the CPU spent executing kernel code. This is usually
dominated by NFS file serving and accessing data from disks.
User time
Time when the CPU is devoted to running ordinary programs.
The biggest consumers of user time in a storage server would
usually be the CIFS server, HTTP server, or FTP server.
CPU time is displayed as a percentage, where 100% is the total time available from a
single CPU. This means that for an 8–CPU server, the total available CPU time is 800%.
In general, NFS workloads consume more system time, whereas CIFS, HTTP, and FTP
workloads consume more user time. The Appliance Manager performance
monitoring infrastructure consumes only a small amount of user time.
The most useful problem indicator is consistently having little or no idle time. This
can mean that the server is underpowered compared to the workload that is expected
of it.
007–4699–010
89
4: Performance Monitoring
Network Throughput
The Network Throughput screen displays the amount of data transferred through
each network interface card (NIC).
If an interface is load-balanced, Appliance Manager displays throughput for both the
bonded interface and its constituent interfaces.
Note: The throughput displayed is total network throughput (which includes
protocol headers), so real data transfer will be somewhat lower than this value. The
Services category screens show the amount of real data transferred from a variety of
perspectives.
Hardware Inventory
The hardware inventory is a summary of the hardware configuration, including the
CPUs, I/O controllers, memory, network controllers, and SCSI disks. The list of SCSI
disks includes both the system root disk and the configured RAID logical units
(LUNs).
Services
A service is a task that is performed by the storage server. While the primary service
is fileserving, Appliance Manager breaks this down by the different methods of
accessing the server. The services known to Appliance Manager are NFS, CIFS, CXFS,
DMF, and NDMP. This screen also provides access to the software versions installed.
This section discusses the following screens available under the Services category:
• "NFS" on page 91
• "CIFS" on page 93
• "CXFS" on page 95
• "DMF Activity" on page 98
• "NDMP" on page 99
• "Versions" on page 100
90
007–4699–010
®
SGI InfiniteStorage Appliance Manager User’s Guide
NFS
Note: The NFS screen is available only if SGI Enhanced NFS is installed.
NFS traffic is a major contributor to storage server utilization. NFS services report
statistics aggregated across all exports/shares as well as statistics for each
export/share.
Table 4-2 describes the statistics reported by both the NFS and CIFS screens. Table
4-3 and Table 4-6 describe additional information that is reported.
NFS services gather like-operations into a smaller number of operation classes. Table
4-4 summarizes these classes. (The NFS operation statistics measure classes of NFS
protocol operations sent by clients.)
Note: There is not a one-to-one correspondence between CIFS and NFS IOPS. The
former measures operations that are received from a network client, the latter
measures operations that are sent to a local filesystem.
Table 4-2 Statistics Reported by NFS and CIFS Screens
007–4699–010
Graph
Description
Throughput
Current incoming and outgoing traffic for the export/share
(the NFS service Throughput graph includes all types of
operations, whereas the CIFS graph only shows actual data
transfer)
Operations by Type
Export/share operations by class
Read Block Sizes
Reads by size
Write Block Sizes
Writes by size
91
4: Performance Monitoring
Table 4-3 Additional Information Reported by the NFS Screen
Category
Description
IOPS
I/O per second for TCP and for UDP
Service Times
Number of operations falling into each service time band as
tracked by the NFS server for each operation
Table 4-4 NFS Operation Classes
92
Class
Description
access
File accessibility tests; checks whether a client can open a
particular file
commit
Commit request; requests that the server flush asynchronously
written data to stable storage
fsinfo
Filesystem statistics and information requests, pathconf calls,
and service availability tests
getattr
File attribute retrieval operations
inode_mods
New file or directory creation, hard and symbolic link creation,
file renaming, and device file creation operations
lockd
General lock operations not covered by other classes
lockd_granted
Number of lock granting operations
lockd_share
Number of export/share reservation operations
lookup
Operations that result in filename translations; that is,
operations that are applied to a filename rather than to a file
handle, such as open
read
File read operations and symbolic link resolution operations
readdir
Directory entry listing operations
readdirplus
Extended directory entry listing operations; returns the
attributes of the directory entries as well as their names
remove
File deletion operations
007–4699–010
®
SGI InfiniteStorage Appliance Manager User’s Guide
Class
Description
setattr
File attribute setting operations, which include file truncations
and changing permissions and ownership
write_async
Asynchronous writes; the written data may be cached and
scheduled for writing at a later time
write_sync
Synchronous write; these do not complete until the data is
written to stable storage
xattr
Operations that manipulate XFS extended attributes
CIFS
Note: The CIFS screen is available only if the SGI Samba packages are installed.
CIFS traffic is a major contributor to storage server utilization. CIFS services report
statistics aggregated across all exports/shares as well as statistics for each
export/share.
Table 4-2 describes the statistics reported by both the NFS and CIFS screens.
CIFS services gather like operations into a smaller number of operation classes. While
these classes are largely similar, there are some differences. Table 4-5 summarizes
these classes.
Note: Clients can perform file operations in a variety of different ways, which can
result in similar logical operations being recorded as differing sets of CIFS operations
depending on the application.
Table 4-5 CIFS Operation Classes
007–4699–010
Class
Description
cancel
Cancel current activity operations
change/notify
Operations requesting notification of changes to a file or in a
directory
93
4: Performance Monitoring
Class
Description
close
File close operations
create/open
File and directory create and open operations
delete/remove
File deletion and directory removal operations
findfirst/next
Operations searching for files or scanning a directory
flush
Operations requesting a flush to disk of buffered data
getattr
Operations requesting file and directory attributes, such as
access times
getsecurity
Operations requesting file access permissions
ioctl
Operations performing special filesystem features, such as
sparse file handling
lock/unlock
File locking and unlocking operations
misc
All other operations, including infrequent filesystem features
move
File and directory move and rename operations
read
File read operations
setattr
Operations setting file and directory attributes, such as hidden
file status
setsecurity
Operations setting file access permissions
write
File write operations
Table 4-6 Additional Information Reported by the CIFS Screen
94
Category
Description
IOPS
Number of SMB operations per second
Latencies
Number of SMB operations falling into each service time band
007–4699–010
®
SGI InfiniteStorage Appliance Manager User’s Guide
CXFS
The CXFS screen reports the status of CXFS filesystems and cluster nodes.
Filesystem information:
• Filesystem name.
• A Usage bar that shows the amount of disk space used on the filesystem. The
numbers to the right of the bar show used space and filesystem size in gigabytes.
• Stable indicator, which is either green if the current state of the system matches
the expected state of the system or red if it does not. For example, a filesystem is
considered stable if it has been successfully mounted by all nodes that are capable
of mounting it. If one or more nodes are currently trying to mount a filesystem, its
stable indicator will be red and the Status text will be similar to hostname: trying
to mount. After all nodes have mounted the filesystem, the indicator will be green.
• The most common Status states for filesystems include:
– Mounted: All enabled nodes have mounted the filesystem
– Unmounted: All nodes have unmounted the filesystem
Node information:
• Hostname.
• Node type, which is either server for the metadata server or client for a
client-only node.1
• Cell ID, which is a number associated with a node that is allocated when a node is
added into the cluster definition. The first node in the cluster has cell ID of 0, and
each subsequent node added gets the next available (incremental) cell ID. If a
node is removed from the cluster definition, its former cell ID becomes available.
• Connected indicator, which is one of the following colors:
– Green if the node is physically plugged in, turned on, and accessible via the
private network and Fibre Channel switch
– Red if the node is not accessible
1
Metadata is information that describes a file, such as the file’s name, size, location, and permissions.The metadata server is
the node that coordinates updating of metadata on behalf of all nodes in a cluster.
007–4699–010
95
4: Performance Monitoring
– Gray if the node has been intentionally disabled by the administrator
• Stable indicator, which is one of the following colors:
– Green if the node has joined the cluster and mounted the clustered filesystems
– Red if the node has not joined the cluster and mounted the filesystems
– Gray if the node has been intentionally disabled by the administrator
When a node comes online, the Connected indicator should always be green, with
the Stable indicator red while the node is establishing membership, probing XVM
volumes, and mounting filesystems. After these processes complete, both
indicators will be green.
• The most common Status states for nodes include:
– Disabled: The node is intentionally not allowed to join the cluster
– Inactive: The node is not in cluster membership
– Stable: The node is in membership and has mounted all of its filesystems
Any other filesystem or node status (not mentioned above) requires attention by the
administrator.
Figure 4-4 shows the following:
• sgiserver has Connected=green, Stable=green, and Status=Stable, indicating
everything is fine.
• enc-linux64 and enc-linux32 both have Connected=red, Stable=green, and
Status=Disabled. This means that both systems are either powered down or not
plugged in (Connected=red), but are considered stable (Stable=green) because the
administrator disabled them via the CXFS management pages.
• enc-mac is powered down or not plugged in (Connected=red), but is enabled; it
is therefore expect it to be up, hence the Status=Inactive state and Stable=red
indicator.
• Because sgiserver and enc-win are the only nodes in the cluster that are
actually operating correctly, they are the only nodes that have mounted the
filesystem /mnt/clufs. All the other nodes are inactive or disabled, so they
cannot mount that filesystem. However the filesystem itself is stable, and its status
is therefore Mounted.
96
007–4699–010
®
SGI InfiniteStorage Appliance Manager User’s Guide
Figure 4-4 CXFS Monitoring Example
You can use the status of the nodes and filesystems as they appear on the CXFS
screen to help diagnose issues. For example, when a client node is trying to mount a
clustered filesystem, that client’s status will be Mounted 0 of 1 filesystems. The
filesystem’s status will be client trying to mount. After a few seconds, the client
should mount the filesystem and then both client and filesystem will be shown as
Stable again.
007–4699–010
97
4: Performance Monitoring
Note: If the client displays incorrect status or appears stuck on Mounted 0 of 1
filesystems for an extended period of time, see "CXFS Client Stuck on Filesystems
Mount" on page 104.
DMF Activity
The DMF Activity screen shows user-generated DMF activity from two points of
view:
• Number of requests being worked on (the Requests screen)
• Rate of data throughput resulting from those requests (the Throughput screen)
Note: Values shown on the Requests and Throughput screens are averaged over the
previous few minutes, so they are not necessarily integers as would be expected. This
process also causes a slight delay in the display, which means that the values of DMF
Activity screens do not necessarily match the current activity on the system, as seen
in the DMF log files.
There are two distinct types of requests that are reflected in these screens:
• Requests from the user to the DMF daemon. These are presented as an aggregate
across the DMF server, and on a per-filesystem basis, using the label of
Filesystems.
• Requests from the DMF daemon to the subordinate daemons managing the
back-end storage, the caches, the volume groups (VGs), and the media-specific
processes (MSPs). Technically, caches are a variant of MSP despite their different
purpose, hence the description Non-Cache MSP in the Appliance Manager screens.
Sometimes, there is a 1:1 correspondence between a daemon request and a back-end
request by cache, volume group, or MSP (such as when a file is being recalled from
back-end media back to the primary DMF-managed filesystem), but this is frequently
not the case. For example, migrating a newly created file to back-end media will
result in one back-end request per copy, but deleting a migrated file results in a single
daemon request but no back-end request at that time. Tape merges may cause a lot of
activity within a volume group but none at the daemon level.
98
007–4699–010
®
SGI InfiniteStorage Appliance Manager User’s Guide
On the top-level requests and throughput screens, and their associated History
screens, for the sake of clarity the different types of requests are not distinguished
from each other. However, if you zoom in (via one of the Filesystems, Caches,
Volume Groups, or MSPs links on the left-hand side), the resulting screen shows the
broad categories as well as by filesystem or by back-end storage group, as
appropriate. This also applies to the related History screens.
NDMP
The NDMP screen shows the following information about the NDMP backup
operations that are currently running:
Session ID
Displays the process ID of the NDMP session
Type
Displays the type of NDMP session. There are three
major types of possible session:
• A DATA session writes/reads data to/from a
network mover
• A MOVER session receives/sends data from/to a
network NDMP data server
• A LOCAL session writes data to a locally attached
backup device
Start Time
Displays the time that the backup began in UNIX time
(seconds since 00:00:00 UTC, January 1, 1970)
DMA Host
Displays the IP address of the data mover agent (DMA)
host
DATA Host
Displays the IP address of the data host
GiB
Displays the number of gigabytes2
transferred
Throughput MiB/s
Displays the speed of throughput for the backup in
megabytes3 per second
that have been
To stop a backup, select it and click Terminate Selected. To select all backups, click
the box in the table header.
2
3
GiB, 1024 megabytes
MiB, 1024 x 1024 bytes
007–4699–010
99
4: Performance Monitoring
To reset the page, select Clear Selection.
Versions
The Versions screen displays the version numbers of key software packages that have
been installed.
Clients
A NAS client is a computer running a program that accesses the storage server. NAS
clients are known to Appliance Manager by their IP address; if multiple accessing
programs are running on the same computer, they are all counted as a single client.
Note: Detailed client information is gathered only for CIFS and NFS protocols.
The All Clients screen will not be available if neither SGI Samba nor SGI Enhanced
NFS are installed.
The All Clients screen displays the NAS clients sorted according to hostname. The
other selections sort according to the chosen selection (such as by aggregate
throughput).
From each of these screens, you can change the sorted display of the data without
returning to the Monitoring screen.
Displaying the NAS clients in this fashion is useful for pinpointing how the current
set of clients are contributing the workload profile. For example, upon noticing an
unusually large amount of network traffic on the Network Throughput screen,
changing to display the clients in order of aggregate throughput will quickly identify
the contributing clients.
From the list of clients, you can display a detailed view of the NFS and CIFS traffic
generated by a particular client. This is useful when trying to diagnose problems that
affect only a single client or type of client. For example, by viewing the client detail,
it may be obvious that throughput is limited by the client using very small read and
write sizes. Continuing from the client details to the client history screen can help
diagnose problems, such as hung NFS mounts.
The iSCSI screen displays a list of the connected iSCSI initiators are connected and
their targets.
100
007–4699–010
Chapter 5
Troubleshooting
This section discusses the following:
• "Forgotten Password or Corrupt Password File" on page 101
• "The archives Directory is Too Large" on page 102
• "Unconfigured Storage Arrays are Discovered" on page 102
• "Filesystem Creation Warning Messages" on page 103
• "Power Outage and iSCSI" on page 103
• "Users and Groups Not Visible" on page 103
• "CXFS Status is Incorrect" on page 104
• "CXFS Client Stuck on Filesystems Mount" on page 104
• "Appliance Manager is Inaccessible when the System Must Be Rebooted" on page
105
• "Appliance Manager is Inaccessible due to Network Configuration Issues" on page
105
• "Reporting Problems to SGI" on page 106
Forgotten Password or Corrupt Password File
If you forget the administrator password or if the Alerts Page reports that the
/etc/appman/passwd file is corrupt (preventing administrator login) run the
following to set a new password of your choice (NEWPASSWORD):
# echo "appman_admin:‘echo -n NEWPASSWORD | md5sum | cut -d’ ’ -f1‘" > /etc/appman/passwd
007–4699–010
101
5: Troubleshooting
The archives Directory is Too Large
Appliance Manager stores historical information in the directory
/var/lib/appman/archives. On a large machine, this directory may require too
much disk space to fit in the / or /var filesystem. This directory can be moved to
any other filesystem (assuming the new filesystem always remains mounted) using
the following procedure:
1. Stop Appliance Manager:
# service appman stop
2. Stop Performance Co-Pilot (PCP):
# service pcp stop
3. Change to the appman directory:
# cd /var/lib/appman
4. Move the archives directory to a different filesystem:
# mv archives /some/other/filesystem/
5. Link the other filesystem to the archives location:
# ln -s /some/other/fs/archives archives
6. Restart PCP:
# service pcp start
7. Restart Appliance Manager:
# service appman start
Unconfigured Storage Arrays are Discovered
Under no circumstance should you try to discover all the storage arrays available via
the public network from the system running Appliance Manager. If you do this,
Appliance Manager will assume you want it to manage all discovered storage arrays,
which may lead to undesired consequences.
If you have inadvertently auto-discovered storage arrays that you do not wish to
manage via Appliance Manager, run the TPSSM, ISSM EE, ISSM WE, or SMI GUI and
explicitly remove the undesired storage arrays.
102
007–4699–010
®
SGI InfiniteStorage Appliance Manager User’s Guide
Filesystem Creation Warning Messages
If you attempt to create a filesystem that will result in less than peak performance,
you will get a warning message from Appliance Manager. This can occur if you
attempt to create a filesystem that spans multiple arrays with different numbers or
sizes of disks, or includes disks that are already in use on one array but not on
another. For more information, see "Multi-Array Filesystems" on page 111.
Power Outage and iSCSI
Due to the nature of iSCSI as a block-level protocol (as distinct from file-level
protocols such as NFS and CIFS), particular care must be taken in the event of a
system crash, power failure, or extended network outage.
If power is lost to the server while an iSCSI initiator is performing a write to an iSCSI
target, the write will not be completed and the filesystem created on that particular
target may then be in an inconsistent state. The iSCSI initiator should be made to
perform a filesystem check on the iSCSI target immediately after power is restored,
and before trying to access that target for normal usage.
For example, on a Windows client:
1. Use the iSCSI Initiator program to connect to the iSCSI target.
2. Open My Computer.
3. Right-click the iSCSI target drive and select Properties.
4. In the Properties window, select the Tools tab and click the Check Now button.
5. In the Check Disk window, select both Automatically fix file system errors and
Scan for and attempt recovery of bad sectors.
6. Click Start to verify the filesystem and attempt recovery of any errors.
Users and Groups Not Visible
If you ran Appliance Manager 4.0 and you added local users or groups to Appliance
Manager, these users and groups may no longer be visible in the GUI due to changes
in the minimum user ID number. User accounts in the range 100 through 999 will
continue to work, but you cannot manipulate them with Appliance Manager.
007–4699–010
103
5: Troubleshooting
CXFS Status is Incorrect
Appliance Manager might display incorrect status for the CXFS clients. To restore the
correct status, see the information about cxfs_admin and restarting the fs2d
quorum master in the CXFS general release notes.
CXFS Client Stuck on Filesystems Mount
If the client appears stuck on Mounted 0 of 1 filesystems for an extended period of
time, this indicates there is a problem. In this case, do the following:
1. Check the status of the metadata server and the other clients. If other nodes are
stable, it indicates that the filesystem and RAID are operating correctly and have
been mounted by those other nodes.
2. Check the CXFS log file on the client for mounting-related errors. For example:
cis_fs_mount ERROR: Illegal logbsize: 64 (x == 16k or 32k)
cis_fs_mount ERROR: logbsize must be multiple of BBSIZE: 64
op_failed ERROR: Mount failed for data3 (data3 on /mnt/data3)
In this example, the client is unable to mount the filesystem due to one of the
filesystem’s mount options. In this case, you must use cxfs_admin to adjust the
filesystem’s mount options appropriately.
3. If no other nodes are stable (that is, all are trying to mount the filesystem and
have been stuck in that state for an extended period), check the Appliance
Manager Alerts page and the CXFS log files on the metadata server.
See the following for more information about CXFS log files and tools:
• CXFS 5 Administration Guide for SGI InfiniteStorage
• CXFS 5 Client-Only Guide for SGI InfiniteStorage
104
007–4699–010
®
SGI InfiniteStorage Appliance Manager User’s Guide
Appliance Manager is Inaccessible when the System Must Be Rebooted
If you must reboot the system but Appliance Manager is inaccessible, do the
following:
1. Log in via the system console as root, such as via the L2 on an Altix ia64 system
or via IPMI or a monitor/keyboard on an Altix XE x86_64 system.
2. Reboot the system:
# reboot
Appliance Manager is Inaccessible due to Network Configuration Issues
If the network configuration is damaged or if the system running Appliance Manager
becomes inaccessible via the network, due the following:
1. Log in via the system console as root, such as via the L2 on an Altix ia64 system
or via IPMI or a monitor/keyboard on an Altix XE x86_64 system.
2. Reconfigure the management interface (eth0) by using the following commands,
as appropriate for your site:
• Static IP address:
/usr/lib/appman/appman-cli -c "network if-enable-static eth0 IPaddress 255.255.255.0"
For example, for a static IP address of 192.168.9.9:
# /usr/lib/appman/appman-cli -c "network if-enable-static eth0 192.168.9.9 255.255.255.0"
• DHCP:
# /usr/lib/appman/appman-cli -c "if-enable-dhcp eth0"
3. To set the default gateway (such as if the system must communicate with other
systems outside the local network or if the default gateway is not supplied by a
DHCP server), enter the following:
/usr/lib/appman/appman-cli -c "network default-gateway-set Default_Gateway_IPaddress"
For example, for a default gateway of 192.168.9.254:
# /usr/lib/appman/appman-cli -c "network default-gateway-set 192.168.9.254"
007–4699–010
105
5: Troubleshooting
4. Reset eth0:
# /usr/lib/appman/appman-cli -c "network if-reset eth0"
5. Restart the Appliance Manager service:
# service appman restart
Reporting Problems to SGI
See "Support Data" on page 73 for information about gathering the information that
SGI Support will require when diagnosing problems.
106
007–4699–010
Appendix A
How Appliance Manager Configures Filesystems
This appendix describes how SGI InfiniteStorage Appliance Manager constructs a
filesystem and provides an overview of the underlying volume and RAID device
configuration that the system uses to lay out the filesystem:
• "Filesystem Creation Goals" on page 107
• "Disk Striping" on page 108
• "Filesystem Configuration Factors" on page 110
• "Disk Allocation" on page 111
• "Multi-Array Filesystems" on page 111
• "Hot Spare Assignment" on page 112
• "Changing from SGIRDAC to SGIAVT Mode" on page 112
For information about creating filesystems via Appliance Manager, see "Creating
Filesystems" on page 30. The system uses the options you provide to create the
underlying filesystems automatically.
Note: The required setting for the Default Host Type of the storage arrays is SGIAVT.
Storage arrays supplied by SGI should already be set to SGIAVT mode; however, if
the host type is different, it must be changed to SGIAVT before Appliance Manager
can support it. See "Changing from SGIRDAC to SGIAVT Mode" on page 112.
Filesystem Creation Goals
Appliance Manager creates a filesystem with the goal of generalizing optimization for
a variety of fileserver workloads.
When you create a filesystem, you choose whether to optimize for performance or
capacity. If you select for capacity, Appliance Manager will use all the available disk
space to create the filesystem, although this may come at the cost of slower
performance. You also select a filesystem optimized for bandwidth or for I/O per
second (IOPS). Select for bandwidth when you will have a small set of files and you
must perform streaming reads and streaming writes as fast as possible. Select for
007–4699–010
107
A: How Appliance Manager Configures Filesystems
IOPS when you will be performing random reads and writes to different sets of files.
In general, selecting for IOPS will be the better choice.
In conjunction with these options, Appliance Manager attempts to provide a balance
among these factors:
• Performance
• Manageability
• Reliability
When a filesystem is configured efficiently on a NAS system, you can support a great
deal of data traffic at full disk-performance capacity.
Disk Striping
To optimize performance, Appliance Manager configures the filesystem so that the
data is striped across multiple disk drives. The data is written in units to each drive
in turn, in a round-robin fashion. This allows multiple reads and writes to take place
in parallel, increasing IOPS performance.
To achieve maximum striping, the underlying RAID disk devices in a NAS system are
grouped together into physical volume elements that combine multiple drives into a
single logical unit. On top of that, the software groups the physical volume elements
together into stripes, which together form a single concatenated volume element per
filesystem. Figure A-1 describes this.
108
007–4699–010
®
SGI InfiniteStorage Appliance Manager User’s Guide
Logical volume
Physical device
Concatenated
volume element
stripe
physical volume element
physical volume element
n+1 RAID 5
n+1 RAID 5
stripe
physical volume element
physical volume element
n+1 RAID 5
n+1 RAID 5
Figure A-1 Filesystem Structure
Appliance Manager uses RAID 5 devices. With RAID 5, parity is spread across the
disks in an array. Because of this, you can lose one of the disks in the array without
losing your data; the RAID device can still reconstruct the data. Where the disks in
the RAID array are all the same size, the usable RAID capacity is the total number of
disks in the array minus one.
When you create a filesystem, the system determines how much capacity the RAID
devices provide and how the RAID devices can be arranged into stripes. From this,
the system determines how many stripes the software will use to create the filesystem
of the size you defined. If the number of RAID units in the system allows it, the
system builds stripes that are two RAID units wide. If possible, the system builds
RAID stripes that are four units wide.
The longer the stripe, the better the performance. After you have created the
filesystem, however, you can add new disks to the system only in numbers that
correspond to the stripe unit. For example, if the system’s stripe unit is a four-way
stripe of 4+1 RAID devices, then you must add 20 disks at a time if you need to grow
the filesystem, as illustrated by Figure A-2, in which a stripe consists of 4 physical
volume elements, each of which requires 5 disks (4 disks plus 1 parity disk). In this
case, optimizing for performance entirely would cause you to lose manageability in
terms of growing the filesystem at a later time.
007–4699–010
109
A: How Appliance Manager Configures Filesystems
Logical volume
Physical device
Concatenated
volume element
stripe
physical volume element1
4+1 RAID 5-disk1
4+1 RAID 5-disk2
4+1 RAID 5-disk3
4+1 RAID 5-disk4
4+1 RAID 5-disk5
physical volume element2
4+1 RAID 5-disk1
4+1 RAID 5-disk2
4+1 RAID 5-disk3
4+1 RAID 5-disk4
4+1 RAID 5-disk5
physical volume element3
4+1 RAID 5-disk1
4+1 RAID 5-disk2
4+1 RAID 5-disk3
4+1 RAID 5-disk4
4+1 RAID 5-disk5
physical volume element4
4+1 RAID 5-disk1
4+1 RAID 5-disk2
4+1 RAID 5-disk3
4+1 RAID 5-disk4
4+1 RAID 5-disk5
20 disks total
per stripe
Figure A-2 Four-Way Stripe
Filesystem Configuration Factors
In determining the underlying filesystem configuration, Appliance Manager uses
internal performance models that evaluate in a numerical fashion, according to
multidimensional criteria, how suitable a RAID configuration will be.
110
007–4699–010
®
SGI InfiniteStorage Appliance Manager User’s Guide
When determining the filesystem configuration, Appliance Manager considers the
following inputs:
• Whether you selected for capacity or performance
• Whether you selected for bandwidth or IOPS optimization
• How many disks the system has in its array
The underlying configuration will be different depending on the number of disks and
whether that number divides evenly. In general, the system tries to use the most
number of disks possible. When you create the filesystem, the system calculates the
following:
• Stripe units
• Stripe width alignment down to the hardware level
• Header alignment on stripe boundaries
Disk Allocation
There is a fixed number of I/O per second (IOPS) that can be performed at the same
time for each disk; if more than one filesystem shares the same disk, they share the
IOPS for that disk. If there is only one filesystem on the disk, you get the
performance for the entire array. If there are two filesystems on the disk, that
performance is divided in two (and not always in a predictable way).
If the workload is more than 3 streaming reads or writes (for example, for media or
satellite ingest), you should select for IOPS. For increased performance, contact SGI
Professional Services.
Multi-Array Filesystems
In order to create optimal filesystems that span multiple arrays, each array must be
identical, having the same number, type, and size of disks, and the same amount of
free space.
Building multi-array filesystems on anything other than 100% symmetrical arrays
requires planning and understanding of how Appliance Manager creates filesystems
in order to achieve good results.
007–4699–010
111
A: How Appliance Manager Configures Filesystems
If you attempt to create a filesystem that spans multiple arrays that have different
numbers of disks, or includes disks that are already in use on one array but not on
another, the result may be a filesystem that does not perform at peak efficiency.
Therefore, you will receive a warning at filesystem creation time.
Hot Spare Assignment
To increase reliability of a RAID system, a RAID array is often configured with a
certain number of disks assigned as hot spares. A hot spare is a drive within a system
that is not used unless a drive within that system fails, at which point it is added to
the system to replace the failed drive without shutting the system down or
interrupting service.
When creating filesystems with Appliance Manager, the assignment of hot spares is
automatic. By default, the storage server has a single filesystem and hot spares
assigned. If you destroy that filesystem, the system will create the hot spares it
determines are necessary for system reliability when you create your first new
filesystem on the empty array. If you manually assign hot spares, the system will
leave those disks as hot spares and create more hot spares if it determines that you
need them.
Changing from SGIRDAC to SGIAVT Mode
This section discussing changing from SGIRDAC to SGIAVT mode for the following:
• "TPSSM" on page 113
• "ISSM EE" on page 113
• "ISSM WE" on page 114
• "SMI" on page 114
112
007–4699–010
®
SGI InfiniteStorage Appliance Manager User’s Guide
TPSSM
Do the following to use the TPSSM GUI:
1. Log in to the system as root and execute the following:
# tpssm
The GUI will present a list of storage arrays that it manages.
2. Double click on the storage array in question. This will open a Storage Array
Management window.
3. Select the following menu:
Storage Array
> Change
> Default Host Type
4. Scroll through the drop-down menu and select SGIAVT.
5. Click OK.
ISSM EE
Do the following to use the ISSM EE GUI:
1. Log in to the system as root and execute the following:
# smeegui
The GUI will present a list of storage arrays that it manages.
2. Double click on the storage array in question. This will open a Storage Array
Management window.
3. Select the following menu:
Storage Array
> Change
> Default Host Type
4. Scroll through the drop-down menu and select SGIAVT.
5. Click OK.
007–4699–010
113
A: How Appliance Manager Configures Filesystems
ISSM WE
You cannot set the global defaultHostType for the defaultGroup using the ISSM
WE GUI (smwegui). You must use the smwecli command-line interface. For
example:
# smwecli -w 600a0b800011144c000000004457e8f9 -c ’set storagearray defaulthosttype="SGIAVT";’
SMI
In SMI, you cannot set the global defaultHostType for the defaultGroup using
the SMI GUI smigui. You must use the smicli command-line interface. For
example:
# smicli -w 600a0b800011144c000000004457e8f9 -c ’set storagearray defaulthosttype="SGIAVT";’
114
007–4699–010
Appendix B
How Appliance Manager Configures the CXFS
Cluster
SGI InfiniteStorage Appliance Manager Setup Wizard automatically creates the CXFS
cluster if CXFS is licensed and installed. After the Setup Wizard is complete, the
cluster will contain the following:
• One CXFS metadata server node, on which Appliance Manager runs 1
• One Fibre Channel switch
• One clustered filesystem
You will add client nodes later using the CXFS Cluster Nodes management pages.
The cluster name, private network IP address, and Fibre Channel switch IP address
are all pre-set. By default, the cluster name is sgisan. The CXFS private network is
in the 10.x.x.x range; one of the ethernet ports on the metadata server is assigned an
address within this range, typically eth2. Another ethernet port (typically eth3) is
configured for direct connect to the Fibre Channel switch.
Note: Ethernet port assignments may vary, depending on your system hardware.
Changing the Network Configuration
If you have a site-specific reason that requires you to change the cluster name or
private network IP address, you can do so using the CXFS tools described in CXFS 5
Administration Guide for SGI InfiniteStorage. However, both these operations are
disruptive to the cluster and must be done with care.
For example, to change the private network IP address by using the cxfs_admin tool:
1. Use cxfs_admin to disable the metadata server and change the private_net
IP address.
1
Metadata is information that describes a file, such as the file’s name, size, location, and permissions.The metadata server is
the node that coordinates updating of metadata on behalf of all nodes in a cluster.
007–4699–010
115
B: How Appliance Manager Configures the CXFS Cluster
2. Use Appliance Manager to reconfigure the appropriate network interface with the
new private network IP address.
3. Use cxfs_admin to reenable the metadata server.
Note: While the metadata server is disabled, the CXFS management and monitoring
pages in Appliance Manager will display the error message Unable to connect
to cluster. These pages will return to normal after the metadata server is enabled
and has reestablished membership, which can take several seconds. For more
information, see "Cluster Connection Issues" on page 116.
To change the cluster name, you must completely destroy and re-create the cluster
using the CXFS tools.
Cluster Connection Issues
The message Unable to connect to cluster may appear on the Summary page
or on the CXFS management or monitoring pages for the following possible reasons:
• The metadata server is currently establishing membership in the CXFS cluster. It
can take several seconds for the metadata server to establish membership. Wait a
few seconds and reload the page.
• The CXFS cluster daemons are not running. Check the daemon status on the
following page:
Management
> Services
> CXFS
> Start/Stop
Start the cluster daemons if necessary.
• The CXFS cluster is misconfigured. You can use the cxfs_admin and
cxfs-config tools to further diagnose cluster configuration issues. For more
information, see CXFS 5 Administration Guide for SGI InfiniteStorage.
116
007–4699–010
Appendix C
Reinstalling Appliance Manager After the Network
is Configured
For information about installing Appliance Manager onto a clean machine, see the
SGI InfiniteStorage Software Platform Release Notes.
If you are reinstalling from CD after your network has already been configured, you
must still run through the Setup Wizard in order for the system to operate correctly. If
networking has already been configured, replace https://192.168.9.9:1178/ in
the instructions above with https://YOUR_SERVER:1178/ in order to access the
Setup Wizard (where YOUR_SERVER is the hostname or IP address of your system).
007–4699–010
117
Appendix D
SGI NEXIS System Reset DVD
The SGI NEXIS System Reset DVD is a bootable DVD that you can use to reset your
NAS settings to the factory defaults. This appendix discusses the following:
• "When to Use the SGI NEXIS System Reset DVD" on page 119
• "Resetting to the Factory Default Image after Severe Failure" on page 120
When to Use the SGI NEXIS System Reset DVD
You can use the reset DVD to recover from hardware failures affecting the NAS
server’s system disk or critical failures that prevent the system from booting. The
following are a few specific scenarios where the SGI NEXIS System Reset DVD could
be used:
• Partition table corruption
• Filesystem corruption on system disks
• Accidental deletion of critical system files
• System disk failure or replacement
!
007–4699–010
Caution: The NEXIS reset process is destructive and is only appropriate in cases of
severe failure.
119
D: SGI NEXIS System Reset DVD
Resetting to the Factory Default Image after Severe Failure
!
Caution: Installing the the SGI NEXIS System Reset DVD will destroy the system root
partition and replace it with a factory default image. It will repartition the system
disk, which will destroy efi, swap, and any other partitions on the system disk.
In the event of a failure as described in "When to Use the SGI NEXIS System Reset
DVD" on page 119, do the following:
1. Ensure that you have a serial connection via IPMI, an L2 terminal, or a physical
terminal.
Note: A serial connection is required because remote access is not configured
when booting from the SGI NEXIS Reset DVD.
2. Insert the SGI NEXIS System Reset DVD into the system.
3. Reboot the system.
4. During the system boot process, select the option to boot from the CDROM.
Follow the instructions below for your system’s architecture type:
• Altix ia64 system:
1. When the system reaches the EFI boot menu, select the EFI shell. When
entering the EFI shell, a list of devices that the EFI system recognizes is
listed. The devices that are available to the system as boot devices are
prefixed with fs# (where # is the device’s number as assigned by the EFI
system, such as fs0 for device number 0). For example, as shown in
Figure D-1:
120
007–4699–010
®
SGI InfiniteStorage Appliance Manager User’s Guide
Figure D-1 EFI Shell
2. Assuming that the CDROM device is listed as fs0, enter the following
commands to boot from the reset DVD:
Shell> fs0:\
fs0:\> efi\boot\bootia64.efi
3. At this point, you will be prompted with an Elilo boot prompt. You may
wait for the boot delay (5 seconds) or press Enter to immediately boot
the reset DVD.
• Altix XE x86_64 system:
1. When prompted during the boot process, press F2 to enter the system
BIOS setup.
2. In the BIOS screen, navigate to the Boot Manager page and select the
device entry that corresponds to the CDROM device.
3. You may wait for the boot delay to expire or press Enter to boot the reset
DVD immediately.
007–4699–010
121
D: SGI NEXIS System Reset DVD
5. After the SGI NEXIS System Reset DVD has completed booting, you will be
prompted to either initiate the reset process or boot a minimal rescue
environment. Choose Reset to initiate the reset process.
6. The reset process has two stages and requires two reboots:
a.
Reset Stage 1: Base Software Installation:
The base software installation stage is a fully automated process, as shown in
Figure D-2. It terminates with a system reboot.
122
007–4699–010
®
SGI InfiniteStorage Appliance Manager User’s Guide
Figure D-2 Fully Automated Base Installation
b.
Reset Stage 2: Post-installation Configuration:
After the system reboots, do the following according to your architecture type:
• Altix ia64 system: select SGI InfiniteStorage NEXIS from the boot menu
• Altix XE x86_64 system: select Boot from Hard Disk from the boot menu
007–4699–010
123
D: SGI NEXIS System Reset DVD
This will install the Appliance Manager software and prompt you for the SGI
NEXIS model to be configured, as shown in Figure D-3.
Figure D-3 Post-Installation Configuration
Select your NEXIS model number and click OK.
124
007–4699–010
®
SGI InfiniteStorage Appliance Manager User’s Guide
Based on the selected NEXIS model, the reset process will do the following:
• Load the appropriate RAID management software
• Configure Appliance Manager
• Configure Appliance Manager’s network management interface
The post-installation configuration completes with an automatic system
reboot.
7. Follow the instructions in Chapter 2, "Initial System Setup" on page 9 to complete
the setup of your NEXIS system.
007–4699–010
125
Glossary
Active Directory
A directory service that implements LDAP in a Windows environment. It provides a
hierarchical structure for organizing access to data.
administration password
The password required to log into the Management screens of Appliance Manager
bonded network interface
Virtual network interface that consists of real interfaces working in tandem. A virtual
interface can provide the aggregated bandwidth of all of the interfaces that you used
to create it.
cell ID
A number associated with a node that is used by the CXFS software and appears in
messages.
CHAP
Challenge Handshake Authentication Protocol is a means of authentication used
between a client and server where the password is sent over the wire in a form that is
impossible to discover and impossible to replay. Both client and server must know
what the original password is, but someone snooping on wire traffic cannot recover
the password and cannot later send the original (snooped upon) authentication packet
to the server in an attempt to try to trick it into letting them authenticate as a valid
client.
CIFS
Common internet filesystem. This protocol is usually used by Microsoft Windows
clients.
client-only node
A node in a CXFS cluster that does not run cluster administration daemons and is not
capable of coordinating CXFS metadata.
007–4699–010
127
Glossary
cluster
A cluster is the set of systems (nodes) configured to work together as a single
computing resource. A cluster is identified by a simple name and a cluster ID. In
CXFS, a cluster running multiple operating systems is known as a multiOS cluster.
current metric
Metric drawn live from the server or taken from the last few minutes of the metric
archives.
CXFS
Clustered XFS filesystem.
DCM
Disk cache manager, which lets you configure the DMF disk MSP to manage data on
secondary storage, allowing you to further migrate the data to tape as needed.
default network gateway
The IP address of the router that this system should use to communicate with
machines that are outside of its subnet.
DHCP
Dynamic host configuration protocol (DHCP) allows one or more server systems to
dynamically distribute network IP addresses and site configuration parameters to
new or requesting client systems. By using DHCP, a site with only a few available
addresses can serve a large number of hosts that connect to the network only
occasionally, or a large site can manage the permanent assignment of addresses with a
minimum of administrative attention. The NAS server can be configured as a DHCP
client.
directory service
See name service.
disk IOPS
Disk I/O per second.
128
007–4699–010
®
SGI InfiniteStorage Appliance Manager User’s Guide
disk striping
Writing data in units to multiple disks in a round-robin fashion, increasing IOPS
performance.
disk throughput
The amount of data that is transferred to and from disks.
distinguished name
A unique identifier for an entry in an LDAP directory tree structure.
DMF
Data Migration Facility, a hierarchical storage management system for SGI
environments.
DNS
Domain name system
DRDB
Distributed Replicated Block Device. See http://www.drbd.org/.
dual-resident file
In DCM, a cache-resident copy of a migrated file that has already been copied to tape,
and can therefore be released quickly in order to prevent the cache filling, without
any need to first copy it to tape
FC
Fibre Channel storage interface connection.
fence
The isolation of a problem node so that it cannot access I/O devices, and therefore
cannot corrupt data in the shared CXFS filesystem.
FQDN
Fully qualified domain name.
007–4699–010
129
Glossary
gigabyte
1024 megabytes (also known as gibibyte). On the DMF Configuration screens, disk
sizes use multipliers that are powers of 1000, such as kB, MB and GB. This is for
consistency with the DMF documentation and log files. However, the rest of
Appliance Manager, including the DMF Monitoring screens, use multipliers that are
powers of 1024, such as kiB, MiB and GiB.
historic metric
Metric taken exclusively from the metric archives.
hot spare
Disk drive within a RAID array that is not used unless another drive within the RAID
array fails, at which point it is added to the filesystem to replace the failed drive
without shutting the filesystem down or interrupting service.
idle time
Time that remained when the CPU could not find any tasks to run.
initiator
The client accessing the storage in an iSCSI network.
interrupt time
Time the CPU spent processing requests from I/O devices. In a storage server
context, these are almost exclusively generated by disk operations or network packets
and by switching between processes.
I/O fencing
See fence.
IOPS
I/O per second.
IPMI
Intelligent Platform Management Interface, a system reset method.
130
007–4699–010
®
SGI InfiniteStorage Appliance Manager User’s Guide
IPoIB
IP over InfiniBand.
iSCSI
Internet Small Computers Systems Interface is a protocol that is used to transport
SCSI commands across a TCP/IP network. This allows a system to access storage
across a network just as if the system were accessing a local physical disk. In an iSCSI
network, the client access the storage is called the initiator. The remote storage that
the client accesses is called the target.
LDAP
Lightweight directory access protocol (LDAP) is a networking protocol that organizes
access to data in a directory tree structure.
KDC
Key distribution center
metadata
Information that describes a file, such as the file’s name, size, location, and
permissions.
metadata server
The node that coordinates updating of metadata on behalf of all nodes in a CXFS
cluster.
MSP
Media-specific process, the daemon-like process in DMF by which data blocks are
copied onto alternate media, and which assigns keys to identify the location of the
migrated data.
name service
Application that manages the information associated with network users.
NAS client
Computer running a program that accesses the storage server.
007–4699–010
131
Glossary
NFS
Network file system.
NIC
Network interface card.
NIS
Network information service (NIS) is a network lookup service that provides a
centralized database of information about the network to systems participating in the
service.
node
A node is an operating system (OS) image, usually an individual computer. (This use
of the term node is different from the NUMA definition for a brick/blade on the end
of a NUMAlink cable.) See also client-only node.
non-dual-resident file
A file in DCM that is not a cache-resident copy of a migrated file. It must be migrated
to tape before it can be removed.
NTP
Network Time Protocol.
physical volume element
The combination of multiple RAID disk drives into a single logical unit.
RAID
Redundant array of independent disks.
RAID 5
A level of RAID that uses block-level striping and distributed parity.
132
007–4699–010
®
SGI InfiniteStorage Appliance Manager User’s Guide
resource
In the context of the Appliance Manager interface, a resource is something that is
monitored and managed by Appliance Manger (such as network interfaces or DMF).
Serial ATA (SATA)
Serial advanced technology attachement storage interface connection.
service
Task performed by the storage server.
shadow file
A file that is protected from all access by non-root users and stores the encrypted
passwords.
ssh
A tool that is used to communicate between nodes in the cluster. See
http://www.openssh.com/.
smart host
The gateway server where email should be delivered.
snapshot
See XVM snapshot.
system time
Time the CPU spent executing kernel code. This is usually dominated by NFS file
serving and accessing data from disks.
tape library slot usage
The number of slots used by DMF, other applications, or vacant.
target
The storage that appears to the initiator as a disk drive in an iSCSI network.
007–4699–010
133
Glossary
TMF
Tape Management Facility.
VG
Volume group, one of the components of a DMF library server. A volume group is
responsible for copying data blocks onto alternate media.
wait time
Time when a CPU was forced to do nothing while waiting for an event to occur.
Typical causes of wait time are filesystem I/O and memory swapping.
XFS
A filesystem implementation type for the Linux operating system. It defines the
format that is used to store data on disks managed by the filesystem.
XVM snapshot
Virtual point-in-time image of a filesystem. Snapshot copies are not actual media
backup for a filesystem.
YaST
An operating system setup and configuration tool.
134
007–4699–010
Index
802.3ad standard, 27
A
About menu selection, 5
access operation
NFS, 92
Active Directory, 17, 49, 65
admin server, 54
administration password, 12
Administrator Password screen, Global
Configuration, 72
aggregate interface
See "bonded interface", 17
AIX, 59
alerts, 81
Alerts menu selection, 4
All Clients screen, 100
All Filesystems screen, 82
Appliance Manager 4.0 upgrade issues, 104
appman_admin, 101
archives, 76
archives directory size, 102
Arrays screen, 31
Asynchronous Writes, NFS export option, 54
authentication services, 17
autonegotiate, 23
available space for filesystem, 32
B
backup of Appliance Manager configuration, 5
bandwidth of filesystem, 32
blue color in graphs, 77
bonded interface, 17
007–4699–010
bonded network interface, 21
bonded network interfaces, 25
bonding mode, 26, 27
browser address for Appliance Manager, 16
busy tape drive, 85
C
cancel operation
CIFS, 93
capacity of filesystem, 32
cell id, 95
change/notify operation
CIFS, 93
CHAP authentication, 40
CIFS, 34, 93
client number, 79
configuration, 57
iSCSI and, 37
CIFS authentication, 65, 69
CIFS screen, 83, 93
clean install, 117
clients, 100
Clients category, 83
Clients menu selection, 4
close operation
CIFS, 94
cluster connection issues, 116
cluster node, 59
colors in graphs, 77
command-line configuration password, 12
commit operation, 92
community string, 63
configuration password, 12
corrupt password file, 101
CPU utilization, 79, 89
135
Index
create/open operation
CIFS, 94
cross-over Ethernet cable, 9
current time, 77
custom installation, 17
CXFS
configuration, 59
how Appliance Manager configures, 115
monitoring, 95
multiple clusters and failover networks, 60
overview, 2
summary, 78
CXFS GUI, 21
CXFS troubleshooting
CXFS client suck on filesystems mount, 104
incorrect status display, 104
cxfs_admin, 21, 104, 116
cxfs_config, 116
D
data flow color-coding in graphs, 78
data reduction process, 77
DCM disk caches, 87
dedicated network interface, 23, 24
default gateway, 13, 14
default network gateway, 64
deleting filesystems, 35
destroying filesystems, 35
DHCP, 13, 23, 24
Discover menu, 35
disk
allocation, 33
IOPS, 83
operations, 83
quotas, 82
space, 79, 82
throughput, 79, 83
throughput, monitoring, 83
Disk IOPS screen, 83
Disk Quota screen, 82
136
disk striping, 108
dmarenadump, 88
dmcheck, 88
DMF
Activity screen, 98
Appliance Manager use with, 7
cache monitoring, 87
Configuration pages, 47
Empty Tape Volume page, 47
error messages, 87
filesystem monitoring, 86
monitoring, 84
OpenVault library is missing, 88
resources, 84
statistics, 87
tape drive state, 85
tape library usage, 84
tape volume and drive, 46
tape volume monitoring, 86
troubleshooting, 87
user-generated activity, 98
DMF resources, 46
DMF version, 2
DNS and Hostnames screen, Global
Configuration, 69
DNS screen, 14
domain, 39, 53
domain search, 14
Domain Search, DNS and Hostnames screen, 70
drive type, 32
dual-resident cache files, 87
duplex option, 23
DVD for NEXIS System reset, 119
dynamic bonding mode, 27
E
Empty Tape Volume screen, 47
Empty Tape Volume, DMF, 47
/etc/dmf/dmf.conf, 88
007–4699–010
®
SGI InfiniteStorage Appliance Manager User’s Guide
/etc/host.conf, 15
/etc/hosts, 15, 17
/etc/krb5.keytab, 54
eth0, 13, 22
ethereal, 73
Ethernet connections, 9
Exchange Server as an iSCSI initiator , 36
expert mode, 48
export options, 54
EXPORT_METRICS, 88
exporting filesystems, 34
F
Fedora Directory Server, 68
fence, 60
Fibre Channel switch, 60
filesystem
automatic configuration by Appliance Manager
creation goals, 107
disk allocation, 111
disk striping, 108
factors, 110
filesystem structure, 109
hot spare assignment, 112
RAID 5 devices, 109
available space, 32
bandwith, 32
capacity, 32
creation, 30
destroying, 35
growing, 34
how Appliance Manager configures, 107
IOPS, 32
limit on an array, 31
listing, 29
multi-array, 111
optimization, 32
performance, 32
SGIAVT mode, 112
size, 31
007–4699–010
warning about unsupported disk
configuration, 31
filesystem configuration, 17
filesystem creation warning messages, 103
filesystem discovery, 35
filesystem preconfiguration, 12
filesytem goal, 32
findfirst/next operation
CIFS, 94
Finished screen, 16
Firefox, 10
flush operation
CIFS, 94
fsinfo operation, 92
full-duplex, 23
G
gateway, 14, 64
Gather Support Data screen, Global
Configuraiton, 73
getattr operation
CIFS, 94
NFS, 92
getsecurity operation
CIFS, 94
global configuration, 64
Global Configuration menu selection, 5
global operations, 53
goal of filesystem, 32
group quotas, 51
growing filesystems, 34
GUI, 113
H
half-duplex , 23
hard limit, 51
hardware inventory, 90
137
Index
identifier, 39
initiator, 36, 41
list targets, 42
modify targets, 42
network, 36
NFS and CIFS, 37
pool, 38
protocol, 36
qualified name, 39
re-exporting targets, 37
start/stop, 42
target, 36
targets, 17, 36, 38
iSCSI and power outage, 103
iSCSI Initiator program, 41
ISSM, 112
ISSM EE GUI, 113
ISSM WE GUI, 114
header alignment, 111
historic time, 77
historical status of a parameter, 79
History menu selection, 79
hostname, 13
hostname resolution, 15
hot spare devices, 112
I
identifier for target, 39
idle tape drive, 85
IEEE 802.3ad standard, 27
Import Users option, Local Users screen, 49
InfiniBand network interface, 24
InfiniBand throughput, 79
initial system setup, 9
initiator for iSCSI, 36, 41
inode_mods operation, 92
input load balancing, 26
installation customization, 17
interface overview, 2
Internet Explorer, 10
Internet Small Computer Systems Interface
See "iSCSI", 36
interrupt time, 89
Introduction screen, 11
ioctl operation
CIFS, 94
IOPS, 32, 83, 92, 94
CIFS, 91
NFS, 91
IP address, 13, 28
IP header, 28
iqn, 39
IRIX, 59
iSCSI
client number, 79
destroy storage pool, 42
destroy targets, 42
domain, 39
138
J
JavaScript, 10
K
KDC, 54
Kerberos, 53
Kerberos aware clients , 55
Kerberos with Integrity support aware clients, 55
key distribution center, 54
keytab, 54
krb5 and krb5i, 55
L
Layer 2 (MAC address), 28
Layer 3 (IP header), 28
LDAP, 17, 49
007–4699–010
®
SGI InfiniteStorage Appliance Manager User’s Guide
LDAP (lightweight directory access protocol), 68
Licenses screen, Global Configuration, 72
licensing requirements, 8
Linux, 59
load average, 79
load balancing, 26, 28
local subnet, NFS access, 55
local users and groups, 17, 49
lockd operation, 92
lockd_granted operation, 92
lockd_share operation, 92
Log In menu selection, 5
Log Out menu selection, 5
lookup operation
NFS, 92
M
MAC address header, 28
mail store and iSCSI, 36
main menu, 4
management interface, 13, 21, 22
Management menu selection, 4
management password, 12
media-specific processes (MSPs), 98
menu path, 2
metadata operations, 83
metrics
CPU, 89
type collected, 76
MiB vs MB, 77
misc operation
CIFS, 94
Modify option, 22, 24
modify the installation, 17
Monitoring menu selection, 4
monitoring performance, 75
monitoring screen example, 76
move operation
CIFS, 94
MSPs, 98
007–4699–010
multi-array filesystems, 111
mutual CHAP authentication, 40
N
name service client, 65
nameserver, 14, 70
NDMP, 61
monitoring, 99
netmask, 14
network configuration and CXFS, 115
network configuration issues, 105
network gateway, 14
Network Information Service (NIS), 69
network interface
bonded, 25
InfiniBand, 24
management, 22
standalone, 22
network interface configuration, 21
Network Interface screen, 12
network interfaces, 17
network throughput, 79, 90, 100
Network Time Protocol (NTP), 15, 71
NEXIS System Reset DVD, 119
NFS, 34, 52, 91
client number, 79
custom definition, 56
export options, 54
iSCSI and, 37
restrict to hosts, 55
NFS screen, 83, 91
NFS serving domain, 53
NFSv4 enabling, 53
NIS, 17, 69
non-dual-resident cache files, 87
NTP, 71
NTP enable, 15
NTP server, 15
139
Index
NTP Time Synchronization, Date and Time
screen, 71
number of users, 79
O
ONLINE RAID status, 30
OpenLDAP Server, 68
OpenVault tape libraries, 84
operation
CIFS, 94
operation classes, 91
Operations, 5
operations by type, 91
oprofile, 73
optimization for filesystem, 32
output load balancing, 26, 28
overview, 1
P
password default, 12
password problems, 101
Passwords screen, 12
PCP, 88
performance archives, 76
performance data, 5
Performance Data screen, 73
performance increases, 111
performance monitoring, 75
performance of filesystem, 32
physical volume elements, 108
pool for iSCSI, 38
port speed, 22
power outage and iSCSI, 103
preconfigured filesystem, 12
principal user (Kerberos) , 54
public NTP timeserver, 15
140
Q
Quick Start guide, 9
quotas
disk, 82
group, 51
user, 50
user and group, 50
quotas and earlier versions of Appliance
Manager, 52
R
RAID 5 devices, 109
re-exporting iSCSI targets with NFS or CIFS, 37
read block sizes, 91
read operation
CIFS, 94
NFS, 92
Read-only NFS Export option, 54
readdir operation
NFS, 92
readdirplus operation, 92
realm, 53
reboot, 5
red color in graphs, 77
Red Hat Enterprise Linux, 59
reinstallation after configuration, 117
remove operation
NFS, 92
removing filesystems, 35
reporting problems to SGI, 107
repository size, 30
reservation delay history, 86
Reset DVD, 119
resources, 4, 81
Resources menu selection, 4
restrict to hosts, NFS option, 55
run_filesystem_scan.sh, 47
007–4699–010
®
SGI InfiniteStorage Appliance Manager User’s Guide
S
Samba schema, 68
Save/Restore Configuration screen, 72
scheduling snapshots, 43
secret for CHAP authentication, 40
security certificate warning, 10
server configuration and management, 19
service times, 92, 94
services, 90
Services menu selection, 4, 5
serving domain for NFS, 53
setattr operation
CIFS, 94
NFS, 93
Setup Wizard, 9
DNS screen, 14
Finished screen, 16
Introduction screen, 11
Network Interface screen, 12
Passwords screen, 12
System Restart screen, 16
Time and Date screen, 15
Verify Configuration screen, 15
severe failures, 119
SGI NEXIS System Reset DVD, 119
SGI Professional Services, 111
SGIAVT, 107, 112
Share Options, CIFS configuration, 57
shutdown, 5
Shutdown screen, Global Configuration, 73
Site Map menu selection, 5
SLES, 59
slot usage, 84
smeegui, 113
SMI, 114
smicli, 114
smwecli, 114
smwegui, 114
snapshot, 33
configuration, 6
custom time specification, 43
007–4699–010
deletion of, 44
maximum number of, 44
name, 44
scheduling, 43
snapshot repository size, 30
snapshots, 17
/SNAPSHOTS directory, 44
SNMP
configuration, 62
soft limit, 51
Solaris, 59
SSL certificates, 10
standalone network interface, 22
static bonding mode, 27
Static option, 23, 24
storage array discovery troubleshooting, 102
storage configuration, 28
stripe unit, 111
stripe width alignment, 111
subnet mask, 28
Summary menu selection, 4, 78
Summary screen example, 80
SUSE Linux Enterprise Server, 59
switch, 60
system alerts, 81
system console, 105
system logs, 81
system name, 64
System Name, Global Configuration, 64
System Restart screen, 16
system setup, 9
system time, 89
system uptime, 79
T
tape
tape
tape
tape
drives, 85
libraries, 85
library slot usage, 84
volumes, 86
141
Index
target for iSCSI, 36
CHAP authentication, 40
creating, 38
identifier, 39
re-exporting with NFS or CIFS, 37
size, 39
username, 40
target name, 39
throughput, 83
CIFS, 91
network, 90
NFS, 91
Time and Date screen, 15, 71
time zone, 15
time zone specification, 19
Time zone, Date and Time screen, 71
TPSSM, 112
tpssm, 113
TPSSM GUI, 113
trap destination, 63
troubleshooting, 101
Appliance Manager is inaccessible
network configuration issues, 105
rebooting the system, 105
archives directory size, 102
CXFS client stuck on filesystems mount, 104
CXFS status is incorrect, 104
filesystem creation warning messages, 103
password issues, 101
power outage and iSCSI, 103
reporting problems, 107
unconfigured storage arrays are discovered, 102
users and groups not visible, 104
Type field, 30
U
unavailable tape drive, 85
unfence, 60
unit measures, 77
142
uptime of system, 79
Use custom definition option, NFS screen, 56
user account range, 104
user and group configuration, 49
user numbers, 79
user quotas, 50
user time, 89
users and groups, 17
V
/var/lib/appman/alerts/archive, 81
/var/lib/appman/archives, 102
/var/lib/appman/archives directory, 76
Verify Configuration screen, 15
versions, 100
VG, 86
volume group, 86
W
wait time, 89
web browsers, 10
Windows, 59
workload optimization for filesystem, 32
worldwide name, 29
write block sizes, 91
write operation
CIFS, 94
write_async operation, 93
write_sync operation, 93
WWN, 29
X
xattr operation
NFS, 93
007–4699–010