1
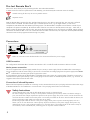
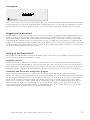
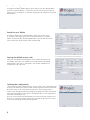
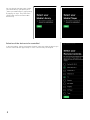
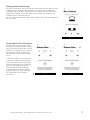
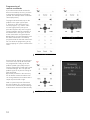
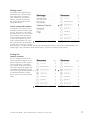
Instruction manual Pro-Ject Remote Box S © Audio Trade GmbH · Pro-Ject Remote Box S · Version June 15th, 2013 1 2 Inhalt Connections.....................................................................4 USB Connection...................................................................................4 Mains power connection.......................................................................4 Connection of infrared Repeaters...........................................................4 Safety Instructions............................................................4 Front panel......................................................................5 Suggestions for placement...............................................5 Setting up the Remote Box S.............................................5 Installation of Java................................................................................5 Installation and Start of the configuration program..................................5 Start of the configuration.......................................................................6 Search for your WLAN..........................................................................6 Entering the WLAN access code.............................................................6 Finishing the configuration....................................................................6 Operation of the Remote Box S with the App „Box Control“.7 Initial start of the app............................................................................7 Select the Remote Box S........................................................................7 Getting started with the app..................................................................9 Commands for Pro-Ject devices.............................................................9 Programming of remote commands.....................................................10 Settings menu....................................................................................11 List of command windows....................................................................11 Sorting the control windows.................................................................11 General Settings.................................................................................12 Specifications.................................................................12 Service...........................................................................12 Warranty........................................................................12 Copyright.......................................................................12 © Audio Trade GmbH · Pro-Ject Remote Box S · Version June 15th, 2013 3 Pro-Ject Remote Box S Dear music lover, thank you for purchasing the Pro-Ject Audio Remote Box S. In order to achieve maximum performance and reliability, you should study this instruction manual carefully. Hazard warning for the user, the unit or possible misuse Important notice With the Remote Box S and the free Pro-Ject Box Control app you are able to control all Pro-Ject units with a infrared remote control via WLAN. The Box Control app is available for iOS units, e.g. the Apple iPhone, as well as for smartphones and tablets with the Android operating system. The Remote Box S simplifies and unifies the control of your complete hi-fi system tremendously. All infrared codes of the Pro-Ject units are already stored in the app – which btw. is able to control all Stream Box units from Pro-Ject except the Stream Box DS even more directly via WLAN, without infrared commands. The Remote Box S can even control devices from other manufacturers, the respective infrared (abbreviated IR) command code can be programmed into the app very easily. Connections USB A B Pro-Ject Audio Systems Vienna, Austria Make all connections while the Remote Box S is disconnected from the power supply. USB Connection For configuration the Remote Box S must be connected to a PC via USB. The USB connection cable is included. Mains power connection The unit is supplied with a power supply suitable for your country’s mains supply. Check the label before connecting to ensure compliance with the mains rating in your house. Connect the low voltage plug from the power supply to the Power 9V socket before connecting the power supply to the mains. It isn’t possible to disconnect the Remote Box S completely from mains power by a power button. Therefore it consumes a small amount of power permanently. If you are not going to use the unit for an extended period of time, e.g. vacation, we suggest to disconnect it from the AC mains. Connection of infrared Repeaters External infrared repeaters (available as accessory) can be connected to the 3,5mm jack plug socket to enhance the range of the Remote Box S or for installation in a second room. The jack plug socket A has no functionality. Safety Instructions Use the Remote Box S only with the DC 9V/2A power supply it is delivered with. AC outlet voltages vary from country to country. Before connecting to the mains, make sure that the voltage in your area meets the voltage requirements printed on the power supply. The power cord is used to disconnect the unit from the mains. Make sure that the power cord is easily accessible at all times. Never handle the device, the power cord/power supply while your hands are wet or damp. Avoid letting liquids enter the device or the power supply. Never place any item containing liquid, such as a flower vase on or near the device. Never spill any liquid on the device or the power supply. Never place any naked flame sources, such as lighted candles on or near the device. The product shall not be used in damp or wet locations, next to a bathtub, sink, swimming pool or any other similar conditions. 4 Front panel Remote Box S There are no controls on the front panel of the Remote Box S. The four small transparent blue plastic domes in the middle are the outlets for the very powerful infrared transmitter integrated into the unit. The opening to the right of them contains the infrared receiver necessary for programming the control codes of devices from other manufacturers into the system. Suggestions for placement The Remote Box S can be positioned at the same place as the hi-fi system. The integrated infrared (IR) transmitter is very powerful, therefore the front panel can point into the same direction as the other units of the hi-fi system. The infrared signals coming from the Remote Box S will be reflected from the walls to the hi-fi system and even then strong enough to be detected by their infrared receivers. In case the room is very big or its walls have a low reflection, it’s possible that the IR signal is not strong enough and the controlled units are not able to receive it. Please place the Remote Box S in this case with the front plate facing to the direction of the hi-fi system or use an external IR transmitter (available as accessory) which can be placed invisibly and facing to the hi-fi devices. Setting up the Remote Box S For the setup of the Remote Box S a Computer (Windows, Apple, or Linux) with a Java installation, Internet access and the access code for the Wireless LAN (WLAN) is necessary. Installation of Java In Case that Java isn’t installed on your computer (or you don’t know or can’t find it out), go to the internet page http:// www.java.com/en/download/installed.jsp. There you can check, if you have Java on your computer and which version it is (we recommend to use always the newest version). If you have to install Java, download the actual version and start the installation by double-clicking on the downloaded file. Follow the instructions shown on the screen for the installation. Installation and Start of the configuration program Please connect the Remote Box S now to power and to your Computer via USB. After that, please download the configuration program „ProJect-WLANCONFIG.zip“ from the internet page http://www.audiotra.de/startseite/marken/project-box-design/systemfernbedienung/remote-box-s/remote-box-s.html. Go to the folder in which you have downloaded the zip archive and open it by double-clicking. Store all files in the archive into a folder of your choice and open this folder. If you use a Windows computer, please start the configuration program „ProJect.WLANConfig.Windows.exe“ by double-clicking on it. With a Linux Computer please use „ProJect.WLANConfig.jar“. On an Apple computer you first have to install a special driver by double-clicking on „FTDIUSBSerialDriver_v2_2_16.dmg“. After that you can start the configuration program by double-clicking on „ProJect.WLANConfig.jar“. © Audio Trade GmbH · Pro-Ject Remote Box S · Version June 15th, 2013 5 Start of the configuration The program window „WLAN Config“ opens and you see your Remote Box S as list item (“WiFi Controller”, see picture). Choose it by clicking on this line and the click on “Configure”, to start the configuration for WLAN access of the Remote Box S. Search for your WLAN The window „WLAN Device Configuration“ opens (see picture). Click on “Search” in the upper right corner to start the search for a wireless network. A small window „Reading WLAN-Status“ opens. After the search was successful, the small window closes automatically. Entering the WLAN access code Select your own WLAN in the dropdown menu „SSID“ (the topmost on the left side). Now enter your WLAN access code into the field „WLAN preshared Key“ and click on „Set Mode“. The window „WLAN Device Configuration“ will close now. Finishing the configuration In the remaining window „WLAN Config“, click on „Exit“. Your configuration will be stored. This takes two to three minutes. Please don’t disconnect your Remote Box S from mains or the computer during this time. The storing process is finished, when the light that shines through the A and B connectors on the back of the units changes from red to green. Your Remote Box S is now registered in your WLAN and ready for use. Now you can disconnect the Remote Box S from mains and the computer and place it in an appropriate place. Please take care that the IR signals can reach the devices you want to control from this position. 6 Operation of the Remote Box S with the App „Box Control“ The app „Box Control“ is available for Apple- and Android devices in the respective app stores free of charge. For their use access of the respective Apple- or Android devices to the same wireless network as the Remote Box is necessary. Attention: The app can’t be used, if the Remote Box S wasn’t configured before as described above! Initial start of the app At the first start of the app, the setup wizard comes up automatically. Tap on “Next” to start the configuration. Select the Remote Box S Select the Remote Box S on the first page „Select your Devices“ (see right) and tap on “Next”. Information regarding the configuration of the Pro-Ject Stream Box devices shown below the Remote Box S can be found in their respective manuals. © Audio Trade GmbH · Pro-Ject Remote Box S · Version June 15th, 2013 7 You can skip the next two pages „Select your Media Library“ (left picture) and „Select your Media Player“ (right picture) by tapping on “skip”. They refer to the configuration of Pro-Ject Stream Box devices only. Selection of the devices to be controlled In the next window, „Select your Remote Controls“ select (see right) the devices you want to control with the app and tap on “next”. Now the setup is complete. 8 Getting started with the app The setup wizard closes and you see the start page of the app (see right). For each of the devices you selected in the step before, a control page was created. It’s symbolized with a light dot in the black bar at the bottom. The dot of the control page that you actually see is shown lighter than the others. The symbol on the rightmost side is for the settings menu. You can change between the control windows with a simple wipe on the display to the left or right. Commands for Pro-Ject devices Change to the desired control window by wiping in the proper direction. (shown here is the second window /dot , see left picture). If you selected a Pro-Ject device, all remote commands are already prestored and the control window is ready for use. In the upper right you see the symbol of a padlock. It enables the programming of new commands when it’s open (left picture), but prevents any programming, when it’s closed (right picture). This function allows for re-programming of already stored commands and the programming of new ones. See below for a description how to program commands. © Audio Trade GmbH · Pro-Ject Remote Box S · Version June 15th, 2013 9 Programming of remote commands If you selected command windows for devices not made by Pro-Ject, you have to program the desired commands by yourself. The example shows a television control (left picture). To program IR commands, tap on the padlock in the upper right to open it. Then tap on the control item you want to program, e.g. “Menu”. Now an insert (right picture) asks you to press the respective key on the original remote controller. Aim the controller at the Remote Box S during this. As soon as the command is recognized by the Remote Box S, the insert disappears and the desired command is successfully programmed to the selected control item. You can abort the programming at any time by tapping on a place outside of the insert. Proceed with all desired command items in the same way until all IR commands are programmed. Finally, tap on the padlock symbol again (left picture) to lock the programming mode and prevent unwanted changes. You can open the padlock again at any time to change or add commands. Repeat this procedure in the same way for all desired command windows. You can change between the windows with a simple wipe to the left or right. With an upward wipe out of the black bar at the bottom you can bring up the overview menu alternatively and change to the desired command window directly. 10 Settings menu The symbol at the rightmost side of the black bar is for the settings menu (left picture). The menu items „Streaming“ and „Volume Control“ are only necessary for the configuration of the Pro-Ject Stream Box devices. List of command windows In „Remotes“ you find a list of all available command windows (right picture). Those with a check mark are already active. You can activate more windows simply by tapping on the respective squares, so that a check mark appears. The new control window appears as a new dot in the black bar at the bottom. Inversely you can remove a window by unchecking it. The IR commands you have already programmed into in this window will be deleted in this case though. If you activate the control window again, you have to repeat the programming. Sorting the control windows You can change the order of the control windows to adapt it to your personal preference: After a tap on „Sort“ (left picture), a symbol for every control window line appears at the right edge of the display. Tap and hold on this symbol to move it up or down (right window). Release it at the desired position. Finally, tap on „Done“ to leave the sorting mode. © Audio Trade GmbH · Pro-Ject Remote Box S · Version June 15th, 2013 11 General Settings The menu item „General“ of the settings menu allows some general configurations: „Setup Wizard“ starts the setup process all over again, “Restore” brings the app to the factory default condition. In both cases all programmed IR commands and all settings are irrevocably lost. Specifications USB connector: Type A socket for configuration of the Remote Box S with a computer Output for infrared repeater: (Socket B) 3,5mm jack plug socket Outboard power supply: 9V/2A DC; 220 - 240V, 50Hz Power consumption: 1,5W Dimensions W x H x D: 103 x 36 x76mm Weight: 380g without power supply Configuration program for Windows: ProJect.WLANConfig.Windows.exe (available for download for Linux (from Kernel 2.4.26 / 2.6.5): ProJect.WLANConfig.jar at www.audiotra.de): for MAC: Driver FTDIUSBSerialDriver_v2_2_16.dmg and ProJect.WLANConfig.jar A wireless network (WLAN) is necessary for the operation of the Remote Box S. For the configuration program, Java has to be installed on the respective Computer (preferable the newest version, please activate the automatic update function in Java). Service Should you encounter a problem which you are not able to alleviate or identify, please contact your dealer for further advice. Only when the problem cannot be resolved there, the unit should be sent to the responsible distributor in your country. Warranty The manufacturer accepts no responsibility for damage caused by not adhering to these instruction manual. Modification or change to any part of the product by unauthorized persons release the manufacturer from any liability over and above the lawful rights of the customer. Copyright PRO-JECT is a Registered Trademark of H. Lichtenegger. This guide was produced by: Audio Trade GmbH Copyright © 2011. All rights reserved. 12 The information was correct at the time of going to press. The manufacturer reserves the right to make changes to the technical specification without prior notice as deemed necessary to uphold the ongoing process of technical development.