1
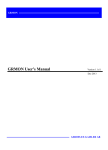
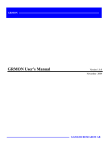
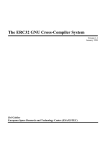
BCC - Bare-C Cross-Compiler User’s Manual
Version 1.0.43, June 2013
Authors: Jiri Gaisler, Konrad Eisele
Copyright Aeroflex Gaisler AB, 2012.
Table of contents
1
Introduction..............................................................................................................3
1.1
1.2
1.3
1.4
2
General development flow .......................................................................................5
2.1
2.2
2.3
2.4
2.5
2.6
2.7
2.8
2.9
2.10
2.11
2.12
2.13
3
Overview ............................................................................................................................. 5
Gcc options.......................................................................................................................... 5
Floating-point considerations.............................................................................................. 5
LEON SPARC V8 instructions ........................................................................................... 5
Alternate register windows organization (only for GCC 3.X) ............................................ 6
Single vector trapping ......................................................................................................... 6
Memory organization .......................................................................................................... 6
Making LEON boot-proms ................................................................................................. 6
Creating applications that run in prom ................................................................................ 6
NGMP, RAM applications located at address 0 and multibus systems............................... 7
Simple examples.................................................................................................................. 7
Newlib C-library.................................................................................................................. 7
FreeRtos ............................................................................................................................ 11
Execution and debugging.......................................................................................12
3.1
3.2
3.3
3.4
3.5
4
Scope ................................................................................................................................... 3
Installation........................................................................................................................... 3
Building from source........................................................................................................... 3
Technical support ................................................................................................................ 4
TSIM simulator and GRMON debug monitor .................................................................. 12
Debugging with GDB........................................................................................................ 12
Debugging on target hardware .......................................................................................... 13
Using the DDD graphical front-end to GDB .................................................................... 14
Using the Insight debugger................................................................................................ 14
MKPROM boot-prom builder................................................................................16
4.1
Introduction ....................................................................................................................... 16
-3-
1
Introduction
1.1
Scope
BCC is a cross-compiler for LEON3 processors. It is based one the GNU compiler tools and the
Newlib standalone C-library. The cross-compiler system allows compilation of both tasking and
non-tasking C and C++ applications. It supports hard and soft floating-point operations, as well as
SPARC V8 multiply and divide instructions. BCC can also be used to compile the eCos kernel.
BCC consists of the following packages:
• GNU GCC C/C++ compiler v3.4.4, v4.4.2
• Newlib C-library v 1.13.1
• Low-level I/O routines for and LEON3, including interrupt support
• uIP light-weight TCP/IP stack
• GDB debugger v6.4 with DDD and Insight Graphical front-end
• Mkprom prom-builder for LEON3/4
• Linux and Windows/Cygwin hosts
Note: LEON2 support has been dropped since release 1.0.36d.
1.2
Installation
1.2.1 Linux / Cygwin
BCC is provided as a bzipped tar-file. It should be unpacked in the /opt directory of the host:
mkdir /opt
tar -C /opt -xjf sparc-elf-<version-number>.tar.bz2
After installation, add /opt/sparc-elf-<gcc-version-number>/bin to the PATH variable. This should
be done by adding the following line to the file .profile in the home directory:
export PATH=/opt/sparc-elf-<gcc-version-number>/bin:$PATH
On Cygwin hosts, all installation steps should be done in a cygwin shell window.
See http://www.cygwin.com/ for information on Cygwin.
1.2.2 Windows
BCC for Windows is provided for native Windows (MinGW) and for the Cygwin environment. For
the Cygwin version see previous section. The native version will not require any additional packages and can be run from a standard Command Prompt.
The native Windows version of BCC is packaged with zip. Use a tool like WinZip to uncompress it
to a directory, e.g., C:\opt. Note: The directory should not contain spaces (or any other non-ASCII
characters) as this will confuse the compiler.
To use the compiler the bin subdirectory, e.g., C:\opt\bin, must be added to the PATH environment
variable. This can be done from the Control Panel:
System -> Advanced -> Environment Variables...
Se http://www.mingw.org/ for more information on MinGW and the optional MSYS environment.
1.3
Building from source
The source code for BCC is available from the Gaisler homepage www.gaisler.com. To build BCC
from source you should:
• untar the source archive to <dir>
• issue “cd <dir>;make download”. This will download the original gcc, binutils and newlibc
sources.
• issue “cd <dir>; make install”. This will untar all the downloaded original archives over the
current sourcetree, preserving the LEON sprecific files.
-4• issue “cd <dir>; make all”. This will build the 4.4.2 and 3.4.4 toolchains. The default prefix
is /opt.
1.4
Technical support
Technical support for BCC can be obtained from Aeroflex Gaisler AB by purchasing a technical support contract. Please contact [email protected] for details.
-5-
2
General development flow
2.1
Overview
Compilation and debugging of applications is typically done in the following steps:
1. Compile and link program with gcc
2. Debug program on a simulator or remote target
3. Create boot-prom for a standalone application
BCC supports both tasking and non-tasking C/C++ programs. Compiling and linking is done in
the same manner as with a host-based gcc, and will not be explained here. The produced binaries
will run on LEON3/4 systems, without requiring any switches during compilation.
2.2
Gcc options
All gcc options are described in detail in the gcc manual. Some useful options are:
•
•
•
•
•
•
•
-g
generate debugging information - must be used for debugging with gdb
-msoft-float emulate floating-point - must be used if no FPU exists in the system
-mcpu=v8 generate SPARC V8 mul/div instructions - needs hardware multiply and divide
-O2 or -O3 optimise code maximum performance and minimal code size
-qsvt
use the single-vector trap model
-mtune=ut699sets UT699 specific parameters (gcc-3.4.4 and gcc-4.4.2)
-mfix-ut699 sets UT699 specific parameters (gcc-4.6.0 upward)
Note that in GCC version 3.4.4 -mcpu=v8 was called -mv8 and -mflat was present:
• -mv8
• -mflat
generate SPARC V8 mul/div instructions - needs hardware multiply and divide
do not use register windows (i.e. no save/restore instructions). This options is
only available in gcc-3.4.4.
Ordinary C programs can be compiled without any particular switches to the compiler driver:
sparc-elf-gcc -msoft-float -g -O2 hello.c -o hello.exe
The default link address is start of RAM, i.e. 0x40000000 for LEON. Other link addresses can be
specified through the -Ttext option (see gcc manual).
2.3
Floating-point considerations
If the targeted LEON processor has no floating-point hardware, then all applications must be compiled (and linked) with the -msoft-float option to enable floating-point emulation. When running
the program on the TSIM simulator, the simulator should be started with the -nfp option (no floating-point) to disable the FPU.
2.4
LEON SPARC V8 instructions
LEON3 processors can be configured to implement the SPARC V8 multiply and divide instructions. The BCC compiler does by default not issue those instructions, but emulates them trough a
library. To enable generation of mul/div instruction, use the -mcpu=v8 switch during both compilation and linking. The v8 switch improves performance on compute-intensive applications and
floating-point emulation.
-6LEON3/4 also supports multiply and accumulate (MAC). The compiler will never issue those
instructions, they have to be coded in assembly. Note that the BCC assembler and other utilities are based on a modified version of GNU binutils-2.15 that supports the LEON MAC
instructions.
2.5
Alternate register windows organization (only for GCC 3.X)
The compiler normally produces binaries that assumes that the target processor has 8 register
windows. However, by compiling and linking with the -mflat switch, it is possible to produce
binaries that will run on processors with only 2 register windows.
-mflat affect performance and code size. Using -mflat, the code size will increase with ~ 10%,
and the performance will decrease with the same amount. When creating boot proms (see
below), it is essential that the same -mflat parameter is given to sparc-elf-mkprom, as was
used when the binary was compiled. Any miss-match will produce a faulty prom image.
2.6
Single vector trapping
When the vhdl model is configured to support single vector trapping (svt) the -qsvt switch can
be used with the linker to build an image that uses a dispatcher rather than a static trap table.
The saving amounts to ~4k for the trap table, however trap handling will be slower. The image
will try to enable svt on boot using %asr17.
2.7
Memory organization
The resulting executables are in elf format and have three main segments; text, data and bss.
The text segment is by default at address 0x40000000 for LEON3/4, followed immediately by
the data and bss segments. The stack starts at top-of-ram and extends downwards. The area
between the end of bss and the bottom of the stack is used for the heap.
2.8
Making LEON boot-proms
To make a boot-prom that will run from the prom on a standalone LEON3/4 target, use the
sparc-elf-mkprom utility. It will create a compressed boot image that will load the application
to the RAM, initiate various LEON registers, and finally start the application. sparc-elfmkprom will set all target dependent parameters, such as memory sizes, waitstates, baudrate,
and system clock. The applications compiled with sparc-elf-gcc do not set these parameters
themselves, and thus do not need to be re-linked for different board architectures.
The example below creates a boot-prom for a system with 1 Mbyte RAM, one RAM waitstate,
3 waitstates for ROM access, and 25 MHz system clock. For more details see the mkprom
manual.
sparc-elf-mkprom -ramsize 1024 -ramws 1 -romws 3 -freq 25 hello.exe -msoft-float
Note that sparc-elf-mkprom creates ELF files. To create an SRECORD file for a prom programmer, use objcopy:
sparc-elf-objcopy -O srec hello.prom hello.srec
Note: it is essential that the same -mflat, -qsvt and -msoft-float parameters are given to sparcelf-mkprom, as was used when the binary was compiled. Any miss-match will produce a
faulty PROM image.
2.9
Creating applications that run in prom
BCC supports applications that run in PROM, but have data and stack in ram. A PROM application is created in two steps:
1. Compile the application into on or more object files, but do not link:
sparc-elf-gcc -msoft-float -c -g -O2 hello.c
2. Create final prom image with mkprom, listing all object files on the command line :
-7-
sparc-elf-mkprom -freq 40 -rmw hello.o -msoft-float
A PROM application has it code (.text segment) in prom, and data (.data & .bss) in RAM. At startup, the .data segment is copied from the prom to the ram, and the .bss segment is cleared. A prom
application is linked to start from address 0x0. The data segment is by default linked to
0x40000000, but can be changed by giving the -Tdata=<address> option of gcc to mkprom. Note
that if no FPU is present, the -msoft-float option must also be given to mkprom in this case since it
is needed during the final linking. When debugging prom applications with GRMON or gdb, only
hardware breakpoints (hbreak command) can be used.
2.10
NGMP, RAM applications located at address 0 and multibus systems
To create an application that is located at address 0, like when runing on a NGMP system, the
option -Wl,-msparcleon0 can be given to gcc or -msparcleon0 to ld. (Until bcc 1.0.40: On systems
with multiple busses -qambapp can be given to gcc in the final link, this activates theAMBA PnP
scan. From 1.0.41 onward AMBA scanning is default).
2.11
Simple examples
Following example compiles the famous ‘hello world’ program and creates a boot-prom in
SRECORD format:
$ sparc-elf-gcc -g -O2 hello.c -o hello -msoft-float
$ sparc-elf-mkprom hello -o hello.exe -msoft-float
MKPROM boot-prom builder v1.0
section: .text at 0x4000000, size 31040 bytes
section: .data at 0x4007940, size 1904 bytes
$ sparc-elf-objcopy -O srec hello.exe hello.srec
Several example C programs can be found in src/examples.
2.12
Newlib C-library
2.12.1 Stdio
BCC applications uses Newlib, which is a posix compatible C-library with full math support.
However, no file or other I/O related functions will work, with the exception of I/O to stdin/stdout.
Stdin/stdout are mapped on UART A, accessible via the usual stdio functions.
2.12.2 Time functions
The LEON timers are used to generate the system time. The function clock() will return the time
expired in microseconds. The gettimeofday(), time() and times() can also be used to get the time.
Before the time functions can be used, leonbare_init_ticks() should be called to start the LEON
timers and install the timer interrupt handler:
#include <asm-leon/timer.h>
void leonbare_init_ticks();
This will initialize Timer1 and Timer2. Timer1 is used to generate ticks at 100Hz while Timer2 is
used to create high resolution timer events. Timer1 ticks can be used by installing a ticker callback
at
tickerhandler ticker_callback;
Timer2 timer events can be generated by initializing a struct timerevent structure and calling
-8#include <asm-leon/timer.h>
int addtimer(struct timerevent *e);
struct timerevent ’expire’ field is the timeposition at which the event should be triggered. The
current time can be retrieved using int gettimeofday(struct timeval *tv, struct timezone *tz);
2.12.3 Task switching
Task switching is supported by the functions:
#include <contextswitch.h>
int thread_setjmp(threadctx_t env, int val);
void thread_longjmp(threadctx_t env, int val);
thread_longjmp() will save the current register windows to the stack and jump to the stack previously saved by thread_setjmp() similar to clib’s setjmp and longjmp construct. You can create your own scheduler by using a construct like:
void sched() {
...
thread_longjmp(next());
}
...
if (!thread_setjmp(self()))
sched();
...
2.12.4 Interrupt handling
Installing an interrupt handle is done by initializing member handler of a global variable struct
irqaction and calling:
#include <asm-leon/irq.h>
void chained_catch_interrupt (int irq, struct irqaction *a );
where irq is the irq number (1 - 15). The supplied struct irqaction will be inserted in a list and
therefore should be global.
The simple void *catch_interrupt(void func(int irq), int irq); is also supported which uses
chained_catch_interrupt internally.
The source code for libgloss (libleonbare.a) can be found in the src/libgloss directory.
For systems using the extended LEON3 interrupt controller with support for up to 31 interrupts it is possible to use irq 1-31 with catch_interrupt() and chained_catch_interrupt().
An example for how to install interrupt handler is supplied withthe src/examples/c-irq.c
example of the BCC distribution.
Low-level interrupt processing takes around 40 instructions to setting up the C enviroment for
the interrupt handler, and another ~25 instruction to dispatch irq to the associated handler. If
very fast processing is required, a custom lolevel assemler irqroutine can be installed using:
#include <asm-leon/leon.h>
void lolevelirqinstall(int irqnr,void (*handler)());
This will write instructions:
sethi
jmpl
nop
%hi(handler), %l4;
%l4 + %lo(handler), %g0;
-9at address traptable+0x100+(irqnr*16). The callers low-level interrupt routine has to ensure proper
enviroment setup before calling a C routine. This includes saving volatile register, checking for
invalid windows and avoiding nested irqs. An appropriate routine would be written in assembler.
In case of single (-qsvt) vector trap shemes you have to use he following funtion to insert a irq handler:
int svtlolevelirqinstall(int trap,void (*handler)())
In case of -qsvt a table is used to dispatch the traps:
struct svt_trap_entry {
int start,end;
void (*func)(void);
};
extern struct svt_trap_entry trap_table[28];
Where start and end specify the range of traps that handler func should process. The last entry in
the table should be {0,0,0}. You can modify the table by hand or use svtlolevelirqinstall to install
a interrupt handler for you. Note that the irq number is trap number + 0x10. The symbol
svt_trap_table_ext_end marks the end of the trap dispatch table. To insert a trap handler in -qsvt
mode you can use the function
int svtloleveltrapinstall(int trap,void (*handler)());
svtlolevelirqinstall(irq,handler) is equivalent to svtloleveltrapinstall(irq+0x10,handler).
Trap pre-amble
-------------1572 400001a0
1579 400001a4
1580 400001a8
1581 400001ac
ae10200a
a1480000
108022fc
a7500000
mov
mov
ba
mov
10, %l7
%psr, %l0
0x40008d98
%wim, %l3
1582
1587
1588
1595
1596
2d000004
a02c0016
2d100023
ac15a1a8
29100025
sethi
andn
sethi
or
sethi
%hi(0x1000), %l6
%l0, %l6, %l0
%hi(0x40008c00), %l6
%l6, 0x1a8, %l6
%hi(0x40009400), %l4
etraps.s save state
-------1597 40008dac 81c52170
1599 40008db0 932de008
1606 40009570 aa27a138
1613 40009574 c2256074
1616 40009578 c43d6078
1620 4000957c c83d6080
1624 40009580 cc3d6088
1634 40009584 15100029
1635 40009588 d602a050
1639 4000958c d6256134
1644 40009590 960560b0
1651 40009594 d622a050
jmp
sll
sub
st
std
std
std
sethi
ld
st
add
st
%l4 + 0x170
%l7, 8, %o1
%fp, 312, %l5
%g1, [%l5 + 0x74]
%g2, [%l5 + 0x78]
%g4, [%l5 + 0x80]
%g6, [%l5 + 0x88]
%hi(0x4000a400), %o2
[%o2 + 0x50], %o3
%o3, [%l5 + 0x134]
%l5, 176, %o3
%o3, [%o2 + 0x50]
mov
sll
andcc
be
nop
jmp
mov
1, %l4
%l4, %l0, %l4
%l4, %l3, %g0
0x400095f0
40008d98
40008d9c
40008da0
40008da4
40008da8
check for invalid window:
1654
1655
1656
1663
1664
1665
1673
40009598
4000959c
400095a0
400095a4
400095a8
400095f0
400095f4
a8102001
a92d0010
808d0013
02800013
01000000
81c5a008
9c100015
%l6 + 0x8
%l5, %sp
back in irqtrap_fast.s:
check for nested_irq flag + set pil
1674
1675
1676
1677
40008db0
40008db4
40008db8
40008dbc
932de008
92140009
11100029
90122054
sll
or
sethi
or
%l7, 8, %o1
%l0, %o1, %o1
%hi(0x4000a400), %o0
%o0, 0x54, %o0
-101678
1688
1691
1692
1693
1700
1701
1702
40008dc0
40008dc4
40008dc8
40008dcc
40008dd0
40008dd4
40008dd8
40008ddc
d0020000
80a00008
22800002
92126f00
818a6020
01000000
01000000
01000000
ld
cmp
be,a
or
mov
nop
nop
nop
[%o0], %o0
%o0
0x40008dd0
%o1, 0xf00, %o1
%o1, 0x20, %psr
--------------------------------------------------------------
call routine catch_interrupt.c: handler_irq():
1703
1710
1711
1712
1713
1714
1715
1722
1723
1726
1727
1734
1735
1739
1748
1749
1750
1754
1761
1762
1764
1765
1775
1777
40008de0
40008de4
40008de8
40008e84
40008e88
40008e8c
40008e90
40008e94
40008e98
40008e9c
40008ea0
40008ea4
40008ea8
40008ec0
40008ec4
40008ec8
40008ecc
40008ed0
40008ed4
40008ed8
40008edc
40008ee0
40008ee4
40008ee8
90100017
40000028
9203a0f0
9de3bf98
03100029
9b2e2002
82106228
e000400d
80a42000
02800018
a4102001
10800007
da040000
80a36000
02bffffa
23100029
c2046124
90100018
80a06000
12bffff5
94100019
d2042008
9fc34000
e4246124
-- installed irq handler
1780 40001260 9de3bf98
mov
call
add
save
sethi
sll
or
ld
cmp
be
mov
ba
ld
cmp
be
sethi
ld
mov
cmp
bne
mov
ld
call
st
%l7, %o0
0x40008e84
%sp, 240, %o1
%sp, -104, %sp
%hi(0x4000a400), %g1
%i0, 2, %o5
%g1, 0x228, %g1
[%g1 + %o5], %l0
%l0
0x40008efc
1, %l2
0x40008ec0
[%l0], %o5
%o5
0x40008eac
%hi(0x4000a400), %l1
[%l1 + 0x124], %g1
%i0, %o0
%g1
0x40008eac
%i1, %o2
[%l0 + 0x8], %o1
%o5
%l2, [%l1 + 0x124]
save
%sp, -104, %sp
2.12.5 Extended IrqCtrl
The extended irq functionality is activated by the following code (the extended irq number is
13 for this example):
#include <asm-leon/irq.h>
extern struct irqmp_type irqmp;
...
irqmp.addr = 0x80000200;
irqmp.eirq = 13;
enable_irq(13);
...
irqmp.addr is the address of the irq controller, irqmp.eirq is the extended irq number. Having
initialized the application like this you can register an irq handler for an irq > 15 using
catch_interrupt(). Note that the extended irq number’s interrupt handler itself is not called but
the handler of the irq indicated by the extended irq ctrl’s extended irq acknowledge register.
Another possibility is of course to implement the extended irq handling yourself.
2.12.6 Interrupt nesting
The variable
extern unsigned int nestedirq;
-11can be set to 1 if irq nesteing is desired.By default it is set to 0. In case of 0 the PSR’s PIL will be
set to 15 (highest) to keep the irq processing uninterrupted. If nestedirq is set to 1 the PSR’s PIL
will be set to the incoming irq’s level, therefore causing higher level irq’s to interrupt the current
irq processing.
2.12.7 Installing custom irq handlers
To overwrite a compile-time generated traptable entry the function traptable_genjmp() can be
used:
#include <asm-leon/leon3.h>
extern void traptable_genjmp(unsigned long *p, int i, int arg, unsigned int fn);
extern unsigned int sparc_leon23_get_tbr_base(void);
where p is the traptable base, i the traptable index, arg a 13 bit value in %l7 at the time of the
traphandler call and fn the assembler function address to be called. The routine
sparc_leon23_get_tbr_base() can be used to retrive the current %tbr base. Below is a simple
example that routes the window-overflow (0x5) trap call through mynewhandler :
...
#include <asm-leon/leon3.h>
...
void wrap(void) {
__asm__ __volatile__("\n.global mynewhandler\nmynewhandler:\n"
"mov %%psr, %%l0\n"
"ba _window_overflow;nop\n"
::);
}
extern void mynewhandler();
main () {
traptable_genjmp((void*)sparc_leon23_get_tbr_base(), 5, 0, (int)&mynewhandler);
...
2.12.8 Small binary
Newlib atexit() introduces a dependency to malloc() which will add ~10k extra code. If you want
to avoid this you can link against libsmall.a (-lsmall). libsmall.a’s atexit() supports only a static 32
exit-function entries. The c library newlib atexit() function is declared weak and can be overridden.
• -lsmall remove reference to malloc() by override Newlibc atexit().
•
2.12.9 Amba PLUG and PLAY
Until BCC 1.0.40: The options -qambapp can be given to enable PLUG and PLAY scanning for
UART, timer and irq-ctrl across AHB2AHB bridges. The default setup ony scanns the main BUS’s
configuration area at 0xfff00000.
From BCC 1.0.41 upward: recursive scanning is set as default, -qnoambapp can be given to disable recursive scaning.
2.13
FreeRtos
The simple sheduling library FreeRtos (www.freertos.org) is included in the distribution. Please
refer to the FreeRtos documentation on the website for information on how to use the FreeRtos
API. The precompiled library libfreertos.a was compiled using the configuration file supplied in
<installdir>/sparc-elf/include/freertos/FreeRTOSConfig.h. To recompile it with another configuration goto <installdir>/src/freertos/, change FreeRTOSConfig.h and type
$make recompile
You might also want to add more sources to $(LIBOBJ).
-12-
3
Execution and debugging
3.1
TSIM simulator and GRMON debug monitor
LEON applications can be debugged on either the TSIM simulator or real target hardware
through the use of the GRMON debug monitor. Both TSIM and GRMON can be connected to
the GNU debugger (sparc-elf-gdb) to perform source-level symbolic debugging.
3.1.1 Running on the TSIM simulator
To execute an application in the TSIM LEON simulator, use the load command to load the
binary, and the go command to execute the application:
$ tsim-leon3
TSIM LEON SPARC simulator, version 2.0.3 (professional version)
Copyright (C) 2001, Gaisler Research - all rights reserved.
using 64-bit time
serial port A on stdin/stdout
allocated 4096 K RAM memory, in 1 bank(s)
allocated 2048 K ROM memory
icache: 1 * 4 kbytes, 16 bytes/line (4 kbytes total)
dcache: 1 * 4 kbytes, 16 bytes/line (4 kbytes total)
tsim> load hello.exe
section: .text at 0x40000000, size 35120 bytes
section: .data at 0x40008930, size 2080 bytes
section: .jcr at 0x400091b4, size 4 bytes
tsim> go
resuming at 0x40000000
Hello world!
Program exited normally.
grmon[sim]>
3.2
Debugging with GDB
To debug an application with gdb, start grmon with the -gdb option (or issue the gdb command
inside grmon). Note that GRMON listens on port 2222 for a gdb connection. This can be
changed to any port using the grmon -port switch at start-up.
$ tsim-leon3 -gdb
TSIM LEON SPARC simulator, version 2.0.3 (professional version)
Copyright (C) 2001, Gaisler Research - all rights reserved.
using 64-bit time
serial port A on stdin/stdout
allocated 4096 K RAM memory, in 1 bank(s)
allocated 2048 K ROM memory
icache: 1 * 4 kbytes, 16 bytes/line (4 kbytes total)
dcache: 1 * 4 kbytes, 16 bytes/line (4 kbytes total)
gdb interface: using port 1234
Then, start gdb in a separate shell, load the application to the target, add optional breakpoints,
and finally execute the application using the gdb run command:
$ sparc-elf-gdb hello.exe
GNU gdb 5.3
Copyright 2002 Free Software Foundation, Inc.
-13GDB is free software, covered by the GNU General Public License, and you are
welcome to change it and/or distribute copies of it under certain conditions.
Type "show copying" to see the conditions.
There is absolutely no warranty for GDB. Type "show warranty" for details.
This GDB was configured as "--host=i686-pc-linux-gnu --target=sparc-tsim-elf"...
(gdb) tar extended-remote localhost:1234
Remote debugging using localhost:1234
0x00000000 in ?? ()
(gdb) load
Loading section .text, size 0x8930 lma 0x40000000
Loading section .data, size 0x820 lma 0x40008930
Loading section .jcr, size 0x4 lma 0x400091b4
Start address 0x40000000, load size 37204
Transfer rate: 297632 bits in <1 sec, 275 bytes/write.
(gdb) break main
Breakpoint 1 at 0x40001384: file hello.c, line 4.
(gdb) run
The program being debugged has been started already.
Start it from the beginning? (y or n) y
Starting program: /home/jiri/samples/hello.exe
Breakpoint 1, main () at hello.c:4
4
printf("Hello world!\n");
(gdb)
To re-execute the application, first re-load it to the target using the gdb load command and the
issue run again.
3.3
Debugging on target hardware
To connect GRMON to a LEON system, start GRMON on the command line in a shell window.
By default, GRMON will connect to the processor debug support unit (DSU) using a serial port of
the host (ttyS0 or com1). See the GRMON manual for how to connect via JTAG, PCI, ethernet or
Spacewire. Once connected, the application can be downloaded and executed using the same procedure as when the simulator is used:
$ grmon -u
GRMON - The LEON multi purpose monitor v1.0.7
Copyright (C) 2004, Gaisler Research - all rights reserved.
For latest updates, go to http://www.gaisler.com/
Comments or bug-reports to [email protected]
using port /dev/ttyS0 @ 115200 baud
initialising .........
Component
Leon3 SPARC V8 Processor
AHB Debug UART
Ethernet DSU interface
LEON2 Memory Controller
AHB/APB Bridge
Leon3 Debug Support Unit
Generic APB UART
Multi-processor Interrupt Ctrl
Modular Timer Unit
Vendor
Gaisler Research
Gaisler Research
Gaisler Research
European Space Agency
Gaisler Research
Gaisler Research
Gaisler Research
Gaisler Research
Gaisler Research
Use command ’info sys’ to print a detailed report of attached cores
grmon[grlib]> load hello.exe
section: .text at 0x40000000, size 35120 bytes
section: .data at 0x40008930, size 2080 bytes
section: .jcr at 0x400091b4, size 4 bytes
total size: 37204 bytes (99.4 kbit/s)
read 110 symbols
-14entry point: 0x40000000
grmon[grlib]> run
Hello world!
Program exited normally.
grmon[grlib]>
Connecting GDB to GRMON when attached to a real LEON target is done in the same way as
when using the simulator. Note that GRMON uses port 2222 to communicate with gdb, while
TSIM uses port 1234.
3.4
Using the DDD graphical front-end to GDB
DDD is a graphical front-end to gdb, and can be used regardless of target. DDD must be
started with the --debugger switch to select the sparc debugger, rather than the native gdb:
ddd --debugger sparc-elf-gdb --attach-window
For further details on DDD operation, see the DDD home page:
http://www.gnu.org/software/ddd/
DDD has also a built-in manual under the HELP menu in the main window.
Figure 1. DDD with TSIM
Attaching to TSIM of GRMON is done in the same manner as when using sparc-elf-gdb without DDD. The gdb commands are entered in the bottom command window. Remember to load
the application first, before issuing a run command. On cygwin hosts, the cygwin X-server
must first be started by issuing startx in a cygwin terminal. This will open an Xterm window,
from which DDD should be started with the options mentioned above.
3.5
Using the Insight debugger
The Insight debugger is based on GDB-6.4 with an TCL/TK based graphical front-end. It can
be used on both linux and cygwin hosts. The debugger is started with:
sparc-elf-insight app.exe
-15-
This will create the Insight main window:
Clicking on the RUN button (or selecting Run->Connect) will open the ‘Connect to target’ menu:
To connect to TSIM, select Remote/TCP and port 1234. To connect to GRMON, select port 2222.
Enable the breakpoint on ‘main’, but disable the breakpoint on ‘exit’. Before clicking on OK,
make sure that you have started TSIM or GRMON is a separate window, and entered gdb mode.
Insight automatically downloads the application to the target when needed, so the load command
does not have to be issued manually. To restart the application, just click on the RUN button again.
NOTE: Insight can only be used with TSIM-2.0.5 and GRMON-1.1.12, or later versions.
-16-
4
MKPROM boot-prom builder
4.1
Introduction
(The successor of sparc-elf-mkprom is mkprom2 that can be downloaded from the Aeroflex
Gaisler homepage).
sparc-elf-mkprom is a utility program to create boot-images for programs compiled with the
BCC cross-compiler. It encapsulates the application in a loader suitable to be placed in a boot
PROM. The application is compressed with a modified LZSS algorithm, typically achieving a
compression factor of 2. The boot loader operates in the following steps:
1. The register files of IU and FPU (if present) are initialized.
2. The memory controller, UARTs and timer unit are initialized according to the specified
options.
3. The application is decompressed and copied into RAM
4. Finally, the application is started, setting the stack pointer to the top of ram.
-17-
-18-
-19-