1
Installation and Registration
User Manual
www.estatemaster.com
2
Installation and Registration
Table of Contents
4
Part I Licence Types
1
User/PC Licence
(Standalone)
...................................................................................................................................
5
2
CAS Licence (Concurrent)
................................................................................................................................... 5
9
Part II Installation
1
Installing Prerequisite
Software
...................................................................................................................................
10
2
Installing the ...................................................................................................................................
Estate Master Software
10
3
Installing the ...................................................................................................................................
Network Licence Server
10
Part III Evaluating the Software
14
Part IV The Estate Master Software
16
1
Registration and
Activation
...................................................................................................................................
16
2
Deactivation (Moving
Licences)
...................................................................................................................................
27
34
Part V The Network Licence Server
1
Registration and
Activation
...................................................................................................................................
34
2
Starting the Licence
Server
...................................................................................................................................
35
3
Detection Requirements
................................................................................................................................... 37
4
Monitoring Licence
Usage
...................................................................................................................................
40
5
Updating Licences
................................................................................................................................... 42
6
Moving the Licence
Server
...................................................................................................................................
42
47
Part VI Technical Support
© 2014 Estate Master Pty Ltd
Part
I
4
1
Installation and Registration
Licence Types
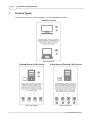
There are three (3) Licence Types available to use the Estate Master software:
User/PC Licence
More Information
Terminal Server CAS Licence
Client-Server (Floating) CAS Licence
More Information
More Information
© 2014 Estate Master Pty Ltd
Licence Types
1.1
5
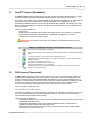
User/PC Licence (Standalone)
A 'User/PC License' allows a single person to install, register and operate Estate Master on a single
computer (desktop or laptop) only. Data files may be stored on the computer or on a server.
If more than one computer requires Estate Master to be installed and registered on it, whether for the
same person (who holds a user licence on another computer) or for a different person, this
constitutes an 'Additional User/PC Licence' and an additional fee is payable. For example, if a single
person requires Estate Master on their PC, and also on their portable laptop, this constitutes two (2)
User/PC Licenses.
This licence type is suitable for:
· Single users
· Small-medium organisations where all the users need access to the software very frequently.
· Small-medium organisations where there is no dedicated IT department or no server
infrastructure to support the CAS Licences.
Important Note: User/PC Licences are only available for PCs/Notebooks and cannot be
used on Servers.
Summary of USER/PC Installation and Registration Process
1.2
1
User wants to use Estate Master on Computer A.
2
User purchases a User/PC licence either from the Estate Master website or contacting Estate Master
Sales
3
On receipt of payment, a unique serial number is emailed to the user.
4
User downloads / installs Estate Master on Computer A and enters in the serial number provided to
activate the licence.
The licence is now 'locked' to Computer A.
5
User wants to use Estate Master on Computer B.
User must complete steps 2 to 4 on Computer B.
6
Licensed users can now share Estate Master files over a network and store them on either a file
server or the computer hard drive.
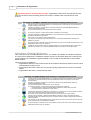
CAS Licence (Concurrent)
A 'CAS License' (Concurrent Access Session) allows for the use of the Estate Master software by
multiple users simultaneously on the same network. The number of CAS Licences determines the
number of users that may operate Estate Master simultaneously via one of the methods below. For
example, if a company has 3 CAS Licences and 3 users are currently operating the software, the 4th
user will have to wait for another to close the software before they can open it. Additional CAS
Licences can be acquired at any time to allow more concurrent users of the software.
There are 2 types of CAS Licences:
Terminal Server CAS Licence
The software is installed on a Terminal Server (e.g Microsoft Terminal Server, Citrix Server, etc) and
the users access the software via a remote desktop connection. The server limits access to the
software based on the number of CAS licenses.
This licence type is suitable for:
· Organisations where the users need access to the software infrequently and the licences can be
shared between multiple users.
· Organisations that already operate other software applications via a Terminal Server to
streamline application deployment and maintenance.
· Organisations that need their users to operate the software remotely from an offsite location
such as home, construction site, etc.
© 2014 Estate Master Pty Ltd
6
Installation and Registration
Important Note for Terminal Server Farms: Organisations that have a Terminal Server Farm
must use the Client-Server (Floating) CAS Licence option, instead of the Terminal Server CAS
Licence.
Summary of TERMINAL SERVER CAS Installation and Registration Process
1
Company wants to install Estate Master on a Terminal Server so their staff can use the software on
multiple computers concurrently.
2
Company purchases a 'Terminal Server' CAS licence either from the Estate Master website or
contacting Estate Master Sales.
They must nominate that a 'Terminal Server' CAS is required.
3
On receipt of payment, a unique serial number is emailed to the Company.
4
Company downloads / installs Estate Master on the Terminal Server and enters in the serial number
provided to activate the CAS licence.
The licence is now 'locked' to that Terminal Server
5
Any computer connected to the Terminal Server can now operate Estate Master via a Remote
Desktop Connection.
6
Once the CAS limit is reached on the Terminal Server, the next user must wait for another user to exit
Estate Master before they can operate it.
7
If additional Terminal Server CAS are required to allow for more simultaneous users to access the
software, the Company can contact Estate Master Sales to purchase a new Serial Number.
Client-Server (Floating) CAS Licence
This is also known as a 'Floating Network' licence. The software is installed on individual computers.
A Licence Server application is installed on another machine on the same network to control access
to the software on the individual computers based on the number of CAS licenses for each Estate
Master product.
This licence type is suitable for:
· Organisations where the users need access to the software infrequently and the licences can be
shared between multiple users.
· Organisations that wish to wish have concurrent licensing options but do not have a Terminal
Server.
· Organisations that have a Terminal Server Farm.
Summary of CLIENT-SERVER CAS Installation and Registration Process
1
2
3
4
5
Company wants to install Estate Master on on multiple computers so their staff can use the software
concurrently. Not all staff will always use the software at the same time and they do not have a
Terminal Server.
Company purchases a 'Client-Server' CAS licence either from the Estate Master website or
contacting Estate Master Sales.
They must nominate that a 'Client-Server' CAS is required.
On receipt of payment, 2 unique serial number are emailed to the Company:
1. A Serial Number to register the Estate Master software on all the client computers.
2. A Serial Number to activate the Licence Server.
Company first downloads / installs the Licence Server on a machine on the same network and enters
in the serial number provided to activate the Licence Server licence.
The licence is now 'locked' to that machine and the Licence Server can now be started.
Company then downloads / installs the Estate Master software on all the computers that will be
potentially needing the software and enters in the serial number provided to register that computer to
use that software.
6
Any computer on the same network as the Licence Server can use one of the CAS Licences (as long
as the computer has the Estate Master software).
7
Once the CAS limit is reached on the Licence Server, the next user must wait for another user to exit
Estate Master before they can operate it.
© 2014 Estate Master Pty Ltd
Licence Types
8
7
If additional Client-Server CAS are required to allow for more simultaneous computers to access the
software, the Company can contact Estate Master Sales to purchase another Serial Number.
Important Note for using a Floating Licence over a WAN: The Client-Server (Floating) CAS
Licence uses UDP Broadcasting to establish a communication with the Network Licence Server and
the client machines running Estate Master. Over a WAN/VPN, these broadcast messages typically
are not received by the server due to network configurations blocking this type of communication (e.g.
firewalls, routers, etc). A Licence Server Finder utility is available to manually specify the IP address of
your server in this scenario, which may resolve this issue in most cases.
© 2014 Estate Master Pty Ltd
Part
II
Installation
2
9
Installation
Pre-installation Checklist
ü The software can only be installed and registered by a person who has Administration rights for
that PC/Notebook/Server.
ü The administrator must install and complete the registration of the software on behalf of the
user.
ü The installation and registration process must be completed on each PC/Notebook/Server that
you intend to use Estate Master on. You can not complete the registration process on one
computer on behalf of another.
Summary of Installation Requirements
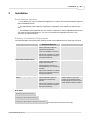
The following tables summarises what software needs to be installed where for each type of licence.
Licence Type
User/PC Licence
Estate Master Software and
Prerequisite Software
· .Net Framework and Estate
Master Software installed on
individual PC/Notebooks
Network Licence Server
· Not required
· Cannot be installed on a Server
· SQL Server installed on a central
server (only required if using the
Enterprise Database)
Terminal Server CAS Licence
· .Net Framework and Estate
Master Software installed on a
single Terminal Server
· Not required
· Remote Desktop Clients (e.g
PCs/Notebooks) do not need any
software
· SQL Server installed on a central
server (only required if using the
Enterprise Database)
Client-Server (Floating) CAS
Licence
· .Net Framework and Estate
Master Software installed on
individual PCs/Notebooks/
Servers
· Licence Server installed on any
single machine on the same
network as the individual PCs/
Notebooks/Servers that have the
Estate Master Software installed.
· SQL Server installed on a central
server (only required if using the
Enterprise Database)
Next Steps
Installing Prerequisite Software
Installing the Estate Master Software
Installing the Estate Master Network Licence Server
© 2014 Estate Master Pty Ltd
(for Client-Server CAS Licences only)
10
2.1
Installation and Registration
Installing Prerequisite Software
To streamline the installation process, please make sure the following prerequisite software is
installed on the PC/Notebook/Server before attempting to install Estate Master:
· Microsoft .Net Framework 3.5
· Microsoft SQL Server 2005 or 2008 (Standard or Express Editions) (only if using the Enterprise
Database)
It is recommended that the prerequisite software be downloaded from Microsoft's Download Centre to
ensure that the latest versions are installed.
Next Steps
Installing the Estate Master Software
Installing the Estate Master Network Licence Server
2.2
(for Client-Server CAS Licences only)
Installing the Estate Master Software
Installing from Disc
Place the Estate Master CD into the drive and wait for the installation program to automatically load.
Installing from Download
After downloading the Setup file from the Estate Master web site and saving it on your PC, run the file
by double-clicking it.
1. If you have not already done so, the setup process may prompt you to install the prerequisite
software.
2. Follow the prompts to install the Estate Master program on the PC/Notebook/Server.
3. The following will be added to the Windows Program list:
· Check for Updates: A utility to check if there are any updates for the Estate Master product
online that can be downloaded.
· Estate Master <product name>: The main Estate Master application.
· Operations Manual: A PDF version of the software manual.
· Sample File: A file with sample data.
Next Steps
Installing the Estate Master Network Licence Server
2.3
(for Client-Server CAS Licences only)
Installing the Network Licence Server
If using a Client-Server CAS Licence ('Floating' licence), you will need to install the Network Licence
Server application on a specific machine on the network so it can control the usage of the software
licenses across a network. It can be either a PC or Server, but preferably a machine that is always
© 2014 Estate Master Pty Ltd
Installation
11
powered on and is accessible by all other machines requiring to run Estate Master using this licence
type.
Installing from Download
After purchasing a Client-Server CAS Licence, you will be emailed a link to download the Network
Licence Server. Alternatively, you can download it directly from here. After downloading the Setup file
and saving it on your PC, run the file by double-clicking it.
1. If you have not already done so, the setup process may prompt you to install the prerequisite
software.
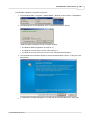
2. Follow the prompts to install the Estate Master Network Licence Server on the PC/Notebook/
Server. You will be given the option to install the following features (by default, all features will
be installed) :
· The Network Monitor: The user-interface for the Network Licence Server. This utility allows
you to stop/start the Network Licence Server service, see who is actually using the software
on the network and check how many available licences for each product there are. The
Network Monitor can also be installed on other machines (in addition to the machine that
has the Network Licence Server service running on it) if you wish to monitor Estate Master
licence usage from several locations.
· The Network Licence Server: The application that controls the concurrent use of the
different Estate Master licences on the network. Only 1 Network Licence Server can be
installed on a network.
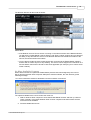
3. Towards the end of the installation process, the registration form to activate the Network
Licence Server will appear. If you have the registration details available, enter them in the form
and click on [Register]. Alternatively, click on [Cancel] and complete the process later, however
please bear in mind, you will not be able to 'start' the Network Licence Server until it has been
registered.
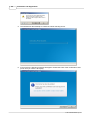
4. Once installation is complete:
· The Network Licence Server (if that feature has been selected to be installed) will be then
added as a Windows Service (set on 'Automatic' startup type) waiting to be 'started'.
· The Network Monitor (if that feature has been selected to be installed) will automatically
appear so you can 'Start' the Network Licence Server.
© 2014 Estate Master Pty Ltd
12
Installation and Registration
5. In addition, the following will be added to the Windows Program list:
· Network Monitor: The user-interface for the Network Licence Server.
· Registration: The registration form for the Network Licence Server. If you did not register
the licence in Step 3, then you can click on this to load the registration form at a later date.
It also allows you to deactivate an active Network Licence Server licence so you can
transfer the Network Licence Server from one machine to another.
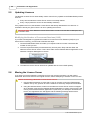
Important Note: Only 1 Network Licence Server can be installed on a network. There are
checks in place to ensure that no more than 1 Server is installed, however as a precautionary
method, if any of the Estate Master products attempt to detect a Server when they load and more
than 1 is found, the following error will be displayed and the user will not be able to use the Estate
Master software until all the superfluous servers are uninstalled.
© 2014 Estate Master Pty Ltd
Part
III
14
3
Installation and Registration
Evaluating the Software
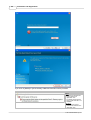
Once the Estate Master software has been installed on a PC/Notebook/Server, it will be operational for
a period of 14 days for evaluation purposes, until a valid serial number needs to be used to activate
the licence.
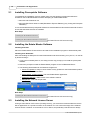
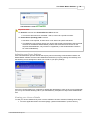
To evaluate the software, just run it after it has been installed and the following screen should appear:
· You can check the number of days remaining in the evaluation period
· You can click [Try] to continue using the software. If 'Try' is disabled, then the evaluation period
has expired.
© 2014 Estate Master Pty Ltd
Part
IV
16
Installation and Registration
4
The Estate Master Software
4.1
Registration and Activation
When purchasing any of the different types of licences, a Serial Number(s) will be provided to
'Register' the Estate Master software (i.e DF, DM, etc) on the PCs/Notebooks/Servers that will be
running the software.
· For User/PC Licences:
o The Estate Master software will be 'registered' on the standalone PCs/Notebooks
· For Terminal Server CAS Licences:
o The Estate Master software will be 'registered' on the Terminal Server
· For Client-Server (Floating) CAS Licences:
o The Estate Master software will be 'registered' on the networked PCs/Notebooks.
o
Important Note: Before attempting to register these networked PCs/Notebooks in a
Client-Server (Floating) CAS scenario, the Network Licence Server needs to be installed
and registered first otherwise the networked PCs/Notebooks will fail in their registration
process.
Internet Connectivity Requirements
· During the 'registration' process, it will also attempt to verify the serial number with the Estate
Master Online Licence Database and then 'activate' the licence.
· An outbound connection needs to be made to the following URL to confirm the licence: http://
clients.estatemaster.net:80/webservices/
· If it cannot activate online during this process (e.g no internet connection or something blocking
the connection), the user will have to activate their software via the offline method within 14
days or 15 uses from 'registering' (whichever comes first) .
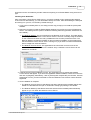
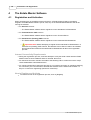
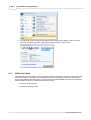
How to Register and Activate
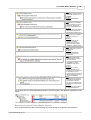
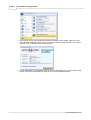
1. On the first screen in the registration process, click on [Register]
© 2014 Estate Master Pty Ltd
The Estate Master Software
17
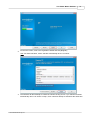
2. On the next screen, enter in the registration details and click [Register]
Hint: For faster activation, select 'Activate Automatically when I am online'
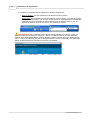
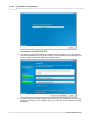
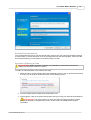
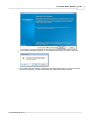
3. The software will then attempt to contact the online licensing server. If you selected 'Activate
Automatically when I am online' in step 2, then it will then attempt to activate at the same time.
© 2014 Estate Master Pty Ltd
18
Installation and Registration
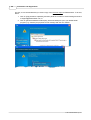
The Software is now REGISTERED
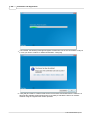
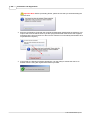
4. If no internet connection is available to complete the online activation, or you did not select
'Activate Automatically when I am online' in step 2, then the following screen will appear. You
will then need to complete the 'Offline Deactivation' process.
5. If the licence was successfully activated, it will check to see if any updates to your licence is
required (e.g changes to your company name, etc). If there are, then the following message
will appear.
© 2014 Estate Master Pty Ltd
The Estate Master Software
19
The Software is now ACTIVATED
Important Note:
For User/PC Licences and Terminal Server CAS Licences:
· The licence will need to be 'activated' - that is, 'locked' to a specific machine.
For Client-Server (Floating) CAS Licences:
· Activation is not required, as the licence is not 'locked' to specific machines.
· The Network Licence Server has its own licence that needs to be activated, but the actual
licences for the different Estate Master products that it monitors and controls on the
separate PCs/Notebooks, only need to be 'registered' (i.e the Serial Number entered in
for each PC/Notebook) .
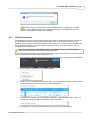
Adjusting your Proxy Settings
If the online activation process detects that a proxy server is blocking communication between the
Estate Master software and the online database and it detect your proxy settings successfully, then
the following screen will appear to allow you to enter in your proxy settings.
If the Proxy Configuration form continues to appear after attempting to enter in the correct credentials,
you can try and set the following URL in your Firewall/Proxy exception list: http://clients.estatemaster.
net/*
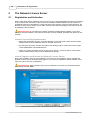
Viewing your Licence Details
To view your licence details at any time once the software has been activated, following these steps:
1. Go to the Application Menu and select [Help] > [About Estate Master <product name>]
© 2014 Estate Master Pty Ltd
20
Installation and Registration
2. The following screen will appear that displays the existing licence details. Until the Licence
has been 'activated', then this screen will just display the text "Trial Licence"
4.1.1
Offline Activation
The registration and activation process requires an internet connection to authorise the licence online.
If there is no internet connection, or a firewall/proxy server is blocking the connection, the following
screen may appear during this process. Two options will then be available to the user to activate their
software within 14 days or 15 uses (whichever comes first):
1. Activate over the internet.
2. Activate by entering a code.
© 2014 Estate Master Pty Ltd
The Estate Master Software
21
Activate Over the Internet
To try and activate the licence over the internet again, firstly check your internet and network settings
to ensure there is no issue with them, then click on [Activate Over the Internet] again. If there are still
errors while activating, you will need to 'Activate by entering a code'
Activate by Entering a Code
Important Note: Offline Activation codes are only available for clients with a valid Annual
Support and Software Assurance contract.
To obtain an offline activation code, follow these steps:
1. When the above screen appears during the registration process, click on [Activate by Entering
a Code]. You will be given a 'Machine Code' on the following screen.
2. Go to the Estate Master website www.estatemaster.com
3. Once logged in, click on the [Client Area] button and log in using your Client ID and Password.
Important Note: If for some reason you have any issues in logging into the the Client
Area of the website to complete this process, please contact an Estate Master Support
Consultant.
© 2014 Estate Master Pty Ltd
22
Installation and Registration
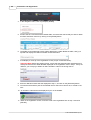
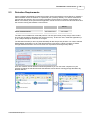
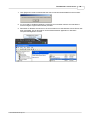
4. In the navigation menu, click on [Company Details]
5. Scroll to the the 'Licensed Product Details' table, and select the license that you wish to obtain
an offline activation code for by clicking on the [Details] button.
6. The details for that particular license will be displayed in a table. Below the table, click [+] to
expand and display the 'Offline Activation Code' information.
7. It will display a mock-up of the registration screen (as per screenshot below).
Important Note: Before proceeding further, ensure that the Serial Number displayed here is
exactly the same as the Serial Number displayed on the registration form in step 1. If they are
different, you are trying to obtain an offline activation code for the wrong licence.
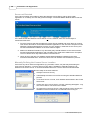
8. Enter the 'Machine Code' that was displayed in step 1, and click on the [Generate] button.
9. You will then be asked to pick the nominated user for this licence from a list, or create a new
user.
10. An activation code will then be displayed to you on the website.
11. Back on the registration screen, enter this code in the registration form in step 1 and click
[Activate]
© 2014 Estate Master Pty Ltd
The Estate Master Software
4.1.2
23
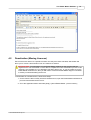
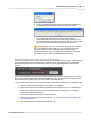
Troubleshooting Errors
If the Registration and Activation process fails for a particular reason, a message will appear with the
reason of the failure.
Errors during Registration and Activation
As soon as the [Register] button is clicked, the first thing that will be checked is the validity of the
serial number used. If the following error message is displayed, it usually means that the serial
number entered is not for that particular Estate Master product (e.g. you are using a DM serial
number to try and register a DF licence).
To check that you have the correct serial number for the Estate Master product, the first 2 letters of
the number should be the same as the product name (e.g for Estate Master DF serial numbers, they
should start with 'DF............')
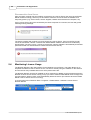
If the serial number validity check has passed, then an issue may arise during the online activation
process. This will be indicated by one of the following screen:
© 2014 Estate Master Pty Ltd
24
Installation and Registration
If you click on [Details] or [Show Details], additional information will be provided:
Error
Causes and Resolutions
Cause
· The incorrect ClientID has
been entered in the
registration form
· The Serial Number doesn't
exist for that Client ID in our
database.
Resolution
· Check that the correct
ClientID was entered in the
registration form.
© 2014 Estate Master Pty Ltd
The Estate Master Software
25
Cause
· The Serial Number has been
marked as 'Inactive' in our
database.
Resolution
· Contact Estate Master
Support
Cause
· You are trying to activate a
version newer than you are
allowed to, due to it not
being a 'Supported' licence.
Resolution
· Renew your Annual Support
and Software Assurance
subscription for that licence.
Cause
· You are trying to activate a
User/PC Licence on a
Server
Resolution
· Install and licence the
software on a PC or
Notebook not running a
Server operating system.
· Upgrade to a CAS Licence.
Cause
· Your Subscription Licence
has expired
Resolution
· Contact Estate Master
Support to renew your
subscription.
Cause
· The licence has already
been activated on another
different machine.
· A previous deactivation did
not update our online
database to free up this
licence.
Resolution
· If you think you have
deactivated that licence
previously and you are tying
to activate it on a new
machine, try and conduct an
Offline Deactivation to reset
our licence database.
Cause
· You are trying to register a
Client-Server CAS licence
and the client machine
connect communicate with
the Network Licence Server.
Resolution
· Refer to the Licence Server
Troubleshooting Errors
Any errors that occur during registration/activation are also logged in the Windows 'Application' Event
Viewer.
Reporting Issues to Estate Master Support
If you require assistance with troubleshooting any issues during the registration and activation
© 2014 Estate Master Pty Ltd
26
Installation and Registration
process, it is recommended that you email a copy of the full error report to Estate Master. To do this,
either:
1. Click on [Copy details to clipboard], and then paste the contents in email message and send
to [email protected], or
2. Click on [Generate detailed email report], which will attempt to open your default email
program (e.g. Outlook) and populate a new message with the error details.
© 2014 Estate Master Pty Ltd
The Estate Master Software
4.2
27
Deactivation (Moving Licences)
Since licences are 'locked' to a specific machine once they have been activated, deactivation will
allow you to 'unlock' it and transfer it from one machine to another.
Important Note: You will need to run the Estate Master software on the machine that the
original licence was a activated on to be able to complete the online deactivation process. If this
machine is not available (e.g. it is damaged, has been stolen, etc), or you are unable to run the
Estate Master software on it, then you will need to contact an Estate Master Support consultant
to assist you with deactivating the licence.
To deactivate an activated licence, follow these steps:
1. On the machine that currently has the activated licence, open the Estate Master software that
you wish to deactivate the licence for.
2. Go to the Application Menu and select [Help] > [About Estate Master <product name>]
© 2014 Estate Master Pty Ltd
28
Installation and Registration
3. The following screen will appear that displays the existing licence details. Take note of the
'Serial Number' displayed on this screen, as it can be used to activate the licence on another
machine. Click on the [Deactivate Licence] button
4. A new deactivation form will appear warning you what will happen next. You will need a valid
internet connection to deactivate the licence. Click on the [Deactivate] button.
© 2014 Estate Master Pty Ltd
The Estate Master Software
29
5. A confirmation message will appear. If you still wish to deactivate the licence, click [Yes].
6. The software will then attempt to contact the online licensing server. If it cannot contact the
online licensing server, you will need to follow the 'Offline Deactivation' process.
© 2014 Estate Master Pty Ltd
30
Installation and Registration
7. If successful, the following message will appear. Please take note of the confirmation code just
in case you need to conduct an 'Offline Deactivation'. Click [OK].
8. Click [OK] and it will be confirmed that the licence has been deactivated from the machine. At
this point the software will shut down and it is now ready to activate the licence on another
machine using the original serial number provided.
© 2014 Estate Master Pty Ltd
The Estate Master Software
31
Important Note: Once a licence has been deactivated from a machine for a specific
product, if at any stage in the future the software needs to be re-activated again on that
machine, the software will need to be reinstalled
4.2.1
Offline Deactivation
The deactivation process requires access to the machine that the original licence was a activated on,
and an internet connection to authorise the deactivation online. If an internet connection is not
available, then the licence will be deactivated from the machine, but our online licence database will
not be updated. Therefore you will not be able to reuse this licence on another machine until you
complete the following process:
Important Note: Once you deactivate a license in an 'Offline' manner, you will be unable to
reuse that Serial Number again unless you activate 'Online'.
Go to the Estate Master website www.estatemaster.com
1. Once logged in, click on the [Client Area] button and log in using your Client ID and Password.
2. In the navigation menu, click on [Company Details]
3. Scroll to the the 'Licensed Product Details' table, and select the license that you wish to obtain
an offline activation code for by clicking on the [Details] button.
1. The details for that particular license will be displayed in a table. Below the table, click [+] to
expand and display the 'Offline Deactivation Code' information.
2. It will display a mock-up of the deactivation screen (as per screenshot below).
© 2014 Estate Master Pty Ltd
32
Installation and Registration
Important Note: Before proceeding further, please ensure that you are deactivating the
correct licence.
3. Enter the Confirmation Code that was originally supplied when deactivating the software. This
unique code ensures that the licence you are trying to deactivate matches the code supplied,
ensuring that the incorrect licence or the incorrect machine is not accidently deactivated. Click
on [Deactivate Computer]
4. If successful, the following message will appear. It is now ready to activate the licence on
another machine using the original serial number provided.
© 2014 Estate Master Pty Ltd
Part
V
34
Installation and Registration
5
The Network Licence Server
5.1
Registration and Activation
When using Client-Server (Floating) CAS Licences for any of the Estate Master products, the Network
Licence Server that controls the concurrent use of the different Estate Master licences needs to be
installed and its licence activated on a single machine on the network. Until successful activation, the
Network Licence Server service will not 'Start', and the Client-Server (Floating) CAS Licences cannot
be utilised by client machines.
Important Note: Do not attempt to install or operate the Estate Master software on the client
machines until the Network Licence Server has been correctly installed, activated and 'started' on the
network.
Internet Connectivity Requirements
· During the 'registration' process, it will also attempt to verify the serial number with the Estate
Master Online Licence Database and then 'activate' the licence.
· An outbound connection needs to be made to the following URL to confirm the licence: http://
clients.estatemaster.net:80/webservices/
· There is no 'offline' activation option for the Licence Server - it must be able to communicate
with the Estate Master Online Licence Database at all times.
How to Register and Activate the Network Licence Server
During the installation process of the Network Licence Server, the registration form to activate the
Network Licence Server will automatically appear. If you have the registration details available, enter
them in the form and click on [Register].
Important Note: When activating a licence for a Network Licence Server, the Serial Number
used should start with 'NLN'.
Hint: For faster activation, select 'Activate Automatically when I am online'
© 2014 Estate Master Pty Ltd
The Network Licence Server
35
Alternatively, click on [Cancel] and complete the process later. However, until you do register Network
Licence Server, none of the Client machines will able to be registered.
To load the registration form at a later time go to Windows Start > Programs > Estate Master >
Network License Server > Registration
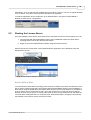
5.2
Starting the Licence Server
Once the Network Licence Server has had its licence activated, the service can be 'Started' so it can:
1. Communicate with the Estate Master Online Licence Database to fetch the Client-Server
(Floating) CAS Licences the client has purchased.
2. Begin to control the Estate Master software usage across the network.
Starting the service is done either via the Network Monitor application or the Windows Computer
Management console.
Using the Network Monitor to start the service
Using Windows Computer Management Console to start the service
Service Fails to Start
To ensure that the Client-Server (Floating) CAS Licences are always up-to-date, the Network Licence
Server service needs to frequently communicate with the Estate Master Online Licence Database. It
does this by using the default proxy information that has been set in Internet Explorer. If the Network
Licence Server service service fails to start, one of the reasons may be that user account that the
Network Licence Server service is running under does not have proxy permissions set, therefore the
communication is being blocked. To rectify this issue, follow these steps to change the account that
the Network Licence Server service is being run under.
© 2014 Estate Master Pty Ltd
36
Installation and Registration
1. Login to the server (the machine running the Network Licence Server service) as a user who
has proxy permissions.
2. Make sure the proxy information has been set in Internet Explorer and ensure they can
browse the web.
3. Logout as this user.
4. Login as an Administrator.
5. Change the account that the Estate Master License Server” service runs as to the same user
as in Step 1.
6. Try and start the Service
© 2014 Estate Master Pty Ltd
The Network Licence Server
5.3
37
Detection Requirements
Client computers will attempt to locate the machine running the Network License Server by sending a
UDP broadcast across the network on a particular port (11000 by default). The Server will hear this
request and reply with the TCP connection information for the Client to continue communication on.
Below is a summary of the ports that the application needs access to on both the client machines and
the machine running the Network License Server.
Client Machines
Network Licence
Server
Client Location Listener
UDP 11000
UDP 11000
Server Communications
TCP random port
TCP 12000
The UDP is an unreliable low-overhead protocol. It is also given lower priority though some routers
and can also possibly be dropped if the router is too busy. In this rare case, restart the application (e.
g. DF, DM) to attempt to locate the server again.
The Windows Firewall (or other corporate firewalls) will also stop these packets. You need to add the
Estate Master application (e.g. DF, DM) and the above ports into the “Allow a program or feature
through Windows Firewall”. This can be done at a corporate level through Group Policy.
As a rule of thumb, server detection should be possible if you can see other computers on your
network (including the machine that has the Network License Server running) though Windows 'My
Network Places'.
© 2014 Estate Master Pty Ltd
38
Installation and Registration
Server not Detected
If the Client computer was unable to detect the Network License Server, either during initial
registration or on startup, the user will get this message: "The Estate Master Network Server was not
found."
If it is believed that the Network License Server is on the network, there are several ways to
troubleshoot this issue:
1. Go to the machine that has the Network License Server installed and check that it is 'running'.
This can be done either via the Network Monitor application or the 'Services' component in the
Windows Computer Management console. If it was 'stopped', restart the service and try and
use the Estate Master software on the client machine again.
2. Make sure Windows Firewall or any other third-party firewall software on the client machine
has the Estate Master applications and TCP/UDP ports noted above added to the 'Exception
List' so it doesn't block any traffic between it and the server.
3. Check to see if their are any VMWare Virtual Network Adaptors installed on the client
machine and disable them. These have been found to interfere with the detection process.
Manually Defining the Licence Server Location
If there are any other network configurations (e.g. firewalls, routers, etc) that may be blocking the
licence server detection, a 'Licence Server Finder' utility is available to manually specify the IP
address of the licence server. It can be downloaded from here: Licence Server Finder Download
Run the utility on the client machine:
1. Click [Find Licence Server]
2. It will attempt to find the Licence Server using the standard detection
process.
3. If a Licence Server is found, it's IP address will be listed in the 'Found
Servers' list.
4. If more than one Licence Server is found, a warning will appear - only
one Licence Server can exist on the network.
5. If it cannot find a Licence Server, it will prompt the user to specify the
IP address of the machine that IT is deemed to be running on.
© 2014 Estate Master Pty Ltd
The Network Licence Server
39
6. Once the IP address has been entered, it will save the settings to a
configuration file, and alert the user where that file is saved.
7. The Estate Master software on the client machine will then
communicate with the Licence Server using these settings. If there
are other client machines that have the same issue, this configuration
file can be copied to the same locations on these machines.
Important Note: Since you are manually setting the IP address of
the Licence Server in these instances, if you ever move the Licence
Server to a different machine with a different IP address, these
configuration files will need to be updated for the client machines that
have had the Licence Server IP address manually defined.
Manually Defining the Licence Server IP Addresses
In some circumstances, the machine that the Network License Server is running may have more than
one IP Addresses allocated to it (ethernet IP's, VPN IP's, etc). This is evident when a different IP
address is displayed each time the Network License Server is stopped/restarted via the Network
Monitor.
Whenever the Network License Server is started, it will bind to the first IP it detects (on any interface)
which can therefore change if the server has multiple IP’s. This can be problematic, especially if the
client machines have had the Licence Server location manually defined.
The resolution to this is to specify a static IP address in the Network License Server configuration file:
1. Go to the machine that the Network License Server is installed on.
2. Determine what the main permanent IP address of this machine from your IT Administrator.
3. Browse to the Network License Server program files folder. By default, it is: C:\Program
Files\Estate Master\NetworkServer
4. Open the file NetworkService.exe.config in Notepad
5. Enter in the IP address in the UserServerIP key, e.g. <add key="UseServerIp" value="enter
your IP address here" />
6. Save the file and restart the Network License Server.
© 2014 Estate Master Pty Ltd
40
Installation and Registration
Disconnection from Server
After the Client computer has successfully connected to the License Server (the user has the Estate
Master software running), there may be an instance where the server becomes unavailable for a
temporary period. (e.g. server reboot, service stopped, network disconnected from computer, etc)
If the License Server cannot be contacted by the Client computer for 2 minutes, the user will get the
following warning message:
The Client computer will continue to try and contact the License Server. If the License Server still
cannot be found after a further 2 minutes then Estate Master software will need to be restarted by
pressing [OK]. The user is given 1 minute to press [OK], until the software is automatically terminated
(therefore a total of 5 minutes without contact with the License Server).
5.4
Monitoring Licence Usage
The Network Monitor is the user-interface for the Network Licence Server. This utility allows you to
stop/start the Network Licence Server service, see who is actually using the software on the network
and check how many available licences for each product there are.
The Network Monitor can also be installed on other machines (in addition to the machine that has the
Network Licence Server service running on it) if you wish to monitor Estate Master licence usage from
several locations. When it starts, it will automatically detect the server (the machine where the Estate
Master Licence Server service is running).
It can be opened from Windows Start > Programs > Estate Master > Network License Server >
Network Monitor
© 2014 Estate Master Pty Ltd
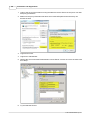
The Network Licence Server
41
The Network Monitor will then load as follows:
Please Note:
· If the Network Licence Server service is running on the same machine as the Network Monitor,
you will see the “Estate Master License Service” and "Error Logging" sections and you will have
the ability to stop and start the service. If the Network Monitor is on a different machine to the
service, then these sections are hidden.
· You are able to restart the service while people are connected to the Estate Master software
and this will not cause anyone to stop working. The service can be stopped for a maximum of 5
minutes before clients will be forced to close their application (for example, just in case a server
needs a reboot).
No More Available Licences
When all the licenses for a particular Estate Master product have been assigned by the Licence
Server and then another Client computer attempts to start the software, the user will then get the
following message:
"You have reached the maximum allowable concurrent network connections"
The options available to the user to resolve the issue are:
1. Wait for another Client computer to close their Estate Master session and free up a licence.
There is a delay of 2 minutes between when a Client computer ends their session and the
licence becomes available.
2. Purchase additional licences.
© 2014 Estate Master Pty Ltd
42
5.5
Installation and Registration
Updating Licences
The Network License Server automatically checks online for any updates to the Estate Master product
licences:
1. Every time the Network License Server service is manually started.
2. Every 3 days (where the service is automatically restarted)
If any updates are found, the Network License Server will silently download the new licences. A
notification will only be given if there is an error updating the licences.
Important Note: If the Network License Server fails to conduct a check after 10 attempts, then
it will fail to start.
Modifying the Number of Concurrent Sessions (CAS)
If you wish to downgrade or upgrade the number of Concurrent Access Sessions (CAS) for your
Client-Server Licensing, you will need to follow these steps:
1. Contact Estate Master Sales and make your request to either increase or decrease the
number of CAS you own.
2. Once the request has been processed and any invoices paid, 'Stop' and then 'Start' the
Network Licence Server service. This is done either via the Network Monitor application or the
Windows Computer Management console.
3. The Network Licence Server will then be updated with the correct CAS quantity.
5.6
Moving the Licence Server
If you wish to move the Network License Server from one machine to another, you will need to
'deactivate' the license first from the original machine, before attempting to 'activate' on the new one.
Before deactivating a Network License Server licence:
1. Use the Network Monitor to check that no user is currently running the Estate Master
software. If they are, get them to exit the software to avoid any unexpected termination.
2. Using the Network Monitor, make sure the Network License Server service is stopped.
Once stopped, make sure the Network Monitor application is closed. If the service is still
running or the Network Monitor application is open when you attempt to 'deactivate' the
licence, the registration form will appear and the following message will be shown:
© 2014 Estate Master Pty Ltd
The Network Licence Server
43
To deactivate a Network License Server licence:
1. Go to Windows Start > Programs > Estate Master > Network License Server > Registration
2. The following form is then displayed. Click on [Deactivate Network Server]
If that form does not appear, then the reasons could be:
· The Network Monitor application is still open, or
· The Network License Server service is still running, or
· The Network License Server licence was never activated in the first place.
3. The registration form will then appear to confirm the deactivation process. To proceed, click
[Deactivate]
4. A confirmation message will appear. If you still wish to deactivate the licence, click [Yes].
© 2014 Estate Master Pty Ltd
44
Installation and Registration
5. The software will then attempt to contact the online licensing server.
6. If successful, the following message will appear. Please take note of the confirmation code
just in case you need it. Click [OK].
© 2014 Estate Master Pty Ltd
The Network Licence Server
45
7. Click [OK] and it will be confirmed that the licence has been deactivated from the machine.
8. It is now ready to install the Network License Server on another machine and activate the
licence using the original serial number provided.
9. Remember to 'Restart' the service on the new machine once the Network License Server has
been reinstalled. This is done either via the Network Monitor application or Windows
Computer Management console.
© 2014 Estate Master Pty Ltd
Part
VI
Technical Support
6
47
Technical Support
For further assistance in installing and registering Estate Master, please contact an Estate Master
consultant.
Asia Pacific
Estate Master Pty Ltd
Level 6, 234 George Street
Sydney NSW 2000 Australia
Tel: 61 2 8198 7600
Fax: 61 2 9241 6854
[email protected]
© 2014 Estate Master Pty Ltd
Middle East
Estate Master Dubai
Level 11 Suite 1102
Dubai Internet City, Dubai,
UAE
Tel: +971 4 433 2116
Fax: +971 4 427 8709
[email protected]
UK and Republic of
Ireland
Building Software Services
4 Milton Terrace, Seapoint
Road
Bray, Co. Wicklow, Ireland
Tel: 353 1 282 8632
Fax: 353 1 282 8634
[email protected]