1
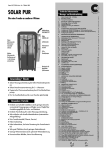
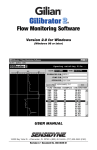
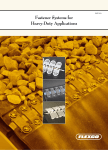
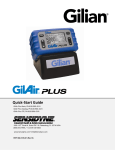
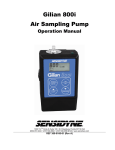
Model AP-20S
Gas Detection Pump
Instruction Manual
Made in Japan for Sensidyne by Komyo Rikagaku Kogyo K.K.
Sensidyne Document No. 360-0027-01 Revision A
Table of Contents
Foreward ................................................................................. 3
• For Safe and Correct Use ............................................. 3
• Cautions ...................................................................... 3
• Notes ........................................................................... 4
AP-20S Pump Accessories ...................................................... 5
AP-20S Pump Components ..................................................... 5
Detector Tube Components ..................................................... 6
Performing the Leak Test ........................................................ 7
Maintenance ........................................................................... 8
• Lubricating the Pump ................................................... 8
• Replacing the Rubber Tube Connector .......................... 8
Operating Procedure ............................................................... 9
Reading the Gas Concentration ............................................. 11
• Faint Discoloration (Feathering) .................................. 11
• Slanted Stain ............................................................. 11
• Using a Conversion Chart ........................................... 11
Temperature Correction ........................................................ 12
• Using a Correction Table ............................................ 12
• Using a Correction Coefficient .................................... 12
Measurement Under Special Conditions ............................... 13
•
•
•
•
Remote Measurement ................................................ 13
High Temperature Gas Measurement ......................... 13
High Concentration Gas Measurement ....................... 14
Atmospheres with Non-ambient Pressure .................. 14
Options & Accessories .......................................................... 15
2
Doc No 360-0027-01
FOREWORD
Thank you for purchasing the Model AP-20S sampling pump. The
Model AP-20S pump is designed specifically for use with Kitagawa
detector tubes. This system with the available Sensidyne/Kitagawa
detector tubes can detect the presence of more than 300 airborne
gases and vapors.
FOR SAFE AND CORRECT USE
• Read carefully both this instruction manual and the instruction sheets for the
individual detector tubes prior to use of this product.
• Ensure that this instruction manual is stored in a convenient location for easy
reference at all times.
• If you have any questions regarding this manual, please contact your local
distributor or manufacturer representative.
The following symbols are used in this manual
CAUTION: Failure to observe this
instruction can result in possible personal
injury or damage to property.
NOTE: Indicates instruction or advice for
the correct use of the product, to prevent
problems with the product.
CAUTIONS
• With a detector tube inserted and the handle drawn back, the pump cylinder
is under a high vacuum. If the handle lock is released under vacuum
conditions, it will pull back suddenly. Holding the pump by the extended shaft
can lead to injury. Always hold the pump by the cylinder, never by the shaft.
• Broken glass tube tips can fall from the tip cutter or storage area when using
the pump. To prevent glass contamination in restricted area (e.g., food
processing plants) use the optional Deluxe Tip Cutter (PNº 7013601).
• Normal use of detector tubes requires the handling of broken glass tubes.
Safety glasses and protective gloves are recommended.
• Avoid skin and eye contact with the internal chemical reagents.
• If the reagent is completely discolored (i.e., the detector tube is over- ranged)
after measuring a high concentration toxic gas (e.g., a process
measurement), the possibility exists for harmful gas residue inside the
cylinder. This gas will exhaust from the back of the cylinder when the handle
is pulled out for the next pump stroke. Whenever the tube has fully discolored,
purge the air inside the cylinder by pulling and pushing the handle several
times in a well-ventilated area.
© 2003 Sensidyne, Inc.
3
NOTES
• If the proper detector tube for a particular application is not chosen, correct
readings cannot be obtained. Choose detector tubes carefully using the tube
selection guide and pay strict attention to chemical names and measuring
ranges.
• When gases other than the target gas are also suspected, refer to the tube
instructions for a list of known interfering compounds and their relative affect
on the reading. Consult the tube selection guide or handbook for tubes that
can monitor those gases.
• A detector tube is designed for a single use; do not re-use detector tubes.
• A detector tube should be used immediately after breaking the ends. Detector
tubes exposed to the air for a long time after breaking the ends will give
erroneous readings, and may not respond to the target gas at all.
• Read the concentration immediately after completion of measurement. If not
read immediately, the stain may lengthen or fade, which can lead to
erroneous readings.
• A leaking pump will produce low readings. Always check the pump for
leakage before use in accordance with section “CHECKING PRIOR TO USE”.
• The temperature range for use of detector tubes in general is 0 to 40 degrees
C. When using detector tubes at temperatures outside of the above range,
refer to the section “MEASUREMENT UNDER SPECIAL CONDITIONS.”
• Do not drop or strike the pump. If the cylinder is dented, it will impede the
handle operation and possibly cause leakage.
• Should the pump be disassembled, hand tighten only on re-assembly. Overtightening can damage threads.
• Clean the pump only with a dry paper towel. Do not use water or solvents.
• Do not store the pump in the areas of high temperature or high humidity. Do
not store with the handle extended, as the pump shaft is susceptible to
bending under stress.
• It is recommended that service repair be done only by authorized service
centers. Any service or repair must be followed by a leak check prior to field
use.
• Note that the AP-20S pump is a vacuum pump only, and it cannot be used for
specialized detector tubes that require sample entry by pressure (Oxygen,
Hydrogen, Propane, etc.)
DISPOSAL OF DETECTOR TUBES
A detector tube contains a chemical reagent which reacts with the target
gas. The chemical reagents used vary among different types of detector
tubes, and may include substances regulated by laws for proper disposal.
When discarding used detector tubes, dispose of them in accordance
with local disposal regulations. For further information contact your local
distributor or the manufacturer’s head office or branches.
4
Doc No 360-0027-01
AP-20S Pump Accessories
AP-20S Pump Components
© 2003 Sensidyne, Inc.
5
DETECTOR TUBE COMPONENTS
Dual Tube
Single Stage Tube
Sample
Gas
Sample
Gas
Flow
Direction
Pre-Treat
Tube
100
300
500
Rubber
Tube
Connector
1000
1200
1400
1600
1800
2000
ppm
100 m/
Flow
Direction
Flow
Direction
Sample
Volume
JAPAN
5
10
20
Detector
Tube
30
40
50
ppm
100m/
To
Pump
6
Sample
Volume
To
Pump
Doc No 360-0027-01
Performing The Leak Test
NOTE
A leaking aspirating pump may cause lower readings or no
response at all. Always perform a leak check before
using the pump.
1
Insert a sealed, unbroken
detector tube into the rubber
tube connector. Align the red
lines on the pump and shaft
handle, and pull the handle to
full stroke locked position.
2
Wait one minute. Unlock the
handle by turning it 1/4 turn
(90°). Hold the cylinder and
handle securely while allowing
the handle to slowly return to
its initial position. The pump
passes the leak test If the
handle returns completely to its
original position. If the red line
on the pump shaft is visible, the
pump has failed.
CAUTION
When the lock is released under full vacuum the
handle tends to snap back quickly
3
If the pump fails the leak test,
the following are possible
causes:
A) A loose inlet connector
holder.
B) Cracks and deterioration of
the rubber tube connector.
C) Deterioration of the grease.
To correct a leaking pump,
consult the MAINTENANCE
section.
© 2003 Sensidyne, Inc.
7
MAINTENANCE
• Lubricating The Pump
1
Pull the handle part way and turn the bottom case
counterclockwise to remove it.
2
Pull the piston out from the cylinder.
3
Wipe off the old grease and dirt from the piston and inside
the cylinder using a clean paper towel. Apply a thin coat of
grease to the rubber gasket of the piston. When wiping off
the old grease, be careful not to scratch the inside walls of
the cylinder. Reassemble pump.
• Replacing The Rubber Tube Connector
If the rubber tube connector appears cracked or deteriorated,
remove the connector holder and replace it with new one.
8
Doc No 360-0027-01
OPERATING PROCEDURE
READ THESE NOTES PRIOR TO USING PUMP
• The operating procedure varies from one detector tube to
another. Before proceeding, read carefully the individual
instruction sheets provided in each box.
• Some detector tubes require temperature and/or humidity
correction using tables provided in the instruction sheets. Be
sure that the tube temperature has reached equilibrium with the
sample area before drawing the sample.
• When using detector tubes at pressure other than normal
atmospheric pressure, correction of the reading is necessary.
Refer to the section “MEASUREMENT AND OPTIONS UNDER
SPECIAL CONDITIONS.”
•To read the tube scale directly, it is necessary that the pressure
of the sample gas is equal to that of the pump.
•When sampling high-pressure systems, first collect the sample
in a gas sampling bag (non-adsorbent material), then use the
pump to draw the sample from the bag.
• Taking a Measurement
NOTE
Always perform a leak check on the
pump (page 7) before taking a sample.
1
Cut both ends of the detector
tube. Insert the tip of a fresh
gas detector tube into the tip
cutter. Score the tip by rotating
the tube one revolution. Pull the
tube toward you at an angle to
break the tip.
Repeat this for the tip at the
other end of the tube.
(The glass tip can be disposed
by removing the tip cutter cap.)
© 2003 Sensidyne, Inc.
9
OPERATING PROCEDURE
2
Insert detector tube. Insert the
gas detector tube into the
rubber tube connector in the
pump. Make sure the tube’s
arrow is pointing toward the
pump.
3
4
Pull the handle. Align the two
red marks on the pump and
shaft handle. Pull the pump
handle to its full 100cc locking
position for a full stroke, or to
the 50cc locking position for a
half stroke.
Sampling
Sampling Done
5
6
10
Draw the sample gas. Take a
sample for the specified time
at the desired sampling point
as shown in the tube
instructions. The sample is
complete when the flow finish
indicator appears.
Return the handle. When the
sample is complete, turn the
handle 1/4 turn (90°) to unlock
the handle. Confirm that the
handle remains extended. (If
the handle returns part way, the
sample is incomplete, causing
a low reading). If the detector
tube requires more than one
stroke, push back the handle
and repeat the operation, as
many times as required.
Read the concentration. After the prescribed sample
volume has been drawn, remove the tube from the pump.
Read the concentration and perform any temperature
corrections as described on page 12 and in the tube
instructions.
Doc No 360-0027-01
Reading The Gas Concentration
For direct-reading tubes, read the gas concentration from the
printed scale at the maximum end of the stain.
Two special cases are described below: Faint Discoloration and a
Slanted Stain.
• Faint Discoloration (Feathering)
For a faintly discolored (feathered) stain read the gas concentration
at the maximum end of the stain.
60
50
40
30
20
10
Discolored Layer
Use This Reading
• Slanted Stain
For a slanted stain read the gas concentration at the middle of the
slanted layer.
60
50
40
30
20
10
Discolored Layer
Use This Reading
• Using A Conversion Chart
Align the zero end of the detecting reagent (inlet side of the tube)
with the O - O line on the concentration chart. Align the other end
of the same layer (exit side or pump side of the tube) with the X - X
line respectively. Read the gas concentration at the maximum end
of the stain against the scale on the card. If the end is slanted, read
at the middle point of the slanted stain.
WRONG
End Plug
RIGHT
X
100
90
X
100
90
80
70
60
50
25
10
5
O
© 2003 Sensidyne, Inc.
Glass Analyzer
Layer
80
70
60
50
25
10
5
O
End-of-Stain
Reading
of 62 ppm
Stained Analyzer
Layer
End Plug
11
TEMPERATURE CORRECTION
The temperature of concern is that of the detector tube (usually the
temperature of the sample gas).
• USING A CORRECTION TABLE
[Example] When the tube reading is 550 ppm at 25°C the true
concentration is found by interpolating between the concentrations listed for 20° and 30°. In this example, the corrected value is
560 ppm.
Scale Reading
(ppm)
1000
900
800
700
600
500
400
300
200
100
Temperature Correction (at 20°C)
True Concentration of Carbon Monoxide (ppm)
0°C
10°C
20°C
30°C
40°C
870
930
1000
1030
1060
780
840
900
930
960
690
750
800
830
860
610
660
700
720
740
520
560
600
620
620
430
470
500
520
540
350
370
400
410
430
260
280
300
310
320
180
190
200
210
220
90
100
100
100
110
Scale readings °C
20°C
25°C
30°C
700
700
710
720
600
600
610
620
550
(550)
(560)
(570)
500
500
510
520
400
400
405
410
• USING A CORRECTION COEFFICIENT
[Example] When the detector tube reading is 0.4 mg/l at 23°C,
the true concentration of water vapour is 0.36 mg/l by the
following calculation: 0.4 mg/l X 0.90 = 0.36 mg/l
Temp. (°C)
0
10
20
30
40
12
0
1.85
1.40
1.00
0.71
0.51
1
1.81
1.36
0.96
0.68
—
2
1.77
1.31
0.93
0.66
—
4
1.68
1.23
0.87
0.62
—
5
1.63
1.19
0.84
0.60
—
6
1.59
1.15
0.81
0.58
—
7
1.54
1.11
0.78
0.56
—
8
1.49
1.07
0.76
0.55
—
9
1.45
1.03
0.73
0.53
—
Temp. (°C)
0
10
20
30
0
1.85
1.40
1.00
0.71
1
1.81
1.36
0.96
0.68
2
1.77
1.31
0.93
0.66
3
1.72
1.27
0.90
0.64
4
1.68
1.23
0.87
0.62
3
1.72
1.27
0.90
0.64
—
Doc No 360-0027-01
Measurement under Special conditions
• Remote Measurement
A rubber extension hose (shown below) is used for remote detection
of potentially harmful gases prior to entering a confined space such
as a manhole or tank. The extension hose is placed between the detector tube and the pump to eliminate the need for purging. The rubber extension hose is available in lengths of 5 or 10 meters.
• High Temperature Gas Measurement
The allowable temperature range for detector tubes is generally, 0°
to 40°C. When measuring gases at temperatures outside of 0° to 40°
C, collect a volume of gas into a container, transport it to a moderate
area (i.e., indoors) and allow it to equilibrate. Then draw the sample
from the container. Care must be taken to choose a container of a
material that is compatible with the target gas. (e.g., A glass syringe
of 100cc or 200cc or a Tedlar bag of 1 to 2 liters is a suitable container). When flue gas or other high temperature gas is sampled, use
the Hot Air Probe.
© 2003 Sensidyne, Inc.
13
Measurement under Special conditions
• High Concentration Gas Measurement
High concentration gas exceeding the measuring range
of the detector tube may be
sampled as follows. Collect a
volume of sample gas into a
glass syringe and dilute with
fresh air. (See photograph).
The tube reading is then multiplied by the ratio of dilution
to determine the actual concentration. Example: Draw
50cc of sample gas into a 100cc syringe. Complete the syringe draw
with fresh air. Take a reading and multiply by 2.
• Atmospheres With Non-ambient Pressure
If 100cc of gas is collected at a pressure that is two times
atmospheric pressure, it is equivalent to 200cc of gas collected at normal atmospheric pressure. When measuring at
pressures other than normal atmospheric pressure, a pressure correction is required.
A true concentration can be obtained by the following equation. However, if the tube’s concentration scale is nonlinear, a
correction error is produced. Therefore it is recommended to
collect the sample in a gas sampling bag, then measure it at
normal atmospheric pressure for more accurate readings.
When collecting gas in a high pressure atmosphere, please
note that the bag can be ruptured by the expansion of the
sample gas.
Corrected value = Reading value on detector tube x 760 mmHg/
Atmospheric pressure in the measuring place [mmHg]
14
Doc No 360-0027-01
Options & accessories
Hazardous Material Detection Kit
The Hazmat III Kit (PNº 7013627) is a portable hazardous material
detection kit that is lightweight, rugged, and capable of on-the-spot
detection of numerous airborne contaminants. The kit utilizes a unique
two-step approach and a special color chart to determine nearly 70
compounds in as little as 2–3 minutes. The kit requires no electrical
power or user calibration and comes with a hard-shell, corrosionresistant polyethylene case.
One-Hand Adapter
The one-hand adapter for the Sensidyne Model AP-20S Pump is
ideal for one hand sampling from a ladder or into hard-to-reach places.
With the adapter installed and a tube inserted, the pump handle can
be drawn and locked without actually taking a sample. The pump can
then be extended into the sampling area and activated with one hand.
Extension Hose
An extension hose of either 5 meters (PNº 830-1001-01) or 10 meters
(PNº 830-1002-01) in length is available for use in confined space
entry, as well as a rigid telescoping extension probe with up to 10
working feet of length (PNº 830-1003-01). The design of the tube
holder at the free end of the hose permits a gas-tight fitting. Since
the detector tube is located at the sampling end of the hose, there is
no need to allow for the volume of air in the hose line.
Hot Probe
The Hot Probe (PNº 7013602) allows sampling of gases at elevated
temperatures (up to 250°C [482°F]) for applications such as auto
exhaust or stack emissions testing. The Hot Probe rapidly cools the
gas before it enters the detector tube.
Compressed Breathing Air Analysis Kit
The Compressed Breathing Air (CBA) Analysis Kit (PNº 7015406) allows anyone to simply, quickly, and quantitatively measure the quality of their compressed breathing air. Easy to use, the CBA Kit is an
accurate and precise method for detecting carbon monoxide
(PNº␣ 600SP), carbon dioxide (PNº 601SP), oil mist (PNº 602SP), oxygen (PNº 604SP), and water vapor (PNº 6003SP) (specific tubes not
included). The CBA Kit measures all four of the common contaminants in breathing air, plus oxygen deficiency.
Tube Tip Breaker/Cutter
The Tube Tip Breaker/Cutter (PNº 7013601) is a convenient container
for cutting and breaking detector tubes.
© 2003 Sensidyne, Inc.
15
Proudly Distributed By:
“The Standard for Professionals”™
16333 Bay Vista Drive • Clearwater, Florida 33760 USA
800-451-9444 • 727-530-3602 • Fax: 727-539-0550
www.sensidyne.com • [email protected]