1
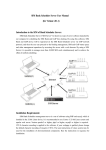
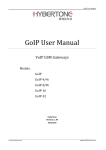
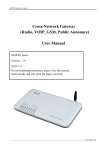
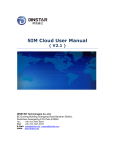
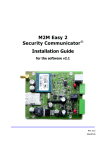
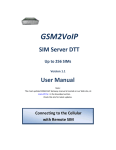
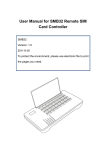
 Sim Bank Scheduler User Manual
(for v1.00.1201109)
Sim Bank Scheduler introduces:
Sim bank Scheduler server is Discovery Telecom’s latest server software allowed SIM CARDS
management and GOIP management. Using this software, SIM BANK and GOIP register
To the server through UDP protocol, you can login the software to manage SIMs and GOIPs.
Also check the status of SIMs & GOIPs.
1.
Overview
Remote SIM technology enables SIM cards to be installed in a SIM Bank and then virtually transfer the SIM cards via TCP/IP
connection to GOIPs. SIM cards can now physically separate from GSM devices and it can be installed in one location while actual
GSM device is installed in another location.
A SIM Bank is a storage device for SIM cards for remote SIM operation. It communicates with the SIM cards installed and then
converts the data into IP packets via T CP/IP protocols. These IP packets are sent to designate GOIPs.
A GOIP is a GSM device with Remote SIM support. It could talk directly to a SIMBank to retrieve SIM card information as required.
A Remote SIM Server is a Linux based utility used to manage a group of SIM Banks and GOIPs in order to form a Remote SIM
Management System.
It is capable of managing over 10,000 SIM cards to communicate with the corresponding GSM channels
simultaneously.
Discovery Telecom is currently offering a complete Remote SIM Management System as shown in the diagram below. It consists of:
1. SIM Bank – SMB32
2. GOIPs – 8*GoIP4 or 4*GOIP-8
3. Remote SIM Server
1
2.
Installation
The PC server should have the following operating system (OS) and software utilities installed. Please insure that these software
utilities are setup properly before proceeding further with the installation.
a) Linux version x.x or above version
or higherwith UTF-8 character code. If you experience character display problem while you are
The Remoteb) SIMPHP
Server
is 4encoded
c) Remote
MySQL
version
or higher please
accessing the
SIM
Server4Webpage,
change the MySQL default character code to UTF- 8.
d) Apache version 2 or higher (http)
To install the Remote SIM Server to your server computer, please follow the procedures below carefully.
1.
Login to your Linux OS as a “root” user.
2. Execute http://www.discoverytelecom.eu/upload/iblock/5b4/smb_scheduler_install-v1.5.tar.gz
to download the installation package.
3.
Execute “ tar – xzvf smb_scheduler_install.tar.gz ” to unzip the installation package.
4.
Execute “ cd smb_scheduler_install” to change directory to the installation folder.
5.
Execute “ ./smb_scheduler_install.sh ” to initiate the installation.
The installation process is interactive as shown in the table below . The user needs to enter information as required.
2
Notes:
1.
Upon restarting your Linux server, both utilities “xchanged ” and “smb_scheduler” starts automatically. If they fails to
execute, you c an start manually by typing the command “/usr/local/smb_scheduler/run_scheduler ”
and add this command to the
server boot up script for automatic execution.
2.
If these two utilities still fail to start, please check if the MySQL is installed properly.
3.
If firewall is enabled, please add port 56011, 56030, and 56130 to the trust list.
4.
If you encounter any problems during installation, please contact our technical support for assistance.
3.
Configuration
The Remote SIM Server offers a web interface for user access. Start a PC web browser and then type “http ://< server
IP>/smb_scheduler” in the address field. Wait till a login window pops up and then enter the default user name as “admin” and the
default password as “admin ”. When the login is successfully, you will see the home page of the Remote SIM Server as shown below.
This page displays the server information and messages.
3
To set up the Remote SIM Server, you need to first know how you want to allocate the SIM cards to the GOIPs. There are two methods
to allocate each SIM slots to GSM channels and this is referred as “SIM Mapping” from here on.
1.
Fixed Allocation – This allows you to allocate each SIM card slot in SIM Banks to a GSM channel in GOIPs manually. This SIM
Mapping is fixed and can only be modified by accessing each SIM Slot settings individually.
2.
Dynamic Allocation –This enables the Remote SIM Server to assign the SIM Mapping automatically. Two concepts are
adopted in performing dynamic allocation. The first one is “Group” definition. In order to qualify for dynamic allocation, each slot and
GSM Channel must be assigned to belong to a group defined. SIM Mapping can only be performed on SIM slots and GSM channels
that belong to the same group. Depending on the number of SIM card slots and GSM channels available in the same group, it is
possible that there are extra SIM card slots left or GSM channels left after the allocation is done.
Re-allocation is another key concept in the Dynamic Allocation method. The Remote SIM Server re
-allocates the SIM Mapping at a predefined interval (call ed Re-allocation Interval).
This effectively moves SIM cards from GSM
channels to other GSM channels regularly. To effectively control GSM channel selection for SIM Mapping, the “Area Number” property
is introduced to identify the location of each GSM channel. The Remote SIM Server can now select a GSM channel with a different
Area Number
for SIM Mapping.
This means that a SIM card can now be used in one location and then be used in another
location in the next re
-allocation interval.
To make the SIM card mo vement seamlessly, an IMEI can also be assigned to each SIM Slot (see Section 3.3) so that the
same IMEI is still be used even when the SIM card is moved to another GSM hardware (channel) .
3. MANAGE
Open the browser (software), input http://IP/smb_scheduler ,
Password :admin manage interface shows as blow.
then you can login with ID: admin
Details: This software including Operations, Data Manage, User Manage.
Operations is the most important part of this software.
4
1, Operation
1.1 Sim Bank management
Click on the “SIM Bank” on the left to access the “ SIM Bank Banks defined are listed in the ascending order of the Bank
Name.
SIMBANK attribute specification:
Offline means not register to the server. Online means register to the server. Bank ID is to distinguish
the SIMBANKs with the name (number) you put in. Line ID is to distinguish the sim cards on the
SIMBANK’ s slot from 1 to 32. Password is the one you set with your SIMBANK.
Bind Mode is the function you bind the sims.
Here is two ways, Fixed Mode means you bind the Sim by hand settings to a GOIP or a Group.
Group Mode means you bind the sim to a certain group you set in the group manage. Remain time of out calls means the working
time you set for each sim.
5
Time unit of calls which is the counting unit of calling, often set with 60 sec (you can set as 59 or even less incase of error)
Enable means whether this sim allowed to be bind. Disable means not.
1.1.1 Add a sim bank
To add a new SIM Bank, click on Add Sim Bank located at the Navigation bar and the above “Add SIM Bank ”
window pops up. And it will shows up with the picture blow.
ID and password is set by yourself. If you want use Fixed Mode pls choose None.
1.1.2 Modify Sim Bank Settings
Back to SIM BANK MANAGE click Modify and it will shows blow:
6
Group: you can add this sim bank to a certain group set in the GROUP MANAGE.
Plan to bind GOIP: you can bind the sim bank with a certain GOIP you set in the GOIP MANAGE.
PASSWORD: you can change the password here.
IMEI – “Random”, “Fixed”, or “Disabled”. “Random” means that the IMEI for the GSM channel Assigned will be randomly generated.
“Fixed” means that the IMEI for the GSM channel is set to the value defined here. Only the IMEI for the first slot is entered and the
IMEI for the subsequent Slots will be incremented by one accordingly.“Disabled” means that the default IMEI for the GSM Channel is
used. Please note that a change made here will be applied to all SIM slots
Designated GSM Channel – For Fixed Allocation mode, user can designate a specific GSM Channel for the selected SIM Slot
7
1.1.3 Delete SIMBANK
Click
Delete
and it will shows
Once confirmed you will delete all SIMBANK.
1.2 GOIP MANAGE
Click
GOIP MANAGE you will get the picture blow
8
Click
Add GOIP you will get picture blow
9
1. Device ID – This specifies a number ID for the GOIP (can only be added in here and cannot be modified once created.)
2. Device Name – This specifies a reference name for the GOIP (can only be modified in the Add GOIPwindow and cannot be modified
once created.).
3. Type – This specifies the type of GOIP. At the moment, all GoIPs (GoIP1, GoIP4, and GoIP8) support
Remote SIM. SIM Emulator will also available later.
4. Group – The Group parameter here assign the group property of all GSM Channels in the GOIP. If it is set to “None”, it means that
all GSM Channels are available for SIM Mapping in Fixed Allocation mode (“Edit SIM Slot” window).
If it is set to an existing group,
all channels will be assigned to belong to the same group and they are available for SIM Mapping in Dynamic Allocation mode.User
can modify this property in the “Edit GOIP ” window.
5. Area Number – Each GSM channel has its own “Area Number” property. When a new GOIP is added, all of its GSM channels will be
assigned to the same Area Number. User can modify this property in the “Edit GOIP” window according to his preference.
This function is use for simulate sim cards moving from Area 1 to Area 2 under the situation that GOIPs is in different place.
(for sim cards blocking)
6. Password – This is the password used to login to the Remote SIM Server.
1.3 GROUP MANAGE
Make a few sim bank lines and goip lines in the same group, the server will connect sim-goip lines in the group automatic
according to the rules, and sim-goip can be make calls after the successful connection.
Group attribute:
Name: the name of the new group you create.
Work interval: sim-goip working time when it keep connecting.
Sleep interval: after the working time, the connection will be canceled, then it will go to “sleep”. If you set the sleep interval for 30
second, it will sleep for 30 second and works again.
Operation: you can manage the sim lines and goip lines in this group, modify work interval and work interval.
1.3.1 SIM member
10
Pic: sim member manage
This is the list of all the sim bank lines in the SMB server, and you can select lines into this group.
1.3.2 goip member
Pic: goip member manage
It is almost the same as sim member.
1.3.3 modify rule
Pic: modify rule of group
Modify the work interval and sleep interval of the group.
11
2. System:
2.1 System manage
Status of Scheduler:show connection is success or fail. Default Language:web
language, English or Chinese.
2.2 Date backup: Backup and restore data, you can backup the date to server and local PC, restore the date from server and local
PC.
12
3. User manages:
You can add or delete account of the server and modify the account info here.
There are two kinds of users, administrator and common user. Common user can’t manage other accounts.
Notes: Follow part are very important to let your SIM BANK works with your GOIP, if not set right,
you will be not able to use SIMBANK server.
13
SimBank webpage configuration:
You should enable client mode in the sim bank terminal page and insert sim cards in sim bank after creating sim bank
information.
Sim bank ID and password is just you have set in the sim bank server.
GoIP webpage configuration:
You should also enable remoter sim option after creating goip information. ID and password is what
you have set in the SMB server.
14