1
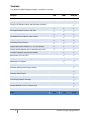
doPublicity Digital Signage Manager
User Manual for PRO+ and PRO+RS
Contents
Getting Started .............................................................................................................................................. 4
Welcome ................................................................................................................................................... 4
Versions .................................................................................................................................................... 5
Features .................................................................................................................................................... 6
Installation ................................................................................................................................................. 9
Registration ............................................................................................................................................. 10
Unregister License And Move To Other PC............................................................................................ 11
Screen Setup .............................................................................................................................................. 12
Auto Start on Windows Startup ............................................................................................................... 12
Screen Options ....................................................................................................................................... 13
Change Screen Settings ......................................................................................................................... 14
Content Setup ............................................................................................................................................. 16
Add New Content .................................................................................................................................... 16
Edit Content ............................................................................................................................................ 18
View Content ........................................................................................................................................... 20
Delete Content ........................................................................................................................................ 21
Playlist Setup .............................................................................................................................................. 22
Add To Playlist ........................................................................................................................................ 22
Edit Playlist .............................................................................................................................................. 24
View Selected Playlist Content ............................................................................................................... 25
Delete From Playlist ................................................................................................................................ 26
Run Display ................................................................................................................................................. 27
Run Digital Signage Display.................................................................................................................... 27
Shutting Down Display Screen ............................................................................................................... 28
View Logs .................................................................................................................................................... 29
View Display Logs ................................................................................................................................... 29
View Screen Logs ................................................................................................................................... 30
Remote Administration ................................................................................................................................ 31
Add Screen To Online Account ............................................................................................................... 31
Subscribe / Renew Subscription ............................................................................................................. 32
Suspend / Resume Remote Services ..................................................................................................... 33
Remote Content Management .................................................................................................................... 34
Add New Content .................................................................................................................................... 34
View / Edit / Delete Content .................................................................................................................... 36
Remote Playlist Management ..................................................................................................................... 38
Add To Playlist ........................................................................................................................................ 38
View / Edit / Delete Playlist ..................................................................................................................... 39
2
doPublicity Digital Signage Manual
Remote Banner Feed Management ............................................................................................................ 40
Add Custom Message ............................................................................................................................. 40
Add RSS Feed ........................................................................................................................................ 41
View / Edit / Delete Banner Feed ............................................................................................................ 42
Change Banner Display Colors ............................................................................................................... 43
Change Banner Display Speed ............................................................................................................... 44
Remote Display Screen Management ........................................................................................................ 45
Manage Display Screen Locations ......................................................................................................... 45
View Content Display Report .................................................................................................................. 46
View Screen Operating Logs .................................................................................................................. 47
3
doPublicity Digital Signage Manual
Getting Started
Welcome
Thanks for installing the doPublicity Digital Signage Manager.
The doPublicity Digital Signage Manager can be used to display your advertising or promotional content
on LCD / LED / Plasma TVs or computer monitors.
Advantages of doPublicity Digital Signage
•
Proven to increase sales to your captive clientele, while they are in your location
•
Use our built-in tools to create customized dynamic advertising content
•
Utilize any Custom Content (Video / Images) you may have received from an outside agency
•
Display Web pages / URL
•
Display Banner at bottom of screen with Custom Messages and / or RSS Feed
•
Use Dayparting to target different customers at different times of day
•
Flexibility to modify your campaign offerings instantly - adjust to foot-traffic and special
occasions
•
Automatic shut off / turn on of screens - save electricity / increase screen life
•
Ability to display both Horizontal and Vertical orientation
•
Trouble-free revenue generating opportunity
4
doPublicity Digital Signage Manual
Versions
The doPublicity Digital Signage manager is available in 2 versions.
Features
Templates Available
Display Images , Video and Web Pages / URL
Display LIVE Weather, News and Horoscope (Optional)
Horizontal / Vertical screen orientation
Set Layout Border Thickness and Color
Screen Display Logs
Set Working Days of Week / Hours of Day
Dayparting
Scheduling Future Displays
Display Split Screen Content in 1, 2, 3 or 4 Sections
Display Scrolling Banner with Custom Message / RSS
PRO
PRO+
PRO+RS
-
50
450+
-
-
Schedule Computer (Player) Auto-Reboot
Auto Screen Turn ON / OFF
Display on Primary or Secondary Screen
Add Audio to Templates
Display Time
Remotely Setup Screen Display settings
Remotely Setup Content
Remotely Setup Playlist
Order Customized Templates
View Display Reports Remotely
View Screen Operating Logs Remotely
Manage Multiple Screens simultaneously
Remote Service Subscription included
Price
Free
5
1 Month
12 Months
$99
$199
doPublicity Digital Signage Manual
Features
Multiple Content Display Options
Types of Content that can be displayed:
Templates
The software is pre-loaded with 50 Templates that may be used to create an assortment of customized
displays depending on your preferences. You can upload pictures that will be automatically inserted into
the Templates and displayed. You can also enter product description and other information, which will
also be inserted and displayed. You may edit this information and view content before commencing
display.
Subscribers of Remote Service have access to a large assortment of over 230 Templates to choose from.
Custom Content
The software allows you to upload and display Custom Content that you may have got from an outside
agency.
Pictures - In JPG, GIF, BMP and PNG formats
Videos - In SWF, WMV, AVI and MPG formats
Web page / URL display
Web pages displaying live news, weather, etc. can be set to display
Single / Split Screen Display
Display using multiple screen formats which include an assortment of Single / Split screens in both
Horizontal and Vertical format. Split Screens can be used to display multiple media formats
simultaneously.
Example: The left side of the screen could should a video, while the right side displays a Template
advertisement or image.
Scrolling Banner Feed - Custom Message / RSS Feed
Display Custom Messages or RSS Feed at the bottom of the screen.
•
Simultaneous display of Custom Message and RSS Feed
•
Customizable Background and Text Colors
•
Customizable Banner Speed
•
Up to 1200 characters permitted
Remote Screen Management
Remotely manage 1 or 100's of screens from a single desktop. All features are accessible remotely along
with live reports on Content displayed and Screen Operating Logs.
Dayparting
Dayparting is the practice of dividing the day into several parts, during each of which a different type of
6
doPublicity Digital Signage Manual
Content suitable for that time is aired. Content is most often geared toward a particular demographic, and
what the target audience typically engages in at that time. Dayparting is setup through the Playlist Setup
process.
Examples:
1. A restaurant may display breakfast menu from 7.00 AM to 10.00 AM and then display lunch menu till
3.00 PM, after which they promote their dinner menu.
2. A retail business may focus on women's products before 4.00 PM and promote products for teenagers
and men from 4.00 PM to closing hours.
The purpose of Dayparting is to maximize exposure to a target audience who may be viewing the display
screen at different times of the day.
Scheduling Future Displays
The software allows you to plan for future displays using the Playlist feature. Content can be scheduled
for display up to 6 months in advance and can have an End Date up to 24 months from setup date.
Auto Screen Turn ON / OFF
The Display TV / Monitor can be turned ON / OFF through the Screen Setup or remotely through the
Manage Display Screen Locations process. This allows you to program independent working days of the
week and their respective work hours. This feature increases Screen life while saving power costs.
Example: Screen can be setup to operate from Monday to Friday with Saturday and Sunday being nonoperative days on account of weekly holiday. In addition, each day can have separate working hours.
Display on Primary or Secondary Screen
Display can be set to show on either the Primary or Secondary screen in a multi monitor / screen setup.
This is ideal for businesses using POS (Point of Sale) systems.
Screen Orientation
The software can be used for either Horizontal or Vertical display. The Display Screen sizes itself
automatically and adjusts to the correct orientation.
Auto Screen Sizing
The software will auto-detect the screen size and size the Display screen accordingly. This ensures that
the entire screen is utilized for maximized display and appropriate proportion display.
Screen Display Logs
The software logs operating details of the software, which can be used for trouble shooting. The logs
cover Date / Time, Function and Description. Screen Display Logs can be viewed through the View
Display Logs tab.
7
doPublicity Digital Signage Manual
Operating Logs
The software logs operating details of the software, which can be used for trouble shooting. The logs
cover Date / Time, Function and Description. Operating Logs can be viewed through the View Logs tab.
8
doPublicity Digital Signage Manual
Installation
Before installing the software, please make sure that your equipment meets the below listed minimum
requirements.
Minimum System Requirements:
•
Windows PC with up to date 2000 / XP / 2003 / Vista / 7 operating system
•
TV / Computer monitor capable of displaying minimum 800 x 600 pixel resolution
•
CPU: 1 Ghz. Processor
•
RAM: 1 Gb.
•
Hard drive space: 150 Mb. + any additional pictures, videos you may upload for display
•
Internet connection: required for Registration purpose only
9
doPublicity Digital Signage Manual
Registration
To purchase a License Key, visit www.doPublicity.com
To Register the License key and unlock all features of the DoPublicity Digital Signage Manager:
1. Start the DoPublicity Digital Signage Manager
2. Click on 'Help' tab
3. Click on 'Register' tab
4. Enter required information
5. Click on 'Register License'
Note: You must be connected to the Internet to complete this process.
10
doPublicity Digital Signage Manual
Unregister License And Move To Other PC
The License may be Unregistered from your existing PC and transferred to an alternate PC.
To Unregister the License key for transfer to another PC:
1. Start the DoPublicity Digital Signage Manager
2. Click on 'Help' tab
3. Click on 'Register' tab
4. Click on 'Unregister License'
On unregistering the License, you may immediately use it on another PC.
Note: You must be connected to the Internet to complete this process.
11
doPublicity Digital Signage Manual
Screen Setup
Auto Start on Windows Startup
'Startup Options' allows you to set DoPublicity Digital Signage Manager to start automatically when the
computer is started.
Vista users must start the application with Administrator privileges.
To start Vista with Administrator privileges
1. Right-click on the 'DoPublicity Digital Signage Manager' icon on the desktop
2. Select and click on the 'Run as administrator' tab
Modifying your 'Startup options'
1. Start 'DoPublicity Digital Signage Manager' (for Vista users, see instructions listed above)
2. Click on the 'File' tab
3. Click on the 'Startup Options' tab
4. Click on 'Yes! Make the change' button
IMPORTANT NOTE: When set to start auto-start, the application will take a couple minutes to start
as it will wait for all regular Windows services / applications to start before it can run. At times, it
may seem that the application is not responding - this should be ignored and just wait for the
application to start.
12
doPublicity Digital Signage Manual
Screen Options
'Screen Options' allows you to select your 'Start-up Page' and whether you would like to see the display
screen 'Closing Instructions'.
Modifying your 'Screen options'
1. Start the DoPublicity Digital Signage Manager
2. Click on the 'Tools' tab
3. Click on the 'Screen Options' tab
4. Select from the list of initial startup screen displays
•
Home Page
•
Templates
•
Screen Details
•
Content Setup
•
Playlist Setup
5. Run Display - This option will start the application and go straight to display mode.
6. Set Remote Services ON / OFF and enter update frequency time (in minutes) - This feature
available only to subscribers of Remote Services.
7. Select option to display on Screen 1 or Screen 2
8. Select option from closing instructions
9. Select Text Debugging
10. Click on 'Update Options' button
13
doPublicity Digital Signage Manual
Change Screen Settings
The 'Screen Details' section shows information about the screen setup and allows customizing these
settings.
Screen details available:
Screen name
Displays name of screen that you may change at any time.
Orientation
Displays whether the screen is setup as a Horizontal or Vertical screen.
Working Days of Week*
Displays whether screen is to stay ON or OFF for each day of the week.
The management of the display screen is automated and seamlessly goes into sleep mode when set to
OFF days and wakes up when set to ON days. This saves electricity and extends life of display screen.
Example: Screen can be setup to operate from Monday to Friday with Saturday and Sunday being nonoperative days on account of weekly holiday.
Daily Working Hours*
Displays whether the screen is to stay ON or OFF for different time slots of the day.
The screen automatically turns ON or OFF depending on set parameters. The time slots are in 30
minutes increments and permit numerous combinations depending on personalized requirements.
Example: The screen can be set to commence display at 8.00 AM and shut down at 12.30 PM. It can
them be set to resume at 1.30 PM and shut down again and 8.00 PM.
The setting can be customized for each day of the week. This allows for shorter working hours for
example on Saturdays.
* 'Working Days of Week' and 'Daily Working Hours' are available only in the Licensed version
To Change Screen Settings
1. Start the DoPublicity Digital Signage Manager
2. Click on the 'Screen Details' button
3. Click on the tab 'Click Here To Edit Screen Details'. This is located above the current Screen
Details
4. This will open the 'Edit Screen' Wizard.
5. Click on 'Next' button
6. Change the Screen Name (if required) and click on the 'Next' button
7. Change / Add the Location Details (where required) and click on the 'Next' button
14
doPublicity Digital Signage Manual
8. Change the Screen Orientation (if required) and click on the 'Next' button
9. Change the Working Days of Week (where required) and click on the 'Next' button
10. Change the Working Hours for Monday (where required) and click on the 'Next' button
11. Change the Working Hours for Tuesday (where required) and click on the 'Next' button
12. Change the Working Hours for Wednesday (where required) and click on the 'Next' button
13. Change the Working Hours for Thursday (where required) and click on the 'Next' button
14. Change the Working Hours for Friday (where required) and click on the 'Next' button
15. Change the Working Hours for Saturday (where required) and click on the 'Next' button
16. Change the Working Hours for Sunday (where required) and click on the 'Next' button
17. Click on 'Finish' button
15
doPublicity Digital Signage Manual
Content Setup
Add New Content
Creating Digital Signage content is easy with DoPublicity Digital Signage Manager. You can create
Template based content or upload your our content.
To Add New Content
1. Start the DoPublicity Digital Signage Manager
2. Click on the 'Content Setup' button
3. Click on the tab 'Click Here To Add New Content'. This is located above the list of existing
content.
4. This will open the 'Add Content' Wizard.
5. Click on 'Next' button
6. Enter the Content Title and click on the 'Next' button
7. Select the Layout style - 1, 2, 3 or 4 section and click on the 'Next' button
8. Select Border thickness and color and click on the 'Next' button
9. Select Type of Content (Template or Custom) and click on the 'Next' button
The continuing steps depend on the type of Content (Template or Custom) you have selected. See
below for the respective types.
For Template Based Content
•
Select Template Category (1 Product, 2 Product, Travel, etc.) and click on the 'Next' button
•
Select Template Style (Blue, Red, etc.) and click on the 'Next' button
•
View selected Template Style and click on the 'Next' button
•
Upload Images where required (from your computer’s hard drive location) and click on the 'Next'
button
•
Enter Description and other relevant information where required and click on the 'Next' button
•
Click on 'Finish' button
For Custom Content
•
Click on 'Upload Your Content' and select Content (Images, Video, etc.) from your computer’s
hard drive location; and click on the 'Next' button
•
Click on 'Finish' button
For Web Pages / URL
•
16
Click on Web Page' and enter URL of the web page to be displayed; and click on the 'Next'
doPublicity Digital Signage Manual
button
•
17
Click on 'Finish' button
doPublicity Digital Signage Manual
Edit Content
Editing Content created is as easy as it was creating it. The Content can be modified at any time and the
changes are automatically reflected in the Playlist and Display.
To Edit Content
1. Start the DoPublicity Digital Signage Manager
2. Click on the 'Content Setup' button
3. Click on the 'Edit' button of the Content you would like to edit
4. This will open the 'Edit Content' Wizard
5. Click on 'Next' button
6. Change the Content Title (if required) and click on the 'Next' button
7. Change the Layout style - 1, 2, 3 or 4 section and click on the 'Next' button
8. Change Border thickness and color and click on the 'Next' button
9. Change the Type of Content (if required) and click on the 'Next' button
The continuing steps depend on the type of Content (Template or Custom) you have selected. See
below for the respective types.
For Template Based Content
•
View currently setup Template Style and click on the 'Next' button
•
Change the Template Category (if required) and click on the 'Next' button
•
Change the Template Style (if required) and click on the 'Next' button
•
View selected Template Style and click on the 'Next' button
•
Upload Images if required (from your computer’s hard drive location) and click on the 'Next'
button
•
Change the Description and other relevant information if required and click on the 'Next' button
•
Click on 'Finish' button
For Custom Content
•
Click on 'Upload Your Content' and select Content (Images, Video, etc.) from your computer’s
hard drive location; and click on the 'Next' button
•
Click on 'Finish' button
For Web Pages / URL
•
Click on Web Page' and enter URL of the web page to be displayed; and click on the 'Next'
button
•
18
Click on 'Finish' button
doPublicity Digital Signage Manual
19
doPublicity Digital Signage Manual
View Content
Content created can be viewed before actually adding to a Playlist for Display. You may Edit Content at
any time and view the changes right away.
Viewing Content in your collection
1. Start the DoPublicity Digital Signage Manager
2. Click on the 'Content Setup' button
3. Click on 'View' button of Content you would like to view, which will appear in a new window
To view other Content, click on 'Close' button of the displayed Content and repeat step 3.
20
doPublicity Digital Signage Manual
Delete Content
Content can be deleted and will be simultaneously removed from the Playlist.
Deleting Content in your collection
1. Start the DoPublicity Digital Signage Manager
2. Click on the 'Content Setup' button
3. Click on 'Delete' button of Content you would like to delete
4. On the Confirmation box, confirm deletion by clicking on the 'Yes' button or click on 'No' to abort
deletion
To delete other Content, repeat step 3.
21
doPublicity Digital Signage Manual
Playlist Setup
Add To Playlist
Content can be added to the Playlist at any time and can be scheduled for immediate or deferred Display.
Setting up the Playlist allows customization of the following settings:
Start Date
The date when the selected Content starts displaying. This can be any date from today to 6 months in the
future.
End Date
The date when the selected Content stops displaying. This can be any date from today to 24 months in
the future.
Days Of Week*
Sets the days when the selected Content is to be displayed. This Dayparting feature allows to display
targeted Content for different days of the week.
Example: A retail business may focus on women's products during the week and promote products for
teenagers and men on weekends.
Hours Of Day*
Sets the hours of the day when the selected Content is to be displayed. This Dayparting feature allows to
display targeted Content for different hours of the day.
Example: A restaurant may display breakfast menu from 7.00 AM to 10.00 AM and then display lunch
menu till 3.00 PM, after which they promote their dinner menu.
Display Duration
Display time for the Content.
Playlist Number
The position within the Playlist. Entering '2' would set this Content to display after Playlist #1 and before
Playlist # 3.
* 'Days of Week' and 'Hours Of Day' are available only in the Licensed version
Add Content To Playlist
1. Start the DoPublicity Digital Signage Manager
22
doPublicity Digital Signage Manual
2. Click on the 'Playlist Setup' button
3. Click on the tab 'Click Here To Add Content To Playlist'. This is located above the list of existing
Playlist Content
4. This will open the 'Add To Playlist' Wizard
5. Click on 'Next' button
6. Select 'Content' from the displayed list and click on the 'Next' button
7. Select the 'Start Date' and 'End Date' for display and click on the 'Next' button
8. Select the 'Days of Week' this Content is to be displayed and click on the 'Next' button
9. Select 'Hours Of Day' this Content is to be displayed and click on the 'Next' button
10. Enter the following information:
•
Display Duration - Example: 42 seconds
•
Playlist Number - Example: 1, 2, etc.
11. Click on 'Next' button
12. Click on 'Finish' button
23
doPublicity Digital Signage Manual
Edit Playlist
The Playlist can be edited at any time and all changes are reflected immediately.
To Edit Playlist
1. Start the DoPublicity Digital Signage Manager
2. Click on the 'Playlist Setup' button
3. Click on the 'Edit' button of the Playlist item you would like to edit
4. This will open the 'Edit Playlist' Wizard
5. Click on 'Next' button
6. Change the 'Start Date' and / or 'End Date' (if required) for display and click on the 'Next' button
7. Change the 'Days of Week' this Content is to be displayed (if required) and click on the 'Next'
button
8. Change the 'Hours Of Day' this Content is to be displayed (if required) and click on the 'Next'
button
9. Change the following information (if required):
•
Display Duration - Example: 42 seconds
•
Playlist Number - Example: 1, 2, etc.
10. Click on 'Next' button
11. Click on 'Finish' button
24
doPublicity Digital Signage Manual
View Selected Playlist Content
Content added to the Playlist can be viewed before actually starting the Display. You may Edit Content or
Edit Playlist at any time and view the changes right away.
Viewing a Template in your collection
1. Start the DoPublicity Digital Signage Manager
2. Click on the 'Playlist Setup' button
3. Click on 'View' button of Playlist item you would like to view, which will appear in a new window.
To view other Playlist item, click on 'Close' button of the displayed Content and repeat step 3.
25
doPublicity Digital Signage Manual
Delete From Playlist
Playlist items may be deleted and will have no effect on their listing under the Content section.
Deleting Playlist item in your collection
1. Start the DoPublicity Digital Signage Manager
2. Click on the 'Playlist Setup' button
3. Click on 'Delete' button of Playlist item you would like to delete
4. On the Confirmation box, confirm deletion by clicking on the 'Yes' button or click on 'No' to abort
deletion
To delete other Playlist item, repeat step 3.
26
doPublicity Digital Signage Manual
Run Display
Run Digital Signage Display
The DoPublicity Digital Signage Manager will auto-detect the screen size and size the Display screen
accordingly.
To Run Display
1. Start the DoPublicity Digital Signage Manager
2. Click on the 'Run Display' button
NOTE: THE MOUSE CURSOR IS PROGRAMMED TO HIDE WITHIN A FEW SECONDS OF THE
DISPLAY STARTING
On starting, the Display screen will show instructions on how to close the Display screen (sample image
shown below) which may be disabled from repeat display, by checking the 'Do not show this Alert again'
box. This Alert can be resumed by making changes through the Screen Options settings.
27
doPublicity Digital Signage Manual
Shutting Down Display Screen
The Display Screen occupies 100% of available screen space with no margins or place where you can
click to close it.
To close the Display Screen, hold down the Alt key on the keyboard and then hit the F4 key once.
NOTE: THE MOUSE CURSOR WILL RE-APPEAR WITHIN A COUPLE SECONDS WHEN THE
DISPLAY SCREEN IS SHUT DOWN
28
doPublicity Digital Signage Manual
View Logs
View Display Logs
The DoPublicity Digital Signage Manager logs details of Content every time it is displayed. The logs cover
Content Display Time, Name and Duration.
To View Display Logs
•
Start the DoPublicity Digital Signage Manager
•
Click on the 'Tools' tab
•
Click on the 'View Display Reports' tab
Note: The software reports details for the last 30 days. All previous information is deleted.
29
doPublicity Digital Signage Manual
View Screen Logs
The DoPublicity Digital Signage Manager logs operating details of the software, which can be used for
trouble shooting. The logs cover Date / Time, Function and Description.
To View Display Logs
1. Start the DoPublicity Digital Signage Manager
2. Click on the 'Tools' tab
3. Click on the 'View Logs' tab
Note: The software reports details for the last 30 days. All previous information is deleted.
30
doPublicity Digital Signage Manual
Remote Administration
Add Screen To Online Account
Using Remote Service Management requires you to add the Display Screen License Key to your Online
Account.
In case you have not yet setup the Online account, click on the following link to register and activate.
http://www.doPublicity.com/Remote-Service/Register.aspx
The initial registration will register your first Display Screen License Key.
To Add Additional Screens To Online Account
1. Login to Remote Service Management account at the website www.doPublicity.com
2. Under the 'Administration' Section, click on the first link 'Add Screens To This Account'
3. Enter the License Number of Display Screen that you would like added to the account
4. Click on the 'Add License' button
31
doPublicity Digital Signage Manual
Subscribe / Renew Subscription
The registered License Key must have a valid Remote Service Subscription to enjoy benefits of Remote
Management.
To Subscribe / Renew Subscription
1. Login to Remote Service Management account at the website www.doPublicity.com
2. Under the 'Administration' Section, click on the second link 'Subscribe / Renew Subscription'
•
Click on the 'Subscribe To Remote Service' for first time subscription, of the relevant
License Key
•
To Renew, click on the link that show expiry date, of the relevant License Key
3. Follow payment instructions as required at the web site
32
doPublicity Digital Signage Manual
Suspend / Resume Remote Services
It is recommended to 'Suspend Remote Services' while making changes / additions / deletions, so that
the Display Screens do not inadvertently download incomplete or incorrect information.
Once the Display, Content, Banner and Playlist settings are as per your requirement, 'Resume Remote
Services' so all screens get the most current display information.
To Suspend Remote Service
1. Login to Remote Service Management account at the website www.doPublicity.com
2. Under the 'Administration' Section, click on the third link 'Suspend Remote Services'
To Resume Remote Service
1. Login to Remote Service Management account at the website www.doPublicity.com
2. Under the 'Administration' Section, click on the third link 'Resume Remote Services'
33
doPublicity Digital Signage Manual
Remote Content Management
Add New Content
Content in multiple media formats can be added for display in single / split screen format - with or without
Banner Feed.
Note: It is recommended to temporarily 'Suspend Screen' updating while adding Content, to prevent
incomplete information from being displayed on any Screen
To Add New Content
1. Login to Remote Service Management account at the website www.doPublicity.com
2. Under the 'Content Management' Section, click on the second link 'Add Content'
3. Enter 'Content Title'
4. Select 'Display Layout', depending on Horizontal / Vertical setup and Single or Split Screen
Display
5. Click on the 'Add New Content' button
6. To change Layout style and select between single / split screen display formats, click on
'Change Layout Style' button
•
Click on button next to the preferred Layout style
•
Click on the 'I like this Layout' button
7. To Setup Section A of selected Layout, click on the 'Setup Section A' button
•
Click on the Content Type (Template / Custom / URL) you would like to use for this
section
•
Click on 'Setup Section A’
Notes:
i. This will delete any previously entered information for this Section A
ii. To keep existing Content Type and preserve current information, click on the link 'Click
here to proceed without changing Content Type'
8. To Setup Section B of selected Layout, click on the 'Setup Section B' button
•
Click on the Content Type (Template / Custom / URL) you would like to use for this
section
•
Click on 'Setup Section B'
Notes:
i. This will delete any previously entered information for this Section B
ii. To keep existing Content Type and preserve current information, click on the link 'Click
here to proceed without changing Content Type'
9. To Edit Template Based Content
34
doPublicity Digital Signage Manual
•
Set Template Style / Color by clicking on the 'Change Template Style / Color' button
•
Upload Logo / Pictures by clicking on their relevant buttons
•
Add / Edit Text by clicking on the relevant sections buttons
10. To Edit Custom Content
•
Upload Video / Picture by clicking on the 'Upload Video / Picture' button
11. To Edit URL Content
•
Enter URL details by clicking on the 'Web Page URL Details' button
To Turn ON / OFF Banner Feed, see 'Manage Display Screen Locations' To Add Banner Custom
Message, see 'Add Custom Message' To Add Banner News, Weather, etc. RSS Feed, see 'Add RSS
Feed'
35
doPublicity Digital Signage Manual
View / Edit / Delete Content
Digital Signage Content may be viewed, edited or deleted remotely. Any changes to Content will be
distributed to Display Screens in real-time.
Note: It is recommended to temporarily 'Suspend Screen' updating while making changes, to prevent
incomplete information from being displayed on any Screen
To Manage Content
1. Login to Remote Service Management account at the website www.doPublicity.com
2. Under the 'Content Management' Section, click on the first link 'Manage Content'
3. To start Initial Setup of Content, click on the 'Setup' button
4. To View / Edit Content, click on the 'Edit' button
5. To Delete Content, click on the 'Delete' button
6. To Suspend Content from displaying, click on the 'Put On Hold' button
7. To Resume Content, click on 'Activate' button
To Edit Content
1. To change Layout style and select between single / split screen display formats, click on
'Change Layout Style' button
•
Click on button next to the preferred Layout style
•
Click on the 'I like this Layout' button
2. To Setup Section A of selected Layout, click on the 'Setup Section A' button
•
Click on the Content Type (Template / Custom / URL) you would like to use for this
section
•
Click on 'Setup Section A'
Notes:
i. This will delete any previously entered information for this Section A
ii. To keep existing Content Type and preserve current information, click on the link 'Click
here to proceed without changing Content Type'
3. To Setup Section B of selected Layout, click on the 'Setup Section B' button
•
Click on the Content Type (Template / Custom / URL) you would like to use for this
section
•
Click on 'Setup Section B'
Notes:
i. This will delete any previously entered information for this Section B
ii. To keep existing Content Type and preserve current information, click on the link 'Click
here to proceed without changing Content Type'
36
doPublicity Digital Signage Manual
4. To Edit Template Based Content
•
Set Template Style / Color by clicking on the 'Change Template Style / Color' button
•
Upload Logo / Pictures by clicking on their relevant buttons
•
Add / Edit Text by clicking on the relevant sections buttons
5. To Edit Custom Content
•
Upload Video / Picture by clicking on the 'Upload Video / Picture' button
6. To Edit URL Content
•
37
Enter URL details by clicking on the 'Web Page URL Details' button
doPublicity Digital Signage Manual
Remote Playlist Management
Add To Playlist
Add Content to Playlist and setup display parameters.
Note: It is recommended to temporarily 'Suspend Screen' updating while adding Content to Playlist, to
prevent incomplete information from being displayed on any Screen.
To Add Content To Playlist
1. Login to Remote Service Management account at the website www.doPublicity.com
2. Under the 'Playlist Management' Section, click on the second link 'Add To Playlist'
3. 'Pick Content to display' that you would like to add to the Playlist. Only Active Content is
displayed in the list
4. Set the Playlist display number. This is the sequential order number in which the Content will be
slotted. Content can have the same number and will be sorted automatically
5. Set 'Start Date'
6. Set 'End Date'
7. Set days of week to display Content. You may select all or any combination of days you need
8. Set hours of day to display Content. You may select all or any combination of hours you need
9. Enter display time 'Duration' in seconds. In case of videos make sure that sufficient time is
allotted for video to start playing and covers the entire duration of display
38
doPublicity Digital Signage Manual
View / Edit / Delete Playlist
Digital Signage Playlist may be viewed, edited or deleted remotely. Any changes to Playlist will be
distributed to Display Screens in real-time.
Note: It is recommended to temporarily 'Suspend Screen' updating while making changes to Playlist, to
prevent incomplete information from being displayed on any Screen
To Manage Playlist
1. Login to Remote Service Management account at the website www.doPublicity.com
2. Under the 'Playlist Management' Section, click on the first link 'Manage Playlist'
3. The page shows the Playlist in 3 different view modes that can be selected by clicking on the
appropriate link on the upper right side of the page
•
Show All Playlist Items - Shows a list of ALL Playlist items sorted by Location Name,
Content Name and Playlist number
•
Show Playlist Items Summary - Shows Playlist items irrespective of the number of
screens it is set to display on
•
Show Locations Playlist Summary - Shows Location Name and details of Playlist by
Location
4. To Edit Playlist item, click on the 'Edit' button
5. To Delete Playlist item, click on the 'Delete' button
39
doPublicity Digital Signage Manual
Remote Banner Feed Management
Add Custom Message
Add a Custom Message to the Banner Feed. Custom Messages are displayed before any RSS Feed that
may be set.
To Add New Custom Message
1. Login to Remote Service Management account at the website www.doPublicity.com
2. Under the 'Content Management' Section, click on the third link 'Manage Banner Feed'
3. Click on the 'Add New Custom Message' button located near the upper left side of the page
4. Enter 'Message Title'. This is just for identification purpose and will not display on the screen
5. Enter 'Custom Message to display'. Maximum 200 characters per message
6. Select from one of 3 options
•
Save Custom Message - Custom Message will be saved to be added subsequently to
screens
•
Add Custom Message to All Screens - Custom Message will be added to all screens
•
Add Custom Message to Select Screens - Option to select screens where the message
should be displayed
To Turn ON / OFF Banner Feed, see 'Manage Display Screen Locations' To set Banner Background and
Text Colors, see: 'Change Banner Display Colors' To set Banner Scroll Speed, see: 'Change Banner
Display Speed'
40
doPublicity Digital Signage Manual
Add RSS Feed
Add a News, Weather, etc. RSS Feed to the Banner Feed. RSS Feed is displayed after any Custom
Message that may be set.
To Add New RSS Feed
1. Login to Remote Service Management account at the website www.doPublicity.com
2. Under the 'Content Management' Section, click on the third link 'Manage Banner Feed'
3. Click on the 'Add New RSS Feed' button located near the upper left side of the page
4. Enter 'RSS Feed Title'. This is just for identification purpose and will not display on the screen
5. Enter RSS Feed URL'
6. Select from one of 3 options
•
Save RSS Feed - RSS Feed will be saved to be added subsequently to screens
•
Add RSS Feed to All Screens - RSS Feed will be added to all screens
•
Add RSS Feed to Select Screens - Option to select screens where the message should
be displayed
To Turn ON / OFF Banner Feed, see 'Manage Display Screen Locations' To set Banner Color, see:
'Change Banner Display Colors' To set Banner Speed, see: 'Change Banner Display Speed'
41
doPublicity Digital Signage Manual
View / Edit / Delete Banner Feed
Digital Signage Banner Feed may be viewed, edited or deleted remotely. Any changes to Banner Feed
will be distributed to Display Screens in real-time.
Note: It is recommended to temporarily 'Suspend Screen' updating while making changes, to prevent
incomplete information from being displayed on any Screen.
To Manage Banner Feed
1. Login to Remote Service Management account at the website www.doPublicity.com
2. Under the 'Content Management' Section, click on the third link 'Manage Banner Feed'
3. To Add / Remove particular Banner Feeds from Screens, click on the link that shows number of
active locations under the column 'Add / Remove'
4. To Edit Banner Feed item, click on the 'Edit' button
5. To Delete Banner Feed item, click on the 'Delete' button
To Turn ON / OFF Banner Feed, see 'Manage Display Screen Locations' To set Banner Color, see:
'Change Banner Display Colors' To set Banner Speed, see: 'Change Banner Display Speed'
42
doPublicity Digital Signage Manual
Change Banner Display Colors
Banner Feed Background and Text Color may be set to personal preference. The set colors are displayed
on all screens.
To Change Banner Feed Display Colors
1. Login to Remote Service Management account at the website www.doPublicity.com
2. Under the 'Content Management' Section, click on the third link 'Manage Banner Feed'
3. Click on the 'Set Colors' button located near the upper right side of the page
4. To select Background Color, click on the Color Palette shown in Banner Background Color row
and pick color
5. To select Text Color, click on the Color Palette shown in Text Color row and pick color
6. Click on 'Set Colors'
7. View sample Banner Feed on page to verify colors are what you visualized
43
doPublicity Digital Signage Manual
Change Banner Display Speed
Banner Feed Display Scroll Speed may be set to personal preference. The speed is set for all screens.
To Change Banner Feed Display Scroll Speed
1. Login to Remote Service Management account at the website www.doPublicity.com
2. Under the 'Content Management' Section, click on the third link 'Manage Banner Feed'
3. Click on the one of the speed options
4. Click on 'Set Speed'
Tip: Setting speed at 'Faster' and 'Fastest' speed will consume more CPU resources. It is
recommended to set at 'Regular' or 'Slower' speed.
44
doPublicity Digital Signage Manual
Remote Display Screen Management
Manage Display Screen Locations
'Manage Display Screen Locations' allows you to Subscribe / Renew Remote Service and setup Screen
Display Parameters.
Screen Display Parameters
1. Login to Remote Service Management account at the website www.doPublicity.com
2. Under the 'Display Screen' Section, click on the first link 'Manage Display Screen Locations'
3. To Subscribe / Renew, click on link in the 'Subscribe / Renew' column
4. To edit Location information, click on the 'Edit' button
5. Update following information and click on the 'Proceed' button at the bottom of the page
•
Location Name, Contact information
•
Remote Service Update Frequency. Example: Every 30 minutes
•
Show Banner Feed - Yes / No
•
Set Initial Startup Page
• Home Page
• Templates
• Screen Details
• Content Setup
• Playlist Setup
• Run Display - This option will start the application and go straight to display
mode
45
•
Working Days of Week
•
Working Hours of Day
doPublicity Digital Signage Manual
View Content Display Report
The DoPublicity Digital Signage Manager logs details of Content every time it is displayed. The logs cover
Content Display Time, Name and Duration.
To View Content Display Report
1. Login to Remote Service Management account at the website www.doPublicity.com
2. Under the Display Screen' Section, click on the second link 'Content Display Report'
3. The page shows the Display Logs in 3 different view modes that can be selected by clicking on
the appropriate link on the upper right side of the page
•
Show Last 1000 Displayed Content - Shows the last 1000 records from all locations
•
Show Displayed Content Summary - Shows list grouped by Content Name. Click on
'View Display Details' to view individual Content Display Report grouped by date
•
Show Displayed by Location Summary - Shows list grouped by Location Name. Click on
'View Display Details' to view individual Location Display Report grouped by date
46
doPublicity Digital Signage Manual
View Screen Operating Logs
The DoPublicity Digital Signage Manager logs operating details of the software, which can be used for
trouble shooting. The logs cover Date / Time, Function and Description.
To View Screen Operating Logs
1. Login to Remote Service Management account at the website www.doPublicity.com
2. Under the Display Screen' Section, click on the second link 'Screen Operating Logs'
3. The page shows the Screen Operating Logs grouped by Location Name. Click on 'View
Operating Logs' to view individual Location Operating Logs
47
doPublicity Digital Signage Manual