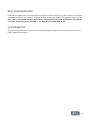
1
S
N
G
A
N
I
O
N
User Guide
I
T
ProFusion® XS
V
A
S T Y L E S
ProFusion XS
Caution
RISK OF ELECTRIC SHOCK!
DO NOT OPEN!
NO USER-SERVICEABLE PART INSIDE!
This symbol is intended to inform users that internal parts may cause electrical shock and injury.
This symbol is intended to inform users of important operational instructions and clarifications.
WARNING!
To reduce the risk of fire, electric shock, or injury:
Do not use ProFusion® XS if it has been exposed to water.
Do not use ProFusion XS if it has been dropped and or damaged.
Do not use ProFusion XS with a damaged power cord.
Do not unplug by pulling on the cord.
Do not restrict case airflow by blocking or inserting objects into
case ventilation openings.
Do not use in environments with excessive heat, humidity, magnetic fields, or dust.
Place ProFusion XS only on a stable surface of sufficient size and
strength where it will not be exposed to excessive vibration.
Do not overload power outlets.
Route all cables safely. Do not place any items on or against the
cables.
Do not allow children to operate without supervision.
Use only attachments that are approved by DMX, Inc.
Safety Agency Listings
This product was tested and found to be fully compliant with
FCC Part 15 Subpart B/Class A
CE Class A
C-Tick/Class A
cTUVus TUV CB Scheme
RoHS Compliant
WEEE marked
N 11152
© DMX, Inc. 2008. All rights reserved.
DMX and PROFUSION are registered trademarks of DMX, Inc.
All other trademarks are the property of their respective owners.
iv
ProFusion XS User Guide
Contents
Features..........................................................................................................................................................................................1
Getting Started
Checking the Package Contents.....................................................................................................................................2
Installation and Setup........................................................................................................................................................2
Placement Guidelines..................................................................................................................................................2
Rack Placement..............................................................................................................................................................2
Connecting ProFusion XS to Your Amplification Equipment........................................................................3
Connecting ProFusion XS to Your Network.........................................................................................................3
Controls and Functions
Front Panel..............................................................................................................................................................................4
Rear Panel...............................................................................................................................................................................5
Basic Operation
Powering ProFusion XS On and Off...............................................................................................................................6
Updating ProFusion XS via CD.........................................................................................................................................7
Control Panel Menu System.............................................................................................................................................7
ProFusion XS Device Information...................................................................................................................................8
Changing Styles....................................................................................................................................................................9
Style Blocking..................................................................................................................................................................... 10
Viewing and Setting Date and Time........................................................................................................................... 10
Adjusting Volume Levels................................................................................................................................................ 11
Muting a Zone.................................................................................................................................................................... 11
Messaging............................................................................................................................................................................ 13
Advanced Operation
Network Connectivity (Ethernet Update Only)...................................................................................................... 15
Viewing the Network Settings............................................................................................................................... 15
Changing the IP Type................................................................................................................................................ 15
Changing the IP Address......................................................................................................................................... 16
Changing the Subnet................................................................................................................................................ 17
Changing the Default Gateway............................................................................................................................. 17
Changing the FTP Server......................................................................................................................................... 18
Testing the Network Settings................................................................................................................................ 19
Viewing the Update Status..................................................................................................................................... 19
Updating the Configuration................................................................................................................................... 20
Updating the Content & Configuration............................................................................................................. 20
Stopping an Update.................................................................................................................................................. 21
Scheduling........................................................................................................................................................................... 21
Direct Serial Interface (DSI)............................................................................................................................................ 23
System Diagnostics........................................................................................................................................................... 23
Appendix A: Glossary............................................................................................................................................................. 24
Appendix B: Troubleshooting............................................................................................................................................. 25
Appendix C: Control Panel Menu System Tree............................................................................................................. 27
Appendix D: Specifications.................................................................................................................................................. 28
Appendix E: Contact DMX.................................................................................................................................................... 28
v
vi
ProFusion XS User Guide
Features
What is ProFusion XS?
As our leading on-premise system, ProFusion® XS digital audio delivery system provides extensive
commercial-free music programming, engaging message marketing, flexible scheduling, and the ability to
play different types of music in various areas of your business. ProFusion XS provides total control over what
your customers hear.
m us i c d e s i g n
Music for Your Unique Business. ProFusion XS puts your DMX music programming into action effortlessly.
Our experienced music design team ensures your music is aligned with the goals you have for your business
and brand. Our music design team is recognized around the world as the best in the business.
S C H ED U L IN G
Easy Music Management. The ProFusion XS scheduling allows your music to target specific customer
demographic types as well as change the tempo of you business by the hour, day, week, as well as, seasonal
or promotional events. Manage the music that you want your customers to hear.
ME S S A G E M A R K E T IN G
Effective Customer Communications. The right message at the right time has the power to stimulate
a customer’s willingness to spend. ProFusion XS supports your business’s message marketing needs by
seamlessly integrating your music programming with the right message, at the right time.
RE L I A B I L I T Y
Dependable Platform. ProFusion XS is commercially built for extended life in heavy-use environments.
Each internal component is carefully selected and tested for maximum reliability. Thousands of ProFusion
products installed as far back as 2000 are still servicing our customer’s music and messaging needs.
H A ND S - F REE U P D A T E S
A Connection You Can Count On. ProFusion XS has been designed to deliver new music and configuration
updates, quickly and cost efficient using your company’s existing network. ProFusion XS dramatically
cuts the time it takes to receive new music. ProFusion XS also supports updates via disc. If you choose to
receive your updates via disc, each month you will receive a disc containing new music that will update your
ProFusion XS using its built-in DVD-ROM.
C O N V ENIEN C E
Simple-to-Use Design. ProFusion XS is engineered for easy integration with most commercial amplification
equipment. ProFusion XS includes a simple-to-use control panel and menu system that allows you to
control your music and messaging at your fingertips. Simply connect your ProFusion XS and begin enjoying
continuous music.
1
Getting Started
Checking the Package Contents
•
(1) ProFusion XS playback device
•
(1) ProFusion XS User Guide
•
(1) 6’ (183cm) 18AWG UL Power cord
•
(1) 6’ (183cm) Stereo RCA male-to-male audio cable
•
(1) 6’ (183cm) Stereo RCA male-to-male audio cable (included only with ProFusion XS devices config-
ured for three or four zones of audio)
Any additional or different cables required to complete the installation will need to be obtained
separately.
Please keep all packaging material for later use in case your ProFusion XS must be re-shipped.
Installation and Setup
Placement Guidelines
•
ProFusion XS is designed to be placed horizontally and right-side up. Other positions may cause problems with air flow within the case and may significantly shorten the lifespan of the components.
•
ProFusion XS should be placed in a clean, well-ventilated area. Do not stack items on or against your ProFusion XS as this can create excessive heat and/or static electricity charge problems.
•
ProFusion XS should only be placed on a surface of adequate strength and stability and free of excessive vibration.
•
Ensure all cabling is routed properly and safely. This will avoid tripping hazards that could pull your ProFusion XS off the surface you have placed it on.
•
Ensure your ProFusion XS is plugged into a properly grounded, always-on AC electrical outlet.
Note: Do not plug your ProFusion XS into a switched outlet, such as power strips or other outlets
that may be inadvertently turned off. This can lead to improper shutdowns which will likely shorten
the life of the equipment.
Rack Placement
•
If your ProFusion XS is going to be installed in a rack, at least 6½” (16.5 cm) (4RU) vertical rack space will be required.
•
Do not improvise a rack mount solution; instead, install a rack shelf suitable for approximately 20 lbs (9.1 kg) of weight, and place your ProFusion XS on the shelf.
Note: ProFusion XS has been designed to be mounted in a rack. Please contact DMX Customer
Service if you would like to order a rackmount kit. See “Appendix E: Contact DMX” (p. 28).
2
ProFusion XS User Guide
Connecting ProFusion XS to Your Amplification Equipment
Always connect audio cables prior to powering on your ProFusion XS.
•
Turn off your amplification equipment and turn the volume completely down before installing your ProFusion XS.
•
Your ProFusion XS should not be plugged into the AC outlet found on the rear of some audio amplifica-
tion equipment due to potential grounding issues. Only plug your ProFusion XS into properly grounded electrical outlets.
•
To avoid being inadvertently powered off, never plug your ProFusion XS into a switched outlet.
Connecting your ProFusion XS to your amplification equipment:
STEP 1 Connect one end of the RCA audio cable with the white plugs into the white RCA jack labeled Zone 1
on the rear panel of your ProFusion XS. Connect the other end of the RCA cable into the corresponding input of your amplification equipment.
Note: If your ProFusion XS is configured for only one zone, the audio for that zone will output from
both the Zone 1 and Zone 2 RCA jacks. Connect one end of the RCA audio cable with the red plugs
into the red RCA jack labeled “Zone 2” on the rear panel of your ProFusion XS. Connect the other
end of the RCA cable into the corresponding input of your amplification equipment.
STEP 2
If your ProFusion XS has been configured for a second zone of audio, connect the red RCA plug of the audio cable into the RCA jack labeled Zone 2 (red jack) on the rear panel of your ProFusion XS. Connect the other end of the RCA cable (red plug) into the corresponding input of your amplification equipment.
STEP 3 If your ProFusion XS has been configured for a third zone of audio, repeat step 1. If your ProFusion XS has been configured for a third and forth zone of audio, repeat steps 1 and 2.
Note: If your ProFusion XS is configured for three zones, the audio output for Zone 3 will also output
the Zone 4 RCA jack. Connect one end of the RCA audio cable with the red plugs into the red RCA
jack labeled “Zone 4” on the rear panel of your ProFusion XS. Connect the other end of the RCA
cable into the corresponding input of your amplification equipment.
Connecting ProFusion XS to Your Network
Connecting your ProFusion XS to your company’s network:
STEP 1 Connect one end of a CAT5 Ethernet cable to the Ethernet port located on the rear panel of your Pro-
Fusion XS.
STEP 2 Connect the other end of the CAT5 Ethernet cable to your network equipment (router, hub, or switch).
It is highly recommended that a connectivity test is performed after changing any network settings. See Testing the
Network Settings (p. 19) for instructions.
3
Controls and Functions
Front Panel
The front panel of ProFusion XS is used to change music styles, stop playback, and access the Control Panel
menu system.
1. POWER Button
The POWER button is used to power ProFusion XS on and off.
Note: Do not hold in the POWER button when powering ProFusion XS on or off.
2. Power LED
This green LED will remain solid while ProFusion XS is powered on.
3. NAVIGATION Buttons
The UP, DOWN, LEFT and RIGHT buttons are used to navigate the Control Panel menu system.
4. * Button
This button is similar to the ENTER button on a keyboard and is used to select menu options from the
Control Panel menu system.
5. Serial Number
This unique number is used to identify your ProFusion XS.
6. LCD Control Panel
The LCD control panel is used to access the Control Panel menu system. While in Playback Mode, the LCD
control panel will display the title, artist, and style information of the content currently playing. The last
line will continuously scroll between the zone name, date/time, and Schedule Mode.
7. STYLE Buttons
These buttons are used to select styles for playback.
8. DVD-ROM Drive
The DVD-ROM is used to update ProFusion XS via CD with the latest configuration, software and content.
9. DVD-ROM Drive Eject Button
This button is used to open and close the DVD-ROM drive when updating your ProFusion XS via CD.
4
ProFusion XS User Guide
Rear Panel
The rear panel of ProFusion XS has a variety of connections that are used to integrate it with your existing amplification equipment and Ethernet network.
1. Power Cord Input
ProFusion XS operates on AC power.
Note: Never attempt to operate your ProFusion XS on DC power.
2. Ethernet Port
The Ethernet port is used to connect ProFusion XS to your network in order to receive configuration, content and software updates.
3. Serial Port
The serial port is used as a RS-232 serial communications interface that allows ProFusion XS to be controlled by external equipment providing the ability to change styles on desired zones. See Direct Serial
Interface (DSI) (p. 23) for additional information.
4. Music Zone Audio Connectors
These connections are standard RCA jacks used to connect ProFusion XS to your amplification equipment.
5. Serial Number
This unique number is used to identify your ProFusion XS.
5
Basic Operation
Powering ProFusion XS On and Off
A lways use the POWER button to power off ProFusion XS before unplugging it from an electrical outlet. Failure to do
so may result in damage to the device.
Powering On ProFusion XS
STEP 1 Press the POWER button once.
STEP 2 The green LED power indicator just left of the POWER button will illuminate, and the LCD control panel will display the DMX logo. This will be followed by an “all’s well” beep.
STEP 3 Approximately 30 seconds after the “all’s well” beep, ProFusion XS will begin a five step initialization process.
Note: Do not attempt to power off ProFusion XS during the initialization process as this can led to corruption which can prevent the device from properly functioning.
STEP 4 Upon completion of the initialization process, the LCD control panel will display Music Stopped and ap-
proximately 15 seconds later playback will start.
Music Stopped
Next Style to
Start at 8:00AM
Zone 1
STEP 5 Once playback has begun, the LCD control panel will display the title/artist information of the content currently playing.
Note: If your ProFusion XS is powered on during a time the device is not scheduled for playback, the LCD control panel will display “Music Stopped” and the time playback is scheduled to begin.
Powering Off ProFusion XS
If your device is configured to receive it updates via Ethernet, your ProFusion XS must remain powered
on at all times.
STEP 1 Press the POWER button once (do not hold the button in).
STEP 2 Approximately 10 seconds after the pressing the POWER button, ProFusion XS will enter a Pause Mode. At this time playback on all zones will stop.
STEP 3 Once ProFusion XS is in Pause Mode; press the POWER button once to complete the shutdown process. This will take approximately 20 seconds.
6
ProFusion XS User Guide
Updating ProFusion XS via CD
ProFusion XS can be updated via Ethernet or CD. It is important to update your device as soon as you receive
any update CDs. Please note that customers with devices configured for Ethernet updates may still receive CD
updates, and should load them as soon as they arrive.
Always verify the update disc is clean and free of scratches, smudges and fingerprints. To clean a CD use
lint-free cotton cloths and wipe against the tracks, starting in the middle of the disc and wiping towards the
outside of the disc. Do not wipe in a circular motion as this can create scratches.
Updating your ProFusion XS via CD:
STEP 1 If your update contains multiple CDs, load disc #1 first.
STEP 2 Hold the CD face up and by the edges.
STEP 3 Press the DVD-ROM eject button to open the tray.
STEP 4 Insert the CD into the center of the DVD-ROM tray.
STEP 5 Press the DVD-ROM eject button to close the tray (Do not push the tray in).
STEP 6 Approximately 15 seconds after the tray has closed, the update will automatically start. The update will take anywhere from 60 seconds to 10 minutes, depending on the type and size of the update.
STEP 7 The DVD-ROM tray will automatically eject once the update has completed and the control panel will display the status of the update.
Update Complete!
Press m to continue
Note: Contact DMX Customer Service if an update produces an error code. See “Appendix E: Con-
tact DMX” (p. 28). Please note the error code number when contacting DMX for assistance.
Update Incomplete!
Error code: 10
Please try again, or
call for support.
Control Panel Menu System
ProFusion XS Control Panel menu system allows you to perform numerous tasks, including:
•
Stopping and starting music playback
•
Adjusting volume levels
•
Enabling and disabling messages
•
Initiating configuration and content updates
•
Modifying and testing network settings
•
Creating Custom schedules
7
NAVIGATION Buttons
I
G
V
G
A
A
N
I
T
left
A
T
O
O
N
N
Menu Navigation Functionality
right
I
I
scroll down
increase value
N
V
A
S T Y L E S
scroll up
decrease value
Data Entry Functionality
Using the Control Panel NAVIGATION buttons:
•
To enter the Control Panel menu system, press the * button in the center of the NAVIGATION buttons.
•
To scroll through menu options, press the NAVIGATION UP or NAVIGATION DOWN button.
•
To select menu options, press the * button.
•
To return to previous menus, press the NAVIGATION UP or NAVIGATION DOWN button until BACK is highlighted, then press the * button.
Control Panel Menu Permissions
Upon request, your ProFusion XS Control Panel menu system can be configured so any of the following menu
option are disabled:
•
Changing volume levels
•
Changing date and time
•
Changing styles
•
Changing and creating schedules
•
Disabling and enabling messages for playback
•
Initiating configuration and content updates via network update
•
Turning DFX® Audio Enhancer on or off
Note: If you require any menu permissions disabled or enabled, contact DMX Customer Service.
See “Appendix E: Contact DMX Customer Service” (p. 28).
I
G
V
I
G
A
V
A
S T Y L E S
ProFusion XS Device Information
N
A
T
A
The Device Information menu option provides some key information about your specific ProFusion XS. The
Device Information menu option contains the following: Device ID, software version, configuration version,
and device description.
I
O
N
I
T
N
O
N
Accessing the Device Information menu option from the title/artist information screen:
STEP 1 Press the * button to access the Control Panel menu system.
STEP 2 Press the NAVIGATION DOWN button until the Device Information menu option is highlighted, then press the * button.
8
ProFusion XS User Guide
STEP 3 The following information will be displayed; Device ID, software version, configuration version, and device description.
DeviceID: 54643
Ver: 36 Conf: 15
My ProFusion XS
Austin, TX
Device ID
The Device ID is a unique number specific to your ProFusion XS. It ensures that custom configurations and
settings are applied only to your specific ProFusion XS.
Note: When calling DMX for assistance, please confirm your Device ID prior to calling.
Software Version (Ver)
Software version indicates which release of ProFusion software is currently installed on your ProFusion XS.
Configuration Version (Conf)
Configuration version refers to a set of specific settings such as scheduling, playback start and stop times, and
other settings unique to your device. This number also ensures that an older configuration update to your
ProFusion XS will not overwrite the current configuration settings.
Device Description
The device description, lines three and four, usually reference your company name and location. This information is optional and may not be present.
Changing Styles
Your ProFusion XS is configured to follow a pre-determined schedule. You may override the schedule by
changing the style. The ability to change styles may be disabled, if requested, for your ProFusion XS. If you attempt to change styles and the control panel displays, You do not have permission to use this feature, the ability
to change styles has been disabled.
If your ProFusion XS is scheduled to stop playback at a certain time, the control panel will display Music
Stopped and the time playback will begin. You may manually begin playback by selecting any available style.
Music Stopped
Next Style to
Start at 8:00AM
Zone 1
Changing styles:
STEP 1 Using the NAVIGATION UP or NAVIGATION DOWN button, change the title/artist information display-
ing on the LCD control panel to the desired zone for the style change.
9
STEP 2 Use the STYLE UP or STYLE DOWN button to scroll through a list of available styles.
BACK
Return to schedule
>Chart Attack
Coffeehouse Rock
STEP 3 Once your desired style is highlighted, press the * button to change to the new style. The content cur-
rently playing will fade down and content from the new style will immediately begin.
Style Blocking
ProFusion XS has the capability to restrict availability of certain music styles to certain times of the day. This
feature helps to ensure that only proper music styles are played to target client demographics and store image.
Style blocking also ensures ProFusion XS users will not inadvertently select an inappropriate musical style.
Viewing and Setting Date and Time
If your ProFusion XS receives its updates via Ethernet, it may be configured to synchronize the date and time
with the server each time it connects.
Viewing Date and Time
To view the currently set date and time for your ProFusion XS, watch the fourth line of the title/artist information. The date and time will scroll by approximately every 30 seconds.
Blue in Green
Miles Davis
Jazz
Aug 31, 2008 11:58 AM
Setting Date and Time
Setting the date and time from the title/artist information screen:
STEP 1 Press the * button to access the Control Panel menu system.
STEP 2 Press the NAVIGATION DOWN button until Set Date and Time is highlighted, then press the * button.
Aug 31, 2008 11:58 AM
US/Pacific
Hit m to set time
STEP 3 Press the NAVIGATION UP or NAVIGATION DOWN button to change the month.
STEP 4 Press the * button if only the month needs to be changed. If you need to make further changes to 10
ProFusion XS User Guide
the date or time, press the NAVIGATION RIGHT button to move to the day, time, and AM/PM setting, and the NAVIGATION UP or NAVIGATION DOWN button to modify each option. Once the current date and time have been set, press the * button.
Adjusting Volume Levels
To maximize sound fidelity, it is recommended volume levels are adjusted from your amplification equipment.
ProFusion XS supports independent volume levels for each zone of audio. Any changes in volume level will
affect only the selected zone.
Adjusting the volume level for a desired zone from the title/artist information screen:
STEP 1 Press the * button to access the Control Panel menu system.
STEP 2 Press the NAVIGATION UP or NAVIGATION DOWN button until Volume Control is highlighted, then press the * button.
STEP 3 Press the NAVIGATION UP or NAVIGATION DOWN button until the desired zone is highlighted, then press the * button.
BACK
>Restaurant Volume
Bar Volume
Mute Restaurant
STEP 4 Press the NAVIGATION LEFT button to decrease the volume level and the NAVIGATION RIGHT button to increase the volume level.
Restaurant Volume
===========
STEP 5 Once the appropriate volume level has been set, press the * button to accept the change.
Muting a Zone
Muting a desired zone from the title/artist information screen:
STEP 1 Press the * button to access the Control Panel menu system.
STEP 2 Press the NAVIGATION UP or NAVIGATION DOWN button until Volume Control is highlighted, then press the * button.
STEP 3 Press the NAVIGATION DOWN button until Mute <Desired Zone> is highlighted, then press the * button.
11
BACK
Restaurant Volume
Bar Volume
>Mute Restaurant
Turning the mute off for a desired zone from the title/artist information screen:
STEP 1 Press the * button to access the Control Panel menu system.
STEP 2 Press the NAVIGATION UP or NAVIGATION DOWN button until Volume Control is highlighted, then press the * button.
STEP 3 Press the NAVIGATION UP or NAVIGATION DOWN button until the desired zone is highlighted, then press the * button. Entering the Volume Control menu option for the selected zone will restore the
previously set volume level for the zone.
BACK
>Restaurant Volume
Bar Volume
Mute Restaurant
STEP 4 Press the * button to exit the Volume Control menu option.
Pause Mode
If it is necessary to stop playback on all zones immediately, press the POWER button once.
** PAUSE MODE **
Entering Pause Mode.
Please wait ...
The music from all zones will fade down as your ProFusion XS enters Pause Mode. When your ProFusion XS is in
Pause Mode, all functionality remains active but all zones will stop playback.
** PAUSE MODE **
Hit m to start playback
or hit POWER again
to power down.
To resume playback on all zones when in Pause Mode, press the * button. Your ProFusion XS will re-enter Playback Mode with the appropriate scheduled styles playing on all zones. To shutdown your ProFusion XS from
Pause Mode, press the POWER button again.
Note: If your ProFusion XS is configured for Network update, it will update at its scheduled time while in
Pause Mode.
12
ProFusion XS User Guide
Messaging
If your ProFusion XS is configured to utilize Messaging, the playback of messages will be scheduled to play at
specific times and days. Changes to Messaging, including scheduling, should be configured by DMX for your
ProFusion XS. If necessary, the Message Control menu option will allow you to suspend a message immediately.
Message Control
Turning messages on or off from the title/artist information screen:
STEP 1 Using the NAVIGATION UP or NAVIGATION DOWN button, change the title/artist information display-
ing on the LCD control panel, to zone with the message that you would like to play.
STEP 2 Press the * button to access the Control Panel menu system.
STEP 3 Press the NAVIGATION DOWN button until Messaging Control is highlighted, then press the * button.
STEP 4 Press the NAVIGATION UP or NAVIGATION DOWN button until Message Control is highlighted, then press the * button.
Note: If “No Messages” is displayed, there are no messages available for that zone.
STEP 5 Press the NAVIGATION UP or NAVIGATION DOWN button until the desired message is highlighted, then press the * button.
BACK
>BBQ Chips
T-Shirts
Steak
STEP 6 Press the * button to toggle between ON and OFF, then press the NAVIGATION RIGHT button to ac-
cept the change. When the message is set to ON, it will playback according to its schedule and when set to OFF, the message will be suspended.
BBQ Chips
Message is ON
Hit m to turn OFF
< MENU | EXIT >
Note: If your ProFusion XS receives a configuration update that still includes a suspended message,
the message playback status will revert to ON. If changes to your Messaging are needed, contact
DMX Customer Service. See “Appendix E: Contact DMX” (p. 28).
Message Playback
Forcing playback of a message from the title/artist information screen:
STEP 1 Using the NAVIGATION UP or NAVIGATION DOWN button, change the title/artist information display-
ing on the LCD control panel, to zone with the message you would like to play.
STEP 2 Press the * button to access the Control Panel menu system.
13
STEP 3 Press the NAVIGATION DOWN button until Messaging Control is highlighted, then press the * button.
STEP 4 Press the NAVIGATION UP or NAVIGATION DOWN button until Message Playback is highlighted, then press the * button.
Note: If “No Messages” is displayed, there are no messages available for that zone.
STEP 5 Press the NAVIGATION UP or NAVIGATION DOWN button until the desired message is highlighted, then press the * button.
BACK
>BBQ Chips
T-Shirts
Steak
STEP 6 Press the * button to play the message. The currently playing content will stop and the message will play. Once the message has completed playing, the previous style will resume.
BBQ Chips
Hit m to play msg
< MENU | EXIT >
14
ProFusion XS User Guide
Advanced Operation
Network Connectivity (Ethernet Update Only)
The Network Control menu option provides information regarding the network configuration for your ProFusion XS, the ability to modify and test the current network configuration, and an option to initiate updates.
ProFusion XS utilizes the FTP protocol to connect to its designated server for updates. In order to connect,
your firewall will need to allow FTP traffic from your ProFusion XS to its designated update server.
Viewing the Network Settings
The View Settings menu option displays the current network configuration for your ProFusion XS. This includes
the IP type (DHCP or Static), IP address, subnet mask, default gateway, and the IP address of the FTP server
your ProFusion XS will connect to for updates.
Viewing the network settings from the title/artist information screen:
STEP 1 Press the * button to access the Control Panel menu system.
STEP 2 Press the NAVIGATION DOWN button until Network Control is highlighted, then press the * button.
STEP 3 Press the NAVIGATION UP or NAVIGATION DOWN button until View Settings is highlighted, then press the * button.
STEP 4 Press the NAVIGATION UP or NAVIGATION DOWN button to scroll through the settings.
IP: 10.1.5.230
SNM: 255.255.0.0
GW: 10.1.0.1
< MENU | EXIT >
STEP 5 Press the NAVIGATION LEFT button to return to the previous menu option and the NAVIGATION RIGHT button to exit to the title/artist information screen.
Modifying the network settings incorrectly will likely render your ProFusion XS unable to connect for updates.
Proceed only at the direction of your network administrator or DMX.
Changing the IP Type
Changing the IP type from the title/artist information screen:
STEP 1 Press the * button to access the Control Panel menu system.
STEP 2 Press the NAVIGATION DOWN button until Network Control is highlighted, then press the * button.
STEP 3 Press the NAVIGATION UP or NAVIGATION DOWN button until Set Configuration is highlighted, then press the * button.
Note: The Set Configuration menu option requires an unlock code. If access to the Set Configuration menu option is needed, contact DMX Customer Service. See “Appendix E: Contact DMX” (p. 28).
15
STEP 4 Press the NAVIGATION UP or NAVIGATION DOWN button until Set IP Type is highlighted, then press the * button.
STEP 5 Press the NAVIGATION UP or NAVIGATION DOWN button to toggle between DHCP and Static and press the * button to select the desired type.
IP Type:
>DHCP
Static
Current Type: STATIC
It is highly recommended that a connectivity test is performed after changing any network settings. See Testing the
Network Settings (p. 19) for instructions.
Changing the IP Address
Changing the IP address from the title/artist information screen:
STEP 1 Press the * button to access the Control Panel menu system.
STEP 2 Press the NAVIGATION DOWN button until Network Control is highlighted, then press the * button.
STEP 3 Press the NAVIGATION UP or NAVIGATION DOWN button until Set Configuration is highlighted, then press the * button.
Note: The Set Configuration menu option requires an unlock code. If access to the Set Configuration menu option is needed, contact DMX Customer Service. See “Appendix E: Contact DMX” (p. 28).
STEP 4 Press the NAVIGATION UP or NAVIGATION DOWN button until Set IP Address is highlighted, then press the * button.
STEP 5 Press the NAVIGATION UP or NAVIGATION DOWN button to set the value for the first digit of the first octet (group of numbers), then press the NAVIGATION RIGHT button to move to the second digit of the first octet.
Note: IP addresses such as 192.168.1.100 should be entered as 192.168.001.100.
IP address:
192.168.001.100
Hit m to select
STEP 6 Press the NAVIGATION UP or NAVIGATION DOWN button to set the value for the second digit of the first octet, then press the NAVIGATION RIGHT button to move to the third digit of the first octet.
STEP 7 Press the NAVIGATION UP or NAVIGATION DOWN button to set the value for the third digit of the first octet, then press the NAVIGATION RIGHT button to move to the first digit of the second octet.
STEP 8 Repeat steps 5 – 7 for the remaining octets, then press the * button to accept the change.
It is highly recommended that a connectivity test is performed after changing any network settings. See Testing the
Network Settings (p. 19) for instructions.
16
ProFusion XS User Guide
Changing the Subnet
Changing the subnet from the title/artist information screen:
STEP 1 Press the * button to access the Control Panel menu system.
STEP 2 Press the NAVIGATION DOWN button until Network Control is highlighted, then press the * button.
STEP 3 Press the NAVIGATION UP or NAVIGATION DOWN button until Set Configuration is highlighted, then press the * button.
Note: The Set Configuration menu option requires an unlock code. If access to the Set Configuration menu option is needed, contact DMX Customer Service. See “Appendix E: Contact DMX” (p. 28).
STEP 4 Press the NAVIGATION UP or NAVIGATION DOWN button until Set IP Subnet is highlighted, then press the * button.
STEP 5 Press the NAVIGATION UP or NAVIGATION DOWN button to set the value for the first digit of the first octet (group of numbers), then press the NAVIGATION RIGHT button to move to the second digit of the first octet.
Note: Subnet addresses such as 255.255.0.0 should be entered as 255.255.000.000.
IP Subnet:
255.255.000.000
Hit m to select
STEP 6 Press the NAVIGATION UP or NAVIGATION DOWN button to set the value for the second digit of the first octet, then press the NAVIGATION RIGHT button to move to the third digit of the first octet.
STEP 7 Press the NAVIGATION UP or NAVIGATION DOWN button to set the value for the third digit of the first octet, then press the NAVIGATION RIGHT button to move to the first digit of the second octet.
STEP 8 Repeat steps 5 – 7 for the remaining octets, then press the * button to accept the change.
It is highly recommended that a connectivity test is performed after changing any network settings. See Testing the
Network Settings (p. 19) for instructions.
Changing the Default Gateway
Changing the default gateway from the title/artist information screen:
STEP 1 Press the * button to access the Control Panel menu system.
STEP 2 Press the NAVIGATION DOWN button until Network Control is highlighted, then press the * button.
STEP 3 Press the NAVIGATION UP or NAVIGATION DOWN button until Set Configuration is highlighted, then press the * button.
Note: The Set Configuration menu option requires an unlock code. If access to the Set Configuration menu option is needed, contact DMX Customer Service. See “Appendix E: Contact DMX” (p. 28).
STEP 4 Press the NAVIGATION UP or NAVIGATION DOWN button until Set Default Gateway is highlighted, then press the * button.
17
STEP 5 Press the NAVIGATION UP or NAVIGATION DOWN button to set the value for the first digit of the first octet (group of numbers), then press the NAVIGATION RIGHT button to move to the second digit of the first octet.
Note: IP addresses such as 192.168.1.1 should be entered as 192.168.001.001.
IP Gateway:
192.168.001.001
Hit m to select
STEP 6 Press the NAVIGATION UP or NAVIGATION DOWN button to set the value for the second digit of the first octet, then press the NAVIGATION RIGHT button to move to the third digit of the first octet.
STEP 7 Press the NAVIGATION UP or NAVIGATION DOWN button to set the value for the third digit of the first octet, then press the NAVIGATION RIGHT button to move to the first digit of the second octet.
STEP 8 Repeat steps 5 – 7 for the remaining octets, then press the * button to accept the change.
It is highly recommended that a connectivity test is performed after changing any network settings. See Testing the
Network Settings (p. 19) for instructions.
Changing the FTP Server
Changing the FTP server IP address from the title/artist information screen:
STEP 1 Press the * button to access the Control Panel menu system.
STEP 2 Press the NAVIGATION DOWN button until Network Control is highlighted, then press the * button.
STEP 3 Press the NAVIGATION UP or NAVIGATION DOWN button until Set Configuration is highlighted, then press the * button.
Note: The Set Configuration menu option requires an unlock code. If access to the Set Configuration menu option is needed, contact DMX Customer Service. See “Appendix E: Contact DMX” (p. 28).
STEP 4 Press the NAVIGATION UP or NAVIGATION DOWN button until Set FTP Server is highlighted, then press the * button.
STEP 5 Press the NAVIGATION UP or NAVIGATION DOWN button to set the value for the first digit of the first octet (group of numbers), then press the NAVIGATION RIGHT button to move to the second digit of the first octet.
Note: IP addresses such as 66.150.1.5 should be entered as 066.150.001.005.
FTP Server IP:
066.150.001.005
Hit m to select
STEP 6 Press the NAVIGATION UP or NAVIGATION DOWN button to set the value for the second digit of the first octet, then press the NAVIGATION RIGHT button to move to the third digit of the first octet.
STEP 7 Press the NAVIGATION UP or NAVIGATION DOWN button to set the value for the third digit of the first octet, then press the NAVIGATION RIGHT button to move to the first digit of the second octet.
18
ProFusion XS User Guide
STEP 8 Repeat steps 5 – 7 for the remaining octets, then press the * button to accept the change.
It is highly recommended that a connectivity test is performed after changing any network settings. See Testing the
Network Settings (p. 19) for instructions.
Testing the Network Settings
Initiating a test connection from the title/artist information screen:
STEP 1 Press the * button to access the Control Panel menu system.
STEP 2 Press the NAVIGATION DOWN button until Network Control is highlighted, then press the * button.
STEP 3 Press the NAVIGATION UP or NAVIGATION DOWN button until Set Configuration is highlighted, then press the * button.
Note: The Set Configuration menu option requires an unlock code. If access to the Set Configuration menu option is needed, contact DMX Customer Service. See “Appendix E: Contact DMX” (p. 28).
STEP 4 Press the NAVIGATION UP or NAVIGATION DOWN button until Test Network Connection is highlight-
ed, then press the * button to initiate the Test Network Connection option.
BACK
>Test Network Connection
Set IP Type
Set IP Address
STEP 5 ProFusion XS will attempt to connect to its designated server. If the Test Network Connection is successful, the LCD control panel will display Connection Successful!.
Connect Successful!
Installation PIN:
####
< MENU | EXIT >
If the Test Network Connection fails, the LCD control panel will display the message below with the third line indicating the nature of the connectivity problem.
Connect Failed!
Last Status:
Update connect error
< MENU | EXIT >
Viewing the Update Status
The View Update Status menu option displays the current connectivity status of your ProFusion XS. If your
ProFusion XS is not currently connected, the View Update Status menu option will display the results of the last
connection attempt.
19
Accessing the View Update Status menu option from the title/artist information screen:
STEP 1 Press the * button to access the Control Panel menu system.
STEP 2 Press the NAVIGATION DOWN button until Network Control is highlighted, then press the * button.
STEP 3 Press the NAVIGATION UP or NAVIGATION DOWN button until the View Update Status menu option is highlighted, then press the * button.
STEP 4 If your ProFusion XS is currently connected, the View Update Status menu option will display the cur-
rent connection activity.
Getting update:
937-50-12670207
ma014987.pfc
< MENU | EXIT >
If your ProFusion XS is not connected, the View Update Status will display Connection Idle, along with the status of the last connection attempt.
Connection Idle
Last Status:
Successful !
< MENU | EXIT >
Updating the Configuration
The Update Configuration menu option allows you at any time to connect and check for configuration changes
and software updates. This menu option will not download any available new content.
Initiating a configuration only update from the title/artist information screen:
STEP 1 Press the * button to access the Control Panel menu system.
STEP 2 Press the NAVIGATION DOWN button until Network Control is highlighted, then press the * button.
STEP 3 Press the NAVIGATION DOWN button until the Update Configuration menu option is highlighted, then press the * button to initiate the configuration update.
Updating the Content & Configuration
The Update Content & Configuration menu option allows you at any time to connect and check for configuration changes and software updates, as well as new music content. With this menu option, ProFusion XS will
download any available configuration changes, software updates and new music content.
Note: If new content is available for download, your ProFusion XS may be updating for a long period of
time. It is advisable to check with your network administrator before selecting this menu option.
Initiating a content and configuration update from the title/artist information screen:
STEP 1 Press the * button to access the Control Panel menu system.
STEP 2 Press the NAVIGATION DOWN button until Network Control is highlighted, then press the * button.
20
ProFusion XS User Guide
STEP 3 Press the NAVIGATION DOWN button until the Update Music & Config menu option is highlighted, then press the * button to initiate the content and configuration update.
Stopping an Update
The Stop Updating menu option allows you to terminate an active update. ProFusion XS will resume the download where it left off the next time it connects for an update.
Stopping an update from the title/artist information screen:
STEP 1 Press the * button to access the Control Panel menu system.
STEP 2 Press the NAVIGATION DOWN button until Network Control is highlighted, then press the * button.
STEP 3 Press the NAVIGATION DOWN button until Stop Updating menu option is highlighted, then press the * button to terminate the connection. It may take up to one minute for the connection to terminate.
When the update has stopped, the control panel will display Connection Idle.
Scheduling
ProFusion XS scheduling supports the ability to play specific styles at designated times, days, and seasonal or
promotional events. This ensures the correct style of music is playing for your locations at the correct times
and days.
Your ProFusion XS will arrive with pre-configured dayparting. If necessary your dayparting schedule can be
overridden from the Control Panel menu system. The Schedule Control menu option allows you to view and
change the current Schedule Mode and add/remove Custom schedules from your ProFusion XS.
ProFusion XS supports the following Schedule Modes:
•
DMX Schedule – the default schedule specifically configured for your ProFusion XS.
•
Custom Schedule – a schedule created from the Control Panel menu system that designates a time a
specific style will start.
•
No Schedule – when selected, this mode will stop playback until a style is selected using the STYLE
buttons. Selected styles will continue to play until a new style is selected or the Schedule Mode is changed.
Changing the Schedule Mode from the title/artist screen:
STEP 1 Press the * button to access the Control Panel menu system.
STEP 2 Press the NAVIGATION DOWN button until Schedule Control is highlighted, then press the * button.
STEP 3 Press the NAVIGATION UP or NAVIGATION DOWN button until Select Schedule is highlighted, then press the * button.
STEP 4 Press the NAVIGATION UP or NAVIGATION DOWN button until the desired Schedule Mode is highlighted, then press the * button.
Creating a Custom Schedule from the title/artist screen:
STEP 1 Press the * button to access the Control Panel menu system.
STEP 2 Press the NAVIGATION DOWN button until Schedule Control is highlighted, then press the * button.
21
STEP 3 Press the NAVIGATION UP or NAVIGATION DOWN button until Add Custom Schedule is highlighted, then press the * button.
STEP 4 Press the NAVIGATION UP or NAVIGATION DOWN button until correct the hour is set for your Custom Schedule.
STEP 5 Press the NAVIGATION RIGHT button to move to the minutes, and AM/PM setting, and use the NAVIGA-
TION UP or NAVIGATION DOWN button to modify each option. Once the correct time has been set, press the * button.
STEP 6 Press the NAVIGATION UP or NAVIGATION DOWN button until the desired style is highlighted, then press the * button.
STEP 7 Press the NAVIGATION RIGHT button to exit to the main screen.
DFX® Audio Enhancer
DFX® Audio Enhancer is a plug-in that improves the sound quality of your ProFusion XS content. The DFX® Audio Enhancer contains four unique and configurable effects;
•
Fidelity – enhances clarity
•
Ambience – adds depth
•
Dynamic Boost – amplifies sound and reduces distortion
•
Bass – amplifies bass
Your ProFusion XS will arrive with a pre-configured default DFX® preset setting that can be modified by DMX if
necessary.
Turning DFX® on or off from the title/artist information screen:
STEP 1 Press the * button to access the Control Panel menu system.
STEP 2 Press the NAVIGATION DOWN button until DFX Audio Control is highlighted, then press the * button.
STEP 3 Press the NAVIGATION UP or NAVIGATION DOWN button until DFX Settings is highlighted, then press the * button.
STEP 4 Press the NAVIGATION UP or NAVIGATION DOWN button to toggle between ON and OFF, then press the * button to select your desired state for DFX®.
If your ProFusion XS has more than one DFX® preset setting, you may change between any of the available
presets.
Changing DFX® presets from the title/artist information screen:
STEP 1 Press the * button to access the Control Panel menu system.
STEP 2 Press the NAVIGATION DOWN button until DFX Audio Control is highlighted, then press the * button.
STEP 3 Press the NAVIGATION UP or NAVIGATION DOWN button until DFX Presets is highlighted, then press the * button.
STEP 4 Press the NAVIGATION UP or NAVIGATION DOWN button until the desired preset is highlighted, then press the * button.
22
ProFusion XS User Guide
Direct Serial Interface (DSI)
ProFusion XS supports a RS-232 communications interface that allows ProFusion XS to be controlled using external
equipment connected to the serial port. The functionality is limited to the ability to change styles on desired zones.
Note: Please contact DMX customer service for the “ProFusion XS Serial Control Specification” documentation if your are planning on use this feature. See “Appendix E: Contact DMX” (p. 28)
System Diagnostics
The System Diagnostics menu option, used for troubleshooting, can only be accessed with the assistance of a
DMX Customer Service agent.
23
Appendix A: Glossary
* Button: This button, located in the middle of the NAVIGATION buttons, is similar to an Enter button on a
keyboard. The * button is used to select options from Control Panel menu system.
Configuration: A set of unique settings such as scheduling, playback start and stop times, and settings specific to your device.
Control Panel Menu System: A software interface that allows the user to perform numerous tasks, including:
stopping/starting playback, adjusting volume levels and modifying/testing network settings.
Custom Schedule: A scheduled style and start time for a desired zone, that created by the user from the Control Panel menu system.
Dayparting: The ability to play specific styles at designated times and days, so the correct style of music is
playing for your locations at the correct times and days.
DFX® Audio Enhancer: An audio enhancement plug-in that improves the sound quality of ProFusion XS content. The DFX® plug-in contains four unique effects: Fidelity, Ambience, Dynamic Boost, and Bass.
Direct Serial Interface (DSI): A RS-232 communications interface that allows ProFusion XS to be controlled
using external equipment connected to the serial port. The functionality is limited to the ability to change
styles on desired zones.
Firewall: Networking hardware configured to permit or deny specific network traffic between locations.
FTP Server: A server which ProFusion XS connects, using the FTP protocol, for music, messaging, and configuration updates.
NAVIGATION Buttons: A set of four buttons (LEFT, RIGHT, UP and DOWN), located to the right of the LCD
Control Panel and above the POWER button, used to navigate the Control Panel menu system.
Pause Mode: A feature that allow the user to stop playback on all zones immediately by press the POWER
button once.
Playback Mode: ProFusion XS is playing music based on its Schedule Mode.
POWER Button: The POWER button is used to power on and off ProFusion XS as well as put it into Pause
Mode. When ProFusion XS is powered on and the POWER button is pressed once, it will enter Pause mode.
Press the POWER button again to shutdown.
Style: A unique musical experience referring to a particular type of music such as Jazz, Classic Rock, etc.
Style Blocking: A configuration restriction that prevents certain styles from being selected from the front
panel during specified hours.
STYLE Buttons: A set of buttons (UP and DOWN), located to the left of the LCD control panel, that are used to
change styles.
Title/Artist Information: Information displayed on the main screen of the Control Panel menu system for
each available zone during music playback, regarding the content currently playing.
Zone: ProFusion XS has the capability to support up to four independent outputs that allow for unique music
types for different areas of a business.
24
ProFusion XS User Guide
Appendix B: Troubleshooting
This section provides a basic troubleshooting guide for the most common issues. If this list does not help you resolve your issue, or if you have an issue that is not listed below, please contact DMX Customer Service (see p. 28) for
assistance.
General Issues
No power
Possible Solution
Page
Verify the power cord is properly connected to your ProFusion XS.
5
Verify the power cord is connected to a known working electrical
outlet.
_
Control panel displays Machine
Expired
Contact DMX Customer Service.
Control panel displays You do not
have permissions to use this feature
The menu option selected is disabled as requested for this ProFusion XS. Contact DMX if permissions for this menu are needed.
28
8, 28
playback Issues
Music does not start at the correct
time
Verify the date and time is correctly set.
Verify the Schedule Mode is set to DMX Schedule.
Control panel displays Music Stopped Verify the date and time is correctly set.
10
_
10
audio Issues
No or low volume levels
Verify the audio cable is connected to the correct audio output of
your ProFusion XS and the correct input of your audio equipment.
3
Verify the volume level for your ProFusion XS is sufficiently turned
up.
11
Verify the volume level of the amplification equipment your ProFusion XS is connected to is sufficiently turned up.
_
disc update Issues
Disc update not properly installing
Disc update taking longer than 10
minutes
Verify the CD is free of scratches, smudges, or fingerprints.
7
Verify the CD has been properly inserted in the DVD-ROM tray.
7
Confirm the Device ID on the CD matches the Device ID of your
ProFusion XS.
8
Allow the update to run for at least 15 minutes. If the update has
not completed, shutdown your ProFusion XS and wait 15 seconds
before powering the device back on. After the device beeps
once, eject the CD and verify it is free of scratches, smudges, or
fingerprints. Attempt the update again. If the update continues
to take longer than 15 minutes, contact DMX Customer Service.
Confirm the Device ID on the CD matches the Device ID of your
Control panel display Incorrect CD for ProFusion XS. If the Device ID on the CD matches the Device ID
this device
of your ProFusion XS, and the update continues to produce the
Wrong Device ID error message, contact DMX Customer Service.
6, 7, 28
8, 28
25
disc update Issues (cont.)
Control panel display Incorrect CD
Type
Control panel displays Old Config Ver
Possible Solution
Page
Verify the CD has “ProFusion XS” printed on the right-side of the
disc.
_
Contact DMX Customer Service.
28
Verify you are loading the most recent update. The disc will have
the date created printed on them.
_
If your ProFusion XS is configured to receive its updates via Network, it may have received newer configuration from a Network
update. Continue loading any CDs you received as your ProFusion XS will update any content on the CDs.
_
Verify the network settings for your ProFusion XS are correct for
your network.
15
Verify your network firewall is configured to allow FTP traffic from
your ProFusion XS to its designated server.
15
Verify the Ethernet cable is properly connected to your ProFusion
XS and your network equipment.
3, 5
Verify the network settings for your ProFusion XS are correct for
your network.
15
Verify your network firewall is configured to allow FTP traffic from
your ProFusion XS to its designated server.
15
network update Issues
Control panel displays Update Connect Error after an Ethernet update is
attempted
Control panel displays FTP Test
Failed after Test Network Connect
attempted
26
ProFusion XS User Guide
Appendix C: Control Panel Menu System Tree
Network Update
CD Update
27
Appendix D: Specifications
Connections
Audio:
Network:
Communications Port:
(4) RCA female jacks
(1) RJ-45 Ethernet port
(1) Serial port (A)
Power Specifications
Voltage:
Range:
Watts:
Current:
Freq:
Thermal Output:
115/230 VAC
105/125 Vrms
220 W
4.0 Arms @ 115V / 2.0 Arms @ 230V
47 ~ 63 Hz
751 BTUs Dimensions
Length: Depth: Height: Weight:
15 ¼” (38.74 cm) 9 ½” (24.13 cm)
3 ½” (8.89 cm) 11 lbs (4.99 kg)
Appendix E: Contact DMX
Before contacting DMX Customer Service, please have the following information ready:
•
•
•
The Device ID for your ProFusion XS (see p. 8)
The serial number for your ProFusion XS (located on the front and rear panels)
Your DMX Account Number
Worldwide Customer Support Centers
Africa: + 27 11 780 3000
Brazil: + 55.11. 3457.0654
Canada: +1 800 350 0369
United States: +1 800 345 5000
28
ProFusion XS User Guide
In Canada call 800.350.0369
Updated 10.08.08
800.345.5000 m dmx.com