1
Resident Management System
RMS
User’s Guide
Software Version 2.37
SPECIAL EDITION FOR CEGRD
BAGHDAD, IRAQ
Resident Management System
U.S. Army Corps of Engineers
RMS Center
(760) 247-0217 – Voice
(760) 247-2547 - Fax
Resident Management System
Written under contract for Stanley-Baker-Hill
Gulf Region Division, U.S. Army Corps of Engineers
Author: Fred Freeman, Owner
Freeman's Funny Farm
While every precaution has been taken in the preparation of this manual,
the U.S. Army Corps of Engineers and the author assume no responsibility for
damages resulting from the use of information contained herein.
Trademarks
Windows 98, Windows ME, Windows 2000, Windows NT and Windows XP
are registered trademarks of the Microsoft Corporation.
HP and LaserJet are registered trademarks of the Hewlett-Packard Corporation.
TOC - 1
Resident Management System
Table of Contents
Introduction ...................................................................................................................................1
What Is RMS, QAS, and QCS? .................................................................................................1
Disk of Knowledge – A resource ...............................................................................................1
Opening Screens.......................................................................................................................2
RMS Opening Screen ...............................................................................................................2
Archive a Contract..............................................................................................................2
How the Archive Feature Works .....................................................................................3
QAS Opening Screen................................................................................................................4
Review the Steps to Install and use QAS ..........................................................................4
Actual Installation of QAS ..................................................................................................5
Assign QAS User Role and Password .........................................................................10
Choose contract for using QAS ....................................................................................11
Contract Setup for QAS................................................................................................11
Assign Remote QAS Site .............................................................................................12
Assign one or more RMS Modules to the Remote QAS Site .......................................14
Export the Contract to the Remote QAS Site ...............................................................16
Add a new contract to the QAS Program .....................................................................18
Request Export File ......................................................................................................18
Import from SFTP .........................................................................................................19
Import from File ............................................................................................................19
Log in to QAS ...............................................................................................................20
Enter Contact Information in QAS ................................................................................21
Contract is now added to the QAS Program ....................................................................22
Updating the QAS Program .............................................................................................23
QCS Opening Screen..............................................................................................................24
About This Manual ..................................................................................................................24
RMS Center Tools...................................................................................................................24
RMS Center Assistance ..........................................................................................................25
Chapter 1 - Overview, Basics and Logging In...............................................................................1
What this Chapter presents:......................................................................................................1
Logging Into the System............................................................................................................1
Logging Into the System Via the RMS Website and Citrix ........................................................3
Menu Bar Options .....................................................................................................................8
Summary Module ......................................................................................................................8
Baseline Schedules............................................................................................................9
Custom Reports ...............................................................................................................13
Custom Report – Summary Level ................................................................................19
TOC - 2
Resident Management System
Contract Groups ...........................................................................................................20
P2 Projects.......................................................................................................................22
Contractor Claims ............................................................................................................22
District Library – District Policy – Claim Dates .............................................................23
Adding a Claim .............................................................................................................24
Supporting Documents for Claims ................................................................................26
Reports for Claims........................................................................................................27
Interface Schedules .........................................................................................................29
Office Module ..........................................................................................................................30
Local Library............................................................................................................................31
User Defined Macros – Required for ALL Contracts in Iraq .............................................32
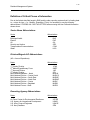
Definition of Critical Pieces of Information .......................................................................33
Sector Name Abbreviations..........................................................................................33
Division/Brigade AO Abbreviations...............................................................................33
Executing Agency Abbreviations ..................................................................................33
Governorate Abbreviations...........................................................................................34
Funding Source Abbreviations .....................................................................................34
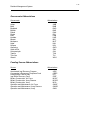
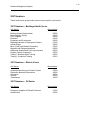
2207 Numbers..................................................................................................................35
2207 Numbers – Buildings/Health Sector.....................................................................35
2207 Numbers – Electric Sector...................................................................................35
2207 Numbers – Oil Sector ..........................................................................................35
2207 Numbers – Security and Law Enforcement Sector..............................................36
2207 Numbers – Transportation/Communications Sector............................................36
2207 Numbers – Water Sector .....................................................................................37
District Library (Well, not really!!) ............................................................................................37
System Library ........................................................................................................................38
Reports.............................................................................................................................39
Chapter 2 - Office and Staff Setup................................................................................................1
What this Chapter presents:......................................................................................................1
Six steps to success to use RMS ..............................................................................................1
Office Module ............................................................................................................................2
Office Description...............................................................................................................3
Deleting an Office...............................................................................................................4
Office Information - Administrators Tab .............................................................................5
Office Administration Rights...............................................................................................6
Full Rights Screen..............................................................................................................6
Selected Rights Screen......................................................................................................6
Office Policy .......................................................................................................................7
Project Delivery Team Members ...............................................................................................8
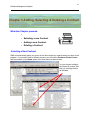
Chapter 3 Adding, Selecting & Deleting a Contract ......................................................................1
What this Chapter presents:......................................................................................................1
Selecting a New Contract..........................................................................................................1
Adding a New Contract .............................................................................................................2
Adding a Contract for Training or Read Only Purposes ............................................................4
Chapter 4 - Entering Contract Description and Status ..................................................................1
What this Chapter presents:......................................................................................................1
Entering Contract Description and Status .................................................................................1
Contract Description Tab................................................................................................2
P2 Projects Tab ..............................................................................................................3
TOC - 3
Resident Management System
Contract Information Tab................................................................................................3
Contract Status ..................................................................................................................4
Contract Status – Future Contract .....................................................................................4
Status / Issues Tab.........................................................................................................4
Contract Status – Active Phase .........................................................................................5
Status Photo Tab............................................................................................................6
Milestones Schedule Tab ...............................................................................................7
Definitions of Milestone Dates for the RMS System .......................................................8
Examples of District Defined Milestones ........................................................................9
Monthly Progress Tab ..................................................................................................10
Cost / Time Growth Tab ...............................................................................................11
Explanation of Options .................................................................................................11
Chapter 5 - Contract Setup and Planning Data ............................................................................1
What this Chapter presents:......................................................................................................1
Contract Setup and Planning Data............................................................................................2
Contract Setup ...................................................................................................................2
Administration / Funding Tab..........................................................................................2
Continuing Funds ...........................................................................................................2
Funding: Track CWE -- Options .........................................................................................3
Option 1 ..........................................................................................................................3
Option 2 ..........................................................................................................................3
Option 3 ..........................................................................................................................3
Contract Setup ...................................................................................................................4
Payment / Modifications Tab ..........................................................................................4
Obligation Payment Terms .............................................................................................4
CEFMS Set Up for ENG 93 Payments...............................................................................5
Quality Assurance Tab ...................................................................................................6
Submittal/Schedule Tab .................................................................................................7
Will there be more than one Submittal Register?...............................................................7
Compute Submittal Need Dates based on Activity Schedule ............................................7
Manually enter Scheduled Start/Finish Dates ....................................................................8
Import Scheduled Start/Finish Dates from NAS .................................................................8
Chapter 6 - Correspondence ........................................................................................................1
What this Chapter presents:......................................................................................................1
Overview ............................................................................................................................1
Adding Correspondence in RMS........................................................................................2
Generating Form Letters ....................................................................................................3
Copying a Document from another Library ........................................................................4
RFI’s (Request for Information)..........................................................................................5
Prepare RFI (QCS) .........................................................................................................5
RFI Requiring Response (QCS) .....................................................................................6
Government Response to RFI (RMS) ............................................................................6
Screen after the RFI has been exported to QCS (RMS) ................................................8
RFI Notification in RMS and QCS ..................................................................................8
QCS Correspondence Module ...........................................................................................9
Contract Documents ........................................................................................................10
Supporting Documents.....................................................................................................11
Create a library of Supporting Documents .......................................................................12
Add a Supporting Document ............................................................................................13
TOC - 4
Resident Management System
Chapter 7 - CEFMS, Finances and the CWE ...............................................................................1
What this Chapter presents:......................................................................................................1
Overview ............................................................................................................................1
CEFMS, Finances and the CWE...............................................................................................1
CEFMS Finances ...............................................................................................................2
CEFMS Work Item Codes..................................................................................................3
Construction Working Estimate .................................................................................................5
Award CWE...............................................................................................................................5
Funds for Construction Working Estimate .................................................................................6
Total Award CWE Amount .................................................................................................6
Award Contract ..................................................................................................................6
Other Supporting Contract .................................................................................................7
Design During Construction ...............................................................................................7
Gov’t Review Contractor Design ........................................................................................7
Contingency .......................................................................................................................7
S&A ....................................................................................................................................7
Other w/o S&A ...................................................................................................................7
Total Award CWE...............................................................................................................8
Funds for Management Reserve ...............................................................................................8
Award Contract Line Items ........................................................................................................8
Adding CLINS in RMS......................................................................................................10
Entry of Maximo URI Code ..............................................................................................12
Sample table of Baghdad Numbers and Project URI numbers ........................................13
Adding Priced SubCLINs in RMS.....................................................................................14
Chapter 8 – Contractor Pay Activities ...........................................................................................1
What this Chapter presents:......................................................................................................1
Importing Contractor Pay Activities ...........................................................................................1
Turning Off QCS from Contract Setup ......................................................................................3
Import SDEF File.......................................................................................................................3
QCS being Used .......................................................................................................................7
Contractor Pay Activities ...........................................................................................................8
Mandatory Entry Elements for Pay Activities .....................................................................9
Description .........................................................................................................................9
CLIN ...................................................................................................................................9
Amount...............................................................................................................................9
Chapter 9 – Contract Change Requests.......................................................................................1
What this Chapter presents:......................................................................................................1
Overview ...................................................................................................................................1
Prefix Code for Change Requests.............................................................................................2
Contract Change Requests .......................................................................................................2
Mod Reason Codes ...........................................................................................................3
Award Options ................................................................................................................3
Controllable ....................................................................................................................3
Uncontrollable.................................................................................................................3
Sample – Basic Change Document (BCD) Form – Partial Only ........................................4
Chapter 10 - Contract Modifications .............................................................................................1
What this Chapter presents:......................................................................................................1
Overview ...................................................................................................................................1
Contract Modifications...............................................................................................................2
TOC - 5
Resident Management System
SF30 - Page 1 Tab.............................................................................................................3
SF30 - Page 2 Tab.............................................................................................................4
SF30 Block 2 ..................................................................................................................4
SF30 Block 4 ..................................................................................................................4
SF30 Block 12 ................................................................................................................4
SF30 Block 13 ................................................................................................................4
SF30 Block 14 ................................................................................................................5
SF30 - Page 3 Tab.............................................................................................................5
SF30 Block 14 (continued) .............................................................................................5
SF30 Block 15A..............................................................................................................5
SF30 Block 16A..............................................................................................................5
Release Mod Tab...............................................................................................................6
Pay Activity Screen ...................................................................................................................8
Supporting Documents..............................................................................................................9
Other Change Orders..............................................................................................................11
Current Construction Working Estimate (CWE) ......................................................................12
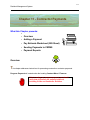
Chapter 11 - Contractor Payments ...............................................................................................1
What this Chapter presents:......................................................................................................1
Overview ............................................................................................................................1
Adding a Progress Payment......................................................................................................2
Prompt Payment / Pay Requests from QCS ......................................................................2
Prompt Payment / Pay Requests from QCS ......................................................................3
Prompt Payment Certification Report (Page 1) .........................................................................4
Contractor’s Pay Request Worksheet .......................................................................................5
Sending Payment to CEFMS ....................................................................................................5
Reports for Payments................................................................................................................7
Chapter 12 - Contractor Quality Control - Planning ......................................................................1
What this Chapter presents:......................................................................................................1
Required Planning Activities: .............................................................................................1
Administrative:....................................................................................................................1
Quality Assurance / Quality Control: ..................................................................................1
Overview ...................................................................................................................................2
Quality Control Requirements ...................................................................................................2
Prime Contractor Data...............................................................................................................2
Responsibility Code – ........................................................................................................3
CEC (DUNS) No – .............................................................................................................3
Contractor Short Name / Contractor Name – .....................................................................3
NAICS Code –....................................................................................................................3
Office to receive payments –..............................................................................................4
Contractor Representative to Review Contractor Evaluation (DD2626) ............................4
Prime Contractor Data in District Library ...................................................................................4
Manually Add Contractor to District Library........................................................................4
Copy Prime Contractors From Existing Contracts .............................................................6
Copy Prime Contractor Data From District Library.............................................................7
Prime Contractor Data is Copied to Contract .....................................................................8
Subcontractor Data ...................................................................................................................9
QC Planning Data ...................................................................................................................11
Features of Work..............................................................................................................11
3 Phase Inspections.........................................................................................................12
TOC - 6
Resident Management System
Hazard Analysis ...............................................................................................................12
Hazard Analysis Report (Sample) ....................................................................................14
QC Requirements ............................................................................................................15
Quality Control Tests ....................................................................................................15
User Schools ................................................................................................................15
Installed Property..........................................................................................................16
Transfer Property..........................................................................................................16
Equipment Checks ..................................................................................................................17
Exposure Hours.......................................................................................................................18
Monthly Injuries/Illnesses & Exposure Report..................................................................19
Exchanging Data between RMS/QAS and QCS .....................................................................20
Export from RMS Using SFTP Server..............................................................................20
Import from RMS/QAS to QCS Using SFTP Server ........................................................24
Export from RMS/QAS by Exporting File .........................................................................25
Export from RMS/QAS by Exporting File .........................................................................26
Import from RMS into QCS by Exported File ...................................................................28
Request Export File for Adding Contract..........................................................................30
Automated Import and Export ..........................................................................................31
Adding QCS site within RMS ...........................................................................................32
CHAPTER 13 - Government Quality Assurance - Planning .........................................................1
What this Chapter presents:......................................................................................................1
Quality Assurance and RMS ..............................................................................................1
Overview ............................................................................................................................1
Contract Setup ...................................................................................................................2
Quality Assurance Tab ...................................................................................................2
QA Testing .........................................................................................................................3
CHAPTER 14 - CQC – Daily Report .............................................................................................1
What this Chapter presents:......................................................................................................1
Quality Control Report and RMS........................................................................................1
Overview ............................................................................................................................1
Daily Quality Control Report...............................................................................................2
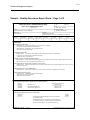
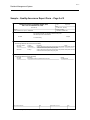
Sample Quality Control Report Form ........................................................................................4
Sample – Quality Control Report Form – Page 1 of 2........................................................5
Sample – Quality Control Report Form – Page 2 of 2........................................................6
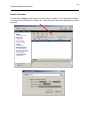
Contractor QC Report Not Imported..........................................................................................7
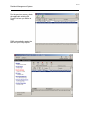
Contractor QC Report Imported – Opportunity to Return ..........................................................8
CHAPTER 15 - Government QA Daily Report..............................................................................1
What this Chapter presents:......................................................................................................1
Quality Assurance and RMS ..............................................................................................1
Overview ............................................................................................................................1
Elements of Quality Assurance ..........................................................................................1
Quality Assurance Requirements ..............................................................................................2
Creating a Daily QA REPORT...................................................................................................2
Iraq Construction QA Report..............................................................................................3
Sample Daily QA Report Form Worksheet – Iraq Construction......................................3
Sample – Quality Assurance Report Form – Page 1 of 2 ..................................................6
Sample – Quality Assurance Report Form – Page 2 of 2 ..................................................7
Punch List Items .............................................................................................................7
Punch List Items .............................................................................................................8
TOC - 7
Resident Management System
CHAPTER 16 - Contract Submittals and SpecsIntact ..................................................................1
What this Chapter presents:......................................................................................................1
Overview ............................................................................................................................2
The SpecsIntact Specification Production System.............................................................2
Contract Setup ...................................................................................................................2
SUBMITTAL REQUIREMENTS ................................................................................................3
Specification Sections ........................................................................................................4
Submittal Details and Requirements..................................................................................5
Submittal Requirements Window ...................................................................................5
Sample Submittal Register Form (ENG Form 4288) ......................................................6
Features – Submittals/Transmittals....................................................................................6
Transmittal Log (ENG Form 4025).....................................................................................7
Sample Transmittal Form (ENG Form 4025)..................................................................8
Transmittals in Review .......................................................................................................9
Imported Transmittals.....................................................................................................9
Review Status...............................................................................................................10
Submittal Reviewers ........................................................................................................11
Chapter 17 – Schedules & the Standard Data Exchange Format (SDEF) ...................................1
What this Chapter presents:......................................................................................................1
Contractor Schedule Requirements ...................................................................................1
Schedules and the SDEF ..........................................................................................................2
Overview ...................................................................................................................................2
RMS maintains four types of schedules ....................................................................................2
Milestone Schedule............................................................................................................2
Placement Schedule ..........................................................................................................3
Activity Schedule................................................................................................................4
Feature Schedule...............................................................................................................5
Standard Data Exchange Format (SDEF) .................................................................................6
Feature of the SDEF ..........................................................................................................6
RMS and the SDEF............................................................................................................6
Contract Specified Project Schedule..................................................................................6
District Milestone Events – District Library .........................................................................6
Milestone Events – Local Library .......................................................................................7
Milestone Schedules - Summary Reports ..........................................................................9
Monthly Progress ....................................................................................................................10
Activity Schedule .....................................................................................................................11
Feature Schedule ....................................................................................................................12
CHAPTER 18 - Closeout Activities ...............................................................................................1
What this Chapter presents:......................................................................................................1
Overview ...................................................................................................................................2
Closeout Activities in RMS ........................................................................................................2
Real Property .....................................................................................................................3
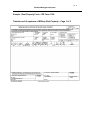
Transfers – DD Form 1354 .............................................................................................4
Sample - DD Form 1354 Report Form ...........................................................................5
Sample - Real Property Form – DD Form 1354 .............................................................6
Transfer and Acceptance of Military Real Property – Page 1 of 2..................................6
Installed Property ...............................................................................................................7
Transfer Property (Requisitions - DD Form 1149) .............................................................8
Requisition and Invoice Screen ......................................................................................8
TOC - 8
Resident Management System
DD 1149 Input Screens ..................................................................................................9
Sample Transfer Property Form – DD Form 1149 .........................................................9
Sample Transfer Property Form – DD Form 1149 .......................................................10
Requisition and Invoice/Shipping Document – Page 1 of 2..........................................10
Contractor Evaluations – DD Form 2626 .........................................................................11
RMS / CCASS Interface ...............................................................................................11
The DD Form 2626 Report Form..................................................................................13
Sample - DD Form 2626 Report Form - Page 1 of 2 ....................................................14
Sample - DD Form 2626 Report Form - Page 2 of 2 ....................................................14
Sample - DD Form 2626 Report Form - Page 2 of 2 ....................................................15
Warranty Inspections...............................................................................................................16
4 Month, 9 Month, and 12 Month Warranty Inspection ...........................................................18
Transfer Warranty Items to Contractor (QCS) .................................................................20
Intro - 1
Resident Management System
Introduction
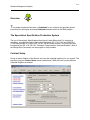
What Is RMS, QAS, and QCS?
The Resident Management System (RMS) is a user-friendly
comprehensive system for the expedient and effective management of
construction contracts through tracking and documentation of all
facets of a contract by Corps of Engineers’ field offices and
contractors. RMS uses Oracle © for the software platform.
The Quality Assurance System (QAS) is an extension of RMS for Government personnel to use
remotely from the main RMS software program. Certain modules/tasks can be assigned by
RMS to be accomplished with QAS and such modules/tasks will become Read Only in the RMS
program. The program can import and/or export to and from RMS to synchronize both
programs. QAS uses Firebird© as the software platform.
The Quality Control System (QCS) is the Contractor Module of RMS that construction
contractors utilize to exchange information electronically with the Government. The QCS
program includes a Remote QCS Program module that allows the Master QCS Site to assign
various modules to one or more remote QCS sites. It operates similar in principle to the QAS
program that is used remotely from the Government program (RMS). QCS uses Firebird© as
the software platform.
Disk of Knowledge – A resource
The Knowledge Library was designed by two Corps of Engineers Instructors as supplements to
course materials provided in the Prospect Course - Construction Contract Administration.
Both instructors have extensive experience in construction. Both realized their knowledge can
easily be shared with their employees and students. This library contains hundreds of files on
Construction Contract Administration, The Resident Management System and Construction
Safety Topics. There is no other single reference library currently in publication by the Corps of
Engineers. This collection provides students and employees an efficient method to plan and
accomplish construction contract administration tasks. Our success is accomplished by
integrating job specific requirements, corporate technical knowledge, and management policies
into the day-to-day process of Construction Contract Administration.
You will find these references invaluable for your own learning experience and then sharing
what you gain with your co-workers.
We encourage you to signup for the D.O.K. and receive the entire course on compact disk (CD).
The website link is available from the RMS Website home page.
Intro - 2
Resident Management System
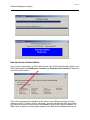
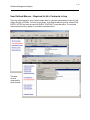
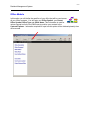
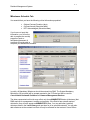
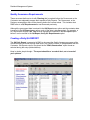
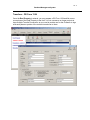
Opening Screens
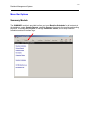
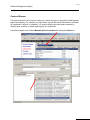
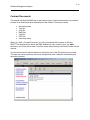
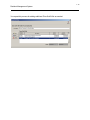
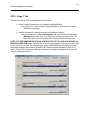
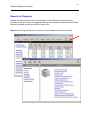
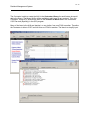
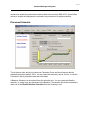
RMS Opening Screen
This is often referred to as the “contracts control center”. It is where you choose the contract you
are looking for and wish to work with.
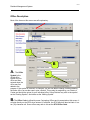
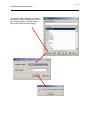
Archive a Contract
You may also decide to Archive contracts as they become complete, as is shown here:
Intro - 3
Resident Management System
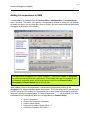
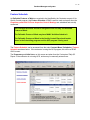
How the Archive Feature Works
Only a System Administrator, an Office Administrator with full Office Administration Rights, or an
Office Administrator with Add/Restore Contracts and Delete/Archive Contracts will be able to
utilize the Archive feature.
There will be a single archive database for the entire Corps of Engineers offices and it will
reside at the WPC, Portland, Oregon. Once a day, a service will run at the WPC and will pull
any archived contracts from the normal RMS database into the RMS Archive Database. The
RMS Center is tasked to run all program updates on the RMS Archive Database as they are
Intro - 4
Resident Management System
released to ensure that the archived/deleted contracts will be able to be added back to the live
RMS database. Once you Archive a contract, it will be removed from your database.
Archive Users will actually log into the archive RMS just like they would log into their normal
(live) RMS database. It will basically be like logging into another Corps District’s RMS program.
When you elect to Add a contract to your normal RMS, you will be given choices to add a new
contract, restore an archived contract, or to restore a deleted contract. If you choose to restore a
deleted or archived contract you will see a listing of all available archived and deleted contracts
for your District. These features are still under construction.
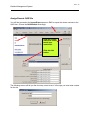
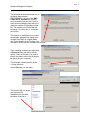
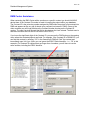
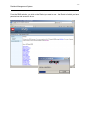
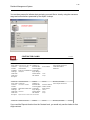
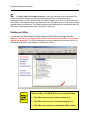
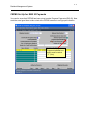
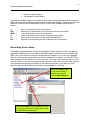
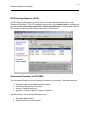
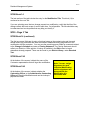
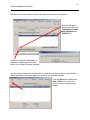
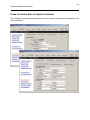
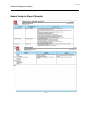
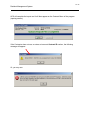
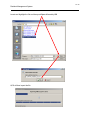
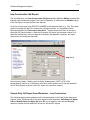
QAS Opening Screen
Site title and ID
number:
Review the Steps to Install and use QAS
1. Download the QAS program (QASSETUP########.exe) from the RMS Center.
2. Launch the exe File to begin the installation of QAS.
3. Upon completion of the QAS installation, import a contract from RMS.
a. RMS must indicate that you will be a QAS User (Office/Office Personnel/Staff
Assignments and Administration / User Roles). You must also have a QAS password.
b. RMS must indicate that the contract will use QAS (Administration/Contract Setup/ and
Administration/Funding).
Intro - 5
Resident Management System
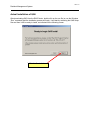
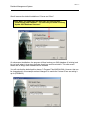
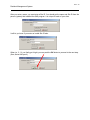
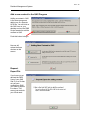
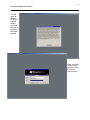
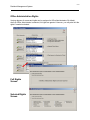
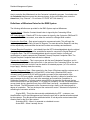
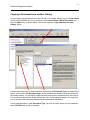
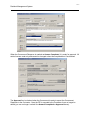
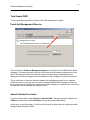
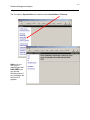
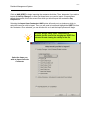
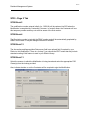
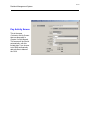
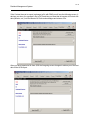
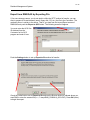
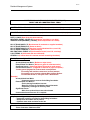
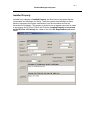
Actual Installation of QAS
After downloading QAS from the RMS Center, double-click on the exe file (or use the Windows
“Run” command) and the installation process will begin. It will start by extracting the QAS Setup
files and then it will be ready to install, as indicated on the following screen.
Click the Next> button.
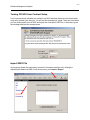
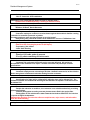
Intro - 6
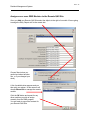
Resident Management System
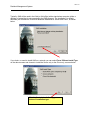
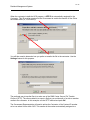
Typically, QAS will be used in the field (or field office) with a stand-alone computer (either a
desktop or laptop) that is not connected to the RMS program. The installation, by default,
assumes you will need the Firebird ® database installed as a “Server and Client”, as shown
below.
If you desire, or need to install QAS on a network you can select Force Different Install Type
on the above screen and choose to install the Server only or the Client only, as seen below.
Click the Next> button following your
choice of Installation type.
Intro - 7
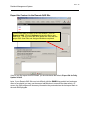
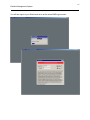
Resident Management System
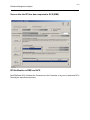
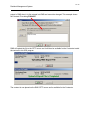
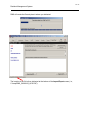
We will assume the default installation of “Server and Client”.
Note: When you install QAS the first time, this line will read:
“Install Empty QAS Database”. The next time you install it will say
“Update QAS Database Structure”.
On subsequent installations, the program will then backup your QAS database (if existing) and
let you know where it is on your computer should you need to reinstall it. This next screen
shows that an empty QAS Database will be installed.
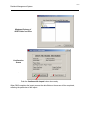
You will note that the default path is always C:\Program Files\QAS\QAS.fdb. However, that can
be changed and in this example we have changed it to match the Contract ID we are setting it
up for (P0008433).
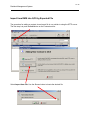
Intro - 8
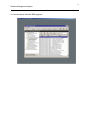
Resident Management System
It will then update and validate your existing database. This occurs when you migrate from one
version (i.e., 2.36) to another version (i.e., 2.37). If this is the first install, it will load an empty
QAS database.
When the program completes the installation you will see a “QASSchema Log – Notepad”
window. Unless you are a geek, this window will not be of any consequence or interest and can
be ignored by simply closing it.
Click “Finish” to launch the QAS program.
Intro - 9
Resident Management System
If you do not yet have any contracts in your QAS program you will need to get an import from
the RMS program for the contract you will be working with.
Intro - 10
Resident Management System
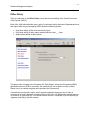
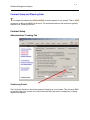
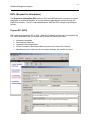
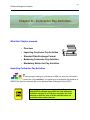
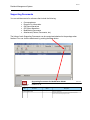
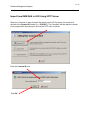
Assign QAS User Role and Password
At this point, you will need to have a User Role assigned that indicates you will be using the
QAS program. This Role is granted from RMS at Office/Office Personnel. The Administration
/User Roles screen is used for this purpose as seen on the next screen.
After the QAS User Role is indicated on the
foregoing screen, you must enter a QAS
Password on the same screen.
Set you password following the password rules
indicated on the QAS Password window.
Intro - 11
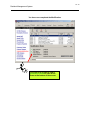
Resident Management System
Choose contract for using QAS
The next step is to
choose the contract
that QAS will be
used on for the
QAS User we just
set up. Find the
contract and hit the
Edit button (or,
double mouse-click
the contract).
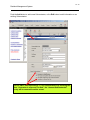
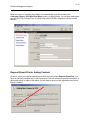
Contract Setup for QAS
Before you can
export the contract
from RMS, for use
with QAS (or, QCS
for that matter) you
will need to indicate
that you wish to do
so. Proceed to the
first tab of
Administration /
Contract Setup
after entering the
contract.
You must ensure
that Do you want
to use QAS with
this contract? is
checked.
Now it is time to export the contract to QAS from RMS.
Intro - 12
Resident Management System
Assign Remote QAS Site
You will then proceed to the Import/Export screen in RMS to export the chosen contract to the
QAS User. Choose the QAS Module accordingly.
Click the Remote
QAS Sites button
to add your
remote site.
Click the Add
button.
The following screen will tell you the next step, one at a time. It first says you must enter a name
for the site.
Intro - 13
Resident Management System
After you enter a name, you must enter a Site ID. You should get the name and Site ID from the
person (system) that installed the QAS program. It is unique for each of your sites.
It will let you know if you enter an invalid Site ID also.
When (or, if - ☺) you finally get it right, you can push the OK button to proceed to the next step.
(See, almost fool-proof.)
Intro - 14
Resident Management System
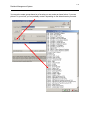
Assign one or more RMS Modules to the Remote QAS Site
Once you Add your Remote QAS Site select the ellipsis to the right of a module. We are going
to assign the Daily Report stuff to the remote site.
Choose Yes (unless you
goofed and meant another
one, or if you changed your
mind.)
A list of available sites appears and you
then pick your poison. In this case we will
choose Bonneville to manage the remote
module.
Click the OK button and repeat for any
other modules you wish to assign
remotely from the RMS program.
You are ready to export the contract for
your Remote QAS Site.
Intro - 15
Resident Management System
Click the Close
button when you
are finished.
If you have already assigned a module to a remote QAS site, you will see this message:
Intro - 16
Resident Management System
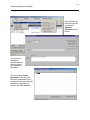
Export the Contract to the Remote QAS Site
You are now ready to export to the QAS Module. Click on
Export to QAS. Click on Settings and save the file to your
hard drive. The file is then able to be added into QAS with the
proper QAS User Role and Assigned Modules completed.
If this is your first export for this contract, you should choose the default, Export file for Daily
Update of QAS.
Later, if your Remote QAS Site runs into difficulty (did the DUMB thing and did not backup as
often as we should) you may use the second radial button to overwrite the data entirely. Of
course, the QAS program will loose any information they entered since the last export back to
the main RMS program.
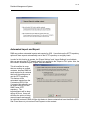
Intro - 17
Resident Management System
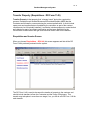
The preferred and recommended way to
exchange data between
RMS/QAS/QCS is by use of the RMS
Center SFTP repository. It is pretty
much automatic and you don’t have to
worry about exchanging files and won’t
make the mistake of importing an older
file. The repository only holds the last
exchange – the new one in, overwrites
the old one.
This version of QAS allows you to have
the program automatically update your
contract from RMS on a nightly basis,
until Final Payment of the Contract. You
will need to check the box to enable this function.
There could be occasion you might wish
to Export to File, and that is also an
option. If such is the case, you need to
identify the path to which the file should
be placed on your computer.
This example is placing the file in the
C:\temp\ directory.
Select OK when you are ready.
This screen tells you where
your exported file
disappeared to and what
the name of the file is.
Intro - 18
Resident Management System
Add a new contract to the QAS Program
Adding a contract in QAS
is the same process as
adding one in a Remote
QCS site. You will click on
the QAS icon on your
desktop and use the RMS
file just created to add the
contract to QAS.
Push this button to begin.
Now we will
review the three
choices on this
screen.
Request
Export File
If you have not yet
advised the RMS
User of your QAS
Site ID, or a file has
not yet been
created from RMS
you need to request
it be done. This
screen just reminds
you of that need.
Intro - 19
Resident Management System
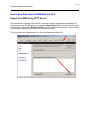
Import from SFTP
This will always be the preferred method. You must have a live internet connection of course
and, hopefully, a high-speed connection. Dialup (56KB/s) is do-able, but painfully slow. You
simply add the unique Contract ID as obtained from the RMS program and select OK.
The file will then be
automatically downloaded
from the repository after
making connection to the
RMS Server.
Import from File
When you select this method, you must find the file on your computer or portable media that you
may have used. A windows explorer will appear to start you off.
Highlight the file and hit Open to
begin.
(It is usually easier just to double
mouse-click the file and it will start
immediately.)
The file will be added to QAS. One of the
first things it does is provide the User
Rights to use the program. If the site is
not identified in RMS prior to the export it
will not complete the process.
The contract is now
available for use in QAS.
Intro - 20
Resident Management System
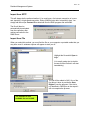
Log in to QAS
The QAS Logon screen will appear and be ready to receive an RMS file to enable you to access
the contract using the QAS Module of RMS.
You will use the same User ID
as you do for RMS, but the
password, as shown previously,
is set within the RMS program –
you cannot use you normal
Oracle password to access
QAS.
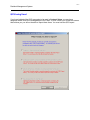
If you have not been given permission to use QAS from the RMS program, you will see
message such as the following.
Intro - 21
Resident Management System
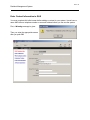
Enter Contact Information in QAS
You must complete this initial screen before adding a contract to your system. It must have a
name AND either a telephone number or an email address before you can use the system.
First, a Warning message is given:
Then you enter the appropriate screen
after you push OK.
Intro - 22
Resident Management System
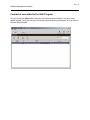
Contract is now added to the QAS Program
You can now hit the Home button and go to the contract controls center to use your newly
added contract. Once you are into your contract, the procedures are the same as if you were in
the main RMS program.
Intro - 23
Resident Management System
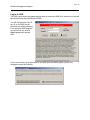
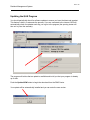
Updating the QAS Program
You should periodically check for software updates to ensure you have the latest and greatest.
This feature is built in to automate the process. If you are connected to the internet, QAS will
automatically check for updates each day you log on to the program (the opening screen will
time out in just a few seconds).
The program will advise that an update is available and/or tell you that your program is already
up to date.
Push the Update NOW button to begin the download from the RMS Center.
Your update will be automatically installed and you can enter the new version.
Intro - 24
Resident Management System
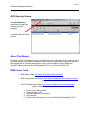
QCS Opening Screen
(See QCS Manual on
procedures to install and
maintain the QCS
program.)
Contractor Site title and ID
number:
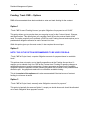
About This Manual
This User’s Guide is intended to give the information that you might need for the effective use of
the RMS program. The reader is directed to other sources of information for particular practices
and suggestions on Contract Management, such as from available Corps of Engineers
“Prospect” training courses, Disk of Knowledge (D.O.K.), your District’s SOPs, etc.
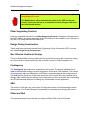
RMS Center Tools
•
RMS Home Page: http://www.rmssupport.com/home.aspx
•
RMS Government Home Page: http://www.rmssupport.com/rmswebhome.aspx
(Login or Password is not required.)
•
QCS Contractor Home Page: http://www.rmssupport.com/qcs/default.aspx
(Login or Password is not required.)
1.
2.
3.
4.
5.
Power Point Training Slides
Technical Data / FAQ
Software Upgrades / Downloads
User Manuals
Links to other data sources, such as the Disk Of Knowledge (D.O.K.).
Intro - 25
Resident Management System
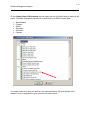
RMS Center Assistance
When contacting the RMS Center with a question on a specific contract you should ALWAYS
advise them of the Contract ID number to assist in locating the project within your database.
The Contract ID is the prime-key number assigned by RMS when the project is first entered into
RMS and appears at the very top of almost every contract-level screen in RMS. (Some of the
older contracts may still linger that have the Contract Number showing as the Contract ID
number. The older versions allowed that field to be whatever the User entered. The bad news is
that those contracts are not able to use either QAS or QCS.)
If you know the significant digits of the Contract ID, you can use the FIND button on the opening
menu where the contracts/projects are listed. For example, if the Contract ID is P00000331, you
can find this contract by entering “331” in the Search field. RMS will “find” the contract and
immediately open it for you. (Note: you can ignore the EROC District identifier – i.e., ‘P0’ in this
example.) For Contract ID numbers that are longer than 4 numbers, you will have to use the
entire number, including the EROC identifier.
1-1
Resident Management System
Chapter 1 - Overview, Basics and Logging In
What this Chapter presents:
•
Logging Into The System
•
Menu Bar Options
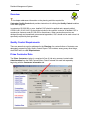
Logging Into the System
CEFMS is a large, diverse system encompassing virtually every
functional area of the U.S. Army Corps of Engineers’ organization. It
handles much more than the finances having to do with construction
contracts. Like CEFMS, RMS is controlled through use of USERIDS
and Passwords and application access permissions. Without these
items, a user will be unable to enter the system to initiate and process
documents or to download financial data needed for RMS.
1-2
Resident Management System
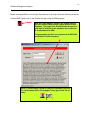
Before accessing RMS you must login. Depending on your setup, there are dfferent procedures.
Click the RMS Castle Icon on the Desktop to begin using the RMS program.
After the Login button is pressed, the system verifies
the User with the RMS security system and the Oracle
Database. This Login User ID and Password must be a
valid User ID with the Oracle database and a valid User
ID and Password for RMS.
The paragraph in the box is a requirement for DITSCAP
certification of DOD computers.
NOTE: If you are using CITRIX or VPN your ICON may vary from
the Castle shown above. For example, it may appear like one of
these:
GRD-RMS GRD-RMS
1-3
Resident Management System
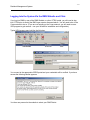
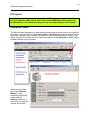
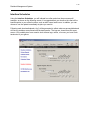
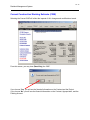
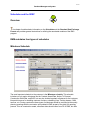
Logging Into the System Via the RMS Website and Citrix
If you log into RMS by way of the RMS Website, or other CITRIX portal, you will need to sign
into CITRIX prior to seeing the RMS logon screen discussed above. You will need to be on the
Corps network to do so. (If you are not actually on the Corps network, you will need to use a
VPN program to gain access – see your IM staff for installation and configuration.)
Typical VPN screens may look like the following:
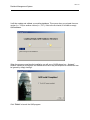
You connect to the appropriate CEEIS portal and your credentials will be verified. If you have
access the following banner appears.
You then can proceed to the website to select your RMS District.
1-4
Resident Management System
From the RMS website, you click on the District you want to use – the District of which you have
permissions and access to do so.
1-5
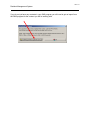
Resident Management System
You will
arrive at
another
DITSCAP
warning
screen.
You must
click OK to
continue
the logon
process.
Enter your User
Name, Oracle
password, and
the correct
logon location.
1-6
Resident Management System
You will then logon to your District and arrive at the normal RMS logon screen.
1-7
Resident Management System
You should now be within the RMS program.
1-8
Resident Management System
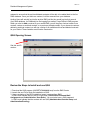
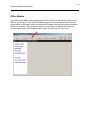
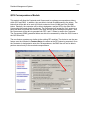
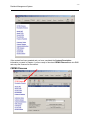
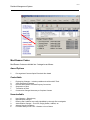
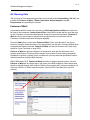
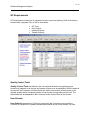
Menu Bar Options
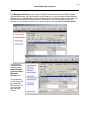
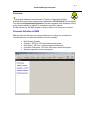
Summary Module
The SUMMARY module is provided to allow you to set Baseline Schedules for all contracts in
the database, create Custom Reports, establish Groups of contracts for reporting and tracking
purposes, to manage P2 Projects, to manage Contractor Claims, and to setup interface
schedules and track interface logs.
1-9
Resident Management System
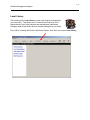
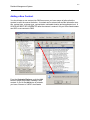
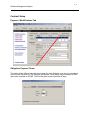
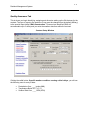
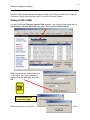
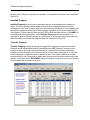
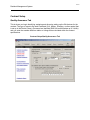
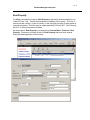
Baseline Schedules
To assist in budgeting and other areas of management, the baseline schedule is used at the
Summary level. It requires that contracts (future and active) have a schedule developed within
RMS. Once contracts have their baseline completed the Administrator can “lock” the schedules
and future placements will be compared to that composite baseline schedule.
You can create a Baseline schedule for any year and can create a schedule for both “Original”
and “Mid Year” timeframes. You are also able to edit a contract and be taken directly to the
point where a schedule can be created and the contract will be added to the list of contracts with
the Baseline Placement entered.
Select the Edit
button to start the
process.
1 - 10
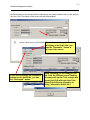
Resident Management System
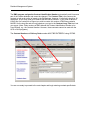
Select Edit, or
double mouseclick on a contract
to provide a
schedule.
Enter the amount of the contract via one of the choices on the popup window.
Click on the Close button to
produce the schedule.
1 - 11
Resident Management System
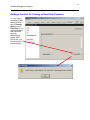
Proceed to the
Placement vs.
Baseline tab to
enter the Baseline
schedule.
Select the Copy
Placement
Baseline button,
then click Yes.
You will receive an advisory
message that the contract will be
added to the Baseline
Placement.
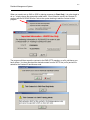
You continue this process until such
time as all contracts / projects have
a schedule and you choose to
LOCK the Baseline. When you
choose to lock the baseline
schedule you should see the
following message:
1 - 12
Resident Management System
You will also be able to see who locked the baseline and on what date it was locked.
1 - 13
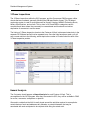
Resident Management System
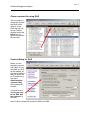
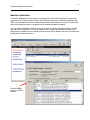
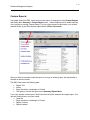
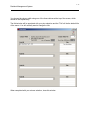
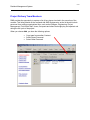
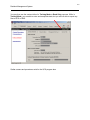
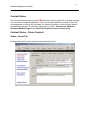
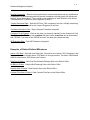
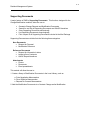
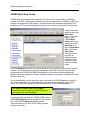
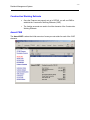
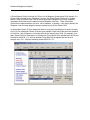
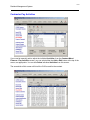
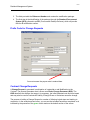
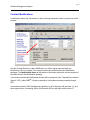
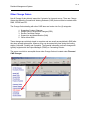
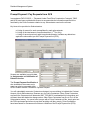
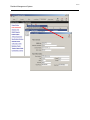
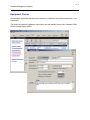
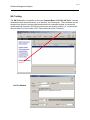
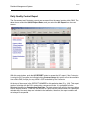
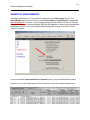
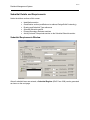
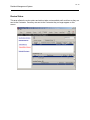
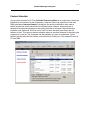
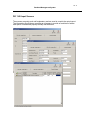
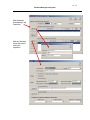
Custom Reports
Using data fields from RMS, users now have the option of creating their own Custom Reports
and adding them Summary / Custom Report menu. Custom Reports can be added manually
or by copying an existing Custom Report. For you to have access to this feature, you must be
granted access by an Office/System Administrator (Office / Personnel).
After you select to manually create the report or to copy an existing report, the report detail is
entered on the next screen.
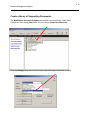
The RMS User enters the following data:
• Report Title
• Author
• Page Orientation: Landscape or Portrait
• The option to include the report on the Summary Report Menu
If you copy another custom report, these items will remain the same as the original report. You
can then modify them to suit your needs.
• Order No.
• Page Orientation: Landscape or Portrait
• Report Columns
• Report Headers
1 - 14
Resident Management System
Columns for the report can be manipulated by using the Add, Edit, or Remove buttons on this
screen.
Column width, Column Title and Data Field are entered here. The Title name defaults from the
data field, but can be changed manually.
Headers may also be added above a group of columns.
1 - 15
Resident Management System
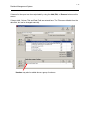
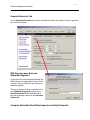
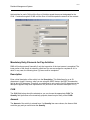
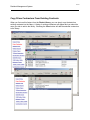
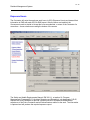
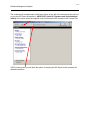
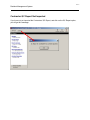
After you Add or Edit the Report Columns the data fields are entered by clicking on the
ellipsis, which opens up the Custom Report Field Lookup.
You should notice that you can have as many as FOUR fields under each column. These are in
addition to a Header, if you need one.
1 - 16
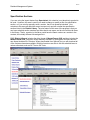
Resident Management System
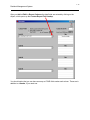
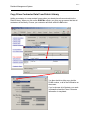
On the Custom Report Field Lookup, the user opens the tree to find the fields to display in the
report. The fields are titled the same as six of the buttons in an RMS Contract Menu.
•
•
•
•
•
•
Administration
Finances
QA/QC
Submittals
Schedules
Closeout
You simply select the lookup you need for your report and choose OK at the bottom of the
window. Let your imagination be your guide as you create reports.
1 - 17
Resident Management System
You choose the column width using one of the three choices at the top of the screen, which
should be self-explanatory.
The field window will be populated with your prior selection and the “Title” will be the default title
of the macro. You will normally want to change the title.
When completed with your column selection, close this window.
1 - 18
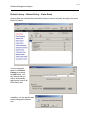
Resident Management System
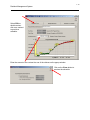
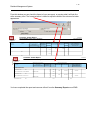
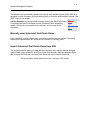
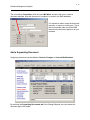
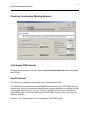
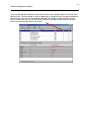
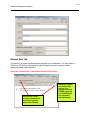
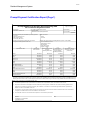
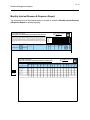
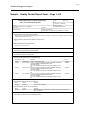
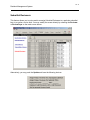
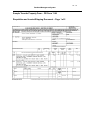
From this window you can check the format of your new report, or preview what it will look like
at the summary level. The format selection is useful to adjust the width of the columns for better
appearance.
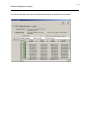
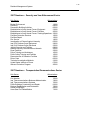
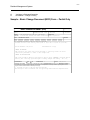
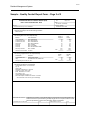
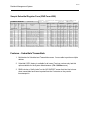
Customer - Status Report
21 Feb 2005
GULF REGION DIVISION
THI QAR RESIDENT OFFICE including Sub-Offices
US Arm y Corps
of Engineers
Financial and Schedule Status
Administrativ e Contracting Of f icer
Contract No.
Contract Title
Contractor
QA Project Engineer Name
Paid Percent
Chief Con-Rep
Reported Percent
Contract Administration Of f ice
Cost Growth
Sum of activ ities Current Contract Value
Scheduled Percent Current CLINS
1,575
ECC
Award CLINS
887
Time Growth
720
BOD - Original Date
BOD - Scheduled Date
Required Completion Date
Primary Delay Code
1,920
616
825
1,075
$0.00
0
$0.00
0
$0.00
0
ECC
ECC
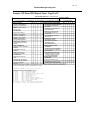
Customer - Status Report
21 Feb 2005
GULF REGION SOUTHERN DISTRICT
THI QAR RESIDENT OFFICE including Sub-Offices
US Arm y Corps
of Engineers
Financial and Schedule Status
Administrativ e Contracting Of f icer
Contract No.
Contract Title
Contractor
QA Project Engineer Name
Paid Percent
Chief Con-Rep
Reported Percent
Contract Administration Of f ice
Award CLINS
Cost Growth
Sum of activ ities Current contract v alue
Scheduled Percent Current CLINS
Time Growth
BOD - Original Date
BOD - Scheduled Date
Required Completion Date
Primary Delay Code
THI QAR RESIDENT OFFICE
FA8903-04-D-8672 0011
0
ECC
73831
0
BE-002 THI-QAR SCHOOL 1801153: QANADEEL
FA8903-04-D-8672 0011
CEGRS-TAO-TQR
0
0
ECC
FA8903-04-D-8672 0011
ECC
CEGRS-TAO-TQR
0
0
0
$73,831.00
0
69101
02/21/2005
$0.00
69101
0
BE-002 THI-QAR SCHOOL 1801176: SAIF ALL
$0.00
73831
73831
$69,101.00
69101
0
41142
02/18/2005
$0.00
41142
$41 142 00
You have completed the report and can now utilize it from the Summary Report area of RMS.
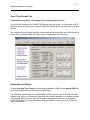
1 - 19
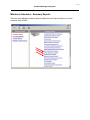
Resident Management System
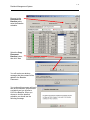
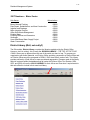
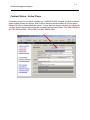
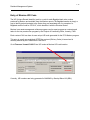
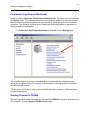
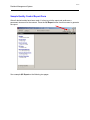
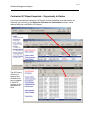
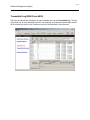
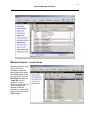
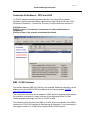
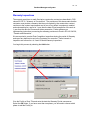
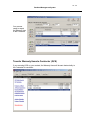
Custom Report – Summary Level
If you have indicated you wish your report to appear on the Summary report menu, it will show
up here, where you can use it in the same manner as all of the other Summary reports.
1 - 20
Resident Management System
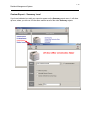
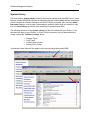
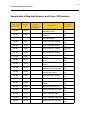
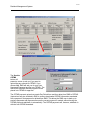
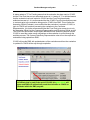
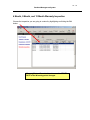
Contract Groups
This optional feature can be used to create any number of groups or selections for Management
reports and tracking. For example, you might create a group that would include all the contracts
for a particular Customer, or Inspector. You might create groups that contain contracts by
funding types, locations, or about anything else you might need.
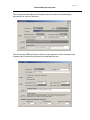
In this first example we will select Manually Select Contracts after hitting the Add button.
1 - 21
Resident Management System
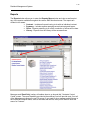
You may also create groups based on a formula you can create as shown below. If you can
picture it in your mind, you can probably create it depending on the data elements you need.
1 - 22
Resident Management System
P2 Projects
Note: P2 Projects is not currently being utilized in IRAQ. If you need guidance on the
use of P2 Projects in RMS, please refer to the standard RMS Manual that is posted on
the RMS Website. The manual will explain the use and implementation of P2 is detail.
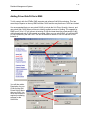
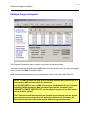
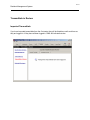
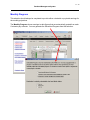
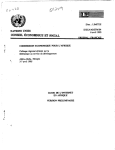
Contractor Claims
This feature allows Management to track and review any claims that may exist in any contract in
the District. You may select to review Open Claims or All Claims and may also choose to view
those claims assigned to an individual (by name), the claims associated with an Office (or Suboffice), and may also limit the claims to a particular contract. At this Summary level ALL claims,
for ALL contracts may be reviewed.
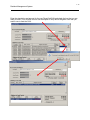
Claims may be added
here in the Summary
Module or at the
individual contract level
(listed under the
Finances selection). In
either case, the data and
screens are identical.
1 - 23
Resident Management System
District Library – District Policy – Claim Dates
Various dates are controlled from the District Library to ensure uniformity throughout the entire
District for claims.
You can add event
dates in the District
Library by selecting
the Add button. You
can indicate that you
wish to automatically
add the new event to all
NEW claims also.
In addition, you can add the date
to all existing open claims as
well.
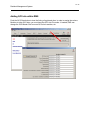
1 - 24
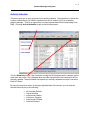
Resident Management System
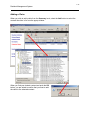
Adding a Claim
When you wish to add a claim from the Summary level, select the Add button to select the
contract the claim is for from the popup window.
When you find your desired contract and push the OK
button, you are asked to confirm that you want to add
the claim to the selected contract.
1 - 25
Resident Management System
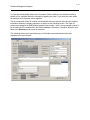
You are then automatically taken to the Contractor Claim selection in the desired contract to
enable you to complete the entry information regarding the claim. If you enter the claim within
the contract level, the same screen appears.
The next sequential Claim ID number is automatically linked to the new claim and the contract
information heading is already populated, as shown on the following screen. The Claim ID
numbers are assigned by RMS without regard to the contract – that is, the sequential number is
for all claims for all contracts within the District database. Otherwise, it would be difficult to sort
them at the Summary level across all contracts.
The following screen is provided with many of the fields completed and should be selfexplanatory for the most part.
1 - 26
Resident Management System
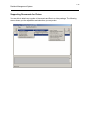
Supporting Documents for Claims
You are able to attach any number of documents and files to a claim package. The following
screen shows you the capabilities and selections you may make.
1 - 27
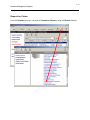
Resident Management System
Reports for Claims
From the Summary area you can view all Contractor Claims by using the Reports function.
1 - 28
Resident Management System
You can then proceed to indicate what precisely you would like to view by using the numerous
range and sort selections presented by the ellipsis’ lookups.
CONTRACTOR CLAIMS
21 Oct 2007
Open Claim s for GULF REGION DIVISION including Sub-Offices
US Arm y Corps
of Engineers
Contract No.:
Project Name:
Contractor:
Customer:
W917BK-06-C-0037 NA
Claim ID:
CLM-0002
SJ-082 Courthouse - New - Bas r Claim Ref. No.:
Al Dayer United Ccmpany
OTHER AGENCIES
Evaluation POC:
KEVIN N. ADDISON
Contracting Officer:
Field Office: BASRAH PALACE RESIDENT OFF
Claim Type: COD Request
Claim Status:
Claim Cause:
Description:
Counsel POC:
Project Manager:
Amount Claimed:
Time Claimed:
Contract No.: 1234567890123456 NA
Project Name: STUDENT TWO
Contractor:
Test Contractor Full Name
Claim ID:
Claim Ref. No.:
Evaluation POC:
CLM-0003
Customer:
Field Office: DIVISION RMS TRAINING OFFICE
Claim Type: REA
Claim Status: In Evaluation
Claim Cause:
Contracting Officer:
Counsel POC:
Project Manager:
Amount Claimed:
Time Claimed:
GEORGE A SCHMIDT
Description:
Received by Government:
Action Complete-File Closed:
>100K COD scheduled:
COD Issued:
750155
30 Days
Received by Government:
Action Complete-File Closed:
CELESTINO C. MERCADO
MICHAEL BENTON
JCCI ACO
350750
90 Days
Spend more than w e bid is not fair and reasonable.
Contract No.: W912ER-04-D-0004 0018
Claim ID:
CLM-0004
Received by Government:
10/01/2007
If you used the Reports function from the Contract level, you would only see the claims for that
single contract.
1 - 29
Resident Management System
Interface Schedules
Using the Interface Schedules, you will indicate how often and when the processes will
transpire, as shown on the following screen. It is suggested that you choose a time that will be
least disruptive to your office functions, such as after normal work hours. In addition, you can
choose to run the update immediately anytime you need to.
Following each download/upload a “log” will be generated to reflect what was accomplished and
will list any problems encountered with the data transfer. The logs are viewed from this same
screen. You probably don’t even need to look at these logs, unless, of course, you have Geek
tendencies in your genes.
1 - 30
Resident Management System
Office Module
The third module, Office, tracks data pertaining to the offices and staff that will interface with
RMS for all contracts. This is where individuals are given access and permissions to work in
various areas of RMS and is where you assign staff members access to particular contracts or
portions of contracts. Thank goodness, most of us need not be concerned with setting up
access, somebody else has probably alread drawn “the short straw” for this chore.
1 - 31
Resident Management System
Local Library
The fourth module, Local Library, contains the libraries maintained by
your local office. This allows you to customize the libraries to fit the
requirements of your local practices and management preferences.
Changes made in this library affect all contracts assigned to your office.
Every office, including the Division and District Offices, have their own unique Local Library.
1 - 32
Resident Management System
User Defined Macros – Required for ALL Contracts in Iraq
There are requirements in Iraq to report certain items on contracts administered under the Gulf
Region Division (CEGRD). From the Local Library, User Defined Macros must be created FOR
EVERY OFFICE and must be used ON EVERY CONTRACT under that office. The required
macros and where they appear in a contract are shown below.
This data
must be
completed for
each contract.
1 - 33
Resident Management System
Definition of Critical Pieces of Information
Due to the limited data field length in RMS and the other reporting systems that it is feeding data
to – unique for Iraq – (i.e., Maximo, Expedition, P3e/c) it is necessary to use the following
abbreviations UTILIZING ALL CAPITAL LETTERS when entering the User Defined Information
shown above.
Sector Name Abbreviations
Sector
Buildings/Health
Electric
Oil
Security and Justice
Transportation/Communications
Water
Abbreviations
BLG
ELE
OIL
SEC
COM
H2O
Division/Brigade AO Abbreviations
(AO = Area of Operations)
Name
1st Cavalry Division
2nd Marine Expeditionary Force
1st Armored Division
3rd Infantry Division
Multi-National Battalion – North
Multi-National Division – Center South
Multi-National Division – South East
Multi-National Division – North East
Multi-National Division – Center
Multi-National Division – Baghdad
Multi-National Forces – West
Abbreviations
1CAV
2MEF
1AD
3ID
MND-N
MNDCS
MNDSE
MNDNE
MNDC
MNDB
MNFW
Executing Agency Abbreviations
Name
Air Force Center for Environmental Excellence
U.S. Agency for International Development
U.S. Army Corps of Engineers
U.S. Navy Seabees
Abbreviations
AFCEE
USAID
USACE
SEA
1 - 34
Resident Management System
Governorate Abbreviations
Governorate
Anbar
Babil
Baghdad
Basrah
Dahuk
Diyala
Erbil
Karbala
Missan
Muthanna
Najaf
Ninewa
Qadissiya
Salah al-Din
Sulaymaniyah
Taamin
Thio-Qar
Wassit
Abbreviations
ANB
BAB
BAG
BAS
DAH
DIY
ERB
KAR
MIS
MUT
NAJ
NIN
QAD
SAL
SUL
TAA
THI
WAS
Funding Source Abbreviations
Source
Accelerated Iraqi Recovery Program
Commander’s Emergency Response Fund
Development Fund for Iraq
Iraqi Relief Recovery Fund
Military Construction, Air Force
Military Construction, Army Reserve
Military Construction, Army
Operation and Maintenance, Air Force
Operation and Maintenance, Army Reserve
Operation and Maintenance, Army
Abbreviations
AIRP
CERP
DFI
IRRF
MCAF
MCAR
MCA
OMAF
OMAR
OMA
1 - 35
Resident Management System
2207 Numbers
These numbers are project codes used to track projects by sub-sector.
2207 Numbers – Buildings/Health Sector
Sub-Sector
Banking System Modernization
Basra Pediatric Facility
Civic Programs
Education
Equipment and Procurement
Expanded Network of Employment Centers
Human Rights
Micro, Small, and Medium Enterprises
Migration and Refugee Assistance
Nationwide Hospital and Clinic Improvements
Property Claims Commission
Training – Business Skills Training
Training – Vocational Training
Abbreviations
08000
91000
06600
06300
92000
01000
09500
03000
04000
90000
05500
02500
02001
2207 Numbers – Electric Sector
Sub-Sector
Automated Monitoring and Control System
Distribution Network Infrastructure
Generation
Security
Transmission
Abbreviations
43000
42000
40000
45000
41000
2207 Numbers – Oil Sector
Sub-Sector
Emergency Supplies of Refined Petroleum
Infrastructure
Abbreviations
51000
50000
1 - 36
Resident Management System
2207 Numbers – Security and Law Enforcement Sector
Sub-Sector
Abbreviations
Border Enforcement
Demining
Democracy Building Activities
Establishment of Iraqi Armed Forces -Equipment
Establishment of Iraqi Armed Forces -Facilities
Establishment of Iraqi Armed Forces -Training/Operations
Facilities Protection Services
Facilities Repair
Fire Service
Investigation of Crimes Against Humanity
Iraqi Civil Defense Corps-Equipment
Iraqi Civil Defense Corps-Personnel
Judicial Security and Facilities
National Security Communications Network
Penal Facilities
Police Training and Assistance
Public Safety Training and Facilities
Reconstruction of Detention Facilities
Rule of Law
Technical Investigative Methods
United States Institute of Peace
Witness Protection Program
11000
09500
06000
21000
20000
22000
12000
13000
14000
05000
24000
23000
09000
25000
32000
10000
15000
33000
06500
31000
07000
30000
2207 Numbers – Transportation/Communications Sector
Sub-Sector
Civil Aviation
Iraq Telecommunications Business Modernization
Iraq Telecommunications Systems
Public Buildings Construction and Repair
Railroad Rehabilitation and Restoration
Roads and Bridges
Umm Qasr Port Rehabilitation
Abbreviations
70000
74000
76000
81000
72000
82000
71000
1 - 37
Resident Management System
2207 Numbers – Water Sector
Sub-Sector
Basra Channel Flushing
Dam Repair, Rehabilitation, and New Construction
Irrigation and Drainage
Major Irrigation Projects
Other Solid Waste Management
Potable Water
Pumping Stations and Generators
Sewerage
Umm Qasr/Basra Water Supply Project
Water Conservation
Abbreviations
69000
67000
65000
66000
63000
60000
64000
62000
68000
61000
District Library (Well, not really!!)
The fifth module, District Library, contains the libraries maintained by the District Office.
However, don’t be misled - this is really the DIVISION LIBRARY – THE TOP OF THE FOOD
CHAIN. We are set up different than the rest of the world over here in Iraq. To compare our
organization with those Stateside, our Division Office would be compared to a District Office and
our District Offices would be compared to REALLY BIG Area Offices, and so forth. This Library
provides uniformity of field offices in areas considered appropriate. Changes made in the library
affect all contracts within the database that fall under the Division Office. Our Districts (GRN,
GRC, and GRS) will use the LOCAL LIBRARY for their offices and ‘flow-down’ requirements to
their sub-offices to include in their own local library.
1 - 38
Resident Management System
System Library
The sixth module, System Library, contains the libraries maintained by the RMS Center. These
libraries include HQUSACE policy-driven selections that will seldom change and are considered
critical enough that uniformity throughout all USACE Offices is required. Also, there are Word
Document samples, such as plans, memorandums, and form letters, that you are able to copy
into your Local Library and modify them as desired in your particular office.
The following selections in the System Library are able to be tailored for your Division. If the
data does not apply to your Division, or if your Division chooses to not use these selections,
simply uncheck the “Include in Lookup” boxes.
•
•
•
•
Program Types
Fund Types
Contract Status Codes
Primary Delay Codes
If unchecked, those items will not appear in the various lookup tables within RMS.
1 - 39
Resident Management System
Reports
The Reports button allows you to enter the Reports Menu window and view as well as print
any of the reports available throughout the various RMS functional areas. The reports are
divided in four areas:
• Contract – Includes all reports having to do with an individual contract.
• Summary – Includes reports spanning several contracts and issues.
• Office - Reports pertaining to an office or selection of offices will be here.
• Library – Reports from the Library will be accessed here.
Managers and “Read Only” parties, will seldom have to go beyond this “Contracts Control
Center” screen. The report capability provided at the summary level will provide most, if not all,
of the Management reports we need. Of course, if you need to micro-manage and drill down to
the individual contractor tasks, such as Activities and the like, then you will need to enter the
area of a “Contract”.
2-1
Resident Management System
Chapter 2 - Office and Staff Setup
What this Chapter presents:
•
Office / Staff Setup
•
Office Module
Six steps to success to use RMS
RMS must be setup to allow each staff member to use it effectively. The Office Administrator
needs to accomplish the following six items:
1. Enter a description (name) for each office
2. Enter each staff member in the office created
3. Set up roles for the office (can be for an individual staff member, by title,
function, etc.)
4. Assign staff members to the roles created
5. Create one or more User Groups for the office and assign the staff to the
Group(s)
6. Assign contracts to the User Group created
2-2
Resident Management System
Office Module
In this option you will define the specifics of your office that will be used across
all your office contracts. You will enter your Office Symbol, your Parent
Office Symbol, Office Type and Office Name. This information is used for
various reports and is the tool RMS uses to position your contract in the
Contract Explorer. Information required for input into this option will be obtained primarily from
office records.
2-3
Resident Management System
Office Description
Most of the items on this screen are self-explanatory.
A
B
A. The Office
C
Symbol is the
official office
symbol for your
office and was
entered when the
office was first
added to the
program. If the symbol is incorrect, or changes, you are now able to change it without deleting
the entire office, as was the case in prior versions. This symbol is assigned by your District or
Center and should be unique for your individual office. Some Districts may refer to the symbol
as the “Routing Symbol”, and others as the “Mailing Symbol”.
B.The Office Code is utilized by some Contracting Offices and is presented on this screen. It
will print directly on the SF30 when entered. If left blank, the SF30 block will also be blank. It is a
ten (10)-character cell. Some offices may refer to this as the SF30 Office Code.
2-4
Resident Management System
C.
The Prefix Code for Change Requests is a two (2)-character prefix code that will be
used to identify the change requests associated with this office. In most cases, your
organization code is used. If this office will not initiate changes as an ACO or CO, the cell may
be left blank. Just because you access RMS, does not necessarily mean you will create change
requests and/or modifications. The change requests and modifications are processed under the
office that is administering the contract, using their own prefix.
Deleting an Office
You may push the Delete button to delete a particular office after you highlight that office.
However, you will not be able to delete an office if a Contract, a Sub-office, or a Person is
assigned to that office. The Office Administrator must first reassign any contracts, offices, or
staff linked to the office to be deleted, or delete them entirely.
There are three conditions that must exist before you can
delete an office: (The DELETE key isn’t accessible either)
1. The Office must not have a User assigned to it.
2. The Office must not have a Contract assigned to it.
3. The Office must not have a subordinate office under it.
2-5
Resident Management System
Office Information - Administrators Tab
This tab reflects all personnel that have access rights and privileges that affect that particular
office. If you desire something be accomplished in areas you have no access, contact one of the
listed people for assistance.
The bullets to the right of each window explain the abilities of the listed members.
What the heck is all this
ACCESS CONTROL about
and why is it so difficult?
RMS access control is really
quite simple when you analyze it. RMS
needs to know three basic things for
access control to be put to use:
WHO WHAT WHERE
1. Who you are (your name and office
affiliation)
2. What you do (what you will have
read/write access to)
3. Where you do it (what contracts you
will have access to)
With this information you can be assigned to one or more groups of individuals that will jointly
administer construction contracts using RMS.
This information can be input by your Office Administrator, who will be assigned by a System
Administrator. The Office Administrator has total control on the access program for the
individual field office and can add or delete other Office Administrators.
2-6
Resident Management System
Office Administration Rights
Varying degrees of access and rights can be assigned to Office Administrators. By default,
when an Office Administrator is selected, full rights are granted. However, you may also limit the
rights if needed or desired.
Full Rights
Screen
Selected Rights
Screen
2-7
Resident Management System
Office Policy
There is a selection in the Office Policy screen that controls editing of the Quality Assurance
Daily Reports (QAR’s).
Each office Chief should decide upon a policy for allowing Quality Assurance Representatives to
edit reports after they are completed. RMS allows the following options:
•
•
•
Only allow editing of the most recent daily report
Only allow editing of daily reports created within the last ___ days.
Always allow editing of daily reports.
This policy does not apply to the Contractor QC Daily Report. Unless the Government (RMS)
specifically returns a QCR for correction, the contractor will not be able to modify his Daily
Report once it is marked complete and exported to the Government.
If something is wrong with a report, and it marked completed, the proper way to make a
correction is to enter a Narrative comment (either in the QA or QC Report) and explain the error
or correction of a previous day. You should not alter a report – especially if you are providing a
‘signature’ and filing it with the contract.
2-8
Resident Management System
Project Delivery Team Members
RMS provides the opportunity to capture a list of key players involved in the execution of the
contract. This listing should not be confused with Staff Assignments, as the list should include
personnel from various organizational lines, such as the Designer, Engineering, Project
Management, Field Office Staff, Users, Occupants and others that might play an important role
during the life-cycle of the project.
When you choose Add, you have the following options:
Copy team from another Contract
Select Distrct Personnel
Select Other Personnel
3- 1
Resident Management System
Chapter 3 Adding, Selecting & Deleting a Contract
What this Chapter presents:
•
•
Selecting a new Contract
•
Adding a new Contract
•
Deleting a Contract
Selecting a New Contract
RMS will automatically place your cursor on the last contract you opened when you return to the
program. If you need to enter a different contract, you will use the Contracts Control Center
that is accessed via the Home option of the main menu as shown below.
You can choose to display
the Project ID number ifyou
wish, by checking the box
as indicated.
3- 2
Resident Management System
Adding a New Contract
You should enter a new contract into RMS as soon as you have reason to believe that the
contract is valid, the sooner the better. A contract can be entered with as little information as a
title, contract type, customer type, contract dates, estimated duration and an estimated cost. A
SCHEDULE MUST BE GENERATED after the contract is entered. Only an Office Administrator
can ADD a new contract to RMS.
From the Contracts Explorer, push the Add
button to begin the process of adding a new
contract. If you hit the Add button by mistake,
you have a chance to “UNDO” the mistake.
3- 3
Resident Management System
The RMS program assigns the Contract Identification Number automatically and it becomes
part of the Oracle database and cannot be changed. The Contract Title is the name on the
contract or task order notice of award or the Bid package. However, it is limited in length to 40
characters, so you may need to be creative with the title to shorten it. If you need to have the
LONG title of a contract for a Report you wish to create, this version of RMS has created a
MACRO for the long title and will copy whatever you type in the Contract Long Title block into
your report. (Note: Older versions of RMS allowed the Contract Identification Number to be
User-Defined, e.g., the Contract Number. However, those contracts cannot be used with the
QCS or QAS programs.)
The Contract Number and Delivery Order number MUST BE ENTERED if using CEFMS.
You are now ready to proceed to the next chapter and begin entering contract specific data.
3- 4
Resident Management System
Adding a Contract for Training or Read Only Purposes
You can export
contracts to QAS
and/or QCS for
use in Training
Mode or to be
Read Only. If you
export a contract
from RMS and
have not
established a
remote QAS
(QCS) site, you
will receive this
brief message:
3- 5
Resident Management System
When you need to set up QAS or QCS for training purposes (or Read Only), it is quite simple to
do so – simply choose the appropriate radial button. You will need to convey the Contract ID
number and the QCS/QAS Access Code to the system desiring to add the contract to their
program.
The program will then export the contract to the RMS SFTP repository or a file, whichever you
have chosen. You then download the desired contract from the SFTP site (or file) and will be
asked for the Contract ID and Access code.
3- 6
Resident Management System
You may then use the contract either for Training Mode or Read Only purposes. While in
Training Mode, you are able to enter and manipulate data, but you are not able to export any
files to QCS or RMS.
Similar screens and procedures exist for the QCS program also.
4-1
Resident Management System
Chapter 4 - Entering Contract Description and
Status
What this Chapter presents:
•
Entering Contract Information
•
Contract Description
•
Providing Contract Dates
•
Contract Status
Entering Contract Description and Status
This chapter may be considered the true “contracts control center” for our work within the
RMS program. RMS segregates specific tasks under this selection as can be seen on the
Contract Menu: Contract Description, Contract Status, Contract Setup, Contract Plans,
Contract Documents, Correspondence, Request for Information, User Defined Entries,
Prime Contractor, Subcontractors, and Completion Status.
4-2
Resident Management System
Contract Description Tab
This screen needs to be complete and accurate, as the information shown controls many
different RMS reports. Each block should be populated.
NOTE: The “Contract Long Title” block is provided to populate a
built-in MACRO within RMS to allow you to use it in custom reports
when needed. The macro appears as {contract_long_title}.
4-3
Resident Management System
P2 Projects Tab
Note: P2 Projects is not currently being utilized in IRAQ. If you need guidance on the
use of P2 Projects in RMS, please refer to the standard RMS Manual that is posted on
the RMS Website. The manual will explain the use and implementation of P2 is detail.
Contract Information Tab
This screen is essential to complete, as this will separate your contracts into the proper
programs for your placement reports and any Contract Groups you might create..
4-4
Resident Management System
Contract Status
The Contract Status selection contains THE information used to update P2 for upward reporting
of our contracts to Higher Headquarters. The Contract Status selection provides an easy way
for management to keep up with the status of a contract; therefore it is critical that the data be
consistent and accurate. This selection includes four (4) Tabs: Status/Issues; Milestone
Schedule; Monthly Progress and Cost/Time Growth (for active contracts only).
Contract Status – Future Contract
Status / Issues Tab
All information on this screen should remain current at all times.
4-5
Resident Management System
Contract Status – Active Phase
Fortunately, most of our contracts will entail only a SINGLE PHASE. However, on those occasions
where multiple phases are required, RMS is able to handle unlimited numbers of Projects and/or
Phases (P2 refers to these phases as “bands”). If more than one phase is required, you will see the
“Contract Phase” selection and will be able to update Status on each Phase. THIS FEATURE WILL
NOT BE SEEN IN IRAQ – BECAUSE P2 IS NOT BEING USED.
4-6
Resident Management System
Status Photo Tab
•
•
•
•
This tab has been added to permit a photo depicting the contract to be filed
within RMS. The photo can be updated as progress is made.
You are cautioned to limit the size of the photo to around 150KB or less.
To update the photo, use the Update Photo button and then use the Delete
button on the following screen to delete your current picture, then you can
use the Select button to update/change your photo. Only one photo at a time
can be used.
4-7
Resident Management System
Milestones Schedule Tab
It is essential that you have the following critical information populated:
•
•
•
Original Contract Duration (days)
Contract Award (Scheduled date)
NTP Acknowledged (Scheduled date)
If you have not input that
information, you will not be
able to prepare the monthly
progress of work or
anticipated placement of
work and will not be able to
complete your Milestones Schedule.
In reality, all Mandatory Milestones should be entered into RMS. The System Mandatory
Milestones (HQ required) will be upward reported to the P2 Portal and will be used for
Consolidated Command Guidance in Command Management Reviews.
The dates represented on this tab may reflect only those MANDATORY dates (milestones) that
RMS requires for management, tracking and reporting. If the District has entered required
milestones, they will also appear as MANDATORY items. You may add other (optional)
milestone dates in the Local Library and use them for all or selected contracts. You can also
add milestones at the contract level that will only be reflected for that contract. Some Offices
4-8
Resident Management System
elect to enter the Key Milestones from the Contractor’s scheduling program. You should enter
the Scheduled dates as soon as they become known. As the event takes place, enter the
Actual date (“Hey, Roscoe!” – Do not enter “FUTURE” ACTUAL dates ☺).
Definitions of Milestone Dates for the RMS System
The following definitions are provided for the RMS System required Milestones:
Contract Award – Date the Contract Award Letter is signed by the Contracting Officer
NTP Acknowledged – Date the NTP for the contract is signed by the Contractor (RMS and P2
use only ONE NTP for a contract, even when the contract is a Design-Build contract.
Construction Start Date – Date actual construction commenced onsite. This will begin the
numbering system for the Daily QA and QC Reports. The start date will be Report #1 and they
will be sequentially numbered after that and will include non-workdays and weekends.
Contract Required Completion – (calculated) Uses the NTP Acknowledged date plus the original
duration plus time added for options awarded after award to compute the Original Required
Completion Date. The NTP Acknowledged date plus the current duration, including all
modifications, is used to compute the Scheduled (Current) Required Completion Date. The
Original Required Completion date will also be retained.
Construction Completion – This is synonymous with the term Substantial Completion, and is
defined contractually as the date upon which, in the opinion of the Contracting Officer, the work
is completed to the point at which it can be used for its intended purpose (i.e. LD’s would no
longer apply). Warranty starts the next day.
Beneficial Occupancy Date – Date agreed to by the Corps of Engineers and the customer as to
when the facility was to be ready (original BOD), will be ready (scheduled BOD) and is
ultimately ready (actual BOD) for useful occupancy pursuant to the requirements of the
contract. For Air Force projects, actual BOD is the date the facility is taken for beneficial use
and possession by the Air Force, and is the same date as Construction Completion, or
Substantial Completion. For Army projects, actual BOD is the date the Government derives
some beneficial use of the facility/work. If it’s “ready for occupancy” but the Government doesn’t
occupy (read: derive a beneficial use), then a BOD hasn’t occurred – a substantial completion
has occurred. The BOD depends on the Government using a facility, with limited regard to
degree of completion. This may be beyond the contractor’s control. Substantial Completion is
something the contractor achieves.
Original BOD - This is the date mutually established by the PDT -- customer, user,
Area/Resident, and Project Management as to when the work will be transferred and accepted
by the customer. This date should be established within 30 cal days after contract award and
remains fixed for the life of the contract.
Scheduled BOD – When it is expected or scheduled to occur.
Actual BOD – When it actually occurs.
4-9
Resident Management System
Physical Completion – Date all work required by the contract documents and any modifications
is completed. All deficiencies/punch list items are completed, including punch-list deficiencies,
training, and all deliverables. (This is similar to the completion of work definition in the clause
“Commencement, Prosecution, and Completion of Work”).
Transfer Document Date – Date the DD Form 1354 is signed by the User, officially transferring
the facility or work performed by the Corps of Engineers to the User.
Contractor Evaluation Date – Date Contractor Evaluation completed
Contractor Final Payment – Date on the check (or electronic transfer) for the Contractor’s Final
Pay Estimate. The RMS User can schedule this date, but the actual date will be downloaded
from CEFMS. If you have a Non-CEFMS contract, the dates are entered manually.
AE Evaluation Date – Date AE Evaluation Completed
Examples of District Defined Milestones
Interim 1354 Date – Date the User Signs (last, if more than one) Interim 1354. Remember, that
it is possible to have multiple Interim 1354 date’s on a single contract. The date in RMS should
reflect the last Interim 1354 Date on the Contract.
Final Pay to District – Date Final Pay Estimate Package Sent to the District Office
As-Builts to District - Date As-Built Drawings Sent to the District Office
Payrolls Sent to District - Date Payrolls Sent to the District Office
Contract Files Sent to District - Date Contract Files Sent to the District Office
4 - 10
Resident Management System
Monthly Progress Tab
Once the NTP Acknowledged date (Scheduled) has been provided, you may proceed to the
Monthly Progress tab and generate your monthly scheduled progress by copying the
actual/projected % placement, choose from a selection of automated S curves, or choose to use
the Contractor’s activity scheduled start and finish dates. Quite a variety of Schedule options
have been added to this latest version of RMS, as you can explore by using the selections at
the bottom of the screen. You do this from selecting the Generate Scheduled Progress button.
This information MUST BE
COMPLETED for placement
projection reports and is
uploaded to HQUSACE via the
P2 module. The initial schedule
is typically based on a Sin²
curve. If you are importing the
contractor’s NAS (via the SDEF),
you should use the selection
Contractor’s activity
scheduled start and finish
dates for more accurate reporting.
4 - 11
Resident Management System
Cost / Time Growth Tab
(Information screen only – no changes can be made from this screen.)
You should first complete your AWARD CWE before using this screen. You must have an NTP
Date (scheduled or actual) and a contract DURATION entered before you will be able to access
this tab.
The information on this screen depicts a succinct snapshot of the contract, as it was originally at
Award, how it currently stands and, finally, what it is estimated to be in the future.
Explanation of Options
Contract Cost and Time Growth is computed and updated by RMS from the Award CWE and
all contract changes and/or modifications issued to-date.
The ORIGINAL contract amount is the AWARDED contract amount, plus OPTIONS exercised
at award time. When you exercise an option that was originally identified it is considered as part
of the original contract amount and time. Therefore, options exercised do not count against
COST/TIME growth. As options are exercised the ORIGINAL contract amount will include the
option as exercised.
5-1
Resident Management System
Chapter 5 - Contract Setup and Planning Data
What this Chapter presents:
Entering Contract Setup and Planning Data For:
•
Administration
•
Funding
•
Payment
•
Modifications
•
Quality Assurance
•
Submittals
•
Schedules
5-2
Resident Management System
Contract Setup and Planning Data
This chapter will address the HOW and WHO of certain aspects of our contract. That is, HOW
we want to do things and WHO will do them. The entries discussed in this module are typically
referred to as “Planning Activities”.
Contract Setup
Administration / Funding Tab
Continuing Funds
The Continuing Funds box should be checked if it applies to your contract. This will cause RMS
to recognize that your contract is not fully funded and will keep track of contingency, including
negative contingency.
5-3
Resident Management System
Funding: Track CWE -- Options
RMS will accommodate three basic methods to enter and track funding for the contract.
Option 1
“Track CWE for each Funding Account, pre-plan Obligations for payment on all CLINS”
This option allows you to pre-plan how you are going to pay for the Contract Award, Changes,
and Modifications. This option gives you complete control of how the contract funds will be
used. The option requires you to maintain a CWE for each Funding Account and requires you to
predetermine obligation amounts for each Contract Line Item.
While this option gives you the most control, it also requires the most input.
Option 2
NOTE: THIS IS THE OPTION RECOMMENDED TO BE USED FOR IRAQ.
“Track CWE at Project Level, compute Obligation amounts for payment based on available
funds”
This options does not require you to identify expenditures at the Funding Account level. It
requires you to maintain only one CWE at the Contract level. Funding for pending changes or
modifications does not require pre-planning. Contract payments are based on the available
Obligations when the payment is made. Monthly payments will be based on the predetermined
allocation split. Any payments made will not exceed the available funding.
This is the easiest of the options and is also recommended if the total source of contract
funding is not known at award.
Option 3
“Track CWE at Project Level, manually enter Obligation amounts for payment”
This option is basically the same as Option 2, except you decide how much should be allocated
out of each Obligation when payment is made.
5-4
Resident Management System
Contract Setup
Payment / Modifications Tab
Obligation Payment Terms
This option allows different payment terms (days) for each Obligation Line Item for compliance
to the Prompt Payment Act. The Payment and Refund Terms (days) may be changed in RMS
and will be uploaded to CEFMS. The Final Payment terms are always 30 days.
5-5
Resident Management System
CEFMS Set Up for ENG 93 Payments
You need to enure that CEFMS has been set up to make Progress Payments (ENG 93). Now
would be a real good time to take a look at the CEFMS screens to verify proper indication.
This is the Progress
Payment Indicator box
and it must be set at
“Y” (Yes).
5-6
Resident Management System
Quality Assurance Tab
This is where you begin identifying, assigning and otherwise setting up the QA features for the
contract. The type of report to be used here in Iraq must be changed from the default (Military)
to the special report labled “IRAQ Construction”. Personnel are identified (RMS will
accommodate up to 3 shifts) and you enter the weather data from within the contract.
Contract Setup Window
Clicking the radial button: Specific weather conditions causing critical delays, you will see
the following rows for entry of data:
•
•
•
Precipitation Over ____ Inches (MM)
Temperature Below 32° F (0° C)
Surface Wind Over ____ MPH (KPH)
5-7
Resident Management System
Submittal/Schedule Tab
On the Submittals/Schedule tab, default submittal information is provided in order to generate
the Submittal Register.
Will there be more than one
Submittal Register?
On the left side of the Submittal/Schedule tab,
RMS defaults to a single Main Register. Each
contract can be provided with any number of
submittal registers.
The pop-up screen must be completed with a
new Submittal Register ID number and a
Submittal Register Title. RMS defaults to
the next sequential number for the Submittal
Register ID.
Compute Submittal Need Dates based on Activity Schedule
5-8
Resident Management System
This selection will automatically populate the fields in the Submittal Register (ENG 4288) with
the dates from the Contractor activity schedule (NAS) or from the dates manually entered if the
SDEF import is not utilized.
Activity Schedule provides for either manually entering the Start/Finish Dates
or Importing the Start/Finish Dates from the Contractor’s NAS scheduling
system. Choose the one specified by the contract, or being used by the
Contractor.
Manually enter Scheduled Start/Finish Dates
If the Contractor is using a Gantt chart, manual entry of dates may be required. The Actual
Dates will be imported from the Contractor QCS module, if it is being used.
Import Scheduled Start/Finish Dates from NAS
The easiest method to keep up-to-date with the Contractor is by use of a Network Analysis
System (NAS) (often referred to as a CPM, Critical Path Method). RMS will automatically be
able to import the Early and Late Start/Finish Dates that can be used to update P2.
The Actual Dates will be imported from the Contractor QCS module.
6-1
Resident Management System
Chapter 6 - Correspondence
What this Chapter presents:
•
Overview
•
Adding Correspondence in RMS
•
Generating Form Letters
•
Copying a Document from another
Library
•
Request for Information (RFI) Procedure
•
Contract Documents
•
Supporting Documents
Overview
he correspondence option allows you to maintain a log of all documents sent or received on
T
a contract. It has links to other menu choices so you can check pertinent correspondence at
several points. For example, when you choose a particular modification, a subsequent menu
choice allows you to view all correspondence on that modification.
This option also gives you access to word processing and assists you in generating form letters
from a variety of templates. Both an RFI module and a Correspondence module is available to
exchange information with the Contractor electronically regarding RFI and/or Correspondence
subjects. All correspondence can be linked to Contractor Claims and/or Contract
Changes/Modifications as Supporting Documents. In order to utilize the RFI and
Correspondence modules in QCS, the appropriate boxes in Contract Setup must be checked.
6-2
Resident Management System
Adding Correspondence in RMS
Correspondence is accessed from the Contract Menu / Administration / Correspondence
menu, as shown. The screen is the primary correspondence window on which you can observe
all letters at a glance. As you place the cursor on a letter, the letter number and brief description
will appear at the bottom of the window.
Correspondence is separated into “status” categories. Those that are SENT or RECEIVED
are on the second and third tabs, respectively. Those letters that have been prepared and
are awaiting completion and/or approval are shown on the first tab (Prepare Letter).
Government In-House Memos are on the forth tab.
When adding a piece of correspondence, a drop-down menu presents a listing of the
categories of all letters maintained within the program. This is the listing you will see when you
are NOT using the QCS module for Correspondence or have chosen to have the Government
enter the Contractor correspondence. The items marked with “ -- ** “ will not appear if you have
indicated that the Contractor will enter the Correspondence in Contract Setup.
•
•
•
•
•
Letter to Contractor
Request for Proposal to Contractor
Letter to Other Agency
Letter from Contractor Home Office -- **
Letter from Contractor Site Office -- **
6-3
Resident Management System
•
•
Letter from Other Agency
Government In-House Memo
The prefixes that RMS utilizes are recorded in the Library for all Agencies and other Customers.
RMS requires certain predefined prefixes and these cannot be changed. These are used to sort
letters on several of the Correspondence reports. The required predefined prefixes are as
follows:
C
RFP
MEM
H
S
RFI
=
=
=
=
=
=
Letter to Contractor from the Government
Request for Proposal letter to the Contractor from the Government
In-house Memorandum for the Government
Letter to the Government from the Contractor Home Office
Letter to the Government from the Contractor Site Office
Request For Information from the Contractor to the Government
Generating Form Letters
Form letters and templates are compiled using MSWord © and make use of the many macros
embedded in RMS (some are provided by the RMS program and others can be created by the
RMS User). There are lots of samples included with the program for your use. It is suggested
that you use the samples as a pattern and let them remain in your system. It is easy to COPY a
letter to another file and modify it to meet your needs. (That way, you can always start over with
one that functions.) You are encouraged to add all the form letters that you use to help speed up
your processes and provide consistency in your office environment. It may help you to get
started by printing out the RMS macros from the report Explorer, as follows.
Select the Library button
on the Report Explorer
window to access the
report for Word Macros.
Select Word Marcos and Preview the report.
It will give you about a five page listing of the
available RMS Word Macros.
6-4
Resident Management System
Copying a Document from another Library
You can easily copy documents from other offices or the System Library into your Local Library
so they will be available for all your contracts. Select Local Library / Word Documents and
then the Add button, as shown below. Choose the selection “Copy Document for other
Library” option.
Use the drop-down menu to select the office, followed by the Document Type you would like to
import. As you select the Document Type, all the available documents will then be reflected in
the middle window. You can select a particular document from the middle window, then click on
it in the extreme right window to get a full screen view. If no documents appear, it is a sign that
you (or someone else) has alread copied the documents from that library.
Check each document, in each Document Type, you wish to import, when you are completed
select CLOSE and they will be imported.
6-5
Resident Management System
RFI’s (Request for Information)
The Request for Information (RFI) module in QCS and RMS allows the contractor to request
clarification of contract information, or to pose questions regarding the contract through the
RMS/QCS interface. The RFI is transmitted between RMS and QCS using the import/export
function.
Prepare RFI (QCS)
The contractor prepares the RFI in QCS. When the Contractor checks that it is completed, the
RFI is then submitted to the Government and includes the following key items:
•
•
•
•
•
Information requested
Date response Required
Contractor’s Recommendation
Will the Contractor’s Recommendation increase cost or time of the contract?
Attachments from Contractor such as contract drawings, documents, or photos
6-6
Resident Management System
RFI Requiring Response (QCS)
The RFI Requiring Response can be found in the Contract Administration Section, under
Request for Information. The RFI module must be turned on in Contract Setup by checking the
box that asks Do you want to answer RFI’s with two-way RFI form? These screens show all
RFI’s that have been received by the Government for this contract.
Government Response to RFI (RMS)
The Government Response to the Contractor is entered on this screen. Required entries are:
•
•
•
•
Response Dates (received and answered dates)
Government Response to Contractor
Answer Completed check box
Approved – Ready to send to Contractor check box
Optional entries in the Government Response are:
•
•
Secondary Respondents
Attachments from the Government
6-7
Resident Management System
When the Government Response is marked as Answer Completed, it is ready for approval. All
entries become read-only and cannot be changed unless the completed box is unchecked.
The Approved box is checked when the Government is ready to export the Government
Response to the Contractor. Once the RFI is exported to the Contractor it can no longer be
edited (you can no longer ‘uncheck’ the Answer Completed or Approved boxes).
6-8
Resident Management System
Screen after the RFI has been exported to QCS (RMS)
RFI Notification in RMS and QCS
Both RMS and QCS will advise the Government or the Contractor of any new or answered RFI’s
following the export/import process.
6-9
Resident Management System
QCS Correspondence Module
This module will allow the Contractor and Government to exchange correspondence letters
within QCS and RMS. In addition, they are able to include file attachments to the letters. The
letters that will be able to be sent will include contractor Home (H-###) and Site (S-####)
letters. Basically, the contractor will be able to designate a remote QCS to be either Site or
Home using the current check out scheme. The Government will accept the ’first’ answer to a
particular letter from either the Home or Site office and will ignore subsequent answers. Also,
the Government will be able to generate both RFP- and C- letters to send to the Contractor.
The Government (RMS) generated letters are able to be answered by either the QCS Home or
the QCS Site office.
The new feature operates very similar to the existing RFI modules. The choice to use the new
feature must be indicated in Contract Setup, the same as the RFI feature is presented. Once
the Contractor is designated to enter the Correspondence, the RMS User will not be able to
perform manual entry to the received correspondence.
6 - 10
Resident Management System
Contract Documents
This module will allow the RMS User to add various types of contract documents to a particular
contract to be shared with other stakeholders of the contract. These may include:
•
•
•
•
•
•
•
Word documents
Text files
JPG files
BMP files
XLS files
PDF files
And many others
When you “Add” a Contract Document, you will be presented with a screen on which to
SELECT the attachments to add to the RMS database for your contract. Once you Add a
document, you will be able to view it from this screen without having to drill down further into the
screens.
You should use caution with this feature by limiting the size of the files (pictures) you include.
This may later cause a problem with server sizing and the time it takes for downloading and
uploading contracts.
6 - 11
Resident Management System
Supporting Documents
A major feature of RMS is Supporting Documents. This function, designed for the
Change/Modification modules, allow the user to:
•
•
•
•
•
Generate Change Request and Modification Documents
Search for and link all Supporting Documents and QA/QC Narratives
Store Supporting Documents electronically
List Supporting Documents chronologically
Print a report of all Supporting Documents included in the Mod Package
Supporting Documents are divided into the following three categories:
New Documents
• Request for Proposal
• Modification Document
Reference Documents
• Request for Information Letters
• Letters to/from Contractor
• QA/QC Report Narratives
Attachments
• Photos
• Documents
• Excel spreadsheets
This module will allow the user to:
1. Create a library of Modification Documents in the Local Library, such as:
a. Price Negotiation Memorandum
b. Price Objective Memorandum
c. Request for Consent Memorandum
2. Add the Modification Documents to a Contract Change and/or Modification
6 - 12
Resident Management System
Create a library of Supporting Documents
The Modification Document templates are created in the local library, under Word
Documents. After clicking Add button, the user selects Create New Document.
From the Category drop down menu the user selects the type of document to create.
6 - 13
Resident Management System
The user selects Create New, which will open MS Word, and allow the user to create a
document template. After the document is complete it is saved in the RMS database.
You would then either create the document
manually, or import an existing one. This is
where you should make use of the RMS
macros so the document applies to all your
contracts.
Add a Supporting Document
Supporting documents can be added to Contract Changes or Contract Modifications
By selecting the Supporting Documents tab of the Change Request, the user selects the
document type to be added.
6 - 14
Resident Management System
After choosing the
document type the
user selects
Generate
Document on this
screen.
The document
template is
selected from this
screen to add a
new supporting
document.
The user selects Create
Document, which will open
MS Word, and allow the user
to create a document. After the
document is complete it is
saved in the RMS database.
7-1
Resident Management System
Chapter 7 - CEFMS, Finances and the CWE
What this Chapter presents:
•
Overview
•
CEFMS
•
Construction Working Estimate (CWE)
•
Contract Line Items (CLINS)
Overview
The chapter addresses the major elements of contract finances.
CEFMS, Finances and the CWE
Contract Finances are centrally located under the area of Contract
Menu/Finances and consist of the following major elements:
CEFMS Finances
Recompute Finances
Award CWE
Award CLINS
Current CLINS
Pay Activities
Progress Payments
Contractor Claims
Contract Changes
Contract Modifications
CWE Changes
Contingency
Current CWE
Current Contract
7-2
Resident Management System
If the contract has been awarded and you have completed the Contract Description
information, covered in Chapter 4, you are ready to download CEFMS Finances data into RMS
and setup the finances for the contract.
CEFMS Finances
7-3
Resident Management System
CEFMS Work Item Codes
CEFMS Work Items can be either created in P2, which, in turn, creates them in CEFMS or
Created in CEFMS. In either case, the Work Items are downloaded from CEFMS into RMS and
linked to the appropriate CWE element. These Work Items are transmitted periodically to P2
refreshing the P2 Current Working Estimate view on the Contract, Project and Funding levels.
Initially, this screen
would not have any
Work Items
listed…it would be
blank. Unique
CEFMS Work
Items identify each
contract and each
Work Item is, or
has, a Parent Work
Item. From these
Work Items,
funding accounts
are setup for
making progress
payments to the
contractor and for
tracking available
funds.
A CEFMS Work Item must be setup for each kind of money (funding source) used to fund the
contract. Your Project Manager typically accomplishes this in P2. The Work Items are then
downloaded from CEFMS into RMS following award of the contract, and then periodically
whenever finances change on a contract (payments made to a contractor, modifications issued,
PR&C’s issued, etc.).
Prior to downloading, use the drop-down menu and select the CEFMS database you wish to
use. (If the need arises, you can download any contract from any database at your CEAP
center. Your ORACLE tnsnames.ora file will need to include the selected database.)
Push Import Financial Data from CEFMS to
download the financial data from CEFMS after you
have selected the correct database.
In getting the financial data from CEFMS, RMS will go to
the Funding Registers and download the “appropriation
data”, and to the Funding Accounts to get the
“authorized amount” for each of the funding accounts
used on the contract.
7-4
Resident Management System
When you begin the download from
CEFMS, you will need to enter your
User Name and Password as assigned
by your District.
User name -- Use your CEFMS ID
Password -- Use your ORACLE
Password.
You will not be granted access for downloading
CEFMS unless you already have a User Name and
Password assigned to you by your District IM.
You must also have that privilege designated in
the RMS Access control module.
RMS will then automatically login to CEFMS and complete the download of financial data and
the following screen will appear.
Once the download is completed, you will be able to view the Appropriations on the top half of
the screen and review particulars of the individual Appropriations on the bottom part of the
screen as you scroll down through them. Of special note, is the ability to see what funds are
truly available. The following diagrams will help explain how RMS actually gets the funding data
from CEFMS.
7-5
Resident Management System
Construction Working Estimate
•
Once the Finances are properly set up in CEFMS, you will use RMS to
establish the Construction Working Estimate (CWE).
•
The funding accounts are used to fund the elements of the Construction
Working Estimate.
Award CWE
The Award CWE is where the initial amounts of money are set-aside for each of the CWE
elements.
7-6
Resident Management System
Funds for Construction Working Estimate
Total Award CWE Amount
This amount will typically be the same as the Current Authorized Amount that is downloaded
from CEFMS.
Award Contract
This amount as is indicated on the Award Letter or Delivery/Task Order.
The ORIGINAL contract amount is the AWARDED contract amount, plus OPTIONS exercised
at award time. When you exercise an option that was originally identified it is considered as part
of the original contract amount and time. Therefore, options exercised do not count against
COST/TIME growth. As options are exercised the ORIGINAL contract amount will include the
option as exercised.
Therefore, OPTIONS exercised do not count against COST/TIME growth.
7-7
Resident Management System
Do not add any Modifications that may have been issued prior to
completing this screen.
The Modifications will be automatically added to the CWE as they are
issued. This screen will serve as a baseline to track changes made from
the initial Award amount.
.
Other Supporting Contract
Enter any applicable amounts for the Other Supporting Contract. Examples of this element of
the CWE could be equipment purchased by the Government to be installed by the Contractor or
the User; A-E Design services after award, etc.
Design During Construction
These costs were previously referred to as Engineering During Construction (EDC), and are
now called Design During Construction.
Gov’t Review Contractor Design
This is for Design-Build Contracts where the Government must review the Contractors’ design
for conformance to criteria furnished by the Customer, review for Code compliance, etc.
Contingency
The Contingency block cannot be changed from this screen. The amount reflected here is
what is left over after funding has been provided for all the other CWE elements. The amount
will automatically adjust as Obligations in CEFMS are completed against the funding account.
The Modifications issued the Construction contractor will not be the only items causing this to
change. Other entities may be draining money away and you can only confirm this by refreshing
the CEFMS download data prior to making any commitments or final negotiations.
S&A
The amount of S&A may vary on the type of funding and can be a fixed percentage or actual
dollar amount. Your Project Manager is responsible for computing and verifying this amount.
Other w/o S&A
This represents project funds that are not subject to District S&A, such as PM costs.
7-8
Resident Management System
Total Award CWE
This is computed automatically as each of the CWE elements are entered.
Funds for Management Reserve
Once the block for Funds for Management Reserve is checked, all the CWE Element fields
disappear. This money cannot be used for CWE amounts for the same funding source as the
other CWE elements. When the funds are ready to be used, they are deducted from the
Management Reserve funding account and added into the Contingency of the other fund cite.
This is used when a Customer desires to approve all expenditures funded from a separate
Funding Account, or you can use it to set up a separate NONCEFMS Contingency amount to
keep a closer look on contingency – the amount of the contingency, if used this way, will need to
be manually reduced with each Modification issued.
Award Contract Line Items
From the Contract Menu, select Finances / Award CLINS. These are currently referred to as
CLINS and were formerly called Bid Items in many Districts and field offices.
At this point, a short discussion of CLINS would be useful to define what we really mean when
dealing with the finances in RMS.
7-9
Resident Management System
A Priced Parent CLIN will include Unit Price, Unit of Measure, Quantity and CLIN Amount. If a
Priced CLIN is funded by one Obligation Line Item, the Priced Parent CLIN may be funded
directly. When a Priced Parent CLIN is funded by multiple Obligation Line Items, separate
Information SubCLINs must be added for each Obligation Line Item. These Information
SubCLINs are entered without unit price, unit of measure, or quantity – they simply identify the
Obligation Line Item and obligation amount required to pay for the Parent CLIN.
An Information Parent CLIN is used when there is a need to have different unit prices for parts
of a CLIN. An Information Parent CLIN can have multiple Priced SubCLINs when the elements
of Unit Price, Unit of Measure, or Quantity differ for the same Parent CLIN. For example, if we
had a Parent CLIN for Excavation, we could use a Priced SubCLIN to indicate the first 100 tons
of material at $40.00 / CY, and use another Priced SubCLIN to indicate the next level of
tonnage, say, 100 – 500 tons would be priced at $35.00 / CY.
7 - 10
Resident Management System
After all CLINS are balanced, the next step in setting up the finances in RMS are to enter the
Contractor’s Construction Activities, which is covered in the next Chapter.
Adding CLINS in RMS
You add CLINS from Finances / Award CLINs selection. Your options will be to add either a
Priced CLIN or a Priced SubCLIN for payment. We will add the Priced CLIN first.
RMS will automatically default to the next
CLIN number, but it can be changed if
desired. Enter the Unit Type, and select
OK.
CLINS must be four
(4) numeric digits.
Enter the description for the Price
CLIN,
7 - 11
Resident Management System
the Award Amount, and check the box to indicate you are ready to decide how you are going to
fund the CLIN. The bottom of the screen will then be populated.
If you desire to change the order
of display of the SubCLINs, you
use the “Renumber” button at
the top of the screen.
If you need to change the Obligation
amount on the SubCLINs, you use
the “Reobligate” button.
Upon indicating you are ready to fund
the CLIN, the Obligations and Funding
Accounts will appear. This example has
funded the CLIN with both SubCLINs
(these SubCLINs are referred to as
being “Information SubCLINs”).
7 - 12
Resident Management System
Entry of Maximo URI Code
The URI (Unique Record Identifier) code is a code for each Baghdad task order number
produced by Maximo and available from the Maximo reports.The Baghdad number is simply a
way to identify project/contracts to the Sector they are associated with. An example of a
Baghdad number could be “ED-016”, which identifies it with the Electrical Sector.
Maximo is an asset-management software program used to report progress on contracts and
tasks for the Iraq construction program by the Projects & Contracting Office, formerly, PMO.
Each contract CLIN can have its own unique URI code generated for the PCO Maximo program.
This entry is usually accomplished AFTER the contract (Delivery Order) is issued and is
normally entered by the Construction Field Office.
Go to Finances / Award CLINS. Enter URI codes at Maximo URI code location.
Currently, URI numbers are being generated in MAXIMO by Stanley-Baker-Hill (SBH).
7 - 13
Resident Management System
Sample table of Baghdad Numbers and Project URI numbers
Contract
Number Delivery Order
Number
Task Order
Baghdad No.
Project
URI
BE-001
10347
BE-001
11406
BE-001
11415
BE-001
11407
School # 201093, Maa'qal
BE-001
10426
School # 200048, Qurna
BE-001
10383
School # 200197, Futowa
BE-001
10395
School # 200910, Nashwa
BE-001
10398
BE-001
10381
BE-001
10424
BE-001
10399
BE-001
10348
School # 200099, A'esha
Omm AL-Mu'meneen
BE-001
11401
School # 200982, Wasit
BE-001
10415
School # 200396, Thowar
BE-001
10397
School # 200097, ALQublah
BE-001
11404
School # 201042, Areej
BE-001
11405
School # 201044, Al Fursan
BE-001
10351
School # 200054, Abtal
BE-001
10389
School # 200980, Farazdaq
BE-001
10370
School # 201102, Ma'moon
Project Title
School # 201321, AlMunadel AL-Arabi
School # 201088, Alandalous
School # 201348, AlHaretha Industrial
School # 200447, Al-Zuhour
School
School # 200818, Ibn AlMu'taz
School # 200969, Al-Nusour
School
School # 200878, ALShaheed Ala' Issa Al-Ansari
Project
Baghdad No.
FAATD001105
FAATD001089
FAATD001110
FAATD001090
FAATD001007
FAATD001016
FAATD001067
FAATD001028
FAATD001054
FAATD001073
FAATD001065
FAATD001010
FAATD001076
FAATD001027
FAATD001009
FAATD001084
FAATD001085
FAATD001008
FAATD001074
FAATD001092
7 - 14
Resident Management System
Adding Priced SubCLINs in RMS
To fully comply with the DFARs, RMS supports and enforces SubCLIN numbering. This has
some major impacts on the way RMS handles CLINS and the way that those CLINS are funded.
It is recommended that you use priced CLINS to include the Unit Price, Quantity, Amount, and
use priced Sub-CLINS when you have to identify multiple sources of funding. The upgrade for
RMS from 2.36 to 2.37 will convert all existing CLINS and treat them like priced parent-CLINS
with informational sub-CLINS created as needed. When you use sub-CLINS, you will first ADD
a CLIN, followed by the sub-CLIN. You will not be able to delete a CLIN if it has sub-CLINS
linked to it.
You will then add a
Description for your
CLIN and the Add
Priced SubCLINs to
that new CLIN. You
must also follow the
required numbering
scheme for the
SubCLINs.
7 - 15
Resident Management System
Enter the description and amount for the new Priced SubCLIN and check the box that you are
ready to fund it. You will then need to use the ellipsis to verify which Obligation Line Item you
want to use to fund the CLIN.
7 - 16
Resident Management System
You repeat this process for adding additional Price SubCLINs as needed.
8-1
Resident Management System
Chapter 8 – Contractor Pay Activities
What this Chapter presents:
•
Overview
•
Importing Contractor Pay Activities
•
Standard Data Exchange Format
•
Balancing Contractor Pay Activities
•
Mandatory Entries for Pay Activities
Importing Contractor Pay Activities
The next step in setting up our finances in RMS is to enter the Contractor’s
Construction (Pay) Activities. The easiest way to accomplish this would be to
IMPORT the Activities electronically via the Standard Data Exchange Format (SDEF).
Entering pay activities correctly is critical. Payment
should not be allowed when either the total amount of
activities assigned to a CLIN does not match the CLIN
amount or when the sum of all the activities does not
match the total contract amount.
8-2
Resident Management System
The Contractor’s Pay Activities are located via the Contract Menu / Finances.
Notice: As you
click on the
Import/Export item
NAS (SDEF) you
may see the
following picture if
your contractor will
use the QCS
program.
8-3
Resident Management System
Turning Off QCS from Contract Setup
If you have previously indicated you wanted to use QCS and later decide to unclick that option,
a log entry will track your doing so. You will see this message box. (Note: There are times when
you may really need to turn off QCS and import the Contractor’s SDEF file, in that case, ignore
the message and face the consequences.
Import SDEF File
As previously stated, the easiest way to enter the Contractor activities is by utilizing the
Import/Export features of RMS. From the top menu, push Import / Export.
8-4
Resident Management System
Click on NAS (SDEF) to begin importing the contractor Activities. Then, determine if you wish to
import all Activity Changes, or select just those items you need to import. If imports have
already been made, this is the screen from which you would import the contractors Pay
Request also.
Selecting the Import from Contractor’s NAS button will send you to a window on which to
select the items you with to import. Then you will need to locate and highlight the SDEF file from
the Contractor. Once selected, you can double click on it and the import process will begin.
An SDEF Merger utility (SDEF Companion) is
available for this version for merging two SDEF files
into one file and viewing the validity of the file.
Select the items you
wish to Import from the
Contractor
8-5
Resident Management System
Windows Explorer of
SDEF Folder and Files
Confirmation
Screen
.
Push the Continue with Import button when ready.
When RMS completes the import process the data fields on the screen will be completed,
reflecting the particulars of the import.
8-6
Resident Management System
To review the activities imported, double mouse-click on any changes shown in the field in the
above screen. The next screen is used for approving or disapproving the changes proposed by
the contractor. You can use the buttons at the top of the screen for approval action on ALL
items, or, alternatetively, you can individually approve or disapprove each item by using the
check boxes on the right side of the screen.
8-7
Resident Management System
QCS being Used
If you have indicated that QCS was going to be used in Contract Setup, you may have
assigned certain items to be managed by the QCS staff. In such a case, you will see this screen
that advises you you will not be able to import those items. You must use the QCS import.
8-8
Resident Management System
Contractor Pay Activities
If you need to manually add or adjust the individual Activities, from the Contract Menu /
Finances / Pay Activities screen, you can select either the Add or Edit button at the top of the
screen, as appropriate. You can also Delete individual Activities from this screen.
The second tab of this screen will list all the CLIN’s used for the contract.
8-9
Resident Management System
Add activities for each CLIN until the Sum of Activities equals the amount designated for the
CLIN. Continue through all CLINS until the Sum of Activities equals the amount of the contract.
Mandatory Entry Elements for Pay Activities
RMS will function properly financially if only the top portion of the input screen is completed. The
lower portion of the screen is extremely useful and you are encouraged to complete all of it in
detail. In any case, the following three (3) items must be completed.
Description
Enter a brief description of the activity into the Description. This field allows for up to 50characters in length. However, when you are using the SDEF feature, the SDEF truncates the
field to about 35 characters. Therefore, you might want to only use the first 35 characters so the
description appears okay after imported from P3 (be sure to use the same description in P3).
CLIN
The CLIN field lookup should be selected so you can choose the appropriate CLIN. The
Quantity field just below will automatically populate, based on prior entry of the CLINS.
Amount
The Amount of the activity is entered here. If a Quantity Item were chosen, the Amount field
would be gray and you would enter the Quantity
9-1
Resident Management System
Chapter 9 – Contract Change Requests
What this Chapter presents:
•
•
Overview
•
Prefix Code for Change Requests
•
Contract Change Requests
•
Basic Change Document (BCD)
Overview
For military projects: When an appropriation is made, contingency funds are generally
allocated to cover modifications that arise. As modifications are proposed and funding entered,
the necessary funds are automatically subtracted from the contingency amount and added to
the unawarded estimated amount (for status 5 mods) on the Construction Working Estimate
screen. When a modification is designated as Complete (status 6 mods), the funding amount is
added to the award contract amount.
For civil projects and many projects in Iraq: Contingency funds are not generally allocated
for the contract. When modifications need to be funded, additional money is added to the
contract.
RMS looks at modifications in four distinct parts:
1. The first part defines the change and tracks actions before the change becomes an
official contract modification. During this time, RMS refers to the change by Change
Request Number, using your Office Prefix Code for Change Requests and a
sequential number. The Prefix Code for Change Requests is identified on the
Office/Office Description screen as shown below.
2. The second part begins once all actions on the Change Request are complete.
9-2
Resident Management System
3. The third part adds the Reference Number and creates the modification package.
4. The final step is the identification of the package through the Standard Procurement
System (SPS), referred to as PD² (Procurement Desktop Defense), which will provide
the A or P modification number.
Prefix Code for Change Requests
You must ensure the proper code is entered here.
Contract Change Requests
A Change Request is generated in anticipation of a potential or real Modification to the
Contract. The process generates what is known as a Basic Change Document (BCD). The
BCD describes the change, the reason it is necessary, the initial estimated cost and time impact
and may also be used to evaluate AE liability if Design Errors or Omissions cause the change.
The process of adding a Change Request is a matter of following logical steps and tracking to
completion. In the example screen below, you can see that all steps have been completed, as is
indicated by the presence of the green check marks on the bottom section of the screen.
9-3
Resident Management System
Mod Reason Codes
Mod Reason Codes are divided into 3 categories as follows:
Award Options
5
Pre-negotiated Contract Option Exercised After Award
Controllable
1
8
G
S
T
V
Engineering Changes -- Includes possible and confirmed A-E Fault
Value Engineering Changes
Deficient Government Furnished Property Corrections
Suspension of Work
Termination of Work
Construction Changes Necessary to Complete Contract
Uncontrollable
4
6
7
9
A
E
User Changes -- Discretionary
Miscellaneous Changes
Differing Site Conditions not readily identifiable by thorough Site Investigation
Administrative Changes – Fund Cite, Paying Station, Address, etc.
Adverse Security Conditions
Excusable Delay for No Fault -- Weather or Act of Nature
9-4
Resident Management System
Q
R
Variations in Estimated Quantities
Revaluation – Foreign Currency
Sample – Basic Change Document (BCD) Form – Partial Only
BASIC CHANGE DOCUMENT (BCD)
MOD SERIAL NO.
00011
PROJECT
LOCATION
CONTRACT NO.
Page 1 of 3
INCEPTION DATE
DATE COMPLETED
W912ER-04-D-0008 0004 27 Jun 2006
OHC Overhead Cover Sys 004 - GRN Master
CONTRACTOR
Salah Ad Din, Kirkuk, and Ninewa GovernoratesPerini Corporation
27 Jun 2006
PART A. 1. DESCRIPTION OF CHANGE
I n c r e a s e
S i z e
2. SPEC/DWG
o f
L i n e
I t e m
0 0 1 3
F a c i l i t y
1. Increase the Size of the Line Item 0013 Facility
Increase the size of the facility from 18,000 sf (1,672 sm) to 25,120 sf (2,334 sm).
Initial Estimate: $10,000.00
Time Extension: 0 Days
CHANGE IN DRAWINGS
The Contractor will revise the as-built drawings to accurately reflect the actual
construction performed as a result of this change item.
CHANGE IN SPECIFICATIONS
The table included in Technical Specification Section 01015, APPENDIX A entitled "Milcon
Priority List & Facility Square Footages" is hereby changed from reading - Pri (13),
3. TIME EXTENSION
YES
X NO
CALENDAR DAYS
0
4. TOTAL
$10,000.00
5. NECESSITY FOR CHANGE
(Attach a copy of Directive letter of authority from OCE or Using Service and brief statement as to necessity
of contract action. Include any special construction requirements or known quantitities. Include any information regarding status of work in
progress and future activities that will be affected by this change).
1. Increase the Size of the Line Item 0013 Facility
This Change has been coordinated with and approved by Authorized User Representatives.
10 - 1
Resident Management System
Chapter 10 - Contract Modifications
What this Chapter presents:
•
Overview
•
Contract Modifications
•
Current Construction Working
Estimate (CWE)
Overview
This chapter furnishes instructions for processing construction contract modifications and
other changes to the CWE. You are encouraged to review and follow your own District
guidelines if a procedure or recommendation herein conflicts with your District policies.
10 - 2
Resident Management System
Contract Modifications
A modification allows the Government to add or change information and/or requirements of the
contract.
Like the Change Request, to add a Modification you follow logical steps and track the
Modification until it is complete. The example screen above shows numerous Modification
packages. The Modification Status at the bottom of the screen reflects the current progress of
the entire effort for the Modification package.
It should be noted that the Modification Number will be assigned by the “Standard Procurement
²
System” (SPS), called “PD ”, following completion of all signatures and processing through
SPS.
In accordance with the FAR, Modifications signed by an ACO will begin with the letter “A”, and
those signed by the Contracting Officer (Procurement Officer) will begin with the letter “P”.
10 - 3
Resident Management System
SF30 - Page 1 Tab
There are two things to be accomplished from this screen:
1. Select Change Request(s) to be included on this Modification
(You select one or more existing Change Requests to be included in this new
Modification package.)
2. Add/Edit Contract Line Item(s) to equal the Modification Amount
You have the choice to either Automatically add a CLIN equal to Modification,
Manually Add a New CLIN, or to Revise an existing Lump Sum CLIN. The
latter will present you with a listing of the existing CLINS to choose from.
NOTE: IT IS RECOMMENDED FOR IRAQ CONTRACTS THAT YOU ALWAYS ‘MODIFY AN
EXISTING LUMP SUM CLIN’. There will be, of course, cases where it only makes sense to add
a new CLIN, but not often. The issue we have in Iraq is that RMS feeds information into other
Information Systems and a unique ‘MAXIMO URI’ number must be indicated on each CLIN
screen. These URI numbers are rolled up for reporting to Higher Headquarters to review total
costs of an individual project.
10 - 4
Resident Management System
SF30 - Page 2 Tab
SF30 Block 2
The modification number entered initially (i.e., R00019) will be replaced via SPS when the
Modification is completed by Contracting. However, in most all cases, the Contractor will use
this temporary number and may not even be aware of the final number.
SF30 Block 4
The Requistion number is typically the PR&C number and will be automatically populated by
RMS in most cases. It may be changed if desired or needed.
SF30 Block 12
The Accounting and Appropriation Data memo field is an optional field if required by your
District or this modification. There is a ‘lookup’ if you choose the EDIT button that may include
standard wording if this feature is used in your District Library.
SF30 Block 13
Select the manner in which the Modification is being issued and select the appropriate FAR
Clause(s) from the lookup provided.
Also, indicate whether or not the Contractor will be required to sign the Modification.
10 - 5
Resident Management System
SF30 Block 14
The last section of the tab includes the entry for the Modification Title. This block (14) is
continued on the next Tab.
If you are selecting more that one change request to a modification, verify that the title of the
change reflects the basic scope of work of each item, if at all possible. The title should be easy
to understand and use keywords that may help you identify it.
SF30 - Page 3 Tab
SF30 Block 14 (continued)
The first two memo fields are for entry of optional notes on the contract price and time and
should reflect any particulars that were discussed or addressed during negotiations of the
modification with the contractor. You may use the remaining memo fields for comments related
to the Change in Schedule and enter a Closing Statement. The Closing Statement should
reflect your District or Office policies. A lookup is available in the Edit screen to import
statements already prepared. These can be found in your District Library, under Standard
Text.
SF30 Block 15A
At the bottom of the screen, indicate the name of the
Contractor representative that will sign this modification.
SF30 Block 16A
At the bottom of the screen, indicate whether the
Contracting Officer or the Administrative Contracting
Officer will sign this Modification and use the lookup to
populate the fields.
Note: You can assign
Signatures for each
individual Modification
and the signatures will
be saved with the
Modification it is
associated with.
10 - 6
Resident Management System
Release Mod Tab
This screen is to record the administrative progress of the modification. You must obtain a
PR&C from CEFMS for funding and all required signatures must be entered with the
appropriated date fields completed.
Notice the “instructions” in the bottom window of the screen.
Indicate that a PR&C
has been obtained and
record the signature
dates in the window.
When date entries
are made in this
section, it is
assumed that the
CEFMS approvals
and certifications
are completed
simultaneously.
10 - 7
Resident Management System
The above screen then turns into this screen when those boxes are completed.
Enter the Obligation
Amount and check the
“Modification funded
with Obligations in
CEFMS” box.
When you indicate the Modification is
complete by checking the box at the
bottom, you will get this popup message
You should then balance the activities prior to exiting the modification area if you push Yes. If
Yes is pushed the next screen appears, from which you enter the activities.
Push the Edit button and then the
Add or Edit button on the next
screen to enter or modify activity
details.
10 - 8
Resident Management System
Pay Activity Screen
This is the same
Contractor Activity Screen
that was discussed in
Chapter 8 of this Manual.
This screen will be filled in
automatically, with this
limited data, if you choose
to let RMS automatically
add activities to balance
the CLIN.
10 - 9
Resident Management System
Supporting Documents
You can add documents for reference that include the following:
•
•
•
•
•
•
Correspondence
Request For Information
QA Report Narratives
QC Report Narratives
Modification Documents
Attachment (Photos, Documents, etc.)
The listing of such Supporting Documents can be created and attached to the package when
finalized. You can view the attachment by pushing the Docs button.
Supporting Documents for Modification R00001
US Arm y Corps
of Engineers
Date
Docum ent
02/01/2004 BCD
03/14/2005 Mod Document
28 Mar 2005
Camp Victory, Iraq
1ST CAVALRY HQ BUILDING
W912ER-04-C-0007 NA
Status
BCD Completed
Description
This change was initiated by the User and is not considered necessary by th
Statement of Disagreement
The Resident Of f ice does not f eel the change should be issued and prov ides,
herewith, their rationale f or disagreeing with the User.
10 - 10
Resident Management System
You have now completed the Modification.
Your goal is to be able to view a
green check mark on each of the
areas at the bottom of the screen.
10 - 11
Resident Management System
Other Change Orders
Not all Change Orders directly impact the Contractor for time and money. There are Change
Orders that affect the Construction Working Estimate (CWE) that must also be tracked within
RMS, CEFMS and PD².
The Change Orders dealing with other CWE items are broken into five (5) categories:
1.
2.
3.
4.
5.
Supporting Contract Changes
Design During Construction Changes (DDC)
Review Contractor Design
Supervision and Administration (S&A)
Other without S&A
These changes are relatively simple to complete and are usually accomplished in RMS after
they have actually taken place. However, they can be entered any time during the funding
stages (Unfunded, Funded, and Complete). The financial information on these changes will
typically originate with the Project Manager (PPMD) or Contracting Division.
The screen on which to accomplish these other Change Orders is located under Finances /
CWE Changes.
10 - 12
Resident Management System
Current Construction Working Estimate (CWE)
Selecting the Current CWE will reflect the impacts of ALL changes and modifications issued.
From this screen, you may view (Read Only) the CWE.
If you choose “Yes” you will see the financial information on the Contract and the Project.
If you choose “No” you will see the financial information on the Contract, Appropriation, and the
Funding Account.
11 - 1
Resident Management System
Chapter 11 - Contractor Payments
What this Chapter presents:
•
•
Overview
•
Adding a Payment
•
Pay Estimate Worksheet (GIG Sheet)
•
Sending Payments to CEFMS
•
Payment Reports
Overview
This chapter addresses instructions for processing construction contractor payments.
Progress Payments is located under the heading Contract Menu / Finances.
Prior to making any progress payment, you should
verify that all finances are properly balanced,
including CLIN’s and Contractor Activities.
11 - 2
Resident Management System
Adding a Progress Payment
The Progress Payments screen is used to review and /or add pay periods.
You begin the process by pushing the Add button at the top of the screen. If a payment already
exists, you can also Edit it from this location.
RMS will accommodate processing a payment and a refund on the same ENG Form 93.
NOTE: The ENG 93 does not exist in the Contractor module (QCS) until AFTER it is
processed in RMS and returned to the Contractor.
You DO NOT NEED to have an ENG 93 to process Pay Requests for the Contractor,
including CEFMS payments. What you should get from the Contractor is the
“PROMPT PAYMENT CERTIFICATE” and his payment request via the QCS export –
that is all that is needed.
The Contractor should be submitting his payment request based upon the agreed
upon amount or percentages that has taken place between the Contractor and
Government office personnel most familiar with the progress taken place.
11 - 3
Resident Management System
Prompt Payment / Pay Requests from QCS
In accordance FAR 52.232-5 — “Payments Under Fixed-Price Construction Contracts”, RMS
and QCS have been provided with screens to accommodate the information specified to be
furnished by the Prime Contractor relative to any Subcontractor used on the contract.
Key items to be provided on Subcontractors:
a. Listing of amount for work accomplished by each subcontractor.
b. Listing of the total amount of each subcontract. (1st Tier Only)
c. Listing of amount previously paid to each subcontractor (includes any deductions
against the subcontract, per the Prompt Payment Act (PPA).
Screens are available to provide data
for Assignments and Notification of
Defective Invoice.
The Prompt Payment Certification is
also included on the screen and a
report can also be generated within
QCS to submit with the Contractor’s Payment Request.
You will undoubtedly encounter Contractors reluctant (or even refusing) to indicate the Contract
Amount of their Subcontractors. Reasons vary for Prime Contractors. Some Prime Contractors
are fearful the Government will determine WAY TOO MUCH overhead/profit is being taken and
will haunt them with deductive change orders. Other Prime Contractors may like to ‘live’ off the
Subcontractor money. You never have to argue with a Prime Contractor on this, simply point out
the FAR requirement and refuse to pay them anything until they comply. Prime Contractors
have been barred for Government work due to violations of the Prompt Payment Act (PPA).
11 - 4
Resident Management System
Prompt Payment Certification Report (Page 1)
Prompt Payment Certification And Supporting Data
For Contractor Payment Invoice
(1) Contract No.:
DACW27-01-C-0030 NA
Page 1 of 13 pages
(2) Location and Description of Work:
(3) Estimate No.:
Olmsted, Illinois
Maintenance and Operating Bulkheads
(5) Contractor Of ficial (name and address) to w hom payment is
to be sent:
(4) Invoice Date:
42
10/26/2005
(6) Discount Terms:
Massman Construction Co.
8901 State Line Road
Kansas City, MO 64114
0 Days
0 Percent
(7) If Notice of Assignment has been filed, enter name of
Assignee to w hom payment is to be sent:
(8) Name, Title, phone number, and mailing address of person to be notif ied in
event of a defective invoice:
Robert Brow ne, Ow ner
909-234-5679
1254 West Avenue
Upland, CA 92506
(9)
Subcontractor Name
(10)
Total Amount
Subcontracted
(11)
Previous Subcontractor
Payments
(Excluding Deductions)
(12)
Subcontractor
Amount Included in this
Payment Estimate
(Excluding Deductions)
(13) **
Subcontractor Earnings
Deducted by Contractor
(Total to Date)
BART
$43,000.00
$24,000.00
$4,000.00
$2,400.00
Bar-Tie
$23,445.00
$0.00
$0.00
$0.00
COE
$13,253.00
$0.00
$0.00
$0.00
$160,000.00
$0.00
$0.00
$0.00
DivCon, LLC
DivCon, LLC
$75,000.00
$0.00
$0.00
$0.00
EGPT
$12,005.00
$1,200.00
$1,200.00
$120.00
MCC
$15,000.00
$0.00
$0.00
$0.00
N & N Metro Plumbing
$80,000.00
$0.00
$0.00
$0.00
$0.00
$0.00
$0.00
$0.00
$12,500.00
$0.00
$0.00
$0.00
$12,500.00
N & N Metro Plumbing, Inc.
PLAT
$250,000.00
$125,000.00
$50,000.00
STW
Plateau Electrical Constructor
$46,500.00
$0.00
$0.00
$0.00
THMS
$33,000.00
$0.00
$0.00
$0.00
Thomas Industrial Coatings Inc
Triangle Enterprises
$35,600.00
$0.00
$0.00
$0.00
$340,000.00
$0.00
$0.00
$0.00
** A w ritten notice of any w ithholding shall be issued to a subcontractor (w ith a copy to the Contracting Officer) of any such notice issued by the Contractor,
specifying (1) the amount to be w ithheld, (2) the specif ic causes f or the w ithholding under the terms of the subcontract, and (3) the remedial actions to be
taken by the subcontractor in order to receive payment of the amounts w ithheld. Attach copy of notif ication to pay estimate. Reference FAR 52.232-27(g).
I herby certify, to the best of my know ledge and belief, that:
(1)
The amounts requested are only for perf ormance in accordance w ith the specif ications, terms, and conditions of the contract;
(2)
Payments to subcontractors and suppliers have been made from previous payments received under the contract, and timely payments w ill be
made from the proceeds of the payments covered by this certification, in accordance w ith subcontract agreements and the requirements of
Chapter 39 of Title 31, United States, Code; and
(3)
This request for progress payments does not include any amounts w hich the prime contractor intends to w ithhold or retain from a subcontractor
or supplier in accordance w ith the terms and conditions of the subcontract.
(4)
This certification is not to be construed as final acceptance of a subcontractor's performance.
Signature
John Mayberry, Superintendant
Typed Name and Title
Date
11 - 5
Resident Management System
Contractor’s Pay Request Worksheet
Each pay period a Contractor’s Pay Request Worksheet (aka, Gig Sheet) can be printed from
the Reports menu. This worksheet shows the total amount for each activity, what has already
been paid and any outstanding items that might impede or impact the amount the Contractor
requested. This should be reviewed prior to making any final determination on the amount of
the pay request to be processed.
The Contractor’s Pay Request Worksheet is accessed from the Reports menu.
The worksheet report will give you a detailed listing of all items that are outstanding and/or
delinquent on a given Activity. For example, if the Contractor is missing payrolls or insurance
the worksheet will list them.
The Contractor is also able to print out this worksheet from the Contractor’s QCS Module prior
to requesting payment.
Sending Payment to CEFMS
With the Progress Payment completed, you can send it to CEFMS for signature and payment to
the Contractor. Push the Send to CEFMS button to begin.
11 - 6
Resident Management System
The Send to
CEFMS
button will
present a screen to ask you if you want to
upload the pay estimate to CEFMS. If you
choose Yes, RMS will ask you for your User
Name and Password and log into CEFMS. The
rest will be automatic and the payment will be
placed into CEFMS for approval.
The CEFMS payment upload now sends Pay Period from and thru dates from RMS to CEFMS.
(Instructions are also included in RMS to remove downloaded CEFMS information associated
with a payment if that payment is deleted from RMS. This allows the RMS user to back up to
previous payments and reprocess them as the current payment if needed, without having the
CEFMS payments add back in automatically. The CEFMS payments will, however, add back in
with the next CEFMS download.
11 - 7
Resident Management System
Reports for Payments
Reports may be accessed from the Contract Menu. Push the Reports button and select
Finances on the next screen. It is suggested that the various Reports available from the Report
Explorer be printed out and filed with the Contract files.
Reports for all Progress Payments can be found via the Report Explorer shown below.
12 - 1
Resident Management System
Chapter 12 - Contractor Quality Control Planning
What this Chapter presents:
Required Planning Activities:
Administrative:
• Prime Contractor Data
•
Subcontractor Data
Quality Assurance / Quality Control:
•
Features of Work
•
3 Phase Inspections
•
Hazard Analysis
•
QC Tests
•
User Schools
•
Transfer Property
•
Installed Property
12 - 2
Resident Management System
Overview
This chapter addresses information on the planning activities required for
Contractor Quality Control and provides instructions for utilizing the Quality Control modules
of the RMS program.
In contracts of $1,000,000 or more, detailed CQC should be applied and a properly edited
CEGS-01451 (01 45 04.00 10) should be included in the contract. Inclusion of detailed CQC in
construction contracts under $1,000,000 is discretionary. When construction services are
obtained through an international governmental agreement, CQC should not be used unless it is
specifically required by that agreement.
Quality Control Requirements
There are areas that must be addressed in the Planning of a contract before a Contractor can
adequately prepare his Daily Quality Control Report. This includes, among many other things,
what RMS refers to a QC Requirements.
Prime Contractor Data
The Prime Contractor window is comprised of four (4) tab entry screens, located under
Administration from the RMS Contract Menu. Data is entered into each tab separately,
beginning with the Contractor Information tab.
12 - 3
Resident Management System
Responsibility Code –
This code should match the Contractor’s scheduling package if one is being used. It must be
unique and cannot be assigned to any other subcontractor for this contract. The responsibility
code for the Prime Contractor is always PRIM and is automatically entered by RMS. If a
subcontractor is performing more that one type (feature) of work, enter the code for his most
‘significant’ work. An alpha/numeric identifier is almost always used within a commercial
scheduling package, such as Primavera, and can easily be imported into the RMS program. The
Corps of Engineer’s Standard Data Exchange Format (SDEF) specifies numeric identifiers only,
however, the RMS/QCS programs will accept either/or.
CEC (DUNS) No –
Enter the nine-digit (or thirteen-digit) Contractor CEC number (DUNS # or DUNS +4#), as it
appears on the Contractor’s proposal or contract award letter. A sample CEC number is “038074381”. (FAR 52.204-4, Contractor Establishment Code (CEC)). The CEC is a 9-digit code
assigned to a Contractor that contracts with a Federal executive agency. The CEC system is a
contractor identification coding system that is currently the Dun and Bradstreet Data Universal
Numbering System (DUNS). The CEC system is distinct from the Federal Identification
Numbering (TIN) system. The Government will obtain a CEC for any awardee that does not
have or does not know its CEC. The CEC number should be found on the executed SF 1422, in
block 14. It is also used in Block 2 of the DD Form 2626, Performance Evaluation
(Construction), form in CCASS.
The Data Universal Number (DUNS) is a unique nine-character (or thirteencharacter) company identification number issued by Dun & Bradstreet. To
verify or locate a DUNS number for the construction firm in the Central
Contractor Registration (CCR) visit:
http://www.bpn.gov/CCRINQ/scripts/search.asp
Contractor Short Name / Contractor Name –
Enter the Contractor’s short name that will be used on many reports and screens in RMS and
QCS and enter the complete name that will be used for Correspondence, Payments, etc.
NAICS Code –
Enter the Contractor’s NAICS code. A sample NAICS code is “236220”, for “Commercial and
Institutional Building Construction”.
12 - 4
Resident Management System
The North American Industry Classification System (NAICS) has replaced the U.S.
Standard Industrial Classification (SIC) system. NAICS was developed jointly by the
U.S., Canada, and Mexico to provide new comparability in statistics about business
activity across North America. To locate your NAICS code for Construction, refer to
the following website: http://www.naics.com/naics23.htm
Office to receive payments –
This entry will be completed automatically from CEFMS, if CEFMS is used.
Contractor Representative to Review Contractor Evaluation (DD2626)
Enter the name and email address of the Contractor representative that will be authorized to
review and comment electronically to the Contractor Evaluation (DD Form 2626) issued at the
end of the contract.
The remaining tabs, (Contractor Address, Management/Work Days, and Bond Co./SBA are self
explanatory and all applicable field should be completed.
Prime Contractor Data in District Library
If your District is using the Prime Contractors module in the District Library, you will be able
to import much of this information for your Prime Contractor.
You will need to ensure that Prime Contractors have first been entered in the District Library to
be able to copy the information from there. Once entered, the information will be easily added to
new contracts.
Manually Add Contractor to District Library
When you select the Add button you can Manually Add a Prime Contractor. Enter the
appropriate information and click on the Close button to add the contractor.
12 - 5
Resident Management System
12 - 6
Resident Management System
Copy Prime Contractors From Existing Contracts
When you first use this feature from the District Library, you can simply copy the data from
existing contracts into the library. A listing of existing contractors will appear and you select the
ones you wish to add to the library. Choosing the Close button will add the selected contractors
to the library.
12 - 7
Resident Management System
Copy Prime Contractor Data From District Library
Adding a contractor to a new contract is easy when you already have them entered into the
District Library. When you click on the DUNS No: elipsis, you get a pop-up screen that lists all
contractors in the library. Choose your contractor and then select the OK button.
You then decide to either copy just the
DUNS number, or all of the information on
the screen.
If you’ve chosen all of the data, your work
is streamlined and the Prime Contractor
information is completed.
12 - 8
Resident Management System
Prime Contractor Data is Copied to Contract
The information copied will spread across two screens (tabs) to complete the information on the
Prime Contractor.
12 - 9
Resident Management System
Subcontractor Data
The subcontractor entry is an essential part of the RMS program, for example: attaching a
subcontractor to each activity will link submittal items to the subcontractor. With the
subcontractor linked to activities, RMS knows who has related responsibilities, such as for
Preparatory and Initial Inspections.
A subcontractor list is necessary to document Labor Interviews. Without the subcontractor data,
daily Labor Hours cannot be posted in the Daily Quality Control Report.
Subcontractor deficiencies are noted on the Pay Estimate Worksheet.
Subcontract amount and particulars are required per the Prompt Payment Act.
NOTE: The Prime Contractor should ONLY enter amounts for their 1st
Tier Subcontractors, and enter $0.00 for all other Subcontractors.
Otherwise, RMS will total the amount twice for reports, such as the
DD Form 2626. The amounts also appear on the Prompt Payment
Certificate. Prime Contractors most often do not have access to the
amount of any subcontracts beyond which they themselves initiate.
A listing of Subcontractors may be provided to the User at the conclusion of the contract for
Warranty contacts.
12 - 10
Resident Management System
Push the Add button to add a new Subcontractor, or the Edit button to edit information on an
existing Subcontractor.
NOTE: ONLY enter amounts for 1st Tier Subcontractors. By checking the
box “Contractor is a Second Tier Sub”, the “Amount Subcontracted”
entry will be removed from this screen.
12 - 11
Resident Management System
QC Planning Data
The next area of Contract planning activities can be found on the Contract Menu, QA / QC, and
includes the Features of Work, 3 Phase Inspections, Hazard Analysis, and QC
Requirements as required by the contract.
Features of Work
In accordance with the terms of the contract, the Definable Features of Work are required to
be listed in the contractors’ Quality Control Plan. Using RMS to create that list is an easy way
for the Contractor to meet these requirements. However, even more importantly, Features of
Work are tied to the contractor’s pay activities providing both the Government and the
Contractor invaluable information and report capability.
Press the Add button to create each Feature of Work. Then, enter the data in the pop up
screen by using the lookup provided, or by typing directly into the cells. Close the window when
completed and repeat as needed. Features of Work can also be entered in QCS (and really
should be if your Contractor is using QCS).
Features of Work are general categories of construction work that are referenced in the
contract specifications. A feature can be thought of as a phase of work requiring a separate
Preparatory Inspection (typically, there is at least one for every technical specification section,
with many sections having multiple features).
Within RMS and/or QCS, Features of Work are tied to 3-phase inspection checks. As such,
Features of Work are an integral part to the power of the RMS Inspection Check sheets and
should be thought through quite carefully. Both the Government and Contractor are able to link
Features of Work to 3 Phase Inspection checks. (See the QCS User Manual for the QCS
process.)
12 - 12
Resident Management System
3 Phase Inspections
The 3-Phase Inspections within the QCS program, and the Government RMS program, utilize
checks that are numbered, generally following the CSI specification format. The CSI-based
numbering system is used in such references as Sweets Catalogs, MEANS Estimating Books,
Military Specifications, and so forth. This is done in QCS and RMS to categorize various
comments and items where they can easily be remembered and found and to minimize
duplication of comments in various areas.
The linking of 3 Phase Inspection checks to the Features of Work is discussed extensively in the
separate QCS Manual and will not be repeated here. Once the links have been made, you will
see a screen similar to the following, which depicts the number of Checks linked for each of the
3 Phase Inspection periods.
Hazard Analysis
The Contractor should prepare a Hazard Analysis for each Feature of Work. This is
accomplished in the QCS program. After they are created in QCS, they will be available in RMS
for review, comments, acceptance or rejection.
We need to realize that the AHA is really keyed around the activities required to accomplish a
certain feature of work and addresses any hazards, or potential hazards, that may be
associated with work anticipated to be required while doing the actual work.
12 - 13
Resident Management System
The Contractor is able to create the AHA in the Contractor Library for each feature he would
add to the library. The library AHA’s will be available to add (copy) to any contract. Thus, the
Contractor, using QCS, will build the AHA on the Features of Work listed in the contractors’
CQC Plan and (hopefully) in the QCS program.
Many of the items in the AHA are identical, or very similar, from one FOW to another. Therefore,
the Contractor is able to COPY an AHA from one FOW to another. The idea is to simplify input.
12 - 14
Resident Management System
Hazard Analysis Report (Sample)
.
12 - 15
Resident Management System
QC Requirements
QC Requirements include four (4) separate items for control and tracking. Each of the items is
located under a separate Tab, as can be seen below.
•
•
•
•
QC Tests
User Schools
Installed Property
Transfer Property
Quality Control Tests
Quality Control Tests are defined in the Contract and are based on engineering and
construction judgment as to the type and number of tests to be accomplished. After the award of
the contract, the Contractor will further define the method and quantity of tests based on the
material quantity and/or equipment options he has chosen to incorporate into the work. The
tests should also be addressed in the Contractor Quality Control Plan for the contract.
User Schools
User Schools represents the Training or Instructions the Contractor must provide the
Customer on equipment or systems provided and installed as part of the contract. As each
12 - 16
Resident Management System
session of the Training or Instruction is completed, it is reported as such within the Contractor’s
Daily QCR.
Installed Property
Installed Property is those items of equipment that are incorporated into the design of a
facility. These are typically acknowledged as those pieces of equipment that may require
maintenance, have serial numbers and can be accounted for individually. It is the Designer that
specifies the equipment, based upon Design guidance provided by the Government Design or
Using Agency. These items are given the prefix “IP” by RMS and take the form of “IP-####” for
numbering and tracking purposes. As the Installed Property arrives at the jobsite, it is
compared to approved Shop Drawings for conformance to the contract; the serial number and
other information is recorded and reported within the Contractor’s Daily QCR.
Transfer Property
Transfer Property is that property that “changes hands” during the construction process.
Examples would include Government Furnished Property (GFP) that the Contractor would
install or consume during the contract performance. It would also include spare parts and
supplies that are furnished by the contractor as part of the contract requirements. It could also
include equipment or materials that were deleted as part of a contract modification and that
were beneficial for the Government to retain rather than get some minimum token credit for the
deletion. It may also include EQUIPMENT that the contractor will leave for turn-over to the Iraqi
Government as the conclusion of the work.
12 - 17
Resident Management System
Equipment Checks
All Contractor equipment that requires a mechanic’s inspection should be entered here – not
‘hand tools’.
The entries will then be available to report their use and standby time on the Contractor Daily
Quality Control Report (QCR).
12 - 18
Resident Management System
Exposure Hours
The Contractor will enter the employee work hours in QCS (Exposure Hours) and transmit that
information to RMS with each QCS-to-RMS export. After the hours are imported, the
Government needs to decide to Accept the hours as submitted, or return to the Contractor for
corrections – these selections are along the bottom of the screen.
The Safety and Health Requirements Manual, EM 385-1-1, at section 01 (Program
Management), Paragraph 01.D (Accident Reporting and Recording), sub-paragraph 01.D.05,
requires the Prime Contractor to provide a monthly record of all exposure and accident
experience of the Prime Contractor and all Subcontractors relative to the work. The information
is captured and will produce the required exposure report.
12 - 19
Resident Management System
Monthly Injuries/Illnesses & Exposure Report
The exposure hours will be compiled and you are able to create the Monthly Injuries/Illnesses
& Exposure Report for upward reporting
USACE PRIME CONTRACTOR
US Army Corps of Engineers
Monthly Record of Work-Related Injuries/Illnesses & Exposure
Month
USACE, Portland District
Fabrication Products, Inc.
W9127N-05-C-0025
Bonnev ille FGE & VBS Modif ications
Vancouv er, Washington 98661
All other illnesses
Hearing Loss
Poisoning
Describe the injury or illness
Date of Injury
or onset of illness
Skin Disorder
Age
Day s
On Job
Away Job Transf er Other recordAway f rom
Death
From or restriction able cases transf er or
work
restriction
Work
(day s)
(day s)
Injury
Where the
ev ent occured
Respiratory Condition
Portland Resident Of f ice
Number of Day s
Date Employ ee
began work
Gender
Labor Classif ication
Prime/Subcontractor
In accordance with t he prov isions of EM 385-1-1, Section 01 Program Management, Paragraph 01.D Accident Reporting and Recording, USACE Command
sub-paragraphs 01.D .05, y ou (the Prime Contractor) shall prov ide a monthly record of all exposure and accident experience incidental
Contractor Name
to the work (this includes exposure and accident experience of the Prime Contractor and its sub-contractor(s)). As a minimum, these
records shall include exposure work hours and a record or occupational injuries and illneses that include the data elements listed below. Contract Number
Def initional criteria f or each data element is f ound in 29 CFR Part 1904. If the maintenance of OSHA 300 Logs are required by OSHA,
Project Title
most of this inf ormation can be obtained f rom those logs. If data on log prov ided below is rev ised af ter it is submitted to USACE,
Contractor shall prov ide a rev ised report to the GDA. You must complete the USACE ENG Form 3394, Report of Accident Inv estigationCity & State
Report f or all recordable accidents. If y ou're not sure whether a case is recordable, call y our local Saf ety and Occupational Health
USACE Office
Of f ice f or help.
Contractor
May , 2006
Page 1 of 2
No accidents reported
USACE PRIME CONTRACTOR
US Army Corps of Engineers
Monthly Record of Work-Related Injuries/Illnesses & Exposure
Month
Contractor
Trade
Month:
Year To Date:
P
or
S
Exposure Hours
Current
Period
Year
to Date
Number of Cases
Number of Day s
Day s Away Transf er or
f rom Work Restriction
Cases
Cases
Death
Cases
Other
Reportable
Cases
May , 2006
Page 2 of 2
Number of Injuries / Illnesses
Rates
Day s
Job
Lost Time Contrac tor Contractor
Skin
Respiratory
Hearing All Other
Away
Transf er Injuries
Frequency
DAR T
Day
Poisoning
Disorder Conditions
Loss Illnesses
f rom Work Day s
Rate
Rate
Count
Fabrication Products, Inc.
Primary Contractor
P
0
256
0
0
0
0
0
0
0
0
0
0
0
0
N/A
N/A
N/A
Accurate Concrete
Concrete Saw Cutting
S
235
2,697
0
0
0
0
0
0
0
0
0
0
0
0
0.0
0.0
0.0
S
338
3,129
0
0
0
Totals: 0
0
0 0
0
Certification of Record
00
0 0
00
0 0
00 0
0 00
0
0.0
0.0
0.0
0
0
0
0.0
0.0
0.0
0
0
0.0
0.0
0.0
0
0
FP Erectors, LLC
Serv ices/Manpower
Exposure Hours
HIRE ELECTRIC
951 hoursElectrical
JH KELLY
7, 677 hours
Serv ices/Manpower
Totals:
S
122
928
0
0
Name of Person Submitting Record: Tim Morrow
0
0
0
0
0
0
0
S
256
Signature:
951
667
0
0
0
0
0
0
0
0
0
7,677
0
0
0
0
0
0
0
0
0
0
Date:
0
0
12 - 20
Resident Management System
Exchanging Data between RMS/QAS and QCS
Export from RMS Using SFTP Server
The procedures to exchange files with the Contractor has been significantly streamlined and
made easier to use. We will start by selecting the Import/Export (QCS) function from the main
contract menu and push the Export to QCS button at the bottom of the window. The procedure
for importing or exporting from QAS is the same as from RMS.
This is how the screen appears after you have exchanged data with QCS.
12 - 21
Resident Management System
If the Contract has yet to export (exchange) a file with RMS you will see the following screen. It
advises you when you exported a file to QCS and lets you know that all exports will include ALL
data (libraries, etc.) until the Master QCS site acknowledges and returns a file.
After you have imported a file from QCS the foregoing screen changes to advise you of the last
date of the QCS import.
12 - 22
Resident Management System
When the contractor installs the QCS program, a SITE ID is automatically assigned for the
Contractor. This ID must be conveyed to the Government to enable the transfer of files. Enter
the number here (i.e., JSG7MJ2G):
You will then need to determine how you prefer to transfer the file to the contractor. Use the
Settings feature for this purpose.
The preferred way to transfer files is to make use of the RMS Center Secure File Transfer
Protocol (SFTP). The other method is to export a file that you would email or furnish on another
media to the contractor. In this example, use the SFTP method and push OK.
The Government Representative will need to advise the Contractor of the Contract ID number
so he can select it from within QCS. This number is the number automatically assigned to a
12 - 23
Resident Management System
project in RMS when it is first entered into RMS and cannot be changed. This example shows
the Contract ID as being P0004537.
RMS will upload the file to the SFTP server and it will then be available for the Contractor to add
the contract to his QCS program.
The contract is now placed on the RMS SFTP server and is available for the Contractor.
12 - 24
Resident Management System
Import from RMS/QAS to QCS Using SFTP Server
When the Contractor is ready to import the project into his QCS program, he must first be
advised of the Contract ID number (i.e., P0004537). The Contractor will then add the contract
to his program after importing your file from the SFTP site, as follows.
Enter the Contract ID here:
Push OK.
12 - 25
Resident Management System
QCS will complete the import and it will then appear on the Contract Menu of the program
(opening screen).
If the Contractor does not use, or enters an incorrect Contract ID number, the following
message will appear:
Or, you may see:
12 - 26
Resident Management System
Export from RMS/QAS by Exporting File
If, for some strange reason, you do not wish to utilize the SFTP method of transfer, you can
elect to prepare a file and transmit (email, floppy disk, CD, etc.) the file to the Contractor. The
method to do so is similar to the above. That is, you start from the Import/Export screen of
RMS/QAS and push the Export to QCS button. The following screen will appear.
You must enter the QCS Site
ID obtained from the
Contractor for his QCS
program and enter it here.
Push the Settings button to set up Export to file method of transfer.
Check the radial button next to Export to file and use the Browse button to indicate where you
want RMS to store the created file (i.e., C:\temp\RMS_P0000816_QCS.RXF). Press OK (twice)
to begin the export.
12 - 27
Resident Management System
RMS will create the file and place it where you indicated.
The location of the file is then indicated at the bottom of the Import/Export screen (i.e.,
C:\temp\RMS_G2000193_QCS.RXF).
12 - 28
Resident Management System
Import from RMS into QCS by Exported File
The procedure for adding a contract via an Import file is very similar to using the SFTP server.
The first step is to push the Add button on the Contracts menu.
Select Import from File. Use the Browse button to locate the desired file.
12 - 29
Resident Management System
Locate and highlight the file and then push Open followed by OK.
QCS will then import the file.
12 - 30
Resident Management System
When the import is complete, the program will automatically open the contract to the
Contractor Library / QCS Site Description screen, as shown below. You will then need to add
the QCS Site Title, Primary Point of Contact Name and EITHER a telephone number or email
address.
Request Export File for Adding Contract
As above, when you push the Add button on the main menu, select Request Export File if you
have not yet been provided one by the Government. The next screen will provide instructions on
getting the export. In either of the cases, you will need to have your site registered to be able to
import a contract.
12 - 31
Resident Management System
Automated Import and Export
RMS can perform automated imports and exports for QCS. Users that use the SFTP repository
option will have exports automatically sent to the SFTP repository on a nightly basis.
In order for this function to operate, the “Export Settings” and “Import Settings” must indicate
that you are using the SFTP transfer method, as opposed to the “Export to File” option. Also, the
box entitled “Automatic Import / Export” must be checked.
This is beneficial to users
that are working on multiple
contracts, because RMS will
send exports for all contracts
that have the settings set to
use the SFTP repository.
This feature will do
automated imports from the
Contractors (QCS) if the
Contractor has manually sent
an export from QCS to the
RMS Center SFTP
repository. The
imports/exports will be done
during off hours. Users will
still have the option of doing
manual imports and exports
for individual contracts. RMS will filter this feature to those contracts that have identified a QCS
Site ID and have not yet received Final Payment on the contract.
12 - 32
Resident Management System
Adding QCS site within RMS
Push the QCS Sites button to view the listing of registered sites. In order to assign the various
Modules to other QCS sites, you must have the QCS site ID number. If needed, RMS can
change the QCS Master Site from one QCS site to another, etc.
13 - 1
Resident Management System
CHAPTER 13 - Government Quality Assurance Planning
What this Chapter presents:
Quality Assurance and RMS
•
Overview
•
QA Staffing
•
QA Tests
Overview
This chapter addresses information on Government Quality Assurance and provides
instructions for utilizing the Quality Assurance areas of the RMS program for planning
purposes.
13 - 2
Resident Management System
Contract Setup
Quality Assurance Tab
This is where you begin identifying, assigning and otherwise setting up the QA features for the
contract. The type of report to be used is selected (Civil, Military, Dredging, or other special that
is set up in the District Library), Personnel are identified (RMS will accommodate up to 3 shifts)
and you enter the weather data from tables or listings that are included within the contract
specifications.
Contract Setup/Quality Assurance Tab
13 - 3
Resident Management System
QA Testing
The QA Tests option is located from the main Contract Menu at QC/QA, QA Tests. Tests are
entered that are to be performed by, or on behalf of, the Government. This information can be
obtained from either the contract specifications and/or the submittal register, but should be
coordinated with Contractor QC Plan for precise type and quantity of tests (i.e., we should be
doing at least 5% of the number of QC Tests performed by the Contractor).
QA Test Window
14 - 1
Resident Management System
CHAPTER 14 - CQC – Daily Report
What this Chapter presents:
Quality Control Report and RMS
•
Overview
•
Daily QC Report
•
Sample Daily QC Report Form
Overview
This chapter addresses information on the Contractor Daily Quality Control Report and
provides general information for utilizing the Quality Control Report module of the RMS
program.
14 - 2
Resident Management System
Daily Quality Control Report
The Government and Contractor reports are accessed from the same location within RMS. The
dates shown reflect the QA/QC Report Dates, and you select the QC Report from the next
screen..
With this next window, push the QC REPORT button to access the QC report. If the Contractor
is using the QCS program (as indicated during Contract Setup) this option will not be available
from within RMS, except you may VIEW a QCR submitted by the Contractor.
At the top of the screen is the REPORT NUMBER for this particular date (E.g., 184). This report
number coincides with the DAY construction commenced onsite. It is computed from the
Milestone identified as Construction Start Date. The date entered will result in the report being
QA/QC Report Number 1. Both the QA and the QC report use the same number for a particular
calendar day. Non-work days are included in the tabulation, therefore, the report numbers will
not always be sequential.
14 - 3
Resident Management System
The contractor will complete each of the items shown on the left of the screen and can print out
or view the QC Report as needed. A HARD COPY (with QC Signature and Superintendent
initials) of the report should be supplied to the Government to be included in the Contract File.
If QCS is being used, you will have the option of returning the QC Report to the contractor for
needed corrections.
14 - 4
Resident Management System
Sample Quality Control Report Form
After all desired entries have been made, it is time to print the report and archive as a
permanent document for the contract. Press the QC Report button from this screen to generate
the report.
See a sample QC Report on the following two pages.
14 - 5
Resident Management System
Sample – Quality Control Report Form – Page 1 of 2
CONTRACTORS QUALITY CONTROL REPORT (QCR)
DAILY LOG OF CONSTRUCTION - IRAQ
REPORT NUMBER
755
Page 1 of 2
DATE
07 Nov 2007 - Wednesday
PROJECT
CONTRACT NUMBER
OHC Overhead Cover Sys 004 - GRN Master
W912ER-04-D-0008 0004
CONTRACTOR
WEATHER
Perini Corporation
Weather Caused No Delay
Temperature Min 18 °C, Max 22 °C; No Precipitation; 10 KPH Wind
QC NARRATIVES
How did Security Issues affect the jobsite activities?
Work crew was reportedly detained outside the IZ by terrorists. They were not allowed to continue to the IZ under death threats. They waited
until the terrorists left, then came to work.
How m any m anhours were lost due to threats or security issues?
100
What work activities were being perform ed?
Pouring roadway concrete at H-3
(Preparatory and initial dates held and advance notice)
PREP/INITIAL DATES
No preparatory or initial inspections were held today
ACTIVITY START/FINISH
No activities were started or finished today
QC REQUIREMENTS
The following 4 QC requirem ents were com pleted today:
Requirement No Type
IP-00001
TP-00001
TP-00003
TP-00004
QA/QC PUNCH LIST
Description
Installed Property Kohler, 4" sewage injection pump.
Transfer Property CLIN 0011 - E-GLASS LAYER, BALLISTIC GRADE FRAGMENT PROTECTION
LAYER. GOVERNMENT FURNISHED MATERIAL (GFM)
ANACONDA DFAC #3
4 FT X 8 FT, THICKNESS NOT GREATER THAN 5/8 INCH. WEIGHT IS 3 TO 6
PSF.
Transfer Property CLIN 0002 - E-GLASS LAYER BALLISTIC GRADE FRAGMENT PROTECTION
LAYER. GOVERNMENT FURNISHED MATERIAL (GFM)
ANACONDA PX EAST
4 FT X 8 FT, THICKNESS NOT GREATER THAN 5/8 INCH. WEIGHT IS 3 TO 6
PSF.
Transfer Property CLIN 0003 - E-GLASS LAYER BALLISTIC GRADE FRAGMENT PROTECTION
LAYER. GOVERNMENT FURNISHED MATERIAL (GFM)
ANACONDA EAST MWR
4 FT X 8 FT, THICKNESS NOT GREATER THAN 5/8 INCH. WEIGHT IS 3 TO 6
PSF.
Results
Completed
Completed
Completed
Completed
(Describe QC Punch List items issued, Report QC and QA Punch List items corrected)
The following QC Punch List item was issued today:
Item No
Location
Description
QC-00009
CDC Class 1
Surface veneer has released
The following Punch List item was corrected today:
Item No
Location
Description
QA-00001
DFAC #3
Rebar installed on North foundation piers is Grade 40 instead of the specified Grade 60.
Remove and Replace.
CONTRACTORS ON SITE (Report first and/or last day contractors were on site)
Today was the first day on site for the following contractor:
14 - 6
Resident Management System
Sample – Quality Control Report Form – Page 2 of 2
CONTRACTORS QUALITY CONTROL REPORT (QCR)
DAILY LOG OF CONSTRUCTION - IRAQ
REPORT NUMBER
755
Page 2 of 2
DATE
07 Nov 2007 - Wednesday
PROJECT
CONTRACT NUMBER
OHC Overhead Cover Sys 004 - GRN Master
W912ER-04-D-0008 0004
Army Corps of Engrs
Today w as the last day on site for the follow ing contractor:
EMTA-Anaconda
LABOR HOURS
The follow ing labor hours w ere Reported today:
Employer
Labor Classification
77 CO - Anaconda
Al Hamra Kuw ait, WLL
Al Hamra Kuw ait, WLL
First Kuw aiti
Perini Corp.
Perini Corp.
Perini Corp.
Prime Proj -Anaconda
IRAQ IRAQ IRAQ IRAQ IRAQ IRAQ IRAQ IRAQ -
Number of
Employees
IRAQI MALES
EXPAT MALES
IRAQI FEMALES
EXPAT FEMALES
OTHERS
US CITIZENS
MULTINATIONAL FORCE
OTHERS
Total
Total hours w orked to date: 196,656.5
2.0
0.0
0.0
0.0
1.0
8.0
0.0
26.0
37.0
Hours
Worked
20.0
0.0
0.0
0.0
10.0
80.0
0.0
205.0
315.0
EQUIPMENT HOURS
The follow ing equipm ent hours w ere Reported today:
Serial Number
Description
SLP3CXTS4E0943291
152G
PPI BACKHOE LOADER
PPI VIBRATING PLATE COMPACTOR
Total
Total operating hours to date: 18,109.0
ACCIDENT REPORTING
Standby
Hours
Operating
Hours
0.0
0.0
0.0
10.0
10.0
20.0
(Describe accidents)
The follow ing accident w as reported today:
Contractor/Subcontractor: 77 CO-Anaconda
Age: 40
Gender: Male
Date Employee Started Work: 11/01/2007
Location of Accident: Class 1 Bldg
Result: Remained at w ork - Other
Injury Category: Injury
Contractor Reportable Accident: Yes
Date Accident Report Submitted to Government: 11/07/2007
Severe laceration to arm caused by poor housekeeping
CONTRACTOR CERTIFICATION
On behalf of the contractor, I certify that this Report is com plete and correct and all equipm ent and
m aterial used and w ork perform ed during this Reporting period are in com pliance w ith the contract
plans and specifications, to the best of m y know ledge, except as noted above.
QC REPRESENTATIVE'S SIGNATURE
DATE
SUPERINTENDENT'S INITIALS
DATE
14 - 7
Resident Management System
Contractor QC Report Not Imported
If you have not yet imported the Contractors’ QC Report, and click on the QC Report option,
you will get this message:
14 - 8
Resident Management System
Contractor QC Report Imported – Opportunity to Return
If you have imported the Contractors’ QC Report and have identified items that need to be
corrected, you can click on the Return to Contractor for Corrections box and it will be
returned with your next RMS to QCS export.
The QC Report
will then be
returned and
unchecked as
being complete
in the QCS
program on the
next export to
QCS.
15 - 1
Resident Management System
CHAPTER 15 - Government QA Daily Report
What this Chapter presents:
Quality Assurance and RMS
•
Overview
•
Daily QA Report
•
Sample Daily QA Report Form
•
Overview
This chapter addresses information on the Government QA Report and provides general
information for utilizing the associated Quality Assurance modules of the RMS program.
Quality Assurance is required on all construction contracts. The extent of assurance should be
commensurate with the value and complexity of the contracts involved and the requirements of
this regulation.
Elements of Quality Assurance
Daily QA Report
Government Staff
QA Tests
Required QA Verifications
3 Phase Inspection Checks
Planned Labor Interviews
Anticipated Adverse Weather
15 - 2
Resident Management System
Quality Assurance Requirements
These are areas that have to do with Planning that is required before the Government or the
Contractor can adequately prepare their respective Daily Reports. The Government, or the
Designer accomplishes some of the planning before the contract exists. This includes what
RMS refers to a QC Requirements as was discussed previously.
Although the government data is entered in the QA Report menu option and the contractor data
is entered in the QC Report menu option, much of the data is interdependent. For example, a
QC requirement such as a QC Test must be reported as completed in the QC Report option
before it can be verified in the QA Report, Verify QC Requirements option.
Creating a Daily QA REPORT
The QA Daily Report is generated in RMS to document the Quality Assurance progress of the
Government and to record, among other items, any conflicts, claims, or disagreements with the
Contractor. QA Reports used in Iraq should be the “IRAQ Construction” report format as
selected during the setup (Administration).
Keep in mind a simple thought: “The report should be a ‘record-of-fact’, not a ‘record of
your opinions’”.
15 - 3
Resident Management System
Iraq Construction QA Report
The only difference in theIraq Construction QA Report and the Civil and Military formated QA
Reports used elsewhere throughout the Corps of Engineers, is reflected on the Weather option
of the QA Report. All other elements are identical.
At the top of the screen is the REPORT NUMBER for this particular date (e.g., 756). This report
number coincides with the DAY construction commenced onsite. It is computed from the
Milestone identified as “Construction Start Date”. The date entered will result in the report
being QA/QC Report Number 1. Both the QA and the QC report use the same number for a
particular calendar day. Non-work days are included in the tabulation, therefore, the report
numbers will not always be sequential.
Iraq format
Labor reporting fields – Weekly report to Higher Headquarters. (NOTE: QCS is fully
implemented in Iraq for our Contractors, such labor will be reported via the normal method of
the QC Daily Report, as shown on the QC report in the previous chapter.)
Sample Daily QA Report Form Worksheet – Iraq Construction
The following pages present guidance on the content desired on the Daily Quality Assurance
Reports in Iraq. Of special note is the input required under Narratives: Daily Report to Higher
HQ and Weekly Report to Higher HQ. Also, G3 in Iraq regularly views the two Security
narratives (issues and lost manhours) in both the QA and QC reports.
15 - 4
Resident Management System
INSPECTORS QUALITY ASSURANCE REPORT (QAR)
DAILY LOG OF CONSTRUCTION - IRAQ
CONTRACT NO: W916QW-04-C-D-0007 (Add project unique identifying number)
PROJECT: PMO BILLETING (Specific project when Contract has multiple projects)
DATE: 11/08/07 (Date of the site observations)
WEATHER: SUNNY– NO DELAY (Important to note delay or no delay)
TEMPERATURE (MIN/MAX): (18C/20C) (Enter temperatures in Celsius)
NO. OF IRAQI MALES: 75 (Be observant of contractor’s supplied numbers)
NO. OF IRAQI FEMALES: 2 (Same as above)
NO. OF EXPAT MALES: 15 (Non-Iraqi, non-multinational force, non-U.S.)
NO. OF EXPAT FEMALES: 1 (Same as above)
MULTINATIONAL FORCE: 10 (Uniformed Personnel, non-U.S., non-Iraqi)
U.S.CITIZENS: 2 (Uniformed and non-uniformed)
OTHERS: 0 (In cases where it is unclear and not covered by the above)
Weekly Report to Higher HQ: Added to the report Dated for Friday.
Accomplished Last Week: (Bullets on major items)
Planned Next Two Weeks: (Bullets on goals for next two weeks.)
Significant Issues: (Items that Higher HQ needs to made aware.)
Construction Actual %: (Judgment on amount of project complete.)
-On-the-ground judgment of contract work accomplished.
-Percentage will lead the contractor’s invoiced amount.
-Percentage can be used to estimate Work In-Place Dollars.
-Construction Actual % X Project Value = WIP Dollars.
(Example)
Accomplished Last Week:
- Contractor placing concrete for building foundation
Planned Next Two Weeks:
- Finish placing foundation concrete
- Removal of forms for foundations placed last week
- Preparatory meetings for masonry walls
Significant Issues:
- Work force reduced due to terrorist’s threats
Construction Actual Percent: 15% complete
Daily Report to Higher HQ: (Paragraph on today’s activities)
- Contractor is placing concrete for the building foundation.
- Slump tests were taken and all passed.
- Cylinders were made and taken to the lab.
What Contractors were on the Jobsite today?
-Prime Contractor: Watkinson-IPM
15 - 5
Resident Management System
-Subcontractor: ABC Concrete
-User IT Contractor: XYZ Installations
Did anything occur today that may lead to a Claim or Change Order?
(General Rule for RMS Reporting: If nothing to add leave blank)
What equipment was being used?
Backhoe, D6 Dozer, Honda Generator
How did Security Issues effect the jobsite activities?
Contractor employees continue to receive threats against them and their families causing
a reduction in contractor personnel on jobsite.
How many manhours were lost due to threats or security issues?
Delay during entry caused 58 workers to be detained for 3 hours = 174 Manhours lost
Were any Preparatory or Initial Phase Meeting held today?
(Attach results of meeting/inspection to QC Report)
-Preparatory: Site utilities.
-Initial: Steel Erecting
Were any Materials received on the Jobsite?
-Received 100 cubic yards of concrete
-Five (5) pallets containing 400 bricks each.
Did the Contractor perform tests today? If so, what tests and results?
-Contractor QC performed slump tests on the concrete delivered. All results are
documented on the contractor’s QC report. All tests were taken and passed per contract
specifications.
Were there any Safety Issues on the Jobsite today?
-Contractor employee was not wearing a hard hat. Notified Contractor QC of the violation.
Worker was given a hard hat and received a warning from the contractor.
Conflicts in the Plans or Specifications:
-Specifications for pipe call for a 200mm PVC while the plans call for 300mm PVC. The
COR was contacted and verified with the designer that 200mm is acceptable. Contractor will use
the 200mm PVC.
General Remarks:
-Despite the reduction in workforce, the contractor is on schedule and actively recruiting
replacement workers.
-Job Site photographs recording concrete placement were filed in the project files.
-Photographs of site activities were taken forwarded to the Area Office POC for inclusion
in reports to Higher Headquarters.
(Photographs depicting reconstruction effort accomplishments, major events, and before/after
shots are needed weekly.)
Quality Assurance Representative:
15 - 6
Resident Management System
Sample – Quality Assurance Report Form – Page 1 of 2
REPORT NUMBER
INSPECTORS QUALITY ASSURANCE REPORT (QAR)
DAILY LOG OF CONSTRUCTION - IRAQ
756
Page 1 of 2
DATE
08 Nov 2007 - Thursday
(ER 1180-1-6)
PROJECT
CONTRACT NUMBER
OHC Overhead Cover Sys 004 - GRN Master
W912ER-04-D-0008 0004
CONTRACTOR
WEATHER
Perini Corporation
Weather Caused No Delay
Temperature Min 12 °C, Max 18 °C; No Precipitation; 10 KPH Wind
NUMBER OF PROJECT SITE WORKERS
IRAQI MALE
IRAQI FEMALE
3
EXPAT MALE
1
EXPAT FEMALE
55
COALITION
2
US CITIZEN
3
OTHER
6
TOTAL
0
70
QA NARRATIVE(S)
Weekly Report to Higher HQ
Fredrick Freeman Accomplished Last Week: All concrete slab work completed
Planned Next Two Weeks: Placement of E-Glass Panels
Significant Issues: GFE (Panels) are not being timely delivered
Construction Actual %: 65% complete
Daily Report to Higher HQ
Fredrick Freeman 1. Contractor is placing E-Glass panels on metal building structure for final positioning.
2. All concrete test results have been provided and all passed.
3. Utilities are being re-routed per plans.
How did security issues affect the jobsite activities?
Fredrick Freeman Workers were delayed arriving at jobsite due to terrorist threats outside of the IZ. Workers waited to enter until they
felt is was safe to do so. They were detained approximately 3 hours.
How m any m anhours were lost due to threats or security issues?
Fredrick Freeman Terrorists threats delayed entry of 53 workers outside the IZ. They arrived approximately 3 hours late for work. This
equates to 159 lost hours.
What Contractors were on the Jobsite today?
Fredrick Freeman Prime Constractor had 6 workers on site and 1st Tier sub had in the neighborhood of 50 workers.
What equipm ent was being used?
Fredrick Freeman Forklift being used to move E-Glass Panels
Crane being used to lift Panel to structure.
Welders being used in 3 locations.
QA FINAL FOLLOW-UPS (Evaluation of Contractors' performance on activities reported finished)
Final follow-up inspections were held today on the following Activities:
Activity #
N2323020
N2323030
N2323040
QA VERIFICATIONS
Foundations - 32
Start Butler Building Erection
Primary Erection @ lower roof
Contractors' QC Performance
Satisfactory QC
Satisfactory QC
Satisfactory QC
(Verification of QC requirements reported completed by the Contractor)
The following 2 QC Requirem ent were verified today:
Requirement #
CT-00001
Results
Complies
3/15/06 -0005 Compressive Strength Test for Concrete. Minimum
of 27.5 MPa at 28 days.
3/15/06 0005 Test was for concrete place at footing Gridline A2 to
A9. Received 10 trucks of concrete. 5 Cylinders were molded from
concrete from load number 4. The cylinder breaks will be as
ENG FORM 2538-1, Aug 89 (Facsimile)
The QCR will be attached to or filed with the QAR
15 - 7
Resident Management System
Sample – Quality Assurance Report Form – Page 2 of 2
INSPECTORS QUALITY ASSURANCE REPORT (QAR)
DAILY LOG OF CONSTRUCTION - IRAQ
REPORT NUMBER
756
Page 2 of 2
DATE
08 Nov 2007 - Thursday
(ER 1180-1-6)
PROJECT
CONTRACT NUMBER
OHC Overhead Cover Sys 004 - GRN Master
W912ER-04-D-0008 0004
follow s: 1@ 3days, 2@ 7 days and 2@ 28 days. Test result of 3
day break w as 2278 PSI, 7 day break w as 3088 PSI 14 day break =
3555 PSI 28 day breaks = 6252/6136 PSI
CT-00002
Complies
Air Content Testing
QA PUNCH LIST
(Describe QA Punch List items issued, verify QA Punch List items reported corrected by contractor)
The follow ing QA Punch List item s w ere issued today:
QA Punch List Item
QA-00002
Location
0005Footings
Description
Status
Grade 4 reinforcing steel has been used instead of the specified Not Reported Corrected
Grade 60. Remove and replace w ith proper grade.
QA-00003
Footings
Grade 4 reinforcing steel has been used instead of the specified Not Reported Corrected
Grade 60. Remove and replace w ith proper grade.
QA TESTING
(Include test description, and results)
The follow ing QA test w as perform ed today:
QA Test #
AT-00001
Description
300 psi pressure test on hydraulic lines to OH crane
INSPECTOR'S SIGNATURE
ENG FORM 2538-1, Aug 89 (Facsimile)
DATE
Results
Aw aiting Results
SUPERVISOR'S INITIALS
DATE
The QCR w ill be attached to or filed w ith the QAR
15 - 8
Resident Management System
Punch List Items
You are able to Copy punchlist items from one location to another. This is especially beneficial
in contracts such as dormitories, offices, etc., where the same comment is applicable to various
locations.
15 - 9
Resident Management System
Per the previous screen, check
the applicable existing QA
Punch List item you desire to
copy.
RMS automatically copies the
item into your Daily Report.
15 - 10
Resident Management System
You are also able to Replace on location
with another location (change the name of
any location globally). This will assist in
having the Punch List sort correctly.
16 - 1
Resident Management System
CHAPTER 16 - Contract Submittals and
SpecsIntact
What this Chapter presents:
•
•
Overview
•
SpecsIntact Submittal Program
•
Contract Setup
•
Submittal Requirements
•
Specification Sections
•
Submittal Details & Register (ENG Form 4288)
•
Transmittal Log (ENG Form 4025)
•
Submittal Reviewers
16 - 2
Resident Management System
Overview
This chapter furnishes information on Submittals for our contracts and provides general
instructions for utilizing the associated Submittal related modules of the RMS program.
The SpecsIntact Specification Production System
The use of SpecsIntact (Specifications-Kept-Intact) in both Military and Civil contracts is
mandatory, as established within Engineering Regulation ER 1110-2-1201 and CEMP-EA
(1110) Memorandum of 14 April 1997, for all FY00 and future projects. This policy has been
incorporated into ER 1110-345-700, “Drawings, Design Analysis, and Specifications”. Most of
the Design-Build Contractors use the program on Iraq contracts.
Contract Setup
During an earlier Chapter of this Manual, we setup the submittal register(s) for our contract. This
was done using the Contract Setup screen shown below. RMS can have as many different
Submittal Registers as needed.
16 - 3
Resident Management System
SUBMITTAL REQUIREMENTS
Submittal requirements can, and should be, imported from the SpecsIntact system. The
Import/Export feature is shown from the main Contract Menu / Import/Export by highlighting
Submittal Register. However, for you remaining neophytes that continue to insist on using an
Excel Spreadsheet for submittal registers, RMS has the capability to import such antiquated and
unofficial data format. If you have multiple submittal registers, be sure to select the correct
“Import To” register.
If you have made the SpecsIntact/Excel Template import, you are finished with the setup!!
However, you can still make manual entries if required, or even the complete register entry.
16 - 4
Resident Management System
Specification Sections
If you are using the Import feature from SpecsIntact, this selection is not absolutely required to
be used. However, this area is used if you need to change or modify a title of a specification
section, or if you need to manually enter a section that is not otherwise included. Your
revisions to this area will affect the current contract only and will not alter the specification
sections listed in the District Library. The nice feature of this area of the program is that you
can have submittal section numbers and titles that do not agree, and do not conflict with those
in the library. That is, a section in the library could have the same number as a section in the
contract, but a totally different title assigned to it.
RMS (District Library) includes the older format of MasterFormat 1995 and also includes the
MasterFormat 2004. The older version basically included 16 Specification Divisions and the
new format includes 50+ Divisions. When downloaded from SpecsInTact you will download all
of the fourteen characters available. With this format we are able to link the submittal items to
various other data, such as QC Test or QA Tests.
16 - 5
Resident Management System
Submittal Details and Requirements
Notice the distinct sections of this screen:
•
•
•
•
•
•
Identification section
Classification section (modified now to address Design-Build Contracting)
Drawing and Submittal Type references
Submittal Schedule section
Primary/Secondary Reviewer sections
Activity link and Time periods section on the Submittal Schedule section.
Submittal Requirements Window
After all submittal items are entered, a Submittal Register (ENG Form 4288) can be generated
as shown on the next page.
16 - 6
Resident Management System
Sample Submittal Register Form (ENG Form 4288)
SUBMITTAL REGISTER
TRANSACTIVITY
No.
ITEM
MITTAL
No.
No.
(ER 415-1-10)
TITLE AND LOCATION
CONTRACTOR
OHC Ov erhead Cov er Sy s 004 - GRN Master,Salah Ad Din, Kirkuk, and Ninewa Gov ernorates
08 Nov 2007
DATE
Perini Corporation
CLASSIFICATION
SPEC
PARAGRAPH
DESCRIPTION OF
SUBMITTAL
TYPE OF SUBMITTAL
No.
FIO
GA, DA
or CR
SECTION - 01015
W912ER-04-D-0008 0004
CONTRACT NUMBER
CONTRACTOR
SCHEDULE DATES
REVIEWER
SUBMIT
OFFICE / NAME
CONTRACTOR
ACTION
CORPS
APPROVAL MATERIAL
NEEDED
NEEDED
NEEDED
BY
BY
BY
GOVERNMENT
ACTION
CODE
RECEIVED
CORPS
CODE RETURNED
DATE
DATE
Technical Requirem ents
N1021248
7
1
01015 3.15.4
CLIN 0002 PX EAST - 60% Prelim. Design
DESIGN DATA
GA
MORLEY , J. BAR 24 Mar 06 08 Apr 06 08 Apr 06
A
16 Dec 05
G
30 Dec 05
N1031448
6
4
01015 3.15.5
CLIN 0003 EAST MWR - 60% Prelim. Design
DESIGN DATA
GA
MORLEY , J. BAR 21 Dec 05 05 Jan 06 05 Jan 06
A
16 Dec 05
G
08 Feb 06
N1031484
31
5
01015 3.15.5
CLIN 0003 EAST MWR -60/99% FINAL DESIGNDESIGN DATA
GA
MORLEY , J. BAR 10 Feb 06 25 Feb 06 25 Feb 06
A
09 Feb 06
G
23 Feb 06
N1041548
8
7
01015 3.15.6
CLIN 0004 WEST MWR - 60% Prelim. Design
DESIGN DATA
GA
MORLEY , J. BAR 03 Jan 06 18 Jan 06 18 Jan 06
A
28 Dec 05
G
03 Jan 06
N1041584
32
8
01015 3.15.6
CLIN 0004 WEST MWR - 60/99% FINAL DESIGDESIGN DATA
GA
MORLEY , J. BAR 09 Feb 06 24 Feb 06 24 Feb 06
A
09 Feb 06
G
23 Feb 06
N1051148
4
10
01015 3.15.3
CLIN 0005 PX WEST - 60% Prelim. Design
DESIGN DATA
GA
MORLEY , J. BAR 30 Dec 05 14 Jan 06 14 Jan 06
A
16 Dec 05
G
10 Jan 06
N1051184
10.2
11
01015 3.15.3
CLIN 0005 PX WEST -60/99% FINAL DESIGN DESIGN DATA
GA
MORLEY , J. BAR 27 Jan 06 11 Feb 06 11 Feb 06
A
30 Jan 06
G
10 Feb 06
N1062448
11
13
01015 3.15.11
CLIN 0006 DFAC - 60% Prelim. Design
DESIGN DATA
GA
MORLEY , J. BAR 18 May 06 02 Jun 06 02 Jun 06
A
03 Jan 06
G
08 Feb 06
N1071948
20
16
01015 3.15.12
CLIN 0007 DFAC - 60% Prelim. Design
DESIGN DATA
GA
MORLEY , J. BAR 03 Feb 06 18 Feb 06 18 Feb 06
A
30 Jan 06
G
17 Feb 06
N1071984
65
17
01015 3.15.12
CLIN 0007 DFAC - 60/99% Final Design
DESIGN DATA
GA
MORLEY , J. BAR 05 Apr 06 20 Apr 06 20 Apr 06
A
10 Apr 06
G
19 Apr 06
N1082048
14
19
01015 3.15.13
CLIN 0008 PX - 60% Prelim. Design
DESIGN DATA
GA
MORLEY , J. BAR 03 May 06 18 May 06 18 May 06
A
09 Jan 06
G
25 Jan 06
17 May 06
N1082084
75
20
01015 3.15.13
CLIN 0008 PX - 60/99% Final Design
DESIGN DATA
GA
MORLEY , J. BAR 03 May 06 18 May 06 18 May 06
A
28 Apr 06
G
N1093248
52
22
01015 3.15.17
CLIN 0009 DFAC - 60% Prelim. Design
DESIGN DATA
GA
MORLEY , J. BAR 18 May 06 02 Jun 06 02 Jun 06
A
27 Mar 06
G
07 Apr 06
N1093284
85
23
01015 3.15.17
CLIN 0009 DFAC - 60%/99% Final Design
DESIGN DATA
GA
MORLEY , J. BAR 18 May 06 02 Jun 06 02 Jun 06
A
18 May 06
G
01 Jun 06
N1103348
53
25
01015 3 15 18
CLIN 0010 EAGLES NEST DFAC - 60% Prelim DESIGN DATA
GA
MORLEY J BAR 31 May 06 15 Jun 06 15 Jun 06
A
27 Mar 06
G
07 Apr 06
Features – Submittals/Transmittals
1. Multi-delete for Submittal and Transmittal screens. You are able to perform multiple
deletes.
2. Submittal COPY feature is available for all users. Previous versions only had this
option available for the System Administrators. (File / Utilities menu)
3. RMS includes a “Notify Label” on the QCS IMPORT screen that lets User’s know
when transmittals have been imported from the Contractor so they can be
timestamped in.
16 - 7
Resident Management System
Transmittal Log (ENG Form 4025)
The form provided by the Contractor to track submittal items is the Transmittal Log. This log
will include one or more submittal items for one (and only one) technical specification section.
QCS will print this form for the Contractor as part of the Submittal Control process.
16 - 8
Resident Management System
Sample Transmittal Form (ENG Form 4025)
TRANSMITTAL OF SHOP DRAWINGS, EQUIPMENT DATA, MATERIAL SAMPLES, OR
MANUFACTURER'S CERTIFICATES OF COMPLIANCE
DATE
TRANSMITTAL NO.
03/02/2006
03300-1
(Read instructions on the reverse side prior to initiating this form)
SECTION I - REQUEST FOR APPROVAL OF THE FOLLOWING ITEMS
TO:
FROM:
GRD Reachback-Submittals EC-T
Training office - For Personel Storage
Perini Corporation
73 Mt Wayte Avenue
Framingham, MA 01790
SPECIFICATION SEC. NO. (Cov er only one section with each transmittal)
03300 Cast-In-Place Structural Concrete
ITEM
NO.
DESCRIPTION OF ITEM SUBMITTED
(Ty pe size, model number/etc.)
b.
a.
(This section w ill be initiated by the contractor)
CONTRACT NO.
CHECK ONE:
X THIS IS A NEW TRANSMITTAL
W912ER-04-D-0008 0004
THIS IS A RESUBMITTAL OF
TRANSMITTAL ___________
PROJECT TITLE AND LOCATION
01-Main Register
OHC Overhead Cover Sys 004 - GRN Master Salah Ad Din, Kirkuk, and Ninew a Governorates
MFG OR CONTR.
CAT., CURVE
DRAWING OR
BROCHURE NO.
(See instruction no. 8)
c.
PRODUCT DATA
NO.
OF
COPIES
CONTRACT REFERENCE
DOCUMENT
SPEC.
PARA. NO.
DRAWING
SHEET NO.
e.
f.
d.
1.2
FOR
CONTRACTOR
USE CODE
VARIATION
(See
Instruction
No. 6)
FOR
CE
USE
CODE
g.
h.
i.
1
Mixture Proportions for Concrete
2
Test Reports for Concrete
TEST REPORTS
5
1.4
A
3
Qualifications of CQC Personnel
CERTIFICATES
5
1.5
A
REMARKS
This submittal is for Camp Anaconda - CLIN's 2, 3, 4, 5, 11, 12, 13.
5
CHECK ONE: THIS TRANSMITTAL IS
FOR X FIO
GA
DA
CR
A
I certify that the above submitted items have been reviewed
in detail and are correct and in the strict conformance with the
contract drawings and specifications except as otherwise
stated.
NAME AND SIGNATURE OF CONTRACTOR
SECTION II - APPROVAL ACTION
ENCLOSURES RETURNED (List by item No.)
ENG FORM 4025-R, MAR 95
NAME, TITLE AND SIGNATURE OF APPROVING AUTHORITY
(ER 415-1-10)
EDITION OF SEP 93 IS OBSOLETE.
SHEET 1 OF 1
DATE
(Proponent: CEMP-CE)
16 - 9
Resident Management System
Transmittals in Review
Imported Transmittals
If you have imported transmittals from the Contractor they will be listed here until such time as
they are logged in. If they have all been logged in, RMS will indicate that also.
16 - 10
Resident Management System
Review Status
This area reflects the review status and actions taken on transmittals until such time as they are
sent to the Contractor. Once they are sent to the Contractor they no longer appear on this
screen.
16 - 11
Resident Management System
Submittal Reviewers
This feature allows you to revise and/or reassign Submittal Reviewers to a particular submittal
item, to a section, and so forth. You may modify the screen directly by selecting the Reviewer
or Review Days on the main screen shown.
Alternatively, you may push the Update and have the following choices:
17 - 1
Resident Management System
Chapter 17 – Schedules & the Standard Data
Exchange Format (SDEF)
What this Chapter presents:
Contractor Schedule Requirements
•
Overview
•
Standard Data Exchange Format (SDEF)
•
RMS and the SDEF
•
Contract Specified Project Schedule
•
Milestone Schedule
•
Monthly Schedule
•
Activity Schedule
•
Feature Schedule
17 - 2
Resident Management System
Schedules and the SDEF
Overview
This chapter furnishes basic information on the Schedules and the Standard Data Exchange
Format and provides general instructions for utilizing the associated modules of the RMS
program.
RMS maintains four types of schedules
Milestone Schedule
The most important schedule to the customer is the Milestone schedule. This schedule
includes not only major milestones like the Contract Award Date, Notice To Proceed,
Construction Start Date, and BOD, but can also include important milestones for the customer,
like partial turnover for installing customer furniture, scheduling User Training classes, O&M
turnover, etc. During construction these types of milestones should be reviewed at the weekly
planning meetings with the contractor and updated in RMS as part of the daily QA reporting
process. Prior to construction award, milestone dates should come from P2 to RMS, but after
17 - 3
Resident Management System
construction award the construction milestone dates will come from RMS to P2. Some offices
choose to include the Milestones the contractor may indicate on his project schedule.
Placement Schedule
This is the area from which you create your Placement Curve and should ensure that the
projected placement reaches 100%. You can create this manually, use an S-curve, or use the
Contractor’s activity scheduled start and finish dates.
A Baseline Schedule can be entered from this selection also. You can create the Baseline
manually, or simply copy any placement to the Baseline. The baseline should be completed to
make use of the District Baseline Schedules from the Summary Level.
17 - 4
Resident Management System
Activity Schedule
This is the schedule used at the jobsite to forecast projected need dates for submittals,
materials, equipment, work crews, testing schedules, 3-Phase inspections, etc. The level of
detail (i.e., form footings, set re-bar, place concrete) is not very useful for the customer or those
not tasked with the day-to-day scheduling operations at the jobsite. It would not make sense to
duplicate this schedule in P2.
17 - 5
Resident Management System
Feature Schedule
As part of the contractor’s QC Plan, Definable Features of Work for a construction contract are
identified by the contractor to plan Preparatory, Initial and Follow-Up inspections of the work.
RMS generates a feature schedule by finding the first activity scheduled to start under a
feature and the last activity scheduled to be finished under a feature. Actual progress is
determined by computing earnings to date on the activities for a feature. Most construction
contracts (even those with 1000’s to tens of 1000’s of work activities) have fewer than 30
features of work. This rolled up feature schedule makes an excellent schedule for monitoring the
progress on a contract. The customers find this schedule very easy to understand. Typical
features include items like Site Utilities, Interior Electrical, Roofing, etc. This schedule is sent to
P2 from RMS.
17 - 6
Resident Management System
Standard Data Exchange Format (SDEF)
The SDEF was developed by the U.S. Army Construction Engineering Research Laboratories
(USACERL) in conjunction with the Corps of Engineers Headquarters, Corps Field Offices,
construction management consultants, scheduling software vendors, and professional
associations.
Implementation of the SDEF makes data transfer between the Corps of Engineers and
construction companies easier by establishing a standard format for the exchange of scheduling
data.
NOTE: As of 2001, only Primavera is providing a Windows
program (P3) with SDEF compatibility.
Feature of the SDEF
You can merge two SDEF files into one file with the available “SDEF Merger Utility”. This utility
is available on the RMS and QCS Websites.
RMS and the SDEF
This guide specification covers the requirements for use of RMS for contract monitoring and
administration. (QCS = 01 45 02.00 10) (Construction Quality Control = 01 45 00.00 20)
Contract Specified Project Schedule
This guide specification covers the requirements for the preparation and maintenance of the
project schedule. (Project Schedule = -1 31 19.00 40) (NAS = 01 32 17.00 20)
District Milestone Events – District Library
Milestones are arranged in sub-groups and are based on the time period in which they occur.
The sub-groups you may select are listed below:
All Events
Design
Construction
Post Construction
= Listing of All Milestone Events
= Events occurring prior to award
= Events occurring during construction
= Events occurring following construction
17 - 7
Resident Management System
Milestone Events – Local Library
Milestones that are “gray”
on this screen are
mandatory milestones
and originate from either
the RMS program, or the
District Library. They are
Read Only and only the
“Order No.” can be
modified. You can
choose to record the time
of the milestone and
whether to add the
milestone to contracts as
they are entered into the
RMS program.
17 - 8
Resident Management System
The Milestone Schedule in the contract reflects all the milestones from the RMS Program
(System Milestones), the District and the Local Libraries. You are also able to add milestones
that are unique to an individual contract, but these would not be listed in the Local Library, nor
would they be available for other contracts. Remember, if you have multiple phases on a
contract you can choose to use them, or roll them up into only one phase (Contract Setup).
The Milestone
Schedule is also
available at the
Administration /
Contract Status /
Milestone
Schedule tab.
The information
on this screen will
be shared with
P2; therefore it is
very important
that it be kept
current.
17 - 9
Resident Management System
Milestone Schedules - Summary Reports
There are three Milestone related reports available from the Reports Explorer, from the
Summary area of RMS.
17 - 10
Resident Management System
Monthly Progress
This selection should always be completed to provide either scheduled or projected earnings for
the monthly projections.
The Monthly Progress shows earnings to-date figures that are automatically posted from each
Contractor pay estimate. You can generate the Scheduled Progress from this selection.
17 - 11
Resident Management System
Activity Schedule
This option gives you a quick overview of your activity schedule. The information in this section
is either entered directly into RMS or imported from the QC module (QCS) or scheduling
software package. There is an opportunity to review imported data before incorporating it into
RMS. Choosing Activity Schedule brings up the following screen.
This is a Read Only screen if the Contractor is using the QCS program and no changes can be
made from this screen. The scheduled dates are either imported from the Contractor’s NAS or
manually updated. The actual dates are imported (or manually extracted from) the Contractor’s
Daily QC Report.
By using the drop-down menu, at the upper righthand side of the screen, you can view the
activities sorted by any of the following:
•
•
•
•
•
•
All Activities (Default)
Critical Activities
Activities Not Started
Activities in Progress
Activities Not Finished
Activities Finished
17 - 12
Resident Management System
Feature Schedule
As Definable Features of Work are required to be identified by the Contractor as part of his
Quality Control program, this Feature Schedule of RMS is used to track and report when the
Preparatory and Initial 3-Phase Inspection Control Meetings are scheduled and actually
conducted.
All Contractor Activities should be assigned to one and only one Definable
Feature of Work.
The Definable Feature of Work may have MANY Activities linked to it.
The Definable Features of Work in the Quality Control Plan should match
those in the Scheduling program and the QCS program if being used.
The Feature Schedule can be accessed from the main Contract Menu / Schedules / Feature
Schedule as shown below. If the contractor is using the QCS program, this will be a READ
ONLY screen.
The Preparatory and Initial dates on this screen are taken from the Contractors’ Daily QC
Report. If the contractor is not using QCS, entries may be manually entered here.
18 - 1
Resident Management System
CHAPTER 18 - Closeout Activities
What this Chapter presents:
•
Overview
•
Closeout Activities
•
Real Property
•
Installed Property
•
Transfers - DD Form 1354
•
Requisitions - DD Form 1149
•
Contractor Evaluations - DD Form 2626
•
Warranty Inspections
18 - 2
Resident Management System
Overview
This chapter addresses requirements for Transfer of Completed Facilities
and Warranty enforcement procedures as addressed in ER 415-345-38 (30 June 2000).
The referenced Engineering Regulation is the basic regulation that prescribes USACE
policy and procedures for transfer of completed construction projects.
We will discuss how the RMS program is setup to assist us in closing out a contract.
Closeout Activities in RMS
RMS provides the following input screens and forms for closing out a construction
contract and more are under consideration for future releases:
•
•
•
•
•
Real Property Screens
Transfers - DD Form 1354 Input screens and reports
Requisitions - DD Form 1149 Input screens and reports
Contractor Evaluations - DD Form 2626 Input screens and reports
Warranty Inspection screens and reports
18 - 3
Resident Management System
Real Property
For Military construction contracts, Real Property is required to be documented by use
of the DD Form 1354, “Transfer and Acceptance of Military Real Property”. This form is
used to transfer a facility, or part of a facility, to the Using Service prior to either partial or
complete occupancy. This form may be supplemented by DA Form 2877, “Real Property
Record”, on Army construction contracts.
As shown above, Real Property is accessed from Contract Menu / Closeout / Real
Property. This screen will show all items of Real Property that have been entered
during the planning phases of the contract.
18 - 4
Resident Management System
Transfers – DD Form 1354
Once the Real Property is entered, you may prepare a DD Form 1354 and link one or
more pieces of the Real Property to the form. It is not uncommon on larger projects to
have multiple Transfer Documents, as you need to provide one for the Customer to sign
with each phase or portion of the contract turned over to them.
18 - 5
Resident Management System
Sample - DD Form 1354 Report Form
You may view and print the form itself by selecting the DD1354 button at the top of the
screen.
18 - 6
Resident Management System
Sample - Real Property Form – DD Form 1354
Transfer and Acceptance of Military Real Property – Page 1 of 2
18 - 7
Resident Management System
Installed Property
Included in the category of Installed Property are those items of equipment that are
incorporated into the design of a facility. These are typically acknowledged as those
pieces of equipment that require maintenance, have serial numbers and can be
accounted for individually. This property is printed out on a separate report and is meant
to accompany the DD Form 1354 for the Customer. Installed Property is not entered
on the DD Form 1354 directly but, rather is one of the QC Requirements addressed
earlier.
18 - 8
Resident Management System
Transfer Property (Requisitions - DD Form 1149)
Transfer Property is that property that “changes hands” during the construction
process. Examples would include Government Furnished Property (GFP) that the
Contractor would install or consume during the contract performance. It would include
spare parts and supplies that are furnished by the contractor as part of the contract
requirements, but not actually installed. It could also include equipment or materials that
were deleted as part of a contract modification and that were beneficial for the
Government to retain rather than get some minimum token credit for the deletion.
Requisition and Invoice Screen
When you choose Requisitions – DD1149, this screen appears and lists all the DD
Form 1149’s previously entered into the system.
The DD Form 1149 is used to document the transfer of property to the customer and
should include transfers to/from the Contractor,and the Corps of Engineers. This
transfer may take place in more than one stage; if so, you will do one DD Form 1149 for
each transfer.
18 - 9
Resident Management System
DD 1149 Input Screens
The screens are pretty much self-explanatory and are used to compile the actual report.
The information should be as complete as necessary to provide on audit trail of where
each piece of transferred property actually was delivered.
18 - 10
Resident Management System
Sample Transfer Property Form – DD Form 1149
Requisition and Invoice/Shipping Document – Page 1 of 2
18 - 11
Resident Management System
Contractor Evaluations – DD Form 2626
It is USACE standard operating procedure that the Contracting Officer evaluate
contractor’s performance and prepare a performance report using the DD Form 2626,
Performance Evaluation – Construction Contracts, for each construction contract of:
$100,000 or more;
$25,000 or more, if any element of performance is either unsatisfactory or
outstanding;
$10,000 or more, if the contract is terminated for default.
RMS / CCASS Interface
The interface between RMS and CCASS is now available. Additional information can be
obtained from the ACASS/CCASS User Manual at the following website: CPARS
<http://www.cpars.navy.mil>
The Construction evaluation will be prepared in RMS. When the evaluator has prepared
the evaluation to the point it is ready to be sent to the Assessing Official, it will be
marked completed and ready to be sent to CCASS in RMS.
The evaluation will be exported from RMS to CCASS. When the evaluation from RMS is
imported into CCASS, the contract will automatically be registered. It is not necessary to
“pre-register contracts" in CCASS when using the RMS-CCASS interface.
18 - 12
Resident Management System
A status update of "P" for Pending means that the evaluation has been sent to CCASS,
but the Focal Point has not yet authorized access to it. A status of "I" for Initiated means
that the evaluation has been copied to CCASS and the Focal Point has already
authorized access to it. It is recommended that the CCASS Focal Point authorize access
to contracts prior to the evaluation being sent to CCASS from RMS. This will allow the
Assessing Official (Evaluator), once notified that the evaluation is copied to CCASS, to
login to CCASS and continue processing the evaluation to the Contractor
Representative. It is further recommended that the Focal Point give access to not only
the Assessing Official, but the Contractor Representative and Reviewing Official as well.
The Focal Point should also include email addresses when authorizing access to allow
CCASS to send the system email notifications as the evaluation is moved through the
workflow process. The Contract Data Entry Representative roles will not be required for
evaluations being copied from RMS.
CCASS will provide RMS with updated status of the evaluation each time the evaluation
is updated in CCASS all the way through completion.
Once you have indicated you are complete with the evaluation in RMS
and indicate that is ready to be sent to CCASS, this green check will
appear and RMS will automatically send the evaluation to CCASS as
scheduled within the RMS program.
18 - 13
Resident Management System
The DD Form 2626 Report Form
You may access the report form directly from this screen by selecting the DD2626
button.
18 - 14
Resident Management System
Sample - DD Form 2626 Report Form - Page 1 of 2
FOR OFFICIAL USE ONLY (WHEN COMPLETED)
1. CONTRACT NUMBER
PERFORMANCE EVALUATION
(CONSTRUCTION)
W912ER04D0008
0004
2. DUNS NUMBER
068993454
IMPORTANT: Be sure to complete Part III - Evaluation of Performance Elements on reverse.
PART I - GENERAL CONTRACT DATA
3. TYPE OF EVALUATION (X one)
4. TERMINATED FOR DEFAULT
INTERIM (List Percentage ________%) X
FINAL
AMENDED
5. CONTRACTOR(Name, Address, and ZIP code)
6.a. PROCUREMENT METHOD (X one)
Perini Corporation
73 Mt Wayte Avenue
Framingham
MA 07110
NAICS Code: 262322
X
SEALED BID
NEGOTIATED
b. TYPE OF CONTRACT (X one)
X FIRM FIXED PRICE
COST REIMBURSEMENT
OTHER (Specify)
7. DESCRIPTION AND LOCATION OF WORK
This Master Project is for the following projects:
URI
URI
URI
URI
URI
URI
URI
URI
URI
20799
20797
19763
20798
19766
19759
19758
19765
19764
OHC
OHC
OHC
OHC
OHC
OHC
OHC
OHC
OHC
-
Anaconda PX West
Anaconda DFAC #3
Anaconda INdoor Gym (East)
Anaconda PX East
Anaconda Theatre
Anaconda West MWR
Anaconda East MWR
Warrior PX
Warrior DFAC
8. TYPE AND PERCENT OF SUBCONTRACTING
0% subcontracted.
9. FISCAL DATA
a.AMOUNT OF BASIC
CONTRACT
b.TOTAL AMOUNT OF
MODIFICATIONS
$65,236,916
10. SIGNIFICANT`` DATES
a.DATE OF AWARD
09/28/2005
c.LIQUIDATED
DAMAGES ASSESSED
$1,207,489
b.ORIGINAL CONTRACT
COMPLETION DATE
03/11/2007
d.NET AMOUNT PAID
CONTRACTOR
$0
c.REVISED CONTRACT
COMPLETION DATE
$27,794,094
d.DATE WORK
ACCEPTED
03/11/2007
PART II - PERFORMANCE EVALUATION OF CONTRACTOR
11. OVERALL RATING (X appropriate block)
OUTSTANDING
ABOVE AVERAGE
X
SATISFACTORY
12. EVALUATED BY
a. ORGANIZATION ((Nam e and Address (Include Zip Code))
CEGRC
c. NAME AND TITLE
UNSATISFACTORY (Explain
in item 20 on reverse)
MARGINAL
b. TELEPHONE NUMBER (Include Area Code)
540-665-5012
d. SIGNATURE
e. DATE
ERIC ANDREWS, MAJ
Project Manager
13. EVALUATION REVIEWED BY
a. ORGANIZATION ((Nam e and Address (Include Zip Code))
c. NAME AND TITLE
d. SIGNATURE
b. TELEPHONE NUMBER (Include Area Code)
e. DATE
14. AGENCY USE (Distribution, etc.)
DD FORM 2626, JUN 94
USAPPC V1.01
EXCEPTION TO SF 1420
APPROVED BY GSA-IRSM 6/94
18 - 15
Resident Management System
Sample - DD Form 2626 Report Form - Page 2 of 2
FOR OFFICIAL USE ONLY (WHEN COMPLETED)
CONTRACT NUMBER
PART III - EVALUATION OF PERFORMANCE ELEMENTS
N/A = NOT APPLICABLE
O = OUTSTANDING
N/A
15.QUALITY CONTROL
a. QUALITY OF WORKMANSHIP
b. ADEQUACY OF THE CQC PLAN
c . IMPLEMENTATION OF THE CQC
PLAN
A = ABOVE AVERAGE
O
A
S
M
a. COOPERATION AND RESPONSIVENESS
b. MANAGEMENT OF RESOURCES /
PERSONNEL
X
c. COORDINATION AND CONTROL OF
SUBCONTRACTORS
X
e. STORAGE OF MATERIALS
f . ADEQUACY OF MATERIALS
g. ADEQUACY OF SUBMITTALS
X
X
X
X
k. IDENTIFICATION / CORRECTION
OF DEFICIENT WORK IN A TIMELY
MANNER
X
X
O
X
X
X
X
18.COMPLIANCE WITH LABOR
STANDARDS
a. CORRECTION OF NOTED DEFICIENCIES
X
b. PAYROLLS PROPERLY COMPLETED
AND SUBMITTED
c . RESOLUTION OF DELAYS
d. SUBMISSION OF REQUIRED
DOCUMENTATION
X
X
e. COMPLETION OF PUNCHLIST
ITEMS
X
c. COMPLIANCE WITH LABOR LAWS
AND REGULATIONS WITH SPECIFIC
ATTENTION OF THE DAVIS-BACON
ACT AND EEO REQUIREMENTS
19.COMPLIANCE WITH SAFETY
STANDARDS
f . SUBMISSION OF UPDATED AND
REVISED PROGRESS SCHEDULES
X
g. WARRANTY RESPONSE
X
X
X
X
a. ADEQUACY OF SAFETY PLAN
b. IMPLEMENTATION OF SAFETY PLAN
c. CORRECTION OF NOTED DEFICIENCIES
20.REMARKS (Explanation of unsatisfactory evaluation is required. Other comments are optional. Provide facts concerning specific
events or actions to justify the evaluation. These data must be in sufficient detail to assist contracting officers in determining the
contractor's responsibility. Continue on separate sheet(s), if needed.)
Very good contractor.
7. DESCRIPTION AND LOCATION OF WORK (Continued...)
URI 19822
URI 20819
URI 20813
URI 19931
URI 19817
URI 19816
URI 19814
URI 19767
URI 19768
URI 23371
Salah Ad Din,
Salah Ad Din,
OHC - Diamondack MWR
OHC - FOB Marez DFAC
OHC - FOB Endurance (Q-West) DFAC
OHC - Dimaondback PX
OHC - Diamondback Gym
OHC - Marez Gym
OHC - FOB Diamondback DFAC
OHC - Victory DFAC, FOB Speicher
OHC - Eagle's Nest DFAC
OHC - Mob/Demob
Kirkuk, and Ninewa Governorates
Kirkuk, and Ninewa Governorates
DD FORM 2626, JUN 94
S
X
X
b. ADHERENCE TO APPROVED
SCHEDULE
EVALUATOR REMARKS:
A
X
e. EFFECTIVENESS OF JOB-SITE
SUPERVISION
i. IMPLEMENTATION OF
SUBCONTRACTING PLAN
17.TIMELY PERFORMANCE
a. ADEQUACY OF INITIAL PROGRESS
SCHEDULE
N/A
X
X
g. PROFESSIONAL CONDUCT
h. REVIEW/RESOLUTION OF
SUBCONTRACTOR'S ISSUES
0004
U = UNSATISFACTORY
d. ADEQUACY OF SITE CLEAN-UP
f. COMPLIANCE WITH LAWS AND
REGULATIONS
X
X
h. ADEQUACY OF QC TESTING
i. ADEQUACY OF AS-BUILTS
j. USE OF SPECIFIED MATERIALS
W912ER04D0008
M = MARGINAL
U 16.EFFECTIVENESS OF MANAGEMENT
X
X
d. QUALITY OF QC
DOCUMENTATION
S = SATISFACTORY
X
X
X
M
U
18 - 16
Resident Management System
Warranty Inspections
The warranty provisions on each fixed-price construction contract are described in FAR
clause 52.276.21, “Warranty of Construction”. The provisions of this clause state that the
contractor must provide a warranty that the work required by the construction contract
conforms to the contract requirements and is free of any defect in equipment, material,
and workmanship for a period of 1 year after the date of final acceptance of the work or
1 year from the date the Government takes possession. Further guidance on
implementing instructions concerning the warranty provisions is found in ER 415-345-38,
“Transfer and Warranties”.
We are required to conduct Post-Completion Inspections during the period of Warranty
and report any deficiencies out to the Contractor for correction. These intervals of
inspection are referred to a 4, 9 and 12 Month Warranty Inspections.
You begin this process by selecting the Add button.
Give the Facility a Short Title and enter the date the Warranty Period commences.
Select the OK button. If you have more than one phase, you will need to choose which
phase to add the Facility to.
18 - 17
Resident Management System
You will then be
able to enter and
track deficiencies
identified during the
inspection. These
work very similar to
QA Punch List
Items.
You enter the
Warranty Items on
the Tab labelled Warranty Items.
Warrany dates are automatically calculated and tabulated when you enter the Start date
on the previous screens.
18 - 18
Resident Management System
4 Month, 9 Month, and 12 Month Warranty Inspection
Choose the Inspection you are going to conduct by highlighting and hitting the Edit
button.
Warranty Dates will recalculate whenever the START
DATE of the Warranty period changes.
18 - 19
Resident Management System
Add Attendees
participating in the
Inspection.
Add any Warranty
Items discovered
during the
inspection
18 - 20
Resident Management System
You are now
ready to export
the Warranty Item
to the Contractor.
Transfer Warranty Items to Contractor (QCS)
If you are using QCS on your contract, the Warranty Items will be sent electronically to
the Contractor for resolution.
18 - 21
Resident Management System
The Contractor should address the Warranty Items and return the results/findings
electronically to close out the action.
The Government (RMS) receives the Warranty Item response from the Contractor and
Evaluates the Contractor’s performance on completing the item.