1
Resident Management System
RMS
User’s Guide
Software Version 2.37
14 April 2008
Folsom Bridge Project
Sacramento District - CESPK
Resident Management System
U.S. Army Corps of Engineers
RMS Center
(760) 247-0217 – Voice
(760) 247-2547 - Fax
Resident Management System
Written under contract for the RMS Center,
Los Angeles District, U.S. Army Corps of Engineers
While every precaution has been taken in the preparation of this manual,
the U.S. Army Corps of Engineers and the author assume no responsibility for
damages resulting from the use of information contained herein.
Trademarks
Windows 98, Windows ME, Windows 2000, Windows NT and Windows XP
are registered trademarks of the Microsoft Corporation.
HP and LaserJet are registered trademarks of the Hewlett-Packard Corporation.
TOC - 1
Resident Management System
Table of Contents
Introduction ...................................................................................................................................1
What Is RMS, QAS, and QCS? .................................................................................................1
Opening Screens.......................................................................................................................2
RMS Opening Screen ...............................................................................................................2
Archive a Contract..............................................................................................................2
How the Archive Feature Works .....................................................................................3
QAS Opening Screen................................................................................................................4
Review the Steps to Install and use QAS ..........................................................................4
Actual Installation of QAS ..................................................................................................5
Assign QAS User Role and Password .........................................................................10
Choose contract for using QAS ....................................................................................11
Contract Setup for QAS................................................................................................11
Assign Remote QAS Site .............................................................................................12
Assign one or more RMS Modules to the Remote QAS Site .......................................14
Export the Contract to the Remote QAS Site ...............................................................16
Add a new contract to the QAS Program .....................................................................18
Request Export File ......................................................................................................18
Import from SFTP .........................................................................................................19
Import from File ............................................................................................................19
Automated Import and Export.......................................................................................20
Log in to QAS ..............................................................................................................20
Enter Contact Information in QAS ................................................................................21
Contract is now added to the QAS Program ....................................................................22
Warning! On use of Remote QAS and QCS Sites ...........................................................22
Updating the QAS Program .............................................................................................23
QCS Opening Screen..............................................................................................................24
About This Manual ..................................................................................................................24
RMS Center Tools...................................................................................................................24
RMS Center Assistance ..........................................................................................................25
Connect to Live Assist.............................................................................................................26
Chapter 1 - Overview, Basics and Logging In...............................................................................1
What this Chapter presents:......................................................................................................1
Logging Into the System............................................................................................................1
Logging Into the System Via the RMS Website and Citrix ........................................................3
Menu Bar Options .....................................................................................................................8
Summary Module ......................................................................................................................8
Baseline Schedules............................................................................................................9
TOC - 2
Resident Management System
Custom Reports ...............................................................................................................12
Custom Reports ...............................................................................................................13
Custom Report – Summary Level ................................................................................19
Contract Groups...............................................................................................................20
P2 Projects.......................................................................................................................22
P2 Project Structure .....................................................................................................22
Example of a P2 Project organized by WBS ................................................................22
Keys points to keep in mind..........................................................................................23
Download P2 Data........................................................................................................27
Identify and Link P2 Projects to RMS Contracts...........................................................29
Controlling the RMS – P2 Interface ..............................................................................30
Information Interchanged from RMS to P2 ...................................................................32
Information that P2 downloads from CRMS: ................................................................33
Information that RMS downloads from P2 prior to Award.............................................33
Contractor Claims ............................................................................................................34
District Library – District Policy – Claim Dates .............................................................35
Adding a Claim .............................................................................................................36
Supporting Documents for Claims ................................................................................38
Reports for Claims........................................................................................................39
Interface Schedules .........................................................................................................41
Office Module ..........................................................................................................................42
Local Library............................................................................................................................43
District Library .........................................................................................................................44
System Library ........................................................................................................................45
Reports.............................................................................................................................46
Chapter 2 - Office and Staff Setup................................................................................................1
What this Chapter presents:......................................................................................................1
Six steps to success to use RMS ..............................................................................................1
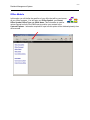
Office Module ............................................................................................................................2
Office Description...............................................................................................................3
Deleting an Office ...........................................................................................................4
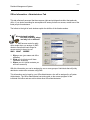
Office Information - Administrators Tab ..........................................................................5
Office Administration Rights ...........................................................................................6
Full Rights Screen ..........................................................................................................6
Selected Rights Screen ..................................................................................................6
Office Personnel.................................................................................................................7
Office Personnel .............................................................................................................7
Other District Personnel .................................................................................................7
Non District Personnel....................................................................................................7
Inactive Personnel ..........................................................................................................7
Office Policy .......................................................................................................................8
Project Delivery Team Members ...............................................................................................9
Chapter 3 Adding, Selecting & Deleting a Contract ......................................................................1
What this Chapter presents:......................................................................................................1
Selecting a New Contract..........................................................................................................1
Adding a New Contract .............................................................................................................2
Adding a Contract for Training or Read Only Purposes ............................................................4
Chapter 4 - Entering Contract Description and Status ..................................................................1
What this Chapter presents:......................................................................................................1
TOC - 3
Resident Management System
Entering Contract Description and Status .................................................................................1
Contract Description Tab ...................................................................................................2
P2 Projects Tab..................................................................................................................3
Contract Information Tab ...................................................................................................5
Contract Status ..................................................................................................................6
Contract Status – Future Contract .....................................................................................6
Status / Issues Tab ............................................................................................................6
Contract Status – Active Phase .........................................................................................6
Contract Status – Active Phase .........................................................................................7
Status Photo Tab ...............................................................................................................8
Milestones Schedule Tab...................................................................................................8
Milestones Schedule Tab...................................................................................................9
Definitions of Milestone Dates for the RMS System .....................................................10
Contractor Final Payment (CC880) – Date on the Check/EFT on the Final Payment to
contractor. Actual date will be downloaded from CEFMS. Scheduled date is a manual entry of
when you expect it to happen. ....................................................................................................11
Examples of District defined Milestones .......................................................................11
Monthly Progress Tab ......................................................................................................12
Cost / Time Growth Tab ...................................................................................................13
Explanation of Options .................................................................................................13
Chapter 5 - Contract Setup and Planning Data ............................................................................1
What this Chapter presents:......................................................................................................1
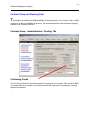
Contract Setup and Planning Data............................................................................................2
Contract Setup – Administration / Funding Tab .................................................................2
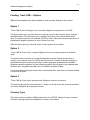
Continuing Funds ...............................................................................................................2
Funding: Track CWE -- Options .........................................................................................3
Option 1..............................................................................................................................3
Option 2..............................................................................................................................3
Option 3..............................................................................................................................3
Currency Type....................................................................................................................3
Contract Setup – Payment / Modifications Tab..................................................................4
Obligation Payment Terms.................................................................................................4
CEFMS Set Up for ENG 93 Payments...............................................................................5
CEFMS Set Up for Payment Terms ...................................................................................6
SPS Set Up for Payment Terms ........................................................................................7
Contract Setup - Quality Assurance Tab............................................................................7
Contract Setup - Quality Assurance Tab............................................................................8
Contract Setup – Submittal/Schedule Tab .........................................................................9
Will there be more than one Submittal Register?...............................................................9
Compute Submittal Need Dates based on Activity Schedule ..........................................10
Manually enter Scheduled Start/Finish Dates ..................................................................10
Import Scheduled Start/Finish Dates from NAS ...............................................................10
Chapter 6 - Correspondence ........................................................................................................1
What this Chapter presents:......................................................................................................1
Overview ............................................................................................................................1
Adding Correspondence in RMS........................................................................................2
Generating Form Letters ....................................................................................................3
Copying a Document from another Library ........................................................................4
Setting up RMS and MS Word ...........................................................................................5
TOC - 4
Resident Management System
Using RMS with MS Word - Word Automation ...............................................................5
Add an icon to the MS Word toolbar...............................................................................7
RFI’s (Request for Information)..........................................................................................8
RFI Requiring Response..................................................................................................10
Government Response to RFI .........................................................................................10
Screen after the RFI has been exported to QCS .............................................................12
RFI Notification in RMS and QCS ....................................................................................12
QCS Correspondence Module .........................................................................................13
Contract Documents ........................................................................................................14
Supporting Documents.....................................................................................................15
Create a library of Supporting Documents .......................................................................16
Add a Supporting Document ............................................................................................17
Chapter 7 - CEFMS, Finances and the CWE ...............................................................................1
What this Chapter presents:......................................................................................................1
Overview ............................................................................................................................1
CEFMS, Finances and the CWE...............................................................................................1
CEFMS Finances ...............................................................................................................2
CEFMS Work Item Codes..................................................................................................3
Construction Working Estimate .................................................................................................5
Award CWE...............................................................................................................................5
Funds for Construction Working Estimate .................................................................................6
Total Award CWE Amount .................................................................................................6
Award Contract ..................................................................................................................6
Other Supporting Contract .................................................................................................7
Design During Construction ...............................................................................................7
Gov’t Review Contractor Design ........................................................................................7
Contingency .......................................................................................................................7
S&A ....................................................................................................................................7
Other w/o S&A ...................................................................................................................7
Total Award CWE...............................................................................................................8
Funds for Management Reserve ...............................................................................................8
Award Contract Line Items ........................................................................................................8
Adding CLINS in RMS......................................................................................................10
Adding Priced SubCLINs in RMS.....................................................................................12
Chapter 8 – Contractor Pay Activities ...........................................................................................1
What this Chapter presents:......................................................................................................1
Importing Contractor Pay Activities ...........................................................................................1
Turning Off QCS from Contract Setup ......................................................................................3
Import SDEF File.......................................................................................................................3
QCS being Used .......................................................................................................................7
Contractor Pay Activities ...........................................................................................................8
Mandatory Entry Elements for Pay Activities .....................................................................9
Description .........................................................................................................................9
CLIN ...................................................................................................................................9
Amount...............................................................................................................................9
Chapter 9 – Contract Change Requests.......................................................................................1
What this Chapter presents:......................................................................................................1
Overview ...................................................................................................................................1
Prefix Code for Change Requests.............................................................................................2
TOC - 5
Resident Management System
Contract Change Requests .......................................................................................................2
Mod Reason Codes ...........................................................................................................3
Award Options ................................................................................................................3
Controllable ....................................................................................................................3
Uncontrollable.................................................................................................................3
Sample – Basic Change Document (BCD) Form – Partial Only ........................................4
Chapter 10 - Contract Modifications .............................................................................................1
What this Chapter presents:......................................................................................................1
Overview ...................................................................................................................................1
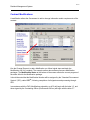
Contract Modifications...............................................................................................................2
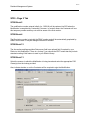
SF30 - Page 1 Tab.............................................................................................................3
SF30 - Page 2 Tab.............................................................................................................4
SF30 Block 2 ..................................................................................................................4
SF30 Block 4 ..................................................................................................................4
SF30 Block 12 ................................................................................................................4
SF30 Block 13 ................................................................................................................4
SF30 Block 14 ................................................................................................................5
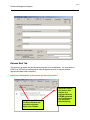
SF30 - Page 3 Tab.............................................................................................................5
SF30 Block 14 (continued) .............................................................................................5
SF30 Block 15A .................................................................................................................5
SF30 Block 16A .................................................................................................................5
Release Mod Tab...............................................................................................................6
Pay Activity Screen ...................................................................................................................8
Supporting Documents..............................................................................................................9
Other Change Orders..............................................................................................................11
Current Construction Working Estimate (CWE) ......................................................................12
Chapter 11 - Contractor Payments ...............................................................................................1
What this Chapter presents:......................................................................................................1
Overview ............................................................................................................................1
Adding a Progress Payment......................................................................................................2
Prompt Payment / Pay Requests from QCS ......................................................................2
Prompt Payment / Pay Requests from QCS ......................................................................3
Prompt Payment Certification Report (Page 1) .........................................................................4
Contractor’s Pay Request Worksheet .......................................................................................5
Sending Payment to CEFMS ....................................................................................................5
Reports for Payments................................................................................................................7
Chapter 12 - Contractor Quality Control - Planning ......................................................................1
What this Chapter presents:......................................................................................................1
Required Planning Activities: .............................................................................................1
Administrative:....................................................................................................................1
Quality Assurance / Quality Control: ..................................................................................1
Overview ............................................................................................................................2
Quality Control Requirements ...................................................................................................2
Prime Contractor Data...............................................................................................................3
Responsibility Code – ........................................................................................................3
CEC (DUNS) No – .............................................................................................................3
Contractor Short Name / Contractor Name – .....................................................................4
NAICS Code –....................................................................................................................4
Office to receive payments –..............................................................................................4
TOC - 6
Resident Management System
Contractor Representative to Review Contractor Evaluation (DD2626) ............................4
Prime Contractor Data in District Library ...................................................................................5
Manually Add Contractor to District Library........................................................................5
Copy Prime Contractors From Existing Contracts .............................................................6
Copy Prime Contractor Data From District Library.............................................................7
Prime Contractor Data is Copied to Contract .....................................................................8
Subcontractor Data ...................................................................................................................9
QC Planning Data ...................................................................................................................11
Features of Work..............................................................................................................11
3 Phase Inspections.........................................................................................................12
Hazard Analysis ...............................................................................................................12
Hazard Analysis Report (Sample) ....................................................................................14
QC Requirements ............................................................................................................15
Quality Control Tests ....................................................................................................15
User Schools ................................................................................................................15
Installed Property..........................................................................................................16
Transfer Property..........................................................................................................16
Equipment Checks ..................................................................................................................16
Equipment Checks ..................................................................................................................17
Dredging Equipment................................................................................................................17
Dredging Equipment................................................................................................................18
Exposure Hours.......................................................................................................................18
Exposure Hours.......................................................................................................................19
Monthly Injuries/Illnesses & Exposure Report..................................................................20
Exchanging Data between RMS/QAS and QCS .....................................................................21
Export from RMS Using SFTP Server..............................................................................21
Import from RMS/QAS to QCS Using SFTP Server ........................................................25
Export from RMS/QAS by Exporting File .........................................................................26
Export from RMS/QAS by Exporting File .........................................................................27
Import from RMS into QCS by Exported File ...................................................................29
Request Export File for Adding Contract..........................................................................31
Automated Import and Export.......................................................................................32
Adding QCS site within RMS ...........................................................................................33
CHAPTER 13 - Government Quality Assurance - Planning .........................................................1
What this Chapter presents:......................................................................................................1
Quality Assurance and RMS ..............................................................................................1
Overview ............................................................................................................................1
Contract Setup – Quality Assurance Tab ...........................................................................2
QA Testing .........................................................................................................................3
Planned Labor Interviews...................................................................................................4
CHAPTER 14 - CQC – Daily Report .............................................................................................1
What this Chapter presents:......................................................................................................1
Quality Control Report and RMS........................................................................................1
Overview ............................................................................................................................1
Daily Quality Control Report...............................................................................................2
Sample Quality Control Report Form ........................................................................................4
Sample – Quality Control Report Form – Page 1 of 2........................................................5
Sample – Quality Control Report Form – Page 2 of 2........................................................5
Sample – Quality Control Report Form – Page 2 of 2........................................................6
TOC - 7
Resident Management System
Sample Bucket Dredge Report Form 4267 – Page 1 of 2..................................................9
Sample Bucket Dredge Report Form 4267 – Page 2 of 2................................................10
Sample Hopper Dredge Report Form 27A – Page 1 of 2 ................................................12
Sample Hopper Dredge Report Form 27A – Page 2 of 2 ................................................13
Contractor QC Report Not Imported........................................................................................14
Contractor QC Report Imported – Opportunity to Return ........................................................15
CHAPTER 15 - Government QA Daily Report..............................................................................1
What this Chapter presents:......................................................................................................1
Quality Assurance and RMS ..............................................................................................1
Overview ............................................................................................................................1
Elements of Quality Assurance ..........................................................................................1
Quality Assurance Requirements ..............................................................................................2
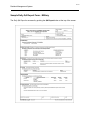
Creating a Daily QA REPORT...................................................................................................2
Civil or Military Format for QA Report ................................................................................3
Punch List Items .............................................................................................................4
Sample Daily QA Report Form - Military ............................................................................6
Sample Daily QA Report Form - Civil.................................................................................7
CHAPTER 16 - Contract Submittals and SpecsIntact ..................................................................1
What this Chapter presents:......................................................................................................1
Overview ............................................................................................................................2
The SpecsIntact Specification Production System.............................................................2
Contract Setup ...................................................................................................................2
SUBMITTAL REQUIREMENTS ................................................................................................3
Specification Sections ........................................................................................................4
Submittal Details and Requirements..................................................................................5
Submittal Requirements Window ...................................................................................5
Sample Submittal Register Form (ENG Form 4288) ......................................................6
Features – Submittals/Transmittals....................................................................................6
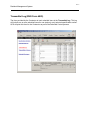
Transmittal Log (ENG Form 4025).....................................................................................7
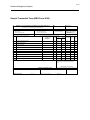
Sample Transmittal Form (ENG Form 4025)..................................................................8
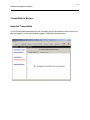
Transmittals in Review .......................................................................................................9
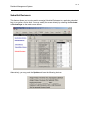
Imported Transmittals ........................................................................................................9
Review Status ..................................................................................................................10
Submittal Reviewers ........................................................................................................11
Chapter 17 – Schedules & the Standard Data Exchange Format (SDEF) ...................................1
What this Chapter presents:......................................................................................................1
Contractor Schedule Requirements ...................................................................................1
Schedules and the SDEF ..........................................................................................................2
Overview ...................................................................................................................................2
RMS maintains four types of schedules ....................................................................................2
Milestone Schedule............................................................................................................2
Placement Schedule ..........................................................................................................3
Activity Schedule................................................................................................................4
Feature Schedule...............................................................................................................5
Standard Data Exchange Format (SDEF) .................................................................................6
Feature for the SDEF .........................................................................................................6
RMS and the SDEF............................................................................................................6
Contract Specified Project Schedule..................................................................................6
District Milestone Events – District Library .........................................................................6
TOC - 8
Resident Management System
Milestone Events – Local Library .......................................................................................7
Milestone Schedules - Summary Reports ..........................................................................8
Monthly Progress ....................................................................................................................10
Activity Schedule .....................................................................................................................11
Feature Schedule ....................................................................................................................12
CHAPTER 18 - Closeout Activities ...............................................................................................1
What this Chapter presents:......................................................................................................1
Overview ...................................................................................................................................2
Closeout Activities in RMS ........................................................................................................2
Real Property .....................................................................................................................3
Real Property Import from Spreadsheet .........................................................................4
Transfers – DD Form 1354 ................................................................................................5
Sample - DD Form 1354 Report Form ...........................................................................6
Sample - Real Property Form – DD Form 1354 .............................................................7
Transfer and Acceptance of Military Real Property – Page 1 of 7..................................7
Installed Property ...............................................................................................................8
Transfer Property (Requisitions - DD Form 1149) .............................................................9
Requisition and Invoice Screen ......................................................................................9
DD 1149 Input Screens ................................................................................................10
Sample Transfer Property Form – DD Form 1149 .......................................................10
Sample Transfer Property Form – DD Form 1149 .......................................................11
Requisition and Invoice/Shipping Document – Page 1 of 1..........................................11
Contractor Evaluations – DD Form 2626 .........................................................................12
RMS / CCASS Interface ...............................................................................................12
Is your Contractor having trouble gaining access to CCASS? .....................................14
The DD Form 2626 Report Form..................................................................................15
Sample - DD Form 2626 Report Form - Page 1 of 2 ....................................................16
Sample - DD Form 2626 Report Form - Page 2 of 2 ....................................................17
Warranty Inspections...............................................................................................................18
4 Month, 9 Month, and 12 Month Warranty Inspection ...........................................................20
Transfer Warranty Items to Contractor (QCS) .................................................................22
Intro - 1
Resident Management System
Introduction
What Is RMS, QAS, and QCS?
The Resident Management System (RMS) is a user-friendly
comprehensive system for the expedient and effective management of
construction contracts through tracking and documentation of all
facets of a contract by Corps of Engineers’ field offices and
contractors. RMS uses Oracle © for the software platform.
The Quality Assurance System (QAS) is an extension of RMS for Government personnel to use
remotely from the main RMS software program. Certain modules/tasks can be assigned by
RMS to be accomplished with QAS and such modules/tasks will become Read Only in the RMS
program. The program can import and/or export to and from RMS to synchronize both
programs. QAS uses Firebird© as the software platform.
The Quality Control System (QCS) is the Contractor Module of RMS that construction
contractors utilize to exchange information electronically with the Government. The QCS
program includes a Remote QCS Program module that allows the Master QCS Site to assign
various modules to one or more remote QCS sites. It operates similar in principle to the QAS
program that is used remotely from the Government program (RMS). QCS uses Firebird© as
the software platform.
Intro - 2
Resident Management System
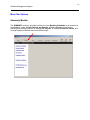
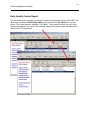
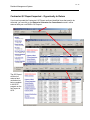
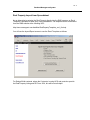
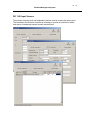
Opening Screens
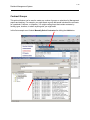
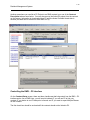
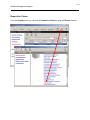
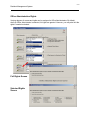
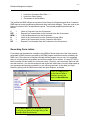
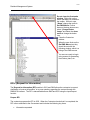
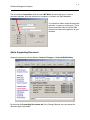
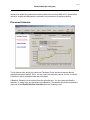
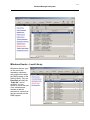
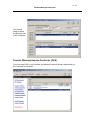
RMS Opening Screen
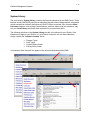
This is often referred to as the “contracts control center”. It is where you choose the contract you
are looking for and wish to work with.
Archive a Contract
You may also decide to Archive contracts as they become complete, as is shown here:
Intro - 3
Resident Management System
How the Archive Feature Works
Only a System Administrator, an Office Administrator with full Office Administration Rights, or an
Office Administrator with Add/Restore Contracts and Delete/Archive Contracts will be able to
utilize the Archive feature.
There will be a single archive database for the entire Corps of Engineers offices and it will
reside at the WPC, Portland, Oregon. Once a day, a service will run at the WPC and will pull
Intro - 4
Resident Management System
any archived contracts from the normal RMS database into the RMS Archive Database. The
RMS Center is tasked to run all program updates on the RMS Archive Database as they are
released to ensure that the archived/deleted contracts will be able to be added back to the live
RMS database. Once you Archive a contract, it will be removed from your database.
Archive Users will actually log into the archive RMS just like they would log into their normal
(live) RMS database. It will basically be like logging into another Corps District’s RMS program.
When you elect to Add a contract to your normal RMS, you will be given choices to add a new
contract, restore an archived contract, or to restore a deleted contract. If you choose to restore a
deleted or archived contract you will see a listing of all available archived and deleted contracts
for your District. These features are still under construction.
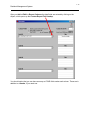
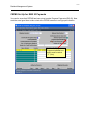
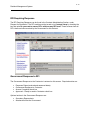
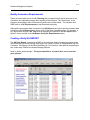
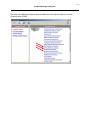
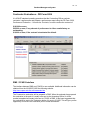
QAS Opening Screen
Site title and ID
number:
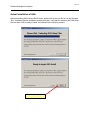
Review the Steps to Install and use QAS
1. Download the QAS program (QASSETUP########.exe) from the RMS Center.
2. Launch the exe File to begin the installation of QAS.
3. Upon completion of the QAS installation, import a contract from RMS.
a. RMS must indicate that you will be a QAS User (Office/Office Personnel/Staff
Assignments and Administration / User Roles). You must also have a QAS password.
b. RMS must indicate that the contract will use QAS (Administration/Contract Setup/ and
Administration/Funding).
Intro - 5
Resident Management System
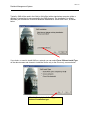
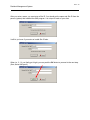
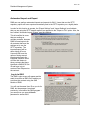
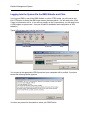
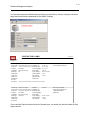
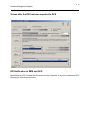
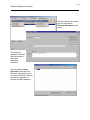
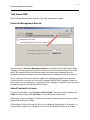
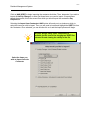
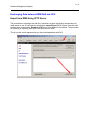
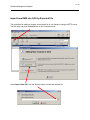
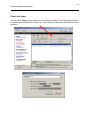
Actual Installation of QAS
After downloading QAS from the RMS Center, double-click on the exe file (or use the Windows
“Run” command) and the installation process will begin. It will start by extracting the QAS Setup
files and then it will be ready to install, as indicated on the following screens.
Click the Next> button.
Intro - 6
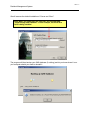
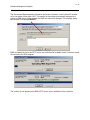
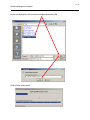
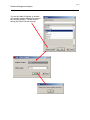
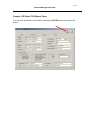
Resident Management System
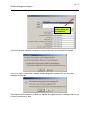
Typically, QAS will be used in the field (or field office) with a stand-alone computer (either a
desktop or laptop) that is not connected to the RMS program. The installation, by default,
assumes you will need the Firebird ® database installed as a “Server and Client”, as shown
below.
If you desire, or need to install QAS on a network you can select Force Different Install Type
on the above screen and choose to install the Server only or the Client only, as seen below.
Click the Next> button following your
choice of Installation type.
Intro - 7
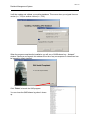
Resident Management System
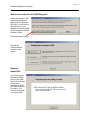
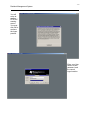
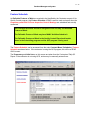
We will assume the default installation of “Server and Client”.
Note: When you install QAS the first time, this line will read:
“Install Empty QAS Database”. In this example, an UPDATE to
QAS is being installed.
The program will then backup your QAS database (if existing) and let you know where it is on
your computer should you need to reinstall it.
Intro - 8
Resident Management System
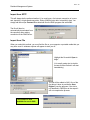
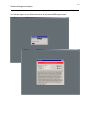
It will then update and validate your existing database. This occurs when you migrate from one
version (i.e., 2.35) to another version (i.e., 2.36).
When the program completes the installation you will see a “QASSchema Log – Notepad”
window. Unless you are a geek, this window will not be of any consequence or interest and can
be ignored by simply closing it.
Click “Finish” to launch the QAS program.
You can close the QASSchema log when it shows
up.
Intro - 9
Resident Management System
If you do not yet have any contracts in your QAS program you will need to get an import from
the RMS program for the contract you will be working with.
Intro - 10
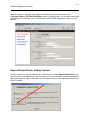
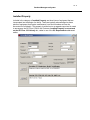
Resident Management System
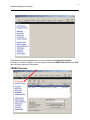
Assign QAS User Role and Password
At this point, you will need to have a User Role assigned that indicates you will be using the
QAS program. This Role is granted from RMS at Office/Office Personnel. The Administration
/User Roles screen is used for this purpose as seen on the next screen.
After the QAS User Role is indicated on the
foregoing screen, you must enter a QAS
Password on the same screen.
Set you password following the password rules
indicated on the QAS Password window.
Intro - 11
Resident Management System
Choose contract for using QAS
The next step is to
choose the contract
that QAS will be
used on for the
QAS User we just
set up. Find the
contract and hit the
Edit button (or,
double mouse-click
the contract).
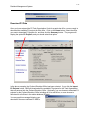
Contract Setup for QAS
Before you can
export the contract
from RMS, for use
with QAS (or, QCS
for that matter) you
will need to indicate
that you wish to do
so. Proceed to the
first tab of
Administration /
Contract Setup
after entering the
contract.
You must ensure
that Do you want
to use QAS with
this contract? is
checked.
Now it is time to export the contract to QAS from RMS.
Intro - 12
Resident Management System
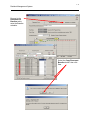
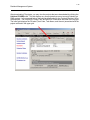
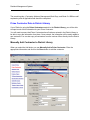
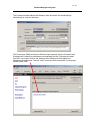
Assign Remote QAS Site
You will then proceed to the Import/Export screen in RMS to export the chosen contract to the
QAS User. Choose the QAS Module accordingly.
Click the Remote
QAS Sites button
to add your
remote site.
Click the Add
button.
The following screen will tell you the next step, one at a time. It first says you must enter a name
for the site.
Intro - 13
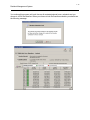
Resident Management System
After you enter a name, you must enter a Site ID. You should get the name and Site ID from the
person (system) that installed the QAS program. It is unique for each of your sites.
It will let you know if you enter an invalid Site ID also.
When (or, if - ☺) you finally get it right, you can push the OK button to proceed to the next step.
(See, almost fool-proof.)
Intro - 14
Resident Management System
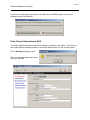
Assign one or more RMS Modules to the Remote QAS Site
Once you Add your Remote QAS Site select the ellipsis to the right of a module. We are going
to assign the Daily Report stuff to the remote site.
Choose Yes (unless
you goofed and meant
another one, or if you
changed your mind.)
A list of available sites appears and you
then pick your poison. In this case we
will choose Bonneville to manage the
remote module.
Click the OK button and repeat for any
other modules you wish to assign
remotely from the RMS program.
You are ready to export the contract for
your Remote QAS Site.
Intro - 15
Resident Management System
Click the Close
button when you
are finished.
If you have already assigned a module to a remote QAS site, you will see this message:
If you try to return control from a module already assigned to another site, you may see a
message such as this:
The purpose of this measure is to have you require the original system to reassign it back to you
in order to avoid loss of data.
Intro - 16
Resident Management System
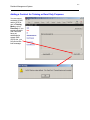
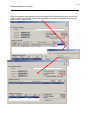
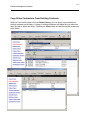
Export the Contract to the Remote QAS Site
You are now ready to export to the QAS Module. Click on
Export to QAS. Click on Settings and save the file to your
hard drive. The file is then able to be added into QAS with the
proper QAS User Role and Assigned Modules completed.
If this is your first export for this contract, you should choose the default, Export file for Daily
Update of QAS.
Later, if your Remote QAS Site runs into difficulty (did the DUMB thing and did not backup as
often as we should) you may use the second radial button to overwrite the data entirely. Of
course, the QAS program will loose any information they entered since the last export back to
the main RMS program.
Intro - 17
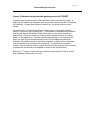
Resident Management System
The preferred and recommended way to
exchange data between
RMS/QAS/QCS is by use of the RMS
Center SFTP repository. It is pretty
much automatic and you don’t have to
worry about exchanging files and won’t
make the mistake of importing an older
file. The repository only holds the last
exchange – the new one in, overwrites
the old one.
This version of QAS allows you to have
the program automatically update your
contract from RMS on a nightly basis,
until Final Payment of the Contract. You
will need to check the box to enable this function.
There could be occasion you might wish
to Export to File, and that is also an
option. If such is the case, you need to
identify the path to which the file should
be placed on your computer.
This example is placing the file in the
C:\temp\ directory.
Select OK when you are ready.
This screen tells you where
your exported file
disappeared to and what
the name of the file is.
Intro - 18
Resident Management System
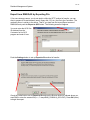
Add a new contract to the QAS Program
Adding a contract in QAS
is the same process as
adding one in a Remote
QCS site. You will click on
the QAS icon on your
desktop and use the RMS
file just created to add the
contract to QAS.
Push this button to begin.
Now we will
review the three
choices on this
screen.
Request
Export File
If you have not yet
advised the RMS
User of your QAS
Site ID, or a file has
not yet been
created from RMS
you need to request
it be done. This
screen just reminds
you of that need.
Intro - 19
Resident Management System
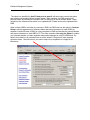
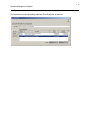
Import from SFTP
This will always be the preferred method. You must have a live internet connection of course
and, hopefully, a high-speed connection. Dialup (56KB/s) is do-able, but painfully slow. You
simply add the unique Contract ID as obtained from the RMS program and select OK.
The file will then be
automatically downloaded from
the repository after making
connection to the RMS Server.
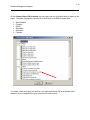
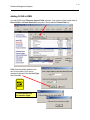
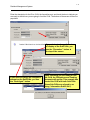
Import from File
When you select this method, you must find the file on your computer or portable media that you
may have used. A windows explorer will appear to start you off.
Highlight the file and hit Open to
begin.
(It is usually easier just to double
mouse-click the file and it will start
immediately.)
The file will be added to QAS. One of the
first things it does is provide the User
Rights to use the program. If the site is
not identified in RMS prior to the export it
will not complete the process.
The contract is now
available for use in QAS.
Intro - 20
Resident Management System
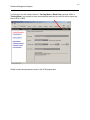
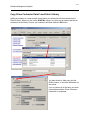
Automated Import and Export
RMS can now perform automated imports and exports for QAS. Users that use the SFTP
repository option will have exports automatically sent to the SFTP repository on a nightly basis.
In order for this function to operate, the “Export Settings” and “Import Settings” must indicate
that you are using the SFTP transfer method, as opposed to the “Export to File” option. Also, the
box entitled “Automatic Import / Export” must be checked.
This is beneficial to users
that are working on
multiple contracts, because
RMS will send exports for
all contracts that have the
settings set to use the
SFTP repository. The
imports/exports will be
done during off hours.
Users will still have the
option of doing manual
imports and exports for
individual contracts. RMS
will filter this feature to
those contracts that have
identified a QAS/QCS Site
ID and have not yet
received Final Payment on
the contract.
Log in to QAS
The QAS Logon screen will appear and be
ready to receive an RMS file to enable you
to access the contract using the QAS
Module of RMS.
You will use the same User ID as you do for
RMS, but the password, as shown
previously, is set within the RMS program –
you cannot use you normal Oracle
password to access QAS.
Intro - 21
Resident Management System
If you have not been given permission to use QAS from the RMS program, you will see
message such as the following.
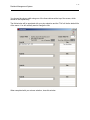
Enter Contact Information in QAS
You must complete this initial screen before adding a contract to your system. It must have a
name AND either a telephone number or an email address before you can use the system.
First, a Warning message is given:
Then you enter the appropriate screen
after you push OK.
Intro - 22
Resident Management System
Contract is now added to the QAS Program
You can now hit the Home button and go to the contract controls center to use your newly
added contract. Once you are into your contract, the procedures are the same as if you were in
the main RMS program.
Warning! On use of Remote QAS and QCS Sites
If you are going to use the QAS/QCS program, it is very important that the QAS/QCS programs frequently
exchange files with RMS. The reason for this is two fold. First, it helps to ensure data integrity between
the two programs and, secondly, it is needed to maintain manageable file sizes for the exports and
imports.
Exchanging data frequently will ensure that each site is up to date with the most recent data. If for some
reason a site becomes inoperative then RMS can send a full overwrite file to get them back on track.
However, if the last time an export was done to RMS/QCS was over a week or two then you may have
quite of bit of data entry to manually catch up with.
If all RMS/QAS/QCS sites are exporting and importing frequently, then it is very common for the file size
to be less than 1 Megabyte in size. If you are on a remote site that does not have DSL a file less than 1
megabyte in size will be very helpful.
If you have a site that is no longer being used then please remove it and then promptly do an export to
your other sites and RMS. Failing to remove a site that is no longer in use can result in data loss and a
tremendous increase in the export file size.
Intro - 23
Resident Management System
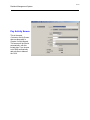
Updating the QAS Program
You should periodically check for software updates to ensure you have the latest and greatest.
This feature is built in to automate the process. If you are connected to the internet, QAS will
automatically check for updates each day you log on to the program.
The program will advise that an update is available and/or tell you that your program is already
up to date.
Push the Update NOW button to begin the download from the RMS Center.
Your update will be automatically installed and you can enter the new version.
Intro - 24
Resident Management System
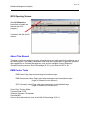
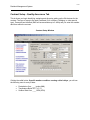
QCS Opening Screen
(See QCS Manual on
procedures to install and
maintain the QCS
program.)
Contractor Site title and ID
number:
About This Manual
This User’s Guide is intended to give the information that you might need for the effective use of
the RMS program. The reader is directed to other sources of information for particular practices
and suggestions on Contract Management, such as from available Corps of Engineers
“Prospect” training courses, Disk of Knowledge (D.O.K.), your District’s SOPs, etc.
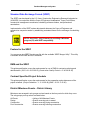
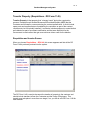
RMS Center Tools
RMS Home Page: http://www.rmssupport.com/home.aspx
RMS Government Home Page: http://www.rmssupport.com/rmswebhome.aspx
(Login or Password is not required.)
QCS Contractor Home Page: http://www.rmssupport.com/qcs/default.aspx
(Login or Password is not required.)
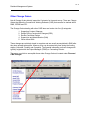
Power Point Training Slides
Technical Data / FAQ
Software Upgrades / Downloads
User Manuals
Links to other data sources, such as the Disk Of Knowledge (D.O.K.).
Intro - 25
Resident Management System
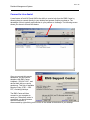
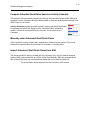
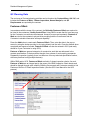
RMS Center Assistance
When contacting the RMS Center with a question on a specific contract you should ALWAYS
advise them of the Contract ID number to assist in locating the project within your database.
The Contract ID is the prime-key number assigned by RMS when the project is first entered into
RMS and appears at the very top of almost every contract-level screen in RMS. (Some of the
older contracts may still linger that have the Contract Number showing as the Contract ID
number. The older versions allowed that field to be whatever the User entered. The bad news is
that those contracts are not able to use either QAS or QCS.)
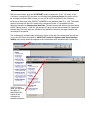
If you know the significant digits of the Contract ID, you can use the FIND button on the opening
menu where the contracts/projects are listed. For example, if the Contract ID is P00000331, you
can find this contract by entering “331” in the Search field. RMS will “find” the contract and
immediately open it for you. (Note: you can ignore the EROC District identifier – i.e., ‘P0’ in this
example.) For Contract ID numbers that are longer than 4 numbers, you will have to use the
entire number, including the EROC identifier.
Intro - 26
Resident Management System
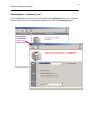
Connect to Live Assist
A new feature of both QCS and QAS is the ability to receive help from the RMS Center by
allowing them to connect directly to your desktop and operate it while you observe. The
advantage of this is typically rapid solution to your problem or challenge. The following screen
shows you where to access this feature.
Once you request this remote
assistance, you will need to
telephone the RMS Center
Helpdesk, (760) 247-0217, and
advise them that you require
assistance. This help is available
Monday-Friday, 0700 – 1500
PST, excluding Holidays.
The RMS Center will then
connect to your computer to
assist you. When their action is
completed, you should ensure
that the connection is
disconnected by right-clicking on the ICON on the toolbar at the bottom of your desktop.
1-1
Resident Management System
Chapter 1 - Overview, Basics and Logging In
What this Chapter presents:
•
Logging Into The System
•
Menu Bar Options
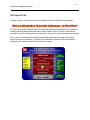
Logging Into the System
CEFMS is a large, diverse system encompassing virtually every
functional area of the U.S. Army Corps of Engineers’ organization. It
handles much more than the finances having to do with construction
contracts. Like CEFMS, RMS is controlled through use of USERIDS
and Passwords and application access permissions. Without these
items, a user will be unable to enter the system to initiate and process
documents or to download financial data needed for RMS.
1-2
Resident Management System
Before accessing RMS you must login. Depending on your setup, there are dfferent procedures.
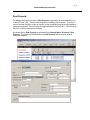
Click the RMS Castle Icon on the Desktop to begin using the RMS program.
After the Login button is pressed, the system verifies
the User with the RMS security system and the Oracle
Database. This Login User ID and Password must be a
valid User ID with the Oracle database and a valid User
ID and Password for RMS.
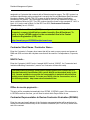
The paragraph in the box is a requirement for DITSCAP
certification of DOD computers.
NOTE: If you are using CITRIX or VPN your ICON may vary from
the Castle shown above. For example, it may appear like this:
GRD-RMS
1-3
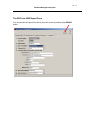
Resident Management System
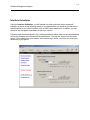
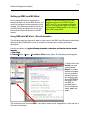
Logging Into the System Via the RMS Website and Citrix
If you log into RMS by way of the RMS Website, or other CITRIX portal, you will need to sign
into CITRIX prior to seeing the RMS logon screen discussed above. You will need to be on the
Corps (.mil) network to do so. (If you are not actually on the Corps network, you will need to use
a VPN program to gain access – see your IM staff for installation and configuration of VPN
software.)
Typical VPN screens may look like the following:
You connect to the appropriate CEEIS portal and your credentials will be verified. If you have
access the following banner appears.
You then can proceed to the website to select your RMS District.
1-4
Resident Management System
From the RMS website, you click on the District you want to use – the District of which you have
permissions and access to do so.
1-5
Resident Management System
You will
arrive at
another
DITSCAP
warning
screen.
You must
click OK to
continue
the logon
process.
Enter your User
Name, Oracle
password, and
the correct
logon location.
1-6
Resident Management System
You will then logon to your District and arrive at the normal RMS logon screen.
1-7
Resident Management System
You should now be within the RMS program.
1-8
Resident Management System
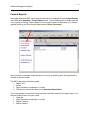
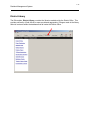
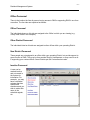
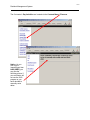
Menu Bar Options
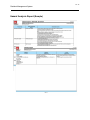
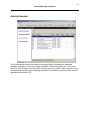
Summary Module
The SUMMARY module is provided to allow you to set Baseline Schedules for all contracts in
the database, create Custom Reports and Queries, establish Groups of contracts for
reporting and tracking purposes, to manage P2 Projects, to manage Contractor Claims, and
to setup interface schedules and track interface logs.
1-9
Resident Management System
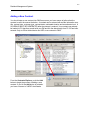
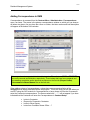
Baseline Schedules
To assist in budgeting and other areas of management, the baseline schedule is used at the
Summary level. It requires that contracts (future and active) have a schedule developed within
RMS. Once contracts have their baseline completed the Administrator can “lock” the schedules
and future placements will be compared to that composite baseline schedule.
You can create a Baseline schedule for any year and can create a schedule for both “Original”
and “Mid Year” timeframes. You are also able to edit a contract and be taken directly to the
point where a schedule can be created and the contract will be added to the list of contracts with
the Baseline Placement entered.
Select the Edit
button to start
the process.
1 - 10
Resident Management System
Select Edit, or
double mouseclick on a contract
to provide a
schedule.
Enter the amount of the contract via one of the choices on the popup window.
Click on the Close button to
produce the schedule.
1 - 11
Resident Management System
Proceed to the
Placement vs.
Baseline tab to
enter the Baseline
schedule.
Select the Copy Placement
Baseline button, then click
Yes.
1 - 12
Resident Management System
You continue this process until such time as all contracts/projects have a schedule and you
choose to LOCK the Baseline. When you choose to lock the baseline schedule you should see
the following message:
1 - 13
Resident Management System
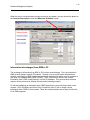
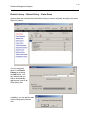
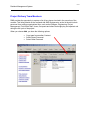
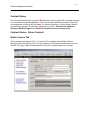
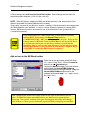
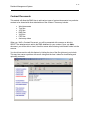
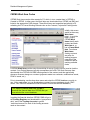
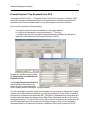
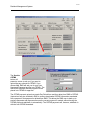
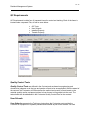
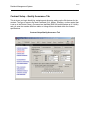
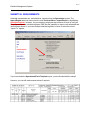
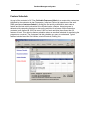
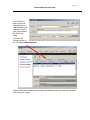
Custom Reports
Using data fields from RMS, users now have the option of creating their own Custom Reports
and adding them Summary / Custom Report menu. Custom Reports can be added manually
or by copying an existing Custom Report. For you to have access to this feature, you must be
granted access by an Office/System Administrator (Office / Personnel).
After you select to manually create the report or to copy an existing report, the report detail is
entered on the next screen.
The RMS User enters the following data:
• Report Title
• Author
• Page Orientation: Landscape or Portrait
• The option to include the report on the Summary Report Menu
If you copy another custom report, these items will remain the same as the original report. You
can then modify them to suit your needs.
• Order No.
• Page Orientation: Landscape or Portrait
• Report Columns
• Report Headers
1 - 14
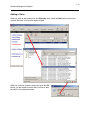
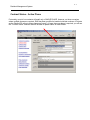
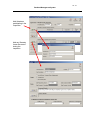
Resident Management System
Columns for the report can be manipulated by using the Add, Edit, or Remove buttons on this
screen.
Column width, Column Title and Data Field are entered here. The Title name defaults from the
data field, but can be changed manually.
Headers may also be added above a group of columns.
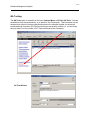
1 - 15
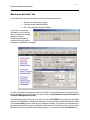
Resident Management System
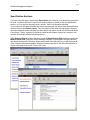
After you Add or Edit the Report Columns the data fields are entered by clicking on the
ellipsis, which opens up the Custom Report Field Lookup.
You should notice that you can have as many as FOUR fields under each column. These are in
addition to a Header, if you need one.
1 - 16
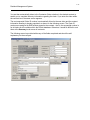
Resident Management System
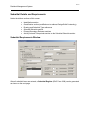
On the Custom Report Field Lookup, the user opens the tree to find the fields to display in the
report. The fields are titled the same as six of the buttons in an RMS Contract Menu.
•
•
•
•
•
•
Administration
Finances
QA/QC
Submittals
Schedules
Closeout
You simply select the lookup you need for your report and choose OK at the bottom of the
window. Let your imagination be your guide as you create reports.
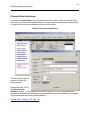
1 - 17
Resident Management System
You choose the column width using one of the three choices at the top of the screen, which
should be self-explanatory.
The field window will be populated with your prior selection and the “Title” will be the default title
of the macro. You will normally want to change the title.
When completed with your column selection, close this window.
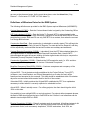
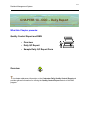
1 - 18
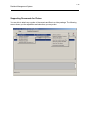
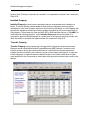
Resident Management System
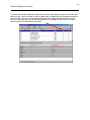
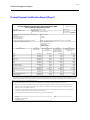
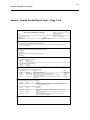
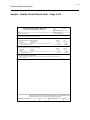
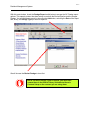
From this window you can check the format of your new report, or preview what it will look like
at the summary level. The format selection is useful to adjust the width of the columns for better
appearance.
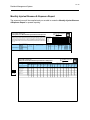
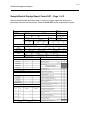
Customer - Status Report
21 Feb 2005
THI QAR RESIDENT OFFICE including Sub-Offices
GULF REGION DIVISION
US Arm y Corps
of Engineers
Financial and Schedule Status
Administrativ e Contracting Of f icer
Contract No.
Contract Title
Contractor
QA Project Engineer Name
Paid Percent
Chief Con-Rep
Reported Percent
Contract Administration Of f ice
Award CLINS
Cost Growth
Sum of activ ities Current Contract Value
Scheduled Percent Current CLINS
1,575
ECC
Time Growth
BOD - Original Date
BOD - Scheduled Date
Required Completion Date
Primary Delay Code
1,920
887
720
616
825
1,075
$0.00
0
$0.00
0
$0.00
0
ECC
ECC
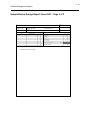
Customer - Status Report
21 Feb 2005
THI QAR RESIDENT OFFICE including Sub-Offices
GULF REGION SOUTHERN DISTRICT
US Arm y Corps
of Engineers
Financial and Schedule Status
Administrativ e Contracting Of f icer
Contract No.
Contract Title
Contractor
QA Project Engineer Name
Paid Percent
Chief Con-Rep
Reported Percent
Contract Administration Of f ice
Award CLINS
Cost Growth
Sum of activ ities Current contract v alue
Scheduled Percent Current CLINS
Time Growth
BOD - Original Date
BOD - Scheduled Date
Required Completion Date
Primary Delay Code
THI QAR RESIDENT OFFICE
FA8903-04-D-8672 0011
0
ECC
73831
0
BE-002 THI-QAR SCHOOL 1801153: QANADEEL
FA8903-04-D-8672 0011
CEGRS-TAO-TQR
0
0
ECC
FA8903-04-D-8672 0011
ECC
CEGRS-TAO-TQR
0
0
0
$73,831.00
0
69101
02/21/2005
$0.00
69101
0
BE-002 THI-QAR SCHOOL 1801176: SAIF ALL
$0.00
73831
73831
$69,101.00
69101
0
41142
02/18/2005
$0.00
41142
$41 142 00
You have completed the report and can now utilize it from the Summary Report area of RMS.
1 - 19
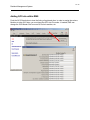
Resident Management System
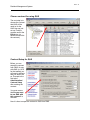
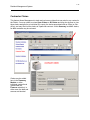
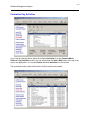
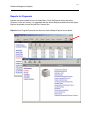
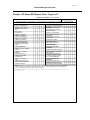
Custom Report – Summary Level
If you have indicated you wish your report to appear on the Summary report menu, it will show
up here, where you can use it in the same manner as all of the other Summary reports.
1 - 20
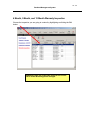
Resident Management System
Contract Groups
This optional feature can be used to create any number of groups or selections for Management
reports and tracking. For example, you might create a group that would include all the contracts
for a particular Customer, or Inspector. You might create groups that contain contracts by
funding types, locations, or about anything else you might need.
In this first example we will select Manually Select Contracts after hitting the Add button.
1 - 21
Resident Management System
You may also create groups based on a formula you can create as shown below. If you can
picture it in your mind, you can probably create it depending on the data elements you need.
1 - 22
Resident Management System
P2 Projects
P2 Project Structure
P2 is organized by Projects separated into Work Breakdown
Structures (WBS) that contain a group of Tasks (activities) that
belong to a construction contract. These Tasks in the WBS
include both construction tasks and construction milestones.
Note: A P2 Project is
not the same thing as
an RMS Contract.
Please read carefully.
When more than one source of funds is required for a Construction contract, there will be
multiple Construction tasks within a WBS, as each construction task in P2 can only be funded
by a single source of funds. In addition, all Construction tasks within a WBS will always belong
to the same RMS contract.
P2 construction tasks are linked to RMS contract by selecting the P2 Project WBS for an RMS
contract. The linking between RMS and P2 has been enhanced so that when RMS Users select
the P2 Project and WBS(s), RMS will automatically link all construction tasks within the WBS to
the RMS contract.
Example of a P2 Project organized by WBS
P2 Project (Project ID and Project Title)
WBS (WBS No. and WBS Name)
Construction Task 1 (Task Code and Task Name)
Construction Task 2 (Task Code and Task Name)
P2 projects can be linked to RMS contracts in a number of different ways:
1. One P2 Project can be linked to one RMS Contract.
-- All WBS’s from a single P2 Project can be linked to a single RMS Contract.
2. One P2 Project can be linked to multiple RMS Contracts.
-- When a P2 Project has multiple WBS’s each WBS can be linked to a different RMS
Contract.
3. Multiple P2 Projects can be linked to a single RMS Contract.
-- WBS’s from different P2 Project can be linked to the same RMS Contract.
1 - 23
Resident Management System
Keys points to keep in mind
The P2 Project is identified by a Project ID and Project Name that is downloaded to RMS.
Additionally, the Project Scope of Work is displayed to describe the P2 project. The WBS band
can be looked upon as simply being a collection of “activities”, such as one would find on any
schedule. In fact, the Tasks within the WBS are given an “Activity ID”, such as our typical
construction schedule would include. For example, among these activities (Tasks) you might
find:
Construction Tasks (Actual WORK)
1. Construction Contract
Activity ID = CON4300
Construction Milestone Dates
2. Award Contract
3. Construction NTP Acknowledged
Activity ID = CON2260
Activity ID = CON2379
Some of the Activities under the WBS are specifically identified within the P2 program under a
column titled: “RMS Interface”. These are the activities that will interface with the RMS Contract.
P2 also includes the milestone dates, Project Status and Delay Codes that are downloaded to
RMS.
Project Managers (PM’s) now need to be instructed to enter the RMS Contract ID in the WBS
“name”, not the P2 Task name.
1 - 24
Resident Management System
P2 Project ID and Project Title
WBS No. and WBS Title
Task Code / Activity ID
Information that is
interfaced between RMS
and P2.
Construction Milestones
P2 construction tasks
linked to an RMS Contract
1 - 25
Resident Management System
P2 Project Number and Title
WBS Activity Costs
Milestone Dates
Status and Delay Codes
1 - 26
Resident Management System
The RMS – P2 interface only downloads the P2 Projects that pertain to your District. The way it
accomplishes this is by downloading available project data only for certain “P2 Org Codes”.
These “P2 Org Codes” should be entered for each office you have setup in RMS if you expect to
download P2 data for contracts in that office.
You can download the
P2 Task Organizations
also by using the
lookup.
1 - 27
Resident Management System
Download P2 Data
Once you have entered the P2 Task Organization Code for a particular office, you are ready to
download the available P2 projects for that office. Click on the Home button, select the office
you want to download P2 projects for, and then click the Summary button. The program will
display the option P2 Projects, and you should select that option.
In the above example, the Portland Resident Office has been selected. If you click the Import
P2 Projects button, RMS will download all the available P2 projects for the Task Organization
that was entered into the Portland Resident Office. Optionally, you can choose to download P2
projects for the Portland Resident Office including all of its sub-offices, or even choose to
download for all offices in the whole database (District).
You may see this message following your
download if there are unlinked P2 WBS’s.
1 - 28
Resident Management System
After downloading P2 projects, you may view the projects that were downloaded by clicking the
Unlinked P2 WBS’s tab. This tab displays any new projects that are not currently linked to an
RMS contract. In the example below, the projects downloaded for the Portland Resident Office
are displayed. The Projects ID, Project Title, and WBS No. information are listed in the top grid.
The lower grid displays the P2 tasks (Task Code, Task Name, and Amount) associated with the
project selected in the upper grid.
1 - 29
Resident Management System
Identify and Link P2 Projects to RMS Contracts
At this point, you can select one of these projects and link it to a contract that already exists on
your system or choose to link it to a new contract. In order to link the P2 Project to an existing
contract, select the P2 project in the upper grid and click the Existing RMS Contract button. A
new screen appears listing the available contracts that do not have a P2 project linked to it. You
can select the contract from this list.
1 - 30
Resident Management System
Another area where you can link a P2 Project to an RMS contract is on one of the Contract
Description tabs as seen below. You can also remove the linked P2 project from the contract
on this screen. Information is downloaded from P2 until the Actual Contract Award date is
entered (this date can be entered in either RMS or P2).
Controlling the RMS – P2 Interface
On the Contract Setup screen, there are three checkboxes that help control how the RMS – P2
interface works. As an RMS User, you will need to indicate IF you will use P2 to link your
contract, IF you desire to use P2 data prior to Award, and IF you want to report Multiple Phases
on the Contract.
The first check box should be unchecked if the contract should not be linked to P2.
1 - 31
Resident Management System
The check box identified by Use P2 data prior to award? will select who controls the status
and milestone information before contract award. When checked, the RMS program will
populate status and milestone information with P2 data prior to actual contract award. When
unchecked, the milestone information is not updated with P2 data and must be updated within
RMS.
When multiple WBS’s are linked to a contract in RMS, the RMS user has the option in Contract
Setup to track a separate set of milestone dates and status information for each WBS (as
separate Contract Phases in RMS) or using one phase in RMS and sending the same milestone
and status information to each WBS in P2. The other checkbox, Use only one Phase?, enables
you to decide whether you want separate status and milestones for each P2 WBS band. By
default, this check box is unchecked and so all the linked P2 Projects will have separate
milestone dates. Check this box if you want to keep roll up all phases to a single set of
Milestones.
1 - 32
Resident Management System
When this box is unchecked and you have more than one phase, you can choose the phase on
the Contract Description screen and Milestone Schedule screen.
Information Interchanged from RMS to P2
The exchange of information from RMS to P2 involves several stages. First, the contracts in
RMS must be linked to specific P2 projects. Second, once an actual award date has been
entered, each District or RMS database automatically uploads information from its contracts to
one large Consolidated RMS system (CRMS). Third, P2 must then retrieve the contract
information from CRMS, finally placing it into the P2 database. This process takes time and
requires all the pieces to be entered correctly and functioning properly.
P2 will start gathering up information from CRMS when there is an actual award date on the
contract. Once P2 obtains an Actual Fiscal Completion date, P2 will no longer retrieve
information from CRMS for that contract. These two milestone dates can be input in either the
P2 or RMS programs.
1 - 33
Resident Management System
Information that P2 downloads from CRMS:
Contract Information
Milestone Dates
Contract Number
Delivery Order Number
Contract Title
Contract Scope of Work
Contract Amount
Placement Percentage
Contract Status Code
Primary Delay Code
Phase (WBS) Title
Contract — Customer Issues
Contract — USACE Issues
Phase Title on Multiphase Contracts
Contract Award Dates
NTP Acknowledged Dates
Contract Required Completion Dates
Construction Start Dates
Construction Completion Dates
Beneficial Occupancy Dates
Physical Completion Dates
Transfer Document Dates
AE Evaluation Dates
Contractor Evaluation Dates
Contractor Final Payment Dates
Information that RMS downloads from P2 prior to Award
Milestone Dates (Target Dates)
Project Information
Contract Award Dates
NTP Acknowledged Dates
Contract Required Completion Dates
Construction Start Dates
Construction Completion Dates
Beneficial Occupancy Dates
Physical Completion Dates
Transfer Document Dates
AE Evaluation Dates
Contractor Evaluation Dates
Contractor Final Payment Dates
Project ID
Project Title
WBS
WBS Title
Task Code
Task Name
Task Amount
Design By
Contract Type
Project — Scope of Work
Contract Status
Primary Delay Code
Project — Customer Issues
Project — USACE Issues
Task Organization (P2 Org Code)
1 - 34
Resident Management System
Contractor Claims
This feature allows Management to track and review any claims that may exist in any contract in
the District. You may select to review Open Claims or All Claims and may also choose to view
those claims assigned to an individual (by name), the claims associated with an Office (or Suboffice), and may also limit the claims to a particular contract. At this Summary level ALL claims,
for ALL contracts may be reviewed.
Claims may be added
here in the Summary
Module or at the
individual contract level
(listed under the
Finances selection). In
either case, the data and
screens are identical.
1 - 35
Resident Management System
District Library – District Policy – Claim Dates
Various dates are controlled from the District Library to ensure uniformity throughout the entire
District for claims.
You can add event
dates in the District
Library by selecting
the Add button. You
can indicate that you
wish to automatically
add the new event to all
NEW claims also.
In addition, you can add the date
to all existing open claims as
well.
1 - 36
Resident Management System
Adding a Claim
When you wish to add a claim from the Summary level, select the Add button to select the
contract the claim is for from the popup window.
When you find your desired contract and push the OK
button, you are asked to confirm that you want to add
the claim to the selected contract.
1 - 37
Resident Management System
You are then automatically taken to the Contractor Claim selection in the desired contract to
enable you to complete the entry information regarding the claim. If you enter the claim within
the contract level, the same screen appears.
The next sequential Claim ID number is automatically linked to the new claim and the contract
information heading is already populated, as shown on the following screen. The Claim ID
numbers are assigned by RMS without regard to the contract – that is, the sequential number is
for all claims for all contracts within the District database. Otherwise, it would be difficult to sort
them at the Summary level across all contracts.
The following screen is provided with many of the fields completed and should be selfexplanatory for the most part.
1 - 38
Resident Management System
Supporting Documents for Claims
You are able to attach any number of documents and files to a claim package. The following
screen shows you the capabilities and selections you may make.
1 - 39
Resident Management System
Reports for Claims
From the Summary area you can view all Contractor Claims by using the Reports function.
1 - 40
Resident Management System
You can then proceed to indicate what precisely you would like to view by using the numerous
range and sort selections presented by the ellipsis’ lookups.
CONTRACTOR CLAIMS
16 Sep 2007
Open Claim s for Portland Resident Office including Sub-Offices
US Arm y Corps
of Engineers
Contract No.:
Project Name:
Contractor:
Customer:
DACW57-02-C-0012 NA
Claim ID:
CLM-0001
480 Ton Intake Gantry Crane, Sup Claim Ref. No.:
CL-2007-110
Advanced Automation Technolog Evaluation POC:
Scott A. Apple
CIVIL WORKS
Field Office: Portland Resident Office
Claim Type: REA
Claim Status:
Claim Cause:
Change No.:
Received by Government:
Action Complete-File Closed:
Contracting Officer: Eric A. Arndt
Counsel POC:
Project Manager:
Amount Claimed:
Time Claimed:
Change Amount:
Bill Averill
Brian P. Schmidtke
35550
90 Days
Mod. Ref. No.:
Change Time:
Mod. No.:
Description: Unforeseen w eather conditions not addressed in Special Clauses
Contract No.: DACW57-95-C-0002 NA
Claim ID:
Project Name: Bonneville 1st PH Major Rehab, S Claim Ref. No.:
Contractor:
Voith Siemens Hydro Pow er Gen Evaluation POC:
Customer:
CIVIL WORKS
Field Office: Portland Resident Office
Claim Type: COD Request
Claim Status:
Claim Cause:
CLM-0002
Contracting Officer:
Counsel POC:
Donald L. Erickson
Project Manager:
Amount Claimed:
175000
Time Claimed:
120 Days
Received by Government:
Action Complete-File Closed:
>100K COD scheduled:
COD Issued:
Description:
If you used the Reports function from the Contract level, you would only see the claims for that
single contract.
1 - 41
Resident Management System
Interface Schedules
Using the Interface Schedules, you will indicate how often and when the processes will
transpire, as shown on the following screen. It is suggested that you choose a time that will be
least disruptive to your office functions, such as after normal work hours. In addition, you can
choose to run the update immediately anytime you need to.
Following each download/upload a “log” will be generated to reflect what was accomplished and
will list any problems encountered with the data transfer. The logs are viewed from this same
screen. You probably don’t even need to look at these logs, unless, of course, you have Geek
tendencies in your genes.
1 - 42
Resident Management System
Office Module
The third module, Office, tracks data pertaining to the offices and staff that will interface with
RMS for all contracts. This is where individuals are given access and permissions to work in
various areas of RMS and is where you assign staff members access to particular contracts or
portions of contracts.
1 - 43
Resident Management System
Local Library
The fourth module, Local Library, contains the libraries maintained by
your local office. This allows you to customize the libraries to fit the
requirements of your local practices and management preferences.
Changes made in this library affect all contracts assigned to your office.
1 - 44
Resident Management System
District Library
The fifth module, District Library, contains the libraries maintained by the District Office. This
provides uniformity of field offices in areas considered appropriate. Changes made in the library
affect all contracts within the database that fall under the District Office.
1 - 45
Resident Management System
System Library
The sixth module, System Library, contains the libraries maintained by the RMS Center. These
libraries include HQUSACE policy-driven selections that will seldom change and are considered
critical enough that uniformity throughout all USACE Offices is required. Also, there are Word
Document samples, such as plans, memorandums, and form letters, that you are able to copy
into your Local Library and modify them as desired in your particular office.
The following selections in the System Library are able to be tailored for your District. If the
Data does not apply to your District, or if your District chooses to not use these selections,
simply uncheck the “Include in Lookup” boxes.
•
•
•
•
Program Types
Fund Types
Contract Status Codes
Primary Delay Codes
If unchecked, those items will not appear in the various lookup tables within RMS.
1 - 46
Resident Management System
Reports
The Reports button allows you to enter the Reports Menu window and view as well as print
any of the reports available throughout the various RMS functional areas. The reports are
divided in four areas:
• Contract – Includes all reports having to do with an individual contract.
• Summary – Includes reports spanning several contracts and issues.
• Office - Reports pertaining to an office or selection of offices will be here.
• Library – Reports from the Library will be accessed here.
2-1
Resident Management System
Chapter 2 - Office and Staff Setup
What this Chapter presents:
•
Office / Staff Setup
•
Office Module
Six steps to success to use RMS
RMS must be setup to allow each staff member to use it effectively. The Office Administrator
needs to accomplish the following six items:
1. Enter a description (name) for each office
2. Enter each staff member in the office created
3. Set up roles for the office (can be for an individual staff member, by title,
function, etc.)
4. Assign staff members to the roles created
5. Create one or more User Groups for the office and assign the staff to the
Group(s)
6. Assign contracts to the User Group created
2-2
Resident Management System
Office Module
In this option you will define the specifics of your office that will be used across
all your office contracts. You will enter your Office Symbol, your Parent
Office Symbol, Office Type and Office Name. This information is used for
various reports and is the tool RMS uses to position your contract in the
Contract Explorer. Information required for input into this option will be obtained primarily from
office records.
2-3
Resident Management System
Office Description
Most of the items on this screen are self-explanatory.
A
B
A. The Office
C
Symbol is the official
office symbol for your
office and was
entered when the
office was first added
to the program. If the
symbol is incorrect, or
changes, you are now able to change it without deleting the entire office, as was the case in
prior versions. This symbol is assigned by your District or Center and should be unique for your
individual office. Some Districts may refer to the symbol as the “Routing Symbol”, and others as
the “Mailing Symbol”.
B.The Office Code is utilized by some Contracting Offices and is presented on this screen. It
will print directly on the SF30 when entered. If left blank, the SF30 block will also be blank. It is a
ten (10)-character cell. Some offices may refer to this as the SF30 Office Code.
2-4
Resident Management System
C.
The Prefix Code for Change Requests is a two (2)-character prefix code that will be
used to identify the change requests associated with this office. In most cases, your
organization code is used. If this office will not initiate changes as an ACO or CO, the cell may
be left blank. Just because you access RMS, does not necessarily mean you will create change
requests and/or modifications. The change requests and modifications are processed under the
office that is administering the contract, using their own prefix.
Deleting an Office
You may push the Delete button to delete a particular office after you highlight that office.
However, you will not be able to delete an office if a Contract, a Sub-office, or a Person is
assigned to that office. The Office Administrator must first reassign any contracts, offices, or
staff linked to the office to be deleted, or delete them entirely.
There are three conditions that must exist before you can
delete an office: (The DELETE key isn’t accessible either)
1. The Office must not have a User assigned to it.
2. The Office must not have a Contract assigned to it.
3. The Office must not have a subordinate office under it.
2-5
Resident Management System
Office Information - Administrators Tab
This tab reflects all personnel that have access rights and privileges that affect that particular
office. If you desire something be accomplished in areas you have no access, contact one of the
listed people for assistance.
The bullets to the right of each window explain the abilities of the listed members.
What the heck is all this
ACCESS CONTROL about
and why is it so difficult?
RMS access control is really
quite simple when you analyze it. RMS
needs to know three basic things for
access control to be put to use:
WHO WHAT WHERE
1. Who you are (your name and office
affiliation)
2. What you do (what you will have
read/write access to)
3. Where you do it (what contracts you
will have access to)
With this information you can be assigned to one or more groups of individuals that will jointly
administer construction contracts using RMS.
This information can be input by your Office Administrator, who will be assigned by a System
Administrator. The Office Administrator has total control on the access program for the
individual field office and can add or delete other Office Administrators.
2-6
Resident Management System
Office Administration Rights
Varying degrees of access and rights can be assigned to Office Administrators. By default,
when an Office Administrator is selected, full rights are granted. However, you may also limit the
rights if needed or desired.
Full Rights Screen
Selected Rights
Screen
2-7
Resident Management System
Office Personnel
There is the location the lists all persons having access to RMS or supporting RMS in one form
or another. The four tabs are explained as follows:
Office Personnel
The individuals shown on this tab are assigned to the Office in which you are viewing (e.g.,
Victory Area Office in the example).
Other District Personnel
The individuals listed on this tab are assigned to other offices within your operating District.
Non District Personnel
These people are not assigned to an office within your operating District, but provide support to
some function of RMS. They may be from another District, Headquarters, or may even be an AE supporting your contract efforts. Some Districts put QA Contractors here also.
Inactive Personnel
A user can be
marked inactive
and yet remain in
the system for
information. For
example, you may
have a submittal
reviewer that has
transferrred
elsewhere and you
wish to retain their
name in the
submittal register,
etc.
2-8
Resident Management System
Office Policy
There is a selection in the Office Policy screen that controls editing of the Quality Assurance
Daily Reports (QAR’s).
Each office Chief should decide upon a policy for allowing Quality Assurance Representatives to
edit reports after they are completed. RMS allows the following options:
•
•
•
Only allow editing of the most recent daily report
Only allow editing of daily reports created within the last ___ days.
Always allow editing of daily reports.
This policy does not apply to the Contractor QC Daily Report. Unless the Government (RMS)
specifically returns a QCR for correction, the contractor will not be able to modify his Daily
Report once it is marked complete and exported to the Government.
If something is wrong with a report, and it marked completed, the proper way to make a
correction is to enter a Narrative comment (either in the QA or QC Report) and explain the error
or correction of a previous day. You should not alter a report – especially if you are providing a
‘signature’ and filing it with the contract.
2-9
Resident Management System
Project Delivery Team Members
RMS provides the opportunity to capture a list of key players involved in the execution of the
contract. This listing should not be confused with Staff Assignments, as the list should include
personnel from various organizational lines, such as the Designer, Engineering, Project
Management, Field Office Staff, Users, Occupants and others that might play an important role
during the life-cycle of the project.
When you choose Add, you have the following options:
Copy team from another Contract
Select Distrct Personnel
Select Other Personnel
3- 1
Resident Management System
Chapter 3 Adding, Selecting & Deleting a Contract
What this Chapter presents:
•
•
Selecting a new Contract
•
Adding a new Contract
•
Deleting a Contract
Selecting a New Contract
RMS will automatically place your cursor on the last contract you opened when you return to the
program. If you need to enter a different contract, you will use the Contracts Control Center
that is accessed via the Home option of the main menu as shown below.
You can choose to display
the Project ID number ifyou
wish, by checking the box
as indicated.
3- 2
Resident Management System
Adding a New Contract
You should enter a new contract into RMS as soon as you have reason to believe that the
contract is valid, the sooner the better. A contract can be entered with as little information as a
title, contract type, customer type, contract dates, estimated duration and an estimated cost. A
SCHEDULE MUST BE GENERATED after the contract is entered. Your contract may already
be loaded in P2, therefore consult with your PM and link the data directly from P2 if it has been
entered. Only an Office Administrator can ADD a new contract to RMS.
From the Contracts Explorer, push the Add
button to begin the process of adding a new
contract. If you hit the Add button by mistake,
you have a chance to “UNDO” the mistake.
3- 3
Resident Management System
The RMS program assigns the Contract Identification Number automatically and it becomes
part of the Oracle database and cannot be changed. The Contract Title is the name on the
contract or task order notice of award or the Bid package. However, it is limited in length to 40
characters, so you may need to be creative with the title to shorten it. If you need to have the
LONG title of a contract for a Report you wish to create, RMS has created a MACRO for the
long title and will copy whatever you type in the Contract Long Title block into your report.
(Note: Older versions of RMS allowed the Contract Identification Number to be User-Defined,
e.g., the Contract Number. However, those contracts cannot be used with the QCS or QAS
programs.)
The Contract Number and Delivery Order number MUST BE ENTERED if using CEFMS.
You are now ready to proceed to the next chapter and begin entering contract specific data.
3- 4
Resident Management System
Adding a Contract for Training or Read Only Purposes
You can export
contracts to QAS
and/or QCS for
use in Training
Mode or to be
Read Only. If you
export a contract
from RMS and
have not
established a
remote QAS
(QCS) site, you
will receive this
brief message:
3- 5
Resident Management System
When you need to set up QAS or QCS for training purposes (or Read Only), it is quite simple to
do so – simply choose the appropriate radial button. You will need to convey the Contract ID
number and the QCS/QAS Access Code to the system desiring to add the contract to their
program.
The program will then export the contract to the RMS SFTP repository or a file, whichever you
have chosen. You then download the desired contract from the SFTP site (or file) and will be
asked for the Contract ID and Access code.
3- 6
Resident Management System
You may then use the contract either for Training Mode or Read Only purposes. While in
Training Mode, you are able to enter and manipulate data, but you are not able to export any
files to QCS or RMS.
Similar screens and procedures exist for the QCS program also.
4-1
Resident Management System
Chapter 4 - Entering Contract Description and
Status
What this Chapter presents:
•
Entering Contract Information
•
Contract Description
•
Providing Contract Dates
•
Contract Status
Entering Contract Description and Status
This chapter may be considered the true “contracts control center” for our work within the
RMS program. RMS segregates specific tasks under this selection as can be seen on the
Contract Menu: Contract Description, Contract Status, Contract Setup, Contract Plans,
Correspondence, Request for Information, User Defined Entries, Prime Contractor,
Subcontractors, Contractor Insurance, Contractor Payrolls, and Labor Interviews.
4-2
Resident Management System
Contract Description Tab
This screen needs to be complete and accurate, as the information shown controls many
different RMS reports. Each block should be populated.
NOTE: The “Contract Long Title” block is provided to populate a
built-in MACRO within RMS to allow you to use it in custom reports
when needed. The macro appears as {contract_long_title}.
4-3
Resident Management System
P2 Projects Tab
Refer to Chapter 1 of this manual for an explanation of how P2 and RMS work together.
What is all this talk about P2, and what does it mean to our Field Offices?
P2 is the tool (AIS) that enables USACE to implement its business processes and to change to
its desired Project Management Business Process (PMBP) culture. USACE is committed to
accomplishing work through project-focused teams, using proven project management practices.
P2 is a suite of commercial-off-the-shelf (cots) software applications configured to support
project execution in the Military, Civil Works, Environmental, Research & Development and
Interagency and International Services (IIS) mission areas.
4-4
Resident Management System
A project may be identified long before it becomes a construction contract. The project data is
input into P2 for tracking and budget purposes. P2 will include information on FUTURE
CONTRACTS, such as estimated contract amounts, scope of work, description, anticipated
milestone dates, and other pertinent data. This is the information that will be downloaded into
RMS until the contract is awarded.
The RMS User will benefit directly by being able to download information directly from P2 when
initially setting up the contract in RMS. The information can be refreshed as needed by
additional downloads for all the future data related to our Contracts that is stored in P2.
Here is the screen depicting what will be downloaded directly from P2:
P2 is meant to make our work easier in the field offices. We should be able to avoid manual
input of data already entered and simply import it into our RMS program. Following the ACTUAL
AWARD of a contract, P2 will automatically and behind the scenes gather necessary data
directly from the Districts RMS databases. The information will reside in a new database,
referred to as CRMS (Consolidated Resident Management System). CRMS will query the
Districts RMS databases and forward the required reporting information to P2.
Only following the Actual Award Date (milestone date) will RMS upload the current contract
data to P2. This will continue until the Contractor Final Payment Date – Actual has been
entered.
4-5
Resident Management System
Contract Information Tab
This screen is essential to complete, as this will separate your contracts into the proper
programs for your placement reports and any Contract Groups you might create.
This is a field in RMS that you can use with the Custom Report Designer for custom reports.
(This is not a topic covered in this Manual.)
4-6
Resident Management System
Contract Status
The Contract Status selection contains THE information used to update P2 for upward reporting
of our contracts to Higher Headquarters. The Contract Status selection provides an easy way
for management to keep up with the status of a contract; therefore it is critical that the data be
consistent and accurate. This selection includes four (4) Tabs: Status/Issues; Milestone
Schedule; Monthly Progress and Cost/Time Growth (for active contracts only).
Contract Status – Future Contract
Status / Issues Tab
These contracts may also be in P2 – if it is not in P2, coordinate with the District Project
Manager to have the data input into P2. All information on this screen should remain current at
all times. The “grey” fields are downloaded from P2 prior to actual award of the contract.
4-7
Resident Management System
Contract Status – Active Phase
Fortunately, most of our contracts will entail only a SINGLE PHASE. However, on those occasions
where multiple phases are required, RMS has been modified to handled unlimited numbers of Projects
and/or Phases (P2 refers to these phases as “bands”). If more than one phase is required, you will see
the “Contract Phase” selection and will be able to update Status on each Phase.
4-8
Resident Management System
Status Photo Tab
•
•
•
•
This tab has been added to permit a photo depicting the contract to be filed
within RMS. The photo can be updated as progress is made.
You are cautioned to limit the size of the photo to around 150KB or less.
To update the photo, use the Update Photo button and then use the Delete
button on the following screen to delete your current picture, then you can
use the Select button to update/change your photo. Only one photo at a time
can be used.
4-9
Resident Management System
Milestones Schedule Tab
It is essential that you have the following critical information populated:
•
•
•
Original Contract Duration (days)
Contract Award (Scheduled date)
NTP Acknowledged (Scheduled date)
If you have not input that
information, you will not be
able to prepare the monthly
progress of work or
anticipated placement of
work and will not be able to
complete your Milestones Schedule.
In reality, all Milestones should be entered into RMS. The System Milestones (HQ required) will
be upward reported to the P2 Portal and will be used for Consolidated Command Guidance in
Command Management Reviews.
The dates represented on this tab may reflect only those SYSTEM dates (milestones) that RMS
requires for management, tracking and reporting. You may add other (optional) milestone dates
in the Local Library and use them for all or selected contracts. You can also add milestones at
the contract level that will only be reflected for that contract. Some Offices elect to enter the Key
Milestones from the Contractor’s scheduling program. You should enter the Scheduled dates
4 - 10
Resident Management System
as soon as they become known. As the event takes place, enter the Actual date (“Hey,
Roscoe!” – Do not enter “FUTURE” ACTUAL dates ☺).
Definitions of Milestone Dates for the RMS System
The following definitions are provided for the RMS System required Milestones (HQ/RMS/P2):
Contract Award (CC800) – Date the Contract Award Letter is signed by the Contracting Officer
NTP Acknowledged (CC810) – Date the Notice To Proceed (NTP) is acknowledged by the
Contractor. Acknowledgement is the contractor’s signature or the receipt date of the NTP letter
postal delivery receipt. RMS and P2 use only ONE NTP for a contract, even when the contract
is a Design-Build contract.
Construction Start Date – Date construction is scheduled or actually started. This will begin the
numbering system for the Daily QA and QC Reports. The start date will be Report #1 and they
will be sequentially numbered after that and will include non-workdays and weekends.
Contract Required Completion (CC830) – (calculated) Uses the NTP Acknowledged date plus
the original duration to compute the Original Required Completion Date. Uses the NTP
Acknowledged date plus the current duration (includes signed mods with time) to compute the
Scheduled (Current) Required Completion Date.
Construction Completion (CC820) – Date that the COE accepts the work (i.e. LD’s would no
longer apply). This is synonymous with the term “Substantial Completion”.
Beneficial Occupancy Date (BOD) (CC850) – Customer acceptance and occupancy of the
facility.
Original BOD - This is the date mutually established by the Project Delivery Team (PDT)
(customer, user, Area/Resident, and Project Management) as to when the work will be
transferred and accepted by the customer. This date should be established within 30 calendar
days after contract award and remains fixed for the life of the contract.
Scheduled BOD – Initially matches the Original BOD established by PDT, then updated as
necessary to reflect when it is currently expected or scheduled to occur.
Actual BOD – When it actually occurs. For military projects, the client should sign the initial
1354 on this date.
It is possible to have multiple BOD’s on a single contract. For projects without separate phases,
the date in RMS should reflect the last or final BOD for the Contract. Local milestones can be
added to track multiple BOD’s in RMS.
Physical Completion (CC840) – Date all contractor work is completed. All deficiencies/punch list
items are completed. Note: Claims can be pending and this date excludes activities within
government control, such as warranty inspections, CCASS evaluations, final 1354, etc.
4 - 11
Resident Management System
Transfer Document Date (CC890) – Date Initial 1354 or Transfer Memo is accepted by the
customer, which should occur at BOD.
Contractor Evaluation Date (CC870) – Date Contractor Evaluation completed, signed by the
Reviewing Official.
Contractor Final Payment (CC880) – Date on the Check/EFT on the Final Payment to
contractor. Actual date will be downloaded from CEFMS. Scheduled date is a manual entry of
when you expect it to happen.
AE Evaluation Date (CC860) – Date AE Evaluation (after construction) completed, signed by the
Reviewing Official.
Red Zone Meeting – Date of meeting with PDT to discuss all aspects of upcoming contract
closeout. Initial Red Zone meeting is held approximately 60 days before the scheduled BOD or
at 80% complete.
Project Fiscal Completion (ML260) – Date all project fiscal requirements are satisfied and all
remaining design and construction funding returned to customer and the CEFMS ConstructionIn-Progress (CIP) asset account is closed by Resource Management. Scheduled and Actual
date comes from P2.
Examples of District defined Milestones
Interim 1354 Date – Date the User Signs (last, if more than one) Interim 1354. Remember, that
it is possible to have multiple Interim 1354 date’s on a single contract. The date in RMS should
reflect the last Interim 1354 Date on the Contract.
Final Pay to District – Date Final Pay Estimate Package Sent to the District Office
As-Builts to District - Date As-Built Drawings Sent to the District Office
Payrolls Sent to District - Date Payrolls Sent to the District Office
Contract Files Sent to District - Date Contract Files Sent to the District Office
4 - 12
Resident Management System
Monthly Progress Tab
Once the NTP Acknowledged date (Scheduled) has been provided, you may proceed to the
Monthly Progress tab and generate your monthly scheduled progress by copying the
actual/projected % placement, choose from a selection of automated S curves, or choose to use
the Contractor’s activity scheduled start and finish dates. Quite a variety of Schedule options
have been added to this latest version of RMS, as you can explore by using the selections at
the bottom of the screen. You do this from selecting the Generate Scheduled Progress button.
This information MUST BE
COMPLETED for placement
projection reports and is
uploaded to HQUSACE via the
P2 module. The initial schedule
is typically based on a Sin²
curve. If you are importing the
contractor’s NAS (via the SDEF),
you should use the selection
Contractor’s activity
scheduled start and finish
dates for more accurate reporting.
4 - 13
Resident Management System
Cost / Time Growth Tab
(Information screen only – you can only change the “Contract Phase” you wish to
review.)
You should first complete your AWARD CWE before using this screen. You must have an NTP
Date (scheduled or actual) and a contract DURATION entered before you will be able to access
this tab.
The information on this screen depicts a succinct snapshot of the contract, as it was originally at
Award, how it currently stands and, finally, what it is estimated to be in the future.
Explanation of Options
Contract Cost and Time Growth is computed and updated by RMS from the Award CWE and
all contract changes and/or modifications issued to-date.
The ORIGINAL contract amount is the AWARDED contract amount, plus OPTIONS exercised
at award time. When you exercise an option that was originally identified it is considered as part
of the original contract amount and time. Therefore, options exercised do not count against
COST/TIME growth. As options are exercised the ORIGINAL contract amount will include the
option as exercised.
5-1
Resident Management System
Chapter 5 - Contract Setup and Planning Data
What this Chapter presents:
Entering Contract Setup and Planning Data For:
•
Administration
•
Funding
•
Payment
•
Modifications
•
Quality Assurance
•
Submittals
•
Schedules
5-2
Resident Management System
Contract Setup and Planning Data
This chapter will address the HOW and WHO of certain aspects of our contract. That is, HOW
we want to do things and WHO will do them. The entries discussed in this module are typically
referred to as “Planning Activities”.
Contract Setup – Administration / Funding Tab
Continuing Funds
The Continuing Funds box should be checked if it applies to your contract. This will cause RMS
to recognize that your contract is not fully funded and will keep track of contingency, including
negative contingency.
5-3
Resident Management System
Funding: Track CWE -- Options
RMS will accommodate three basic methods to enter and track funding for the contract.
Option 1
“Track CWE for each Funding Account, pre-plan Obligations for payment on all CLINS”
This option allows you to pre-plan how you are going to pay for the Contract Award, Changes,
and Modifications. This option gives you complete control of how the contract funds will be
used. The option requires you to maintain a CWE for each Funding Account and requires you to
predetermine obligation amounts for each Contract Line Item.
While this option gives you the most control, it also requires the most input.
Option 2
“Track CWE at Project Level, compute Obligation amounts for payment based on available
funds”
This options does not require you to identify expenditures at the Funding Account level. It
requires you to maintain only one CWE at the Contract level. Funding for pending changes or
modifications does not require pre-planning. Contract payments are based on the available
Obligations when the payment is made. Monthly payments will be based on the predetermined
allocation split. Any payments made will not exceed the available funding.
This is the easiest of the options and is also recommended if the total source of contract funding
is not known at award.
Option 3
“Track CWE at Project Level, manually enter Obligation amounts for payment”
This option is basically the same as Option 2, except you decide how much should be allocated
out of each Obligation when payment is made.
Currency Type
The foreign currency module in RMS matches the one in CEFMS. Foreign Currency contracts
will honor exchange rates at the Obligation Line Item level at award.
5-4
Resident Management System
Contract Setup – Payment / Modifications Tab
Obligation Payment Terms
This option allows different payment terms (days) for each Obligation Line Item for compliance
to the Prompt Payment Act. The Payment and Refund Terms (days) may be changed in RMS
and will be uploaded to CEFMS for the current payment only (if the Payment Terms are different
in CEFMS, RMS will not be over-ridden on the next exchange of data with CEFMS). The Final
Payment terms are always 30 days.
5-5
Resident Management System
CEFMS Set Up for ENG 93 Payments
You need to enure that CEFMS has been set up to make Progress Payments (ENG 93). Now
would be a real good time to take a look at the CEFMS screens to verify proper indication.
This is the Progress
Payment Indicator box
and it must be set at
“Y” (Yes).
5-6
Resident Management System
CEFMS Set Up for Payment Terms
CEFMS needs to reflect the Payment Terms required by the contract. CEFMS defaults to 30
days, but many contracts have 14 day Payment Terms. The following screen (2.41) in CEFMS
is set up for each Obligation Line Item and includes the box to indicate the proper Payment
Terms.
This is the Payment
Term indicator box
and should match the
contract (either 30 or
14, typically).
5-7
Resident Management System
SPS Set Up for Payment Terms
Modifications created in SPS should also have the Payment Terms agree with the Contract and
should agree with CEFMS. The following screen (6.1.1) in SPS is set up for each Obligation and
includes the box to indicate the proper Payment Terms.
This is the Payment
Terms indicator box
and it must reflect the
proper payment
terms.
5-8
Resident Management System
Contract Setup - Quality Assurance Tab
This is where you begin identifying, assigning and otherwise setting up the QA features for the
contract. The type of report to be used is selected (Civil or Military, Dredging, or other special
type), Personnel are identified (RMS will accommodate up to 3 shifts) and you enter the weather
data from within the contract.
Contract Setup Window
Clicking the radial button: Specific weather conditions causing critical delays, you will see
the following rows for entry of data:
•
•
•
Precipitation Over ____ Inches (MM)
Temperature Below 32° F (0° C)
Surface Wind Over ____ MPH (KPH)
5-9
Resident Management System
Contract Setup – Submittal/Schedule Tab
On the Submittals/Schedule tab, default submittal information is provided in order to generate
the Submittal Register.
Will there be more than one
Submittal Register?
On the left side of the Submittal/Schedule tab,
RMS defaults to a single Main Register. Each
contract can be provided with any number of
submittal registers.
The pop-up screen must be completed with a
new Submittal Register ID number and a
Submittal Register Title. RMS defaults to
the next sequential number for the Submittal
Register ID.
5 - 10
Resident Management System
Compute Submittal Need Dates based on Activity Schedule
This selection will automatically populate the fields in the Submittal Register (ENG 4288) with
the dates from the Contractor activity schedule (NAS) or from the dates manually entered if the
SDEF import is not utilized.
Activity Schedule provides for either manually entering the Start/Finish Dates
or Importing the Start/Finish Dates from the Contractor’s NAS scheduling
system. Choose the one specified by the contract, or being used by the
Contractor.
Manually enter Scheduled Start/Finish Dates
If the Contractor is using a Gantt chart, manual entry of dates may be required. The Actual
Dates will be imported from the Contractor QCS module, if it is being used.
Import Scheduled Start/Finish Dates from NAS
The easiest method to keep up-to-date with the Contractor is by use of a Network Analysis
System (NAS) (often referred to as a CPM, Critical Path Method). RMS will automatically be
able to import the Early and Late Start/Finish Dates that can be used to update P2.
The Actual Dates will be imported from the Contractor QCS module.
6-1
Resident Management System
Chapter 6 - Correspondence
What this Chapter presents:
•
Overview
•
Adding Correspondence in RMS
•
Generating Form Letters
•
Copying a Document from another
Library
•
Request for Information (RFI) Procedure
•
Contract Documents
•
Supporting Documents
Overview
he correspondence option allows you to maintain a log of all documents sent or received on
T
a contract. It has links to other menu choices so you can check pertinent correspondence at
several points. For example, when you choose a particular modification, a subsequent menu
choice allows you to view all correspondence on that modification.
This option also gives you access to word processing and assists you in generating form letters
from a variety of templates. Both an RFI module and a Correspondence module is available to
exchange information with the Contractor electronically regarding RFI and/or Correspondence
subjects. All correspondence can be linked to Contractor Claims and/or Contract
Changes/Modifications as Supporting Documents. In order to utilize the RFI and
Correspondence modules in QCS, the appropriate boxes in Contract Setup must be checked.
6-2
Resident Management System
Adding Correspondence in RMS
Correspondence is accessed from the Contract Menu / Administration / Correspondence
menu, as shown. The screen is the primary correspondence window on which you can observe
all letters at a glance. As you place the cursor on a letter, the letter number and brief description
will appear at the bottom of the window.
Correspondence is separated into “status” categories. Those that are SENT or RECEIVED
are on the second and third tabs, respectively. Those letters that have been prepared and
are awaiting completion and/or approval are shown on the first tab (Prepare Letter).
Government In-House Memos are on the forth tab.
When adding a piece of correspondence, a drop-down menu presents a listing of the
categories of all letters maintained within the program. This is the listing you will see when you
are NOT using the QCS module for Correspondence or have chosen to have the Government
enter the Contractor correspondence. The items marked with “ -- ** “ will not appear if you have
indicated that the Contractor will enter the Correspondence in Contract Setup.
•
•
•
•
Letter to Contractor
Request for Proposal to Contractor
Letter to Other Agency
Letter from Contractor Home Office -- **
6-3
Resident Management System
•
•
•
Letter from Contractor Site Office -- **
Letter from Other Agency
Government In-House Memo
The prefixes that RMS utilizes are recorded in the Library for all Agencies and other Customers.
RMS requires certain predefined prefixes and these cannot be changed. These are used to sort
letters on several of the Correspondence reports. The required predefined prefixes are as
follows:
C
RFP
MEM
H
S
RFI
=
=
=
=
=
=
Letter to Contractor from the Government
Request for Proposal letter to the Contractor from the Government
In-house Memorandum for the Government
Letter to the Government from the Contractor Home Office
Letter to the Government from the Contractor Site Office
Request For Information from the Contractor to the Government
Generating Form Letters
Form letters and templates are compiled using MSWord © and make use of the many macros
embedded in RMS (some are provided by the RMS program and others can be created by the
RMS User). There are lots of samples included with the program for your use. It is suggested
that you use the samples as a pattern and let them remain in your system. It is easy to COPY a
letter to another file and modify it to meet your needs. (That way, you can always start over with
one that functions.) You are encouraged to add all the form letters that you use to help speed up
your processes and provide consistency in your office environment. It may help you to get
started by printing out the RMS macros from the report Explorer, as follows.
Select the Library button
on the Report Explorer
window to access the
report for Word Macros.
Select Word Marcos and Preview the report.
It will give you about a five page listing of the
available RMS Word Macros.
6-4
Resident Management System
Copying a Document from another Library
You can easily copy documents from other offices or the System Library into your Local Library
so they will be available for all your contracts. Select Local Library / Word Documents and
then the Add button, as shown below. Choose the selection “Copy Document for other
Library” option.
Use the drop-down menu to select the office, followed by the Document Type you would like to
import. As you select the Document Type, all the available documents will then be reflected in
the middle window. You can select a particular document from the middle window, then click on
it in the extreme right window to get a full screen view. If no documents appear, it is a sign that
you (or someone else) has alread copied the documents from that library.
Check each document, in each Document Type, you wish to import, when you are completed
select CLOSE and they will be imported.
6-5
Resident Management System
Setting up RMS and MS Word
Prior to using MS Word for creating form
letters that make use of the RMS macros, you
must first configure the two programs to work
together. The following procedures will set up
your MS Word © and create an Icon on your
tool bar that will provide access to all RMS
macros.
NOTE: This does not apply if your RMS
program is on one of our CEAP servers
(WPC or CPC), as it is already configured
for you. This would only apply if you have
a stand-alone RMS program or are using a
Non-CEAP center RMS.
Using RMS with MS Word - Word Automation
The following steps are required in order to allow users of the RMS Word Document Automation
features to select RMS Macros from an interactive interface when creating automated
documents.
Use this procedure to copy
py the following declaration, subroutine, and function into the normal
template:
1. Start Word.
2. Choose Tools
T
– Macro – Visual Basic Editor menu option. The following screen appears.
3. Right click on the
Normal icon and
choose Insert –
Module. A smaller
window will appear
and you paste the
following data into
the window (paste
all text BETWEEN
the words START
and END as
provided below –
Do not include the
words “start” and
“end”).
The example module is named RMS – the module name can be changed here, at the top line in
the lower left hand box.
6-6
Resident Management System
START
Public Declare Function GetMacroInfo Lib “c:\winrms\RMSword.dll” (ByVal MacroChoice As
String) As Boolean
Sub GetMacro()
Dim Result As Boolean
Dim MacroInfoChosen As String
Dim OtherString As String
MacroInfoChosen = Space$(4096)
System.Cursor = wdCursorWait
‘ call function in RMSword
GetMacroInfo (MacroInfoChosen)
System.Cursor = wdCursorNormal
‘ insert macro into document at current cursor position
MacroInfoChosen = Strip(MacroInfoChosen)
If (Len(MacroInfoChosen) > 2) Then
‘ Word automation stuff - ERW
Selection.Fields.Add Range:=Selection.Range, Type:=wdFieldEmpty,
PreserveFormatting:=False
Selection.TypeText Text:=MacroInfoChosen
pos = Selection.Range.End
Selection.SetRange Start:=pos + 2, End:=pos + 2
End If
End Sub
Function Strip(Incoming As String) As String
Dim FoundAt As Long
FoundAt = InStr(Incoming, Chr$(0))
If (FoundAt <> 0) Then
Incoming = Mid(Incoming, 1, FoundAt - 1)
End If
Incoming = Trim(Incoming)
Strip = Incoming
End Function
END
If you have problems selecting the code using a mouse, it is suggested that
you point the cursor to the first character of the first line, hold down the shift
key, and hit the down cursor key until all the code is highlighted.
6-7
Resident Management System
4. Save changes and exit from the Visual Basic editor. Save changes and exit from the
Normal document template. (<Ctrl>+5, then <alt>+Q)
NOTE: When MS Word is called from RMS, the default directory is the same as that of the
Winrms executable file (where RMSword.dll is located).
Some users may want to use Word for creation / updating of Word Automation documents when
the RMS database is not available. In order to use the interactive method of inserting RMS
macros, RMSword.dll needs to be located in one of the directories in the System Path (i.e.,
C:\windows\command).
A file named MacroLST.RMS containing all RMS macros currently
defined MUST be located in the System Temp path (i.e.,
C:\WINDOWS\TEMP). RMS periodically updates this file. Going to the
Library menu in RMS and choosing Word Macros will force this file to
be regenerated when you exit the macro listing. If you delete the
temporary files in your system temp directory, you will need to locate
that file and replace it. You can locate it from another computer that is
using RMS, or contact the RMS Center for support.
Add an icon to the MS Word toolbar
Right click on the top toolbar within MS Word
(i.e., next to “Help” icon) – Choose Customize
and click on the Commands tab.
Choose the Macros category in the left window
and highlight the Normal.RMS.GetMacro
subroutine located in the right window. Drag the
Normal.RMS.GetMacro subroutine to the
standard toolbar and drop it (i.e., again, next to
the “Help” icon).
Note: Dropping the button into empty space to the right of the toolbar will not
work. Position the button on toolbar where you want icon to appear before
letting go. The symbol it shows while you are dragging the button will change
from an X to a + when you are located in a position where dropping is permitted.
6-8
Resident Management System
Do not close the Customize
window. Right click on the
button that was just created on
the toolbar. Where is says,
“Name” change the name to
Get RMS Macro. Further
down on the drop down menu,
select “Change Button
Image” and select the down
arrow to change the button
icon.
Close the Customize
window.
When the user clicks on the
Get RMS Macro icon they
should be met with the
following window, which is a
listing of the RMS macros.
You are now ready to begin
using macros for generating
form letters, plans, etc.
RFI’s (Request for Information)
The Request for Information (RFI) module in QCS and RMS allows the contractor to request
clarification of contract information, or to pose questions regarding the contract through the
RMS/QCS interface. The RFI is transmitted between RMS and QCS using the import/export
function.
Prepare RFI
The contractor prepares the RFI in QCS. When the Contractor checks that it is completed, the
RFI is then submitted to the Government and includes the following key items:
•
Information requested
6-9
Resident Management System
•
•
•
•
Date response Required
Contractor’s Recommendation
Will the Contractor’s Recommendation increase cost or time of the contract?
Attachments from Contractor such as contract drawings, documents, or photos
6 - 10
Resident Management System
RFI Requiring Response
The RFI Requiring Response can be found in the Contract Administration Section, under
Request for Information. The RFI module must be turned on in Contract Setup by checking the
box that asks Do you want to answer RFI’s with two-way RFI form? These screens show all
RFI’s that have been received by the Government for this contract.
Government Response to RFI
The Government Response to the Contractor is entered on this screen. Required entries are:
•
•
•
•
Response Dates (received and answered dates)
Government Response to Contractor
Answer Completed check box
Approved – Ready to send to Contractor check box
Optional entries in the Government Response are:
•
•
Secondary Respondents
Attachments from the Government
6 - 11
Resident Management System
When the Government Response is marked as Answer Completed, it is ready for approval. All
entries become read-only and cannot be changed unless the completed box is unchecked.
The Approved box is checked when the Government is ready to export the Government
Response to the Contractor. Once the RFI is exported to the Contractor it can no longer be
edited (you can no longer ‘uncheck’ the Answer Completed or Approved boxes).
6 - 12
Resident Management System
Screen after the RFI has been exported to QCS
RFI Notification in RMS and QCS
Both RMS and QCS will advise the Government or the Contractor of any new or answered RFI’s
following the export/import process.
6 - 13
Resident Management System
QCS Correspondence Module
This module will allow the Contractor and Government to exchange correspondence letters
within QCS and RMS. In addition, they will be able to include file attachments to the letters.
The letters that will be able to be sent will include contractor Home (H-###) and Site (S-####)
letters. Basically, the contractor will be able to designate a remote QCS to be either Site or
Home using the current check out scheme. The Government will accept the ’first’ answer to a
particular letter from either the H or S office and will ignore subsequent answers. Also, the
Government will be able to generate both RFP- and C- letters to send to the Contractor. The
generated letters are able to be answered by either the QCS Home or the QCS Site office.
The new feature operates very similar to the existing RFI modules.
The choice to use the new feature must be indicated in Contract Setup, the same as the RFI
feature is presented. Once the Contractor is designated to enter the Correspondence, the RMS
User will not be able to perform manual entry to the received correspondence.
6 - 14
Resident Management System
Contract Documents
This module will allow the RMS User to add various types of contract documents to a particular
contract to be shared with other stakeholders of the contract. These may include:
•
•
•
•
•
•
•
Word documents
Text files
JPG files
BMP files
XLS files
PDF files
And many others
When you “Add” a Contract Document, you will be presented with a screen on which to
SELECT the attachments to add to the RMS database for your contract. Once you Add a
document, you will be able to view it from this screen without having to drill down further into the
screens.
You should use caution with this feature by limiting the size of the files (pictures) you include.
This may later cause a problem with server sizing and the time it takes for downloading and
uploading contracts.
6 - 15
Resident Management System
Supporting Documents
A major feature of RMS is Supporting Documents. This function, designed for the
Change/Modification modules, allow the user to:
•
•
•
•
•
Generate Change Request and Modification Documents
Search for and link all Supporting Documents and QA/QC Narratives
Store Supporting Documents electronically
List Supporting Documents chronologically
Print a report of all Supporting Documents included in the Mod Package
Supporting Documents are divided into the following three categories:
New Documents
• Request for Proposal
• Modification Document
Reference Documents
• Request for Information Letters
• Letters to/from Contractor
• QA/QC Report Narratives
Attachments
• Photos
• Documents
• Excel spreadsheets
This module will allow the user to:
1. Create a library of Modification Documents in the Local Library, such as:
a. Price Negotiation Memorandum
b. Price Objective Memorandum
c. Request for Consent Memorandum
2. Add the Modification Documents to a Contract Change and/or Modification
6 - 16
Resident Management System
Create a library of Supporting Documents
The Modification Document templates are created in the local library, under Word
Documents. After clicking Add button, the user selects Create New Document.
From the Category drop down menu the user selects the type of document to create.
6 - 17
Resident Management System
The user selects Create New, which will open MS Word, and allow the user to create a
document template. After the document is complete it is saved in the RMS database.
You would then either create the document
manually, or import an existing one. This is
where you should make use of the RMS
macros so the document applies to all your
contracts.
Add a Supporting Document
Supporting documents can be added to Contract Changes or Contract Modifications
By selecting the Supporting Documents tab of the Change Request, the user selects the
document type to be added.
6 - 18
Resident Management System
After choosing the document
type the user selects
Generate Document on this
screen.
The document
template is selected
from this screen to
add a new
supporting
document.
The user selects Create
Document, which will open
MS Word, and allow the user
to create a document. After the
document is complete it is
saved in the RMS database.
7-1
Resident Management System
Chapter 7 - CEFMS, Finances and the CWE
What this Chapter presents:
•
Overview
•
CEFMS
•
Construction Working Estimate (CWE)
•
Contract Line Items (CLINS)
Overview
The chapter addresses the major elements of contract finances.
CEFMS, Finances and the CWE
Contract Finances are centrally located under the area of Contract
Menu/Finances and consist of the following major elements:
CEFMS Finances
Recompute Finances
Award CWE
Award CLINS
Current CLINS
Pay Activities
Progress Payments
Contractor Claims
Contract Changes
Contract Modifications
CWE Changes
Contingency
Current CWE
Current Contract
7-2
Resident Management System
If the contract has been awarded and you have completed the Contract Description
information, covered in Chapter 4, you are ready to download CEFMS Finances data into RMS
and setup the finances for the contract.
CEFMS Finances
7-3
Resident Management System
CEFMS Work Item Codes
CEFMS Work Items can be either created in P2, which, in turn, creates them in CEFMS or
Created in CEFMS. In either case, the Work Items are downloaded from CEFMS into RMS and
linked to the appropriate CWE element. These Work Items are transmitted periodically to P2
refreshing the P2 Current Working Estimate view on the Contract, Project and Funding levels.
Initially, this screen
would not have any
Work Items
listed…it would be
blank. Unique
CEFMS Work
Items identify each
contract and each
Work Item is, or
has, a Parent Work
Item. From these
Work Items,
funding accounts
are setup for
making progress
payments to the
contractor and for
tracking available
funds.
A CEFMS Work Item must be setup for each kind of money (funding source) used to fund the
contract. Your Project Manager typically accomplishes this in P2. The Work Items are then
downloaded from CEFMS into RMS following award of the contract, and then periodically
whenever finances change on a contract (payments made to a contractor, modifications issued,
PR&C’s issued, etc.).
Prior to downloading, use the drop-down menu and select the CEFMS database you wish to
use. (If the need arises, you can download any contract from any database at your CEAP
center. Your ORACLE tnsnames.ora file will need to include the selected database.)
Push Import Financial Data from CEFMS to
download the financial data from CEFMS after you
have selected the correct database.
In getting the financial data from CEFMS, RMS will go to
the Funding Registers and download the “appropriation
data”, and to the Funding Accounts to get the
“authorized amount” for each of the funding accounts
used on the contract.
7-4
Resident Management System
When you begin the download from
CEFMS, you will need to enter your
User Name and Password as assigned
by your District.
(User name -- Use your CEFMS ID.
Password -- Use your ORACLE
Password.)
You will not be granted access for downloading
CEFMS unless you already have a User Name and
Password assigned to you by your District IM.
You must also have that privilege designated in
the RMS Access control module.
RMS will then automatically login to CEFMS and complete the download of financial data and
the following screen will appear.
Once the download is completed, you will be able to view the Appropriations on the top half of
the screen and review particulars of the individual Appropriations on the bottom part of the
screen as you scroll down through them. Of special note, is the ability to see what funds are
truly available. The following diagrams will help explain how RMS actually gets the funding data
from CEFMS.
7-5
Resident Management System
Construction Working Estimate
•
Once the Finances are properly set up in CEFMS, you will use RMS to
establish the Construction Working Estimate (CWE).
•
The funding accounts are used to fund the elements of the Construction
Working Estimate.
Award CWE
The Award CWE is where the initial amounts of money are set-aside for each of the CWE
elements.
7-6
Resident Management System
Funds for Construction Working Estimate
Total Award CWE Amount
This amount will typically be the same as the Current Authorized Amount that is downloaded
from CEFMS.
Award Contract
This amount as is indicated on the Award Letter or Delivery/Task Order.
The ORIGINAL contract amount is the AWARDED contract amount, plus OPTIONS exercised
at award time. When you exercise an option that was originally identified it is considered as part
of the original contract amount and time. Therefore, options exercised do not count against
COST/TIME growth. As options are exercised the ORIGINAL contract amount will include the
option as exercised.
Therefore, OPTIONS exercised do not count against COST/TIME growth.
7-7
Resident Management System
Do not add any Modifications that may have been issued prior to
completing this screen.
The Modifications will be automatically added to the CWE as they are
issued. This screen will serve as a baseline to track changes made from
the initial Award amount.
.
Other Supporting Contract
Enter any applicable amounts for the Other Supporting Contract. Examples of this element of
the CWE could be equipment purchased by the Government to be installed by the Contractor or
the User; A-E Design services after award, etc.
Design During Construction
These costs were previously referred to as Engineering During Construction (EDC), and are
now called Design During Construction.
Gov’t Review Contractor Design
This is for Design-Build Contracts where the Government must review the Contractors’ design
for conformance to criteria furnished by the Customer, review for Code compliance, etc.
Contingency
The Contingency block cannot be changed from this screen. The amount reflected here is
what is left over after funding has been provided for all the other CWE elements. The amount
will automatically adjust as Obligations in CEFMS are completed against the funding account.
The Modifications issued the Construction contractor will not be the only items causing this to
change. Other entities may be draining money away and you can only confirm this by refreshing
the CEFMS download data prior to making any commitments or final negotiations.
S&A
The amount of S&A may vary on the type of funding and can be a fixed percentage or actual
dollar amount. Your Project Manager is responsible for computing and verifying this amount.
Other w/o S&A
This represents project funds that are not subject to District S&A, such as PM costs.
7-8
Resident Management System
Total Award CWE
This is computed automatically as each of the CWE elements are entered.
Funds for Management Reserve
Once the block for Funds for Management Reserve is checked, all the CWE Element fields
disappear. This money cannot be used for CWE amounts for the same funding source as the
other CWE elements. When the funds are ready to be used, they are deducted from the
Management Reserve funding account and added into the Contingency of the other fund cite.
This is used when a Customer desires to approve all expenditures funded from a separate
Funding Account, or you can use it to set up a separate NONCEFMS Contingency amount to
keep a closer look on contingency – the amount of the contingency, if used this way, will need to
be manually reduced with each Modification issued.
Award Contract Line Items
From the Contract Menu, select Finances / Award CLINS. These are currently referred to as
CLINS and were formerly called Bid Items in many Districts and field offices.
At this point, a short discussion of CLINS would be useful to define what we really mean when
dealing with the finances in RMS.
A Priced Parent CLIN will include Unit Price, Unit of Measure, Quantity and CLIN Amount. If a
Priced CLIN is funded by one Obligation Line Item, the Priced Parent CLIN may be funded
7-9
Resident Management System
directly. When a Priced Parent CLIN is funded by multiple Obligation Line Items, separate
Information SubCLINs must be added for each Obligation Line Item. These Information
SubCLINs are entered without unit price, unit of measure, or quantity – they simply identify the
Obligation Line Item and obligation amount required to pay for the Parent CLIN.
An Information Parent CLIN is used when there is a need to have different unit prices for parts
of a CLIN. An Information Parent CLIN can have multiple Priced SubCLINs when the elements
of Unit Price, Unit of Measure, or Quantity differ for the same Parent CLIN. For example, if we
had a Parent CLIN for Excavation, we could use a Priced SubCLIN to indicate the first 100 tons
of material at $40.00 / CY, and use another Priced SubCLIN to indicate the next level of
tonnage, say, 100 – 500 tons would be priced at $35.00 / CY.
After all CLINS are balanced, the next step in setting up the finances in RMS are to enter the
Contractor’s Construction Activities, which is covered in the next Chapter.
7 - 10
Resident Management System
Adding CLINS in RMS
You add CLINS from Finances / Award CLINs selection. Your options will be to add either a
Priced CLIN or a Priced SubCLIN for payment. We will add the Priced CLIN first.
RMS will automatically default to the
next CLIN number, but it can be
changed if desired. Enter the Unit Type,
and select OK.
CLINS must be four
(4) numeric digits.
7 - 11
Resident Management System
Enter the description for the Price CLIN, the Award Amount, and check the box to indicate you
are ready to decide how you are going to fund the CLIN. The bottom of the screen will then be
populated.
If you desire to change the order
of display of the SubCLINs, you
use the “Renumber” button at
the top of the screen.
If you need to change the Obligation
amount on the SubCLINs, you use
the “Reobligate” button.
Upon indicating you are ready to fund
the CLIN, the Obligations and Funding
Accounts will appear. This example has
funded the CLIN with both SubCLINs
(these SubCLINs are referred to as
being “Information SubCLINs”).
7 - 12
Resident Management System
Adding Priced SubCLINs in RMS
To fully comply with the DFARs, RMS supports and enforces SubCLIN numbering. This has
some major impacts on the way RMS handles CLINS and the way that those CLINS are funded.
It is recommended that you use priced CLINS to include the Unit Price, Quantity, Amount, and
use priced Sub-CLINS when you have to identify multiple sources of funding. The upgrade for
RMS from 2.36 to 2.37 will convert all existing CLINS and treat them like priced parent-CLINS
with informational sub-CLINS created as needed. When you use sub-CLINS, you will first ADD
a CLIN, followed by the sub-CLIN. You are able to delete a CLIN if it has sub-CLINS linked to it
– the funding sub-CLINS will be deleted automatically.
You will then add a
Description for your
CLIN and the Add
Priced SubCLINs to
that new CLIN. You
must also follow the
required numbering
scheme for the
SubCLINs.
7 - 13
Resident Management System
Enter the description and amount for the new Priced SubCLIN and check the box that you are
ready to fund it. You will then need to use the ellipsis to verify which Obligation Line Item you
want to use to fund the CLIN.
7 - 14
Resident Management System
You repeat this process for adding additional Price SubCLINs as needed.
8-1
Resident Management System
Chapter 8 – Contractor Pay Activities
What this Chapter presents:
•
Overview
•
Importing Contractor Pay Activities
•
Standard Data Exchange Format
•
Balancing Contractor Pay Activities
•
Mandatory Entries for Pay Activities
Importing Contractor Pay Activities
The next step in setting up our finances in RMS is to enter the Contractor’s
Construction (Pay) Activities. The easiest way to accomplish this would be to
IMPORT the Activities electronically via the Standard Data Exchange Format (SDEF).
8-2
Resident Management System
The Contractor’s Pay Activities are located via the Contract Menu / Finances.
Notice: As you
click on the
Import/Export item
NAS (SDEF) you
may see the
following picture if
your contractor will
not use the QCS
program or you
have decided to
manually enter
dates.
8-3
Resident Management System
Turning Off QCS from Contract Setup
If you have previously indicated you wanted to use QCS and later decide to unclick that option,
a log entry will track your doing so. You will see this message box. (Note: There are times when
you may really need to turn off QCS and import the Contractor’s SDEF file, in that case, ignore
the message and face the consequences.
Import SDEF File
As previously stated, the easiest way to enter the Contractor activities is by utilizing the
Import/Export features of RMS. From the top menu, push Import / Export.
8-4
Resident Management System
Click on NAS (SDEF) to begin importing the contractor Activities. Then, determine if you wish to
import all Activity Changes, or select just those items you need to import. If imports have
already been made, this is the screen from which you would import the contractors Pay
Request also.
Selecting the Import from Contractor’s NAS button will send you to a window on which to
select the items you with to import. Then you will need to locate and highlight the SDEF file from
the Contractor. Once selected, you can double click on it and the import process will begin.
An SDEF Merger utility (SDEF Companion) is
available for this version for merging two SDEF files
into one file and viewing the validity of the file.
Select the items you
wish to Import from the
Contractor
8-5
Resident Management System
Windows Explorer of
SDEF Folder and Files
Confirmation
Screen
.
Push the Continue with Import button when ready.
When RMS completes the import process the data fields on the screen will be completed,
reflecting the particulars of the import.
8-6
Resident Management System
To review the activities imported, double mouse-click on any changes shown in the field in the
above screen. The next screen is used for approving or disapproving the changes proposed by
the contractor. You can use the buttons at the top of the screen for approval action on ALL
items, or, alternatetively, you can individually approve or disapprove each item by using the
check boxes on the right side of the screen.
8-7
Resident Management System
QCS being Used
If you have indicated that QCS was going to be used in Contract Setup, you may have
assigned certain items to be managed by the QCS staff. In such a case, you will see this screen
that advises you you will not be able to import those items. You must use the QCS import.
8-8
Resident Management System
Contractor Pay Activities
If you need to manually add or adjust the individual Activities, from the Contract Menu /
Finances / Pay Activities screen, you can select either the Add or Edit button at the top of the
screen, as appropriate. You can also Delete individual Activities from this screen.
The second tab of this screen will list all the CLIN’s used for the contract.
8-9
Resident Management System
Add activities for each CLIN until the Sum of Activities equals the amount designated for the
CLIN. Continue through all CLINS until the Sum of Activities equals the amount of the contract.
Mandatory Entry Elements for Pay Activities
RMS will function properly financially if only the top portion of the input screen is completed. The
lower portion of the screen is extremely useful and you are encouraged to complete all of it in
detail. In any case, the following three (3) items must be completed.
Description
Enter a brief description of the activity into the Description. This field allows for up to 50characters in length. However, when you are using the SDEF feature, the SDEF truncates the
field to about 35 characters. Therefore, you might want to only use the first 35 characters so the
description appears okay after imported from P3 (be sure to use the same description in P3).
CLIN
The CLIN field lookup should be selected so you can choose the appropriate CLIN. The
Quantity field just below will automatically populate, based on prior entry of the CLINS.
Amount
The Amount of the activity is entered here. If a Quantity Item were chosen, the Amount field
would be gray and you would enter the Quantity
9-1
Resident Management System
Chapter 9 – Contract Change Requests
What this Chapter presents:
•
•
Overview
•
Prefix Code for Change Requests
•
Contract Change Requests
•
Basic Change Document (BCD)
Overview
For military projects: When an appropriation is made, contingency funds are generally
allocated to cover modifications that arise. As modifications are proposed and funding entered,
the necessary funds are automatically subtracted from the contingency amount and added to
the unawarded estimated amount (for status 5 mods) on the Construction Working Estimate
screen. When a modification is designated as Complete (status 6 mods), the funding amount is
added to the award contract amount.
For civil projects: Contingency funds are not generally allocated for the contract. When
modifications need to be funded, additional money is added to the contract.
RMS looks at modifications in four distinct parts:
1. The first part defines the change and tracks actions before the change becomes an
official contract modification. During this time, RMS refers to the change by Change
Request Number, using your Office Prefix Code for Change Requests and a
sequential number. The Prefix Code for Change Requests is identified on the
Office/Office Description screen as shown below.
2. The second part begins once all actions on the Change Request are complete.
9-2
Resident Management System
3. The third part adds the Reference Number and creates the modification package.
4. The final step is the identification of the package through the Standard Procurement
System (SPS), referred to as PD² (Procurement Desktop Defense), which will provide
the A or P modification number.
Prefix Code for Change Requests
You must ensure the proper code is entered here.
Contract Change Requests
A Change Request is generated in anticipation of a potential or real Modification to the
Contract. The process generates what is known as a Basic Change Document (BCD). The
BCD describes the change, the reason it is necessary, the initial estimated cost and time impact
and may also be used to evaluate AE liability if Design Errors or Omissions cause the change.
The process of adding a Change Request is a matter of following logical steps and tracking to
completion. In the example screen below, you can see that all steps have been completed, as is
indicated by the presence of the green check marks on the bottom section of the screen.
9-3
Resident Management System
Mod Reason Codes
Mod Reason Codes are divided into 3 categories as follows:
Award Options
5
Pre-negotiated Contract Option Exercised After Award
Controllable
1
8
G
S
T
V
Engineering Changes -- Includes possible and confirmed A-E Fault
Value Engineering Changes
Deficient Government Furnished Property Corrections
Suspension of Work
Termination of Work
Construction Changes Necessary to Complete Contract
Uncontrollable
4
6
7
9
User Changes -- Discretionary
Miscellaneous Changes
Differing Site Conditions not readily identifiable by thorough Site Investigation
Administrative Changes – Fund Cite, Paying Station, Address, etc.
9-4
Resident Management System
A
E
Q
R
Adverse Security Conditions
Excusable Delay for No Fault -- Weather or Act of Nature
Variations in Estimated Quantities
Revaluation – Foreign Currency
Sample – Basic Change Document (BCD) Form – Partial Only
BASIC CHANGE DOCUMENT (BCD)
MOD SERIAL NO.
00015
PROJECT
LOCATION
CONTRACT NO.
W9127N-05-C-0025
Bonneville FGE & VBS Modifications
Bonneville Lock & Dam
NA
Page 1 of 2
INCEPTION DATE
DATE COMPLETED
30 Nov 2006
30 Nov 2006
CONTRACTOR
Fabrication Products, Inc.
PART A. 1. DESCRIPTION OF CHANGE
A l l o c a t i o n
o f
2. SPEC/DWG
F Y 0 7
F u n d s
-
$ 3 0 0 , 0 0 0 . 0 0
1. Allocation of FY07 - $300,000.00
Allocation of $300,000.00 for contractor payment in FY07.
Initial Estimate: $0.00
3. TIME EXTENSION
YES
Time Extension: 0 Days
X NO
CALENDAR DAYS
0
4. TOTAL
$0.00
5. NECESSITY FOR CHANGE
(Attach a copy of Directive letter of authority from OCE or Using Service and brief statement as to necessity
of contract action. Include any special construction requirements or known quantitities. Include any information regarding status of work in
progress and future activities that will be affected by this change).
1.
Allocation of FY07 - $300,000.00
10 - 1
Resident Management System
Chapter 10 - Contract Modifications
What this Chapter presents:
•
Overview
•
Contract Modifications
•
Current Construction Working
Estimate (CWE)
Overview
This chapter furnishes instructions for processing construction contract modifications and
other changes to the CWE. You are encouraged to review and follow your own District
guidelines if a procedure or recommendation herein conflicts with your District policies.
10 - 2
Resident Management System
Contract Modifications
A modification allows the Government to add or change information and/or requirements of the
contract.
Like the Change Request, to add a Modification you follow logical steps and track the
Modification until it is complete. The example screen above shows numerous Modification
packages. The Modification Status at the bottom of the screen reflects the current progress of
the entire effort for the Modification package.
It should be noted that the Modification Number will be assigned by the “Standard Procurement
²
System” (SPS), called “PD ”, following completion of all signatures and processing through
SPS.
In accordance with the FAR, Modifications signed by an ACO will begin with the letter “A”, and
those signed by the Contracting Officer (Procurement Officer) will begin with the letter “P”.
10 - 3
Resident Management System
SF30 - Page 1 Tab
There are two things to be accomplished from this screen:
1. Select Change Request(s) to be included on this Modification
(You select one or more existing Change Requests to be included in this new
Modification package.)
2. Add/Edit Contract Line Item(s) to equal the Modification Amount
You have the choice to either Automatically add a CLIN equal to Modification,
Manually Add a New CLIN, or to Revise an existing Lump Sum CLIN. The
latter will present you with a listing of the existing CLINS to choose from.
10 - 4
Resident Management System
SF30 - Page 2 Tab
SF30 Block 2
The modification number entered initially (i.e., R00019) will be replaced via SPS when the
Modification is completed by Contracting. However, in most all cases, the Contractor will use
this temporary number and may not even be aware of the final number.
SF30 Block 4
The Requistion number is typically the PR&C number and will be automatically populated by
RMS in most cases. It may be changed if desired or needed.
SF30 Block 12
The Accounting and Appropriation Data memo field is an optional field if required by your
District or this modification. There is a ‘lookup’ if you choose the EDIT button that may include
standard wording if this feature is used in your District Library.
SF30 Block 13
Select the manner in which the Modification is being issued and select the appropriate FAR
Clause(s) from the lookup provided.
Also, indicate whether or not the Contractor will be required to sign the Modification.
10 - 5
Resident Management System
SF30 Block 14
The last section of the tab includes the entry for the Modification Title. This block (14) is
continued on the next Tab.
If you are selecting more that one change request to a modification, verify that the title of the
change reflects the basic scope of work of each item, if at all possible. The title should be easy
to understand and use keywords that may help you identify it.
SF30 - Page 3 Tab
SF30 Block 14 (continued)
The first two memo fields are for entry of optional notes on the contract price and time and
should reflect any particulars that were discussed or addressed during negotiations of the
modification with the contractor. You may use the remaining memo fields for comments related
to the Change in Schedule and enter a Closing Statement. The Closing Statement should
reflect your District or Office policies. A lookup is available in the Edit screen to import
statements already prepared. These can be found in your District Library, under Standard
Text.
SF30 Block 15A
At the bottom of the screen, indicate the name of the
Contractor representative that will sign this modification.
SF30 Block 16A
At the bottom of the screen, indicate whether the Contracting
Officer or the Administrative Contracting Officer will sign
this Modification and use the lookup to populate the fields.
Note: You can assign
Signatures for each
individual Modification
and the signatures will
be saved with the
Modification it is
associated with.
10 - 6
Resident Management System
Release Mod Tab
This screen is to record the administrative progress of the modification. You must obtain a
PR&C from CEFMS for funding and all required signatures must be entered with the
appropriated date fields completed.
Notice the “instructions” in the bottom window of the screen.
Indicate that a PR&C
has been obtained and
record the signature
dates in the window.
When date entries
are made in this
section, it is
assumed that the
CEFMS approvals
and certifications
are completed
simultaneously.
10 - 7
Resident Management System
The above screen then turns into this screen when those boxes are completed.
Enter the Obligation
Amount and check the
“Modification funded
with Obligations in
CEFMS” box.
When you indicate the Modification is
complete by checking the box at the
bottom, you will get this popup message
You should then balance the activities prior to exiting the modification area if you push Yes. If
Yes is pushed the next screen appears, from which you enter the activities.
Push the Edit button and then the
Add or Edit button on the next
screen to enter or modify activity
details.
10 - 8
Resident Management System
Pay Activity Screen
This is the same
Contractor Activity Screen
that was discussed in
Chapter 8 of this Manual.
This screen will be filled in
automatically, with this
limited data, if you choose
to let RMS automatically
add activities to balance
the CLIN.
10 - 9
Resident Management System
Supporting Documents
You can add documents for reference that include the following:
•
•
•
•
•
•
Correspondence
Request For Information
QA Report Narratives
QC Report Narratives
Modification Documents
Attachment (Photos, Documents, etc.)
The listing of such Supporting Documents can be created and attached to the package when
finalized. You can view the attachment by pushing the Docs button.
Supporting Documents for Modification R00001
US Arm y Corps
of Engineers
Date
Docum ent
02/01/2004 BCD
03/14/2005 Mod Document
28 Mar 2005
Camp Victory, Iraq
1ST CAVALRY HQ BUILDING
W912ER-04-C-0007 NA
Status
BCD Completed
Description
This change was initiated by the User and is not considered necessary by th
Statement of Disagreement
The Resident Of f ice does not f eel the change should be issued and prov ides,
herewith, their rationale f or disagreeing with the User.
10 - 10
Resident Management System
You have now completed the Modification.
Your goal is to be able to view a
green check mark on each of the
areas at the bottom of the screen.
10 - 11
Resident Management System
Other Change Orders
Not all Change Orders directly impact the Contractor for time and money. There are Change
Orders that affect the Construction Working Estimate (CWE) that can also be tracked within
RMS, CEFMS and PD².
The Change Orders dealing with other CWE items are broken into five (5) categories:
1.
2.
3.
4.
5.
Supporting Contract Changes
Design During Construction Changes (DDC)
Review Contractor Design
Supervision and Administration (S&A)
Other without S&A
These changes are relatively simple to complete and are usually accomplished in RMS after
they have actually taken place. However, they can be entered any time during the funding
stages (Unfunded, Funded, and Complete). The financial information on these changes will
typically originate with the Project Manager (PPMD) or Contracting Division.
The screen on which to accomplish these other Change Orders is located under Finances /
CWE Changes.
10 - 12
Resident Management System
Current Construction Working Estimate (CWE)
Selecting the Current CWE will reflect the impacts of ALL changes and modifications issued.
From this screen, you may view (Read Only) the CWE.
If you choose “Yes” you will see the financial information on the Contract and the Project.
If you choose “No” you will see the financial information on the Contract, Appropriation, and the
Funding Account.
11 - 1
Resident Management System
Chapter 11 - Contractor Payments
What this Chapter presents:
•
•
Overview
•
Adding a Payment
•
Pay Estimate Worksheet (GIG Sheet)
•
Sending Payments to CEFMS
•
Payment Reports
Overview
This chapter addresses instructions for processing construction contractor payments.
Progress Payments is located under the heading Contract Menu / Finances.
Prior to making any progress payment, you should
verify that all finances are properly balanced,
including CLIN’s and Contractor Activities.
11 - 2
Resident Management System
Adding a Progress Payment
The Progress Payments screen is used to review and /or add pay periods.
You begin the process by pushing the Add button at the top of the screen. If a payment already
exists, you can also Edit it from this location.
RMS will accommodate processing a payment and a refund on the same ENG Form 93.
NOTE: The ENG 93 does not exist in the Contractor module (QCS) until AFTER it is
processed in RMS and returned to the Contractor.
You DO NOT NEED to have an ENG 93 to process Pay Requests for the Contractor,
including CEFMS payments. What you should get from the Contractor is the
“PROMPT PAYMENT CERTIFICATE” and his payment request via the QCS export –
that is all that is needed.
The Contractor should be submitting his payment request based upon the agreed
upon amount or percentages that has taken place between the Contractor and
Government office personnel most familiar with the progress taken place.
11 - 3
Resident Management System
Prompt Payment / Pay Requests from QCS
In accordance FAR 52.232-5 — “Payments Under Fixed-Price Construction Contracts”, RMS
and QCS have been provided with screens to accommodate the information specified to be
furnished by the Prime Contractor relative to any Subcontractor used on the contract.
Key items to be provided on Subcontractors:
a. Listing of amount for work accomplished by each subcontractor.
b. Listing of the total amount of each subcontract. (1st Tier Only)
c. Listing of amount previously paid to each subcontractor (includes any deductions
against the subcontract, per the Prompt Payment Act (PPA).
Screens are available to provide data
for Assignments and Notification of
Defective Invoice.
The Prompt Payment Certification is
also included on the screen and a
report can also be generated within
QCS to submit with the Contractor’s Payment Request.
You will undoubtedly encounter Contractors reluctant (or even refusing) to indicate the Contract
Amount of their Subcontractors. Reasons vary for Prime Contractors. Some Prime Contractors
are fearful the Government will determine WAY TOO MUCH overhead/profit is being taken and
will haunt them with deductive change orders. Other Prime Contractors may like to ‘live’ off the
Subcontractor money. You never have to argue with a Prime Contractor on this, simply point out
the FAR requirement and refuse to pay them anything until they comply. Prime Contractors
have been barred for Government work due to violations of the Prompt Payment Act (PPA).
11 - 4
Resident Management System
Prompt Payment Certification Report (Page 1)
Prompt Payment Certification And Supporting Data
For Contractor Payment Invoice
(1) Contract No.:
DACW27-01-C-0030 NA
Page 1 of 13 pages
(2) Location and Description of Work:
(3) Estimate No.:
Olmsted, Illinois
Maintenance and Operating Bulkheads
(5) Contractor Official (name and address) to w hom payment is
to be sent:
(4) Invoice Date:
42
10/26/2005
(6) Discount Terms:
0 Days
0 Percent
Massman Construction Co.
8901 State Line Road
Kansas City, MO 64114
(7) If Notice of Assignment has been filed, enter name of
Assignee to w hom payment is to be sent:
(8) Name, Title, phone number, and mailing address of person to be notified in
event of a defective invoice:
Robert Brow ne, Ow ner
909-234-5679
1254 West Avenue
Upland, CA 92506
(9)
Subcontractor Name
(10)
Total Amount
Subcontracted
(11)
Previous Subcontractor
Payments
(Excluding Deductions)
(12)
Subcontractor
Amount Included in this
Payment Estimate
(Excluding Deductions)
(13) **
Subcontractor Earnings
Deducted by Contractor
(Total to Date)
BART
$43,000.00
$24,000.00
$4,000.00
$2,400.00
Bar-Tie
$23,445.00
$0.00
$0.00
$0.00
COE
$13,253.00
$0.00
$0.00
$0.00
DivCon, LLC
$160,000.00
$0.00
$0.00
$0.00
DivCon, LLC
$75,000.00
$0.00
$0.00
$0.00
EGPT
$12,005.00
$1,200.00
$1,200.00
$120.00
MCC
$15,000.00
$0.00
$0.00
$0.00
N & N Metro Plumbing
$80,000.00
$0.00
$0.00
$0.00
$0.00
$0.00
$0.00
$0.00
N & N Metro Plumbing, Inc.
PLAT
Plateau Electrical Constructor
$12,500.00
$0.00
$0.00
$0.00
$250,000.00
$125,000.00
$50,000.00
$12,500.00
STW
$46,500.00
$0.00
$0.00
$0.00
THMS
$33,000.00
$0.00
$0.00
$0.00
Thomas Industrial Coatings Inc
$35,600.00
$0.00
$0.00
$0.00
$340,000.00
$0.00
$0.00
$0.00
Triangle Enterprises
** A w ritten notice of any w ithholding shall be issued to a subcontractor (w ith a copy to the Contracting Of ficer) of any such notice issued by the Contractor,
specifying (1) the amount to be w ithheld, (2) the specific causes for the w ithholding under the terms of the subcontract, and (3) the remedial actions to be
taken by the subcontractor in order to receive payment of the amounts w ithheld. Attach copy of notification to pay estimate. Ref erence FAR 52.232-27(g).
I herby certify, to the best of my know ledge and belief, that:
(1)
The amounts requested are only for performance in accordance w ith the specifications, terms, and conditions of the contract;
(2)
Payments to subcontractors and suppliers have been made from previous payments received under the contract, and timely payments w ill be
made from the proceeds of the payments covered by this certif ication, in accordance w ith subcontract agreements and the requirements of
Chapter 39 of Title 31, United States, Code; and
(3)
This request for progress payments does not include any amounts w hich the prime contractor intends to w ithhold or retain from a subcontractor
or supplier in accordance w ith the terms and conditions of the subcontract.
(4)
This certification is not to be construed as final acceptance of a subcontractor's perf ormance.
Signature
John Mayberry, Superintendant
Typed Name and Title
Date
11 - 5
Resident Management System
Contractor’s Pay Request Worksheet
Each pay period a Contractor’s Pay Request Worksheet (aka, Gig Sheet) can be printed from
the Reports menu. This worksheet shows the total amount for each activity, what has already
been paid and any outstanding items that might impede or impact the amount the Contractor
requested. This should be reviewed prior to making any final determination on the amount of
the pay request to be processed.
The Contractor’s Pay Request Worksheet is accessed from the Reports menu.
The worksheet report will give you a detailed listing of all items that are outstanding and/or
delinquent on a given Activity. For example, if the Contractor is missing payrolls or insurance
the worksheet will list them.
The Contractor is also able to print out this worksheet from the Contractor’s QCS Module prior
to requesting payment.
Sending Payment to CEFMS
With the Progress Payment completed, you can send it to CEFMS for signature and payment to
the Contractor. Push the Send to CEFMS button to begin.
11 - 6
Resident Management System
The Send to
CEFMS
button will
present a screen to ask you if you want to
upload the pay estimate to CEFMS. If you
choose Yes, RMS will ask you for your User
Name and Password and log into CEFMS. The
rest will be automatic and the payment will be
placed into CEFMS for approval.
The CEFMS payment upload now sends Pay Period from and thru dates from RMS to CEFMS.
(Instructions are also included in RMS to remove downloaded CEFMS information associated
with a payment if that payment is deleted from RMS. This allows the RMS user to back up to
previous payments and reprocess them as the current payment if needed, without having the
CEFMS payments add back in automatically. The CEFMS payments will, however, add back in
with the next CEFMS download.
11 - 7
Resident Management System
Reports for Payments
Reports may be accessed from the Contract Menu. Push the Reports button and select
Finances on the next screen. It is suggested that the various Reports available from the Report
Explorer be printed out and filed with the Contract files.
Reports for all Progress Payments can be found via the Report Explorer shown below.
12 - 1
Resident Management System
Chapter 12 - Contractor Quality Control Planning
What this Chapter presents:
Required Planning Activities:
Administrative:
• Prime Contractor Data
•
Subcontractor Data
Quality Assurance / Quality Control:
•
Features of Work
•
3 Phase Inspections
•
Hazard Analysis
•
QC Tests
•
User Schools
•
Transfer Property
•
Installed Property
12 - 2
Resident Management System
Overview
This chapter addresses information on the planning activities required for Contractor Quality
Control and provides instructions for utilizing the Quality Control modules of the RMS
program.
In contracts of $1,000,000 or more, detailed CQC should be applied and a properly edited
CEGS-01451 (01 45 04.00 10) should be included in the contract. Inclusion of detailed CQC in
construction contracts under $1,000,000 is discretionary. When construction services are
obtained through an international governmental agreement, CQC should not be used unless it is
specifically required by that agreement.
Quality Control Requirements
There are areas that must be addressed in the Planning of a contract before a Contractor can
adequately prepare his Daily Quality Control Report. This includes, among many other things,
what RMS refers to a QC Requirements.
12 - 3
Resident Management System
Prime Contractor Data
The Prime Contractor window is comprised of four (4) tab entry screens, located under
Administration from the RMS Contract Menu. Data is entered into each tab separately,
beginning with the Contractor Information tab.
Responsibility Code –
This code should match the Contractor’s scheduling package if one is being used. It must be
unique and cannot be assigned to any other subcontractor for this contract. The responsibility
code for the Prime Contractor is always PRIM and is automatically entered by RMS. If a
subcontractor is performing more that one type (feature) of work, enter the code for his most
‘significant’ work. An alpha/numeric identifier is almost always used within a commercial
scheduling package, such as Primavera, and can easily be imported into the RMS program. The
Corps of Engineer’s Standard Data Exchange Format (SDEF) specifies numeric identifiers only,
however, the RMS/QCS programs will accept either/or.
CEC (DUNS) No –
Enter the nine-digit (or thirteen-digit) Contractor CEC number (DUNS # or DUNS +4#), as it
appears on the Contractor’s proposal or contract award letter. A sample CEC number is “038074381”. (FAR 52.204-4, Contractor Establishment Code (CEC)). The CEC is a 9-digit code
12 - 4
Resident Management System
assigned to a Contractor that contracts with a Federal executive agency. The CEC system is a
contractor identification coding system that is currently the Dun and Bradstreet Data Universal
Numbering System (DUNS). The CEC system is distinct from the Federal Identification
Numbering (TIN) system. The Government will obtain a CEC for any awardee that does not
have or does not know its CEC. The CEC number should be found on the executed SF 1422, in
block 14. It is also used in Block 2 of the DD Form 2626, Performance Evaluation
(Construction), form in CCASS.
The Data Universal Number (DUNS) is a unique nine-character (or thirteencharacter) company identification number issued by Dun & Bradstreet. To
verify or locate a DUNS number for the construction firm in the Central
Contractor Registration (CCR) visit:
http://www.bpn.gov/CCRINQ/scripts/search.asp
Contractor Short Name / Contractor Name –
Enter the Contractor’s Company short name that will be used on many reports and screens in
RMS and QCS and enter the complete name that will be used for Correspondence, Payments,
etc.
NAICS Code –
Enter the Contractor’s NAICS code. A sample NAICS code is “236220”, for “Commercial and
Institutional Building Construction” (most of our Contractor will have this code).
The North American Industry Classification System (NAICS) has replaced the U.S.
Standard Industrial Classification (SIC) system. NAICS was developed jointly by the
U.S., Canada, and Mexico to provide new comparability in statistics about business
activity across North America. To locate your NAICS code for Construction, refer to
the following website: http://www.naics.com/naics23.htm
Office to receive payments –
This entry will be completed automatically from CEFMS, if CEFMS is used. (If the contractor is
in CEFMS more than one time, you will need to select which Payee Office to use.
Contractor Representative to Review Contractor Evaluation (DD2626)
Enter the name and email address of the Contractor representative that will be authorized to
review and comment electronically to the Contractor Evaluation (DD Form 2626) issued at the
end of the contract.
12 - 5
Resident Management System
The remaining tabs, (Contractor Address, Management/Work Days, and Bond Co./SBA are self
explanatory and all applicable field should be completed.
Prime Contractor Data in District Library
If your District is using the Prime Contractors module in the District Library, you will be able
to import much of this information for your Prime Contractor.
You will need to ensure that Prime Contractors have first been entered in the District Library to
be able to copy the information from there. Once entered, the information will be easily added to
new contracts. You can also copy all contractors from the various offices directly into the District
Library.
Manually Add Contractor to District Library
When you select the Add button you can Manually Add a Prime Contractor. Enter the
appropriate information and click on the Close button to add the contractor.
12 - 6
Resident Management System
Copy Prime Contractors From Existing Contracts
When you first use this feature from the District Library, you can simply copy the data from
existing contracts into the library. A listing of existing contractors will appear and you select the
ones you wish to add to the library. Choosing the Close button will add the selected contractors
to the library.
12 - 7
Resident Management System
Copy Prime Contractor Data From District Library
Adding a contractor to a new contract is easy when you already have them entered into the
District Library. When you click on the DUNS No: elipsis, you get a pop-up screen that lists all
contractors in the library. Choose your contractor and then select the OK button.
You then decide to either copy just the
DUNS number, or all of the information on
the screen.
If you’ve chosen all of the data, your work
is streamlined and the Prime Contractor
information is completed.
12 - 8
Resident Management System
Prime Contractor Data is Copied to Contract
The information copied will spread across two screens (tabs) to complete the information on the
Prime Contractor.
12 - 9
Resident Management System
Subcontractor Data
The subcontractor entry is an essential part of the RMS program, for example: attaching a
subcontractor to each activity will link submittal items to the subcontractor. With the
subcontractor linked to activities, RMS knows who has related responsibilities, such as for
Preparatory and Initial Inspections.
A subcontractor list is necessary to document Labor Interviews. Without the subcontractor data,
daily Labor Hours cannot be posted in the Daily Quality Control Report.
Subcontractor deficiencies are noted on the Pay Estimate Worksheet.
Subcontract amount and particulars are required per the Prompt Payment Act.
NOTE: The Prime Contractor should ONLY enter amounts for their 1st
Tier Subcontractors. The should indicate that 2nd tier subcontractor
as such and the amount of the subcontract will not be entered.
Otherwise, RMS will total the amount twice for reports, such as the
DD Form 2626. The amounts also appear on the Prompt Payment
Certificate. Prime Contractors most often do not have access to the
amount of any subcontracts beyond which they themselves initiate.
A listing of Subcontractors may be provided to the User at the conclusion of the contract for
Warranty contacts.
12 - 10
Resident Management System
Push the Add button to add a new Subcontractor, or the Edit button to edit information on an
existing Subcontractor.
NOTE: ONLY enter amounts for 1st Tier Subcontractors. By checking the
box “Contractor is a Second Tier Sub”, the “Amount Subcontracted”
entry will be removed from this screen.
12 - 11
Resident Management System
QC Planning Data
The next area of Contract planning activities can be found on the Contract Menu, QA / QC, and
includes the Features of Work, 3 Phase Inspections, Hazard Analysis, and QC
Requirements as required by the contract.
Features of Work
In accordance with the terms of the contract, the Definable Features of Work are required to
be listed in the contractors’ Quality Control Plan. Using RMS to create that list is an easy way
for the Contractor to meet these requirements. However, even more importantly, Features of
Work are tied to the contractor’s pay activities providing both the Government and the
Contractor invaluable information and report capability.
Press the Add button to create each Feature of Work. Then, enter the data in the pop up
screen by using the lookup provided, or by typing directly into the cells. Close the window when
completed and repeat as needed. Features of Work can also be entered in QCS (and really
should be if your Contractor is using QCS).
Features of Work are general categories of construction work that are referenced in the
contract specifications. A feature can be thought of as a phase of work requiring a separate
Preparatory Inspection (typically, there is at least one for every technical specification section,
with many sections having multiple features).
Within RMS and/or QCS, Features of Work are tied to 3-phase inspection checks. As such,
Features of Work are an integral part to the power of the RMS Inspection Check sheets and
should be thought through quite carefully. Both the Government and Contractor are able to link
Features of Work to 3 Phase Inspection checks. (See the QCS User Manual for the QCS
process.)
12 - 12
Resident Management System
3 Phase Inspections
The 3-Phase Inspections within the QCS program, and the Government RMS program, utilize
checks that are numbered, generally following the CSI specification format. The CSI-based
numbering system is used in such references as Sweets Catalogs, MEANS Estimating Books,
Military Specifications, and so forth. This is done in QCS and RMS to categorize various
comments and items where they can easily be remembered and found and to minimize
duplication of comments in various areas.
The linking of 3 Phase Inspection checks to the Features of Work is discussed extensively in the
separate QCS Manual and will not be repeated here. Once the links have been made, you will
see a screen similar to the following, which depicts the number of Checks linked for each of the
3 Phase Inspection periods.
Hazard Analysis
The Contractor should prepare a Hazard Analysis for each Feature of Work. This is
accomplished in the QCS program. After they are created in QCS, they will be available in RMS
for review, comments, acceptance or rejection.
12 - 13
Resident Management System
We need to realize that the AHA is really keyed around the activities required to accomplish a
certain feature of work and addresses any hazards, or potential hazards, that may be
associated with work anticipated to be required while doing the actual work.
The Contractor is able to create the AHA in the Contractor Library for each feature he would
add to the library. The library AHA’s will be available to add (copy) to any contract. Thus, the
Contractor, using QCS, will build the AHA on the Features of Work listed in the contractors’
CQC Plan and (hopefully) in the QCS program.
Many of the items in the AHA are identical, or very similar, from one FOW to another. Therefore,
the Contractor is able to COPY an AHA from one FOW to another. The idea is to simplify input.
12 - 14
Resident Management System
Hazard Analysis Report (Sample)
.
12 - 15
Resident Management System
QC Requirements
QC Requirements include four (4) separate items for control and tracking. Each of the items is
located under a separate Tab, as can be seen below.
•
•
•
•
QC Tests
User Schools
Installed Property
Transfer Property
Quality Control Tests
Quality Control Tests are defined in the Contract and are based on engineering and
construction judgment as to the type and number of tests to be accomplished. After the award of
the contract, the Contractor will further define the method and quantity of tests based on the
material quantity and/or equipment options he has chosen to incorporate into the work. The
tests should also be addressed in the Contractor Quality Control Plan for the contract.
User Schools
User Schools represents the Training or Instructions the Contractor must provide the
Customer on equipment or systems provided and installed as part of the contract. As each
12 - 16
Resident Management System
session of the Training or Instruction is completed, it is reported as such within the Contractor’s
Daily QCR.
Installed Property
Installed Property is those items of equipment that are incorporated into the design of a
facility. These are typically acknowledged as those pieces of equipment that may require
maintenance, have serial numbers and can be accounted for individually. It is the Designer that
specifies the equipment, based upon Design guidance provided by the Government Design or
Using Agency. These items are given the prefix “IP” by RMS and take the form of “IP-####” for
numbering and tracking purposes. As the Installed Property arrives at the jobsite, it is
compared to approved Shop Drawings for conformance to the contract; the serial number and
other information is recorded and reported within the Contractor’s Daily QCR.
Transfer Property
Transfer Property is that property that “changes hands” during the construction process.
Examples would include Government Furnished Property (GFP) that the Contractor would
install or consume during the contract performance. It would also include spare parts and
supplies that are furnished by the contractor as part of the contract requirements. It could also
include equipment or materials that were deleted as part of a contract modification and that
were beneficial for the Government to retain rather than get some minimum token credit for the
deletion.
12 - 17
Resident Management System
Equipment Checks
All Contractor equipment that requires a mechanic’s inspection should be entered here – not
‘hand tools’.
The entries will then be available to report their use and standby time on the Contractor Daily
Quality Control Report (QCR).
12 - 18
Resident Management System
Dredging Equipment
If you have a dredging contract, the dredging equipment data must be entered to be able to
complete a Daily Dredging Report in QCS.
You will add information for a bucket/pipeline dredge, or a hopper dredge. You make the
selection after you choose the Add button. You then choose to ad the Bucket/Pipeline Dredge
or a Hoppoer Dredge and enter the appropriate information.
12 - 19
Resident Management System
Exposure Hours
The Contractor will enter the employee work hours in QCS (Exposure Hours) and transmit that
information to RMS with each QCS-to-RMS export. After the hours are imported, the
Government needs to decide to Accept the hours as submitted, or return to the Contractor for
corrections – these selections are along the bottom of the screen.
The Safety and Health Requirements Manual, EM 385-1-1, at section 01 (Program
Management), Paragraph 01.D (Accident Reporting and Recording), sub-paragraph 01.D.05,
requires the Prime Contractor to provide a monthly record of all exposure and accident
experience of the Prime Contractor and all Subcontractors relative to the work. The information
is captured and will produce the required exposure report.
12 - 20
Resident Management System
Monthly Injuries/Illnesses & Exposure Report
The exposure hours will be compiled and you are able to create the Monthly Injuries/Illnesses
& Exposure Report for upward reporting
USACE PRIME CONTRACTOR
US Army Corps of Engineers
Monthly Record of Work-Related Injuries/Illnesses & Exposure
Month
USACE, Portland District
Fabrication Products, Inc.
W9127N-05-C-0025
Bonnev ille FGE & VBS Modif ications
Vancouv er, Washington 98661
All other illnesses
Hearing Loss
Poisoning
Describe the injury or illness
Date of Injury
or onset of illness
Skin Disorder
Age
Day s
On Job
Away Job Transf er Other recordAway f rom
Death
From or restriction able cases transf er or
work
restriction
Work
(day s)
(day s)
Injury
Where the
ev ent occured
Respiratory Condition
Portland Resident Of f ice
Number of Day s
Date Employ ee
began work
Gender
Labor Classif ication
Prime/Subcontractor
In accordance with t he prov isions of EM 385-1-1, Section 01 Program Management, Paragraph 01.D Accident Reporting and Recording, USACE Command
sub-paragraphs 01.D .05, y ou (the Prime Contractor) shall prov ide a monthly record of all exposure and accident experience incidental
Contractor Name
to the work (this includes exposure and accident experience of the Prime Contractor and its sub-contractor(s)). As a minimum, these
records shall include exposure work hours and a record or occupational injuries and illneses that include the data elements listed below. Contract Number
Def initional criteria f or each data element is f ound in 29 CFR Part 1904. If the maintenance of OSHA 300 Logs are required by OSHA,
Project Title
most of this inf ormation can be obtained f rom those logs. If data on log prov ided below is rev ised af ter it is submitted to USACE,
Contractor shall prov ide a rev ised report to the GDA. You must complete the USACE ENG Form 3394, Report of Accident Inv estigationCity & State
Report f or all recordable accidents. If y ou're not sure whether a case is recordable, call y our local Saf ety and Occupational Health
USACE Office
Of f ice f or help.
Contractor
May , 2006
Page 1 of 2
No accidents reported
USACE PRIME CONTRACTOR
US Army Corps of Engineers
Monthly Record of Work-Related Injuries/Illnesses & Exposure
Month
Contractor
Trade
Month:
Year To Date:
P
or
S
Exposure Hours
Current
Period
Year
to Date
Number of Cases
Number of Day s
Day s Away Transf er or
f rom Work Restriction
Cases
Cases
Death
Cases
Other
Reportable
Cases
May , 2006
Page 2 of 2
Number of Injuries / Illnesses
Rates
Day s
Job
Lost Time Contrac tor Contractor
Skin
Respiratory
Hearing All Other
Away
Transf er Injuries
Frequency
DAR T
Day
Poisoning
Disorder Conditions
Loss Illnesses
f rom Work Day s
Rate
Rate
Count
Fabrication Products, Inc.
Primary Contractor
P
0
256
0
0
0
0
0
0
0
0
0
0
0
0
N/A
N/A
N/A
Accurate Concrete
Concrete Saw Cutting
S
235
2,697
0
0
0
0
0
0
0
0
0
0
0
0
0.0
0.0
0.0
S
338
3,129
0
0
0
Totals: 0
0
0 0
0
Certification of Record
00
0 0
00
0 0
00 0
0 00
0
0.0
0.0
0.0
0
0
0
0.0
0.0
0.0
0
0
0.0
0.0
0.0
0
0
FP Erectors, LLC
Serv ices/Manpower
Exposure Hours
HIRE ELECTRIC
951 hoursElectrical
JH KELLY
7, 677 hours
Serv ices/Manpower
Totals:
S
122
928
0
0
Name of Person Submitting Record: Tim Morrow
0
0
0
0
0
0
0
S
256
Signature:
951
667
0
0
0
0
0
0
0
0
0
7,677
0
0
0
0
0
0
0
0
0
0
Date:
0
0
12 - 21
Resident Management System
Exchanging Data between RMS/QAS and QCS
Export from RMS Using SFTP Server
The procedures to exchange files with the Contractor has been significantly streamlined and
made easier to use. We will start by selecting the Import/Export (QCS) function from the main
contract menu and push the Export to QCS button at the bottom of the window. The procedure
for importing or exporting from QAS is the same as from RMS.
This is how the screen appears after you have exchanged data with QCS.
12 - 22
Resident Management System
If the Contract has yet to export (exchange) a file with RMS you will see the following screen. It
advises you when you exported a file to QCS and lets you know that all exports will include ALL
data (libraries, etc.) until the Master QCS site acknowledges and returns a file.
After you have imported a file from QCS the foregoing screen changes to advise you of the last
date of the QCS import.
12 - 23
Resident Management System
When the contractor installs the QCS program, a SITE ID is automatically assigned for the
Contractor. This ID must be conveyed to the Government to enable the transfer of files. Enter
the number here (i.e., JSG7MJ2G):
You will then need to determine how you prefer to transfer the file to the contractor. Use the
Settings feature for this purpose.
The preferred way to transfer files is to make use of the RMS Center Secure File Transfer
Protocol (SFTP). The other method is to export a file that you would email or furnish on another
media to the contractor. In this example, use the SFTP method and push OK.
12 - 24
Resident Management System
The Government Representative will need to advise the Contractor of the Contract ID number
so he can select it from within QCS. This number is the number automatically assigned to a
project in RMS when it is first entered into RMS and cannot be changed. This example shows
the Contract ID as being P0004537.
RMS will upload the file to the SFTP server and it will then be available for the Contractor to add
the contract to his QCS program.
The contract is now placed on the RMS SFTP server and is available for the Contractor.
12 - 25
Resident Management System
Import from RMS/QAS to QCS Using SFTP Server
When the Contractor is ready to import the project into his QCS program, he must first be
advised of the Contract ID number (i.e., P0004537). The Contractor will then add the contract
to his program after importing your file from the SFTP site, as follows.
Enter the Contract ID here:
Push OK.
12 - 26
Resident Management System
QCS will complete the import and it will then appear on the Contract Menu of the program
(opening screen).
If the Contractor does not use, or enters an incorrect Contract ID number, the following
message will appear:
Or, you may see:
12 - 27
Resident Management System
Export from RMS/QAS by Exporting File
If, for some strange reason, you do not wish to utilize the SFTP method of transfer, you can
elect to prepare a file and transmit (email, floppy disk, CD, etc.) the file to the Contractor. The
method to do so is similar to the above. That is, you start from the Import/Export screen of
RMS/QAS and push the Export to QCS button. The following screen will appear.
You must enter the QCS Site
ID obtained from the
Contractor for his QCS
program and enter it here.
Push the Settings button to set up Export to file method of transfer.
Check the radial button next to Export to file and use the Browse button to indicate where you
want RMS to store the created file (i.e., C:\temp\RMS_P0000816_QCS.RXF). Press OK (twice)
to begin the export.
12 - 28
Resident Management System
RMS will create the file and place it where you indicated.
The location of the file is then indicated at the bottom of the Import/Export screen (i.e.,
C:\temp\RMS_G2000193_QCS.RXF).
12 - 29
Resident Management System
Import from RMS into QCS by Exported File
The procedure for adding a contract via an Import file is very similar to using the SFTP server.
The first step is to push the Add button on the Contracts menu.
Select Import from File. Use the Browse button to locate the desired file.
12 - 30
Resident Management System
Locate and highlight the file and then push Open followed by OK.
QCS will then import the file.
12 - 31
Resident Management System
When the import is complete, the program will automatically open the contract to the
Contractor Library / QCS Site Description screen, as shown below. You will then need to add
the QCS Site Title, Primary Point of Contact Name and EITHER a telephone number or email
address.
Request Export File for Adding Contract
As above, when you push the Add button on the main menu, select Request Export File if you
have not yet been provided one by the Government. The next screen will provide instructions on
getting the export. In either of the cases, you will need to have your site registered to be able to
import a contract.
12 - 32
Resident Management System
Automated Import and Export
RMS can perform automated imports and exports for QCS. Users that use the SFTP repository
option will have exports automatically sent to the SFTP repository on a nightly basis.
In order for this function to operate, the “Export Settings” and “Import Settings” must indicate
that you are using the SFTP transfer method, as opposed to the “Export to File” option. Also, the
box entitled “Automatic Import / Export” must be checked.
This is beneficial to users
that are working on multiple
contracts, because RMS will
send exports for all contracts
that have the settings set to
use the SFTP repository.
This feature will do
automated imports from the
Contractors (QCS) if the
Contractor has manually sent
an export from QCS to the
RMS Center SFTP
repository. The
imports/exports will be done
during off hours. Users will
still have the option of doing
manual imports and exports
for individual contracts. RMS will filter this feature to those contracts that have identified a QCS
Site ID and have not yet received Final Payment on the contract.
12 - 33
Resident Management System
Adding QCS site within RMS
Push the QCS Sites button to view the listing of registered sites. In order to assign the various
Modules to other QCS sites, you must have the QCS site ID number. If needed, RMS can
change the QCS Master Site from one QCS site to another, etc.
13 - 1
Resident Management System
CHAPTER 13 - Government Quality Assurance Planning
What this Chapter presents:
Quality Assurance and RMS
•
Overview
•
QA Staffing
•
QA Tests
•
Planned Labor Interviews
Overview
This chapter addresses information on Government Quality Assurance and provides
instructions for utilizing the Quality Assurance areas of the RMS program for planning
purposes.
13 - 2
Resident Management System
Contract Setup – Quality Assurance Tab
This is where you begin identifying, assigning and otherwise setting up the QA features for the
contract. The type of report to be used is selected (Civil, Military, Dredging, or other special that
is set up in the District Library), Personnel are identified (RMS will accommodate up to 3 shifts)
and you enter the weather data from tables or listings that are included within the contract
specifications.
Contract Setup/Quality Assurance Tab
13 - 3
Resident Management System
QA Testing
The QA Tests option is located from the main Contract Menu at QC/QA, QA Tests. Tests are
entered that are to be performed by, or on behalf of, the Government. This information can be
obtained from either the contract specifications and/or the submittal register, but should be
coordinated with Contractor QC Plan for precise type and quantity of tests (i.e., we should be
doing at least 5% of the number of QC Tests performed by the Contractor).
QA Test Window
13 - 4
Resident Management System
Planned Labor Interviews
If selected in Contract Setup, Labor Standard Interviews, using SF 1445, are held with labortype workers by Government Representatives as a spot-check to verify that the contractors are
in compliance with the labor standard provisions of the contract.
Planned Labor Interview Window
The actual Labor Interview
is part of the Daily QA
Report process.
Please review ER 1180-18, Contracts Labor
Relations, Chapter 7, which speaks to the interview process. It is very important that the
enforcement procedure and reporting be accomplished as required by regulations. This chapter
may be obtained at the following website address:
Contract Labor Relations - ER 1180-1-8
14 - 1
Resident Management System
CHAPTER 14 - CQC – Daily Report
What this Chapter presents:
Quality Control Report and RMS
•
Overview
•
Daily QC Report
•
Sample Daily QC Report Form
Overview
This chapter addresses information on the Contractor Daily Quality Control Report and
provides general information for utilizing the Quality Control Report module of the RMS
program.
14 - 2
Resident Management System
Daily Quality Control Report
The Government and Contractor reports are accessed from the same location within RMS. The
dates shown reflect the QA/QC Report Dates, and you select the QC Report from the next
screen. This screen depicts a standard “Civil Report”. This contract has been set up to utilize
Dredge Reports and if you need to add a dredge report you will simply check the radial button
and view the 2nd screen below.
14 - 3
Resident Management System
With this next window, push the QC REPORT button to access the “CIVIL” QC report. If the
Contractor is using the QCS program (as indicated during Contract Setup) this option will not
be available from within RMS, except you may VIEW a QCR submitted by the Contractor.
At the top of the screen is the REPORT NUMBER for this particular date (E.g., 184). This report
number coincides with the DAY construction commenced onsite. It is computed from the
Milestone identified as Construction Start Date. The date entered will result in the report being
QA/QC Report Number 1. Both the QA and the QC report use the same number for a particular
calendar day. Non-work days are included in the tabulation, therefore, the report numbers will
not always be sequential.
The contractor will complete each of the items shown on the left of the screen and can print out
or view the QC Report as needed. A HARD COPY (with QC Signature and Superintendent
initials) of the report should be supplied to the Government to be included in the Contract File.
If QCS is being
used, you will have
the option of
returning the QC
Report to the
contractor for
needed corrections.
14 - 4
Resident Management System
Sample Quality Control Report Form
After all desired entries have been made, it is time to print the report and archive as a
permanent document for the contract. Press the QC Report button from this screen to generate
the report.
See a sample QC Report on the following two pages.
14 - 5
Resident Management System
Sample – Quality Control Report Form – Page 1 of 2
CONTRACTORS QUALITY CONTROL REPORT (QCR)
DAILY LOG OF CONSTRUCTION - MILITARY
REPORT NUMBER
482
Page 1 of 2
DATE
01 Apr 2002 - Monday
PROJECT
CONTRACT NUMBER
Facility Modernization of DeCA
DACA09-99-D-0020 0005
CONTRACTOR
WEATHER
Straub Pacific, LLC
Weather Not Entered
QC NARRATIVES
Did anything de ve lop that m ay lead to a Change Orde r/Claim ?
The Government Inspector insists that we don't do any work onsite without an adequate number of Quality Control Representative
present. This is unreasonable.
(Preparatory and initial dates held and advance notice)
PREP/INITIAL DATES
Pre paratory ins pe ctions were he ld today for the following 2 feature s:
CARPENTRY
ELECFINISH
Initial ins pe ctions were he ld today for the following 2 feature s:
DEMO
ELECFINISH
ACTIVITY START/FINISH
The following activity was started today:
Activity No
02924
Description
Approve for Sodding
The following activity was finished today:
Activity No
0025A
Description
Add lights
QC REQUIREMENTS
The following 4 QC re quirem e nts we re com pleted today:
Requirement No Type
CT-00002
IP-00001
TP-00001
US-00002
QA/QC PUNCH LIST
Description
QC Testing
Perform load test per ANSI A17.1
Installed Property Ionization smoke detectors, CP-101-J, addressable, plug-in
Transfer Property Acoustical wall covering that will be installed by User at a later date (after
customer move-in is completed.
User Schooling
Provide programming training (3-days, minimum) for addressable Fire Alarm
Control Panel.
Results
Awaiting Results
Completed
Completed
Completed
(Describe QC Punch List items issued, Report QC and QA Punch List items corrected)
The following QC Punch List ite m was is s ue d today:
Item No
Location
Description
QC-00002
Roof
Replace alll roof ing insulation. Insulation was not properly protected and is all wet
due to the rain we had this morning.
The following 3 Punch Lis t item s were corre cte d today:
Item No
Location
Description
QA-00019
Bldg. 950
QA-00028
Corridors
QA-00035
Attic
Damper actuators, at the VAV's, shall not be installed such that they cover the
schematic.
Verfiy that the wiremold/cable tray covers can be removed for access to the data
cables at the corridors.
All of the roof framing and bridging pieces, that have been removed for hvac
equipment installation, shall be replaced.
14 - 6
Resident Management System
Sample – Quality Control Report Form – Page 2 of 2
CONTRACTORS QUALITY CONTROL REPORT (QCR)
DAILY LOG OF CONSTRUCTION - MILITARY
REPORT NUMBER
482
Page 2 of 2
DATE
01 Apr 2002 - Monday
PROJECT
CONTRACT NUMBER
Facility Modernization of DeCA
DACA09-99-D-0020 0005
CONTRACTORS ON SITE (Report first and/or last day contractors were on site)
No contractors had the ir firs t or las t day on s ite today
LABOR HOURS
The following labor hours we re Reported today:
Employer
Number of
Employees
Labor Classification
Straub Pacific
CARPENTER
Total hours worked to date:
128.0
Hours
Worked
8.0
8.0
Total
64.0
64.0
EQUIPMENT HOURS
The following e quipm e nt hours we re Reported today:
Equipment ID
Description
00000001
Track Hoe
Total
Total operating hours to date: 14.0
ACCIDENT REPORTING
Standby
Hours
Operating
Hours
0.0
0.0
8.0
8.0
(Describe accidents)
The following accident was re porte d today:
Operator should have had seatbelt on when in the cab. This was just discussed at our Safety Meeting at 6:00 a.m.
today. What a dummy!
CONTRACTOR CERTIFICATION
On behalf of the contractor, I certify that this Report is com plete and correct and all equipm ent and
m ate rial us e d and work perform e d during this Re porting pe riod are in com pliance with the contract
plans and spe cifications, to the bes t of m y knowledge, except as noted above .
QC REPRESENTATIVE'S SIGNATURE
DATE
SUPERINTENDENT'S INITIALS
DATE
14 - 7
Resident Management System
With this next window, check the Dredge Report radial button to access the QC Dredge report
options. This sample contract has been setup to use both the Bucket/Pipeline and the Hopper
Dredge. You will add these reports by choosing the Add button, selecting the Date of the report
and, finally, the Dredge Type you wish to report on.
We will choose the Bucket Dredge to view first.
NOTE: For these Dredge Types to appear, you must have
created them in the District Library and selected them in
Contract Setup on the contract you are using them.
14 - 8
Resident Management System
The contractor will complete each of the items shown on the left of the screen and can print out
or view the QC Report (Form 4267) after the report is checked as being completed. You may
also COPY a report from a previous day and make any changes to it as necessary.
14 - 9
Resident Management System
Sample Bucket Dredge Report Form 4267 – Page 1 of 2
After all desired entries have been made, it is time to print the report and archive as a
permanent document for the contract. Press the Form 4267 button to generate the report.
PAGE NO.
QUALITY CONTROL REPORT-BUCKET/PIPELINE
CONTRACT NO.
CONTRACT TITLE
W912ER-04-C-0013
CONTRACTOR VILLAGE
CHARACTER OF
REPORT
X MAINTENANCE
REPORT NO.
Sructural Engineers LLC
NEW WORK
440
DATE
ENVIRONMENTAL
15 Mar 2005 - Tuesday
NAME AND TY PE
DREDGE
Page 1 of 2
CONTRACTOR
SHIFTS PER DAY
DAY S PER WEEK
Bucket Dredge
3
SIZE
PIPELINE
HORSEPOWER
DIPPER OR
BUCKET
6
DREDGE PUMP
12
SUCTION
PIPE JET
50
7
NO. OF CREW MEMBERS
CUTTER OR
BUCKET
20
DREDGE
10
SHORE
0
OTHER
0
TOTAL
0
0
LOCATION/CHANNEL OF WORK
LOCATION OF
WORK
CHARACTER OF
MATERIAL (%)
REACH DREDGED; STATION TO STATION
GRAVEL
SAND
CLAY
0
MUD
0
SILT
0
HARDPAN
0
0
STONE
0
BEFORE DREDGING __________________0
AVERAGE DEPTH
0 TIME
00:00 GAGE LOCATION
MIN
0 TIME
00:00 MAX
0 TIME
00:00 GAGE DATUM
Weather Caused No Delay
0 °C / 5 °C
ITEM
VISIBILITY
0
WIND
16
16
DISTRIBUTION OF WORK
UNIT
AVERAGE WIDTH
OF CUT
EFFECTIVE WORKING TIME
(CHARGEABLE TO COST OF WORK)
QUANTITY
0
FT
HR.
MIN.
24
0
0
0
0
0
0
0
CLEARING CUTTER OR SUCTION HEAD
0
0
WAITING FOR SCOWS
0
0
TO AND FROM WHARF OR ANCHORAGE
0
0
PUMPING OR DREDGING
PCT OF EFFECTIVE TIME
TOTAL ADVANCE
THIS PERIOD
FT
0
TOTAL ADVANCE
PREVIOUSLY
FT
0
TOTAL ADVANCE
TO DATE
FT
0 HANDLING PIPE LINES
100 %
BOOSTER (IN LINE)
NON-EFFECTIVE WORKING TIME
(CHARGEABLE COST OF WORK)
0 SUBMERGED PIPE_______
0 HANDLING ANCHOR LINES
FLOATING PIPE_________0 SHORE PIPE____________
TOTAL LENGTH OF DISCHARGE PIPE
CUBIC YARDS REMOVED
100
0
AFTER DREDGING __________________
00:00 MAX
WORK PERFORMED
OTHER
0
0 TIME
TEMP (min / max)
0
SHELL
0
MIN
WEATHER
WEATHER CONDITION
CUMULATIVE AND QTY
DEPOSIT FOR DA (CY )
0
CHANNEL CONDITION
RIVER/TIDE
STAGE
DISPOSAL AREA USED QTY DEPOSITED
GROSS (CY )
0 CLEARING PUMP AND PUMP LINES
FT
GROSS
CREDITED
AMOUNT DREDGED
THIS DATE
0
0 CHANGING LOCATION OF PLANT ON JOB
0
0
AMOUNT PREVIOUSLY
REPORTED
0
0 LOSS DUE TO OPPOSING NATURAL ELEMENTS
0
0
SHORE LINE AND SHORE WORK
0
0
WAITING FOR BOOSTER
0
0
MINOR OPERATING REPAIRS (EXPLAIN IN REMARKS)
0
0
WAITING FOR ATTENDANT PLANT
0
0
PREPARATION AND MAKING UP TOW
0
0
TRANSFERRING PLANT BETWEEN WORKS
0
0
LAY TIME OFF SHIFT AND SATURDAY S
0
0
SUNDAY S AND HOLIDAY S
0
0
FIRE DRILL
0
0
MOVING OUT OF WAY OF TRAFFIC
0
0
MISCELLANEOUS (EXPLAIN IN REMARKS)
0
0
TOTAL NON-EFFECTIVE TIME
0
0
24
0
TOTAL AMOUNT
DREDGED TO DATE
0
AMOUNT DREDGED PER
PUMPING/CUTTING HR
0
0.00
0.00
OPERATING SUPPLIES
COMMODITY
ITEM
FUEL
ELECTRICITY
LUBRICANTS
UNIT
CONSUMED
CREDITED
QUANTITY
QUANTITY
0
BBL
0
0
KW
0
0
GAL
0
PCT. OF NON-EFFECTIVE
MOB DATE
03/01/2005
RMS FORM 4267
DREDGE START
DEMOB DATE
03/15/2005
TOTAL EFFECTIVE AND NON-EFFECTIVE TIME
(CHARGEABLE TO COST OF WORK)
0%
14 - 10
Resident Management System
Sample Bucket Dredge Report Form 4267 – Page 2 of 2
QUALITY CONTROL REPORT-BUCKET/PIPELINE
CONTRACT NO.
W912ER-04-C-0013
CONTRACT TITLE
CONTRACTOR
CONTRACTOR VILLAGE
Sructural Engineers LLC
NAME AND TY PE
DREDGE
LOST TIME
H.P.
HR.
RMS FORM 4267
MIN.
MAJOR REPAIRS
0
0
CESSATION
0
0
COLLISIONS
0
0
MISCELLANEOUS
0
0
TOTAL LOST TIME
0
0
24
0
TOTAL TIME IN PERIOD
No QC Narratives w ere reported today
(NOT CHARGEABLE TO COST OF WORK)
HOURS
PERCENTAGE OF TOTAL TIME
QC NARRATIVE(S)
440
15 Mar 2005 - Tuesday
ATTENDANT PLANT
NAME OR NUMBER
Page 2 of 2
REPORT NO.
DATE
Bucket Dredge
ITEM
PAGE NO.
0%
14 - 11
Resident Management System
Next, we will view the Hopper Dredge Report:
As with the previous Dredge Report, when you report the entries as completed, you may
view/print the Report itself. Click on the Form 27A button to view the report. Also, you are able
to COPY a report from a previous day and make any necessary changes.
14 - 12
Resident Management System
Sample Hopper Dredge Report Form 27A – Page 1 of 2
PAGE NO.
QUALITY CONTROL REPORT-HOPPER DREDGE
CONTRACT NO.
CONTRACT TITLE
W912ER-04-C-0013
CONTRACTOR VILLAGE
CHARACTER OF
REPORT
Page 1 of 2
CONTRACTOR
X MAINTENANCE
REPORT NO.
Sructural Engineers LLC
440
DATE
NEW WORK
15 Mar 2005 - Tuesday
150
HOPPER CAP:_____________CY
10
AVG VOL OF BIN WATER:_____________CY
500
AVG UNFILLED CAP:_____________CY
DREDGE
NO. OF CREW
MEMBERS
DREDGE
OTHER PLANT
0
LOCATION CHANNEL
WORK SCHEDULE
0
REACH DREDGED; STA TO STA
DAY S PER WEEK
3
DISPOSAL AREA USE
LOCATION
OF
WORK
QTY DEPOSITED
GROSS(CY )
7
CUMULATIVE AND QTY
DEPOSIT FOR DA(CY )
0
AVG LENGTH OF CUT__________FT
0
CHARACTER OF
MATERIAL
RIVER/TIDE
STAGE
AVG WIDTH OF CUT___________FT
0
DENSITY OF MATERIALS
____________________________
DENSITY OF WATER
0
____________________________
GMS/LITER__________________0
0 °C
GMS/LITER@________________
0 TIME
00:00 MAX
0 TIME
00:00 GAGE LOCATION
MIN
0 TIME
00:00 MAX
0 TIME
00:00 GAGE DATUM
TEMP (min / max)
Weather Caused No Delay
VISIBILITY
0
AVG DIST TO DUMP___________NM
0
MIN
WEATHER
WEATHER CONDITION
0
WIND
0 °C / 0 °C
DRAFT
FORWARD
SHIFTS PER DAY
DISTRIBUTION OF TIME AND MILES RUN
LIGHT
AGITATING
(MIN)
LOADED
0
0
0
0
DREDGE & HAUL
(MIN)
MILES RUN
(NAUT MI)
EFFECTIVE W ORKING TIME:
AFT
DRAG DEPTH
MAX ________________
0MIN _________________
0
12/30/1899
INDICATORS LAST CHECKED ON __________________
AVERAGE SPEED OF DREDGE DURING LOADING
FT/MIN
0
AVERAGE SPEED OF DREDGE DURING AGITATING
PUMPING:
24:00
00:00
0.0
TURNING:
00:00
00:00
0.0
TO DUMP:
00:00
00:00
0.0
DUMPING:
00:00
00:00
0.0
TO CUT:
00:00
00:00
0.0
TOTALS:
24:00
00:00
0.0
TAKING ON FUEL AND SUPPLIES:
00:00
00:00
0.0
TO AND FROM WHARF OR
ANCHORAGE:
00:00
00:00
0.0
LOSS DUE TO NATURAL ELEMENTS:
00:00
00:00
0.0
LOSS DUE TO TRAFFIC AND
BRIDGES
00:00
00:00
0.0
MINOR OPERATING REPAIRS:
00:00
00:00
0.0
TRANSFERRING BETWEEN WORKS:
00:00
00:00
0.0
LAY TIME:
00:00
00:00
0.0
FIRE AND BOAT DRILLS:
00:00
00:00
0.0
MISCELLANEOUS:
00:00
00:00
0.0
TOTALS:
00:00
00:00
0.0
MAJOR REPAIRS AND
ALTERATIONS:
00:00
00:00
0.0
CESSATION:
00:00
00:00
0.0
COLLISIONS:
00:00
00:00
0.0
TOTALS:
00:00
00:00
0.0
TOTAL TIME/MILES:
24:00
00:00
0.0
FT/MIN
0
GALLONS OF FUEL OIL CONSUMED
GAL
GALLONS OF WATER CONSUMED
GAL
0
0
NON-EFFECTIVE W ORKING TIME:
WORK PERFORMED
DREDGING AND HAULING
NO. OF LOADS
TOTAL CY S
0
DISPOSAL AREA
AGITATING
TOTAL CY S
0
0
ATTENDANT PLANT
ITEM
NAME OR NUMBER
H.P.
HOURS
LOST TIME:
RMS FORM 27A
14 - 13
Resident Management System
Sample Hopper Dredge Report Form 27A – Page 2 of 2
QUALITY CONTROL REPORT-HOPPER DREDGE
CONTRACT NO.
W912ER-04-C-0013
DREDGE
CONTRACT TITLE
CONTRACTOR
CONTRACTOR VILLAGE
Sructural Engineers LLC
Page 2 of 2
REPORT NO.
440
NAME AND TY PE
DATE
Hopper Dredge
15 Mar 2005 - Tuesday
QC NARRATIVE(S)
No QC Narratives w ere reported today
RMS FORM 27A
PAGE NO.
14 - 14
Resident Management System
Contractor QC Report Not Imported
If you have not yet imported the Contractors’ QC Report, and click on the QC Report option,
you will get this message:
14 - 15
Resident Management System
Contractor QC Report Imported – Opportunity to Return
If you have imported the Contractors’ QC Report and have identified items that need to be
corrected, you can click on the Return to Contractor for Corrections box and it will be
returned with your next RMS to QCS export.
The QC Report
will then be
returned and
unchecked as
being complete
in the QCS
program on the
next export to
QCS.
15 - 1
Resident Management System
CHAPTER 15 - Government QA Daily Report
What this Chapter presents:
Quality Assurance and RMS
•
Overview
•
Daily QA Report
•
Sample Daily QA Report Form
•
Overview
This chapter addresses information on the Government QA Report and provides general
information for utilizing the associated Quality Assurance modules of the RMS program.
Quality Assurance is required on all construction contracts. The extent of assurance should be
commensurate with the value and complexity of the contracts involved and the requirements of
this regulation.
Elements of Quality Assurance
Daily QA Report
Government Staff
QA Tests
Required QA Verifications
3 Phase Inspection Checks
Planned Labor Interviews
Anticipated Adverse Weather
15 - 2
Resident Management System
Quality Assurance Requirements
These are areas that have to do with Planning that is required before the Government or the
Contractor can adequately prepare their respective Daily Reports. The Government, or the
Designer accomplishes some of the planning before the contract exists. This includes what
RMS refers to a QC Requirements as was discussed previously.
Although the government data is entered in the QA Report menu option and the contractor data
is entered in the QC Report menu option, much of the data is interdependent. For example, a
QC requirement such as a QC Test must be reported as completed in the QC Report option
before it can be verified in the QA Report, Verify QC Requirements option.
Creating a Daily QA REPORT
The QA Daily Report is generated in RMS to document the Quality Assurance progress of the
Government and to record, among other items, any conflicts, claims, or disagreements with the
Contractor. QA Reports can be either the Military or Civil format (or other special), depending on
how it was setup. RMS also includes Dredging Reports.
Keep in mind a simple thought: “The report should be a ‘record-of-fact’, not a ‘record of
your opinions’”.
15 - 3
Resident Management System
Civil or Military Format for QA Report
The only difference in the Civil and Military format is reflected on the Weather option of the QA
Report. All other elements are identical.
At the top of the screen is the REPORT NUMBER for this particular date (E.g., 492). This report
number coincides with the DAY construction commenced onsite. It is computed from the
Milestone identified as “Construction Start Date”. The date entered will result in the report being
QA/QC Report Number 1. Both the QA and the QC report use the same number for a particular
calendar day. Non-work days are included in the tabulation, therefore, the report numbers will
not always be sequential.
Military format
Civil format
15 - 4
Resident Management System
Punch List Items
You are able to Copy punchlist items from one location to another. This is especially beneficial
in contracts such as dormitories, offices, etc., where the same comment is applicable to various
locations.
15 - 5
Resident Management System
You are also able to Replace on location
with another location (change the name of
any location globally). This will assist in
having the Punch List sort correctly.
15 - 6
Resident Management System
Sample Daily QA Report Form - Military
The Daily QA Report is accessed by pushing the QA Report button at the top of the screen.
15 - 7
Resident Management System
Sample Daily QA Report Form - Civil
The Daily QA Report is accessed by pushing the QA Report button at the top of the screen.
The bottom portion of the report would be the same layout as the Military Report on the previous
page.
THE QCR WILL BE ATTACHED TO OR FILED
WITH THE QAR
INSPECTORS QUALITY ASSURANCE REPORT (QAR)
DAILY LOG OF CONSTRUCTION - CIVIL
REPORT NUMBER
(ER 1180-1-6)
439
Page 1 of 1
TO
DATE
PROJECT
CONTRACT NUMBER
14 Mar 2005 - Monday
CONTRACTOR VILLAGE,Camp Victory, Iraq
W912ER-04-C-0013 NA
CONTRACTOR (Or hired Labor)
WEATHER
Sructural Engineers LLC
Weather Caused No Delay
PORTION OF SCHEDULED DAY SUITABLE FOR OPERATIONS
STRUCTURAL EXCA- BORROW EXCAVATION
VATION
100
100
%
EMBANKMENT
100
%
CONCRETE
50
%
TEMPERATURE
STRUCTURE
MINIMUM
75
%
MM
ENDING
Y ES (Explain)
5.00
NUMBER OF GOVERNMENT EMPLOY EES
SUPERVISORY
OFFICE
2
LAY OUT
1
INSPECTION
1
SKILLED
6
LABORERS
TOTAL
5
LABOR
38
245
FEET
9
0
NUMBER OF SHIFTS
TOTAL
FROM
289
17:00
M
2300
M
RIVER STAGE
NUMBER OF CONTRACTOR'S EMPLOY EES
SUPERVISORY
25 °C
24 HOUR PRECIPITATION
X NO
HAS ANY THING DEVELOPED ON THE WORK WHICH MIGHT
LEAD TO A CHANGE ORDER OR FINDING OF FACT ?
MAXIMUM
15 °C
%
0600
TO
M
1800
X 1
FROM
M
TIME
2.0
2
TO
M
3
FROM
TO
M
M
M
Attach list of the f ollowing: (a) Major items of equipment either idle or working, and (b) Number and classif ication of contractor personnel onsite.
Note: If the contractor's Quality Control Report (QCR) contains the inf ormation it need not be repeated.
INSPECTOR'S SIGNATURE
ENG FORM 2538-2, May 94
DATE
(CIVIL)
SUPERVISOR'S INITIALS
This form together with ENG Form 2538-1, Aug 92, is equivalent to
Aug 89 version, ENG Form 2538, Dec 87, however, is obsolete.
DATE
(Proponent: CEMP-CE)
16 - 1
Resident Management System
CHAPTER 16 - Contract Submittals and
SpecsIntact
What this Chapter presents:
•
•
Overview
•
SpecsIntact Submittal Program
•
Contract Setup
•
Submittal Requirements
•
Specification Sections
•
Submittal Details & Register (ENG Form 4288)
•
Transmittal Log (ENG Form 4025)
•
Submittal Reviewers
16 - 2
Resident Management System
Overview
This chapter furnishes information on Submittals for our contracts and provides general
instructions for utilizing the associated Submittal related modules of the RMS program.
The SpecsIntact Specification Production System
The use of SpecsIntact (Specifications-Kept-Intact) in both Military and Civil contracts is
mandatory, as established within Engineering Regulation ER 1110-2-1201 and CEMP-EA
(1110) Memorandum of 14 April 1997, for all FY00 and future projects. This policy has been
incorporated into ER 1110-345-700, “Drawings, Design Analysis, and Specifications”.
Contract Setup
During an earlier Chapter of this Manual, we setup the submittal register(s) for our contract. This
was done using the Contract Setup screen shown below. RMS can have as many different
Submittal Registers as needed.
16 - 3
Resident Management System
SUBMITTAL REQUIREMENTS
Submittal requirements can, and should be, imported from the SpecsIntact system. The
Import/Export feature is shown from the main Contract Menu / Import/Export by highlighting
Submittal Register. However, for you remaining neophytes that continue to insist on using an
Excel Spreadsheet for submittal registers, RMS has the capability to import such antiquated and
unofficial data format. If you have multiple submittal registers, be sure to select the correct
“Import To” register.
If you have made the SpecsIntact/Excel Template import, you are finished with the setup!!
However, you can still make manual entries if required.
16 - 4
Resident Management System
Specification Sections
If you are using the Import feature from SpecsIntact, this selection is not absolutely required to
be used. However, this area is used if you need to change or modify a title of a specification
section, or if you need to manually enter a section that is not otherwise included.
Your revisions to this area will affect the current contract only and will not alter the specification
sections listed in the District Library. The nice feature of this area of the program is that you
can have submittal section numbers and titles that do not agree, and do not conflict with those
in the library. That is, a section in the library could have the same number as a section in the
contract, but a totally different title assigned to it.
RMS (District Library) includes the older format of MasterFormat 1995 and also includes the
MasterFormat 2004. The older version basically included 16 Specification Divisions and the
new format includes 50+ Divisions. When downloaded from SpecsInTact you will download all
of the fourteen characters available. With this format we are able to link the submittal items to
various other data, such as QC Test or QA Tests.
16 - 5
Resident Management System
Submittal Details and Requirements
Notice the distinct sections of this screen:
•
•
•
•
•
•
Identification section
Classification section (modified now to address Design-Build Contracting)
Drawing and Submittal Type references
Submittal Schedule section
Primary/Secondary Reviewer sections
Activity link and Time periods section on the Submittal Schedule section.
Submittal Requirements Window
After all submittal items are entered, a Submittal Register (ENG Form 4288) can be generated
as shown on the next page.
16 - 6
Resident Management System
Sample Submittal Register Form (ENG Form 4288)
SUBMITTAL REGISTER
TRANSACTIVITY
ITEM
MITTAL
No.
No.
(ER 415-1-10)
TITLE AND LOCATION
CONTRACTOR
CLASSIFICATION
SPEC
DESCRIPTION OF
PARAGRAPH
SUBMITTAL
TYPE OF SUBMITTAL
No.
No.
Bonnev ille FGE & VBS Modif ications,Bonnev ille Lock & Dam
Fabrication Products Inc.
OFFICE / NAME
or CR
SECTION - 01525
1002
CONTRACTOR
SCHEDULE DATES
REVIEWER
FIO
GA, DA
DATE
SUBMIT
NEEDED
BY
CONTRACTOR
ACTION
APPROVAL MATERIAL
NEEDED
NEEDED CODE
BY
24 Jun 2006
W9127N-05-C-0025 NA
CONTRACT NUMBER
BY
GOVERNMENT
ACTION
CORPS
RECEIVED
CORPS
CODE RETURNED
DATE
DATE
Safety and Occupational Health Requirem ent
1
1
01525 1.3.5
Accident Prev ention Plan (APP)
GA
RO
Arndt, Eric A.
A
21 Oct 05
B
1
2
01525 1.3.5
Activ ity Hazard Analy sis
GA
RO
Arndt, Eric A.
A
21 Oct 05
B
25 Oct 05
3
3
01525 1.3.5
Crane Critical Lif t Plan
GA
RO
Arndt, Eric A.
A
31 Oct 05
F
11 Nov 05
4
01525 1.3.6
Accident Report
FIO
RO
Arndt, Eric A.
5
01525 1.3.6
Monthly Exposure Reports
FIO
RO
Bechtel, Gary L
A
31 Oct 05
F
10 Feb 06
4
1002
1002
6
01525 1.3.6
Regulatory Citations and Violations
FIO
RO
Arndt, Eric A.
7
01525 1.3.6
Crane Reports
FIO
RO
Arndt, Eric A.
21 Sep 05 01 Oct 05 01 Oct 05
8
01525 1.3.6
Conf ined Space Entry Permit
FIO
RO
Bechtel, Gary L
21 Sep 05 01 Oct 05 01 Oct 05
25 Oct 05
9
01525 1.3.7
Certif icate of Compliance
CERTIFICATES
GA
RO
Bechtel, Gary L
01 Sep 05 01 Oct 05 01 Oct 05
1002
5
9.1
01525 1.3.7
CRANE OPERATOR CERTIFICATION
CERTIFICATES
FIO
RO
Arndt, Eric A.
21 Sep 05 01 Oct 05 01 Oct 05
A
31 Oct 05
F
19 Dec 05
1002
5
9.2
01525 1.3.7
CRANE OPERATOR CERTIFICATION
CERTIFICATES
FIO
RO
Arndt, Eric A.
21 Sep 05 01 Oct 05 01 Oct 05
A
31 Oct 05
F
19 Dec 05
1002
5
9.3
01525 1.3.7
OSHA 30 TRAINING CERTIFICATION
CERTIFICATES
FIO
RO
Arndt, Eric A.
21 Sep 05 01 Oct 05 01 Oct 05
A
31 Oct 05
F
19 Dec 05
1002
5
9.4
01525 1.3.7
OSHA 30 TRAINING CERTIFICATION
CERTIFICATES
FIO
RO
Arndt, Eric A.
21 Sep 05 01 Oct 05 01 Oct 05
A
31 Oct 05
F
19 Dec 05
1002
1
10
01525 1.3.5
Quality Control Plan
GA
RO
Arndt, Eric A.
01 Sep 05 01 Oct 05 01 Oct 05
A
21 Oct 05
B
25 Oct 05
1002
2
11
01525 1 3 5
WORK PLAN & SCHEDULE
GA
RO
Arndt Eric A
01 Sep 05 01 Oct 05 01 Oct 05
A
25 Oct 05
F
17 Nov 05
Features – Submittals/Transmittals
1. Multi-delete for Submittal and Transmittal screens. You are able to perform multiple
deletes.
2. Submittal COPY feature is available for all users. Previous versions only had this
option available for the System Administrators. You are ableto copy a submittal
register from one contract to another contract or one register to another register. If
you copy from register to register, you will need to ensure that Contract Setup is
configured to use more than one submittal register.
3. RMS includes a “Notify Label” on the QCS IMPORT screen that lets User’s know
when transmittals have been imported from the Contractor so they can be
timestamped in.
16 - 7
Resident Management System
Transmittal Log (ENG Form 4025)
The form provided by the Contractor to track submittal items is the Transmittal Log. This log
will include one or more submittal items for one (and only one) technical specification section.
QCS will print this form for the Contractor as part of the Submittal Control process.
16 - 8
Resident Management System
Sample Transmittal Form (ENG Form 4025)
TRANSMITTAL OF SHOP DRAWINGS, EQUIPMENT DATA, MATERIAL SAMPLES, OR
MANUFACTURER'S CERTIFICATES OF COMPLIANCE
DATE
TRANSMITTAL NO.
10/21/2005
01525-1
(Read instructions on the reverse side prior to initiating this form)
SECTION I - REQUEST FOR APPROVAL OF THE FOLLOWING ITEMS
TO:
FROM:
Portland District Eng/Const
P.O. Box 2946
Portland, Oregon 97208-2946
Fabrication Products Inc.
4201 N.E. Minnehaha Street
Vancouver, Washington 98661
SPECIFICATION SEC. NO. (Cov er only one section with each transmittal)
01525 Safety and Occupational Health Requirement
ITEM
NO.
DESCRIPTION OF ITEM SUBMITTED
(Ty pe size, model number/etc.)
b.
a.
(This section w ill be initiated by the contractor)
CONTRACT NO.
CHECK ONE:
X THIS IS A NEW TRANSMITTAL
W9127N-05-C-0025 NA
THIS IS A RESUBMITTAL OF
TRANSMITTAL ___________
PROJECT TITLE AND LOCATION
01-Main Register
Bonneville FGE & VBS Modifications Bonneville Lock & Dam
MFG OR CONTR.
CAT., CURVE
DRAWING OR
BROCHURE NO.
(See instruction no. 8)
c.
NO.
OF
COPIES
d.
CHECK ONE: THIS TRANSMITTAL IS
FOR
FIO X GA
DA
CR
CONTRACT REFERENCE
DOCUMENT
SPEC.
PARA. NO.
DRAWING
SHEET NO.
e.
f.
FOR
CONTRACTOR
USE CODE
VARIATION
(See
Instruction
No. 6)
g.
h.
FOR
CE
USE
CODE
i.
1
Accident Prevention Plan (APP)
5
1.3.5
A
B
2
Activity Hazard Analysis
5
1.3.5
A
B
10
Quality Control Plan
5
1.3.5
A
B
TOM WEISS
I certify that the above submitted items have been reviewed
in detail and are correct and in the strict conformance with the
contract drawings and specifications except as otherwise
stated.
REMARKS
NAME AND SIGNATURE OF CONTRACTOR
SECTION II - APPROVAL ACTION
ENCLOSURES RETURNED (List by item No.)
ENG FORM 4025-R, MAR 95
NAME, TITLE AND SIGNATURE OF APPROVING AUTHORITY
(ER 415-1-10)
EDITION OF SEP 93 IS OBSOLETE.
SHEET 1 OF 1
DATE
(Proponent: CEMP-CE)
16 - 9
Resident Management System
Transmittals in Review
Imported Transmittals
If you have imported transmittals from the Contractor they will be listed here until such time as
they are logged in. If they have all been logged in, RMS will indicate that also.
16 - 10
Resident Management System
Review Status
This area reflects the review status and actions taken on transmittals until such time as they are
sent to the Contractor. Once they are sent to the Contractor they no longer appear on this
screen.
16 - 11
Resident Management System
Submittal Reviewers
This feature allows you to revise and/or reassign Submittal Reviewers to a particular submittal
item, to a section, and so forth. You may modify the screen directly by selecting the Reviewer
or Review Days on the main screen shown.
Alternatively, you may push the Update and have the following choices:
17 - 1
Resident Management System
Chapter 17 – Schedules & the Standard Data
Exchange Format (SDEF)
What this Chapter presents:
Contractor Schedule Requirements
•
Overview
•
Standard Data Exchange Format (SDEF)
•
RMS and the SDEF
•
Contract Specified Project Schedule
•
Milestone Schedule
•
Monthly Schedule
•
Activity Schedule
•
Feature Schedule
17 - 2
Resident Management System
Schedules and the SDEF
Overview
This chapter furnishes basic information on the Schedules and the Standard Data Exchange
Format and provides general instructions for utilizing the associated modules of the RMS
program.
RMS maintains four types of schedules
Milestone Schedule
The most important schedule to the customer is the Milestone schedule. This schedule
includes not only major milestones like the Contract Award Date, Notice To Proceed,
Construction Start Date, and BOD, but can also include important milestones for the customer,
like partial turnover for installing customer furniture, scheduling User Training classes, O&M
turnover, etc. During construction these types of milestones should be reviewed at the weekly
planning meetings with the contractor and updated in RMS as part of the daily QA reporting
process. Prior to construction award, milestone dates should come from P2 to RMS, but after
17 - 3
Resident Management System
construction award the construction milestone dates will come from RMS to P2. Some offices
choose to include the Milestones the contractor may indicate on his project schedule.
Placement Schedule
This is the area from which you create your Placement Curve and should ensure that the
projected placement reaches 100%. You can create this manually, use an S-curve, or use the
Contractor’s activity scheduled start and finish dates.
A Baseline Schedule can be entered from this selection also. You can create the Baseline
manually, or simply copy any placement to the Baseline. The baseline should be completed to
make use of the District Baseline Schedules from the Summary Level.
17 - 4
Resident Management System
Activity Schedule
This is the schedule used at the jobsite to forecast projected need dates for submittals,
materials, equipment, work crews, testing schedules, 3-Phase inspections, etc. The level of
detail (i.e., form footings, set re-bar, place concrete) is not very useful for the customer or those
not tasked with the day-to-day scheduling operations at the jobsite. It would not make sense to
duplicate this schedule in P2.
17 - 5
Resident Management System
Feature Schedule
As part of the contractor’s QC Plan, Definable Features of Work for a construction contract are
identified by the contractor to plan Preparatory, Initial and Follow-Up inspections of the work.
RMS generates a feature schedule by finding the first activity scheduled to start under a
feature and the last activity scheduled to be finished under a feature. Actual progress is
determined by computing earnings to date on the activities for a feature. Most construction
contracts (even those with 1000’s to tens of 1000’s of work activities) have fewer than 30
features of work. This rolled up feature schedule makes an excellent schedule for monitoring the
progress on a contract. The customers find this schedule very easy to understand. Typical
features include items like Site Utilities, Interior Electrical, Roofing, etc.
17 - 6
Resident Management System
Standard Data Exchange Format (SDEF)
The SDEF was developed by the U.S. Army Construction Engineering Research Laboratories
(USACERL) in conjunction with the Corps of Engineers Headquarters, Corps Field Offices,
construction management consultants, scheduling software vendors, and professional
associations.
Implementation of the SDEF makes data transfer between the Corps of Engineers and
construction companies easier by establishing a standard format for the exchange of scheduling
data.
NOTE: As of 2001, only Primavera is providing a Windows
program (P3) with SDEF compatibility.
Feature for the SDEF
You can merge two SDEF files into one file with the available “SDEF Merger Utility”. This utility
is available on the RMS and QCS Websites.
RMS and the SDEF
This guide specification covers the requirements for use of RMS for contract monitoring and
administration. (QCS = 01 45 02.00 10) (Construction Quality Control = 01 45 00.00 20)
Contract Specified Project Schedule
This guide specification covers the requirements for the preparation and maintenance of the
project schedule. (Project Schedule = -1 31 19.00 40) (NAS = 01 32 17.00 20)
District Milestone Events – District Library
Milestones are arranged in sub-groups and are based on the time period in which they occur.
The sub-groups you may select are listed below:
All Events
Design
Construction
Post Construction
= Listing of All Milestone Events
= Events occurring prior to award
= Events occurring during construction
= Events occurring following construction
17 - 7
Resident Management System
Milestone Events – Local Library
Milestones that are “gray”
on this screen are
mandatory milestones
and originate from either
the RMS program, or the
District Library. They are
Read Only and only the
“Order No.” can be
modified. You can
choose to record the time
of the milestone and
whether to add the
milestone to contracts as
they are entered into the
RMS program.
17 - 8
Resident Management System
The Milestone Schedule in the contract reflects all the milestones from the RMS Program
(System Milestones), the District and the Local Libraries. You are also able to add milestones
that are unique to an individual contract, but these would not be listed in the Local Library, nor
would they be available for other contracts. Remember, if you have multiple phases on a
contract you can choose to use them, or roll them up into only one phase (Contract Setup).
The Milestone
Schedule is also
available at the
Administration /
Contract Status /
Milestone
Schedule tab.
The information
on this screen will
be shared with
P2; therefore it is
very important
that it be kept current.
Milestone Schedules - Summary Reports
17 - 9
Resident Management System
There are three Milestone related reports available from the Reports Explorer, from the
Summary area of RMS.
17 - 10
Resident Management System
Monthly Progress
This selection should always be completed to provide either scheduled or projected earnings for
the monthly projections.
The Monthly Progress shows earnings to-date figures that are automatically posted from each
Contractor pay estimate. You can generate the Scheduled Progress from this selection.
17 - 11
Resident Management System
Activity Schedule
This option gives you a quick overview of your activity schedule. The information in this section
is either entered directly into RMS or imported from the QC module (QCS) or scheduling
software package. There is an opportunity to review imported data before incorporating it into
RMS. Choosing Activity Schedule brings up the following screen.
This is a Read Only screen if the Contractor is using the QCS program and no changes can be
made from this screen. The scheduled dates are either imported from the Contractor’s NAS or
manually updated. The actual dates are imported (or manually extracted from) the Contractor’s
Daily QC Report.
By using the drop-down menu, at the upper righthand side of the screen, you can view the
activities sorted by any of the following:
•
•
•
•
•
•
All Activities (Default)
Critical Activities
Activities Not Started
Activities in Progress
Activities Not Finished
Activities Finished
17 - 12
Resident Management System
Feature Schedule
As Definable Features of Work are required to be identified by the Contractor as part of his
Quality Control program, this Feature Schedule of RMS is used to track and report when the
Preparatory and Initial 3-Phase Inspection Control Meetings are scheduled and actually
conducted.
All Contractor Activities should be assigned to one and only one Definable
Feature of Work.
The Definable Feature of Work may have MANY Activities linked to it.
The Definable Features of Work in the Quality Control Plan should match
those in the Scheduling program and the QCS program if being used.
The Feature Schedule can be accessed from the main Contract Menu / Schedules / Feature
Schedule as shown below. If the contractor is using the QCS program, this will be a READ
ONLY screen.
The Preparatory and Initial dates on this screen are taken from the Contractors’ Daily QC
Report. If the contractor is not using QCS, entries may be manually entered here.
18 - 1
Resident Management System
CHAPTER 18 - Closeout Activities
What this Chapter presents:
•
Overview
•
Closeout Activities
•
Real Property
•
Installed Property
•
Transfers - DD Form 1354
•
Requisitions - DD Form 1149
•
Contractor Evaluations - DD Form 2626
•
Warranty Inspections
18 - 2
Resident Management System
Overview
This chapter addresses requirements for Transfer of Completed Facilities
and Warranty enforcement procedures as addressed in ER 415-345-38 (30 June 2000).
The referenced Engineering Regulation is the basic regulation that prescribes USACE
policy and procedures for transfer of completed construction projects.
We will discuss how the RMS program is setup to assist us in closing out a contract.
Closeout Activities in RMS
RMS provides the following input screens and forms for closing out a construction
contract and more are under consideration for future releases:
•
•
•
•
•
Real Property Screens
Transfers - DD Form 1354 Input screens and reports
Requisitions - DD Form 1149 Input screens and reports
Contractor Evaluations - DD Form 2626 Input screens and reports
Warranty Inspection screens and reports
18 - 3
Resident Management System
Real Property
For Military construction contracts, Real Property is required to be documented by use
of the DD Form 1354, “Transfer and Acceptance of Military Real Property”. This form is
used to transfer a facility, or part of a facility, to the Using Service prior to either partial or
complete occupancy. This form may be supplemented by DA Form 2877, “Real Property
Record”, on Army construction contracts.
As shown above, Real Property is accessed from Contract Menu / Closeout / Real
Property. This screen will show all items of Real Property that have been entered
during the contract.
18 - 4
Resident Management System
Real Property Import from Spreadsheet
As an alternative to entering the Real Property directly into the RMS screens, an Excel
Template is available to allow entry via a spreadsheet. The template can be downloaded
from the RMS website at the following URL:
http://www.rmssupport.com/datafiles/RealPropertyTemplate_ver1_final.zip
You will use the Import/Export screen to use the Excel Template as follows:
For Design-Build contracts, where the Contractor is using QCS and must also provide
the Real Property Listing and DD Form 1354, this will be most helpful.
18 - 5
Resident Management System
Transfers – DD Form 1354
Once the Real Property is entered, you may prepare a DD Form 1354 and link one or
more pieces of the Real Property to the form. It is not uncommon on larger projects to
have multiple Transfer Documents, as you need to provide one for the Customer to sign
with each phase or portion of the contract turned over to them.
18 - 6
Resident Management System
Sample - DD Form 1354 Report Form
You may view and print the form itself by selecting the DD1354 button at the top of the
screen.
18 - 7
Resident Management System
Sample - Real Property Form – DD Form 1354
Transfer and Acceptance of Military Real Property – Page 1 of 7
Form Approved
OMB No. 0704-0188
TRANSFER AND ACCEPTANCE OF MILITARY REAL PROPERTY
PAGE
1
OF
7
PAGES
The public reporting burden for this collection of information is estimated to average 30 minutes per response, including the time for reviewing instructions, searching existing data sources, gathering and maintaining the data needed, and completing and reviewing
the collection of information. Send comments regarding this burden estimate or any other aspect of this collection of information, including suggestions for reducing the burden, to the Department of Defense, Executive Services and Communications
Directorate (0704-0188). Respondents should be aware that notwithstanding any other provision of law, no person shall be subject to any penalty for failing to comply with a collection of information if it does not display a currently valid OMB control number.
PLEASE DO NOT RETURN YOUR COMPLETED FORM TO THE ABOVE ORGANIZATION.
1. FROM (Installation/Activity/District and Zip Code)
NORTHWEST AREA OFFICE
USACE, SEATTLE PO BOX 610
DUPONT, WA 98327-0610
2. DATE PREPARED
(YYYYMMDD)
3. PROJECT/JOB
NUMBER
4. SERIAL NUMBER
9. TRANSACTION DETAILS
20070515
57437
N/A
a.
X NEW CONST.
5. TO (Installation/Activity/Service, Zip Code and INSNO)
6. SITE/INSNO
NAME
7. CONTRACT
NUMBER(S)
8. DRAWING
NUMBER(S)
DIRECTOR FT LEWIS PUBLIC WORKS
ATTN: AFZH-PWS (REAL PROPERTY)
FT LEWIS, WA 98433-0500
FT LEWIS/53465
W912DW-07-C-0006
22s/141-10-01
OTHER (Specify)
c.
X DRAFT
11.
FACILITY
12.
CATEGORY
13.
CATCODE
NO.
NO.
CODE
DESCRIPTION
14.
AREA
OTHER
15. UNIT 16. TOTAL 17. UNIT 18. TOTAL
OF
QUANTITY
OF
QUANTITY
MEAS 1
UM 1
MEAS 2
UM 2
19.
COST
20.
21.
22.
FUND
FUND
SOURCE
ORG
INTEREST
CODE
1 03101
14112
AVN UNIT OPS
P
SF
40097
NA
0
$10,720,200.00
01
00
01
2 03099
44263
VEH STOR INST
P
SF
2304
NA
0
$150,497.00
01
00
01
3 03071
44263
VEH STOR INST
P
SF
2592
NA
0
$169,309.00
01
00
01
4 03072
44263
VEH STOR INST
P
SF
1902
NA
0
$124,226.00
01
00
01
5 03073
44224
ORG STR BLDG
P
SF
432
NA
0
$28,218.00
01
00
01
6 ROAD1
85110
ROADS, PAVED
P
SY
0
MI
0
$516,652.00
01
00
01
7 OPKG1
85210
ORG PARK PAVED
P
SY
0
NA
0
$0.00
01
00
01
8 NPKG1
85215
NONORG PK PAVED
P
SY
0
NA
0
$0.00
01
00
01
9 WALK1
85220
SIDEWALKS SURFA
Additional Item Information: New Walkw ays:
Standard Concrete Sidew alk (
SY)
Patterned Concrete (Patio) (
SY)
Concrete Ramps (
SY)
Concrete Stairs (
SY)
3' Wide Path (
SY)
*
10
87150
RETAIN STRUCTUR
11 PADSR
85225
PAD
P
SY
0
NA
0
$57,532.00
01
00
01
P
P
NA
SY
0
0
LF
NA
43
0
$4,480.00
$5,000.00
01
01
00
00
01
01
TYPE
The facilities listed hereon are in accordance w ith
maps, draw ings, and specifications and change orders approved by the authorized
representative of the using agency except for the deficiencies listed on the reverse side.
24. STATEMENT OF COMPLETION:
a. TRANSFERRED BY (Typed Name and Signature)
b. DATE SIGNED
(YYYYMMDD)
25.a. ACCEPTED BY (Typed Name and Signature)
DD FORM 1354, 20040303
PARTIAL BOD
FINANCIAL COM.
OTHER (Specify)
FINAL d. EFFECTIVE DATE (YYYYMMDD)
23.
ITEM
REMARKS
New Air Support Operations Squadron
(ASOS) w ith attached 21410 Vehicle
Maint Shop
New HMMWV 16 Bay Vehicle Storage
Building
New HMMWV 18 Bay Vehicle Storage
Building
New Stryker 16 Bay Vehicle Storage
Building
New Law nmow er Storage Building w ith
attached 83312 Dumpster Enclosure
New 24' w ide asphalt concrete
drivew ays; curb/gutter (
LF)
New 5 vehicle space Ops Parking
inside fence @VMS
New POV Parking-63 spaces;
curb/gutter (
LF)
New Walkw ays-see information below .
New Concrete Retaining Wall
New Concrete Equipment Pads-see
information below .
b. DATE SIGNED
(YYYYMMDD)
Emerson Eskeets, PE
c. TITLE (DPW/RPAO)
c. TITLE (Area Engr./Base Engr./DPW)
FT LEWIS RESIDENT ENGINEER
PHYS. COM. AVAIL.
X BENF/O
INTERIM
10.
ITEM
GEORGE P. HENRY , PE
b.
EXISTING FAC.
CAPITAL IMP.
Tribal Chief
PREVIOUS EDITION IS OBSOLETE.
26. PROPERTY VOUCHER
NUMBER
18 - 8
Resident Management System
Installed Property
Included in the category of Installed Property are those items of equipment that are
incorporated into the design of a facility. These are typically acknowledged as those
pieces of equipment that require maintenance, have serial numbers and can be
accounted for individually. This property is printed out on a separate report and is meant
to accompany the DD Form 1354 for the Customer. Installed Property is not entered
on the DD Form 1354 directly but, rather is one of the QC Requirements addressed
earlier.
18 - 9
Resident Management System
Transfer Property (Requisitions - DD Form 1149)
Transfer Property is that property that “changes hands” during the construction
process. Examples would include Government Furnished Property (GFP) that the
Contractor would install or consume during the contract performance. It would include
spare parts and supplies that are furnished by the contractor as part of the contract
requirements, but not actually installed. It could also include equipment or materials that
were deleted as part of a contract modification and that were beneficial for the
Government to retain rather than get some minimum token credit for the deletion.
Requisition and Invoice Screen
When you choose Requisitions – DD1149, this screen appears and lists all the DD
Form 1149’s previously entered into the system.
The DD Form 1149 is used to document the transfer of property to the customer and
should include transfers to/from the Contractor,and the Corps of Engineers. This
transfer may take place in more than one stage; if so, you will do one DD Form 1149 for
each transfer.
18 - 10
Resident Management System
DD 1149 Input Screens
The screens are pretty much self-explanatory and are used to compile the actual report.
The information should be as complete as necessary to provide on audit trail of where
each piece of transferred property actually was delivered.
18 - 11
Resident Management System
Sample Transfer Property Form – DD Form 1149
Requisition and Invoice/Shipping Document – Page 1 of 1
SHIPPING CONTAINER TALLY
1
2
3
4
5
6
7
8
9
10 11 12 13 14 15 16 17 18 19 20 21 22 23 24 25 26 27 28 29 30 31 32 33 34 35 36 37 38 39 40 41 42 43 44 45 46 47 48 49 50
Form Approved
OMB No. 0704-0246
Expires Dec 13, 1996
REQUISITION AND INVOICE / SHIPPING DOCUMENT
PLEASE DO NOT RETURN YOUR COM PLETED FORM TO EITHER OF THESE ADDRESSES, RETURN COMPLETED FORM TO THE ADDRESS IN ITEM 2
1. FROM:
(Include ZIP Code)
SHEET NO. OF
NO.
SHEETS
Sundt Corporation
Tucson, Arizona
5. REQUISITION DATE
6. REQUISITION NUMBER
02/04/2002
COE-0020
8. PRIORITY
7. DATE MATERIAL REQUIRED
02/06/2002
2. TO:
(Include ZIP Code)
9. AUTHORITY OR PURPOSE
Tucson Resident Office
Davis-Monthan AFB, Arizona
Spare Parts/Supplies Required
10. SIGNATURE
11a. VOUCHER NUMBER AND DATE
12. DATE SHIPPED
b.
D-AD99000
3. SHIP TO-MARK FOR
Received by ____________________________
Date: ______________________
CESPL-CO-AD
02/06/2002
02/06/2002
14. BILL OF LADING NUMBER
13. MODE OF SHIPMENT
Pickup Truck
N/A
15. AIR MOVEMENT DESIGNATOR OR PORT REFERENCE NO.
OBJECT
CLASS
4. APPROPRIATION SYMBOL AND SUBHEAD
EXPENDITURE ACCOUNT
(From)
(T o)
CHARGEABLE
ACTIVITY
BUREAU CONTROL
ACTIVITY NO.
BUREAU
CONTROL NO.
AMOUNT
DECA DACA09-99-D-0020 0005
IT EM
NO.
UNIT
OF
ISSUE
QUANT IT Y
REQUEST ED
SUPPLY
ACT ION
T YPE
CONT AINER
CONT AINER
NOS.
UNIT PRICE
T OT AL COST
FEDERAL ST OCK NUMBER, DESCRIPT ION, AND CODING OF MAT ERIAL AND/OR SERVICES
(a)
(b)
(c )
(d)
(e)
(f )
(g)
(h)
(i)
TP-00001Acoustical wall covering that will be installed by User atSYa later date
customer
move-in
is completed.
300 (after
Complete
Box 001
$1,275.00
$382,500.00
TP-00002Spare laminate for wall signs and directories. Even numberEAfor all represented
100 Complete
colors
Box 002
and sizes.
16. T RANSPORT AT ION VIA MAT S OR MST S CHARGEABLE T O
18.
R
E
C
A
P
I
T
U
L
A
T
I
0
N
ISSUED BY
T OT AL
CONT AINERS
$475.00
17. SPECIAL HANDLING
T YPE
CONT AINER
DESCRIPT ION
O
F
S
H
I
P
M
E
N
T
$4.75
T OT AL
WEIGHT
T OT AL
CUBE
19.
R
E
C
E
I
P
T
CHECKED BY
CONT AINERS
RECEIVED
EXCEPT AS
NOT ED
DAT E (YYMMDD)
BY
SHEET T OT AL
QUANT IT IES
RECEIVED
EXCEPT AS
NOT ED
DAT E (YYMMDD)
BY
GRAND T OT AL
DAT E (YYMMDD)
BY
20. RECEIVER'S VOUCHER NO.
PACKED BY
POST ED
T OT AL
DD Form 1149, DEC 93
51 52 53 54 55 56 57 58 59 60 61 62 63 64 65 66 67 68 69 70 71 72 73 74 75 76 77 78 79 80 81 82 83 84 85 86 87 88 89 90 91 92 93 94 95 96 97 98 99 100
18 - 12
Resident Management System
Contractor Evaluations – DD Form 2626
It is USACE standard operating procedure that the Contracting Officer evaluate
contractor’s performance and prepare a performance report using the DD Form 2626,
Performance Evaluation – Construction Contracts, for each construction contract of:
$100,000 or more;
$25,000 or more, if any element of performance is either unsatisfactory or
outstanding;
$10,000 or more, if the contract is terminated for default.
RMS / CCASS Interface
The interface between RMS and CCASS is now available. Additional information can be
obtained from the ACASS/CCASS the following website:
http://www.cpars.csd.disa.mil/ccassmain.htm
The Construction evaluation will be prepared in RMS. When the evaluator has prepared
the evaluation to the point it is ready to be sent to the Assessing Official, it will be
marked completed and ready to be sent to CCASS in RMS. It has been suggested that
the evaluation be sent to the Contractor before it is sent to CCASS. This will give you the
opportunity to fine-tune the evaluation prior to formal submission.
18 - 13
Resident Management System
The evaluation will be exported from RMS to CCASS. When the evaluation from RMS is
imported into CCASS, the contract will automatically be registered. It is not necessary to
“pre-register contracts" in CCASS when using the RMS-CCASS interface.
It is recommended (but not necessary) that the CCASS Focal Point authorize access to
contracts prior to the evaluation being sent to CCASS from RMS. This will allow the
Assessing Official (Evaluator), once notified that the evaluation is copied to CCASS, to
login to CCASS and continue processing the evaluation to the Contractor
Representative. It is further recommended that the Focal Point give access to not only
the Assessing Official, but the Contractor Representative and Reviewing Official at the
same time.
The Focal Point is required to include email addresses when authorizing access to allow
CCASS to send the system email notifications as the evaluation is moved through the
workflow process. The Contract Data Entry Representative role is not required for
evaluations being exported from RMS. (The only roles required are Assessing Official,
Contractor Representative, and Reviewing Official.)
CCASS will provide RMS with updated status of the evaluation each time the evaluation
is updated in CCASS all the way through completion.
Once you have indicated you are complete with the evaluation in RMS
and indicate that is ready to be sent to CCASS, this green check will
appear and RMS will automatically send the evaluation to CCASS as
scheduled within the RMS program.
18 - 14
Resident Management System
Is your Contractor having trouble gaining access to CCASS?
Contractors are required to obtain a PKI certificate in order to access the system. In
addition to US contractors, contractors from only 4 other countries are able to obtain the
PKI certificate: Canada, New Zealand, Australia, UK. All others must use a work
around.
It works like this: Contractors from other countries need to use the login selection
labeled, "Contractor Logon (Pending PKI)". This selection is available to all contractors
from the date that the Focal Point initially enters them into the system through the
next 90 days. (This is one reason not to set up these contractors at time of contract
award, i.e. pre-registration.) However, since this pass through is only temporary (90
days), the Focal Point must send an email to the CCASS helpdesk requesting an
extension of the 90-day period for the foreign contractor, as many times as necessary
until the contractor has completed his commenting. The requests do not need to
overlap. Once a contractor is in the system, the next time this contractor has a contract,
a similar email can be sent to the helpdesk to initiate a new 90-day window.
Bottom line: There is no reason that any contractor cannot access CCASS to do their
part, regardless of their country of origin.
18 - 15
Resident Management System
The DD Form 2626 Report Form
You may access the report form directly from this screen by selecting the DD2626
button.
18 - 16
Resident Management System
Sample - DD Form 2626 Report Form - Page 1 of 2
FOR OFFICIAL USE ONLY (WHEN COMPLETED)
1. CONTRACT NUMBER
PERFORMANCE EVALUATION
(CONSTRUCTION)
W9127N05C0025
NA
2. DUNS NUMBER
97-989965
IMPORTANT: Be sure to complete Part III - Evaluation of Performance Elements on reverse.
PART I - GENERAL CONTRACT DATA
3. TYPE OF EVALUATION (X one)
4. TERMINATED FOR DEFAULT
INTERIM (List Percentage ________%) X
FINAL
AMENDED
5. CONTRACTOR(Name, Address, and ZIP code)
6.a. PROCUREMENT METHOD (X one)
Fabrication Products Inc.
4201 N.E. Minnehaha Street
Bonneville
OR 98867
NAICS Code: 012345
X
SEALED BID
NEGOTIATED
b. TYPE OF CONTRACT (X one)
X FIRM FIXED PRICE
COST REIMBURSEMENT
OTHER (Specify)
7. DESCRIPTION AND LOCATION OF WORK
Bonneville Second Powerhouse Fish Guidance (FGE) Program Gatewell and Vertical Barrier
Screen (VBS) Modifications
Bonneville Lock & Dam
8. TYPE AND PERCENT OF SUBCONTRACTING
14%
12%
5%
Concrete Saw Cutting
Services/Manpower
Electrical
9. FISCAL DATA
a.AMOUNT OF BASIC
CONTRACT
b.TOTAL AMOUNT OF
MODIFICATIONS
$4,531,947
10. SIGNIFICANT`` DATES
a.DATE OF AWARD
09/15/2005
c.LIQUIDATED
DAMAGES ASSESSED
$35,000
b.ORIGINAL CONTRACT
COMPLETION DATE
04/15/2006
d.NET AMOUNT PAID
CONTRACTOR
$0
c.REVISED CONTRACT
COMPLETION DATE
05/15/2006
$3,367,909
d.DATE WORK
ACCEPTED
04/28/2006
PART II - PERFORMANCE EVALUATION OF CONTRACTOR
11. OVERALL RATING (X appropriate block)
OUTSTANDING
X
ABOVE AVERAGE
SATISFACTORY
12. EVALUATED BY
a. ORGANIZATION ((Nam e and Address (Include Zip Code))
NWDC0-BO
c. NAME AND TITLE
UNSATISFACTORY (Explain
in item 20 on reverse)
MARGINAL
b. TELEPHONE NUMBER (Include Area Code)
505-456-7866
d. SIGNATURE
e. DATE
Brandt D. Bannister
Project Engineer
13. EVALUATION REVIEWED BY
a. ORGANIZATION ((Nam e and Address (Include Zip Code))
c. NAME AND TITLE
d. SIGNATURE
b. TELEPHONE NUMBER (Include Area Code)
e. DATE
14. AGENCY USE (Distribution, etc.)
DD FORM 2626, JUN 94
USAPPC V1.01
EXCEPTION TO SF 1420
APPROVED BY GSA-IRSM 6/94
18 - 17
Resident Management System
Sample - DD Form 2626 Report Form - Page 2 of 2
FOR OFFICIAL USE ONLY (WHEN COMPLETED)
CONTRACT NUMBER
PART III - EVALUATION OF PERFORMANCE ELEMENTS
N/A = NOT APPLICABLE
O = OUTSTANDING
N/A
15.QUALITY CONTROL
A = ABOVE AVERAGE
O
A
d. QUALITY OF QC
DOCUMENTATION
X
e. STORAGE OF MATERIALS
f. ADEQUACY OF MATERIALS
g. ADEQUACY OF SUBMITTALS
X
U 16.EFFECTIVENESS OF MANAGEMENT
X
X
O
c. RESOLUTION OF DELAYS
d. SUBMISSION OF REQUIRED
DOCUMENTATION
X
e. COMPLETION OF PUNCHLIST
ITEMS
X
f. SUBMISSION OF UPDATED AND
REVISED PROGRESS SCHEDULES
X
X
X
X
X
e. EFFECTIVENESS OF JOB-SITE
SUPERVISION
X
X
X
g. PROFESSIONAL CONDUCT
h. REVIEW/RESOLUTION OF
SUBCONTRACTOR'S ISSUES
X
X
X
b. PAYROLLS PROPERLY COMPLETED
AND SUBMITTED
DD FORM 2626, JUN 94
X
c. COMPLIANCE WITH LABOR LAWS
AND REGULATIONS WITH SPECIFIC
ATTENTION OF THE DAVIS-BACON
ACT AND EEO REQUIREMENTS
19.COMPLIANCE WITH SAFETY
STANDARDS
X
a. ADEQUACY OF SAFETY PLAN
b. IMPLEMENTATION OF SAFETY PLAN
c. CORRECTION OF NOTED DEFICIENCIES
X
X
X
20.REMARKS (Explanation of unsatisfactory evaluation is required. Other comments are optional. Provide facts concerning specific
events or actions to justify the evaluation. These data must be in sufficient detail to assist contracting officers in determining the
contractor's responsibility. Continue on separate sheet(s), if needed.)
EVALUATOR REMARKS:
Professionals.
S
d. ADEQUACY OF SITE CLEAN-UP
a. CORRECTION OF NOTED DEFICIENCIES
X
b. ADHERENCE TO APPROVED
SCHEDULE
A
X
18.COMPLIANCE WITH LABOR
STANDARDS
X
X
N/A
a. COOPERATION AND RESPONSIVENESS
b. MANAGEMENT OF RESOURCES /
PERSONNEL
i. IMPLEMENTATION OF
SUBCONTRACTING PLAN
17.TIMELY PERFORMANCE
a. ADEQUACY OF INITIAL PROGRESS
SCHEDULE
NA
U = UNSATISFACTORY
f. COMPLIANCE WITH LAWS AND
REGULATIONS
X
k. IDENTIFICATION / CORRECTION
OF DEFICIENT WORK IN A TIMELY
MANNER
M
W9127N05C0025
M = MARGINAL
c. COORDINATION AND CONTROL OF
SUBCONTRACTORS
X
X
X
h. ADEQUACY OF QC TESTING
i. ADEQUACY OF AS-BUILTS
j. USE OF SPECIFIED MATERIALS
g. WARRANTY RESPONSE
S
X
X
X
a. QUALITY OF WORKMANSHIP
b. ADEQUACY OF THE CQC PLAN
c. IMPLEMENTATION OF THE CQC
PLAN
S = SATISFACTORY
Very good and responsive Contractor. A pleasure to work with
M
U
18 - 18
Resident Management System
Warranty Inspections
The warranty provisions on each fixed-price construction contract are described in FAR
clause 52.276.21, “Warranty of Construction”. The provisions of this clause state that the
contractor must provide a warranty that the work required by the construction contract
conforms to the contract requirements and is free of any defect in equipment, material,
and workmanship for a period of 1 year after the date of final acceptance of the work or
1 year from the date the Government takes possession. Further guidance on
implementing instructions concerning the warranty provisions is found in ER 415-345-38,
“Transfer and Warranties”.
We are required to conduct Post-Completion Inspections during the period of Warranty
and report any deficiencies out to the Contractor for correction. These intervals of
inspection are referred to a 4, 9 and 12 Month Warranty Inspections.
You begin this process by selecting the Add button.
Give the Facility a Short Title and enter the date the Warranty Period commences.
Select the OK button. If you have more than one phase, you will need to choose which
phase to add the Facility to.
18 - 19
Resident Management System
You will then be
able to enter and
track deficiencies
identified during the
inspection. These
work very similar to
QA Punch List
Items.
You enter the
Warranty Items on
the Tab labelled Warranty Items.
Warrany dates are automatically calculated and tabulated when you enter the Start date
on the previous screens.
18 - 20
Resident Management System
4 Month, 9 Month, and 12 Month Warranty Inspection
Choose the Inspection you are going to conduct by highlighting and hitting the Edit
button.
Warranty Dates will recalculate whenever the START
DATE of the Warranty period changes.
18 - 21
Resident Management System
Add Attendees
participating in the
Inspection.
Add any Warranty
Items discovered
during the
inspection
18 - 22
Resident Management System
You are now
ready to export
the Warranty Item
to the Contractor.
Transfer Warranty Items to Contractor (QCS)
If you are using QCS on your contract, the Warranty Items will be sent electronically to
the Contractor for resolution.
18 - 23
Resident Management System
The Contractor should address the Warranty Items and return the results/findings
electronically to close out the action.
The Government (RMS) receives the Warranty Item response from the Contractor and
Evaluates the Contractor’s performance on completing the item. Following the Import
from QCS, you need to click on the Warranty Item Change and either approve or
disapprove the submission. That will “clear” it from the window and place it in the proper
location within RMS.
18 - 24
Resident Management System
Close the screen.
Rate the
performance of the
Contractor on this
item and you have
completed the
process.