1
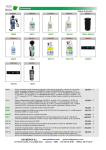
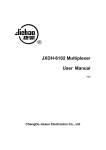
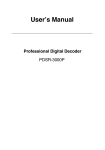
LCT
DCH-6000MX
Digital TS Re-multiplexer
User Manual
-1-
LCT
DCH-6000MX
Contents
Warnings and Notices ·························································································· 3
1 Overview ··········································································································· 4
1.1 General ·········································································································· 4
1.2 Features ········································································································· 4
1.3 Panels and Interface ······················································································ 4
1.3.1 Front Panel ······································································································ 4
1.3.2 Rear Panel ······································································································· 5
2 Specifications ···································································································· 5
3 Typical Application ····························································································· 6
4 Menu Structure and Operation ·········································································· 7
4.1 Menu Tree ······································································································ 7
4.2 Menu Operation······························································································ 8
4.2.1 Initialization ······································································································ 8
4.2.2 Inputs Setup Menu··························································································· 8
4.2.3 Outputs Setup Menu ························································································ 9
4.2.4 Mux Menu ······································································································ 10
4.2.5 System Menu ··································································································11
5 Installation and Initial use ················································································ 13
6 Accessories ····································································································· 15
-2-
LCT
DCH-6000MX
Warnings and Notices
z
Please follow the below instructions. Don’t connect power before you finish install ting
and checking according to safe procedure.
Avoid Moisture
Electrical Shock
Thoroughly
grounding
check
and
your
connectors
electrical
Do not use this equipment in high
prior
moisture environment
to
powering. Make sure all connectors are of
the three-prong type to ensure proper
No Heavy Stacking
grounding.
Whenever the equipment is not used for a
Do not stack the equipment back to back
prolong period of time, you should
to allow proper ventilation
disconnect the power cord.
No Touching with
Bare Hands
Power Disconnect
Do not touch the equipment during heavy
lightening condition.
Disconnect the power cord under the
following conditions
1.damage on cord and connector
Caution
2.equipment get wet or substantial
moisture enter the chassis
1.Do not place this equipment on
3. Exposure to rain or water
unstable support.
4. equipment dropped or damaged
2.Do not place objects on top of the
5.Apparent irregularity appears
equipment to block up the ventilation
opening.
3.Do not place radioactive instrument or
object on top of adjacent to the
Don’t Open The
Equipment
equipment.
4.Provide proper room ventilation during
operation of this equipment.
1. Do not try to repair by yourself.
5.Verify with the repair engineer or
2. Do not use unauthorized part for repair.
authorized entity after repair is done to be
3. Do not open the covers of the
sure the equipment can be put back to
equipment
operation.
without
proper
factory
authorization.
6.Read the operating manual prior to
usage.
-3-
LCT
DCH-6000MX
DCH-6000MX TS Re-multiplexer
1 Overview
1.1 General
DCH-6000MX is a compact and cost-effective DVB MPEG-2 TS re-multiplexer which can
multiplex up to 8 ASI transport streams and deliver with 2 ASI ports (1 for redundancy). The
combination of PID-packet-exchanging based technology; Ethernet remote control and 19" rack
mountable chassis make it an ideal device for a wide range of re-multiplexing applications
including cable and terrestrial regional head-ends.
1.2 Features
•
Fully compliant with DVB ETSI 300421 standard
•
Processing of up to 8 SPTS or MPTS
•
SI/PSI automatic regeneration
•
Service and PID packet filtering and re-multiplexing
•
Up to 160Mbps Mbps MPTS/ SPTS inputs
•
Output rate up to 100 Mbps
•
ASI input packet length 188/204 bytes Self-adapting. Output packet length 188/204
bytes optional.
•
8 ASI inputs, 2 ASI outputs (1 for redundancy)
•
Standard 19” rack 1U chassis installation
•
Network remote control and software upgrade
1.3 Panels and Interface
1.3.1 Front Panel
A1 A8
Indicators for ASI 1-ASI 8 Input Status, respectively
A9
2 × 24 character LCD Menu Display
A10-A13 Arrow buttons for menu navigating and parameters modifications
A14
Enter button for issuing a command or selecting an option
A15
Exit button for returning to previous menu
-4-
LCT
DCH-6000MX
1.3.2 Rear Panel
B1
ASI OUT 2
B2
ASI OUT 1
B3-B10
ASI IN 8- ASI IN 1
B11
RS-232 port for debug
B12
Ethernet port
B13
Grounding Terminal
B14
Power cord socket 90V~260ACV, 50Hz/60Hz
2 Specifications
ASI input
ASI Input Connector
BNC female 75 Ω
ASI Input bit rate
Up to 160Mbps
Data format
Byte, Burst (self-adapting)
Packet length
188/204 bytes (self-adapting)
ASI output
ASI Output Connector
2 ASI Output (1 for redundancy), BNC connector, 75Ω
ASI Output bit rate
≤100Mbps
Date transfer mode
Byte
Packet length
188/204 bytes (selectable)
Signal level
800mV±10%
Other
Net weight
3Kg
Size
44mm×240mm×430mm
Running temperature
0~40
Deposit temperature
-20~70
Humidity
85%
-5-
LCT
DCH-6000MX
3 Typical Application
Encrypted
satellite signal
DCH-3000P-30S
QPSK satellite digital
CI modulator
DCH-3000P-30S
QPSK satellite digital
CI modulator
TS1
TS2
DCH-6000MX TS
DCH-3000TM
CATV
Re-multiplexer
QAM modulator
Network
……
Simulate AV
DVB-ASI
Simulate AV
DCH-3000EC
DVB MPEG2 Encoder TS7
DCH-6000EC
DVB MPEG2 Encoder
LAN
TS8
Network control
-6-
LCT
DCH-6000MX
4 Menu Structure and Operation
4.1 Menu Tree
Inputs Setup
Inputs Setup Æ
……
Main Menu
ASI 1 016464/019860Kbps
Inputs Setup
ASI 8 037171/043302Kbps
Bit Rate
038000Kbps
Æ
Packet Size
188 Byte
Outputs Setup
Packet Size
Main Menu
Outputs Setup Æ
Outputs Setup
Transport Stream ID
Æ
Outputs Setup
Outputs Program
DCH-6000MX SN:12345678
IP:010.010.030.058
Main Menu
Mux
Æ
Unit Name
DCH-6000MX
IP Address
010.010.030.058
Network Mask
255.255.255.000
Gateway
010.010.030.001
Remote Server IP
010.010.030.023
MAC Address
00:20:aa:21:01:05
Main Menu
System
Æ
Factory Setting
ENTER=YES EXIT=NO
Serial Number
12345678
MCU Software Version
00.03.15
FPGA Software Version
Version : 12
Hardware Version
01.00
-7-
ASI 8
1/22
Service ID : fffe
Æ
Outputs Setup
Bit Rate
ASI 1
* 1/4
CCTV-4
Transport Stream ID
00008
ASI1 1/7 34267 Kbps
Æ
CCTV-1
LCT
DCH-6000MX
4.2 Menu Operation
4.2.1 Initialization
Connect the DCH-6000MX to an appropriated AC power source, turn on the power switch on
the rear panel, the unit will be booted up automatically, and the LCD displays as below
The power on boot up might take several tenths of seconds. The LCD displays as below
after initialization:
DCH-6000MX
IP:010.010.030.058
The unit name is displayed on the first row and IP on the second.
Press [ENTER] for entering the main menu then press
or
to navigate through the
menu:
Main Menu
Æ
Inputs Setup
The main menu includes four items
Inputs Setup Configuration of input parameters
Outputs Setup Configuration of output parameters
Mux mux options press [ENTER] to activate
System Configuration of system information
Press or to navigate upward and downward the menu, press ENTER to confirm the selection,
press EXIT to exit the menu.
4.2.2 Inputs Setup Menu
Enter Inputs Setup menu the LCD displays as below
Inputs Setup
ASI 1 016464/019860Kbps
Bit rate of each ASI input port is displayed on the second row, effective TS rate is shown on
the left and total TS rate on the right.
Press or to check bit rate among ASI input ports.
Press [ENTER] to check the available services of current ASI input port. An ‘$’ sign next to
the service name indicates the program is being encrypted. Please refer to the diagram below,
“1/4”,as an example, indicates the service just being shown is the first of all 4 available ones.
Press [ENTER] to confirm your selection and an ‘*’ sign indicates this service has just been
selected, and will be multiplexed once the multiplexing process is being activated. Press
[ENTER] again to de-select the service.
-8-
LCT
DCH-6000MX
ASI 1
CCTV-4
*
1/4
Press or to switch channels among ASI ports and press [EXIT] to back to the previous menu.
If the any service has been selected, when you back to the main menu, the below message will
be displayed on the LCD:
Confirm Changed ?
ENTER=YES EXIT=NO
Press [ENTER] to multiplex the selected services and press [EXIT] to discard.
If there is no valid ASI input found, if press ENTER and then it displays ‘No Program List’ as below,
then it returns to the previous menu automatically.
ASI 1
No Program List
4.2.3 Outputs Setup Menu
This menu has 4 items
Bit Rate ASI output bit rate configuration
Packet Size packet size setting of ASI output
Transport Stream ID ID setting of TS multiplexed
Outputs Program Channel information output
Press
or
to switch. Press [ENTER] to enter the submenu.
4.2.3.1 Bit Rate
Enter the Bit Rate menu and the LCD displays as below
Bit Rate
038000Kbps
Output bit rate is from 100kbps to 100000Kbps adjustable. Press or to move the cursor and
press ▲ or ▼ to change the numurical entry(ies). Press [ENTER] to confirm the numurical
entry(ies).
Notice: To ensure the sum of all selected services, including some Variable Bit Rate
ones, does not exceed the output bit rate actually set, it is recommended to set 1.1 times
higher than the static sum of bit rates of all services selected. If the effective output bit
rate exceeds the actual setting value, there will be a alarm on the root menu as below
DCH-6000MX
Outputs 42125Kbps Overflow
where 42125Kbps indicates the effective bit rate detected of the Outputs Stream.
4.2.3.2 Packet Size
-9-
LCT
DCH-6000MX
Packet Size: used for select output packet format as below
Packet Size
188 Byte
There are 2 kinds of ASI output packet format 188 Bytes and 204 Bytes. Use
or to switch.
Press [ENTER] to select.
Remark: The final effective output Bit rate will be reset, if the packet format is changed.
4.2.3.3 Transport Stream ID
The ID of TS stream is to distinguish from other streams in the same system . Press [ENTER] for
entering, as below
Transport Stream ID
00008
The valid range of ID of TS is 0 65535. Press
or
to move cursor, press
or
to change
the digit values and press [ENTER] to select. This example shows an ID number of 8 is set for the
final TS multiplexed.
4.2.3.4 Outputs Program
The menu is used for checking the information of the services multiplexed from each input, as
below
ASI 1
1/7
34267Kbps
CCTV-1
Port number of input ASI is displayed on the left of the first row. “1/7”, as an example, indicates this
is the first service from 7 ones on this ASI input, and effective bit rate on the right. Press
or
to
check all the services have been multiplexed. The second row is the service name have been
multiplexed.
If there is no service being multiplexed, it will display as below
Outputs Setup
No Program
4.2.4 Mux Menu
It is used to activate the multiplexing process. When complete the selecting ASI port input
programs services from different ASI inputs, and the output parameters settings, press [ENTER],
to activate the multiplexing process , the LCD on the front panel will display as below
Start to Mux
please wait…
It backs to the main menu, when the process is completed.
- 10 -
LCT
DCH-6000MX
4.2.5 System Menu
There are 11 items in the menu as below
Unit Name;
IP Address;
Network Mask;
Gateway;
Remote Server IP;
MAC Address;
Factory Setting;
Serial Number;
MCU Software Version;
FPGA Software Version;
Hardware Version;
Press
or
to switch among these 11 items, and press [EXIT] to back to the previous menu.
4.2.5.1 Unit Name
It is the nicked name of the unit, an example is shown below
Unit Name
DCH-6000MX
Press [ENTER] to enter, then press
or
to move the cursor and press
or
to
change the character values, press [ENTER] to confirm the value.
4.2.5.2 IP Address
This menu is used for the IP address setting for this DCH-6000MX, this should be an unique
address on a LAN network, an example is shown as below
IP Address
010.010.030.058
Press [ENTER] to activate, and then press
or
to move the cursor and press
or
to
change the digit values, then press [ENTER] to confirm.
4.2.5.3 Network Mask
This menu is used for the network mask setting for the LAN network connected, an example is
shown as below
Network Mask
255.255.255.000
Press [ENTER] to activate, and then press
or
to move the cursor and press
change the digit values, then press [ENTER] to confirm.
- 11 -
or
to
LCT
DCH-6000MX
4.2.5.4 Gateway
It is used for the gateway setting for the LAN network, an example is shown as below
Gateway
010.010.030.001
Press [ENTER] to activate, and then press
or
to move the cursor and press
or
to
change the digit values, then press [ENTER] to confirm.
4.2.5.5 Remote Server IP
It is used for the IP address setting of a computer for network management, this IP address must
be the same of the IP address of the computer connected to this DCH-6000MX for remote
management, an example is shown as below
Remote Server IP
010.010.030.023
Press [ENTER] to activate, and then press
or
to move the cursor and press
or
to
change the digit values, then press [ENTER] to confirm.
4.2.5.6 MAC Address
This menu is used for checking MAC address. MAC address is factory set and every MAC
address of all LCT products are unique worldwide. User is not allowed to change the value of
MAC address. This sub-menu will show its MAC, and an example is shown below
MAC Address
00:20:aa:21:01:05
4.2.5.7 Factory Setting
This menu is used for recovering factory default settings of this unit as below
Factory Setting
ENTER=YES EXIT=NO
Press [ENTER] to select factory setting and [EXIT] to return to the last-level menu.
Notice: When factory setting is selected, all user set parameters will be lost and will
be recovered to the factory default ones.
4.2.5.8 Serial Number
This menu is used for serial number checking of this machine, and an example is shown
below
Serial Number
12345678
- 12 -
LCT
DCH-6000MX
4.2.5.9 MCU Software Version
This menu is used for checking MCU version of this machine, as below
MCU Software Version
00.03.15
4.2.5.10 FPGA Software Version
This menu is used for checking FPGA version of this machine, as below
FPGA Software Version
Version : 12
4.2.5.11 Hardware Version
This menu is used for checking hardware version of this machine, as below
Hardware Version
01.00
5 Installation and Initial use
User and installer must read this user manual thoroughly and carefully before installation and
use.
z
Using screw bolts to fix the unit on a 19 inches cabinet.
z
Ground the unit on the grounding bolt on the rear panel with appropriated
grounding wire to the appropriated grounding terminal(s).
z
Connect all input and output connectors to their appropriated sources or
destinations.
z
Verify the AC electricity source available is within the acceptant range of that of the
equipment. Connect the unit to the AC source with power cord originally
dispatched, then turn on the power switch near the AC inlet on the rear panel.
Please unplug when the unit if not in use for a long period, e.g. 1 week.
- 13 -
LCT
DCH-6000MX
For your security, please take attention to the below
Do not use the equipment under strong electric field, strong magnetic field and heat
sources temperature range <40 relative humidity<85%
Notice: Avoid strong
magnetic and electric
Do not expose the equipment to excessive dust, high humidity nor high temperature
Do not expose the external surface to petrol, thinner or other volatile substances,
such as pesticides Use soft cloth to remove dust gently.
Notice: Corrosive
×
Users are not allowed to remove the top cover of the equipment. If there is any
malfunction, please check the connection of the connectors and the power cord on
the rear panel. If there is no any improvement, please ask for help from your supplier
or service agent.
Notice: Please don’t open
the chassis !
×
- 14 -
LCT
DCH-6000MX
Please connect to an appropriated AC power source which meets the requirement of
this unit.
Notice: ~220V
±10% 50Hz±10%
Both this unit and the CATV system connected should be well grounded to an appropriated
earth terminal(s).
Notice: well grounding
6 Accessories
The following items are dispatched originally with the equipment as the accessory parts:
a Power cord (might differs from countries),
a ASI cable,
an User manual,
a CD (includes the remote network management software and electronic file of the user
manual) ,
a Quality warrantee card .
- 15 -
LCT
2008