1
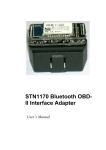
Vehicle Data Logger User Manual
A Sponsored Project by Dr. Yiannis Papelis
University of Central Florida
Kyle Fiducia, Joshua Mahaz,
Graham Smith
1
Table of Contents:
1. Device Overview …………………………………….3
2. Placement ……………………………………………3
3. Removable Media …………………………………...4
4. Enclosure ……………………………………………..5
5. User Interface ………………………………………..5
6. Data Output …………………………………………..7
2
1. Device Overview
Dr. Papelis’ purpose in sponsoring this project was to provide real world data for
his research. His research is motivated by the 45,000 automobile accident
deaths each year, of which 90% involve driver error. The device he requested us
to design logs extensive amounts of data for studying driver behavior and
developing metrics for driver performance. The device is able to log GPS data,
OBDII data, video, acceleration, and yaw rate. All polled data is then off loaded to
a secure digital (SD) card for the user to interpret. Below is an image of the
vehicle data logger (VDL) with the components that will be discussed in this
manual.
Enclosure
OBD Connector
Device
Motherboard
GPS Receiver
Camera Module
Figure 1.A: Component Overview
2. Placement
To increase the accuracy of the VDL, a low & level center of gravity is required.
This minimizes invalid accelerometer data caused by automobile suspension
play. The device must also be close to the OBD port, which is positioned a few
inches from the steering wheel on a majority of vehicles. Also, the GPS on the
device must be able to reach the roof of the vehicle and the camera housing
needs to be attached to the driver’s head rest. Taking this into consideration, the
floor behind the driver’s seat was chosen as the best location for running the
3
GPS, OBD connector, and camera module. Below is the recommended cable
routing guide:
Figure 2.A: Cable Routing Guide
3. Removable Media
The VDL uses a secure digital (SD) card to store data for the user. The size of
the SD card is up to the user but 2 GB is recommended to ensure at least fifty
hours of data recording before the card reaches maximum capacity. Refer to the
image below for the SD modules location.
Microcontroller
OBD port
SD module
GPS port
Camera port
4
4. Enclosure
There are a few important notes on the VDL enclosure. First, the power switch
for the enclosure keeps the device cool and prevents malfunctions. Make sure
this is switched on during device operation. Second, note the camera module
power switch. This is used to shut down the camera and stop picture logging to
triple the amount of time the device can log other sensor data. Third, note the
commonality of the camera module connector and OBD connector. Never plug
the OBD connector directly into the camera module! This will result in permanent
damage to the CMOS camera within the module. See the following two figures
for the locations of the discussed items.
Camera Power Switch
Fan Power Switch
Cable Routing
Hole
Camera LED
System LED
Figure 4.A: Enclosures
5. User Interface
For our user interface seven light emitting diodes (LED) are used. One LED
corresponds to each device. The GPS, yaw rate gyro, accelerometer, ELM327,
uALFAT, and camera LED’s will go solid if a hardware failure is encountered or
flash rapidly during proper device usage. The last LED is mounted with the
camera in a separate housing and acts as an overall system indicator. This was
added so the driver can check the status of the device while driving. All of the
other LED’s will be hidden from view while the device is behind the driver’s seat
during operation. The system LED will flash during system boot to indicate the
completion of each devices test. If any device fails test, the LED goes solid to
indicate a non critical error; if the SD module fails it will repeatedly flash till the
SD card is inserted or enough room is made on the SD card. If no error is
encountered the indicator will turn off post boot up. If during polling the SD card
becomes full the system indicator will begin to blink repeatedly.
5
The device signals system status through its seven light emitting diodes (LED).
Five reside on the motherboard and are dedicated to the GPS, yaw rate gyro,
accelerometer, ELM327, uALFAT, and system with the last two located on the
camera module and are dedicated to the camera and system.
Upon device power up the system will enter its boot sequence marked by the
system LED blinking four times. Next the connection with the ELM327 and
vehicles on-board diagnostic (OBD) system is checked. The LED will flash during
its boot up. After completion of the ELM327 and OBD the corresponding LED will
shut off and the system LED will flash twice to mark the end of the device check.
The boot sequence continues in this manner checking the yaw rate gyro,
accelerometer, GPS, and camera. Last the VDL tests the uALFAT, if no secure
digital (SD) card is detected the system and uALFAT LED will flash repeatedly
until a SD card is inserted. With all devices checked and LEDs off, each LED
flashes one after the other to allow the user to ensure all LEDs are operational.
Then the boot report is provided via illuminating solid the LED of any device that
failed testing.
Common Causes of Boot Errors
GPS:
A. Unplug and reconnect GPS module
B. Ensure GPS module has a clear unobstructed view of the sky
Camera Module:
A. Unplug and reconnect camera module
B. Ensure camera module power switch is set to on (1)
ELM327 & OBD
A. Unplug and reconnect OBD cable
B. Ensure vehicle is on
uALFAT:
A. Insert SD card
Post boot sequence the VDL will enter its normal polling mode gathering data
from all of its sensors and store that data to the SD card. The VDL will proceed in
this manner until either its power cable is unplugged from the OBD or the vehicle
is shut off. Since all of the devices are powered d by the vehicle’s battery through
the OBD connection, unplugging it will shut down the VDL. To prevent excessive
power drain the VDL will detect the vehicle has been shut off from the RPM drop
and in turn will put the device into standby. This is indicated to the user by all but
LEDs shutting off except the accelerometer. The VDL will remain in standby, only
monitoring the accelerometer, until a jump in acceleration is detected. If detected,
the system will reset itself and begin from the boot sequence and begin the cycle
anew.
6
6. Data Output
Data polled from the different sensors is constantly off loaded to a file which is
created on the SD card upon VDL boot-up. One file is created strictly for sensor
data and the other for picture data. The end user can differentiate between the
two by the file name’s prefix: DL for data log and PL for picture log.
Following this prefix are three sets of numbers. The first set is the day of the
month, the second set is the hour of the day, and the last set is minutes. Both
files will have the same six digit number. Below is a sample of a data log taken
during testing.
Figure 6.A: Proper Data Log File
In an instance where the date and time cannot be retrieved from the GPS due to
no connection or lack of a GPS lock, a random four digit number will be created
from the four most significant digits of the microcontroller’s timer. This number
will be prefaced with either DLOG (data log) or PLOG (picture log). Below is an
example of such a file.
Figure 6.B: Data Log File without GPS
It should also be noted without GPS data the UTC Time column of the data log
will be filled with a second timer.
7
The picture log file is formatted with a time stamp followed by a variable amount
of hex digits representing the jpeg image taken by the camera module. As you
can see below the format of the picture log is not meant to be reader friendly, but
easy for a web based application to crunch the data quickly and easily into jpegs.
Figure 6.C: Picture Log File
To convert the picture log file into a set of time stamped jpeg images quickly
reviewable use the following web application:
http://kfiducia.com/SDP07/index.php
Simply use the browse button and select the location of the file requiring
processing and click submit query. The user will be notified when the file is
successfully uploaded and a new link with the files name will be added to the list,
selecting process images next to your file will convert the text file into multiple
jpegs for the user. The figures below show the end result of the web application.
Figure 6.D: Web Application Process
8