1
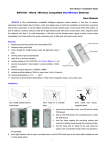
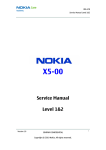
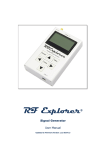
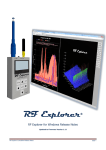
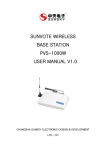
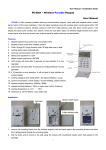
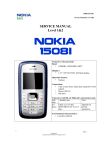
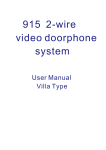
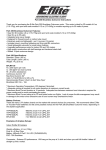
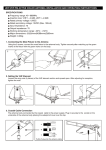
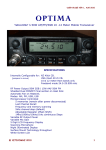
RF Explorer – User Manual – v1.05 - Page 1 of 13
RF Explorer
User Manual
Updated to firmware v1.05
Edition date: 2011/Mar/01
www.rf-explorer.com
Please consider the environment before printing this manual.
RF Explorer – User Manual – v1.05 - Page 2 of 13
Table of Contents
Introduction .................................................................................................................................................. 3
Features ........................................................................................................................................................ 4
Spectrum Analyzer mode - Main Screen......................................................................................................... 5
Using menus .................................................................................................................................................. 6
Frequency Menu............................................................................................................................................ 7
Attenuator Menu ........................................................................................................................................... 9
Configuration Menu..................................................................................................................................... 10
RF Generator mode ..................................................................................................................................... 11
Specifications .............................................................................................................................................. 12
Acknowledgments ....................................................................................................................................... 13
Regulatory Warning ..................................................................................................................................... 13
License ........................................................................................................................................................ 13
RF Explorer – User Manual – v1.05 - Page 3 of 13
Introduction
RF Explorer has been designed to be intuitive and easy to use. There is no need to learn large user manuals
to get advantage of its advanced functionality.
Most of the complexity inherent to full sized Spectrum Analyzers is simplified by the firmware. For instance,
you do not need to adjust Resolution Bandwidth (RBW) everytime you select a different frequency span.
Actually, you do not even need to know what RBW is.
We welcome your feedback and look for ideas to make this manual more useful. Let us be in contact through
official discussion list http://groups.google.com/group/rf-explorer.
RF Explorer – User Manual – v1.05 - Page 4 of 13
Features
Pocket size and light weight
Solid aluminum metal case
Spectrum Analyzer mode with Peak Max, Normal and Averaging modes
Support one of three popular ISM bands of choice: 433Mhz, 868Mhz or 915Mhz.
Integrated RF Signal Generator for the ISM band of choice
Lifetime free firmware upgrades available
Open to new features requested by user community
High capacity Lipo for 16hs+ of continuous run, rechargeable by USB
Windows PC client Open Source
Internal expansion port for future modules, will support additional bands including popular 2.4 Ghz
RF Explorer – User Manual – v1.05 - Page 5 of 13
Spectrum Analyzer mode - Main Screen
When RF Explorer starts, it goes automatically to Spectrum Analyzer mode.
As you can see on the screen, there is an X and Y axis, being X for frequency in MHZ and Y for power in dBm.
In this case, the frequency span goes from 430.5 MHz to 439.5 MHz, and the amplitude (dynamic range)
goes from -50 dBm to -110 dBm.
Configuration settings such as amplitude reference and frequency span are preserved between sessions.
The main screen automatically displays a small marker with a triangle shape. This will indicate the peak
amplitude in the current frequency span, being the first line the frequency and the second line the amplitude
at that particular point.
The screen also includes an icon for USB connection (when connected to a PC as in this case) or a battery
icon (when the battery power switch is in ON position). If you connect the RF Explorer to USB and the power
switch is in ON at the same time, you are charging the internal battery, and in that case the USB and battery
icon will blink to indicate that.
There are three basic RF Explorer models available, one for each popular ISM frequency band as follows:
·
·
·
433M : 430-440Mhz or
868M : 860-870Mhz or
915M : 910-920Mhz
Each one of these models can only operate on the respective band. In this manual, we will concentrate all
examples and pictures on 433M only, but 868M and 915M operate exactly the same, except they work in a
different band. We are working on internal expansion modules for your RF Explorer in case you want to work
on multiple bands with the same unit, so you can leverage additional power to your RF Explorer for a very
reasonable cost increase, whenever you need it.
RF Explorer – User Manual – v1.05 - Page 6 of 13
Using menus
There are several menus in RF Explorer. They are organized on different screens, which you can iterate
through by using the [Menu] key. If you click [Menu] button multiple times, you will visit every one of them:
You can exit from any menu anytime by using the [Return] key.
Note the last one is not actually a menu but a display of the current firmware version installed. You can see
this same version screen when RF Explorer starts.
RF Explorer – User Manual – v1.05 - Page 7 of 13
Frequency Menu
The first and probably most used menu is the one you can use to change frequency settings.
The first time you open a Menu in a RF Explorer session, it will go to the Frequency Menu. This may change
as we will see later, so everytime you click on [Menu] from Spectrum Analyzer main screen, you actually reopen the last menu you were working with. In this way you save time by not having to navigate through all
the menus to go the same place where you were before.
While you are at Frequency Menu, you can change the selected frequency band to display in two different
but complementary ways:
·
·
Center+Span: This is the traditional Spectrum Analyzer format all engineers are used to. You basically
select the Center frequency at which the band will be displayed, and then a Frequency Span. Note
this is limited to the range 430-439.995 Mhz (or equivalent in other models) and 0.1 - 9.995Mhz for
the span.
Low+High: This is unusual (despite its convenience) in most commercial Spectrum Analyzers. It is just
another way to select the same parameters, which in the end is what will be displayed on the
Spectrum Analyzer main screen.
As you edit Center+Span or Low+High, the other values are updated accordingly, so feel free to use the
method you prefer. In general, you will use Center+Span more frequently when you know the frequency you
want to look at, and probably Low+High when you just want to look at a larger span to see what is
happening in a specific range.
To navigate through the menu, just use [Up] and [Down] keys to go to the option you want, then click on
[Enter] to edit that option, [Left] or [Right] to go to the digit you want to change, and [Enter] to confirm or
[Return] to cancel. Let’s change the Span to 6.5Mhz, see how Low+High Frequency values are updated
automatically:
And now click on [Return] to close the menu and go back to Spectrum Analyzer main screen.
RF Explorer – User Manual – v1.05 - Page 8 of 13
The new frequency range is in place.
Let’s now repeat the process to change the span to 2.5Mhz. Therefore click on [Menu] again, note as the
previous menu option (Freq Span) remains selected, and then update it to 2.5Mhz, then click on [Return] to
go back to main screen.
The new frequency range is in place, but what is interesting now is how you can actually move the center
frequency right or left from the very same Spectrum Analyzer main screen, with no need to go to Menu
again and again.
To do that, just click on [Right] or [Left] while Spectrum Analyzer main screen is active, and you will move the
Center Frequency to the right or left accordingly, by half of the span everytime. So in this case where the
span is 2.5Mhz, you will effectively move the Center Frequency to 1.25Mhz right or left with a simple key
press. Note you are limited by frequency limits of your RF Explorer model so in this case you cannot go lower
than 430 nor higher than 439.995 Mhz. This direct method is very convenient when the selected span is
narrow.
RF Explorer – User Manual – v1.05 - Page 9 of 13
Attenuator Menu
The amplitude reference settings in the Y axis is what you can change using this menu. To get there, use the
familiar [Menu] key, which will iterate through all RF Explorer menus till you get to the one you want.
This menu has a few interesting options:
·
·
·
Calculator offers three modes to display data, to change mode click on [Enter] key:
o Max: Peak values are used from the last sweep Iterations (see menu option at the bottom).
In this case, the Peak values from last 4 sweep iterations. This is the standard mode you will
want to use to detect rapidly changing DSS signals or find for worst case channel occupancy.
o Average: Arithmetic media average is calculated over the last sweep Iterations. You will
likely use this mode to average noise floor out, particularly useful in constant wave (CW)
signals display.
o Normal: No calculation is done, just raw data as result of the sweep.
Top / Bottom dBm: Use these options to change the lower and higher display margins for the
amplitude reference. These are limited from -1 to -110 dynamic range boundaries.
Iterations: The number of sweep data iterations to perform calculations on. It goes from 2 to 32.
For a simple test, do a change on Top dBm reference and define it as -70 dBm. Then click on [Return] to go
back to Spectrum Analyzer main screen. As you can see, the reference is now lower and signal goes higher in
the display, particularly the noise floor.
As this is something you will like to change very frequently, the RF Explorer Spectrum Analyzer main screen
offers two keyboard shortcuts: [Up] and [Down] arrow keys can be used to increase or decrease Top dBm
respectively by 5dBm each time. This shortcut, together with [Left] and [Right] for moving Center Frequency
as described before, are very convenient to make configuration changes real-time with no need to visit the
Menu.
RF Explorer – User Manual – v1.05 - Page 10 of 13
Configuration Menu
Same as you did with other menus, just click on [Menu] as many times as needed to rotate between the
different menus available, till you get to the Config menu.
There are a few configuration settings available in the RF Explorer to customize your unit based on your
preference or usage conditions:
·
·
·
·
Operational Mode: Currently available are two modes, but more are coming with new Firmware
upgrades:
o Normal SA: This is the standard Spectrum Analyzer mode the RF Explorer always selects by
default when you restart the unit.
o RF Gen: RF Signal Generator, for more info please refer to specific section later in this
document.
Backlight: Several levels of display backlight. RF Explorer has good visibility indoor and outdoor,
including direct sunlight. The level of backlight should be the appropriate for each condition, and you
may want to limit backlight brightness to preserve battery capacity.
Contrast: There are 10 different display contrast levels to choose from.
USB Bauds: Default is 500Kbps, which is also the recommended setting. In the rare case you
experience a problem when connecting with the PC, you may want to change this to 2400bps slower
speed. However, this is not recommended as the connection will go really slow, so do this only if
there is a good reason to. The port speed in the RF Explorer and PC Client settings must match to
properly establish a connection.
RF Explorer – User Manual – v1.05 - Page 11 of 13
RF Generator mode
RF Explorer can generate a RF tone for easy testing other RF devices. You can activate RF Generator from the
Config menu, and return to Spectrum Analyzer mode anytime by using [Menu] button and changing mode
back to Normal SA.
There are two basic configuration steps you need to know: Output frequency and Output power. Select the
specific frequency you want to transmit and then click on Transmitter to switch it ON.
Please note an important detail: You must have connected a proper 50 ohm antenna before you switch
your transmitter on. If you switch the transmitter on without a proper antenna, you may damage the RF
module of your RF Explorer, as the power amplifier will not have a load to feed. Think of the equivalent to an
audio amplifier with no speakers running at full power, you are likely damaging the power transistors.
If you are an RF expert you know you can really connect any 50 ohm load, not only an antenna. Therefore
you can use also a RF 50 ohm dummy load, a coaxial with a proper termination, etc. If you use a load
different than 50 ohm, the reflected wave may also damage the power amplifier, so be sure to use a proper
load (including a proper antenna).
There are three power levels, corresponding to 0 dBm (Low), 9 dBm (Med) and 20 dBm (High). Except you
need full power for a range test, we suggest always use the lowest power level to minimize battery
consumption and EMI radiation. Note local regulations must be respected, so double check you are not
transmitting a tone with power or frequency that may interfere with other equipment.
The RF Generator is limited to the same frequency band than the Spectrum Analyzer; therefore you can
transmit any frequency of choice in the specific band of your model.
RF Explorer – User Manual – v1.05 - Page 12 of 13
Specifications
·
Currently available in three models, based on frequency range:
o
430-440Mhz
o
860-890Mhz
o
910-920Mhz
·
High contrast graphics LCD 128x64 pixels, great visibility outdoors even on sunlight
·
PC Windows client supports WindowsXP\Vista\Win7 both 32 and 64bits
·
Backlight for great indoor visibility
·
Internal 860mAh high capacity LiPo battery, rechargeable by a powered USB
·
Amplitude resolution: 0.5dBm
·
Dynamic range: -110dBm to 0dBm
·
Absolute Max input power: +5dBm
·
Average noise level (typical): -105dBm
·
RF Generator amplitude: 0dBm to 20dBm
·
Standard 50 ohm SMA connector
·
Matching 50 ohm calibrated antenna included
·
Frequency stability and accuracy (typical): +-10ppm
·
Amplitude stability and accuracy (typical): +-3dBm
·
Frequency resolution: 1Khz
·
Resolution bandwidth (RBW): automatic 2.6Khz to 80Khz
·
Weight: 185g
·
Size: 113x70x25 mm
RF Explorer – User Manual – v1.05 - Page 13 of 13
Acknowledgments
RF Explorer couldn’t be a reality without the seriousness and high levels of professionalism of Eric Pan and
team in Seeed Studio Technology. I really want to thank him for his dedication, as well as Kevin and Icing for
the many hours resolving implementation issues to produce this unit with high quality components at a very
affordable price.
We all hope you find it useful, and make Radio Frequency more accessible to the non-experts everywhere.
We are committed to create tutorials, projects and kits to help you tinkering and experimenting in the RF
space.
If you think you can contribute on RF tutorials and examples, let us know at
http://groups.google.com/group/rf-explorer
Regulatory Warning
This equipment is intended for use in a laboratory test environment only.
It generates, uses, and can radiate radio frequency energy and has not been tested for compliance with the
limits of computing devices pursuant to subpart J of part 15 of FCC rules, which are designed to provide
reasonable protection against radio frequency interference.
Operation of this equipment in other environments may cause interference with radio communications, in
which case, the user is required to take whatever measures may be required to correct this interference his
own expense.
License
RF Explorer embedded firmware is copyrighted © by Ariel Rocholl, 2010-2011.
RF Explorer PC Client is Open Source under GPL v3, so you are free to modify, distribute and use it based on
GPL terms.