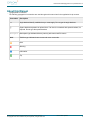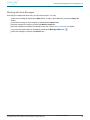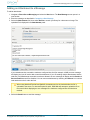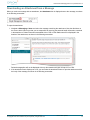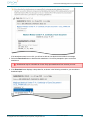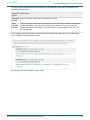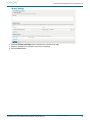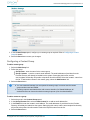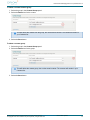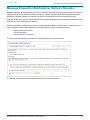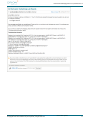
1
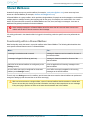
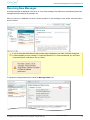
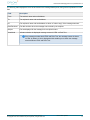
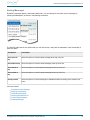
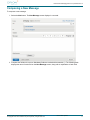
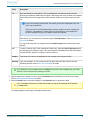
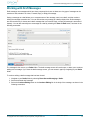
Direct Secure Messaging Web
2.5.2
User Manual v1.0
May 12, 2014
Orion Health Limited
PO Box 8273
Symonds Street
Auckland, New Zealand
Ph +64-9-638 0600
Fax +64-9-638 0699
[email protected]
www.orionhealth.com
Direct Secure Messaging Web 2.5.2 | User Manual v1.0
Legal Notice
©2014 Orion Health Group of Companies. All rights reserved. Trademarks displayed in this document are the
property of Orchestral Developments Limited or their respective owners, and may not be used without written
permission of the owner.
Oracle® is a registered trademark of Oracle Corporation and/or its affiliates. Windows®, SQL Server and IIS are
registered trademarks of Microsoft Corporation and/or its affiliates. UNIX® is a registered trademark of The Open
Group and/or its affiliates. Adobe® Acrobat® and Adobe® Reader® are registered trademarks of Adobe Systems
Incorporated and/or its affiliates. Linux® is a registered trademark of Linus Torvalds and/or his affiliates. IBM® is a
registered trademark of International Business Machines Corporation and/or its affiliates. Mozilla® and Mozilla®
Firefox® are registered trademarks of the Mozilla Foundation. Mac OS® is a registered trademark of Apple
Computer, Inc. iOS, iPhone, iPod touch, iTunes, and iCloud are registered trademarks of Apple Inc. App Store is a
service mark of Apple Inc. Android™, Google Play™ and Chrome™ are trademarks of Google Inc.
Orion Health™ (Orion Health) documentation is an independent publication and has not been authorized,
sponsored, or otherwise approved by Apple Inc or Google Inc.
This document is provided subject to the terms of the license and support agreement relating to the software
application. Orchestral Developments Limited has made reasonable efforts to ensure that all information contained
in this document is accurate, but no liability is accepted by Orchestral Developments Limited, its agents or suppliers
for use of the documentation by the end user or any other party.
Orion Health applications employ third party software components, each of which is subject to its own license terms.
These licenses are included with the installed product.
Questions or concerns relating to this documentation should be addressed to the supplier from whom the product
was obtained.
Disclaimer
All patient identifiers, contact details and medical conditions represented in the screenshots and
presentations shown in this manual are fictitious to the best knowledge of Orion Health™ (Orion
Health), and do not relate to a real person or persons.
The screenshots and presentations shown are intended as examples only, and may differ from the
actual screenshots and presentations generated by the released product in commercial production.
Printed copies of this document may be out of date. Please refer to https://doki.orionhealth.com for the latest updates.
© Copyright 2014 Orion Health Group of Companies | All rights reserved
2
Direct Secure Messaging Web 2.5.2 | User Manual v1.0
Contents
Orion Health Direct Secure Messaging Web 2.5 . . . . . . . . . . . . . . . . . . . . . . . . . . . . . . . . . . . . . . . . . . . . . 4
User Manual . . . . . . . . . . . . . . . . . . . . . . . . . . . . . . . . . . . . . . . . . . . . . . . . . . . . . . . . . . . . . . . . . . . . . . . . 5
Navigating Direct Secure Messaging Web
.............................................. 7
User Interface Conventions . . . . . . . . . . . . . . . . . . . . . . . . . . . . . . . . . . . . . . . . . . . . . . . . . . . . . . . . . . 9
Flagging Messages for Follow-up
. . . . . . . . . . . . . . . . . . . . . . . . . . . . . . . . . . . . . . . . . . . . . . . . . . 10
Shared Mailboxes . . . . . . . . . . . . . . . . . . . . . . . . . . . . . . . . . . . . . . . . . . . . . . . . . . . . . . . . . . . . . . . . . 11
Working with Messages . . . . . . . . . . . . . . . . . . . . . . . . . . . . . . . . . . . . . . . . . . . . . . . . . . . . . . . . . . . . . 12
Receiving New Messages . . . . . . . . . . . . . . . . . . . . . . . . . . . . . . . . . . . . . . . . . . . . . . . . . . . . . . . . 13
Composing a New Message
. . . . . . . . . . . . . . . . . . . . . . . . . . . . . . . . . . . . . . . . . . . . . . . . . . . . . . 17
Forwarding a Message . . . . . . . . . . . . . . . . . . . . . . . . . . . . . . . . . . . . . . . . . . . . . . . . . . . . . . . . . . . 23
Replying to a Message . . . . . . . . . . . . . . . . . . . . . . . . . . . . . . . . . . . . . . . . . . . . . . . . . . . . . . . . . . . 24
Sent Messages
. . . . . . . . . . . . . . . . . . . . . . . . . . . . . . . . . . . . . . . . . . . . . . . . . . . . . . . . . . . . . . . . 26
Working with Draft Messages
. . . . . . . . . . . . . . . . . . . . . . . . . . . . . . . . . . . . . . . . . . . . . . . . . . . . . 29
Working with Attachments . . . . . . . . . . . . . . . . . . . . . . . . . . . . . . . . . . . . . . . . . . . . . . . . . . . . . . . . 32
Deleting Messages . . . . . . . . . . . . . . . . . . . . . . . . . . . . . . . . . . . . . . . . . . . . . . . . . . . . . . . . . . . . . . 38
Searching for a Message . . . . . . . . . . . . . . . . . . . . . . . . . . . . . . . . . . . . . . . . . . . . . . . . . . . . . . . . . 40
Managing Folders . . . . . . . . . . . . . . . . . . . . . . . . . . . . . . . . . . . . . . . . . . . . . . . . . . . . . . . . . . . . . . . . . 41
Creating a folder . . . . . . . . . . . . . . . . . . . . . . . . . . . . . . . . . . . . . . . . . . . . . . . . . . . . . . . . . . . . . . . . 42
Deleting a Folder . . . . . . . . . . . . . . . . . . . . . . . . . . . . . . . . . . . . . . . . . . . . . . . . . . . . . . . . . . . . . . . 43
Renaming a Folder . . . . . . . . . . . . . . . . . . . . . . . . . . . . . . . . . . . . . . . . . . . . . . . . . . . . . . . . . . . . . . 44
Moving a Folder . . . . . . . . . . . . . . . . . . . . . . . . . . . . . . . . . . . . . . . . . . . . . . . . . . . . . . . . . . . . . . . . 45
Moving Messages Between Folders
. . . . . . . . . . . . . . . . . . . . . . . . . . . . . . . . . . . . . . . . . . . . . . . . 46
Managing your Mailbox . . . . . . . . . . . . . . . . . . . . . . . . . . . . . . . . . . . . . . . . . . . . . . . . . . . . . . . . . . . . . 47
Configuring Out of Office Auto-Reply . . . . . . . . . . . . . . . . . . . . . . . . . . . . . . . . . . . . . . . . . . . . . . . . 48
Maintaining Message Rules . . . . . . . . . . . . . . . . . . . . . . . . . . . . . . . . . . . . . . . . . . . . . . . . . . . . . . . 50
Maintaining Contact Groups . . . . . . . . . . . . . . . . . . . . . . . . . . . . . . . . . . . . . . . . . . . . . . . . . . . . . . . 53
Message Disposition Notifications (Delivery Receipts) . . . . . . . . . . . . . . . . . . . . . . . . . . . . . . . . . . . . . 56
Protected Health Information . . . . . . . . . . . . . . . . . . . . . . . . . . . . . . . . . . . . . . . . . . . . . . . . . . . . . . . . . 58
Printed copies of this document may be out of date. Please refer to https://doki.orionhealth.com for the latest updates.
© Copyright 2014 Orion Health Group of Companies | All rights reserved
3
Direct Secure Messaging Web 2.5.2 | User Manual v1.0
Orion Health Direct Secure Messaging Web 2.5
Orion Health™ Direct Secure Messaging Web (DSM Web) utilizes national standards to communicate health
information between healthcare organizations, providers, and patients. DSM Web is an easy-to-use, secure
communication method that replaces mail and fax transmissions between known parties, such as providers,
laboratories, and public health departments. DSM Web benefits both patients and providers by improving the
transport of health information, making it faster, easier, more secure, and less expensive.
DSM Web is a web-based secure mail solution within Orion Health™ Clinical Portal (Clinical Portal). It secures
communications between providers participating in the HIE, as well as providers connected through any Healthcare
Information Service Provider (HISP) who share a trust relationship with the HIE.
About the Product
Installation
Security Essentials
System Requirements
Install Webmail
Post-Installation Configuration
Configuration
Solution Overview
Configuring Direct Secure Messaging Web
Frequent Tasks
Receiving New Messages
Replying to a Message
Composing a New Message
Working with Attachments
Deleting Messages
What's New
About this Release
Printed copies of this document may be out of date. Please refer to https://doki.orionhealth.com for the latest updates.
© Copyright 2014 Orion Health Group of Companies | All rights reserved
4
Direct Secure Messaging Web 2.5.2 | User Manual v1.0
User Manual
Revision Summary
Software
Release
Document
Version
Date
Release/Nature of Amendment
2.5
1.0
1/16/2014 January 2014 release.
2.5.1
1.0
3/17/2014 Direct Secure Messaging Web 2.5.1 Service Pack release, no
changes to this document.
2.5.1
1.1
3/28/2014 Updated with additional details about forwarding and replying to
messages.
2.5.2
1.0
5/12/2014 Direct Secure Messaging Web 2.5.2 Service Pack release, no
changes to this document.
Refer to Printable Documents to download printable versions of the documentation.
Key Features
DSM Web enables the secure sending and receiving of emails between associates within an Orion Health, Inc.
Direct Messaging System.
The ability to easily send encrypted messages between Orion Health HISP subscribers and non-Orion Health
subscribers (trusted HISPs – for example, HealthVault).
Direct Message Portal (webmail).
Standard webmail capabilities – including secure sending/receipt of messages and attachments, and viewing
CDA attachments in the browser.
Focus on Web Content Accessibility Guidelines (WCAG) 2.0 recommendations for making Web content more
accessible.
Messages can only be sent to, and received by, associates who have access to the Direct Messaging application
within your Orion Health HIE system.
Quick Guide
Learn more about...
Navigating Direct Secure Messaging Web
Replying to a Message
Composing a New Message
Working with Attachments
Deleting Messages
Printed copies of this document may be out of date. Please refer to https://doki.orionhealth.com for the latest updates.
© Copyright 2014 Orion Health Group of Companies | All rights reserved
5
Direct Secure Messaging Web 2.5.2 | User Manual v1.0
About this Manual
Typographical Conventions
The following typographical conventions are used throughout this manual and in the application's help screens.
Convention
Description
<>
Angle brackets identify variables that you must supply. Do not type the angle brackets.
[]
Square brackets represent an optional item. If an item is not marked with square brackets, it is
required. Do not type the square brackets.
monospace
Monospace type indicates directory names, path names and file names.
bold
Boldface type indicates button names and menu commands.
Note.
Warning.
Information.
Tip.
Printed copies of this document may be out of date. Please refer to https://doki.orionhealth.com for the latest updates.
© Copyright 2014 Orion Health Group of Companies | All rights reserved
6
Direct Secure Messaging Web 2.5.2 | User Manual v1.0
Navigating Direct Secure Messaging Web
Once you have logged into DSM Web, you may:
Access incoming secure messages. Refer to Receiving New Messages for details.
Use the Global Menu to access your home page and the help documentation. Refer to Navigating Using the
Global Menu for details.
Navigate DSM Web using your keyboard. Refer to Navigating DSM Web Using a Keyboard for details.
Navigating Using the Global Menu
The Global Menu is always accessible from any screen in DSM Web:
The following table describes each field on the Global Menu along with an explanation of the functionality provided:
Global
Menu
Item
Functionality
Last
Logged In
Displays the date and time that you last logged in to Clinical Portal. This is a brief notification that
only displays for a few seconds every time you log in.
Home
Displays your home page. This can be a default home page configured by your administrator or a
home page you have selected from the My Preferences screen.
Help
Displays the online help screen that relates to the page you are viewing.
Logout
Select the Logout button to log out of DSM Web. This closes all windows and tabs.
Navigating DSM Web Using a Keyboard
DSM Web can be accessed using your keyboard.
DSM Web has been designed to work with screen readers, such as JAWS. All images within the user-facing
documentation contain alt text.
To navigate between page elements, use the Tab key to move forwards, and Shift + Tab to move backwards.
Printed copies of this document may be out of date. Please refer to https://doki.orionhealth.com for the latest updates.
© Copyright 2014 Orion Health Group of Companies | All rights reserved
7
Direct Secure Messaging Web 2.5.2 | User Manual v1.0
Navigating Between Folders
Folders enable you to manage your mailbox and organize messages so you can find them easily. When you first log
in to DSM Web, the Inbox is shown by default. To view messages in other folders, select the folder in the list of
folders.
Refer to Managing Folders for details.
Printed copies of this document may be out of date. Please refer to https://doki.orionhealth.com for the latest updates.
© Copyright 2014 Orion Health Group of Companies | All rights reserved
8
Direct Secure Messaging Web 2.5.2 | User Manual v1.0
User Interface Conventions
The following list describes the user interface conventions for the messages in DSM Web.
Unread messages are displayed in bold, against a light gray background, with a teal bar to the left.
Read Messages have a white background and the subject of the message is displayed in normal text (that is,
not bold).
Starred messages have a light orange background with a Star icon next to the patient's name.
Printed copies of this document may be out of date. Please refer to https://doki.orionhealth.com for the latest updates.
© Copyright 2014 Orion Health Group of Companies | All rights reserved
9
Direct Secure Messaging Web 2.5.2 | User Manual v1.0
Flagging Messages for Follow-up
You can flag messages for follow-up by marking them with an orange star.
To flag a message:
1. Open the message to be starred.
2. Select the
icon at the top left of the message. The icon changes to
.
You can also sort the inbox for flagged messages.
Printed copies of this document may be out of date. Please refer to https://doki.orionhealth.com for the latest updates.
© Copyright 2014 Orion Health Group of Companies | All rights reserved
10
Direct Secure Messaging Web 2.5.2 | User Manual v1.0
Shared Mailboxes
Instead of having access to a provider mailbox (for example, [email protected]), some users may have
access to a Shared Mailbox (for example, [email protected]).
A Shared Mailbox is a group mailbox, which provides a single address for people to send messages to, and enables
multiple people to manage incoming and outgoing mail for the group, for example, at a medical clinic or a nurse's
station. All users who have access to the Shared Mailbox can view, send, and reply to messages - there are no
additional fine-grained permissions for these mailboxes.
Users sending messages to a Shared Mailbox should be aware that all users who have access to the
mailbox will be able to view the content of their message.
All activity performed in the shared mailbox is logged in the audit log under the specific user who performed the
action.
Functionality within a Shared Mailbox
Most functionality works the same in a provider mailbox and a Shared Mailbox. The following table describes how
some specific webmail features work in a Shared Mailbox:
When...
The...
a message is marked as read or unread
message is shown as read or unread for all users of
the shared mailbox.
a message is flagged for follow-up (star icon)
message is shown as starred for all users of the
shared mailbox.
mail rules for the shared mailbox are configured (on the
Settings screen)
rules are applied for all incoming messages to the
shared mailbox.
an out of office auto-reply is configured for the shared
mailbox (on the Settings screen)
out of office auto-reply is applied for all incoming
messages to the shared mailbox.
There is only one Settings screen for a mailbox, and all users that can access the shared mailbox can update and
change the settings (email rules and the out of office auto-reply).
With concurrent access to a single mailbox, users of a shared mailbox should remember to refresh their
inbox to ensure they are viewing up-to-date information, and may at times experience an error message
if they are trying to perform an action at the same time as another user in the mailbox.
Printed copies of this document may be out of date. Please refer to https://doki.orionhealth.com for the latest updates.
© Copyright 2014 Orion Health Group of Companies | All rights reserved
11
Direct Secure Messaging Web 2.5.2 | User Manual v1.0
Working with Messages
This section describes working with messages. Sending, receiving, and forwarding messages and attachments will
make up the bulk of your work with DSM Web.
Quick Guide
Learn more about...
Receiving New Messages
Composing a New Message
Forwarding a Message
Replying to a Message
Sent Messages
Working with Draft Messages
Working with Attachments
Deleting Messages
Searching for a Message
Printed copies of this document may be out of date. Please refer to https://doki.orionhealth.com for the latest updates.
© Copyright 2014 Orion Health Group of Companies | All rights reserved
12
Direct Secure Messaging Web 2.5.2 | User Manual v1.0
Receiving New Messages
Incoming messages are displayed in the Inbox, or, if you have message rules defined, are automatically filtered into
message folders according to the message rule.
When you first log in to DSM Web, the inbox is shown by default. To view messages in other folders, select the folder in
the list of folders.
If you are using Internet Explorer 8 and you have many messages in your Inbox, it will take a long time
to load and display an error message. For optimal performance, it is recommended that you use Firefox
or Internet Explorer 9 and later to view your Inbox.
To expand the message details panel, select the Message Details icon.
Printed copies of this document may be out of date. Please refer to https://doki.orionhealth.com for the latest updates.
© Copyright 2014 Orion Health Group of Companies | All rights reserved
13
Direct Secure Messaging Web 2.5.2 | User Manual v1.0
The following table displays the name of each field on the message details panel, along with an explanation of each
field:
Field
Description
From
The sender's name and email address.
To
The recipient's name and email address.
CC
The recipient's name and email address to whom a "carbon copy" of the message was sent.
Date Received
The date and time when the message was received by the recipient.
Subject
The text displayed for the message in the recipient's inbox.
View Mode
Indicates whether the displayed message content is HTML or Plain Text.
If the message contains both HTML and Plain Text, the message content is shown
in HTML by default. A link is displayed which enables you to switch the message
content between HTML and Plain Text.
Printed copies of this document may be out of date. Please refer to https://doki.orionhealth.com for the latest updates.
© Copyright 2014 Orion Health Group of Companies | All rights reserved
14
Direct Secure Messaging Web 2.5.2 | User Manual v1.0
Unread Messages
When you have new (unread) messages in a folder, DSM Web displays the folder in bold. The number of new
(unread) messages are shown to the right of the name, as shown in the following screenshot.
When a new (unread) message is delivered to a hidden subfolder, DSM Web displays the lowest visible parent
folder in bold. The number of new (unread) messages in a hidden subfolder is not visible until the parent folder has
been expanded to reveal the subfolder, as shown in the following screenshot.
Printed copies of this document may be out of date. Please refer to https://doki.orionhealth.com for the latest updates.
© Copyright 2014 Orion Health Group of Companies | All rights reserved
15
Direct Secure Messaging Web 2.5.2 | User Manual v1.0
Sorting Messages
By default, messages display in descending date order. You can change the sort order of your messages by
selecting the Sort option, as shown in the following screenshot:
The following table lists the sort options that you can choose from, along with an explanation of the functionality of
each sort option:
Sort Option
Description
Sort recent at
top
Select this option to view the latest message at the top of the list.
Sort oldest at top
Select this option to view the oldest message at the top of the list.
Sort starred at
top
Select this option to view all starred messages at the top of the list.
Sort unread at
top
Select this option to view all unread messages at the top of the list.
Sort by sender
Select this option to view all messages in alphabetical order according to the sender's first
name.
Learn more about:
Composing a New Message
Replying to a Message
Forwarding a Message
Working with Attachments
Viewing Sent Messages
Deleting Messages
Printed copies of this document may be out of date. Please refer to https://doki.orionhealth.com for the latest updates.
© Copyright 2014 Orion Health Group of Companies | All rights reserved
16
Direct Secure Messaging Web 2.5.2 | User Manual v1.0
Composing a New Message
To compose a new message:
1. Select the New button. The New Message screen displays in a new tab:
2. Complete the fields on the screen. Mandatory fields are marked with an asterisk (*). The following table
displays the name of each field on the New Message screen, along with an explanation of each field.
Printed copies of this document may be out of date. Please refer to https://doki.orionhealth.com for the latest updates.
© Copyright 2014 Orion Health Group of Companies | All rights reserved
17
Direct Secure Messaging Web 2.5.2 | User Manual v1.0
Field
Description
To
Enter the recipient's email address. The email addresses of providers from the Provider
Directory will already be loaded into the system. Start typing their name, and the auto-complete
functionality will provide a drop-down list with matches. Select the recipient's name from the
list.
If you have contact groups defined, the contact groups will be displayed at the end
of the auto-complete list.
There is a limit of 15 email addresses and contact groups in the auto-complete list.
Therefore, if the address or contact group you are looking for is not displayed in
the auto-complete list, type more letters to reduce the matches.
Alternatively, you can search for a provider using the Provider Search . Refer to Searching for
a Provider for details.
You may enter more than one recipient. Select the Add Recipient link to add another email
address.
CC
To send a "carbon copy" of the message to another user, select the Add Cc Recipient button
and start typing the recipient's name. The auto-complete functionality will provide a drop-down
list with matches. Select the recipient's name from the list.
Subject
Type the text you want to be displayed for this message in the recipient's inbox.
Message
Type your message. You can customize the font style and insert links using the rich-text
formatting buttons. Refer to Rich-Text Formatting for details.
If you attempt to send a message without a Subject or any text in the message body, you will be
asked to confirm this before the message will send.
3. Add an attachment, if desired. To do so, select the Browse button, and select your file from your library.
Refer to Working with Attachments for details.
4. Select the Send button to send the message, or the Discard button to discard your draft.
Once a message has been sent it cannot be recalled. A copy of the message will be stored in
your Sent folder.
A message displays, confirming the message has been sent.
Printed copies of this document may be out of date. Please refer to https://doki.orionhealth.com for the latest updates.
© Copyright 2014 Orion Health Group of Companies | All rights reserved
18
Direct Secure Messaging Web 2.5.2 | User Manual v1.0
If an email fails to send, a Delivery Failure Notification message will be delivered to the sender.
Depending on what caused the sending to fail, the delivery failure notification message may take
an hour or more to arrive. Therefore, it is recommended that urgent messages are followed up in
person.
Refer to Message Disposition Notifications (Delivery Receipts) for details about Delivery Failure
Notifications.
Printed copies of this document may be out of date. Please refer to https://doki.orionhealth.com for the latest updates.
© Copyright 2014 Orion Health Group of Companies | All rights reserved
19
Direct Secure Messaging Web 2.5.2 | User Manual v1.0
Rich-Text Formatting
Text Formatting
When composing a new message, you can format the text by selecting the buttons above the Message field. The
functions are described in the table below:
Feature
Icon
Description
Bold
Bold all or some of your message.
Italic
Italicize all or some of your message.
Underline
Underline all or some of your message.
Bulleted list
Create a bulleted list in your message.
Numbered list
Create a numbered list in your message.
Insert link
Hyperlink the selected text.
Paragraph Formatting
To change the paragraph format style, select the option from the drop-down list above the Message field. The
paragraph format styles are described in the table below:
Feature
Description
Paragraph
Applies the Paragraph style in the text.
Heading 1
Applies the Heading 1 style in the text.
Heading 2
Applies the Heading 2 style in the text.
Printed copies of this document may be out of date. Please refer to https://doki.orionhealth.com for the latest updates.
© Copyright 2014 Orion Health Group of Companies | All rights reserved
20
Direct Secure Messaging Web 2.5.2 | User Manual v1.0
Searching for a Provider
The Provider Search enables you to search for healthcare workers when composing a new message, when
forwarding a message, or when replying to a message.
This feature must be configured by the DSM administrator before it is available to users.
To search for a provider:
1. From the Message screen, select the Show Provider Search link.
2. The Provider Search screen is shown to the right of the message screen.
This enables you to enter a keyword to search for the provider.
3. Enter the details of the provider you want to search for and then select the Search icon
4. If you want to add additional search options, select the More Options link.
Printed copies of this document may be out of date. Please refer to https://doki.orionhealth.com for the latest updates.
© Copyright 2014 Orion Health Group of Companies | All rights reserved
.
21
Direct Secure Messaging Web 2.5.2 | User Manual v1.0
This enables you to search for a provider by:
Specialty
Facility
Organization
Location
5. Enter the name and any additional search criteria to search for the provider and then select the Search icon.
Any providers that match the search criteria are then displayed.
6. To select a provider:
Select the To link to add the selected provider to the To recipient list.
Select the Cc link to add the selected provider to the Cc recipient list.
To hide the Provider Search screen:
1. From the Message screen, select the Hide Provider Search link.
The Provider Search screen is then hidden.
Printed copies of this document may be out of date. Please refer to https://doki.orionhealth.com for the latest updates.
© Copyright 2014 Orion Health Group of Companies | All rights reserved
22
Direct Secure Messaging Web 2.5.2 | User Manual v1.0
Forwarding a Message
You may send a copy of a message to a new recipient or recipients by using the Forward button.
To forward a message:
1. Select a message to open it. The message displays in the right pane.
2. Select the Forward button. The Forward Message screen opens, containing all the information included in
the original email, excluding the original recipients of the message. The copy of the original message will be
automatically inserted as plain text.
3. Enter a new recipient, or recipients, in the To field.
4. Write your email as described in Composing a New Message. All attachments in the original message will be
included in the forwarded message by default. You may remove these attachments, or add new ones. Refer
to Working with Attachments for details.
5. Select the Send button to send the message, or the Discard button to discard your draft. The forwarded
message will remain in your inbox and will display Fwd: or the Forward icon, as shown in the following
screenshot:
Printed copies of this document may be out of date. Please refer to https://doki.orionhealth.com for the latest updates.
© Copyright 2014 Orion Health Group of Companies | All rights reserved
23
Direct Secure Messaging Web 2.5.2 | User Manual v1.0
Replying to a Message
To read and reply to a message:
1. Select a message to open it. The message displays in the right pane.
Incoming HTML messages are sanitized to remove potentially malicious content. This means
that some details, such as images, links, and certain styles, may not display.
A message will be marked as read 3 seconds after you have selected it. You may mark the message as
Unread again by selecting the Mark as Unread link in the header of the open message.
2. To display message details, such as, who the message is from, the subject of the message, and the date the
message was sent, select the Message Details icon.
When the message details panel is expanded, the timezone is displayed next to the date and
time that the message was received. This timezone is taken from the computer's operating
system of the logged-in user.
3. Select the Reply button
to reply to the sender of the message, or the Reply All button
to all recipients included in the original email. The Reply screen opens in a new window:
Printed copies of this document may be out of date. Please refer to https://doki.orionhealth.com for the latest updates.
© Copyright 2014 Orion Health Group of Companies | All rights reserved
to reply
24
Direct Secure Messaging Web 2.5.2 | User Manual v1.0
The copy of the original message will be automatically inserted as plain text.
Enter your reply. Refer to Composing a New Message for details on sending messages.
4. Select the Send button to send your message, or the Discard button to delete your draft. A confirmation
message displays when your message is successfully sent. The replied to message will remain in your inbox.
It will display Re: or the Replied icon
.
Printed copies of this document may be out of date. Please refer to https://doki.orionhealth.com for the latest updates.
© Copyright 2014 Orion Health Group of Companies | All rights reserved
25
Direct Secure Messaging Web 2.5.2 | User Manual v1.0
Sent Messages
The Sent Messages folder contains copies of all messages you have sent.
To view sent messages, navigate to your Sent folder by selecting Direct Secure Messaging > Sent. A list of sent
messages displays:
Printed copies of this document may be out of date. Please refer to https://doki.orionhealth.com for the latest updates.
© Copyright 2014 Orion Health Group of Companies | All rights reserved
26
Direct Secure Messaging Web 2.5.2 | User Manual v1.0
Sorting Sent Messages
By default, messages display in descending date order. You can change the sort order of your messages by
selecting the Sort option as shown in the following screenshot:
The following table lists the sort options that you can choose from, along with an explanation of the functionality of
each sort option:
Sort Option
Description
Sort recent at
top
Select this option to view the latest message at the top of the list.
Sort oldest at
top
Select this option to view the oldest message at the top of the list.
Sort starred at
top
Select this option to view all starred messages at the top of the list.
Sort unread at
top
Select this option to view all unread messages at the top of the list.
Sort by recipient
Select this option to view all messages in alphabetical order according to the recipient's first
name.
Printed copies of this document may be out of date. Please refer to https://doki.orionhealth.com for the latest updates.
© Copyright 2014 Orion Health Group of Companies | All rights reserved
27
Direct Secure Messaging Web 2.5.2 | User Manual v1.0
Working with Sent Messages
Even though a message has been sent, you may still work with it. You may:
Reply to the message by selecting the Reply button, or reply to all recipients by selecting the Reply All
button.
Forward the message to a new recipient by selecting the Forward button.
Mark the message as unread by selecting the Mark as Unread link.
Mark the message as important by selecting the star icon. Refer to Starring Messages for details.
View more information about the message by selecting the Message Details icon
Delete the message by selecting the Delete button.
.
Printed copies of this document may be out of date. Please refer to https://doki.orionhealth.com for the latest updates.
© Copyright 2014 Orion Health Group of Companies | All rights reserved
28
Direct Secure Messaging Web 2.5.2 | User Manual v1.0
Working with Draft Messages
Draft messages are messages which have been composed, but have not been sent. Any type of message can be
saved as a draft, whether it is a New, Forward, Reply, or Reply All message.
Saving a message as a draft allows you to compose some of the message, save it as a draft, and then continue
editing the message at another time. You can edit and save a message as a draft multiple times. Draft messages
are auto-saved every 2 minutes and a draft message that is a Forward, Reply, or Reply All message is auto-saved
instantly. You can also manually save a message as a draft by selecting the Save as Draft button, as shown in the
following screenshot:
The message is then sent to your Drafts folder. The draft message screen will remain open, to allow you to continue
adding to the message. If you close the draft message screen, you can access it again by navigating to your Drafts
folder.
To continue editing a draft message that has been closed:
1. Navigate to your Drafts folder by selecting Direct Secure Messaging > Drafts.
2. Select the desired draft message.
3. Select the Continue Editing button or the Continue Editing link in the body of the message, as shown in the
following screenshot:
Printed copies of this document may be out of date. Please refer to https://doki.orionhealth.com for the latest updates.
© Copyright 2014 Orion Health Group of Companies | All rights reserved
29
Direct Secure Messaging Web 2.5.2 | User Manual v1.0
Refer to Composing a New Message for details on how to send your draft message when you have
completed editing it.
You can delete a draft message by selecting the Discard button. This will permanently delete the draft message and
you will not be able to access the deleted message from the Trash folder.
Printed copies of this document may be out of date. Please refer to https://doki.orionhealth.com for the latest updates.
© Copyright 2014 Orion Health Group of Companies | All rights reserved
30
Direct Secure Messaging Web 2.5.2 | User Manual v1.0
Sorting Draft Messages
By default, messages display in descending date order. You can change the sort order of your messages by
selecting the Sort option, as shown in the following screenshot:
The following table lists the sort options that you can choose from, along with an explanation of the functionality of
each sort option:
Sort Option
Description
Sort recent at
top
Select this option to view the latest message at the top of the list.
Sort oldest at
top
Select this option to view the oldest message at the top of the list.
Sort starred at
top
Select this option to view all starred messages at the top of the list.
Sort by recipient
Select this option to view all messages in alphabetical order according to the recipient's first
name.
Printed copies of this document may be out of date. Please refer to https://doki.orionhealth.com for the latest updates.
© Copyright 2014 Orion Health Group of Companies | All rights reserved
31
Direct Secure Messaging Web 2.5.2 | User Manual v1.0
Working with Attachments
Attachments are files which are attached to an email. For example, an image or a document may be sent as an
attachment.
Attachments are uploaded from, downloaded to, and stored on local computers. If you download an
attachment you are responsible for using appropriate safeguards to prevent improper use and/or
disclosure of any personal identifying information (PII) including patient protected health information
(PHI). You also agree not to use or disclose PII or PHI contained in a downloaded attachment other
than as permitted or required by applicable law.
Adding an Attachment to a Message
Downloading an Attachment from a Message
Forwarding a Message with an Attachment
Printed copies of this document may be out of date. Please refer to https://doki.orionhealth.com for the latest updates.
© Copyright 2014 Orion Health Group of Companies | All rights reserved
32
Direct Secure Messaging Web 2.5.2 | User Manual v1.0
Adding an Attachment to a Message
To add an attachment:
1. Navigate to Direct Secure Messaging and select the New button. The New Message screen opens in a
new window.
2. Enter the message, as described in Composing a New Message.
3. Select the Attachments field, then select Browse to search your library for a document or image. The
uploaded file is displayed in the Attachments panel:
If your attachment size exceeds the maximum configured size limit (for example, 10MB), an error message
will display and you will not be able to send the attachment. If you are sending multiple attachments and the
total size of all attachments exceeds the maximum allowed, an error message will display and the Send and
Save as Draft buttons will be disabled. You can remove attachments by selecting the Remove icon until the
total attachment size is under the limit.
When using Mozilla® Firefox® and Safari®, the attachment size is checked before the file is
uploaded to the server. For Internet Explorer 8 and 9, DSM Web will attempt to upload the file to
the server before displaying an error message if the maximum configured size limit has been
reached.
4. Select the Send button to send the message.
Printed copies of this document may be out of date. Please refer to https://doki.orionhealth.com for the latest updates.
© Copyright 2014 Orion Health Group of Companies | All rights reserved
33
Direct Secure Messaging Web 2.5.2 | User Manual v1.0
Downloading an Attachment from a Message
When you receive a message with an attachment, the Attachment icon is displayed next to the message, as shown
in the following screenshot:
To open the attachment:
1. Navigate to Messaging > Inbox and select the message containing the attachment. Note the disclaimer on
the screen which informs you that you are responsible for securing the personal health information contained
in the attachment. Patient information associated with a CCD or CDA attachment will be displayed in the
header of the attachment, as shown in the following screenshot:
Patient demographics will not be displayed with any other attachment types except CCD or CDA.
2. If the attachment name displays as a link, you can select the attachment name to open the attachment within
the body of the message, as shown in the following screenshot:
Printed copies of this document may be out of date. Please refer to https://doki.orionhealth.com for the latest updates.
© Copyright 2014 Orion Health Group of Companies | All rights reserved
34
Direct Secure Messaging Web 2.5.2 | User Manual v1.0
If the attachment name is not a link, you will not be able to view the document within the message.
3. Select the Download button to download the attachment. You will be prompted to open or save the
attachment.
Attachments may be vulnerable to viruses. Only open attachments from sources you trust.
4. If the Download button displays a drop-down list, as shown in the following screenshot, you can select a
download option.
Printed copies of this document may be out of date. Please refer to https://doki.orionhealth.com for the latest updates.
© Copyright 2014 Orion Health Group of Companies | All rights reserved
35
Direct Secure Messaging Web 2.5.2 | User Manual v1.0
The following table describes the download options that are displayed, along with an explanation of the
functionality of each option:
Download
Option
Description
Download
as PDF
Select this option to download the attachment as a PDF.
View
printable
version
Select this option to view what the attachment will look like when it is printed. The printable
version will display in the body of the message with a Print button so you can print the
attachment without downloading it. This functionality is only applicable to CCD, CDA, and
PDF attachments.
5. If the message contains an XDM file, each attachment will display separately under the main attachment
name, as shown in the following screenshot:
You can work with each attachment as per normal.
Printed copies of this document may be out of date. Please refer to https://doki.orionhealth.com for the latest updates.
© Copyright 2014 Orion Health Group of Companies | All rights reserved
36
Direct Secure Messaging Web 2.5.2 | User Manual v1.0
Forwarding a Message with an Attachment
Messages containing attachments may be forwarded to another user, as described in Forwarding a Message.
Attachments may be removed from messages to be forwarded, or more attachments may be added.
Attachments are scanned for viruses when they are uploaded, but not when they are forwarded.
Printed copies of this document may be out of date. Please refer to https://doki.orionhealth.com for the latest updates.
© Copyright 2014 Orion Health Group of Companies | All rights reserved
37
Direct Secure Messaging Web 2.5.2 | User Manual v1.0
Deleting Messages
You may delete a message at any point by selecting the message, then the Delete button as shown in the following
screenshot:
The message is then moved into the Trash folder.
If you delete a Draft Message, the message will be permanently removed and will not be moved into the
Trash folder.
Viewing Deleted Messages
Deleted messages are stored in the Trash folder. To view a deleted message:
1. Select the Trash folder. The Trash folder displays.
2. Select a deleted message to display it in the right pane.
Sorting Deleted Messages
By default, messages display in descending date order. You can change the sort order of your messages by
selecting the Sort option as shown in the following screenshot:
The following table lists the sort options that you can choose from, along with an explanation of the functionality of
each sort option:
Printed copies of this document may be out of date. Please refer to https://doki.orionhealth.com for the latest updates.
© Copyright 2014 Orion Health Group of Companies | All rights reserved
38
Direct Secure Messaging Web 2.5.2 | User Manual v1.0
Sort Option
Description
Sort recent at
top
Select this option to view the latest message at the top of the list.
Sort oldest at top
Select this option to view the oldest message at the top of the list.
Sort starred at
top
Select this option to view all starred messages at the top of the list.
Sort unread at
top
Select this option to view all unread messages at the top of the list.
Sort by sender
Select this option to view all messages in alphabetical order according to the sender's first
name.
Working with Deleted Messages
Deleted messages cannot be restored to the inbox. They can be worked with from the Trash folder.
Even though a message has been deleted, you may still work with it. You may:
Reply to the message by selecting the Reply button, or reply to all recipients by selecting the Reply All
button.
Forward the message to a new recipient by selecting the Forward button.
Mark the message as unread by selecting the Mark as Unread link.
Mark the message as important by selecting the star icon. Refer to Starring Messages for details.
View more information about the message by selecting the Message Details icon
.
Emptying the Trash Folder
Messages remain in the Trash folder until you choose to erase the messages. Messages can only be deleted
individually. To do so:
1. Navigate to the Trash folder, as described in Viewing Deleted Messages.
2. Select a message and select the Delete button. The message is deleted.
Printed copies of this document may be out of date. Please refer to https://doki.orionhealth.com for the latest updates.
© Copyright 2014 Orion Health Group of Companies | All rights reserved
39
Direct Secure Messaging Web 2.5.2 | User Manual v1.0
Searching for a Message
You can filter the messages in the various folders by email address and message subject. When filtering by email
address, the following logic is applied:
Messages in the Inbox are filtered by the From address.
Messages in the Drafts and Sent folders are filtered by the To and Cc addresses.
Messages in the Trash are filtered by the To, Cc, and From addresses.
All punctuation is ignored, apart from single quotation marks. For example, bob's and john's CCD are both valid
search terms.
To search for a message:
1. In the Search <folder> field, enter the term or a part of the term you want to filter for. DSM Web looks up
the email address and subject of each message, and only displays the messages that match the string you
entered.
Printed copies of this document may be out of date. Please refer to https://doki.orionhealth.com for the latest updates.
© Copyright 2014 Orion Health Group of Companies | All rights reserved
40
Direct Secure Messaging Web 2.5.2 | User Manual v1.0
Managing Folders
Folders enable you to manage your mailbox and organize messages so you can find them easily. There are two
types of folders:
System Folders - Inbox, Drafts, Sent, and Trash. System folders cannot be moved, renamed, or deleted.
User-defined Folders - Folders you have created to organize your mail.
System Folders
The system folders are Inbox, Drafts, Sent, and Trash. You cannot move, rename, or delete these folders. System
folders are always displayed at the top of the list of folders, followed by any folders you create.
Inbox - New mail arrives in the inbox when you first receive them. The Inbox is displayed by default when
you log in to DSM Web. Refer to Receiving New Messages for details.
Drafts - Draft messages are messages which have been composed, but have not been sent. Any type of
message can be saved as a draft, whether it is a New, Forward, Reply, or Reply All message. Refer to
Working with Draft Messages for details.
Sent - The Sent folder contains copies of all messages you have sent. Refer to Sent Messages for details.
Trash - Deleted items are placed in the Trash folder and remain there until you manually delete the message
(in the Trash). The message is then permanently deleted and cannot be restored.
User-defined Folders
DSM Web enables you to create folders to organize your mail. Folders you create are displayed below the system
folders, in the list of folders. Folder names must be unique at each level.
Folder names are not case sensitive, meaning Patient and patient are considered the same name.
Printed copies of this document may be out of date. Please refer to https://doki.orionhealth.com for the latest updates.
© Copyright 2014 Orion Health Group of Companies | All rights reserved
41
Direct Secure Messaging Web 2.5.2 | User Manual v1.0
Creating a folder
In addition to the system folders (Inbox, Drafts, Sent, and Trash), you can create custom folders to store your mail
messages.
To create a new folder:
1. Select the Add Folder
icon at the bottom of the screen. The Add Folder screen is displayed.
2. Type a name for the folder.
3. Select the parent folder for the new folder.
You cannot create two folders with the same name within the same parent folder. For example,
you cannot have two folders named Patients in your Inbox folder, but you can have one folder
named Patients in your Inbox folder, and another one with the same name in the Sent folder.
4. Select the Add button.
Printed copies of this document may be out of date. Please refer to https://doki.orionhealth.com for the latest updates.
© Copyright 2014 Orion Health Group of Companies | All rights reserved
42
Direct Secure Messaging Web 2.5.2 | User Manual v1.0
Deleting a Folder
DSM Web enables you to delete custom folders you have created. You cannot delete system folders ( Inbox, Sent,
Draft, and Trash).
To delete a folder:
1. Select the folder in the list of folders.
2. Select the Delete
icon:
a. If there is mail in the folder, a warning message is displayed.
Select Confirm to delete the folder and all mail in the folder.
Select Cancel to cancel the action.
b. If there is no mail in the folder (you are deleting an empty folder), DSM Web deletes the folder.
When you delete a folder, its contents are moved to the Trash. You can recover contents from
the Trash moving them to another folder.
If there are messages in the folder that you want to save, move them to another folder.
Printed copies of this document may be out of date. Please refer to https://doki.orionhealth.com for the latest updates.
© Copyright 2014 Orion Health Group of Companies | All rights reserved
43
Direct Secure Messaging Web 2.5.2 | User Manual v1.0
Renaming a Folder
To rename a folder:
1. Select the folder in the list of folders.
2. Select the Rename
icon. The Rename dialog is displayed.
3. Enter a new name for the folder and select the Rename button.
Printed copies of this document may be out of date. Please refer to https://doki.orionhealth.com for the latest updates.
© Copyright 2014 Orion Health Group of Companies | All rights reserved
44
Direct Secure Messaging Web 2.5.2 | User Manual v1.0
Moving a Folder
To move a folder:
1. Select the folder you want to move.
2. Select the Move
icon. The Move dialog is displayed.
3. Select the new location for the folder and select the Save button.
You cannot move a folder if a folder with the same name already exists in that location.
The folder is moved to the specified destination, and all messages within the folder stay within
the folder (that is, they are moved to the new location).
Printed copies of this document may be out of date. Please refer to https://doki.orionhealth.com for the latest updates.
© Copyright 2014 Orion Health Group of Companies | All rights reserved
45
Direct Secure Messaging Web 2.5.2 | User Manual v1.0
Moving Messages Between Folders
DSM Web enables you to move messages from one folder to another.
To move a message:
1. Open the message you want to move.
2. Select the Move Message
icon. The Move Message dialog is displayed.
3. Select the folder you want to move the message to.
4. Select the Move button.
You can move messages between folders as follow:
Received messages in Inbox, Trash, and custom folders can be moved to any folder
except the Sent or Drafts folder.
Messages in Sent and Drafts can be moved to the Trash.
Printed copies of this document may be out of date. Please refer to https://doki.orionhealth.com for the latest updates.
© Copyright 2014 Orion Health Group of Companies | All rights reserved
46
Direct Secure Messaging Web 2.5.2 | User Manual v1.0
Managing your Mailbox
DSM Web enables you to create message rules, contact groups, and configure an out of office auto-reply to manage
your mailbox.
These features must be configured by the DSM administrator before they are available to users.
Configuring Out of Office Auto-Reply
Maintaining Message Rules
Maintaining Contact Groups
Printed copies of this document may be out of date. Please refer to https://doki.orionhealth.com for the latest updates.
© Copyright 2014 Orion Health Group of Companies | All rights reserved
47
Direct Secure Messaging Web 2.5.2 | User Manual v1.0
Configuring Out of Office Auto-Reply
DSM Web enables you to configure an out of office or automatic reply to respond to people who send you an email
message. This helps inform people that you are not in the office or that your response might be delayed. Automatic
Replies can include details, such as alternate contact information.
To enable an auto-reply (out of office):
1. Select the Mailbox Settings
icon at the bottom of the list of folders.
2. The Mailbox Settings screen is displayed.
Printed copies of this document may be out of date. Please refer to https://doki.orionhealth.com for the latest updates.
© Copyright 2014 Orion Health Group of Companies | All rights reserved
48
Direct Secure Messaging Web 2.5.2 | User Manual v1.0
3. Select the Enable Auto-Reply field, to enable the out of office auto-reply.
4. Enter the message to be sent when you receive a message.
5. Select the Save button.
Printed copies of this document may be out of date. Please refer to https://doki.orionhealth.com for the latest updates.
© Copyright 2014 Orion Health Group of Companies | All rights reserved
49
Direct Secure Messaging Web 2.5.2 | User Manual v1.0
Maintaining Message Rules
DSM Web enables you to create rules to automatically filter incoming messages into a custom folder. For example,
all messages with Referrals in the subject should be moved to the Referrals folder. Rules can be created based on
message Subject or the sender of the message (From).
Messages can be automatically filed into the Inbox, any custom folders, and the Trash folders.
Messages cannot be automatically filed into the Sent or Drafts folders, or any subfolders of the Trash
folder.
To configure a message rule:
1. Select the Mailbox Settings
icon at the bottom of the list of folders.
2. The Mailbox Settings screen is displayed.
Printed copies of this document may be out of date. Please refer to https://doki.orionhealth.com for the latest updates.
© Copyright 2014 Orion Health Group of Companies | All rights reserved
50
Direct Secure Messaging Web 2.5.2 | User Manual v1.0
3. In the Message Rules panel, configure message delivery rules as required. Refer to Configuring Message
Rules for details.
4. Select the Save button to save your changes.
Printed copies of this document may be out of date. Please refer to https://doki.orionhealth.com for the latest updates.
© Copyright 2014 Orion Health Group of Companies | All rights reserved
51
Direct Secure Messaging Web 2.5.2 | User Manual v1.0
Configuring Message Rules
To add a rule:
1. Select the Add Rule link.
2. Define the condition:
Condition
Description
Subject
Contains
Enter the subject to filter on. For example, filter messages that have the word Referral in
the subject.
test will return Test and Tests.
From
Enter the email address of the sender. For example, filter messages from
admin@<emailaddress>.com.
3. Define the action to take when a message meets a condition. For example, in the Move to Folder field,
select the folder to file the message into when the condition matches.
Multiple rules can be defined for a mailbox.
Rules are run in the order they are defined in the Message Rules settings. If there is more than
one condition that matches an incoming message, only the first rule in the list is executed.
If there is rule where a condition matches but the folder to file the message into has been
changed (deleted, moved, renamed), then the message will be filed (left) in the Inbox.
To delete a rule:
1. Select the Delete icon for the row of the rule that you want to delete.
Printed copies of this document may be out of date. Please refer to https://doki.orionhealth.com for the latest updates.
© Copyright 2014 Orion Health Group of Companies | All rights reserved
52
Direct Secure Messaging Web 2.5.2 | User Manual v1.0
Maintaining Contact Groups
A contact group enables you to maintain a list of email addresses, providing an easy way to send an email message
to everyone in the group at once, by addressing the email to the contact group. For example, if you frequently send
messages to a group of people for referrals, you can create a contact group that contains the email addresses of
everyone you send referrals messages to. A message sent to this distribution list goes to all recipients listed in the
distribution list.
To view and maintain a contact group:
1. Select the Mailbox Settings
icon at the bottom of the list of folders.
2. The Mailbox Settings screen is displayed.
Printed copies of this document may be out of date. Please refer to https://doki.orionhealth.com for the latest updates.
© Copyright 2014 Orion Health Group of Companies | All rights reserved
53
Direct Secure Messaging Web 2.5.2 | User Manual v1.0
3. In the Contact Groups panel, configure your contact group as required. Refer to Configuring a Contact
Group for details.
4. Select the Save button to save your changes.
Configuring a Contact Group
To add a contact group:
1. Select the Add Group link.
2. Define the group:
Group Name - enter the name for the contact group.
Group Contacts - enter the contact's email address. The email addresses of providers from the
Provider Directory will already be loaded into the system. Start typing their name, and the
auto-complete functionality will provide a drop-down list with matches. Select the contact's name from
the list. To add another contact to the contact group, select the Add Contact link.
3. Select the Save button.
You can create and manage your own personal contact groups, but cannot see the contact
groups another user has created.
Contact groups are associated with a mail account, therefore, for Shared Mailboxes, all
authorized users can view and maintain contact groups set up for the shared mailbox.
To add a contact to a group:
1. Select the group in the Contact Groups panel.
2. In the Group Contacts field, select the Add Contact link to add an email address line.
3. In the Email field, enter the contact's email address. The email addresses of providers from the Provider
Directory will already be loaded into the system. Start typing their name, and the auto-complete functionality
will provide a drop-down list with matches. Select the recipient's name from the list.
4. Select the Save button.
Printed copies of this document may be out of date. Please refer to https://doki.orionhealth.com for the latest updates.
© Copyright 2014 Orion Health Group of Companies | All rights reserved
54
Direct Secure Messaging Web 2.5.2 | User Manual v1.0
To delete a contact from the group:
1. Select the group in the Contact Groups panel.
2. Select the Delete icon for the contact.
This will delete the contact from the group, but not the actual contact. The contact will remain in
your Contacts list.
3. Select the Save button.
To delete a contact group:
1. Select the group in the Contact Groups panel.
2. Select the Delete icon for the group.
This will delete the contact group, but not the actual contacts. The contacts will remain in your
Contacts list.
3. Select the Save button.
Printed copies of this document may be out of date. Please refer to https://doki.orionhealth.com for the latest updates.
© Copyright 2014 Orion Health Group of Companies | All rights reserved
55
Direct Secure Messaging Web 2.5.2 | User Manual v1.0
Message Disposition Notifications (Delivery Receipts)
Message Disposition Notifications (MDNs) or Delivery Receipts are sent between a sender's system and recipient's
system to indicate if mail delivery has been successful or if delivery has failed. Notification messages indicate the
disposition of a Direct message (for example, processed, successfully delivered, unsuccessfully delivered).
DSM Web displays only Delivery Failure Notifications. Success notifications (both processed and successful delivery
notifications) are not displayed in the interface.
If delivery has failed, the MDNs trigger a Delivery Status Notification (DSN), to indicate delivery has failed to one or
more recipients. Delivery Failure Notifications may be generated for any of the following reasons:
Message has been rejected
Delivery has failed
Delivery cannot be confirmed
The following screenshot shows an example of a message rejection or a delivery failure.
The following screenshot shows an example where delivery cannot be confirmed.
Printed copies of this document may be out of date. Please refer to https://doki.orionhealth.com for the latest updates.
© Copyright 2014 Orion Health Group of Companies | All rights reserved
56
Direct Secure Messaging Web 2.5.2 | User Manual v1.0
Printed copies of this document may be out of date. Please refer to https://doki.orionhealth.com for the latest updates.
© Copyright 2014 Orion Health Group of Companies | All rights reserved
57
Direct Secure Messaging Web 2.5.2 | User Manual v1.0
Protected Health Information
Care must be taken to keep Protected Health Information (PHI) secure. Although DSM Web is secure, information
on local systems may be accessed by unauthorized users if care is not taken. This may happen if:
The system is left in an insecure state; for example, you do not log out of DSM Web when you have finished
your session.
Attachments or draft messages are left open for others to see.
To ensure PHI is not accessed by an unauthorized user:
Always log out at the end of your session. To do so, select the Logout button. This closes all open drafts and
attachments automatically.
Always check all windows and tabs are closed before stepping away from your computer, as attachments and
drafts may be open in new windows in your browser.
Follow all security guidelines recommended by your system administrator.
Taking Care Not to Miss Vital Messages
When an email has been opened, it is automatically marked as read. There is a risk that a message may be
selected accidentally, causing it to be marked as read. There is an automatic delay between messages being
opened and being marked as read; additionally, you can manually mark a read message as unread.
If an email fails to send, a delivery failure notification message will be delivered to the sender. Depending on what
caused the sending to fail, the delivery failure notification message may take an hour or more to arrive. This means
that it may be some time before the sender is aware that the email failed to send. Therefore, it is recommended that
urgent information is followed up in person.
Printed copies of this document may be out of date. Please refer to https://doki.orionhealth.com for the latest updates.
© Copyright 2014 Orion Health Group of Companies | All rights reserved
58