1
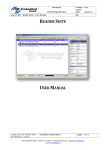
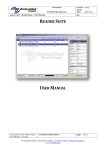
Document
Technical Specification
project title: Reader Suite – User Manual
version: v1.06
status:
date:
2013-03-05
doc
READER SUITE
USER MANUAL
20130304_EN_UM - Reader-Suite User Manual_v1.06.docx
created by: Stefan Detter
page: 1 von 12
RF-Embedded GmbH • Kufsteiner Straße 11 • D-83080 Oberaudorf • [email protected]
www.rf-embedded.eu
Document
Technical Specification
project title: Reader Suite – User Manual
version: v1.06
status:
date:
2013-03-05
doc
1 Installing the Reader Suite
To install the Reader Suite execute the “Reader Suite Setup”:
Step through the installation and select the options
you like.
On the last page after the installation you will be
asked, if you want to install the driver for the
RF-Embedded devices. If you are installing the
Reader Suite the first time, you should do so. If
you already installed the Reader Suite including
the driver before, there is no need to instal the
driver.
20130304_EN_UM - Reader-Suite User Manual_v1.06.docx
created by: Stefan Detter
page: 2 von 12
RF-Embedded GmbH • Kufsteiner Straße 11 • D-83080 Oberaudorf • [email protected]
www.rf-embedded.eu
Document
Technical Specification
project title: Reader Suite – User Manual
version: v1.06
status:
date:
2013-03-05
doc
2 The Main Window
After the installation start the Reader Suite and you will get to the main screen.
The main screen is split up into three
parts.
The big widget in the middle of the window is the main
widget, which contains an overview of all used reader and
scanned tags.
At the bottom of the window there are a few control widgets,
to start and stop a scan and to clear the screen.
On the right side of the window there is an information widget, which shows
context dependent information. If you click on a reader entry in the main
window, you will get information about the reader; if you click on a tag entry,
you will get information about the tag; if you click into the white space of the
main widget, you will get information about the application itself. Initial there is
no reader and no tag in the Reader Suite so the application information is
shown.
20130304_EN_UM - Reader-Suite User Manual_v1.06.docx
created by: Stefan Detter
page: 3 von 12
RF-Embedded GmbH • Kufsteiner Straße 11 • D-83080 Oberaudorf • [email protected]
www.rf-embedded.eu
Document
Technical Specification
project title: Reader Suite – User Manual
version: v1.06
status:
date:
2013-03-05
doc
3 Add the reader to the Reader Suite
The first step to work with the Reader Suite is to add a reader. So first
connect the reader you want to use and then you can either select
Menu -> Reader -> Add in the menu bar,
or you right click into the white space in the main window and select
“Add reader”.
After this, a dialog appears where you can specify how the reader
can be connected. If you have a USB or Serial Reader, you can find it
in the “Serial” tab. Here you can select one of the shown reader or
explicitly enter the COM port number. Initially the list shows only
serial ports that are connected via USB and have the RF-Embedded
VID and PID. If you activate the “Show all Serial Devices” check box,
all available ports will be shown.
If you have an Ethernet
Reader, you can specify
the IP and the port of the
reader in the Ethernet tab. The tab will show a list of addresses
that were already connected successfully to the Reader Suite.
If you have either double clicked an entry in the
lists or you entered an address and pressed OK,
the Reader Suite will try to connect to the
reader. If this was successfully, the reader will
appear in the main widget of the Reader Suite:
20130304_EN_UM - Reader-Suite User Manual_v1.06.docx
created by: Stefan Detter
page: 4 von 12
RF-Embedded GmbH • Kufsteiner Straße 11 • D-83080 Oberaudorf • [email protected]
www.rf-embedded.eu
Document
Technical Specification
project title: Reader Suite – User Manual
version: v1.06
status:
date:
2013-03-05
doc
Now you can start an inventory
with the just added reader
using the “Start Scan” button at
the bottom left of the
application. If a tag is detected,
it is shown in the tree view
below the reader:
If you now click on the entry of the reader, you will get all the
information about the reader. If you click on the tag entry, you will
get all information about the tag.
20130304_EN_UM - Reader-Suite User Manual_v1.06.docx
created by: Stefan Detter
page: 5 von 12
RF-Embedded GmbH • Kufsteiner Straße 11 • D-83080 Oberaudorf • [email protected]
www.rf-embedded.eu
Document
Technical Specification
project title: Reader Suite – User Manual
version: v1.06
status:
date:
2013-03-05
doc
4 Configuration
To configure the Reader Suite itself, a specific reader or a scanned tag, there are two ways to get to the
Settings-Dialog.
One way is to select the item of interest in the main widget (Reader, Tag, Application = white space), so
the information widget shows the information about the desired item. If the item is selected, the button
at the bottom of the information widget will point to the settings dialog.
For example to configure the application, the white space of
the main widget has to be selected. After this the information
widget shows the button “Application Settings” at the bottom.
The other way to get to the Configuration/Settings Dialog is to right-click the desired item. The menu
point “Settings” will always appear and will always open the context dependent settings dialog.
For example to configure a reader a right-click on the
reader in the main window will show the menu with the
entry “Settings”. Clicking on the “Settings” button will
open the settings of the reader.
20130304_EN_UM - Reader-Suite User Manual_v1.06.docx
created by: Stefan Detter
page: 6 von 12
RF-Embedded GmbH • Kufsteiner Straße 11 • D-83080 Oberaudorf • [email protected]
www.rf-embedded.eu
Document
Technical Specification
project title: Reader Suite – User Manual
version: v1.06
status:
date:
2013-03-05
doc
4.1 Application Settings
The application settings of the Reader Suite are kept quite
simple.
4.1.1 Display Settings
In the first section the display behavior of tag entries can be
configured. The time to live simply specifies the behavior of tag
entries, after they were scanned. If “Time To Live” is switched off,
every tag that was scanned once remains in the list until “Clear
Tags” is clicked or the Reader Suite is closed.
If “Time To Live” is switched on, and a tag of the scanned list is
not scanned again, the tag entry passes through the three stages
of display options:
Online
Inactive
Out Of Rang
Deleted
4.1.2 Scan Options
The only offers the option to multiplex reader. If there are more than one reader added to the Reader
Suite and “Multiplex Reader” is active, there is always only one reader active during a Scan for the
configured Read Time. After this time the next reader is active.
4.1.3 On Tag Read
The only action on a tag read that is configurable at the moment is the Beep action. If any tag is read by
any reader the PC will do a beep. The beep is not available on every PC; it is OS and PC dependent.
20130304_EN_UM - Reader-Suite User Manual_v1.06.docx
created by: Stefan Detter
page: 7 von 12
RF-Embedded GmbH • Kufsteiner Straße 11 • D-83080 Oberaudorf • [email protected]
www.rf-embedded.eu
Document
Technical Specification
project title: Reader Suite – User Manual
version: v1.06
status:
date:
2013-03-05
doc
4.2 Reader Settings
In the reader settings you can completely configure
the reader. The layout of the reader dialog depends on
the reader that is used. The dialog for a PUR reader
shows other settings than a dialog for an AUR reader.
Generally the reader settings show all configuration
possibilities the reader has. So every type of
configuration can be tested here.
4.3
Tag Settings
In the Tag Settings dialog the tag can be
configured. There are tag dependent functions
to e.g. read/write data from/to the tag, change
passwords, lock or kill tags.
For some tags there are also manufacturer and
model dependent functions.
20130304_EN_UM - Reader-Suite User Manual_v1.06.docx
created by: Stefan Detter
page: 8 von 12
RF-Embedded GmbH • Kufsteiner Straße 11 • D-83080 Oberaudorf • [email protected]
www.rf-embedded.eu
Document
Technical Specification
project title: Reader Suite – User Manual
version: v1.06
status:
date:
2013-03-05
doc
5 PUR
5.1 Reader Settings
The reader settings of a PUR reader are split up into categories and some control buttons. In each
category there are widgets to set or change the current setting.
Caution:
Every change only takes place, if the “Set” Button of the specific setting is pressed.
5.1.1 Application
Reader Name / Reader Location
Here you can specify a name and a location of the reader,
which are then shown in the reader suite.
Inventory Mode
The inventory mode is the mode the reader uses to search
for tags.
Power Safe
The power safe interval is the time, for which the reader
turns of the antenna power between to inventory.
Send RSSI
If this option is turned on, the reader sends the RSSI
value of each tag, which is then shown in the main
widget.
Send Frequency
If this option is turned on, the reader sends the frequency
at which the tag was detected.
Send TagId Once:
If this option is turned on, the reader sends one tag id
only once during a whole scan.
Caution: The memory for already scanned tags is limited
on each reader.
20130304_EN_UM - Reader-Suite User Manual_v1.06.docx
created by: Stefan Detter
page: 9 von 12
RF-Embedded GmbH • Kufsteiner Straße 11 • D-83080 Oberaudorf • [email protected]
www.rf-embedded.eu
Document
Technical Specification
project title: Reader Suite – User Manual
version: v1.06
status:
date:
2013-03-05
doc
5.1.2 RF-Settings
5.1.2.1 Frequency
Profile
By selecting one of the presets regulatory, the
frequencies of the regulatory is loaded into the frequency
table.
Frequency
By selecting or unselecting a frequency, the frequency is
used or not used on the reader.
Random Channel Hopping
If this option is selected, the reader hops random
through the set channels. Otherwise the reader steps
through the frequencies, like they are noted in the list.
5.1.2.2 Listen Before Talk
Profile
By selecting one of the presets regulatory, the settings of
the regulatory are loaded.
Listen Time
The listen time describes how long the reader should
listen to the channel, before allocating it.
Idle Time
The idle time describes how long the reader should be in
idle mode before it starts listening.
Maximum Allocation Time
The maximum allocation time describes how long the
reader is allowed to allocate one channel.
RSSI Threshold
The RSSI threshold is the limit which the reader uses to
detect a channel as free or as used.
5.1.2.3 UHF
Attenuation
The maximum output power of the reader is attenuated
by the set value.
Sensitivity
The maximum output power of the reader is attenuated
by the set value.
Modulation Depth
The modulation depth controls, how the TX signals are
modulated onto the carrier signal.
20130304_EN_UM - Reader-Suite User Manual_v1.06.docx
created by: Stefan Detter
page: 10 von 12
RF-Embedded GmbH • Kufsteiner Straße 11 • D-83080 Oberaudorf • [email protected]
www.rf-embedded.eu
Document
Technical Specification
project title: Reader Suite – User Manual
version: v1.06
status:
date:
2013-03-05
doc
5.1.2.4 Gen2
Link Frequency
This setting defines the link frequency that is used for
the reader tag communication like specified in the Gen2
standard.
Coding
This field defines the used coding for the reader tag
communication like specified in the Gen2 standard.
EPC Size
Here can be defined which EPC sizes the reader should
handle. This means, if there is set a fix EPC size, the
reader only detects tags with this EPC size. If there is set
the dynamic value, the reader detects all tags with all
EPC sizes.
5.1.3 GPIO
At the moment there are only GPIO ports supported that
are configured as an output.
In this widget the level of the GPIO ports can be changed
immediately.
5.1.4 Control Buttons
Store Settings Permanent
If settings of the reader are changed and the reader is
afterwards powered off and on, all settings are lost. With
this button the settings can be stored permanent so they
are still available after reset.
Restore Factory Settings
With this button every stored setting are overwritten to
the factory settings.
Reboot Device
Reboots the reader.
20130304_EN_UM - Reader-Suite User Manual_v1.06.docx
created by: Stefan Detter
page: 11 von 12
RF-Embedded GmbH • Kufsteiner Straße 11 • D-83080 Oberaudorf • [email protected]
www.rf-embedded.eu
Document
Technical Specification
project title: Reader Suite – User Manual
version: v1.06
status:
date:
2013-03-05
doc
6 Updating a Reader
To update a reader with a more recent or special firmware, the first step is to
set the reader to the bootloader mode. This is done by opening the reader
settings and selecting “Switch to Bootloader”.
After this the reader reboots and starts the
bootloader. The reader is then automatically
added to the Reader Suite and the update
dialog is opened.
To update the reader with a specific firmware,
just select the entry in the list and select
“Start Update”. If this is done the Reader
Suite updates the reader with the specific
firmware and notifies you about the result.
If you do not want to update the reader,
“Switch to Firmware” will switch the reader
back to the current installed firmware.
Caution:
After updating a reader, all setteings, even permanent, are lost!
6.1 Difference
If any reader is added to the Reader Suite, the System value should be checked. A reader which is in the
bootloader state looks nearly the same like one that is in the firmware state. The main difference is in
the system value:
20130304_EN_UM - Reader-Suite User Manual_v1.06.docx
created by: Stefan Detter
page: 12 von 12
RF-Embedded GmbH • Kufsteiner Straße 11 • D-83080 Oberaudorf • [email protected]
www.rf-embedded.eu